The agent structure functionality is used to create an agent network composed of machines with Comarch Auto Update installed. The agent network can be managed remotely through installation of components, quick fixes and add-ons. Agents of which the agent structure can be composed:
- Parent agent – one agent within the whole network, it is dedicated to the Headquarters such as ERP system and connects to Comarch servers, accesses the agent structure to download and distribute the software, quick fixes and add-ons to child agents.
- Child agent – many agents within the whole network, it is dedicated to workstations such as points of sale and connects to the parent agent.
The agent structure is applicable in retail chains for instance, where the parent agent is installed in the Headquarters along with the ERP system, whereas child agents with sales-dedicated components (such as Comarch POS) are installed on individual points of sales in stores. Owing to such configuration, it is possible to manage distribution of components, quick fixes and add-ons.
The agent structure is not, however, required. When there are few workstations in a business environment, where separate distribution of components, quick fixes and add-ons is not a problem, then it is allowed to use parent agents only. Note, however, that they will not connect to each other and will operate independently. In order to use more than one parent agent in business environments, an additional client ID needs to be obtained from Comarch for each of them.
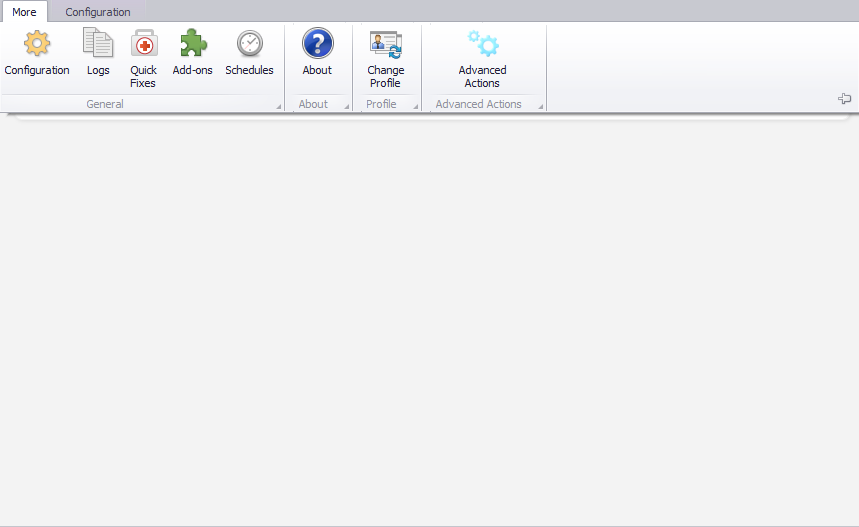
To create an agent structure, select [Agent Structure] button from the main menu. You will be redirected to the child agent management view.
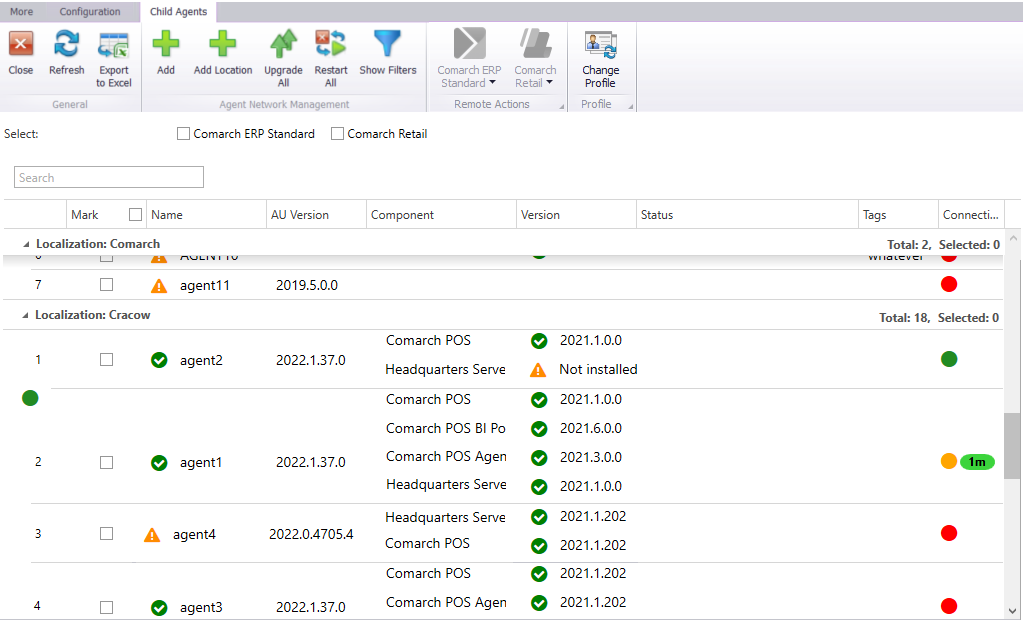
All child agents available as part of an active profile are listed. The first column presents the ordinal number of each listed agent. The list is composed of the following columns:
- Select – used to perform batch operations for selected agents
- Name – child agent’s name which is also its code provided in the Agent Code field when connecting to the parent agent
- AU Version – Comarch Auto Update version currently installed on a child agent
- Component – components installed or available for installation in a child agent
- Version – component version installed on a workstation. If a component is not yet installed, a relevant information will be communicated in this column.
- Status – status of a remote action performed on a given child agent
- Tags – added when creating a new child agent. They make it easier to identify an agent in the agent structure
- Connection – presents icons that inform about the connection status of a specific child agent. These statuses can be as follows:
- red – a child agent has never been online, i.e. it has not connected to the parent agent.
- yellow – a child agent was once online, i.e. connection was once established but it is not currently connected. Next to the icon, there is the timeline since which there has been no connection established with a specific agent.
- green – a child agent is online. It is currently connected to the parent agent.
Agents on the list can additionally be grouped into localizations. These localizations are used in the environment with the parent agent configured locally. It can only be the parent agent in a specific localization. Localization addition is described later in this article.
It is also possible to verify add-on/quick-fix versions on certain child workstations. This can be verified with the [Show Details] button. Selecting it opens a side pane with details of the selected child workstation:
- Service Address – a service address is presented when connection between parent and child agents is properly established
- Agent Version – Comarch Auto Update version currently installed on a child agent. The yellow triangle icon with an exclamation mark indicates no information about the child agent version.
- Free space information – if connection is not established, a message No information about free space is presented.
The table below presents information about the names and versions of installed:
- products
- add-ons
- quick-fixes
Options available above the list:
- Select pane – after selecting a product, agents for which such product is available will selected on the list.
- Search field – used to search the list by agent name and tags.
Buttons in the ribbon are used to manage the agent network:
[Add] – adds a child agent, which is described later in this article.
[Add Localization] – adds a localization which groups child agents on the list.
[Upgrade All] – sends a request to all selected child agents or to all listed agents if none of them is selected to upgrade Comarch Auto Update.
[Enforce Synchronization] – gets compulsorily the current data of the components, quick fixes and add-ons from all selected child agents or from all listed agents if none of them is selected. The information will only be retrieved if the agent is online.
Buttons available in the Remote Actions button group are used to perform remote actions on child agents. The button name corresponds to the name of the component that is available under the selected agent. After you expand the button, you can select a remote action and then the component version the action applies to.
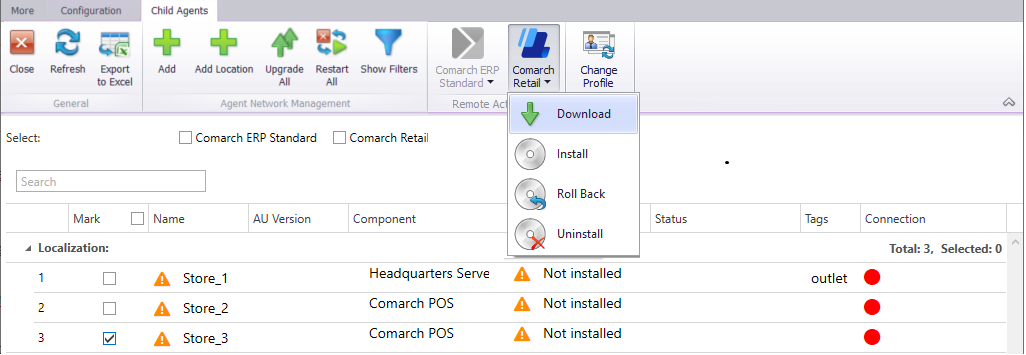
Progress of the selected remote action is communicated in the Status column.
A downward arrow next to the selected child agent name drops down the list with additional agent management options.

Selectable options are:
- Delete Agent – deletes an agent from the agent structure.
- Edit – edits the selected agent. Editable elements are tags, location, profiles, and the Local parent agent parameter
- Information – this section informs about the IP address and port though which a child agent connects as well as the application version. If the agent is not yet registered, then no information is provided in this section.
- Restart Agent Service – restarts remotely the child agent service.
- Clear Connection Token – deletes a connection token in the child agent database. This operation is required when a previously registered child agent is transferred to another installation. Otherwise, the program will communicate in the child agent that the agent code is used on another workstation.
How to add a child agent
In order to use a new child agent, it needs to be added to the agent structure from the level of the parent agent. To do so, select the [Add] button. A new child agent window will open.
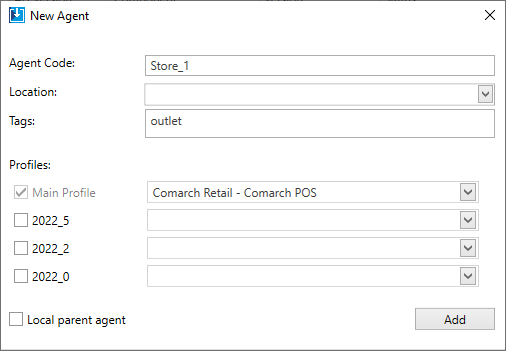
In the opened window, complete the following fields:
- Agent Code – child agent’s name which is also its code provided when connecting to the parent agent. This field is mandatory.
- Localization – groups child agents on the list. A localization is added with the [Add Localization] button. This field is not mandatory.
- Tags – additional information that makes it easier to identify an agent in the agent structure. This field is not mandatory.
- Profiles – profiles in which a child agent is to be available and the components that are to be available in a given profile are selected in this section. This is to maintain profiles also under child agents to create test installations on workstations for instance. The main profile is selected by default because each child agent needs to be added to that profile.
- Local parent agent – it manages how a child agent works. If this parameter is selected, it will act as the parent agent to other child agents in a localization. The child agents will be downloading the component versions, quick fixes and add-ons from this very agent in the first place. If such agent is not available, then these elements will be downloaded from the primary parent agent. It is recommended to have only one local parent agent in a given localization.
When all the fields are completed, select the [Add] button to add the new agent to the list. After it is added, you can proceed to the locally installed Comarch Auto Update application on the parent agent’s machine.
In order to install the agent, use a setup file dedicated to a child agent. It can be downloaded from the Individual Sites for Business Partners (https://www.erp.comarch.pl/partnerzy) in the Current Versions tab under selected Comarch product.
After you launch the Auto Update setup wizard, a window will open to inform to install additional environment components necessary for Auto Update to work properly. After you accept the message, the installation will begin. Once the components are installed, a configuration window will open, where you need to provide the basic application parameters.
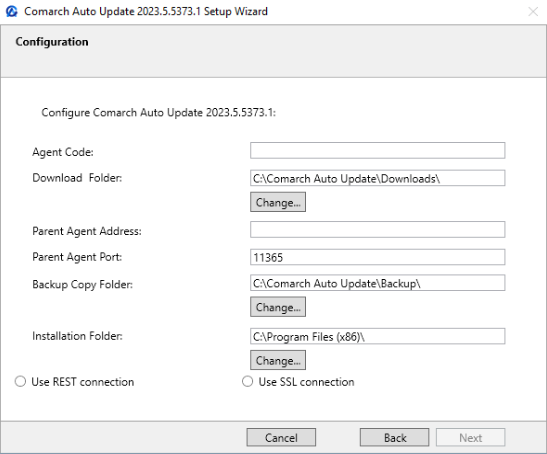
- Agent Code – enter the child agent name provided earlier in the parent agent under the agent structure in this field.

- Download Folder – default directory to which component versions, upgrades, fixes and add-ons are downloaded
- Parent Agent Address – for child agents it is the address of the machine with installed parent agent. It is specified under Configure the service for child agents
- Parent Agent Port – for child agents it is 11365 by default for the default REST communication. It is specified under Configure the service for child agents under a child agent.

- Backup Copy Folder– default folder for backup copies
- Installation Folder – default setup folder of the application
Once you complete the fields, select the [Next] button. The setup wizard will go through the next steps to finally inform about a properly installed application. If everything is properly configured and installed, then the main agent window will open with the Online status in the left bottom corner after you run the program.
