Comarch Auto Update is used to manage Comarch products in a production environment. Products are divided into components which correspond to individual applications available to users. With Comarch Auto Update you can install, upgrade and uninstall components as well as their dedicated fixes and add-ons. The application provides also various features such as child-parent agent structure, remote actions, profiles or schedules, which make it easier to manage enterprise installations.
The application supports the following products and components:
- Comarch ERP Standard
- Headquarters Server, Headquarters Workstation
- Comarch Retail
- Comarch POS, Comarch POS Agent, Comarch POS Agent Broker, Comarch mPOS, Comarch Device Manager Service, Comarch Discount Engine – Discount Service, Comarch Discount Engine – Synchronization Service
- Comarch ERP Tools
- Add-on Wizard
- Comarch Mobile Management
- Application, Documentation
- Comarch Mobile
- Synchronization Server, Mobile Application
- Comarch Magazynier
- Application
- Comarch WMS
- Management, Warehouseman
Minimum requirements
The parent agent of Comarch Auto Update requires sufficient hardware resources depending on the number of configured child agents. Below are the minimum requirements:
Parent agent:
- Up to 20 child agents in child agent structure
CPU: 2 cores, Intel i3/AMD Ryzen 3
RAM: 8GB
- From 21 to 200 child agents in child agent structure
CPU: 4 cores, Intel i5/AMD Ryzen 5
RAM: 16GB
- From 201 to 1000 child agents in child agent structure
CPU: 8 cores, Intel i7/AMD Ryzen 7
RAM: 24GB
- Over 1000 child agents in child agent structure
CPU: 16 cores, Intel i7/AMD Ryzen 7 (or a suitable server processor)
RAM: 32GB
- Over 5000 child agents in child agent structure
CPU: 32 cores, Intel i7/AMD Ryzen 7 (or a suitable server processor)
RAM: 32GB
- Over 7000 child agents in child agent structure
It is recommended to divide the network into 2+ separate networks with no more than 5,000 child agents per network
Child agent:
- CPU: 2 cores, Intel i3/AMD Ryzen 3
- RAM: 4GB
Regardless of the number of child agents in child agent structure, the application requires at least 1 GB of disk space to be installed. Disk space used by the components installed through the application should also be taken into account. Component-required disk space can be found in the component-related website with documentation.
Comarch Auto Update can be installed on Windows 10/Server 2016 or higher operating system.
Environment preconfiguration
For Comarch Auto Update application to work properly, it is required to open communication on the ports indicated below.
Under parent agent:
- Inbound connections: 5671, 5672, 11365, 12365
- Outbound connections: 9466 and 10466 (PL and EN language versions), 9460 and 10460 (FR and ES language versions), 9539 and 10539 (DE version)
Under local parent agent:
- Inbound connections: 11365
- Outbound connections: 5672, 11365, 12365
Under child agent:
- Outbound connections: 5671, 5672, 11365, 12365
Installation process (parent agent)
In order to install Comarch Auto Update application, use a setup file which is available for download on individual websites for business partners (https://www.erp.comarch.pl/partnerzy) in the Current Versions tab under selected Comarch product.
Before downloading the file, select the appropriate type of setup wizard for:
- Parent agent – one agent within the whole system, it is dedicated to the Headquarters such as ERP system and connects to Comarch servers to download and distribute the software, fixes and add-ons to child agents. The RabbitMQ service is installed automatically for the parent agent only. It is used to communicate between a parent agent and a child agent.
- Child agent – multiple agents within the whole system, it is dedicated to workstations such as points of sale and connects to the parent agent.
When Comarch Auto Update is launched, a window is opened to inform to install additional environment components necessary for the program to work properly. Additionally, it will be necessary to specify the appropriate country flag for which Auto Update is being installed. After you accept the message, the installation begins.

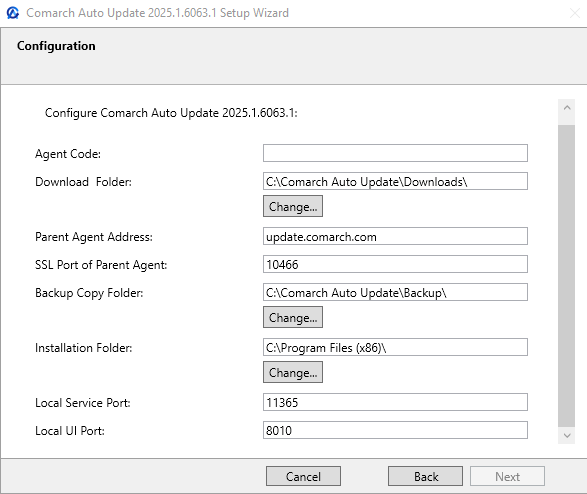
Once the components are installed, a configuration window opens, where you need to provide the basic application parameters.

Fields to complete or changed in this window:
- Agent Code – unique client ID received along with the license for selected Comarch product. In the installer version for a child agent, this field must contain the agent name defined in the agent structure on the parent agent.
- Download Folder – default directory to which component versions, upgrades, fixes and add-ons are downloaded
- Parent Agent Address – the address for parent agents is update.comarch.com
- Parent Agent Port – the port for parent agents is the appropriate Comarch server port:
- 9466 for PL and EN language versions,
- 9460 for FR and ES language versions,
- 9539 for DE language version
- 11365 for child agents
- Backup Copy Folder– default folder for backup copies
- Installation Folder – default setup folder of the application
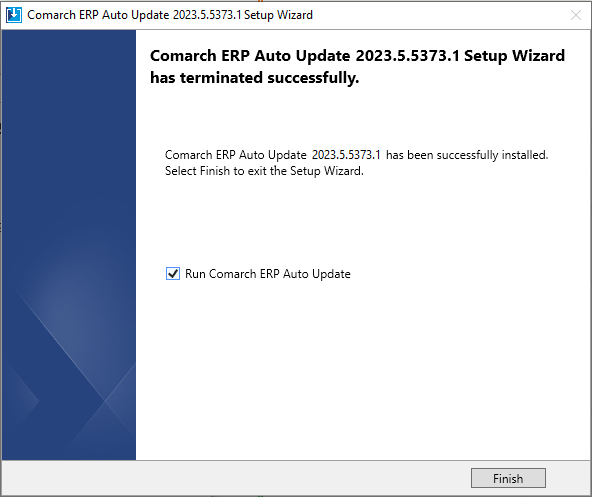
After you complete all the fields are go though the other configuration steps, the application will finish the installation and a relevant message will be displayed.

