
This document presents the installation of Comarch POS from version 2021.0 in cooperation with Comarch ERP Enterprise.
Glossary
- Comarch ERP Auto Update – a tool necessary for the installation of Comarch Retail product and its components. During the installation of the tool, the main profile is created. The application enables the user to create additional profiles with independent configuration.
- Comarch POS Agent – an independent service with its own database that provides up-to-date information on stock levels on each workstation while issuing documents.
- Synchronization service – with this synchronization service, synchronization between the ERP system and Comarch POS application is possible. The service’s name and port is defined in the ERP system. If the service is missing, it is not possible to work with Comarch POS application.
Log information
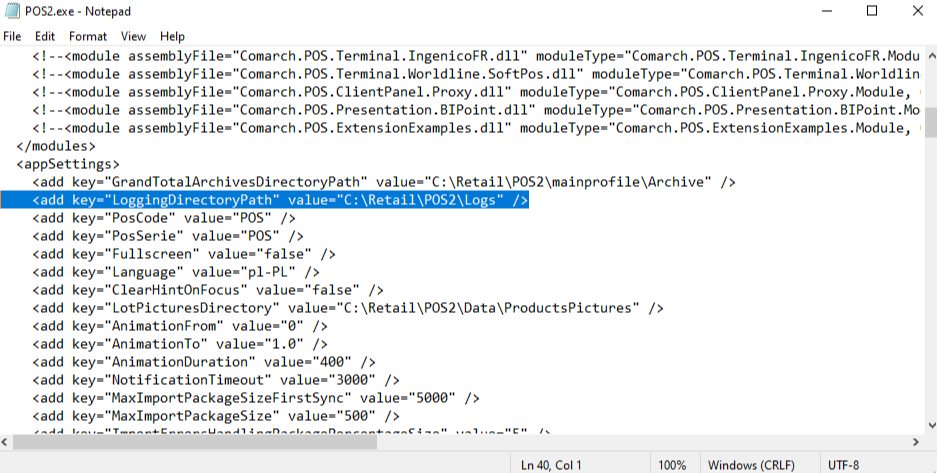
Detailed information about events occurring on a POS workstation, concerning Comarch POS application itself or any component or service, is recorded in txt files (logs). Default log saving paths:
- For a POS workstation: C:\Retail\POS2\mainprofile\Logs
- For the Comarch POS Agent service: C:\Retail\POS Agent\mainprofile\Logs and C:\Retail\POSAgentConfig\Logs
- For Comarch ERP Auto Update application: C:\Program Files (x86)\Comarch ERP Auto Update\Logs
Requirements
In order to enable the configuration of a POS workstation in the system, it is necessary to:
- Install the Comarch Retail product along with Comarch POS and Comarch POS Agent components in Comarch ERP Auto Update application
- Activate the Multi-channel sales function in Customizing → Functions → Multi-channel sales
- Activate the Comarch Retail POS function in Customizing → Functions → Comarch Retail POS
- Adjust relevant settings for the Multi-channel sales and Comarch Retail POS functions in the Customizing application
- Define a sales channel to which a workstation is to be assigned in the Sales channels application
- Adjust parameters required to work with Comarch POS application for the created sales channel
- Adjust basic configuration parameters for Comarch POS in the Number ranges application
- Assign user groups
- Define a POS workstation in the Comarch Retail POS terminals application
- Export the workstation (including the export of meta data)
- Export items, item availability, price lists, and partners
- Assign a user certificate to the POS workstation
- Configure Comarch POS Agent
- Perform the preliminary configuration of the POS workstation
General information
Sales channels connect to external systems through adapters designed for those systems. The purpose of an adapter is to manage the connection to a given external system, and to exchange and synchronize data between systems.
The Comarch Retail POS adapter requires:
- ERP system engine version CIS600PB-Fix17 or higher
- Multi-channel sales application version 2.18:6.0.0
- Comarch Financials Enterprise application version 20.2:6.0.0 or higher
The following Java libraries are additionally required for the adapter to work properly (they must be located in the lib/ext directory):
- jackson-core-asl-1.9.13.jar (The Apache Software License, version 2.0)
- jackson-jaxrs-1.9.13.jar (The Apache Software License, version 2.0)
- jackson-mapper-asl-1.9.13.jar (The Apache Software License, version 0)
This version of the Comarch Retail POS adapter in Comarch ERP Enterprise system is compatible with:
- Comarch POS application versions:
- 5.1 (with the CEE POS App_2019.51.23 add-on)
- 0
- 1
- 2
- 5
- 6
- 0
- Comarch mPOS application versions:
- 0
- 1
- 2
- 5
- 6
- 0
From version 2021.0 of Comarch POS, it is necessary to use a new component Comarch POS Agent for cooperation with Comarch ERP Enterprise system.
The component needs to be installed using Comarch ERP Auto Update along with the installation of the Comarch Retail product and the Comarch POS component.
Installation of the Comarch Retail product and its components using Comarch ERP Auto Update tool
In the first step, a new profile must be created in Comarch ERP Auto Update. To do open the Configuration tab and select the [Profiles] button. The window opened displays all the profiles defined so far.
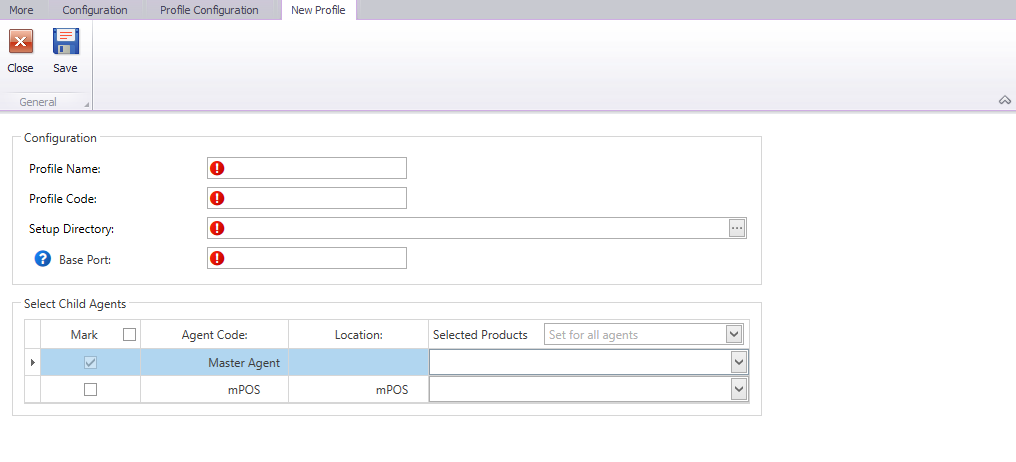
When defining a new profile, the following fields must be filled in:
- Profile Name
- Profile Code – it must be unique
- Setup Directory – a directory where components are to be installed as part of the profile being created. Each profile must have a separate setup directory
- Base Port – a port that will be reserved for the profile along with the next 99 ports. It is only determined for master agents. For other agents, the same port range will be reserved upon the first connection to the master agent
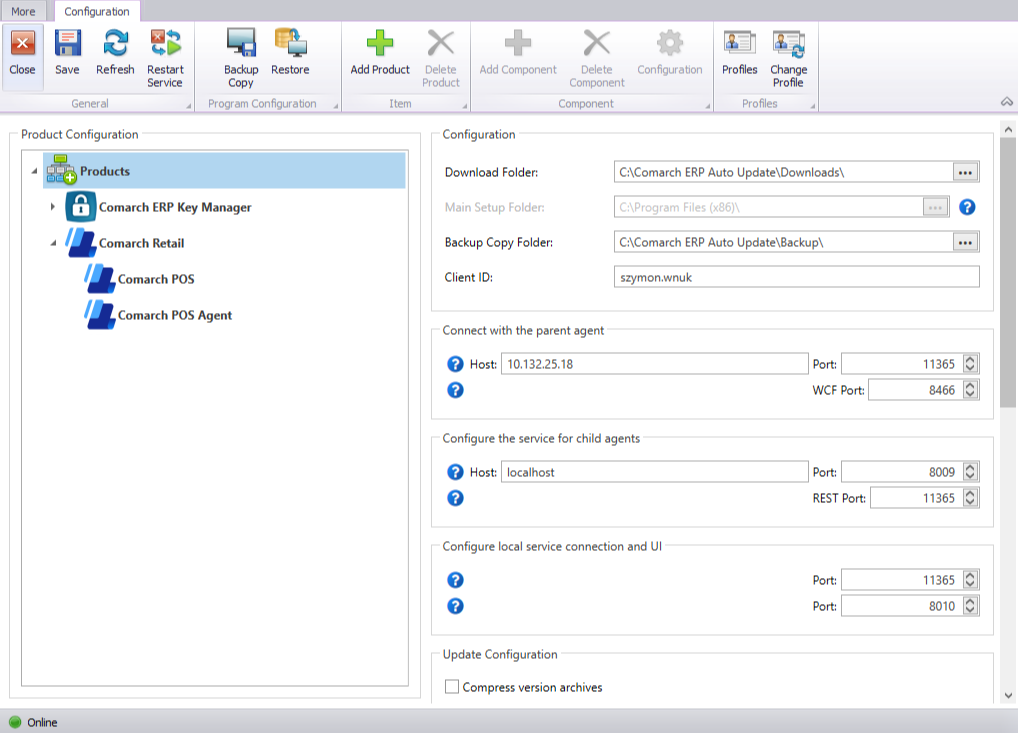
In order to download and install the Comarch POS and Comarch POS Agent components, add the Comarch Retail product to the profile created in Auto Update and add the Comarch POS and Comarch POS Agent components to it.
The configuration window is opened by selecting a component and choosing the [Configuration] button from the main menu. In the window, enter the appropriate database connection data for Comarch POS (POS workstation database) and Comarch POS Agent (Comarch POS Agent service database).
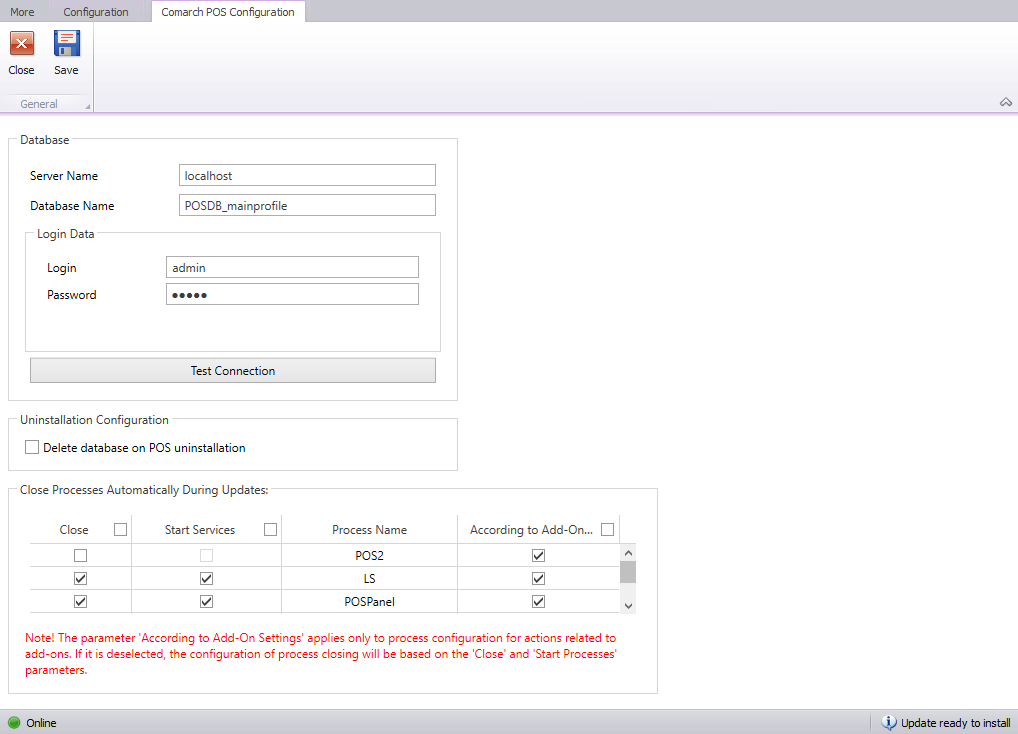
- Server Name – the name and instance of the server where the database is to be created
- Database Name – by default, the name POSDB_[profile_code] is suggested
- Login Data – a user login and password
The [Test Connection] button makes it possible to verify connection with the selected server.
Backup copies of empty databases are located in Comarch ERP Auto Update download directories of relevant component versions:
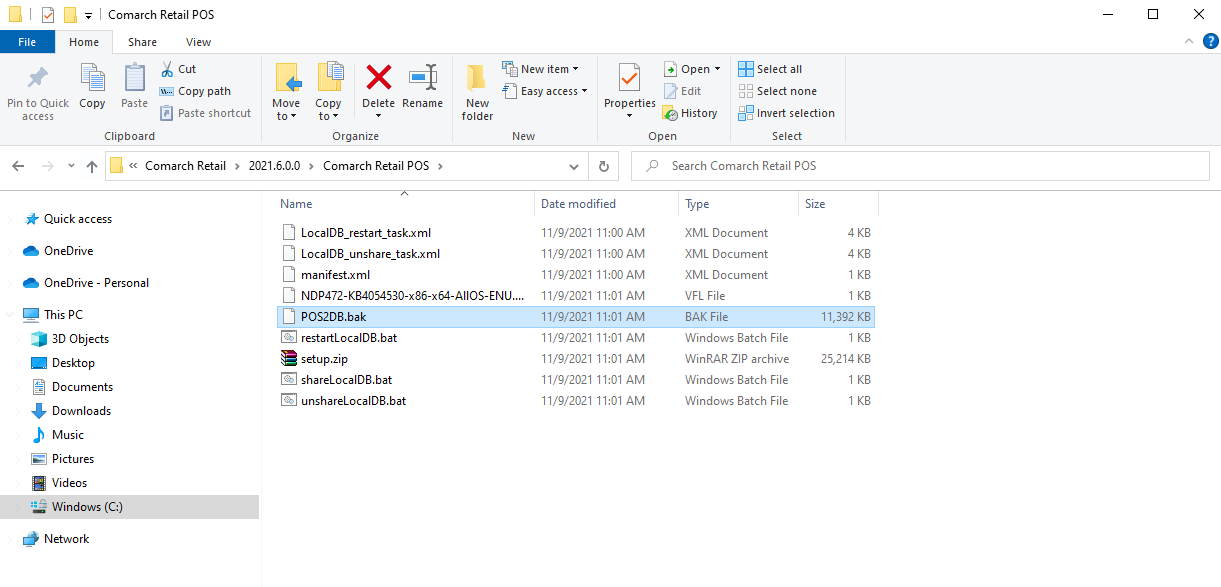
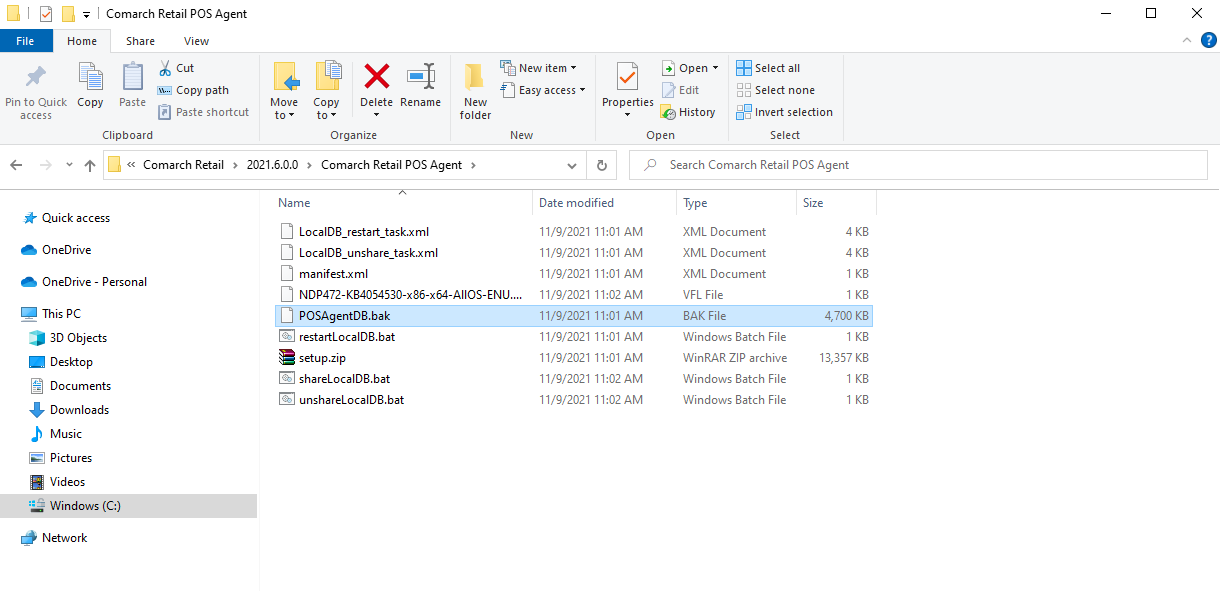
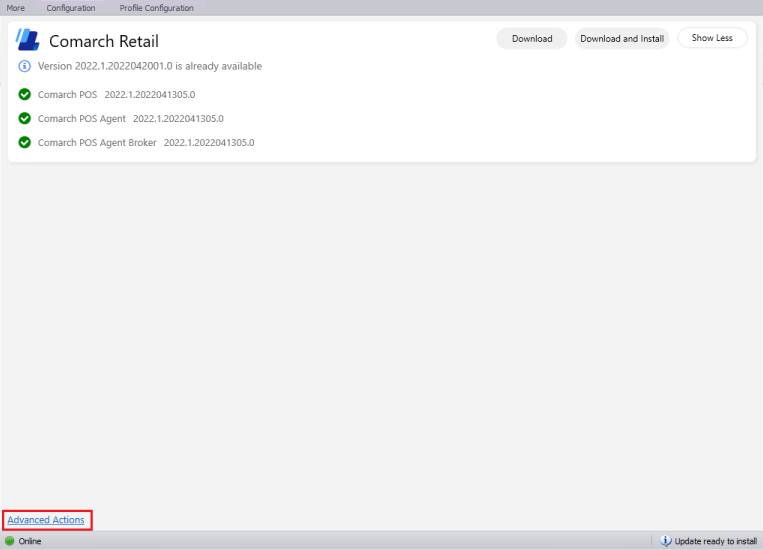
After completing the configuration of databases, the [Advanced Actions] button is made available in the main window of Comarch ERP Auto Update application.
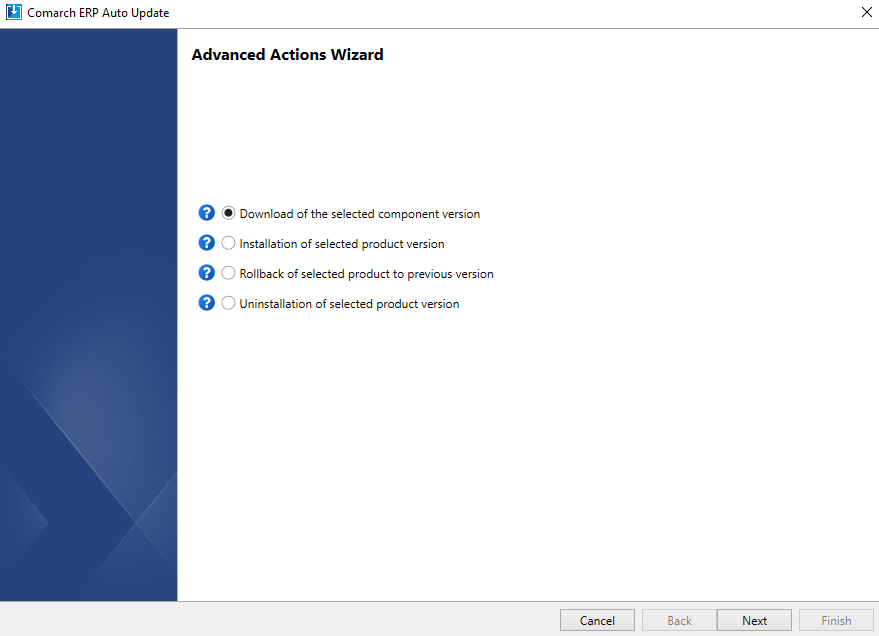
- Download of the selected component version – it downloads a product in the directory specified in the configuration (the default path is C:\Comarch ERP Auto Update\Downloads\). Once the download is complete, the [Install] button becomes available.
- Installation of selected product version – a product in the selected version is automatically installed after the download is completed. By selecting this option, a previously downloaded version of a product can be installed, and if it has not been downloaded, it is downloaded first and installed immediately.
- Rollback of selected product to previous version – if a version of some component has already been installed on a given profile and the installation of a higher version has been performed, this option restores the previous version, installed before the update
- Uninstallation of selected product version – if a version of some component is installed on a given profile, using this option the user can select which version of a given component is to be completely uninstalled
Activating functions in the Customizing application
The first stage of defining a POS workstation in Comarch ERP Enterprise is the activation of the Multi-channel sales and Comarch Retail POS functions in the Customizing application.
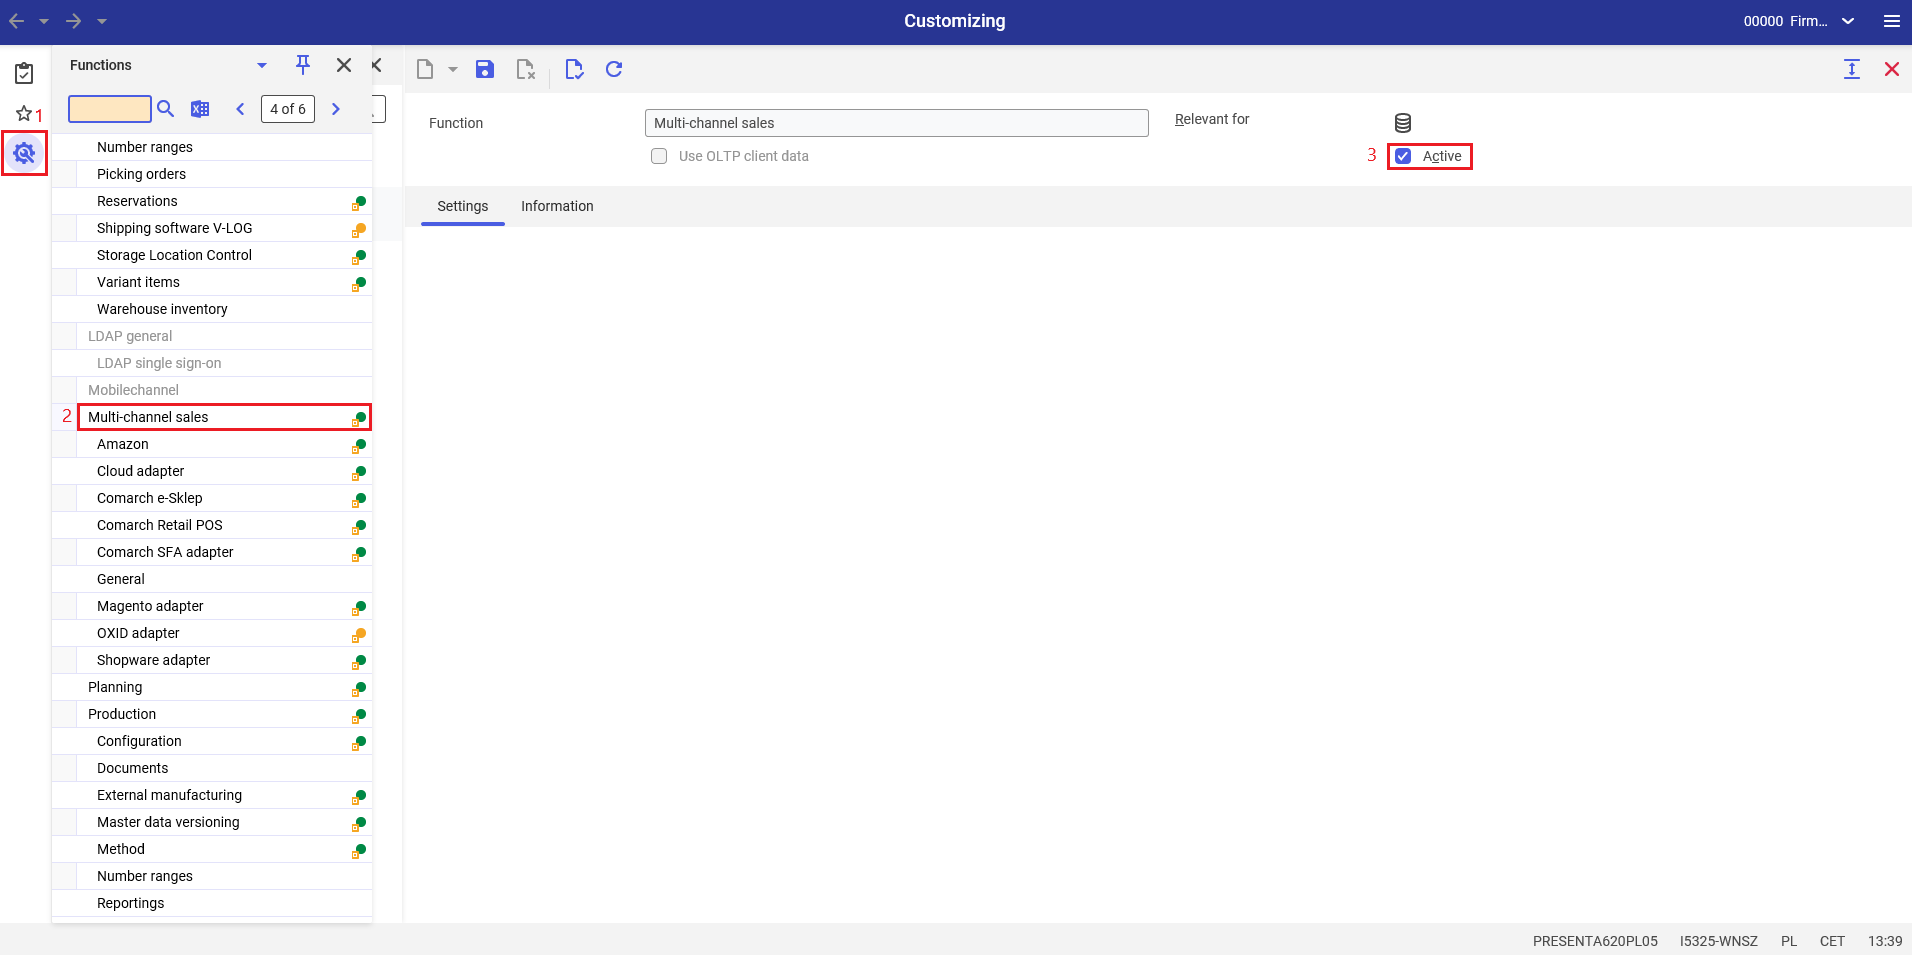
After opening the Customizing application, it is first necessary to use the [Functions] button to display the list of available functions. Next, it is necessary to find the Multi-channel sales function on the list. Finally, the Active parameter must be enabled.
Comarch Retail POS is a function belonging to the Multi-channel sales framework; it is activated in a similar way. Note that it is first required to enable the Active parameter for Multi-channel sales.
Required configuration of the Multi-channel sales function
In order to adjust required configuration parameters for multi-channel sales, open the Customizing application → Multi-channel sales framework → General function.
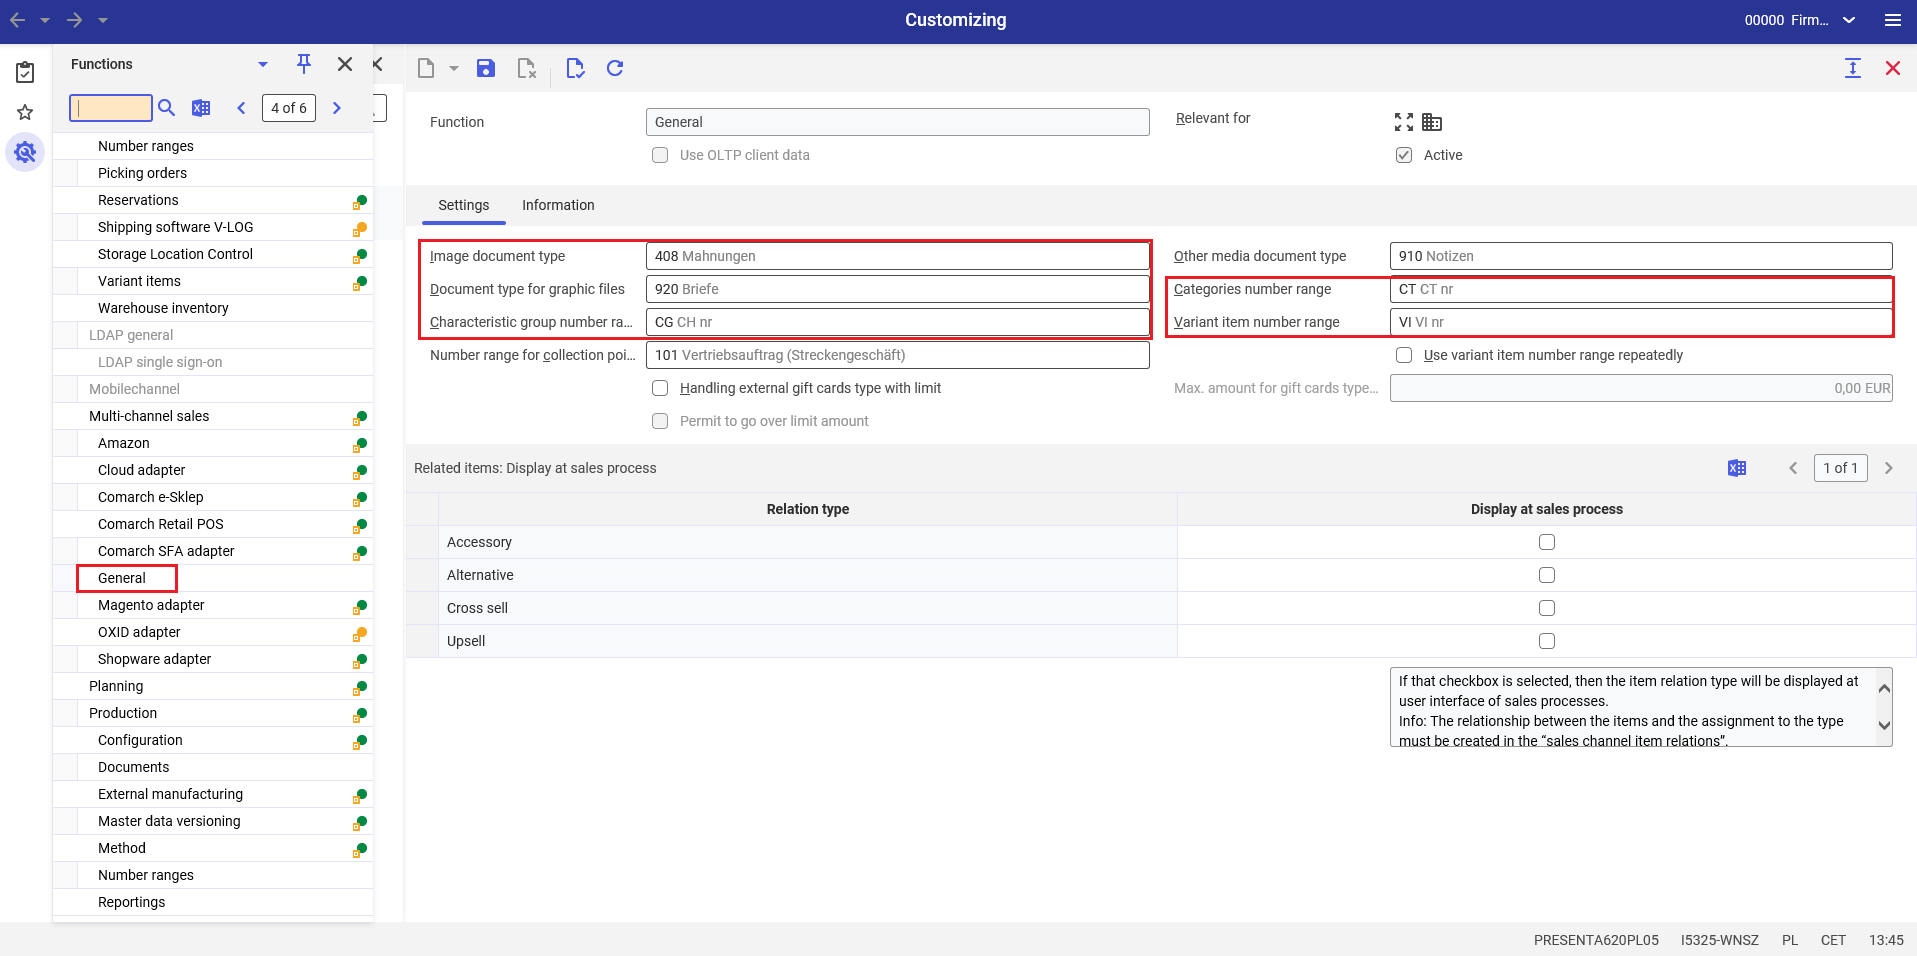
The following fields must be filled in:
- Image document type – when adding a new image for an item, a document is automatically generated in Comarch ERP Enterprise. In this field, it is necessary to select a document type to be generated for the image files – the so-called logo.
- Document type for graphic files – when importing item categories from a sales channel, graphic files can be imported along with categories. In the case of imported image files, documents (attachments) are generated automatically in Comarch ERP Enterprise. They contain information on the location of the file responsible for e.g. a given image and they link it to an object in Comarch ERP Enterprise e.g. to a specific item. In this field, it is necessary to select a document type to be generated for graphic files. Graphic files allow the user to add, for example, additional images to create a product image gallery in an external store.
- Characteristic group number range – in this field, it is necessary to enter a number range for an item characteristic group. The number range is used to automatically assign identifiers to characteristic groups. Characteristic group identifiers are used to uniquely identify a given group.
- Categories number range – in this field, it is possible to define number ranges used to automatically assign category numbers in the Number ranges application
- Variant item number range – in this field, it is possible to define a number range to be used when generating new associated items. The generated number will be used to expand a reference item.
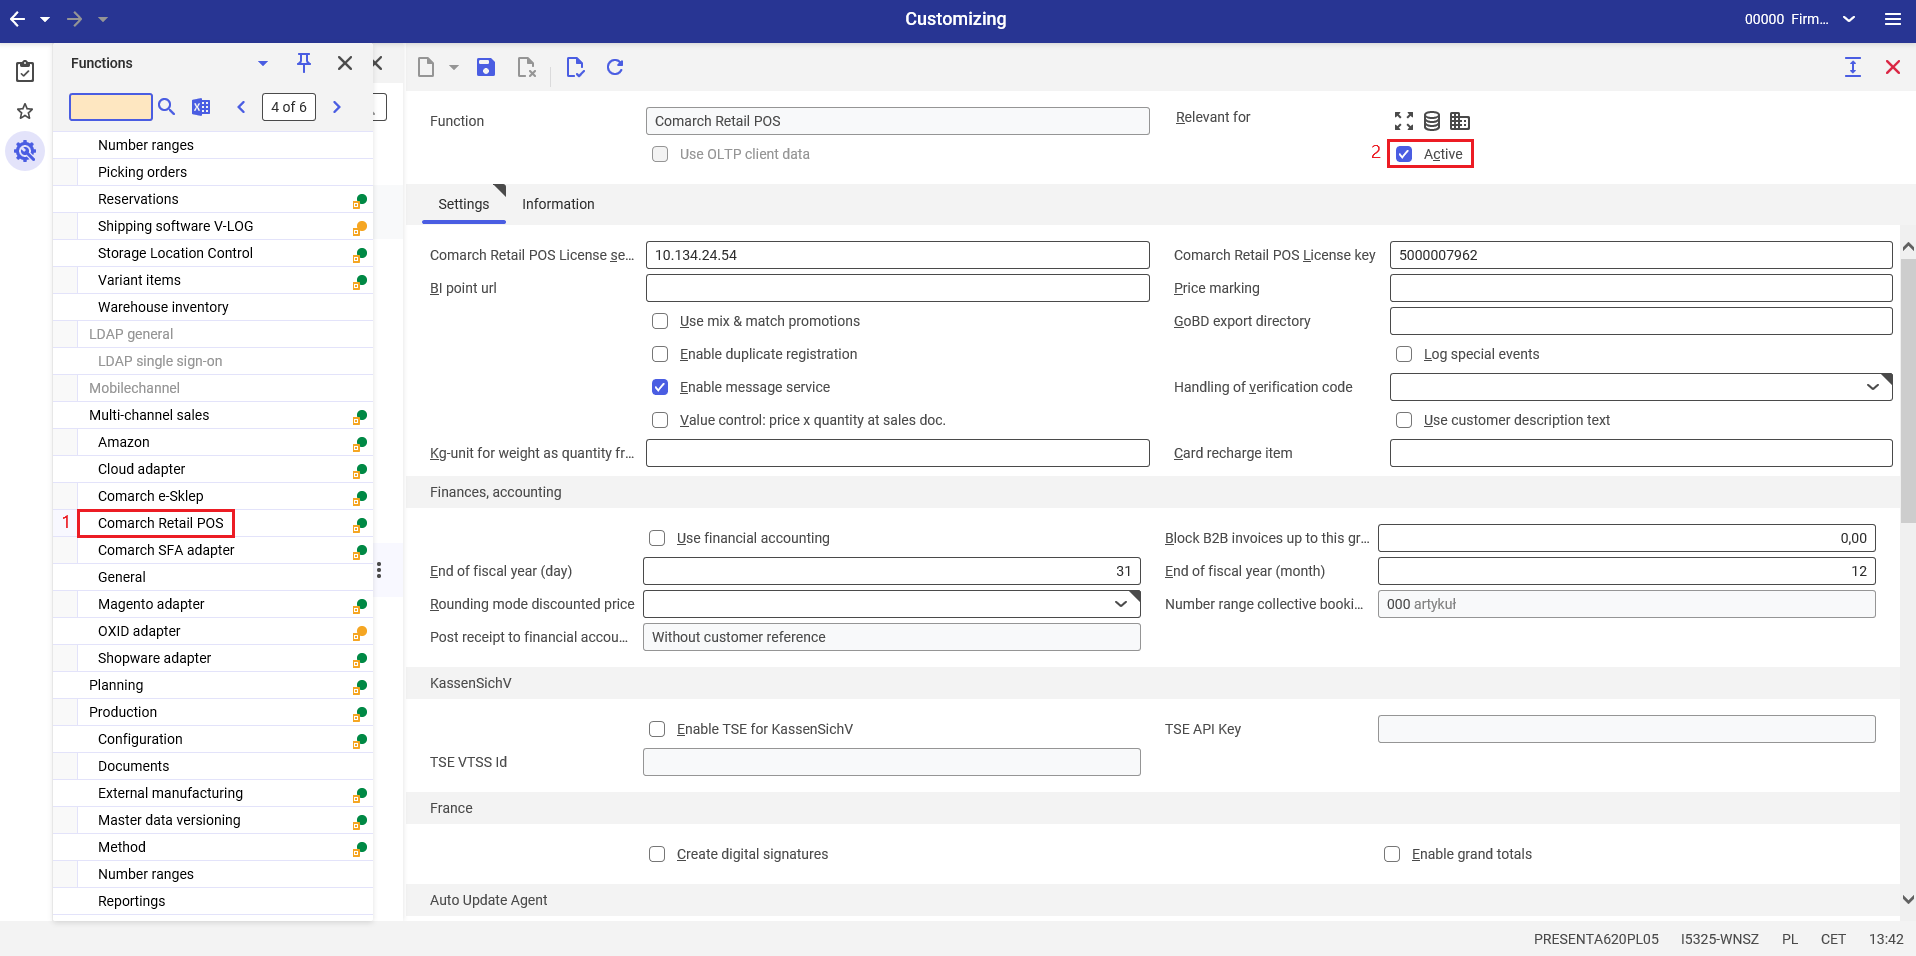
Required configuration of the Comarch Retail POS function
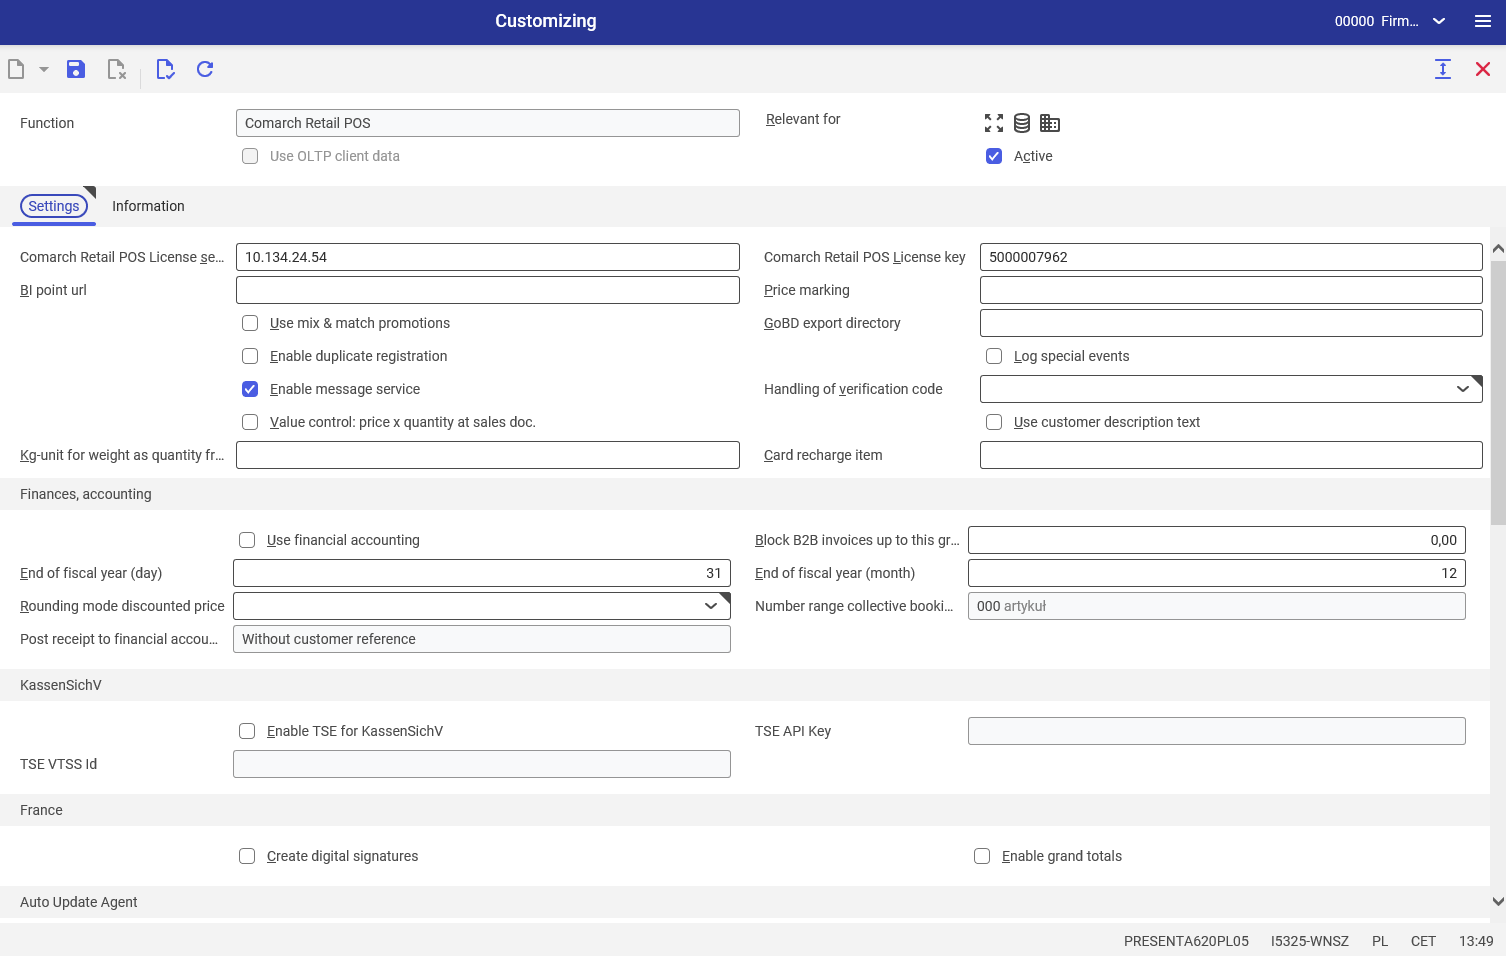
After activating the Comarch Retail POS function in Customizing → Functions → Comarch Retail POS, the user should specify the necessary parameters to be able to define a POS workstation in the system:
- Comarch Retail POS License server – the URL address of the Comarch POS license server
- Comarch Retail POS License key – the license key for Comarch POS
- Number range collective bookings – a number range used when generating document numbers in collective bookings. Created collective bookings will be automatically assigned a number from the selected number range.
- End of fiscal year (month) – a fiscal year closing month.
- End of fiscal year (day) – a fiscal year closing day.
A detailed description of the configurable parameters may be found here.
Defining a sales channel for Comarch POS
For the cooperation of Comarch ERP Enterprise with Comarch POS, it is necessary to define a sales channel to which workstations are assigned.
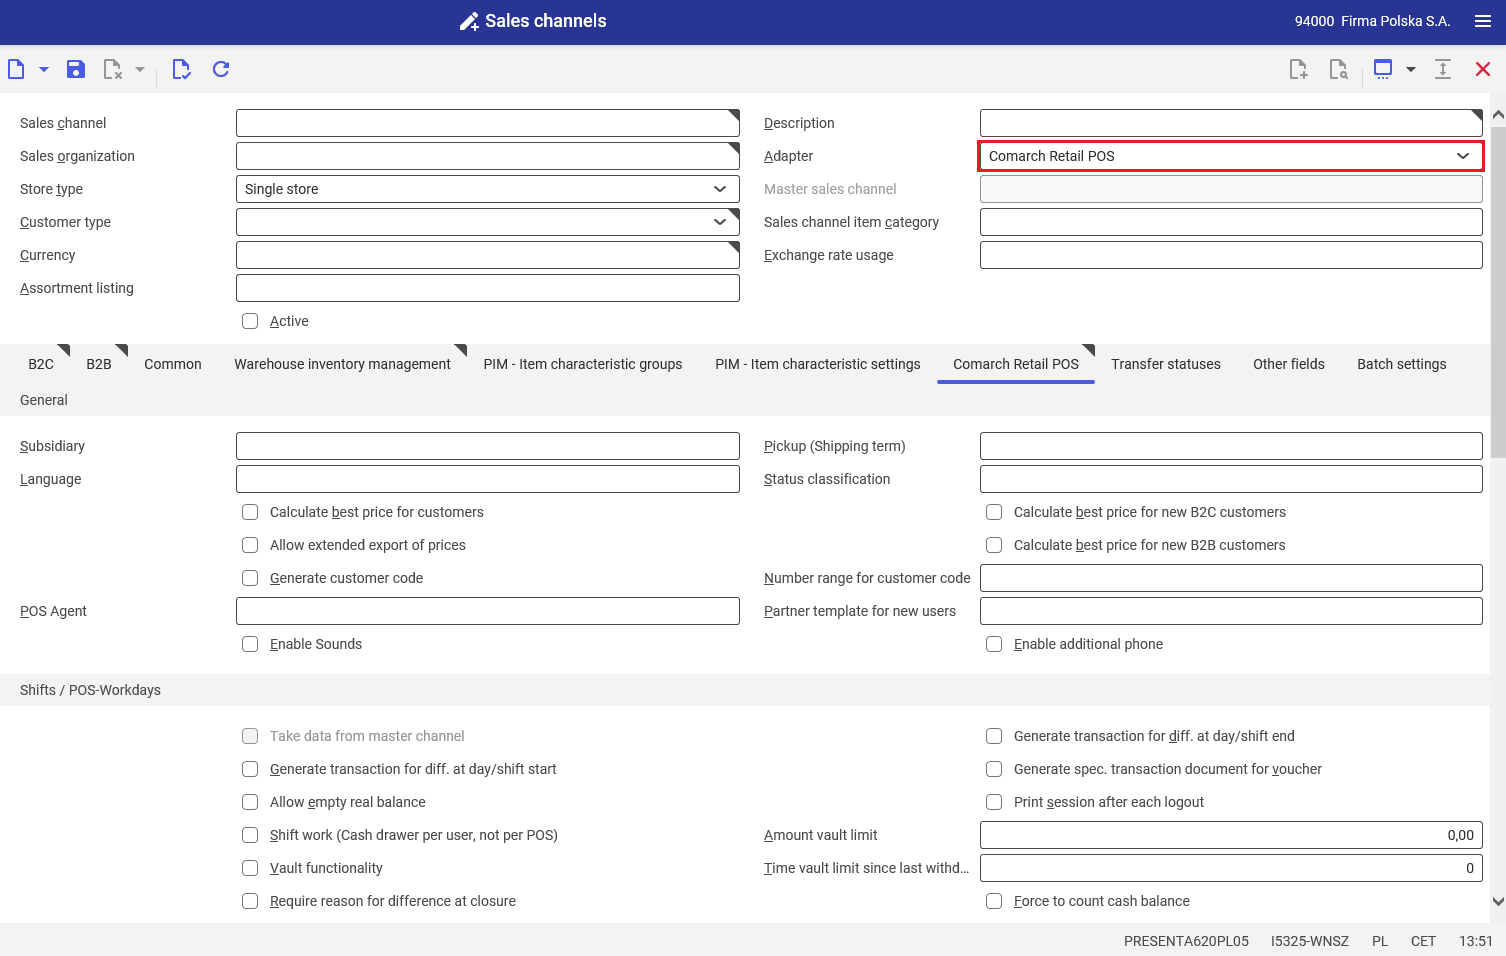
To create a new sales channel, it is necessary to open the Sales channels application available in the Multi-channel sales framework. In the application, define the adapter type as Comarch Retail POS.
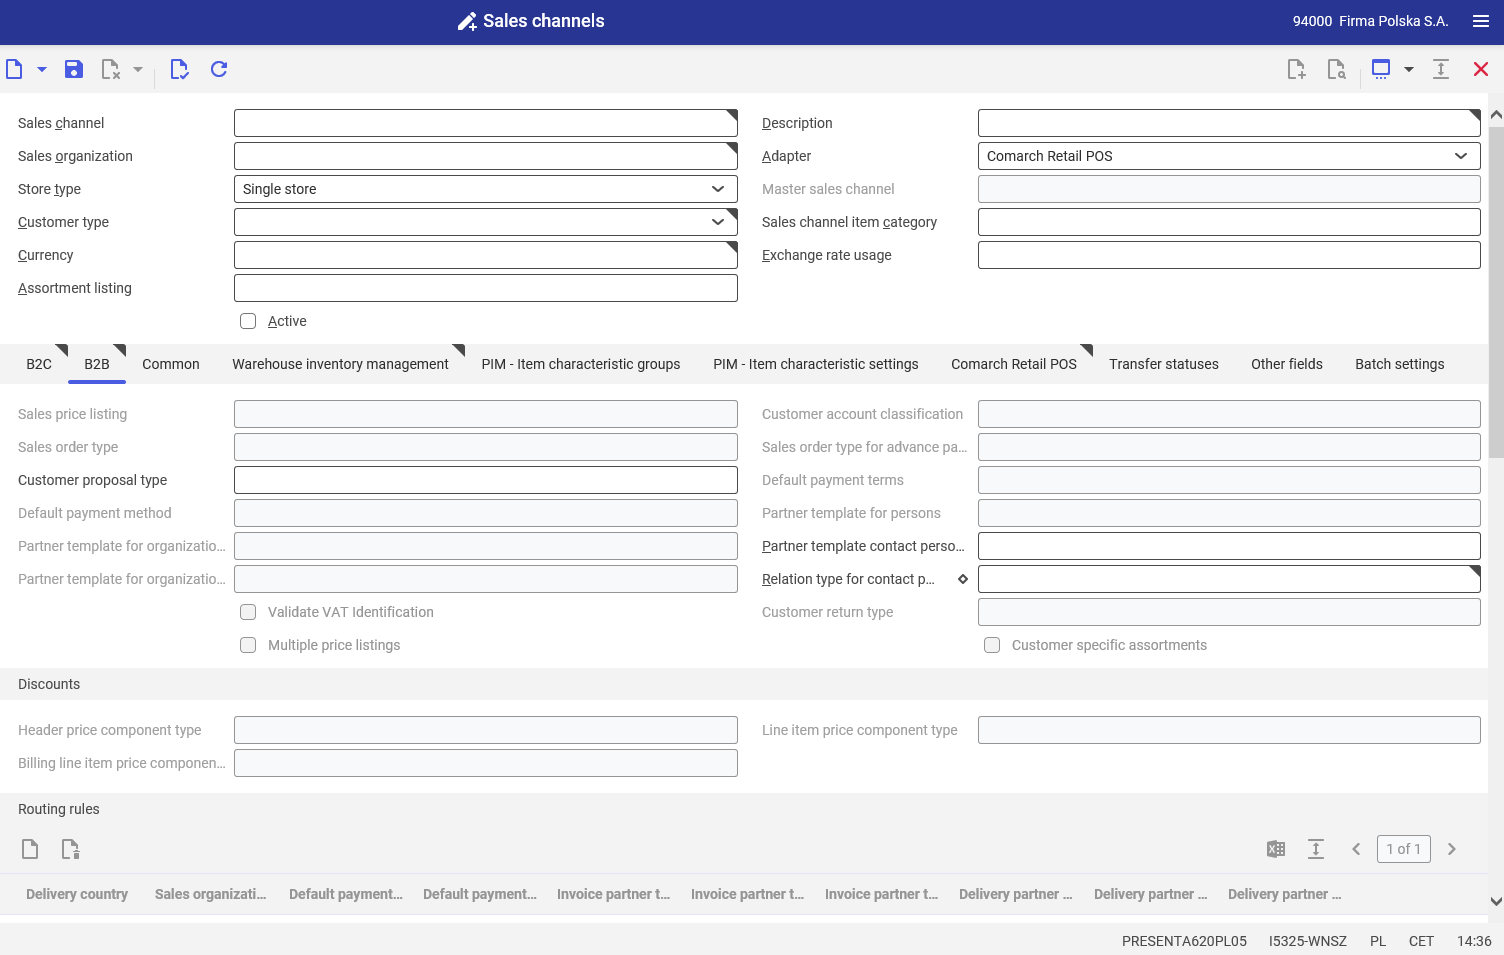
More information on sales channel parameters and features may be found in the Sales channels article. In order to assign a workstation to a sales channel, fill in the fields on the following tabs:
- B2C
- B2B
- Warehouse inventory management
- Comarch Retail POS
The required parameters for defining a sales channel for Comarch POS are described below.
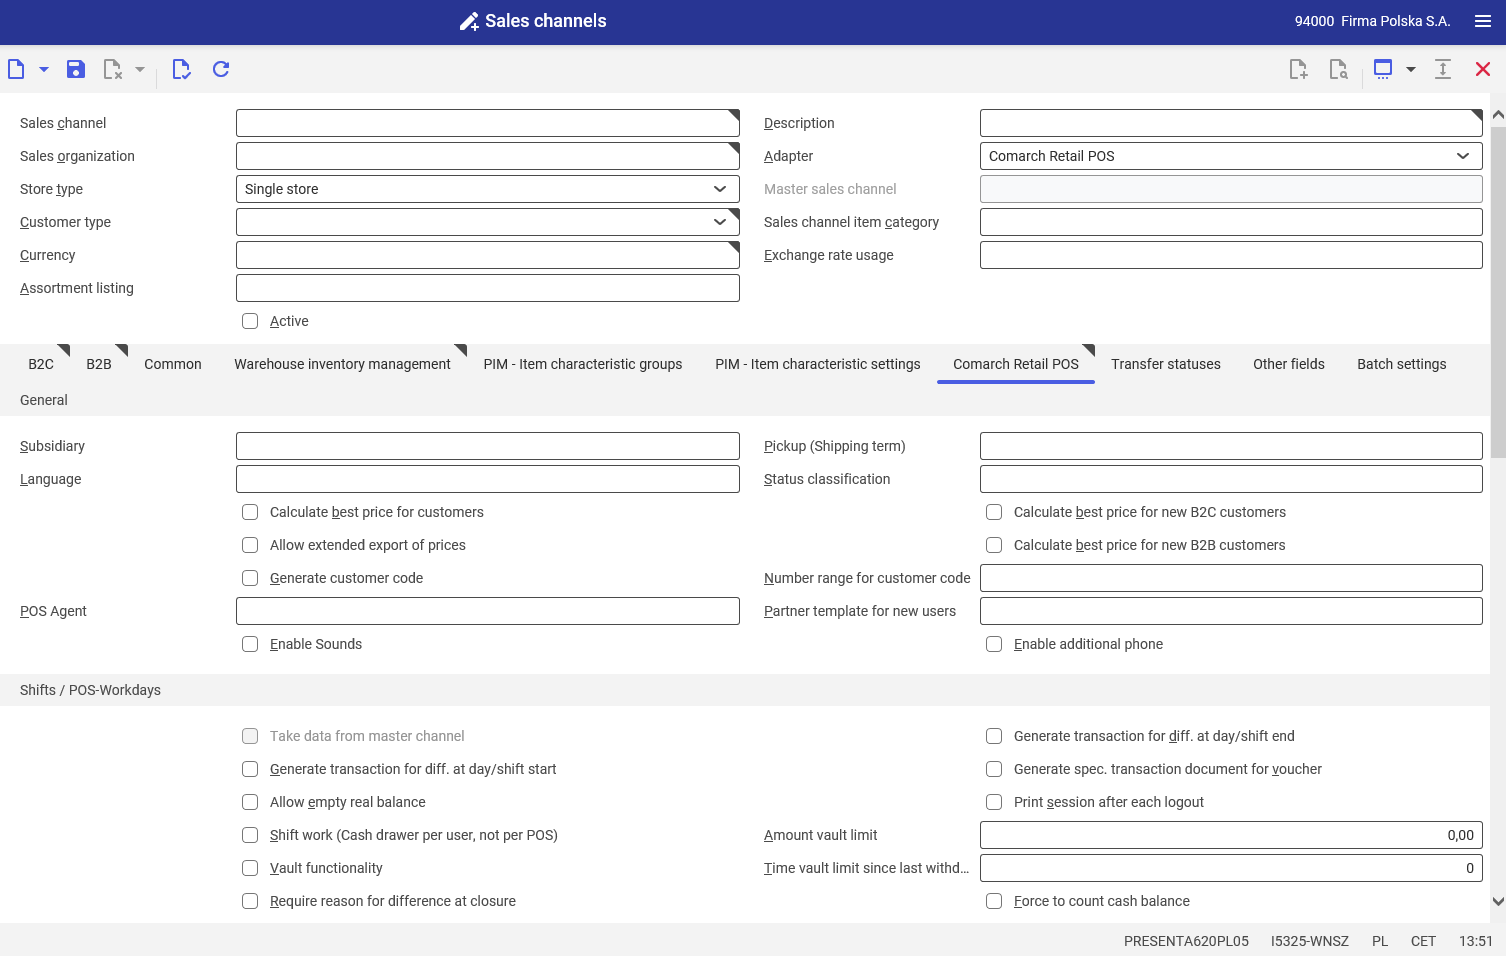
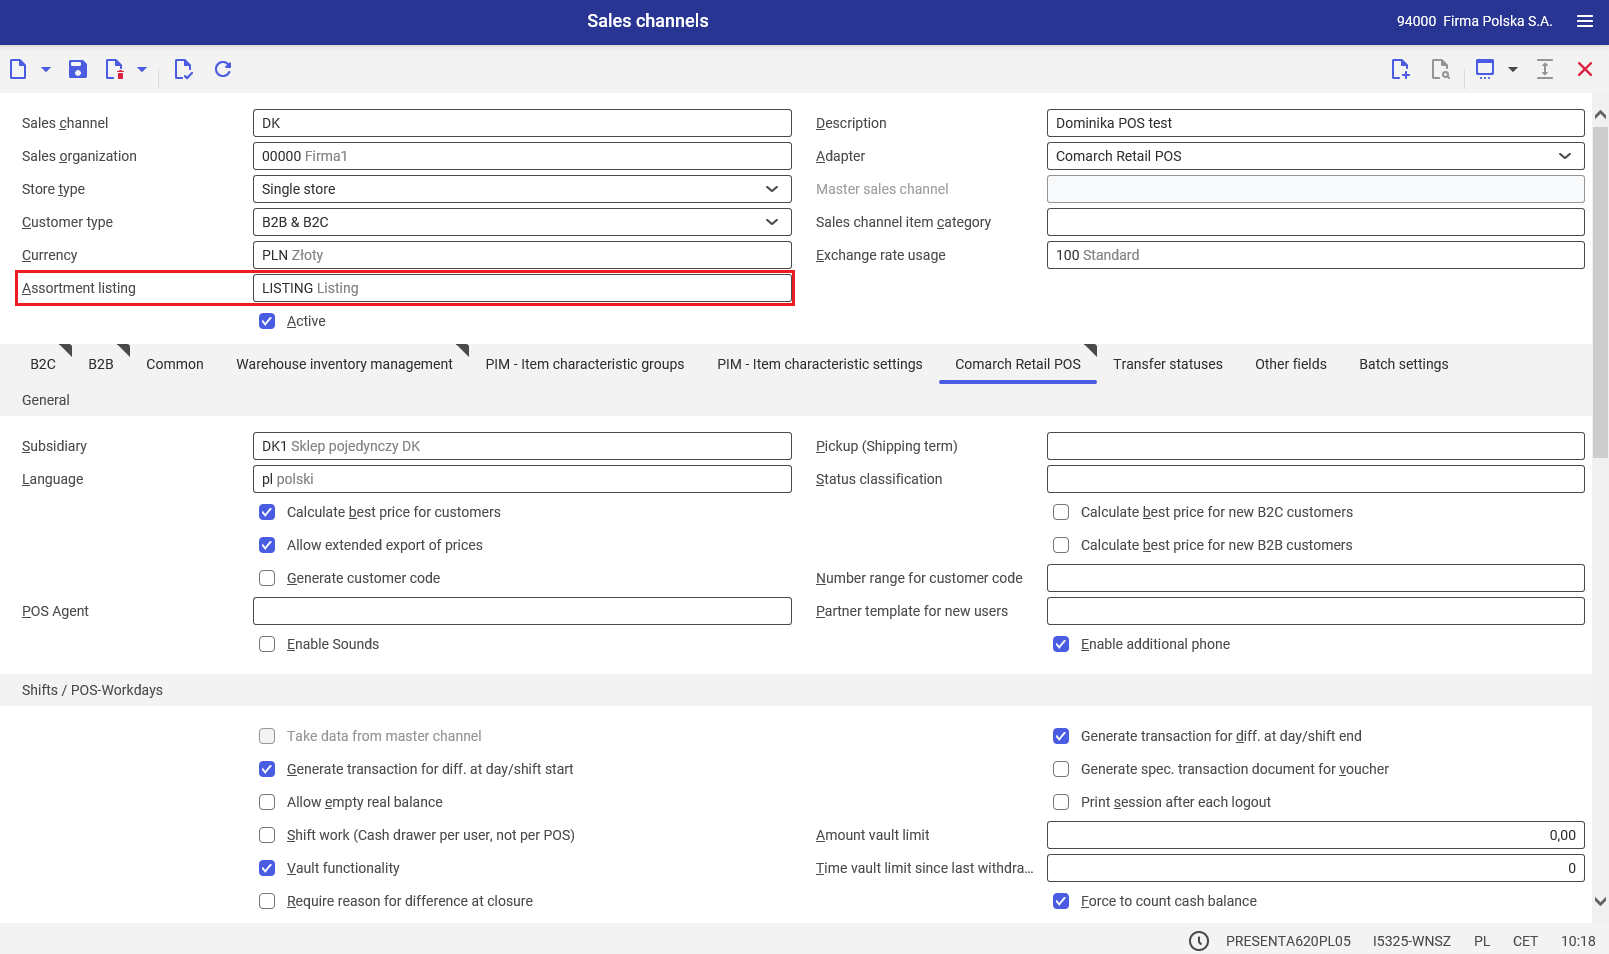
The following fields must be filled in in the header of the Sales channels application:
- Sales channel – the sales channel’s identification. It consists of a combination of up to three characters (numbers and letters). The sales channel identification must be unique.
- Description – an additional description of the sales channel. It can contain any text, but it should be unambiguous to facilitate searching
- Sales organization – the sales organization handles the fulfillment of sales orders issued within the sales channel
- Adapter – it allows the user to assign the sales channel to a specific adapter, the selection of which determines the settings available on the adapter tab; in this case, Comarch Retail POS should be selected
- Store type – the field’s default value is Single store. In the case of the Comarch Retail POS adapter, it is also possible to set it as Master store or Sub store. A sub store inherits settings from a master store selected in the Master sales channel field
- Master sales channel – if the store type is set as Sub store, this field allows the selection of a master sales channel from which settings should be retrieved
- Customer type – in this field, it should be specified whether the sales channel will serve end customers (B2C), business customers (B2B), or both types of customers (B2C & B2B). For the Comarch Retail POS adapter, the customer type is B2C & B2B.
- Sales channel item category – in this field, indicate the category of sales channel items that will be used to classify items on the POS workstation
- Currency – in this field, indicate the currency used for all prices within the channel
- Exchange rate usage – in this field, specify the exchange rate to be used for currency conversion when exporting sales price lists. If there is no specific usage, the default values defined in the Customizing application within the Sales function will be used
- Assortment listing – in this field, it is necessary to specify the listing of assortment to be sold through the sales channel
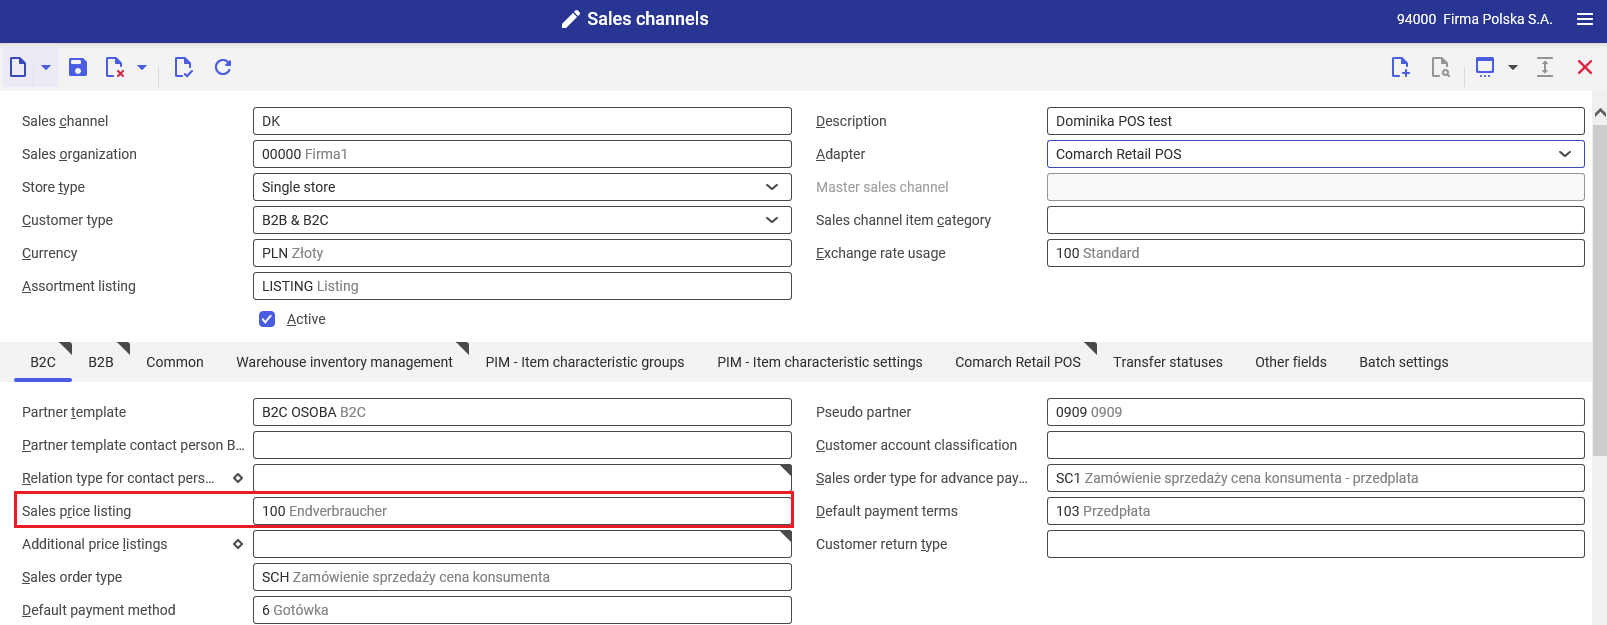
Basic sales channel configuration parameters, B2C tab
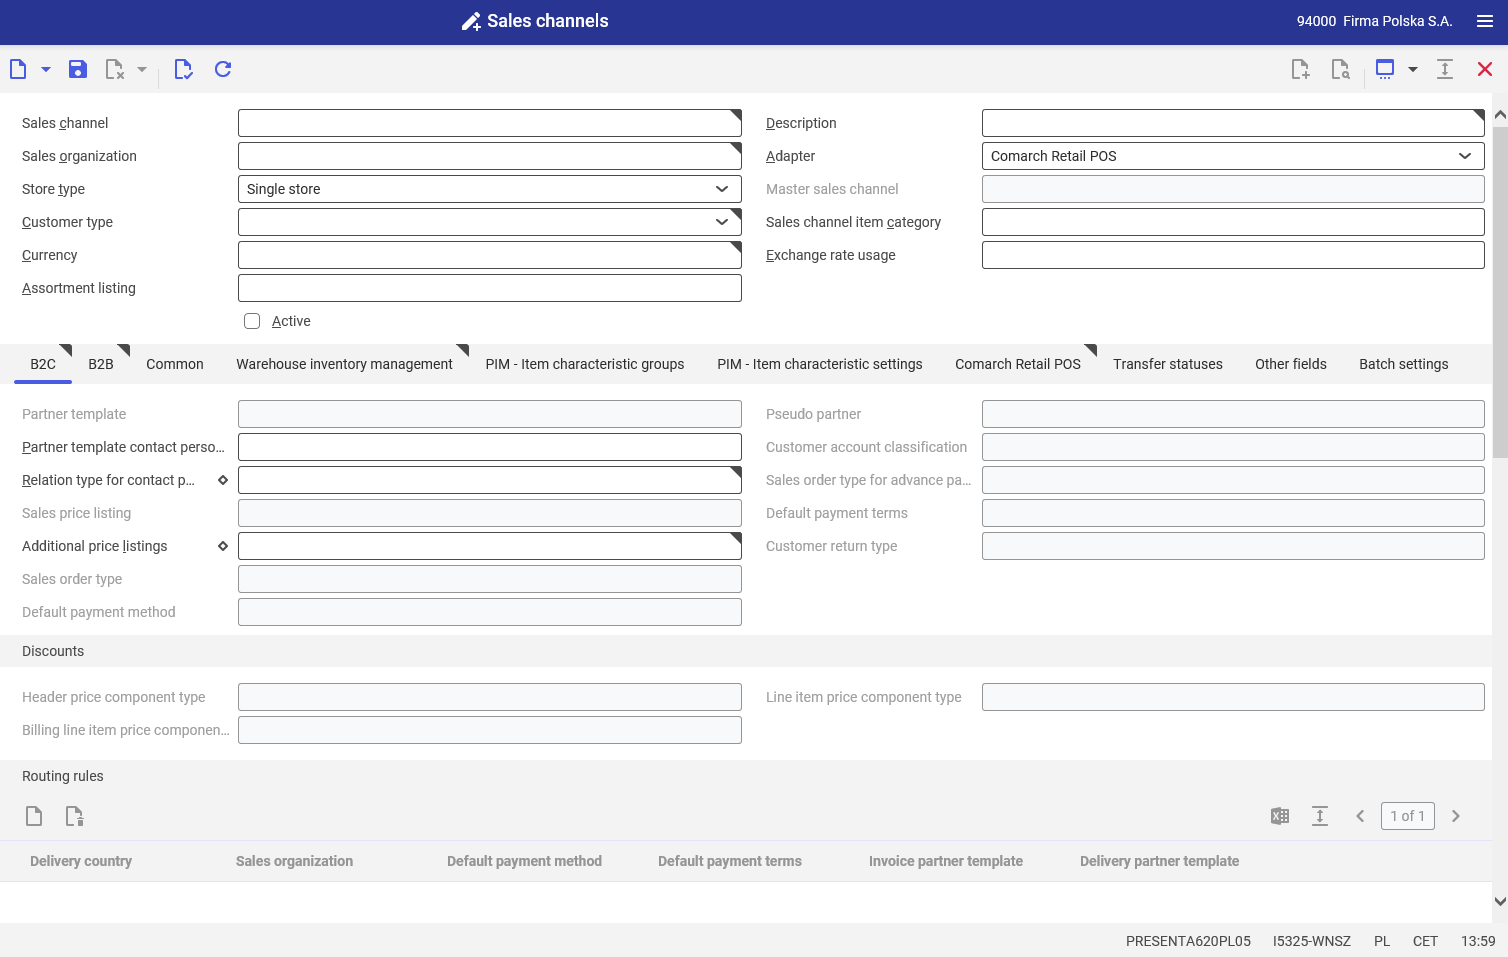
The B2C tab contains specific configuration settings to support business-to-customer processes, i.e. sales to a retail customer. The following fields should be filled in on the tab:
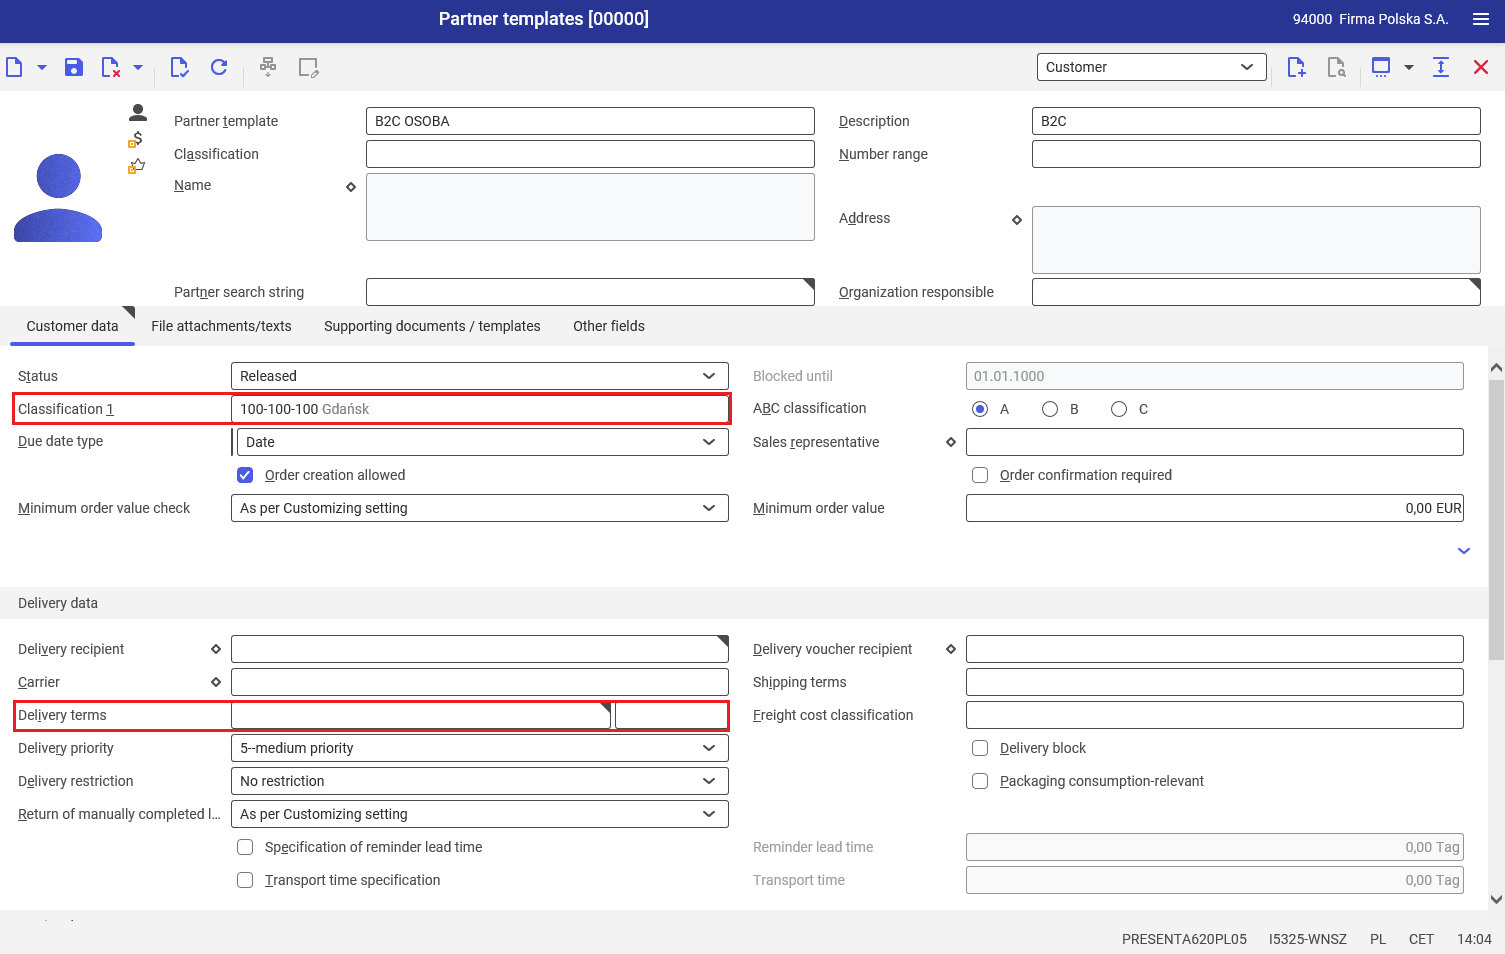
- Partner template – a partner template is used to transfer customer data from sales channels to CEE system. It defines what data will be entered into the ERP system and how it will be done. The partner template, defined in the Partner templates application, should include data in the header, as well as in the Customer and Financials views for a partner of the Person type
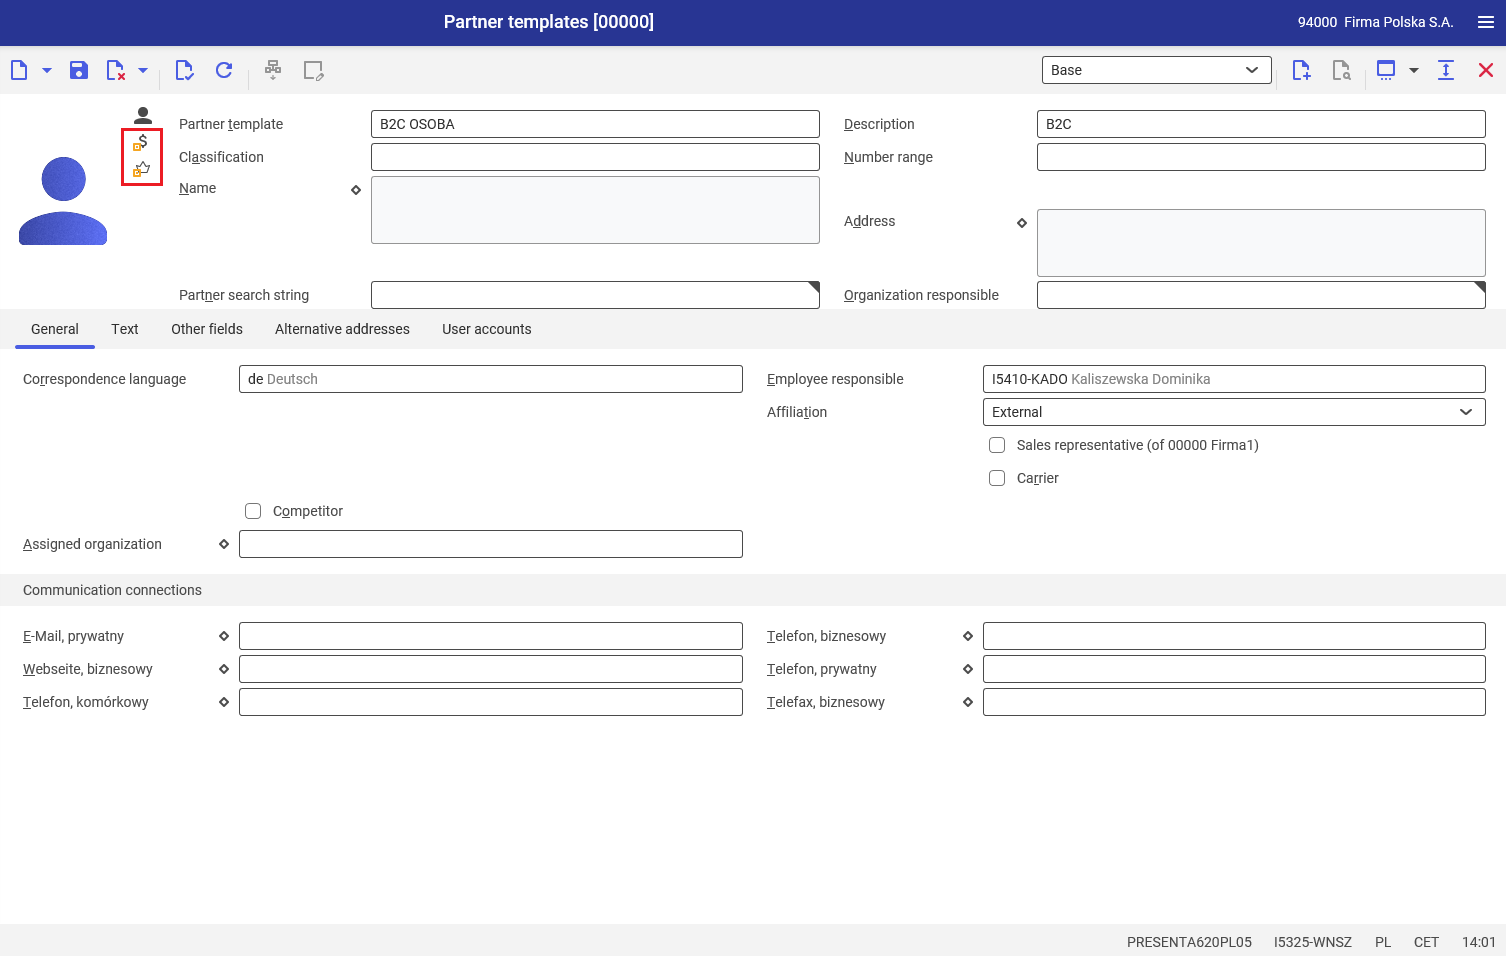
Data to be entered in the header of the Partner templates application (for an appropriate partner) include:
- Partner template – the identification of a partner template for B2C processes
- Description – a detailed description of the partner template entered
In the Customer view, some fields prompt default data. Additionally, it is necessary to fill in the following fields on the Customer data tab:
- Classification 1 – a customer classification created in the Classifications application (Base framework)
- Delivery terms – terms agreed upon by the buyer and seller. They are used to determine the type and location of delivery.
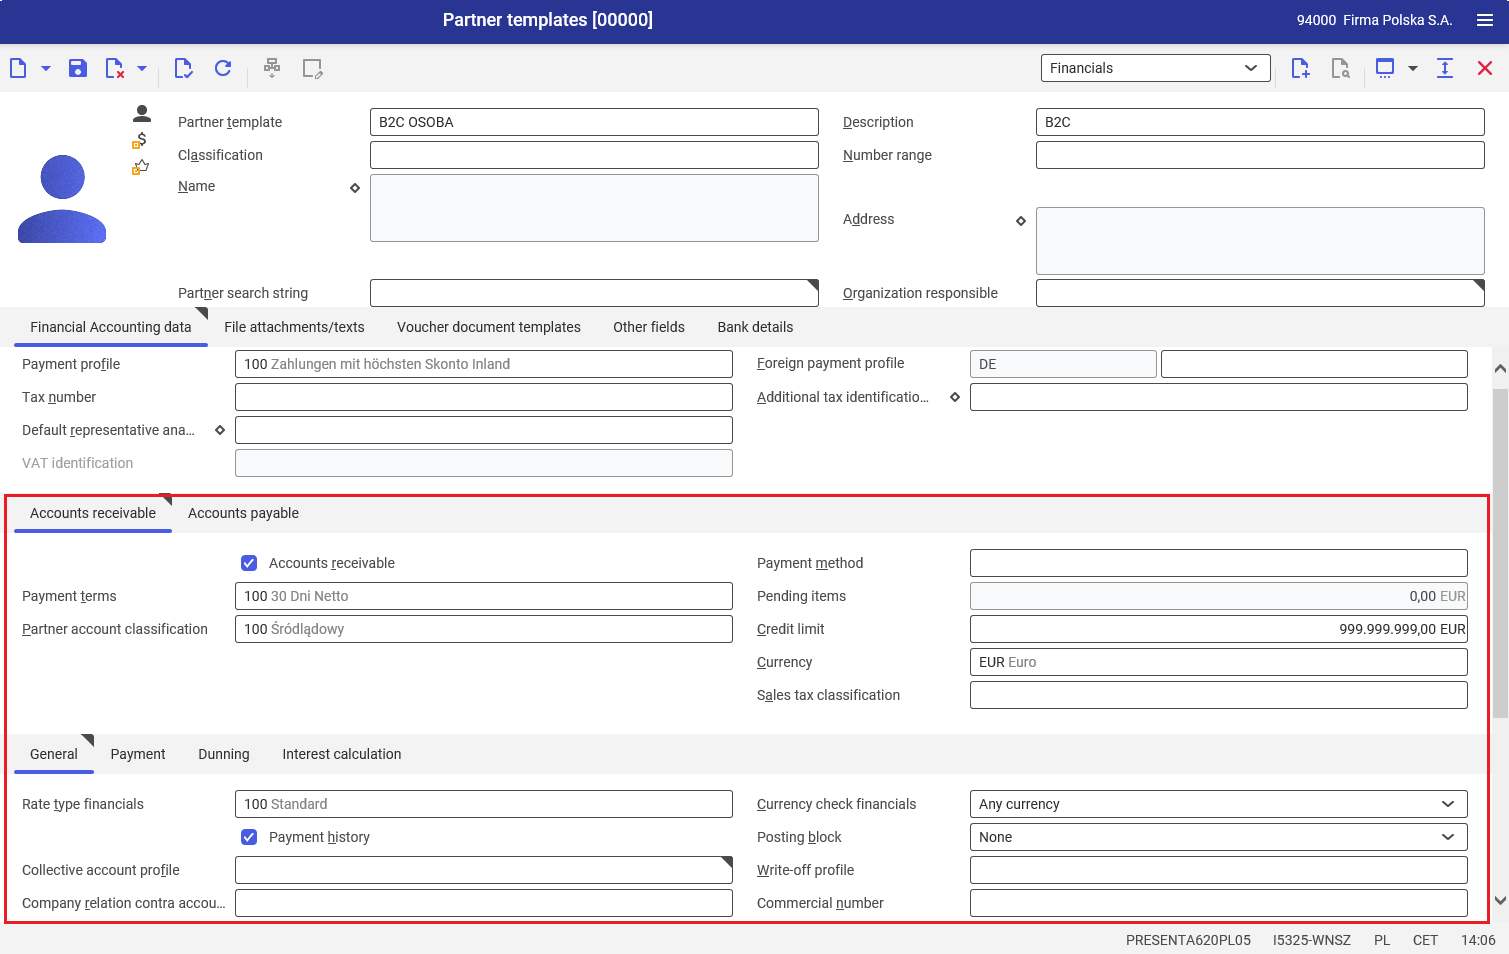
In the Financials view, it is necessary to activate the Accounts receivable parameter on the Accounts receivable tab and fill in the following fields:
- Payment terms – this field enables the user to determine a default due date for a given partner template
- Partner account classification – in this field, it is necessary to assign an account classification to be used for specifying appropriate revenue accounts when posting sales documents
- Currency – a currency in which documents will be issued for the partner template
On the General tab, it is necessary to fill in the following fields:
- Rate type financials – it is a rate type used in financial accounting when adding a posting recorded in a foreign currency. The field indicates which table the rate type is taken from.
- Collective account profile – this field is used to specify groups of accounts to which transactions will be posted. As part of collective account profiles, it is possible to determine groups for assets or liabilities.
It is also required to activate the End consumer parameter – it indicates whether the partner is an end consumer. Price lists for end consumers may be assigned in the Customer view.
- Pseudo-partner – a pseudo-partner is used as the ordering party for sales orders originating from the sales channel. The pseudo-partner is used whenever a sales channel customer is not registered as a customer in the ERP system or is not yet available. The pseudo-partner should have data entered in the header, as well as in the Base, Customer, and Financials The pseudo-partner is a partner of the Organization category.
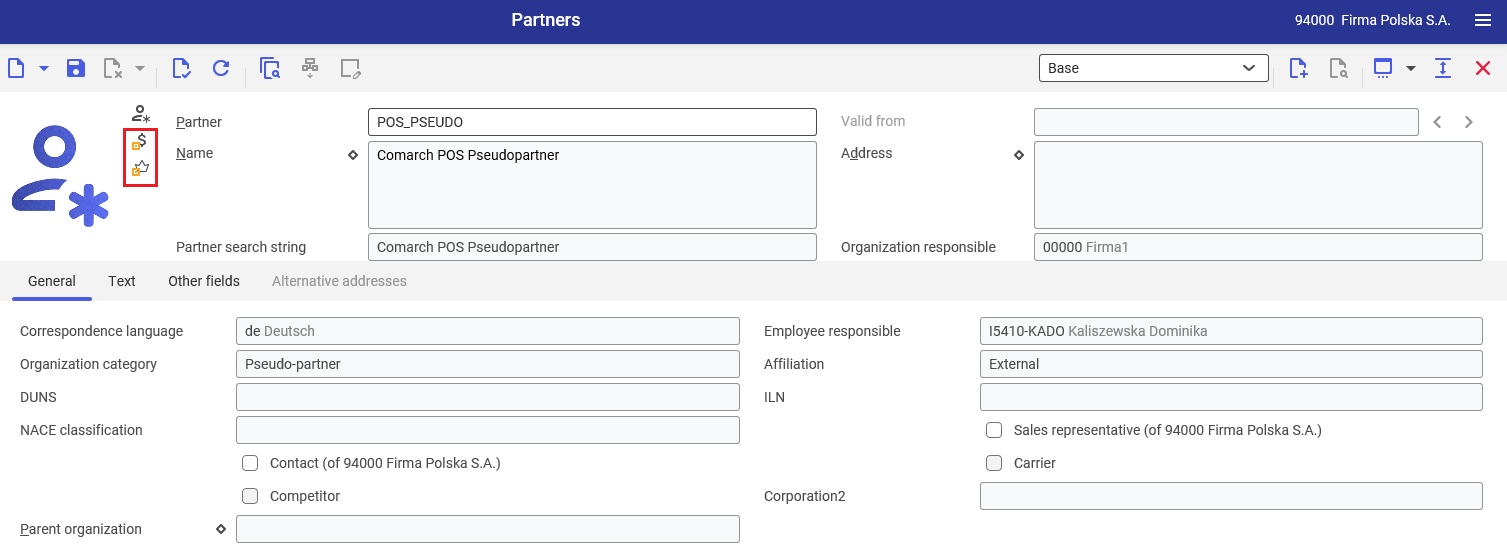
The following fields should be filled in in the header:
- Partner – a pseudo-partner’s number/identification. The identification may consist of digits, letters, or their combinations.
- Name – the pseudo-partner’s name entered by selecting the diamond button and completing one of the three possible names
- Partner search string – if the field is not filled in, the system automatically enters the search string
- Organization responsible – it allows selecting an organization that will be the controller of pseudo-partner data; by default, the currently selected organization is entered
On the General tab of the Base view, the option Pseudo-partner should be selected in the Organization category field.
In the Customer view, some fields prompt default data. Additionally, it is necessary to fill in the following fields on the Customer data tab:
- Classification 1 – a customer classification created in the Classifications application (Base framework)
On the Customer data tab, the fields Delivery recipient in the Delivery data section and Invoice recipient in the Invoice data section are filled in automatically with the identification of the added pseudo-partner.
In the Statistical data section, it is necessary to enter a customer classification used for statistical purposes.
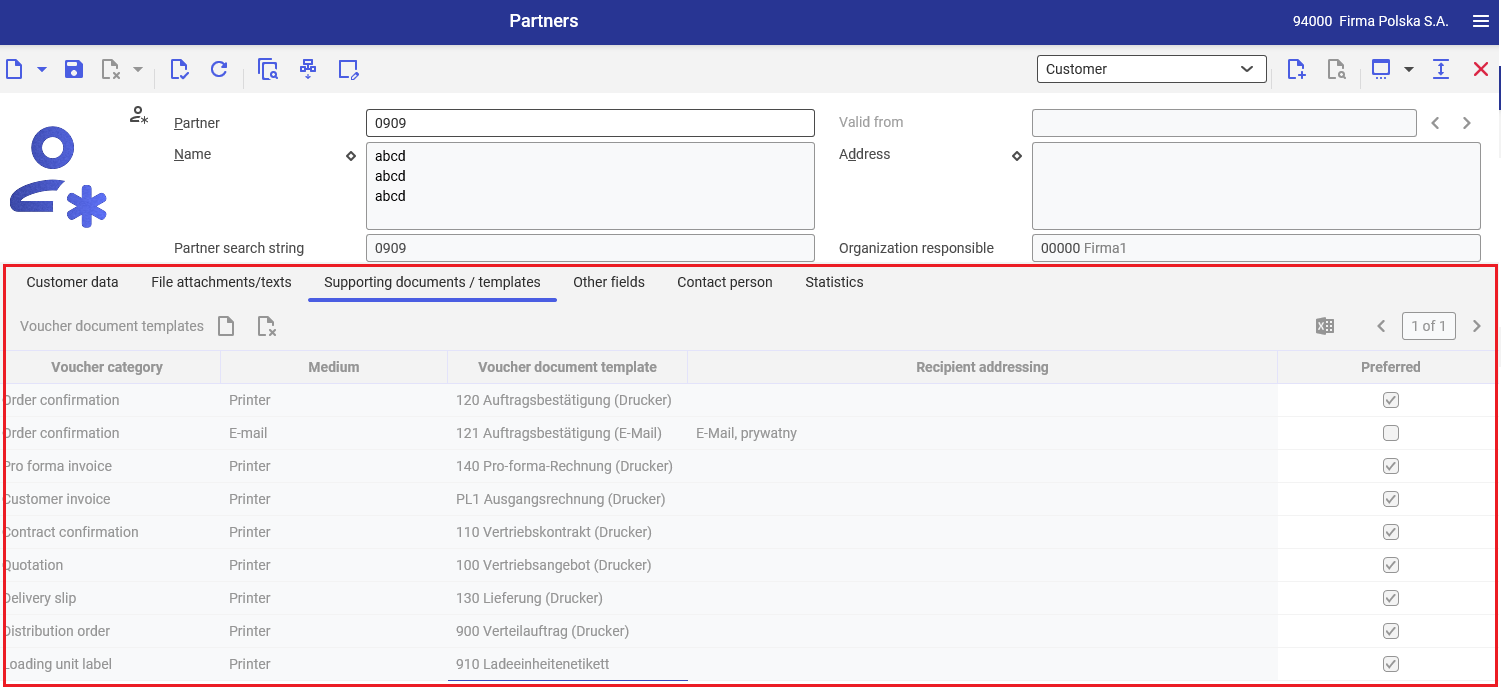
On the Supporting documents / templates tab, it is necessary to add voucher categories along with a medium and a template to be used by the pseudo-partner.
In the Financials view, it is necessary to activate the Accounts receivable parameter on the Accounts receivable tab and fill in the following fields:
- Payment terms – this field enables the user to determine a default due date for a given partner template
- Sales tax classification – in this field, it is necessary to assign an account classification to be used for determining the partner’s sales tax
- Currency – a currency in which documents will be issued for the partner template
On the General tab, it is necessary to fill in the following fields:
- Rate type financials – it is a rate type used in financial accounting when adding a posting recorded in a foreign currency. The field indicates which table the rate type is taken from.
- Collective account profile – this field is used to specify groups of accounts to which transactions will be posted. As part of collective account profiles, it is possible to determine groups for assets or liabilities.
It is also required to activate the End consumer parameter – it indicates whether the partner is an end consumer. Price lists for end consumers may be assigned in the Customer view.
- Sales price listing – a sales price listing containing the prices of items offered within a given sales channel. The listing may only contain price lists with the activated parameter Accept validity period (price components are valid in the same period as the price list)
- Customer account classification – a customer account classification is used when transferring customer data from sales channels. When customers with the same customer account identification are transferred from different sales channels (if the channels are assigned to the same customer account classification), the data of these customers is treated as duplicates and is generated only once
- Sales order type – this field specifies the sales order type for imported sales orders without advance payments
- Sales order type for advance payment – this field specifies the sales order type for imported sales orders with advance payments
- Default payment method – this field specifies the payment method (e.g. card payment, bank transfer, check, cash) that is used by default for imported sales orders
- Default payment terms – the type of payment terms (e.g. advance payment, installments) that is used by default for imported sales orders
- Customer return type – this field specifies the type of return used for customer returns from an external system
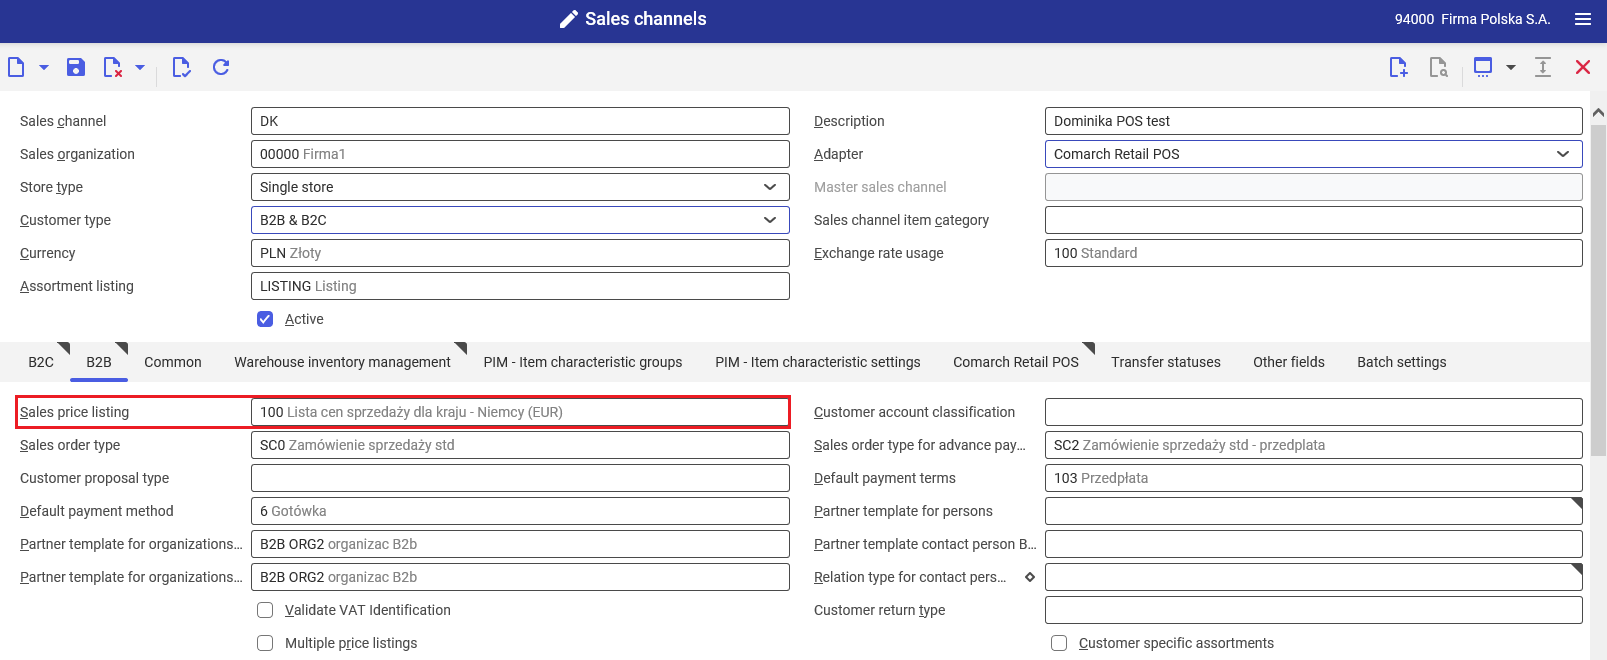
Basic sales channel configuration parameters, B2B tab
The B2B tab contains specific configuration settings to support business-to-business processes. This tab is editable only for a sales channel with the customer type B2B or B2B & B2C.
- Sales price listing – a sales price listing containing the prices of items offered within a given sales channel. The listing may only contain price lists with the activated parameter Accept validity period (price components are valid in the same period as the price list)
- Sales order type – this field specifies the sales order type for imported sales orders without advance payments
- Sales order type for advance payment – this field specifies the sales order type for imported sales orders with advance payments
- Default payment method – this field specifies the payment method (e.g. card payment, bank transfer, check, cash) that is used by default for imported sales orders if a payment method used in an external system cannot be automatically assigned to an existing payment method in the ERP system
- Default payment terms – payment terms are assigned in the adapter. If the adapter cannot specify appropriate payment terms for a sales order, the default value is used
- Partner template for organizations w/ tax ID – in this field, a partner template should be assigned that should be used when creating a partner for the sales channel as an organization with its own tax identification number
- Partner template for organizations w/o tax ID – in this field, a partner template should be assigned that should be used when creating a partner for the sales channel as an organization without its own tax identification number
Basic sales channel configuration parameters, Warehouse inventory management tab
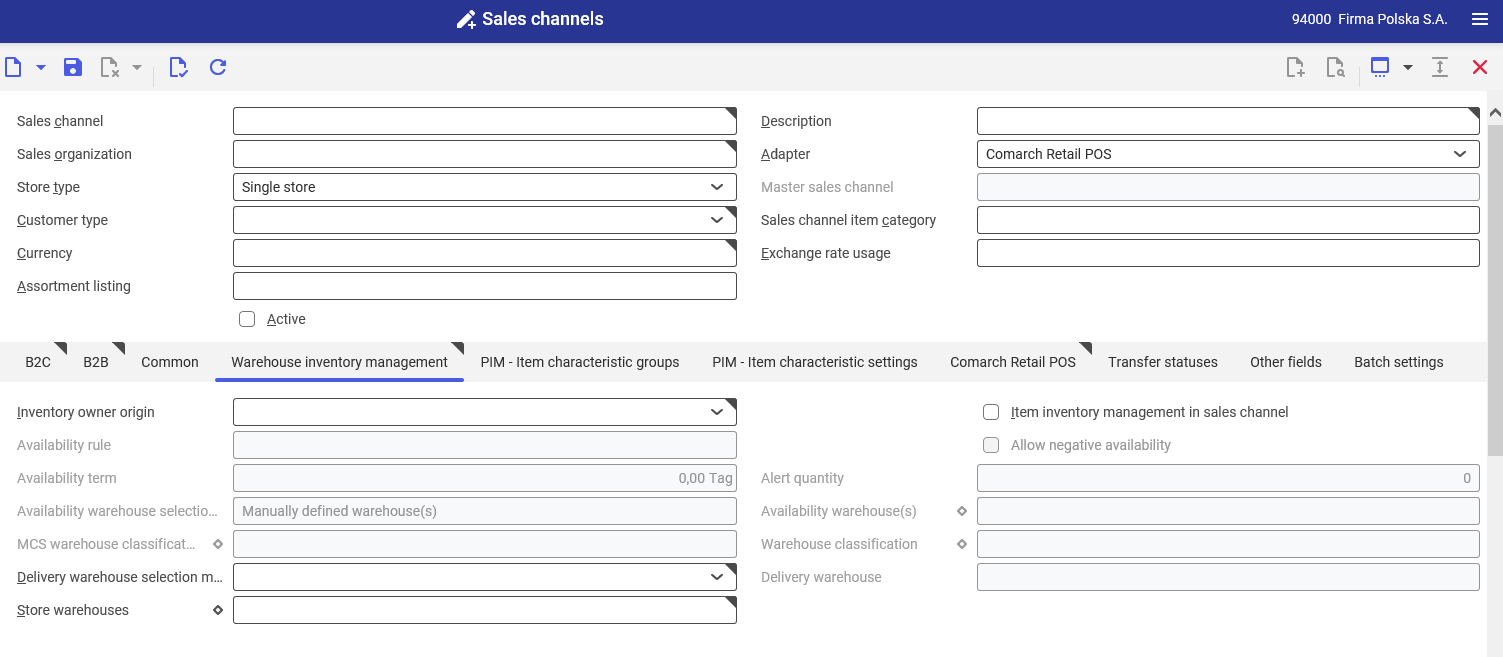
The Warehouse inventory management tab contains fields used for the calculation of availability and the determination of delivery warehouses.
- Inventory owner origin – in this field, the origin of an inventory owner may be defined. Available options include:
- Delivery partner firm
- Sales organization firm
- Item inventory management in sales channel – activating this parameter allows the user to display stock levels in the sales channel. Once activated, the parameter allows the definition of more detailed settings (such as an availability rule, availability term, alert quantity, availability warehouses or an availability warehouse selection method). Also, activating the parameter affects the export of items to Comarch POS. If the parameter is activated, it is first necessary to run the batch application Export items and then Export item availability to fully export items.
- Availability rule – an availability rule determines item quantities available in stock within the sales channel. The field is available after activating the Item inventory management in sales channel parameter
- Availability warehouse selection method – in this field, it is possible to determine a method that is to enable the calculation of availability in selected warehouses
- Availability warehouse(s) – in this field, ti is necessary to define one or more warehouses to be included when calculating availability
- Delivery warehouse selection method – in this field, it is possible to determine a method that is to be used for the selection of a delivery warehouse for sales orders. If the Fixed warehouse option is selected, it is also necessary to fill in the Delivery warehouse field
- Delivery warehouse – in this field, it is necessary to specify a warehouse to be used as a fixed delivery warehouse, i.e. a warehouse from which items are to be picked when shipping sales order items
- Store warehouse – in this field, it is possible to assign one or more warehouses, e.g. backroom, wholesale store, display. At least one warehouse for calculating availability (if entered) and a delivery warehouse must be assigned in the field.
Basic sales channel configuration parameters, Comarch Retail POS tab
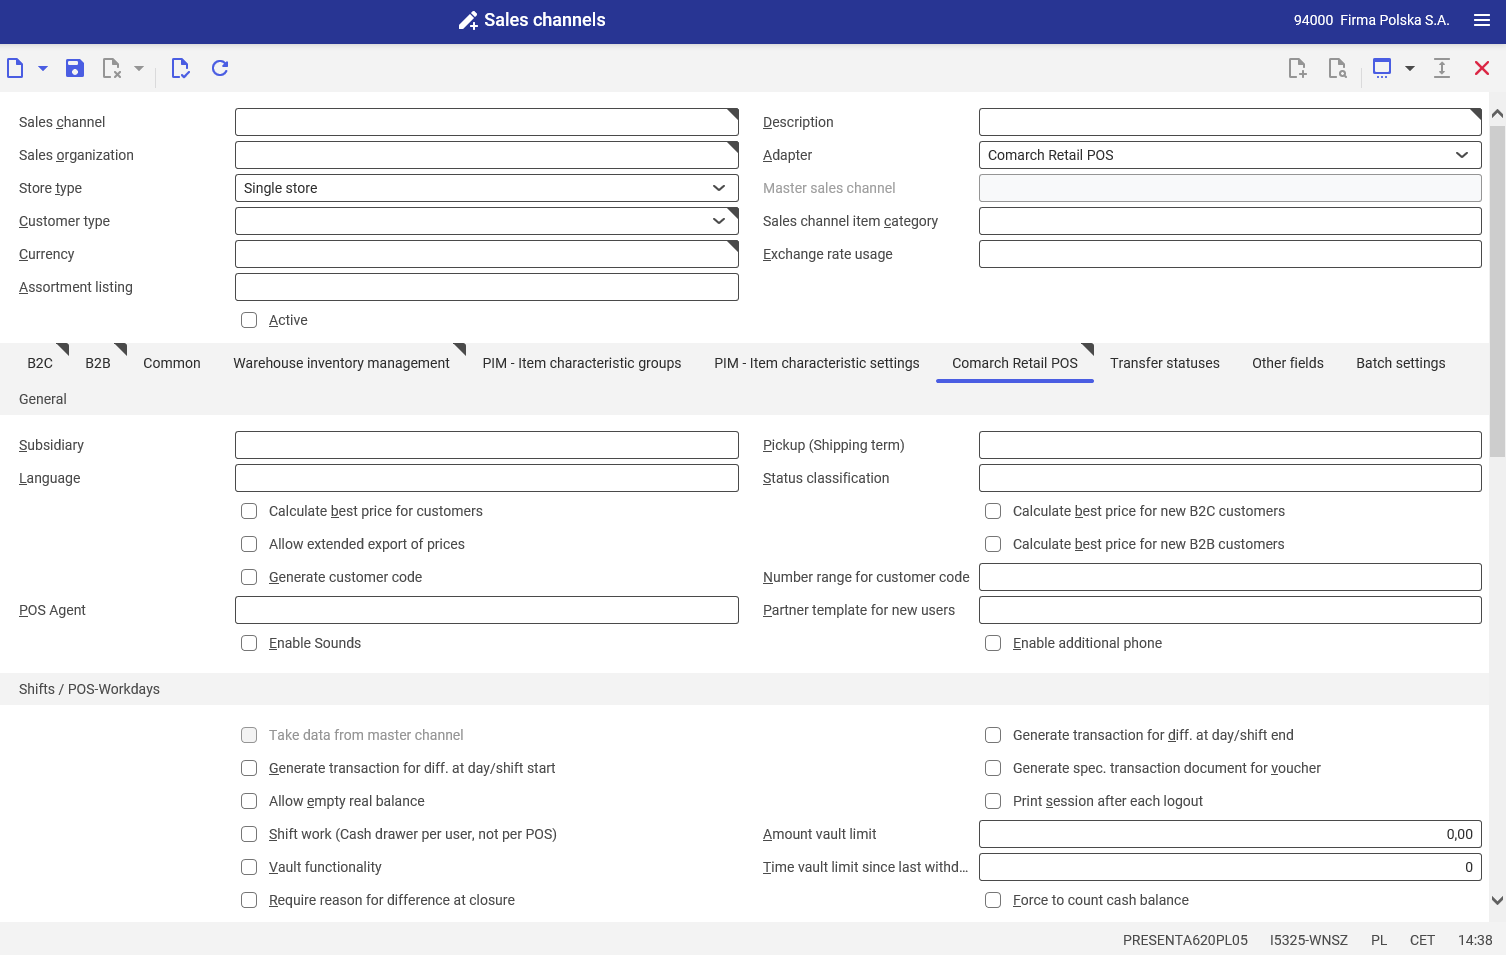
Parameters required by the Sales channels application on the Comarch Retail POS (General section) include:
- Subsidiary – a specific subsidiary of the sales organization within which the sales channel operates. The address and communication details will be made available to Comarch POS. Settings defined for this subsidiary are used to calculate VAT.
- Language – a content language for the selected sales channel, in which object names will be presented on the POS workstation. Item names and other master data are transferred to Comarch POS
Inventory transactions for receipts section:
- Posting key (Issue) – it is used to record transactions for released items
- Posting key (Receipt) – it is used to record transactions for received items
Posting keys allow the user to automatically assign payment terms defined for a given key. Warehouse transactions are generated when processing receipt documents.
Inventory transactions for warehouse documents section:
- Distribution order type – an order type to be used for the settlement of warehouse movements
- Posting key (Issue) – it is used to post transactions for released items for warehouse documents (when an item has left a warehouse)
- Posting key (Receipt) – it is used to post transactions for received items for warehouse documents (when an item has been added in a warehouse) These posting keys allow the user to automatically assign payment terms defined for a given key. In this case, warehouse transactions are generated when processing warehouse documents, e.g. for delivery receipt or release processes.
Basic configuration parameters for Comarch POS in the Number ranges application
The Number ranges application is available in the Base framework.
The application makes it possible to adjust individual parameters for document and object numerators.
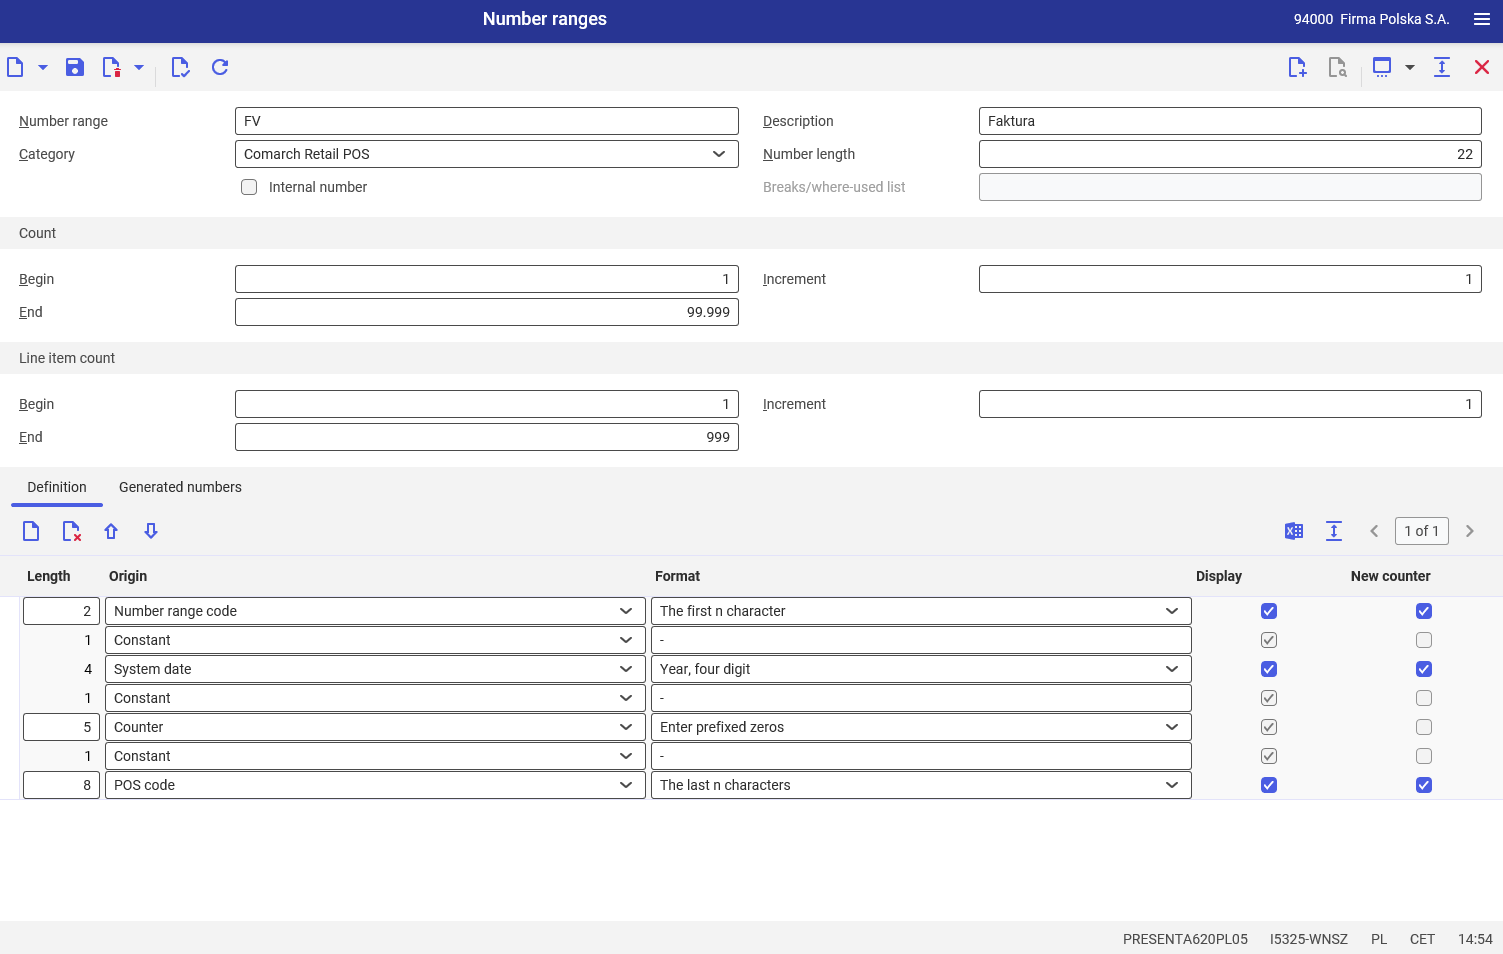
In order to define new settings for numerators in the Number ranges application, it is necessary to fill in the following fields:
- Number range – the name of a created number range type for a selected object, e.g. item, trade document
- Description – an additional description characterizing the setting, e.g. Cash withdrawal
- Category – Comarch Retail POS
After defining the number ranges for all document types, it is necessary to open the Comarch Retail POS number ranges application and assign a number range for each document type in the created sales channel. Based on this, document numerators are generated.
More information on the Comarch Retail POS number ranges application may be found here.

User groups
Operator rights
The system makes it possible to manage operator rights in the context of POS workstations, including the right to read, create, edit, and delete all objects/documents on the POS workstation and the right to sales prices and discounts.
The Comarch Retail POS operator rights application is available as part of the Multi-channel sales framework.
The Comarch Retail POS operator rights application makes it possible to assign operator rights. Rights may be assigned with respect to a specific authorization role. A role with assigned rights may be associated with multiple POS workstations.
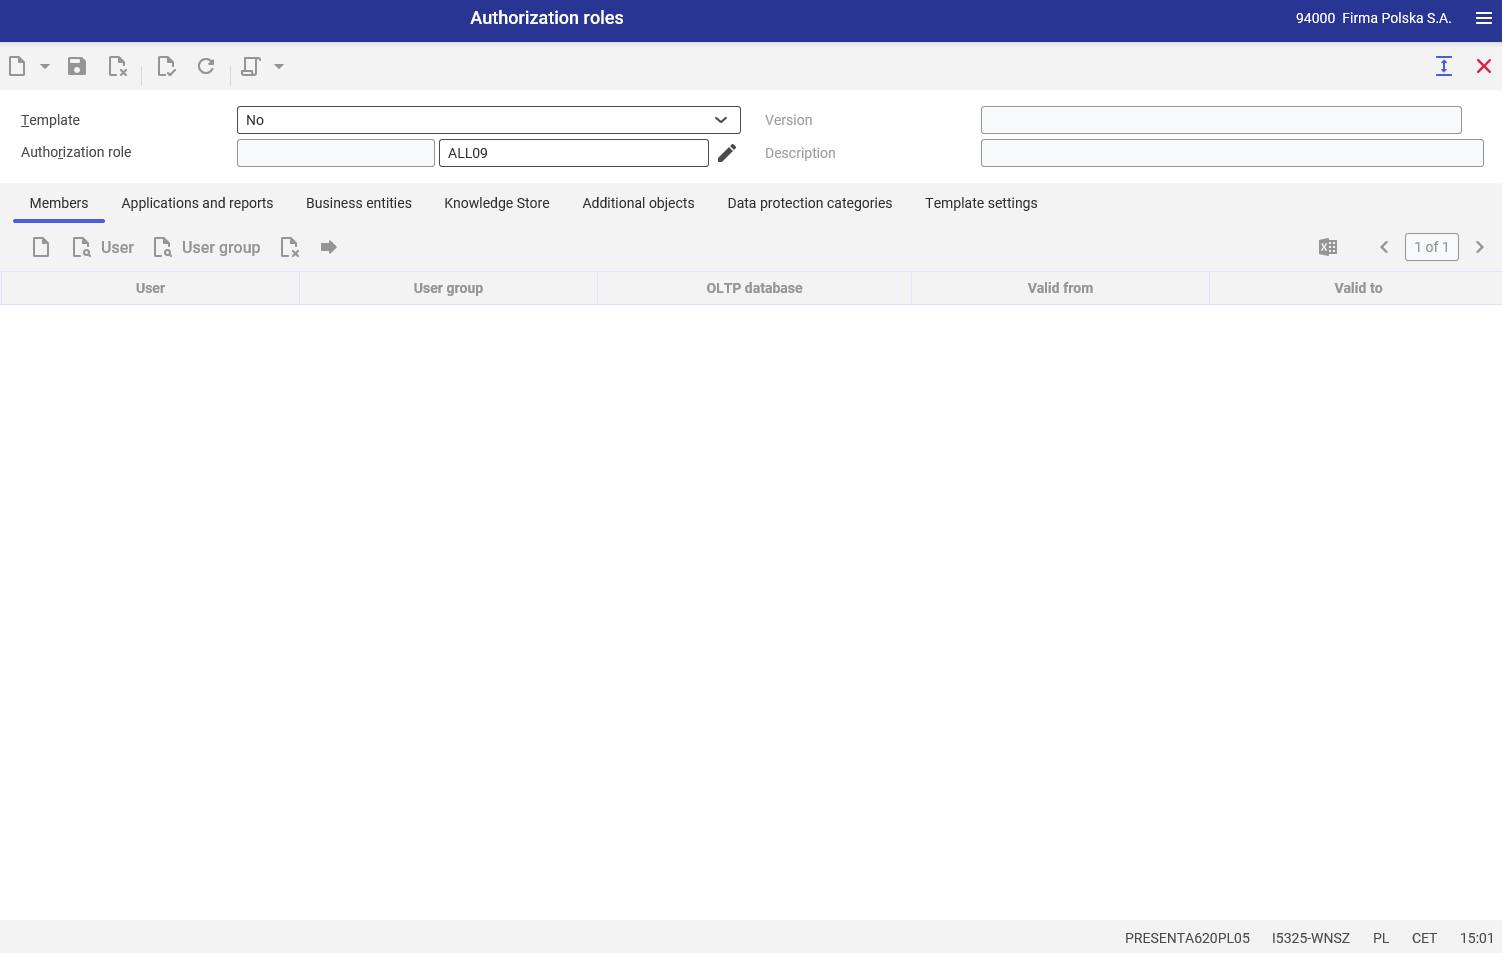
In the Authorization roles application, it is necessary to define the name of the newly added authorization role and its description. In the lower part of the application, it is possible to add users or entire user groups defined in the system.
Once the new authorization role is created, the following fields must be filled in in the Comarch Retail POS operator rights application:
- Authorization role – for the user to have access to objects in the system, he/she must be assigned the authorization role created in the Authorization roles
- Type – it specifies the type of role of a given user group. Available options include: Manager, Employee, An authorization role type is specified for informational purposes only and can be defined optionally to further characterize the role.
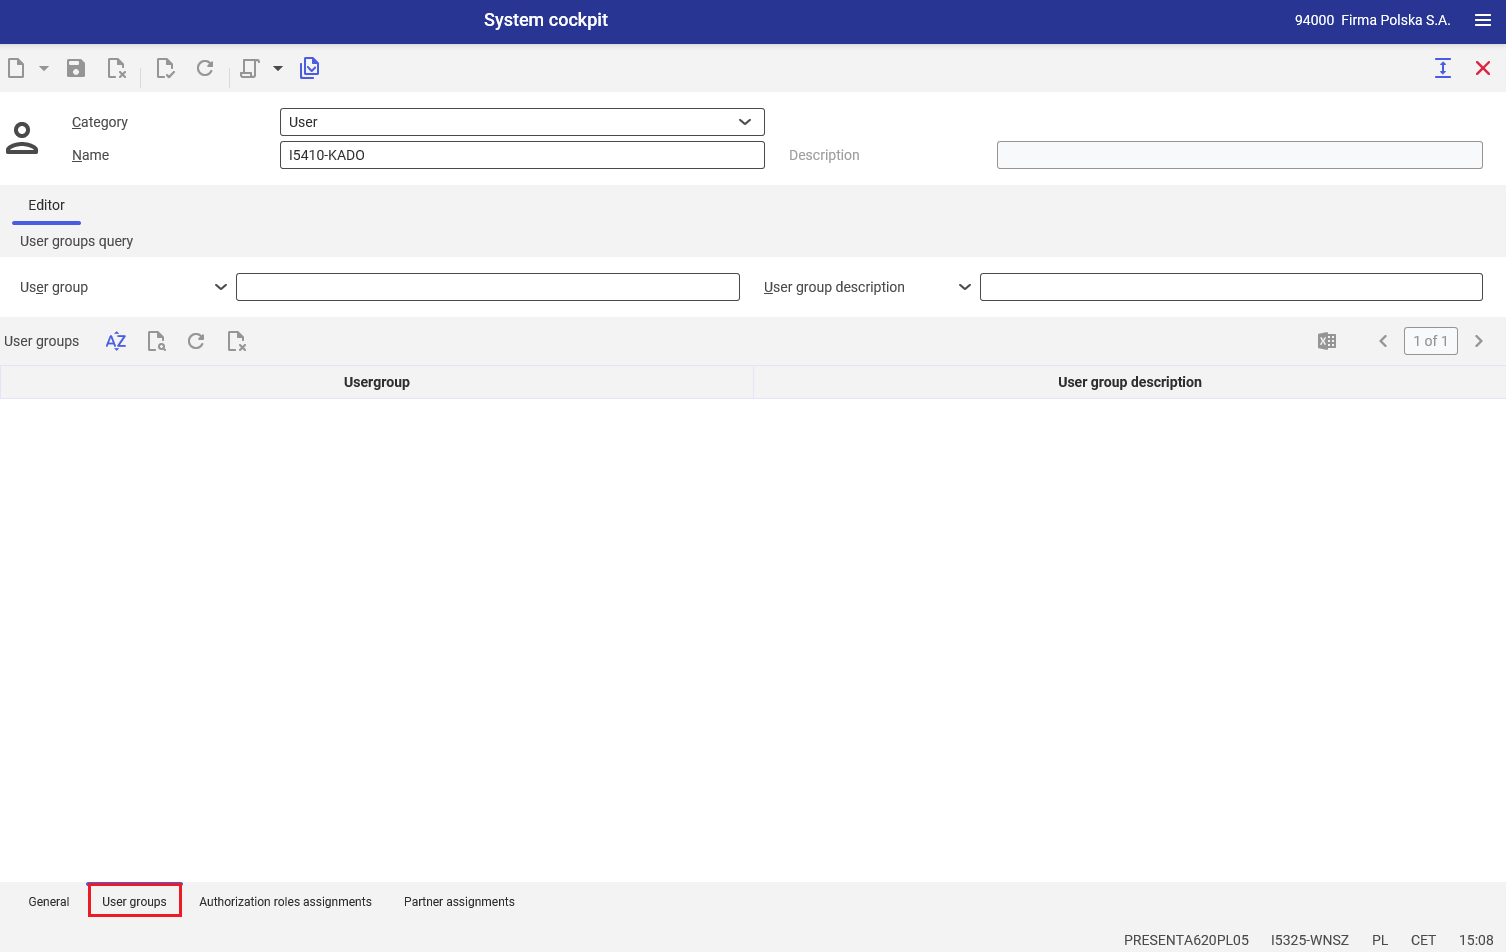
To add a given user to an existing user group, open the System cockpit application, select User in the Category field, and enter a user to be added to the relevant group in the Name field. Next, open the bottom tab User groups. Using the button [Search and add multiple user groups] on the tab, it is possible to select specific groups to which a given user should be added.
Sales price and discount tab
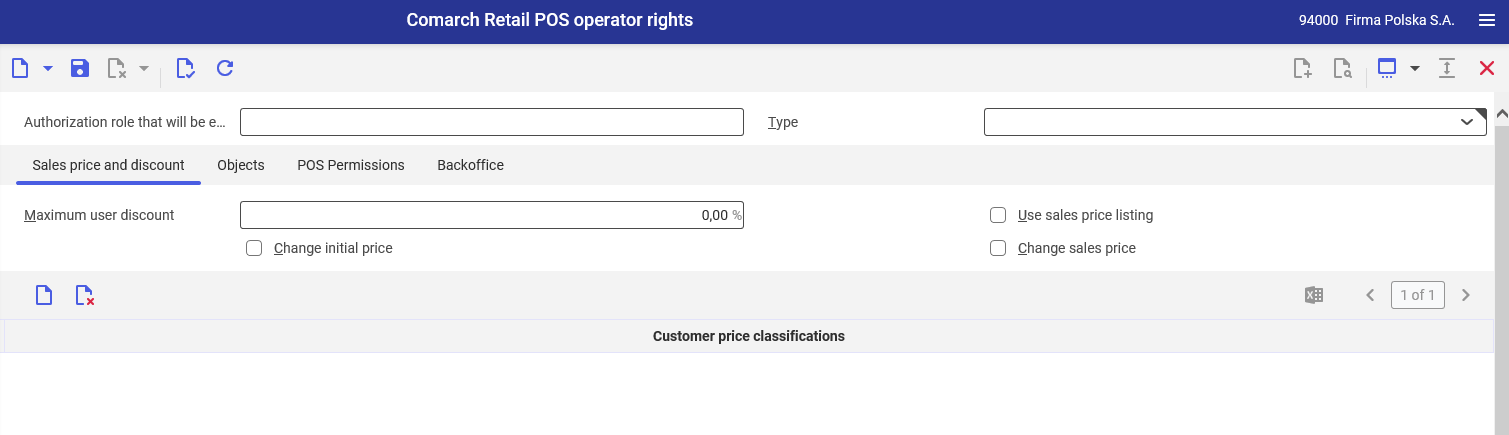
The tab makes it possible to manage rights to discounts and prices on the POS workstation.
- Maximum user discount – it determines the percentage value of the maximum discount that can be given by operators with the selected role
- Use sales price listing – it determines whether users have access to the sales price list for a given sales channel
- Change initial price – it gives an operator the possibility to modify the initial price in a document
- Change sales price – it gives an operator the possibility to modify the sales price in a document
The user can also allow additional price types by specifying assignments for customer prices. Selecting the [Add] button adds a new table row, enabling the user to assign a new customer price classification.
Objects tab
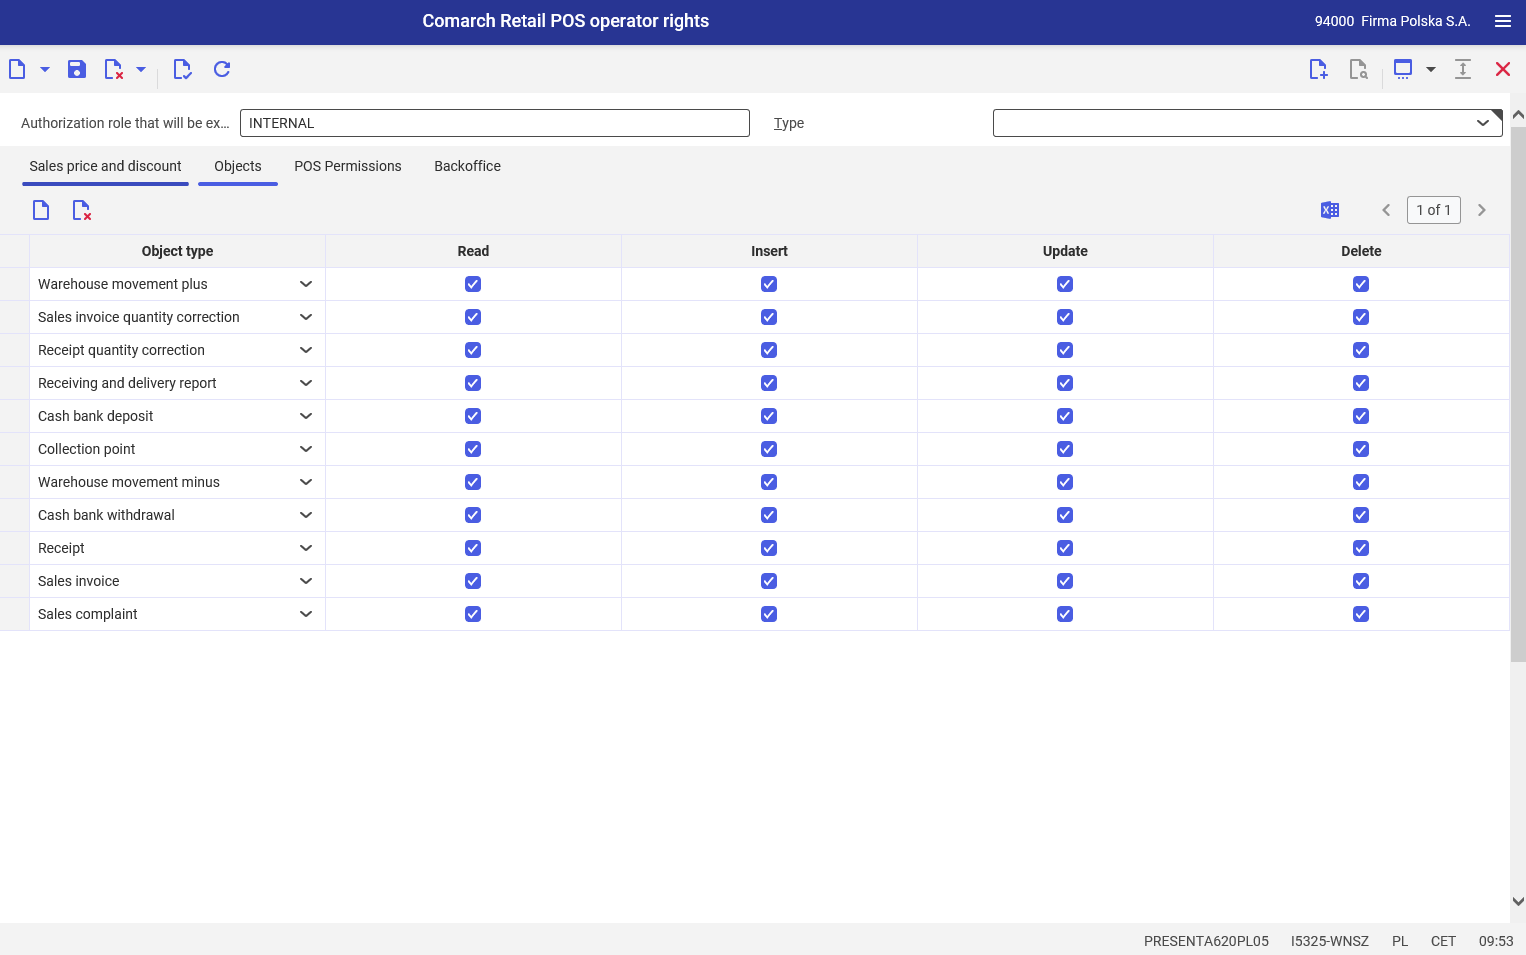
The tab makes it possible to define rights to different object types on the POS workstation.
Selecting the [Add] button enables the user to create a new authorization for an object type. The following objects to which rights can be granted are available on the POS workstations:
- Receipt
- Receipt quantity correction
- Sales invoice
- Sales invoice quantity correction
- Cash bank deposit
- Cash bank withdrawal
- Sales complaint
- Internal order (this object is currently not supported in Comarch POS application)
- Tax free
- Debit note
- Warehouse movement minus
- Warehouse movement plus
- Receiving and delivery report
- Sales order
- Advance invoice
- Advance invoice correction
- Sales quote
- Collection point
- Consents to personal data processing
Selecting the options Read, Insert, Update, Delete for the abovementioned objects grants corresponding rights to a given user group on the POS workstation. If a given right is not granted, relevant actions will require authorization from an operator with higher rights.
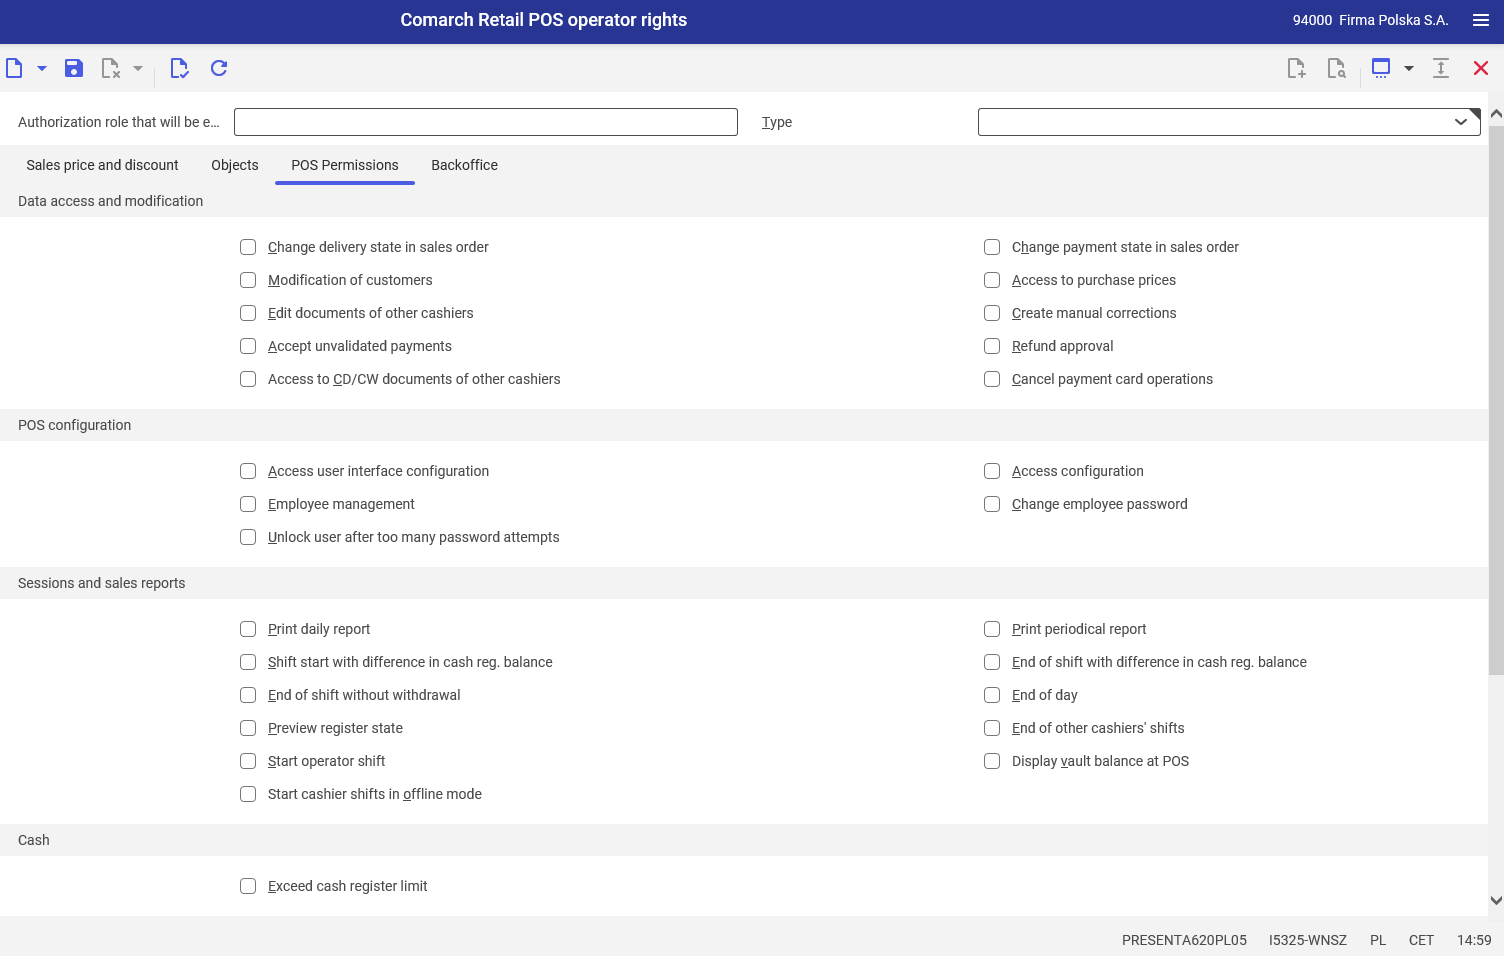
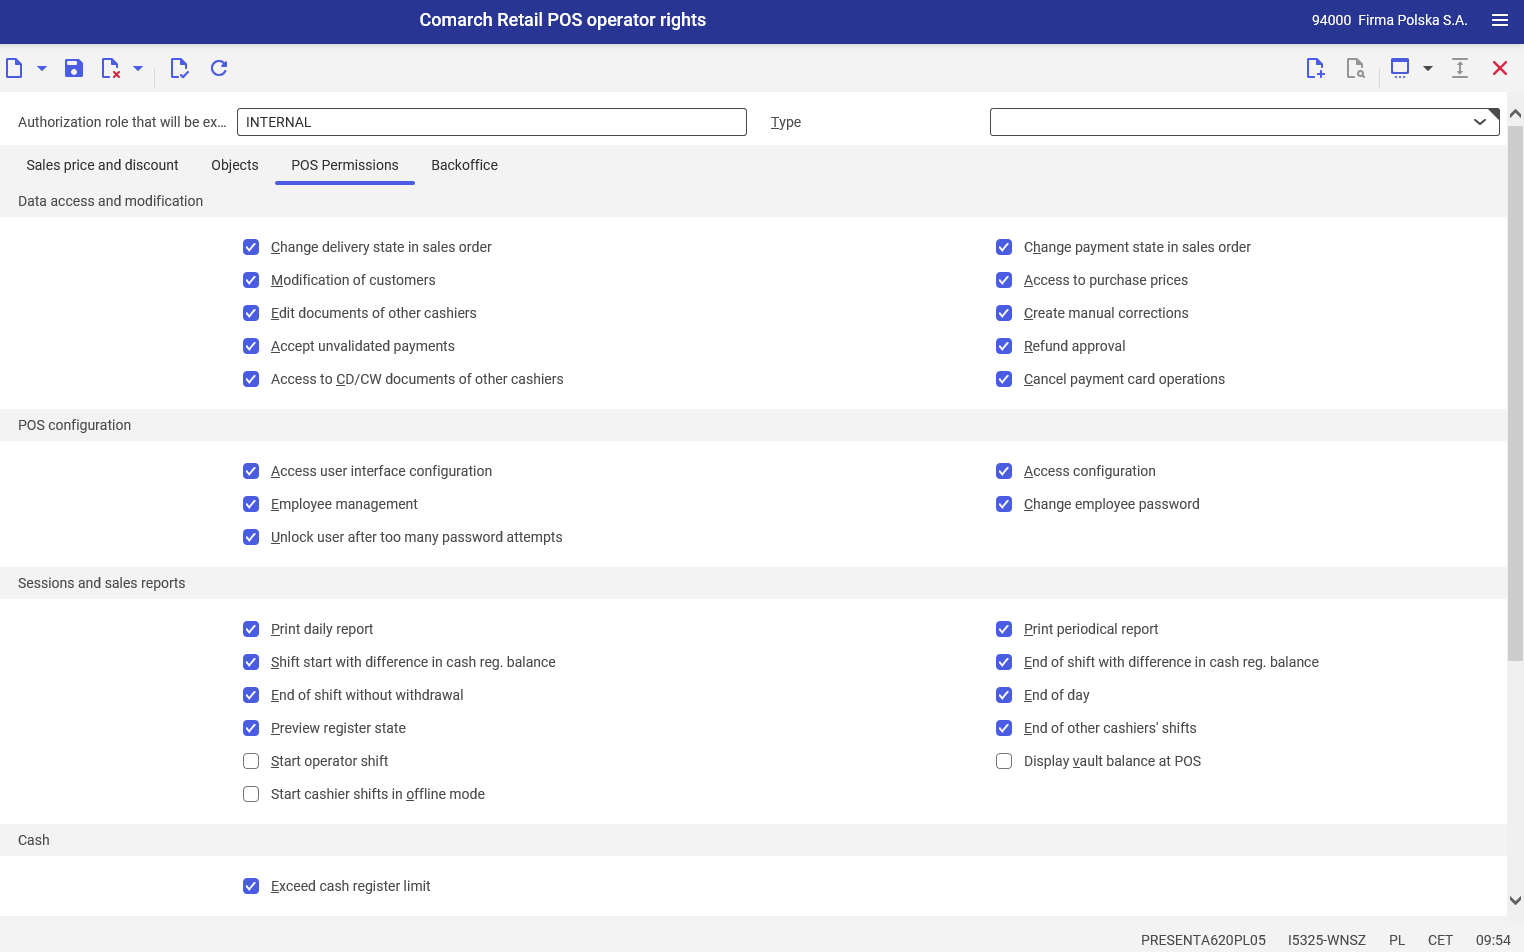
POS Permissions tab
The tab is used to configure the general settings of the POS workstation, for example to determine if a given authorization role has access to the pricing configuration. The system makes it possible to define additional rights for operator roles, dedicated to operations performed on POS workstations. These rights are available on the POS Permissions tab. Comarch POS application verifies the sum of operator privileges, i.e. if an operator has several authorization roles and at least one of them assumes the right to a given action, then the operator will be able to perform this action on the POS workstation.
More information on the individual fields of the Comarch Retail POS operator rights application may be found in the article Application Comarch Retail POS operator rights.
Adding a new workstation to the sales channel
In order to create a new workstation, it is necessary to define an associated sales channel and assign the workstation’s user groups.
To configure a new workstation, open the application Comarch Retail POS terminals available in the Multi-channel sales framework.
Required configuration of a new workstation
Only the necessary configuration of the POS workstation is described below; more information about particular fields and parameters may be found here .

The following fields in the header of the Comarch Retail POS terminals must be filled in in order to save a new POS workstation:
- Point of sale code – the code of the new point of sale composed of a type defined in the Comarch Retail POS Terminal types and a unique code

- Description – an additional description of the new workstation
- Related sales channel of multi-channel sales – a sales channel in which the new POS workstation is to be created
- Is active – after activating the parameter and exporting the POS workstation, the user will be able to log in to the workstation. If the parameter is deactivated, it is not possible to log in.
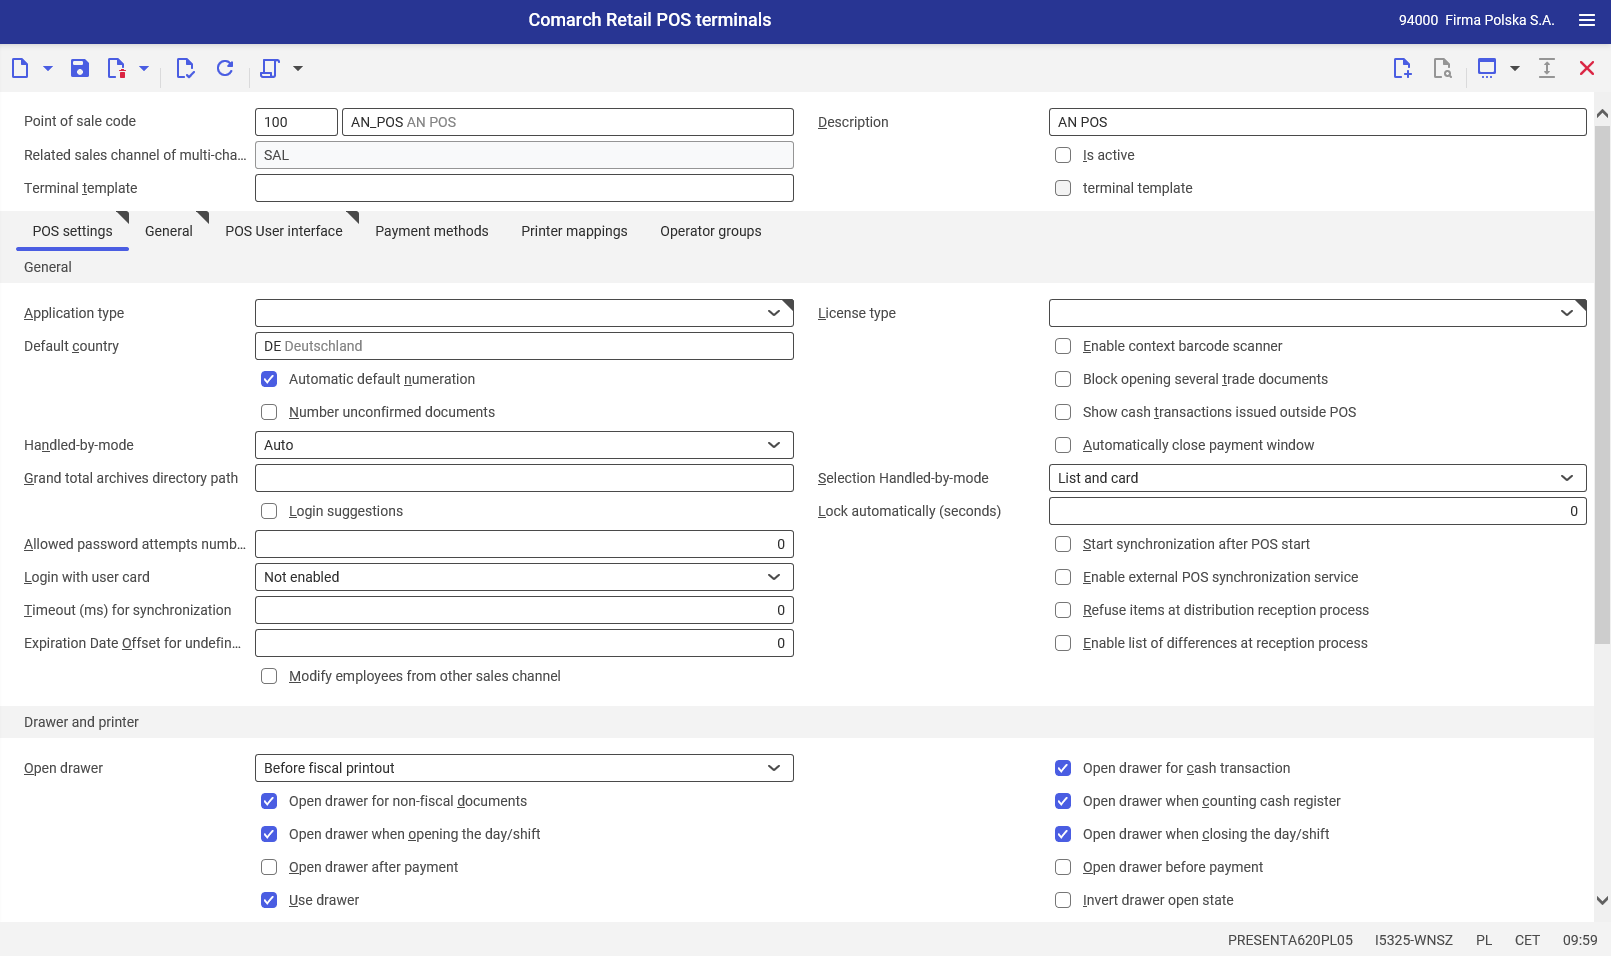
POS settings tab
On the POS settings tab, in the General section, it is necessary to specify a license type depending on the product.
- Application type – in this field, it is necessary to define the product for which the license is to be selected. Available options include:
- mPOS
- POS
- License type – in this field, it is necessary to select which modules are to be supported on the workstation:
- Front- and backoffice – the sales and warehouse functionalities
- Backoffice only – the warehouse functionality
- Front only – the sales functionality
Payment methods tab

On this tab, it is necessary to define payment methods for the POS workstation. A new payment method may be defined in the system by selecting the [Add] button. Also, the following parameters may be determined for particular payment methods:
- Customer price hierarchy – this informational field allows the user to specify a classification for customer prices. Customer price classifications are defined in the Classifications application
- Show by default – it determines whether a payment method should be displayed as default
- Use with credit limit – it makes it possible to use options verifying a credit limit for payments of the Bank transfer or Check type
- Reset balance at day closing – it defines whether payment balances are to be automatically zeroed at the end of day
- Grouped – the grouping of payment methods is used to improve the presentation of payment methods in the payment window of Comarch POS. For instance, if there are several payment methods of the Voucher type in the system and they are marked as grouped, selecting the Voucher payment method tile on the POS workstation opens a window with methods grouped for this type of payment
- Default of group – if the Grouped parameter has been selected, it determines whether a payment method is default for a group
- Include in the vault – activating this parameter makes it possible to store a given payment method in the vault. The parameter is activated by default for such payment methods as Cash, Check, and External vouchers
Operator groups tab
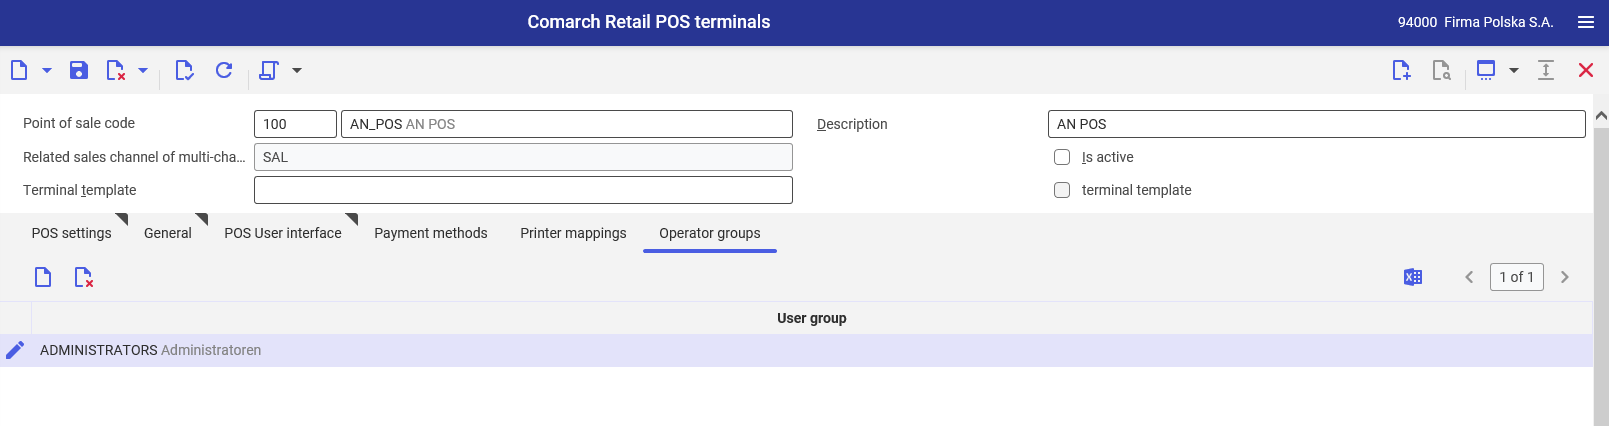
On the Operator groups tab, it is necessary to add all user groups that should have access to the created POS workstation. Using the [Add] button assigns a new user group whose members will be able to log in to the POS workstation.
A user group may be assigned to a sales channel in the application Comarch Retail POS user group assignment.
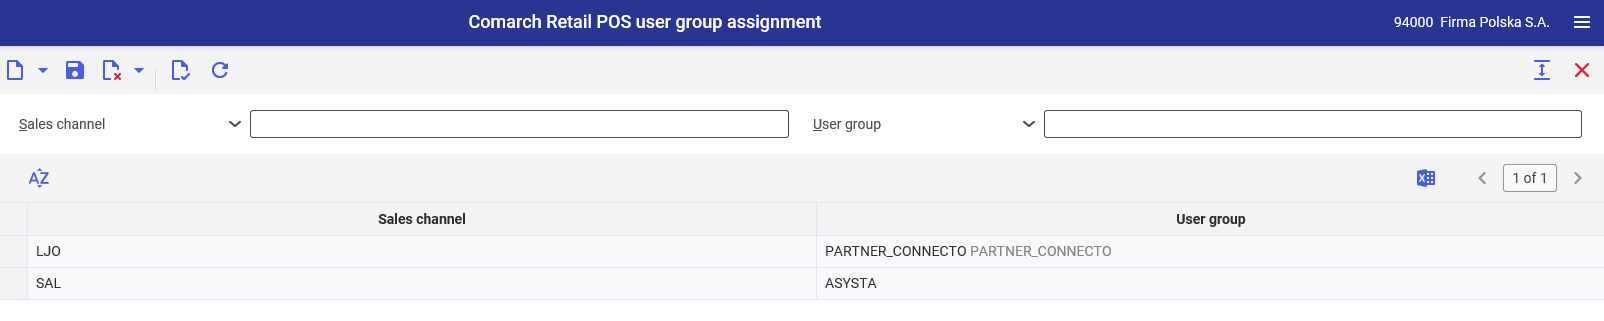
The application Comarch Retail POS user group assignment makes it possible to associate selected user groups with a sales channel. Owing to this, it is possible to manage user group rights on all POS workstations assigned to a given sales channel.
Selecting the [New] button adds a new table row, enabling the user to define particular values in the columns:
- Sales channel – a sales channel to which a user group is to be assigned
- User group – a user group assigned to a given sales channel
Action buttons
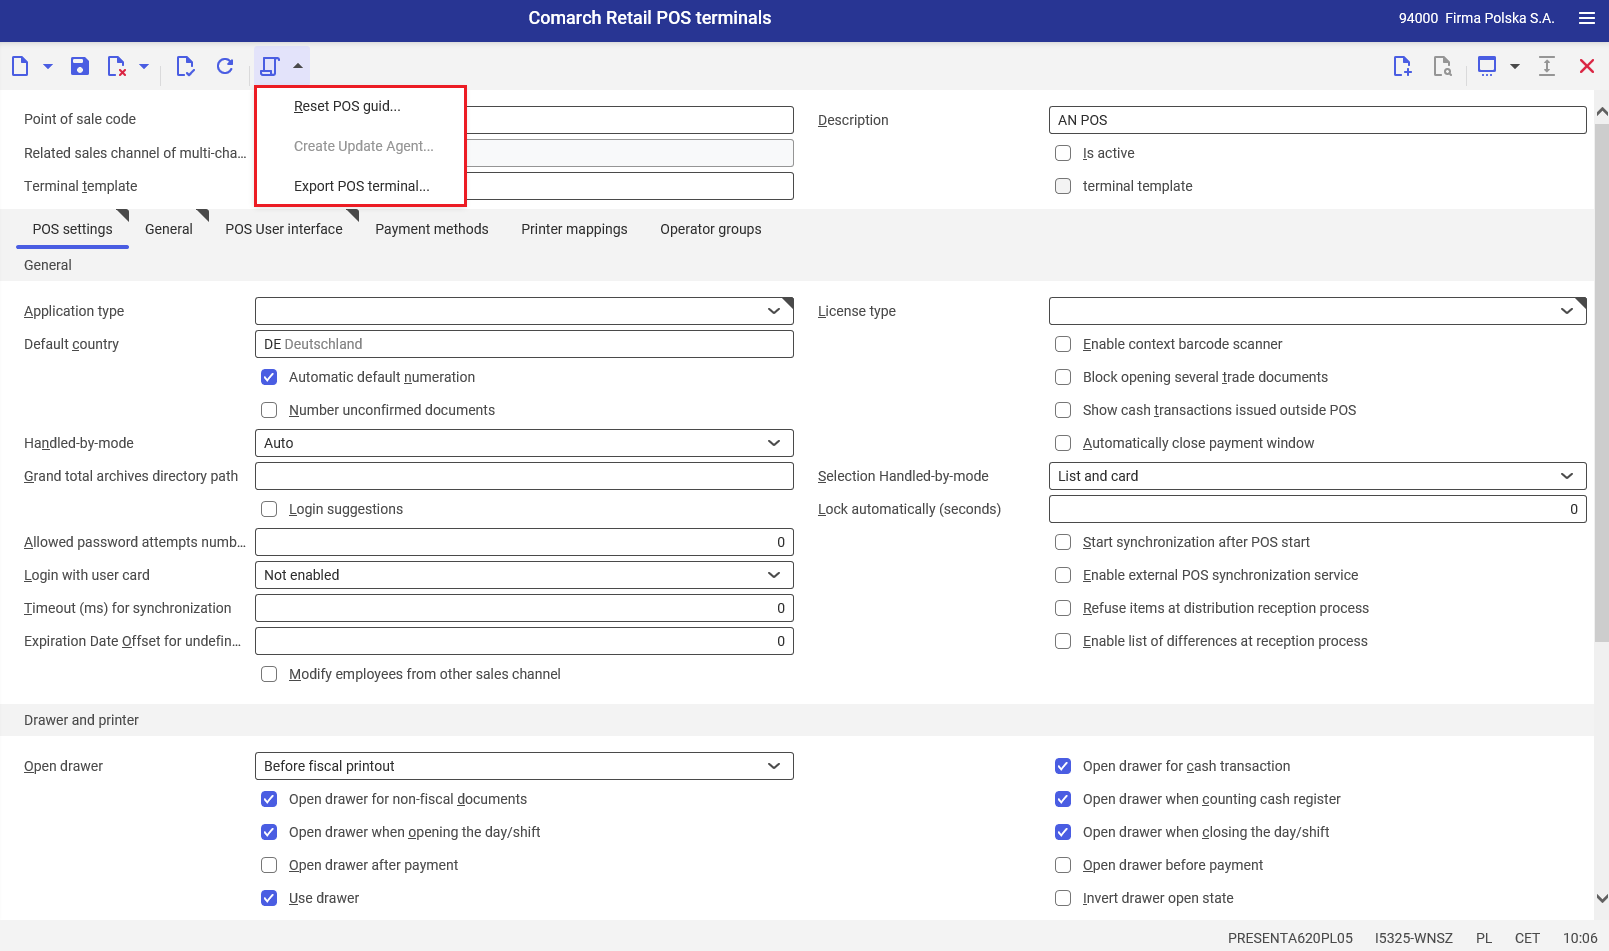
Once the required configuration settings are defined, the user should/can select the [Select action] button in the standard toolbar. The button enables the user to select one of the following actions:
- [Reset POS guid] – it allows resetting the GUID of the POS workstation, making it possible to reconnecting to this workstation
- [Create Update Agent] – it allows activating Comarch ERP Auto Update via Comarch ERP Enterprise
- [Export POS terminal] – it allows exporting the POS workstation from the system, making it possible to use the workstation following necessary configuration
Exporting a workstation
In order to enable logging in to a POS workstation, the workstation needs to be exported.
To export a saved workstation, it is necessary to:
- Select the button [Select action] in the standard toolbar and click [Export POS terminal]

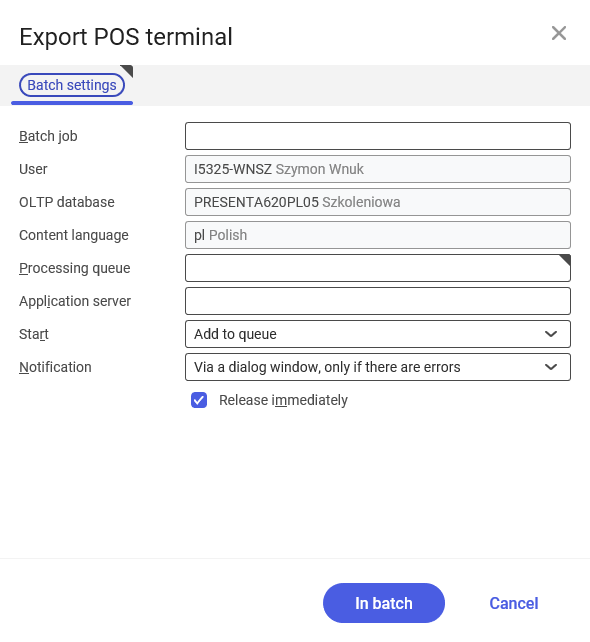
Some of the fields are filled in automatically; additionally, it is necessary to define:
- Processing queue – a relevant processing queue defined in the system should be selected. The processing queue determines the way in which a new task is to be processed. A default processing queue may be defined in the User settings application
- Application server – a relevant server should be selected. The system makes it possible to specify a batch job for a specific application server. A default application server value may be defined in the User settings application
Next, the [In batch] button should be selected to initiate background synchronization, after which the view should be refreshed.
A progress icon will be displayed in the bottom part of the screen. Progress can also be tracked in the Batch jobs application.
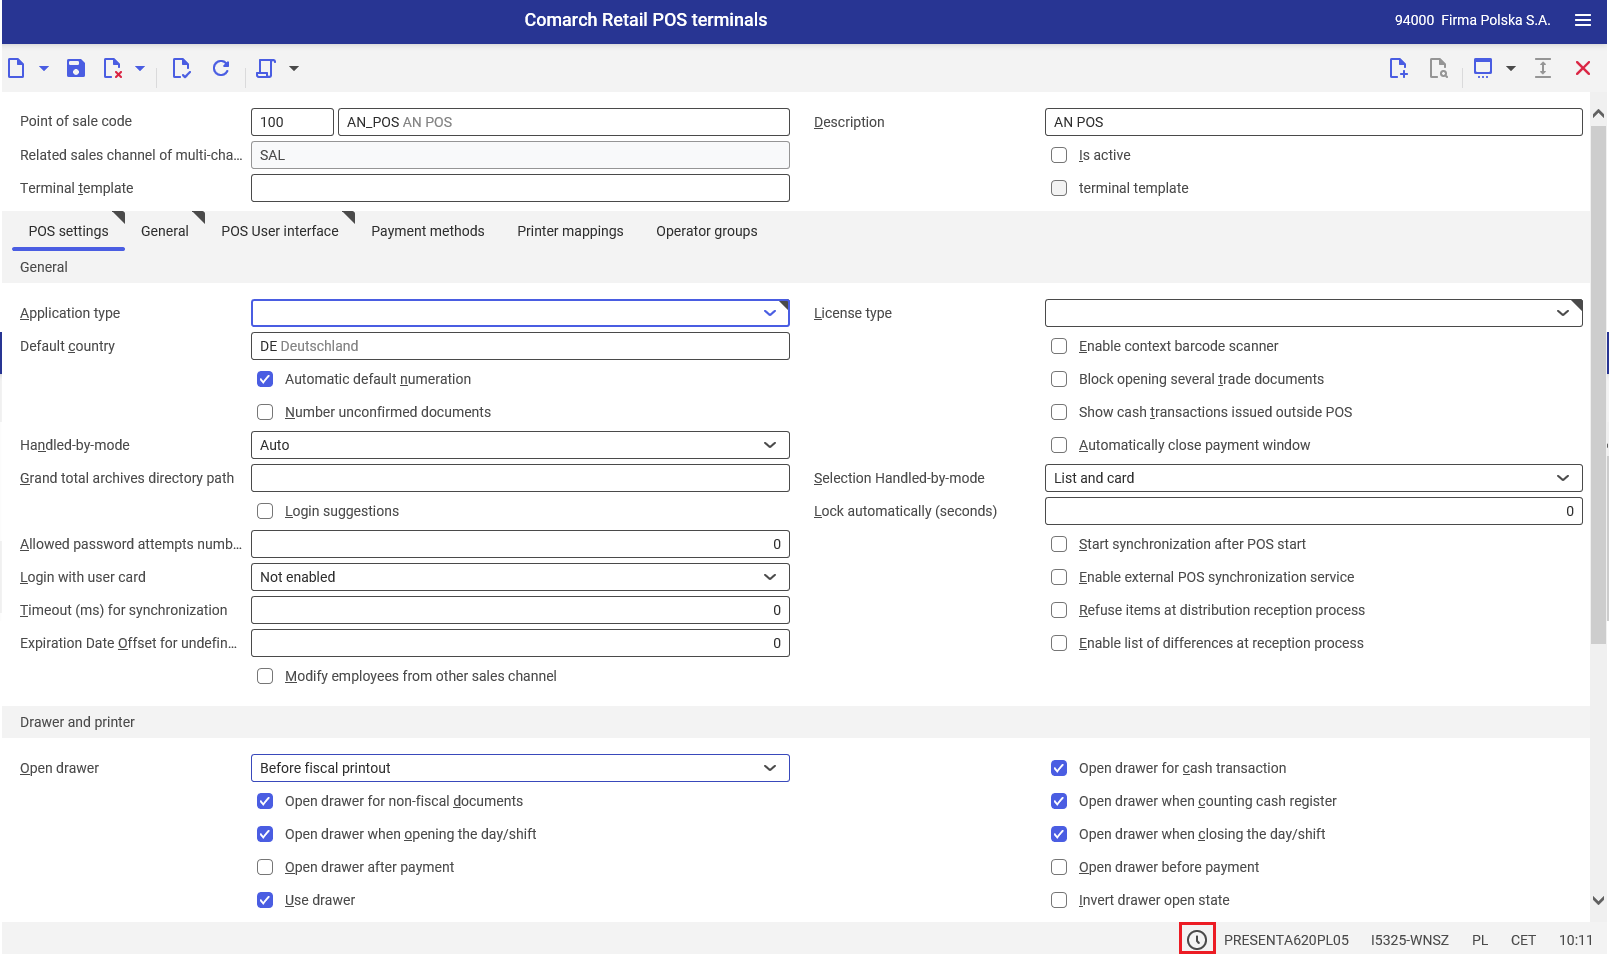
Once these steps are completed, the POS workstation is exported.
Exporting POS meta data
Using the POS export meta data application, basic configuration is created and the following data is synchronized to the POS workstation:
- Countries and regions
- Warehouses and collection points
- Currencies – exchange rates, denominations and cash limits
- Payment methods and their availability on cash register devices
- Units
- VAT rates
- Document types and their number ranges
- Price types and lists (price or discount values)
- Item characteristics, classifications
- Configuration of items and customer attributes
- Customer and item groups (classifications)
- Subsidiary and company data
- Trading periods
- Printouts and layouts
- POS workstation configuration
- Customer card types
- Coupon types
- Barcode rules
- Field validations
- General directories
The POS export meta data application is used to synchronize data entered in the ERP system to the POS workstation.
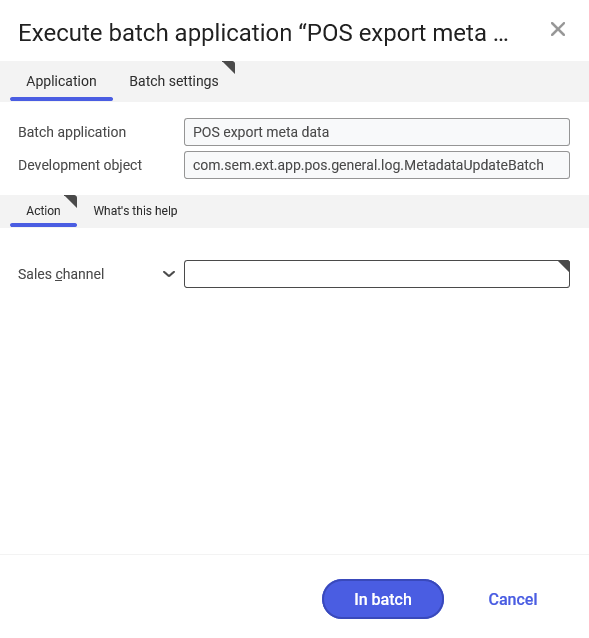
In order to export meta data to the POS workstation, it is necessary to:
- Open the POS export meta data batch application
- Fill in the field available on the Application tab (Action section):
- Sales channel – a sales channel for which meta data is to be updated on the POS workstation
- Fill in the fields on the Batch settings tab
- Click the [In batch] button
POS meta data is exported when the batch job has the status Closed.
Exporting items, item availability, price lists, and partners
When performing the first export for the entire sales channel, it is additionally required to export the following objects (in the following order):
1. Items
2. Item availability – if the Warehouse inventory management parameter is activated in the sales channel, it is also required to run the Export item availability application after exporting items
3. Price lists
4. Partners
Exporting items
Items can be exported using the Export items batch application. It generates data on the POS workstation for all items on the assortment list of the sales channel.
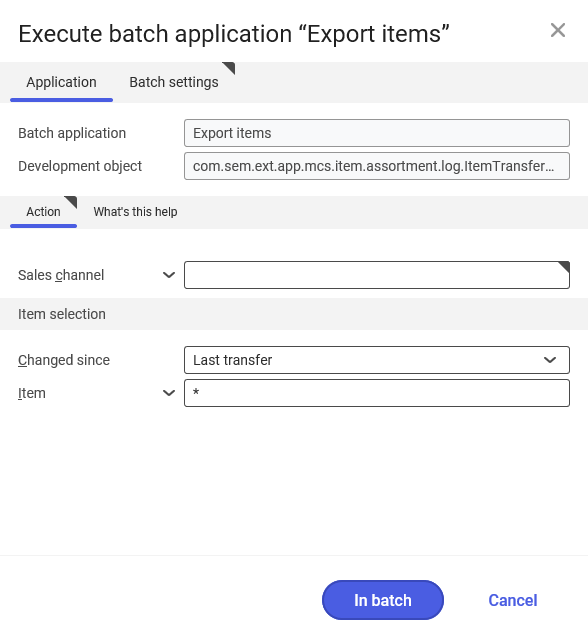
- Open the batch application Export items
- Fill in the field available on the Application tab (Action section):
- Sales channel – a sales channel for which items are to be updated on the POS workstation. If the configuration of sales channels for a sub store is used, a master channel must be selected.
- It is also possible to select a specific item:
- Item – an item whose data is to be exported. The “*” character can be used to select all items added to the assortment list.
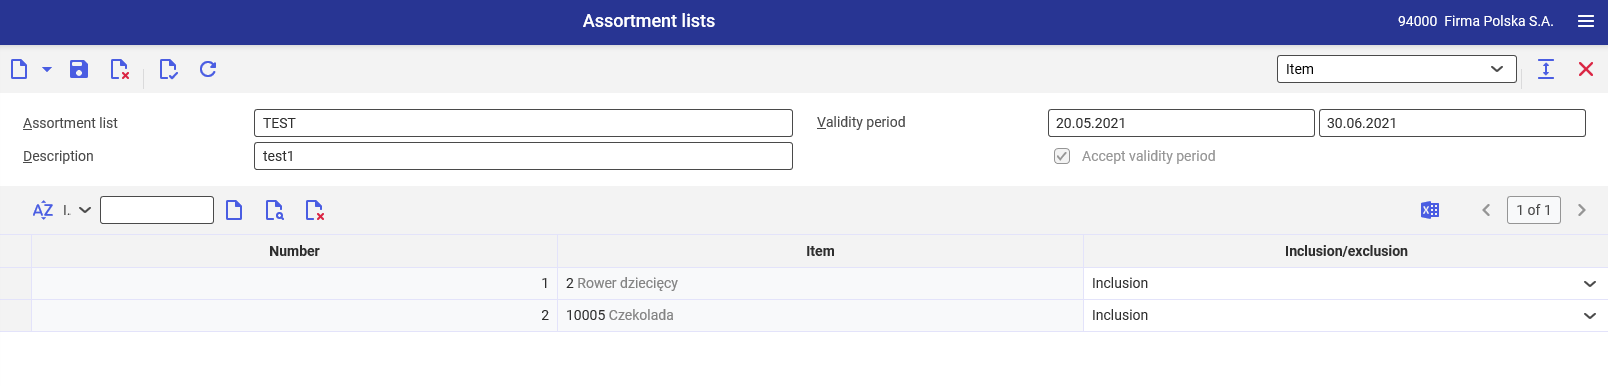
1. In the first step, add items to the assortment list in the Assortment lists
2. Next, in the Assortment listings application, create a new listing for a relevant organization that would include the previously created assortment list.
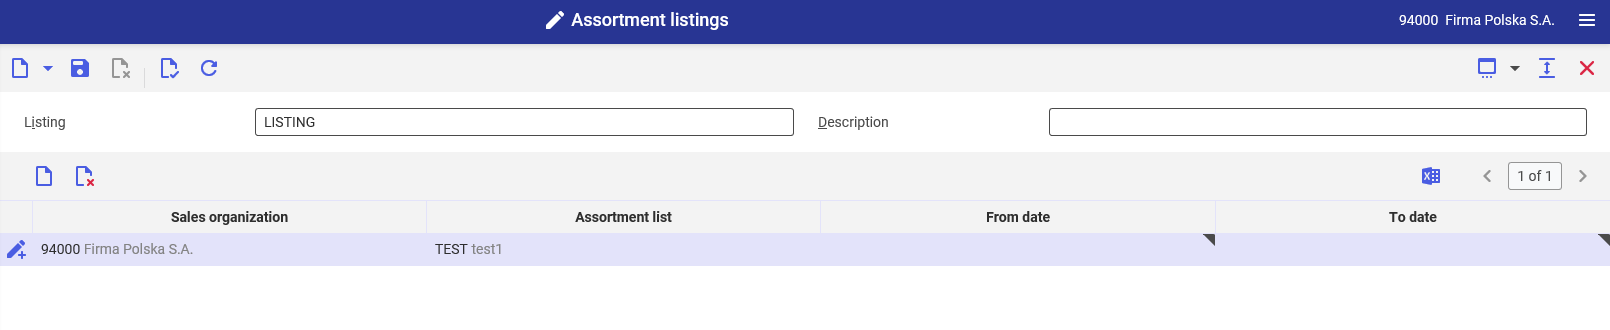
3. Finally, a given listing must be selected in the Sales channels application, in the Assortment listing field
[/alert]
- Changed since – it specifies a moment in time that should be the basis of the synchronization:
- Anytime – all information on a given item will be once again sent to the POS workstation
- Last transfer – changes made following the last export will be sent to the POS workstation
- Fill in the fields on the Batch settings tab
- Click the [In batch] button
Partners are exported once the relevant batch job is assigned the status Closed.
Exporting item availability
The batch application Export item availability updates the stock levels of available items. Following the export, the current stock levels may be previewed in the application Cockpit: Sales channel item availability for all subsidiaries.
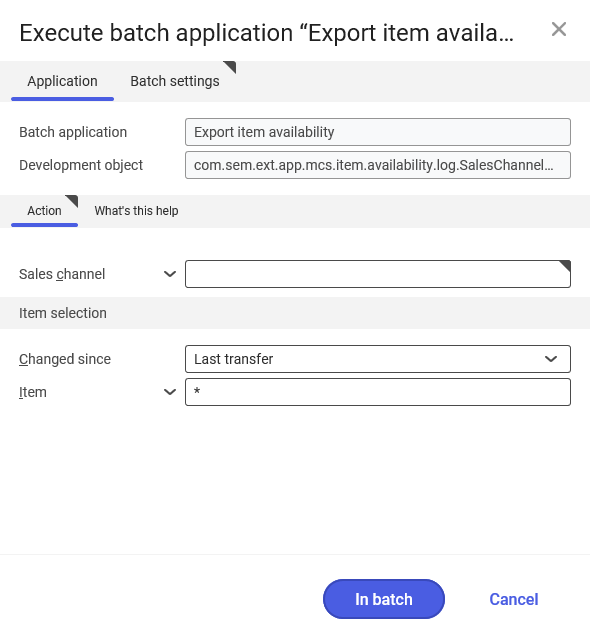
In order to export item availability to the POS workstation, it is necessary to:
- Open the batch application Export item availability
- Fill in the field available on the Application tab (Action section):
- Sales channel – a sales channel for which item availability statuses are to be updated on the POS workstation. If the configuration of sales channels for a sub store is used, a master channel must be selected.
- It is also possible to select a specific item:
- Item – an item whose data is to be exported. The “*” character can be used to select all items added to the assortment list.
- Changed since – it specifies a moment in time that should be the basis of the synchronization:
- Anytime – all information on a given item will be once again sent to the POS workstation
- Last transfer – changes made following the last export will be sent to the POS workstation
- Fill in the fields on the Batch settings tab
- Click the [In batch] button
Item availability export is performed once the relevant batch job is assigned the status Closed.
Exporting POS sales price lists
The batch application POS Export sales price lists is used to transfer current and future sales prices to the POS workstation. To use this type of price export, the user must activate the parameter Allow extended export of prices for the sales channel supporting Comarch POS. If the parameter is not activated, export is performed with the use of the Export sales price lists application.
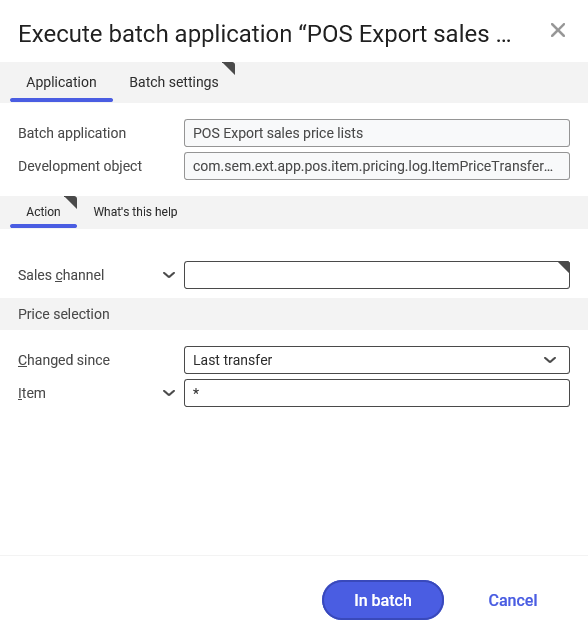
In order to export sales price lists to the POS workstation, it is necessary to:
- Open the batch application POS Export sales price lists
- Fill in the field available on the Application tab (Action section):
- Sales channel – a sales channel for which items are to be updated on the POS workstation. If the configuration of sales channels for a sub store is used, a master channel must be selected.
- It is also possible to select a specific item:
- Item – an item whose data is to be exported. The “*” character can be used to select all items added to the sales price listing.
- Changed since – it specifies a moment in time that should be the basis of the synchronization:
- Anytime – all information on a given item will be once again sent to the POS workstation
- Last transfer – changes made following the last export will be sent to the POS workstation
- Fill in the fields on the Batch settings tab
- Click the [In batch] button
Price lists are exported once the relevant batch job is assigned the status Closed.
1. Create a new sales price listing in the Sales price listings application
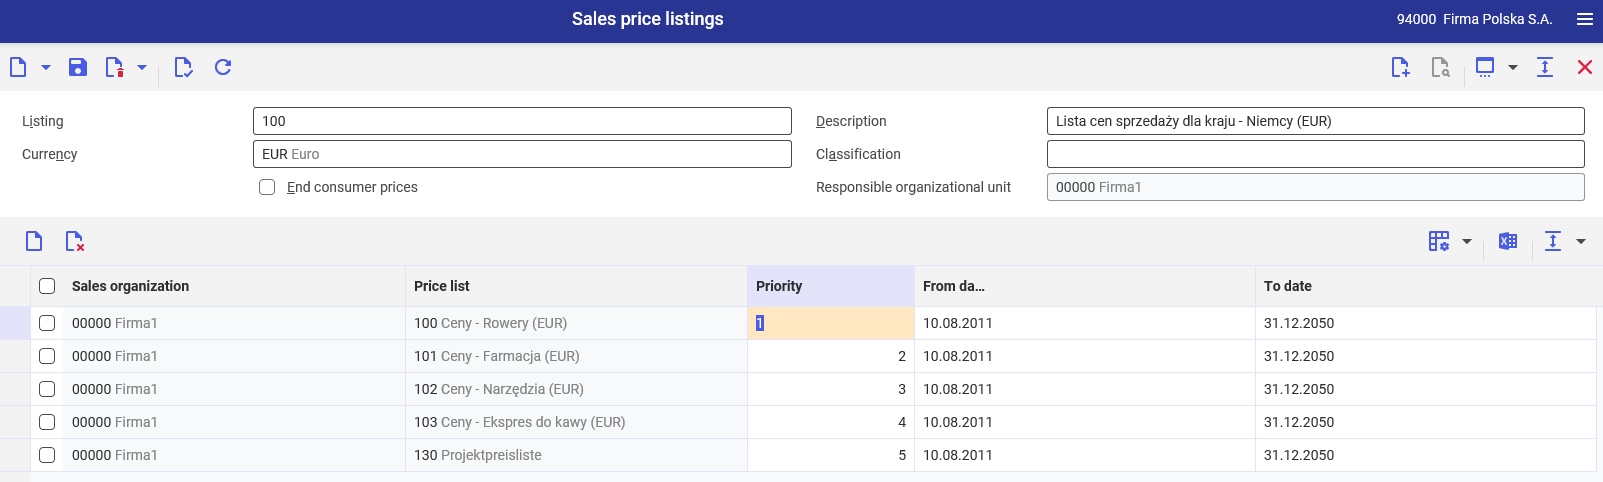
2. Add the created sales price listing in the Sales channels application in the Sales price listing fields on the B2C and B2B
If sales channels of the sub/master store types are created, the sales price list needs to be assigned to the master channel.
Exporting partners
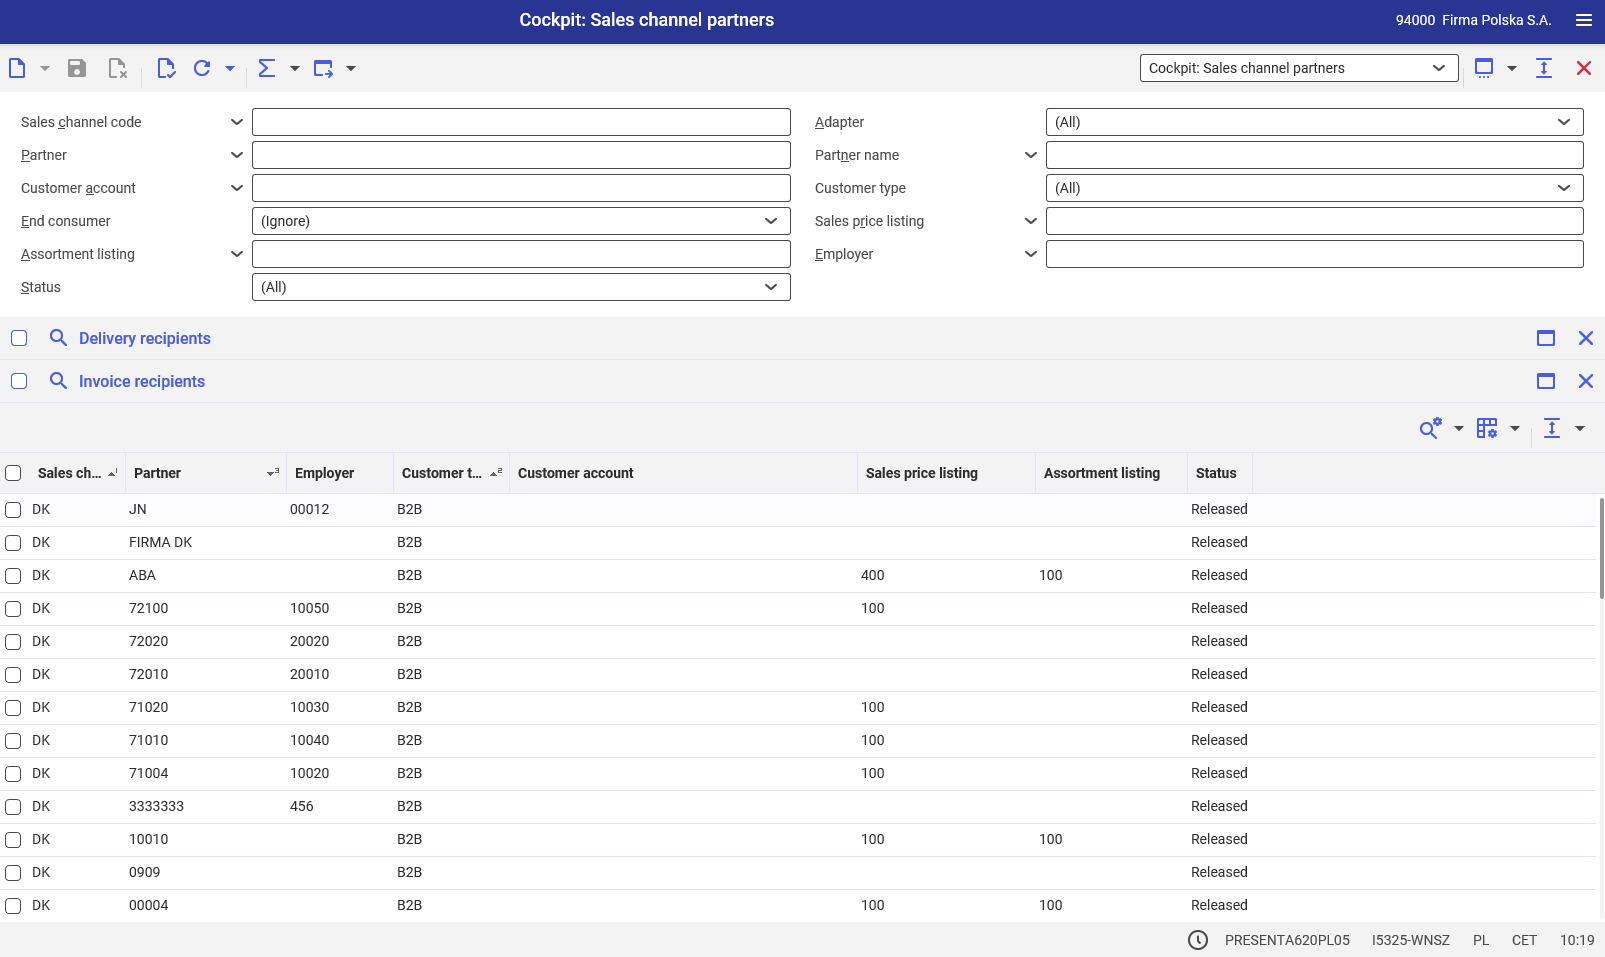
The batch application Export customers makes it possible to export partners and address data to Comarch POS. To do so, a given partner must be previously assigned to the sales channel in the application Sales channel partners.
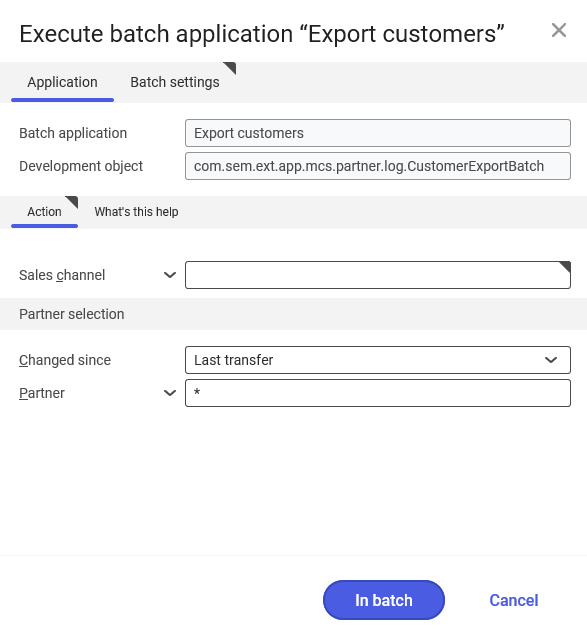
In order to export partners to the POS workstation, it is necessary to:
- Open the batch application POS Export sales price lists
- Fill in the field available on the Application tab (Action section):
- Sales channel – a sales channel for which items are to be updated on the POS workstation. If the configuration of sales channels for a sub store is used, a master channel must be selected.
- It is also possible to select a specific item:
- Partner – a partner whose data is to be exported. The “*” character can be used to select all partners assigned to a given sales channel in the Sales channel partners application
- Changed since – it specifies a moment in time that should be the basis of the synchronization:
- Anytime – all information on a given customer will be once again sent to the POS workstation
- Last transfer – changes made following the last export will be sent to the POS workstation
- Fill in the fields on the Batch settings tab
- Click the [In batch] button
Partners are exported once the relevant batch job is assigned the status Closed.
1. Add partners in the Sales channel partners application
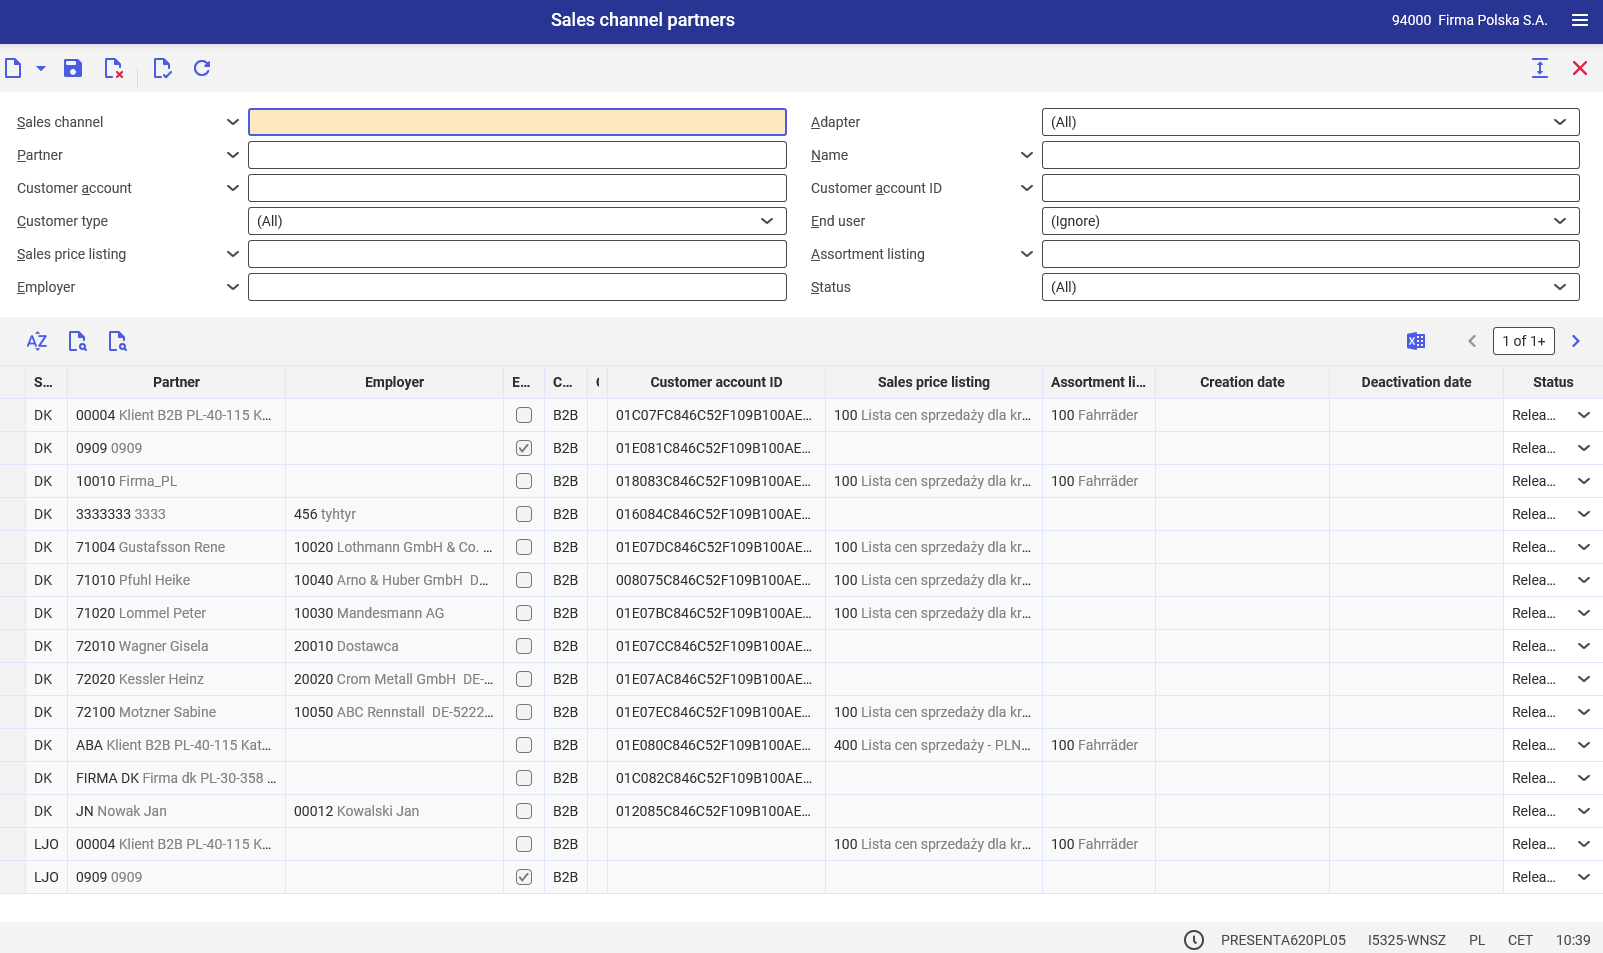
2. Define the following data:
- Sales channel
- Partner
- Customer type – in the case of Comarch POS, it is always the B2B type
To set a password for the POS user, open the application POS change password and PIN for any user.
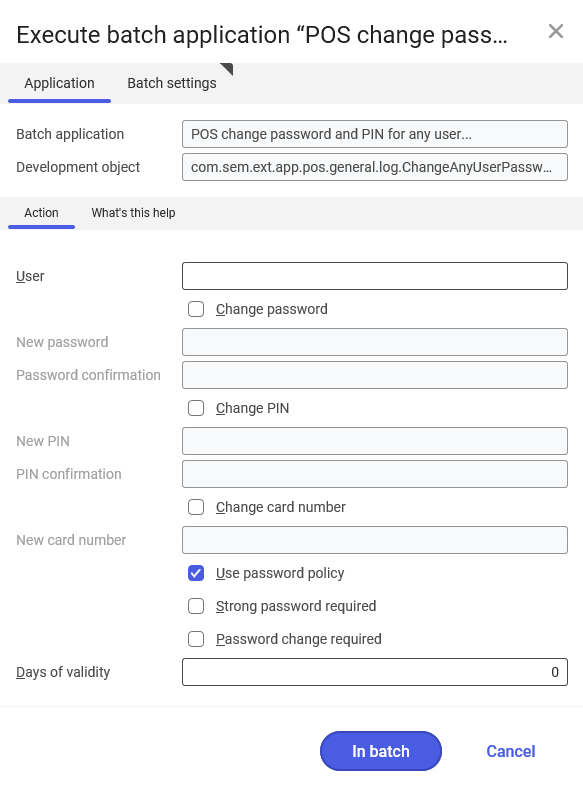
In order to change a user password, it is necessary to activate the Change password parameter and enter the new password in the fields New password and Password confirmation. Next, click the [In batch] button and export POS meta data.
Certificate
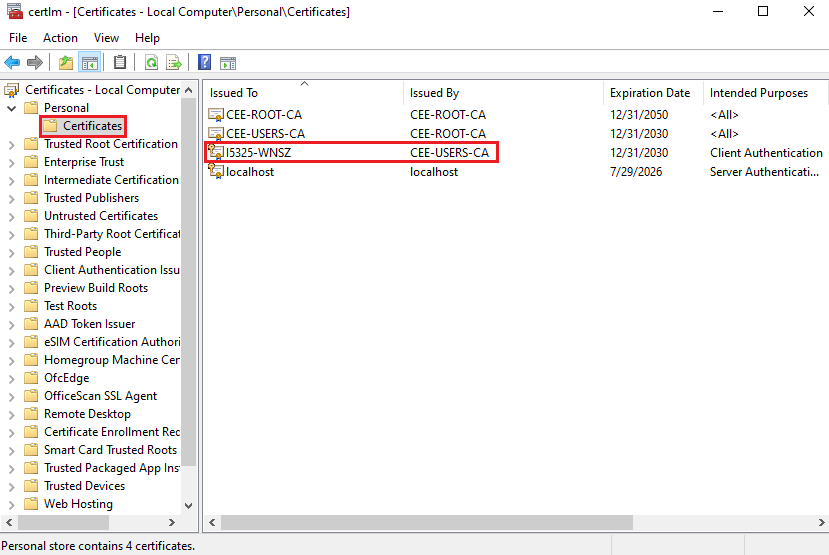
Synchronization between Comarch ERP Enterprise and the POS workstation is performed with the use of the CEE user certificate.
The certificate must be located on the workstation computer in the current user’s certificate directory. It is necessary to make sure that there is only one certificate of a given name in the certificate directory of the workstation.
1. Open the Windows application Manage computer certificates
2. Add the CEE certificate in the personal certificates directory
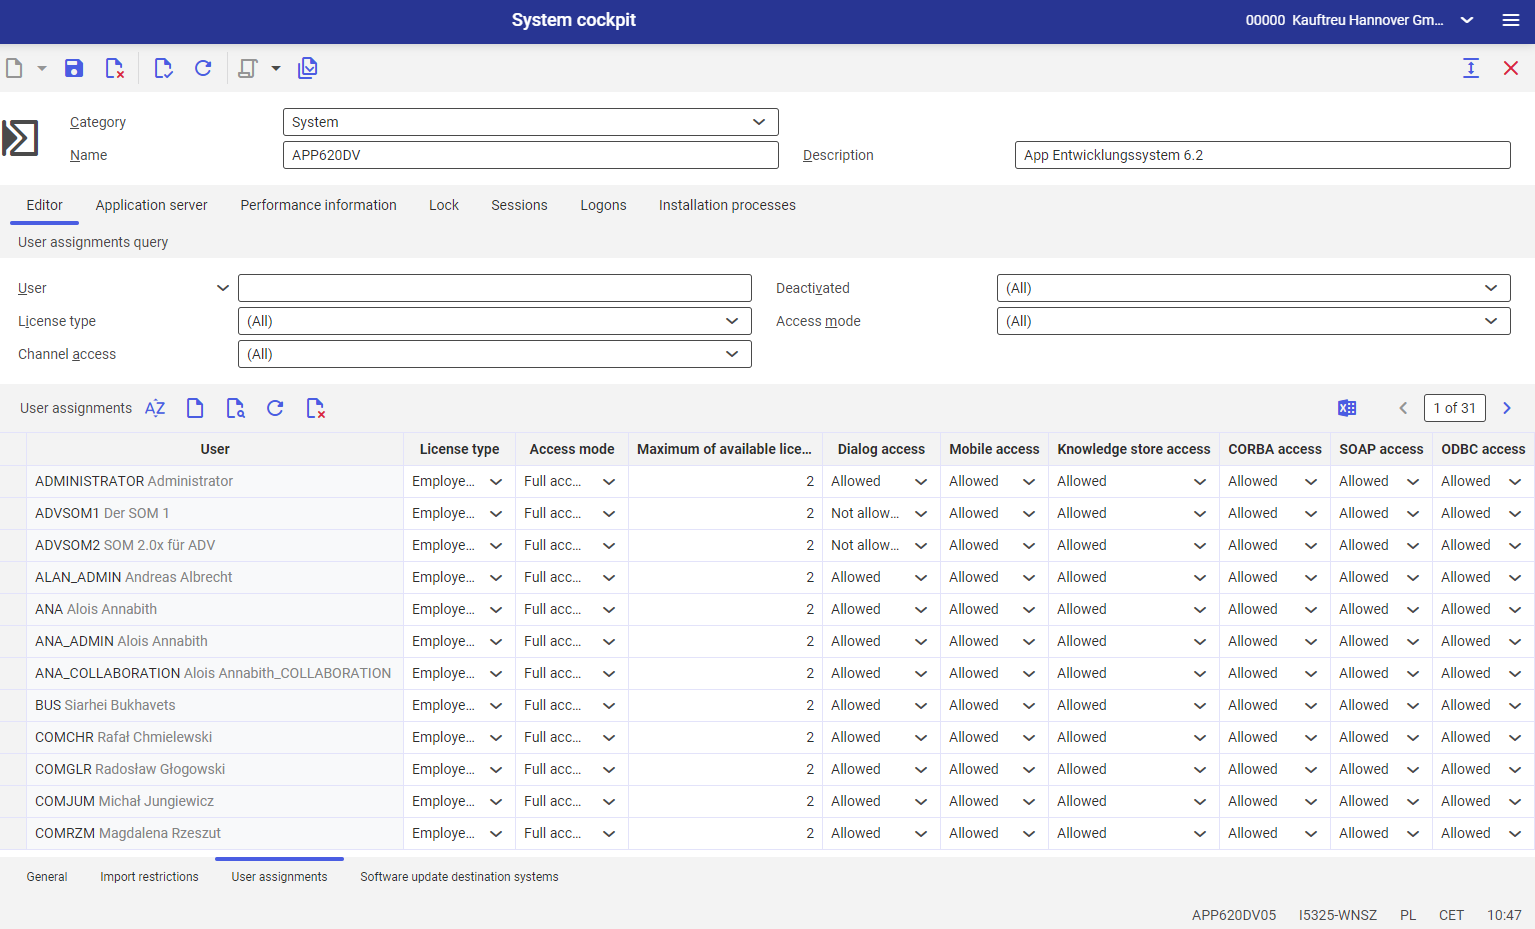
A Comarch ERP Enterprise user for whom a certificate has been issued must have SOAP access permissions.
To assign SOAP access permissions, it is necessary to complete the following steps:
1. Open the System cockpit application
2. Select System in the Category field
3. Open the bottom tab User assignments
4. Find or add the user for whom SOAP permissions are to be available
Comarch Retail POS Agent application
The Comarch Retail POS Agent application is available in the Multi-channel sales framework after activating the functions Multi-channel sales and Comarch Retail POS in the Customizing application.

Selecting the [New] button enables the user to define particular values in the fields:
- Code (required) – a Comarch POS Agent code (that needs to be entered in the Comarch POS Agent configuration tool)
- Host – the IP address of the Comarch POS Agent service (i.e. of the computer where the service has been installed). The value is non-editable and set automatically upon service registration
- Reconciliation timeout (s) – time (given in seconds) needed to exchange information on stock levels between the ERP system and Comarch POS Agent
- Reconciliation lock time – a timestamp until a request from the Import sales orders application is processed (during reconciliation). It is the sum of a reconciliation start time and a reconciliation timeout
- Time schedule stock reconciliation – this field makes it possible to schedule the automatic reconciliation of stock levels by Comarch POS. Schedules can be defined in the Time schedules application
After entering data in the Comarch Retail POS Agent application, it is necessary to export POS meta data.
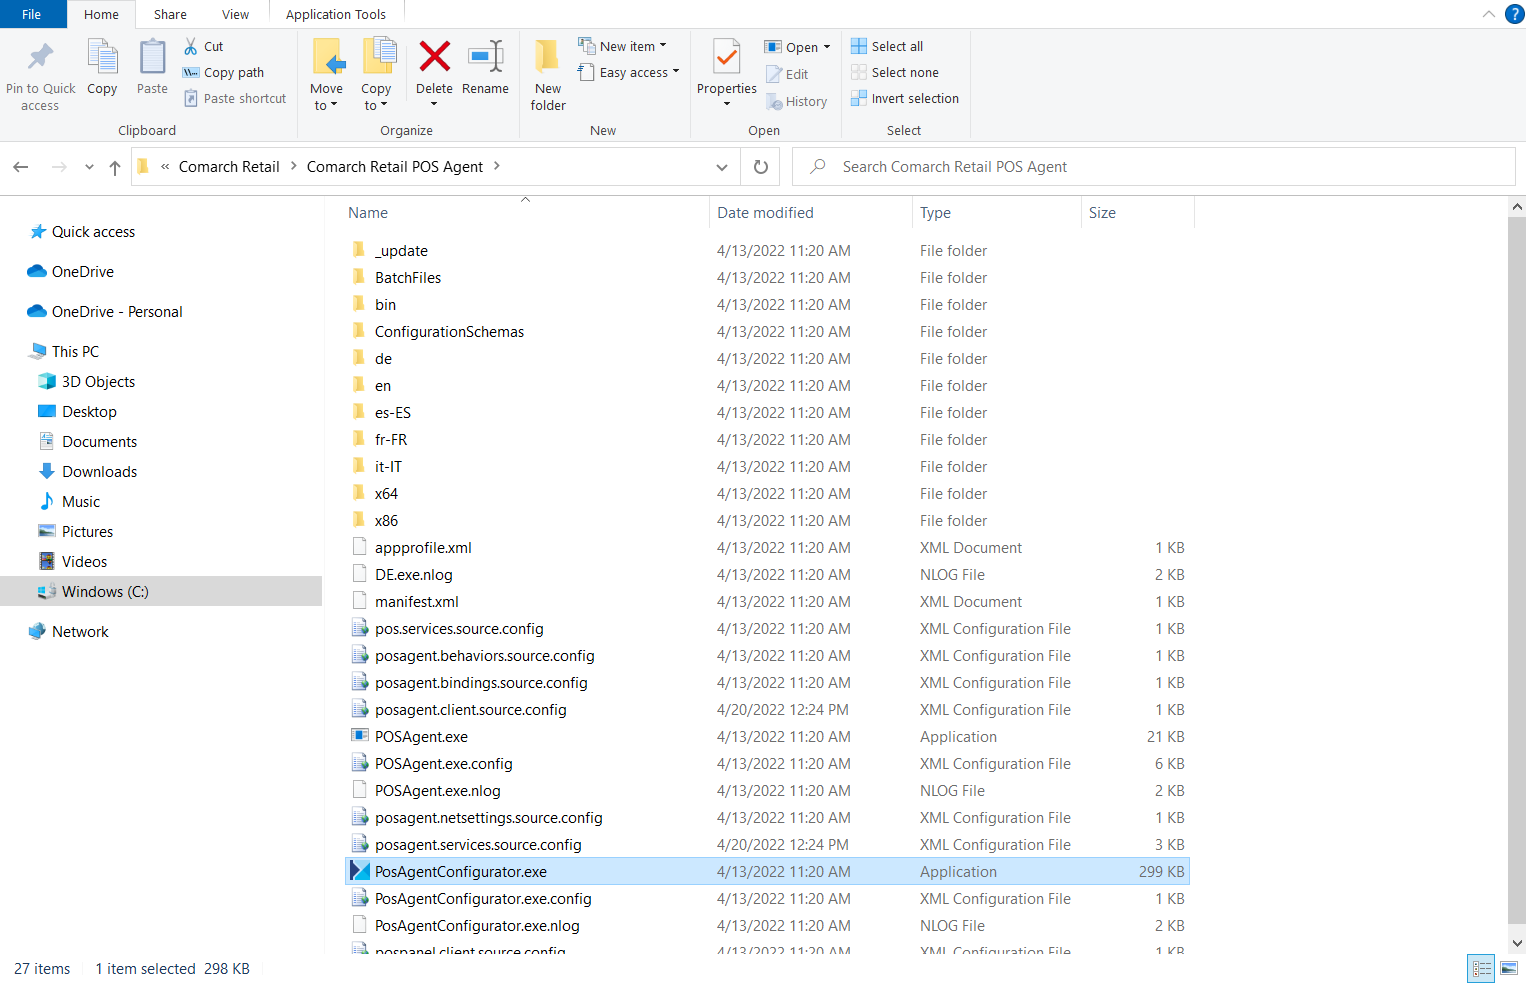
After exporting the data and downloading and installing the Comarch POS Agent in Comarch ERP Auto Update tool, navigate to the folder where Comarch POS Agent is located (the default path is C:\Program Files (x86)\Comarch Retail\Comarch Retail POS Agent).
1. The Comarch Retail → Comarch Retail POS Agent folder contains the exe application.
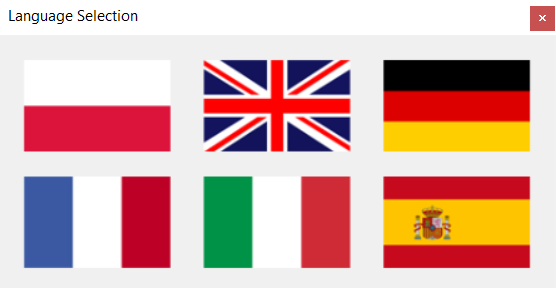
2. When the application is opened for the first time, a language selection window is displayed.
3. Also, when the application is opened for the first time, an error message is displayed, informing about the uninstalled service.
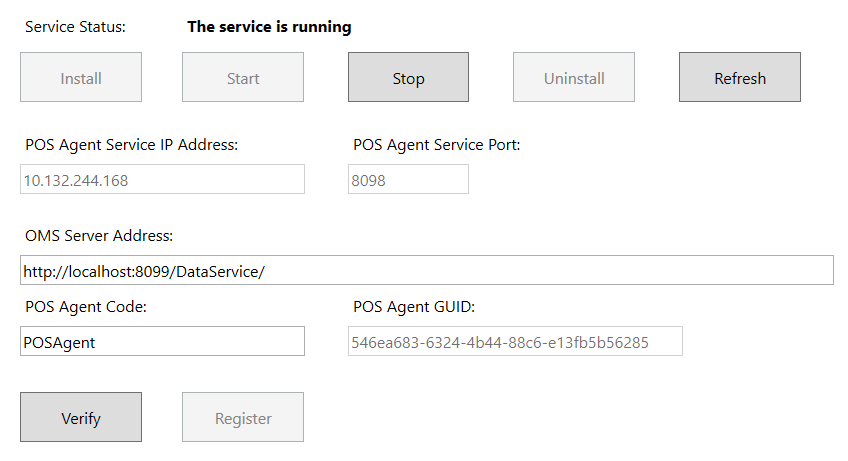
4. The error message needs to be confirmed with the [OK] button. Next, the configuration tool’s window is displayed:
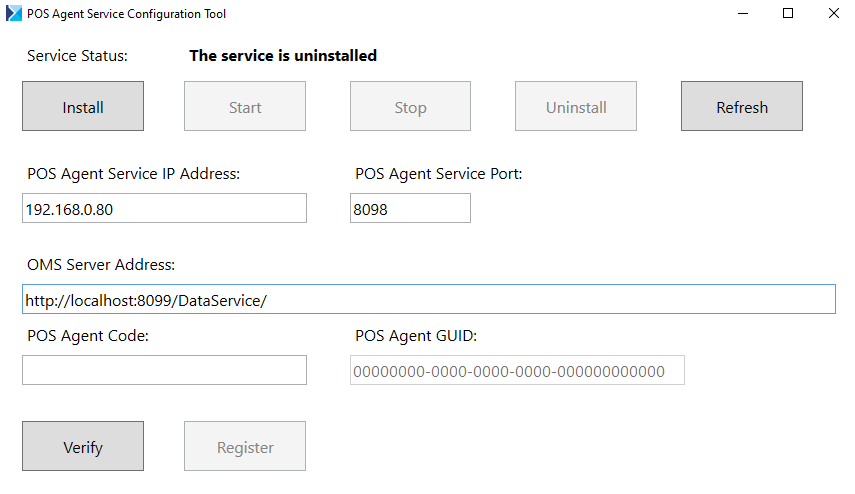
Before selecting the [Install] button, it is necessary to specify the following information:
- POS Agent Service IP Address – the field is automatically filled in with the IP address of a computer where the Comarch POS Agent service has been installed. In the case where the IP address is dynamic, it is necessary to set a permanent IP redirection for the Comarch POS Agent service; instead of the localhost name, the address 127.0.0.1 may be entered.
- POS Agent Service Port – the default port is 8098. It is possible to enter any available port.
- OMS Server Address – the default address is http://localhost:8099/DataService/; it is composed of:
- localhost – the address of the ERP system where the database is located
- 8099 – the default port of the synchronization service. If necessary, it is possible to enter a different port.
- POS Agent Code – the POS Agent code entered in the ERP system in the Comarch Retail POS Agent application
- POS Agent GUID – this value is assigned automatically after the correct registration of the service
After filling in all the abovementioned data in the Comarch POS Agent configuration tool, select the buttons in the following order:
- [Install]
- [Refresh]
- [Start] – a notification should be displayed, concerning the start of the service
- [Verify] (if the POS Agent code is entered) – it displays a window with information on the connection status
- [Refresh]
- [Register] – it automatically fills in the POS Agent GUID field in the configuration tool, as well as HOST, PORT, and GUID fields in Comarch ERP Enterprise system. Additionally, a window with information on the correct registration of the agent will be displayed.
Preliminary configuration on the POS workstation
In the first step, it is necessary to modify .config files located in the Comarch POS product directory. The default path is: C:\Program Files (x86)\Comarch Retail\Comarch Retail POS.
.config files
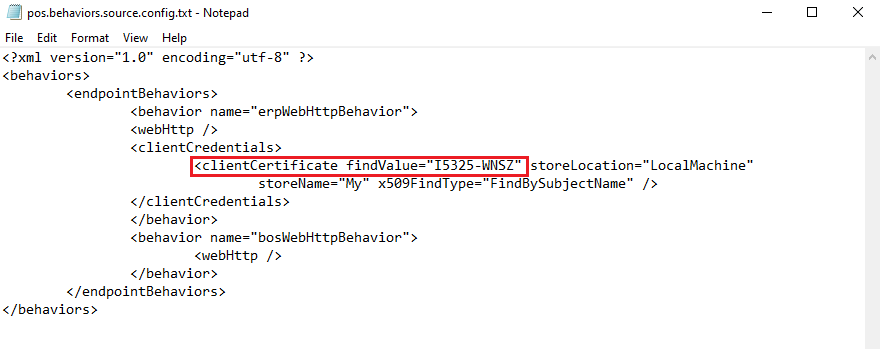
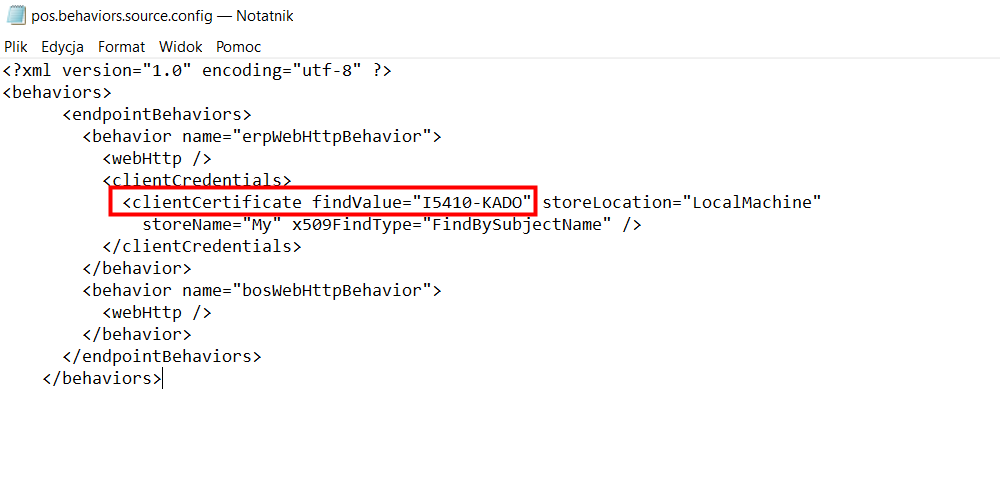
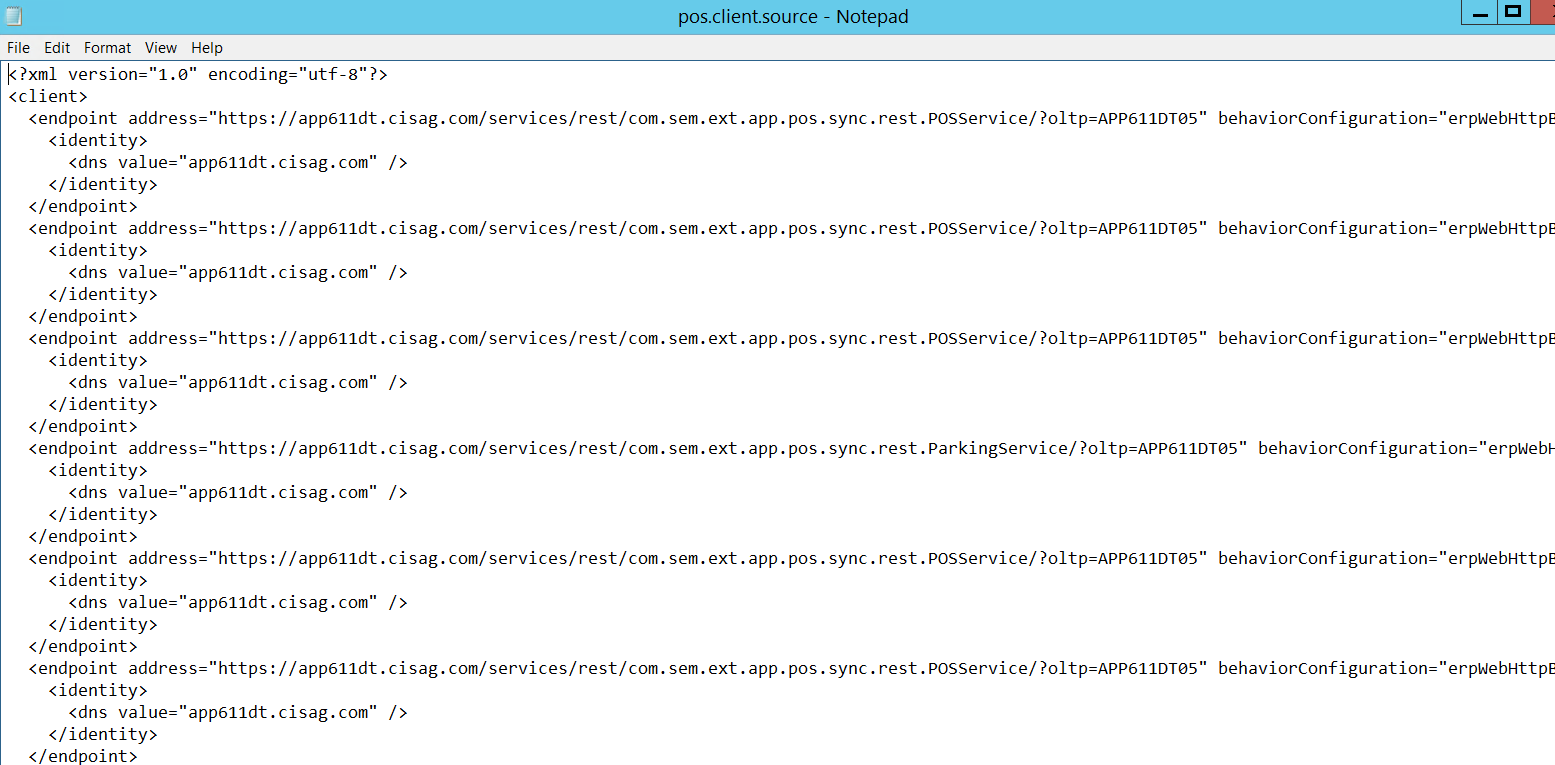
Essential changes in Comarch POS .config files:
1. behaviors.source.config file – change of the name of the user certificate
2. client.source.config file – change of address data for own Comarch POS Agent service
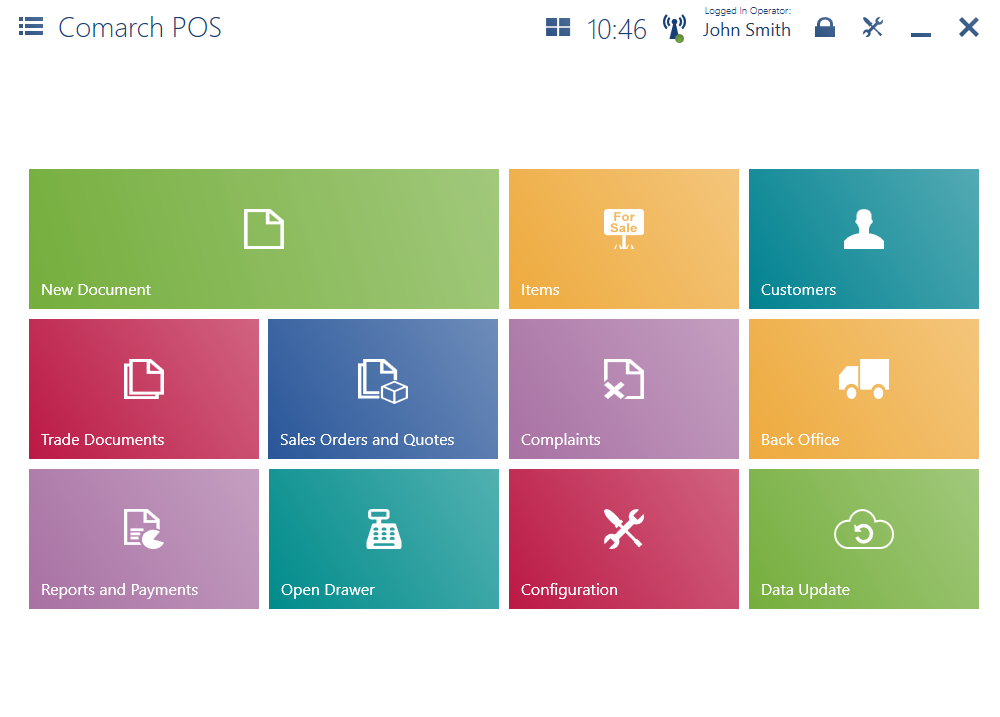
Comarch POS application
After installing Comarch POS application via Comarch ERP Auto Update, run the application. When it is run for the first time, complete the required configuration fields:
- POS Code – a POS workstation code created in the Comarch Retail POS terminals application in the ERP system
- POS Data Service Address and Port – the address of the system where the POS workstation has been created and an appropriate port
- POS Workstation Language – available languages include:
- Polish
- English
- German
- French
- Spanish
- Italian

The icon of a green dot with an antenna on the top bar of the application indicates that the workstation is properly connected to the services.
Upgrading Comarch POS product versions and installing quick fixes
In the case of version upgrades or installation of quick fixes (QFs) containing major system changes, especially related to data synchronization, it is required to complete the following steps:
1. Perform synchronization to transfer all data from POS workstations to Comarch ERP Enterprise system
2. Run the upgrade of the Comarch ERP Enterprise environment
3. At the same time, upgrade/upload QFs to the following components: Comarch POS, Comarch mPOS, Comarch POS Agent and Comarch POS Agent Broker.
4. After the upgrade, verify that the Data Service synchronization service is running correctly.
Duplicating a sales channel and Comarch POS workstation
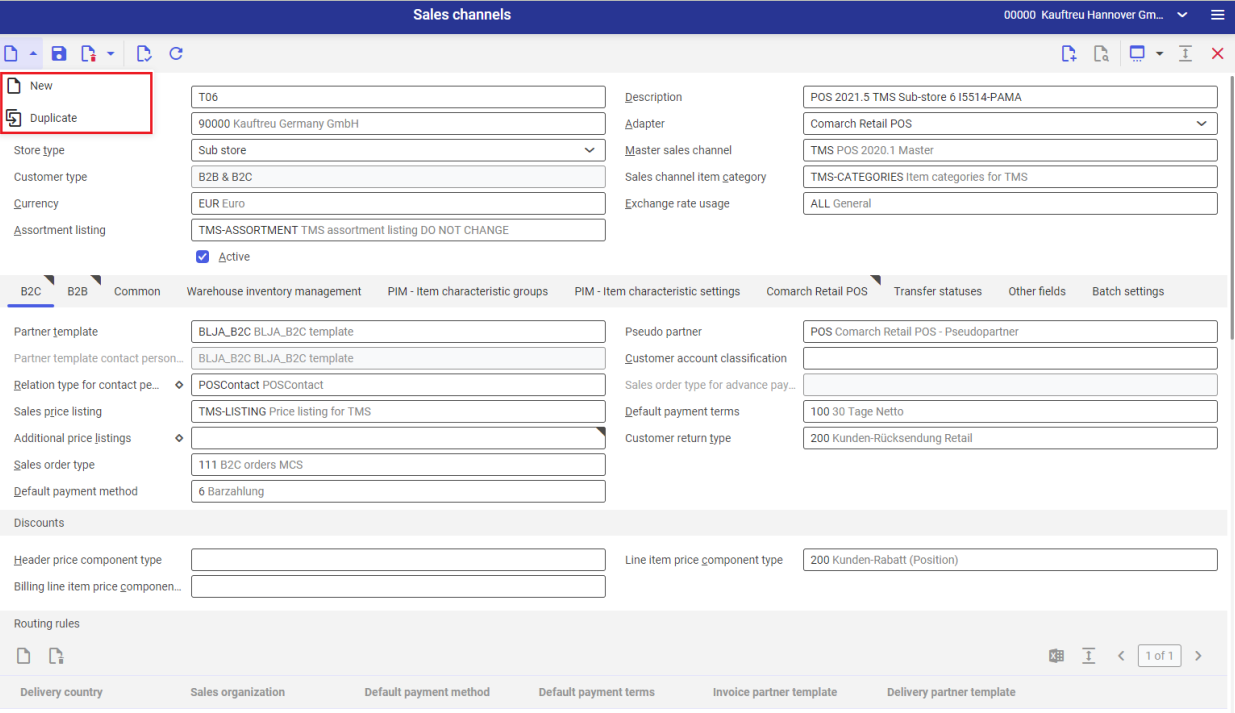
Duplicating a sales channel
In Comarch ERP Enterprise system, it is possible to copy the settings of a given sales channel. To do so, open the Sales channels application and select the [Duplicate] button under [New]. The newly added sales channel will be an exact copy of the selected channel.
Duplicating a POS workstation
In order to copy the settings of a selected Comarch POS workstation, open the Comarch Retail POS terminals application and select the [Duplicate] button under [New].
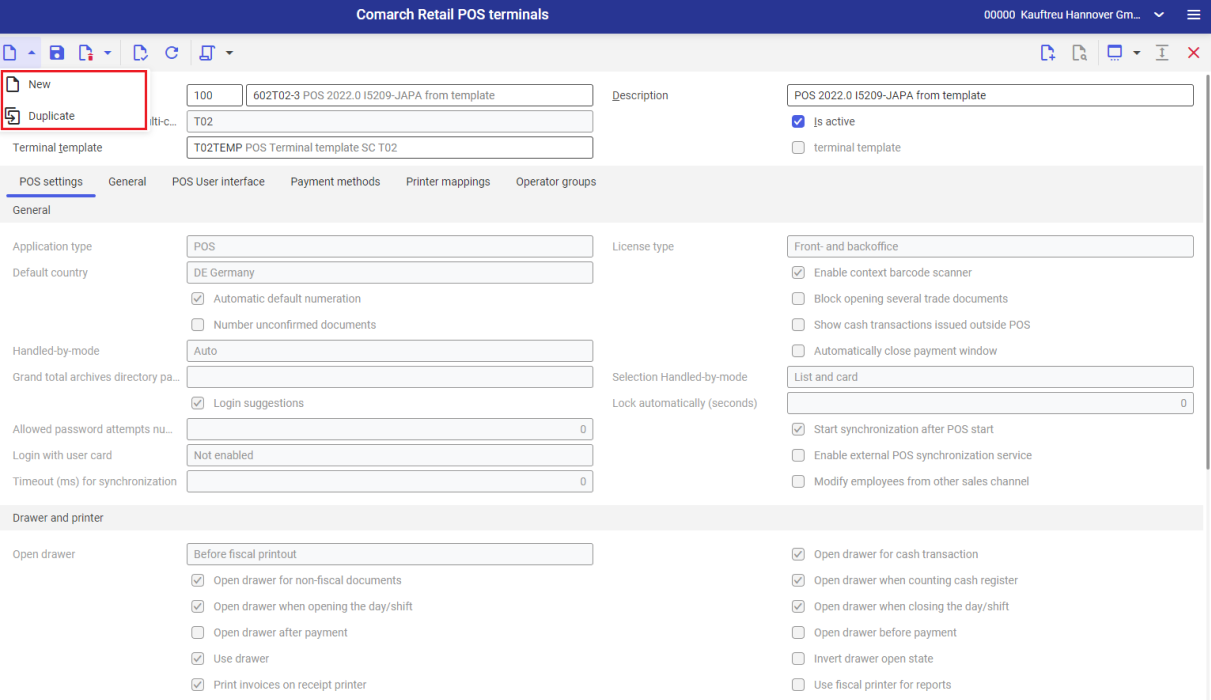
Note that the duplicated workstation should be assigned a new, unique name.