
In many applications of the system, the user can define his/her own fields. Thanks to that it is possible to customize the applications in accordance with requirements for the system. New fields are usually defined in Other fields tab of an application. The fields are assigned to the business entity of the application in which they were defined.
Other fields tab
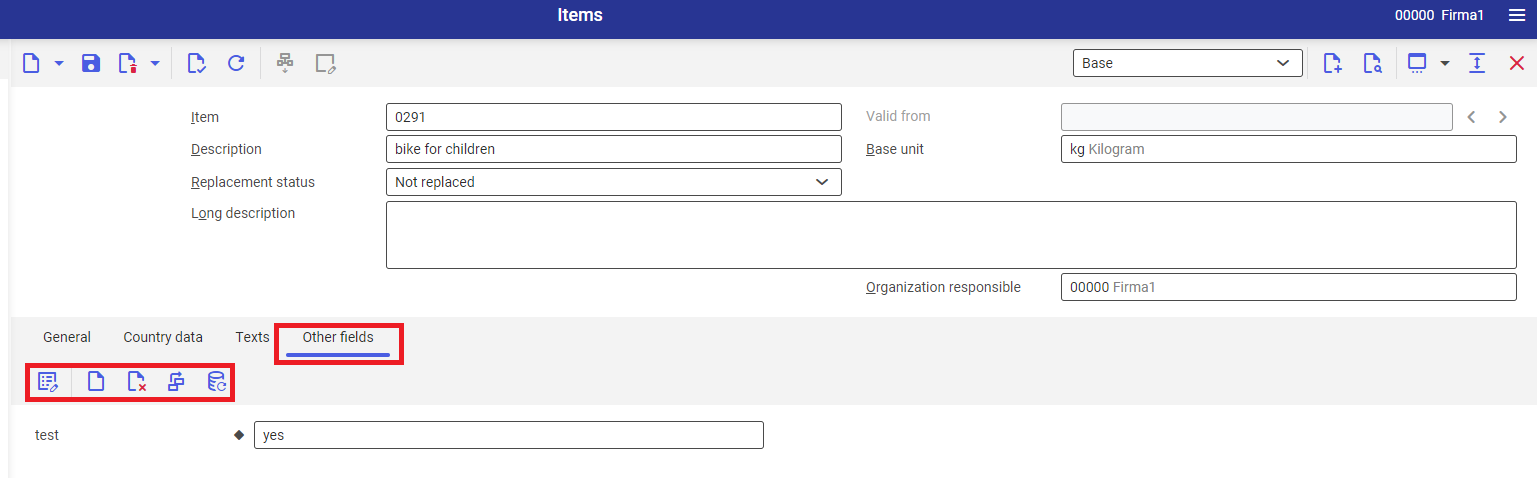
The Other fields tab allows for adding and editing fields defined by the user. The following buttons are available in the tab:
- [Properties] – opens Properties dialog window which allows for editing parameters of defined field. The structure of the Properties dialog window is the same as the structure of New field dialog window.
- [New] – opens New dialog window which allows for defining new field. The window is described in the chapter New dialog window.
- [Delete] – opens Delete dialog window which allows for selecting one or several defined fields for deletion. The fields will be deleted after executing [Generate table schema] action.
- [Arrange] – opens Arrange fields dialog window which allows for reorganizing the view of defined fields.
- [Generate table schema] – opens batch job dialog window. Once the job is processed, the table schema for newly created fields in database is created, selected fields are deleted and data for modified field properties is updated.
New dialog window
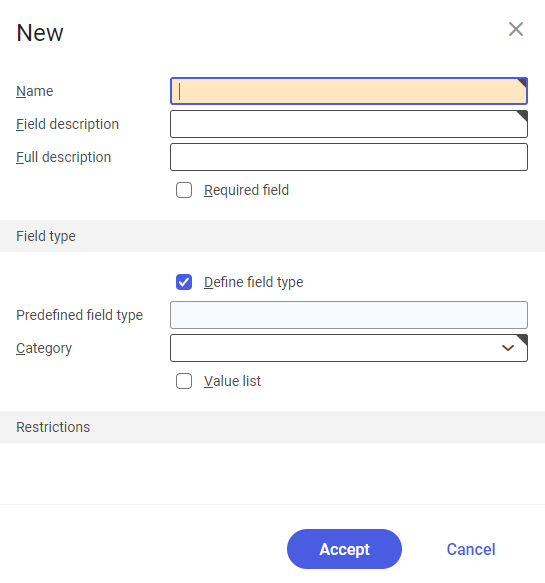
The New dialog window allows the user for defining a field. The following fields and parameters are available in the window:
- Name – allows for defining field name. The name will be reference to the filed when using formulas and functions. It can be composed of a maximum of 10 characters.
- Field description – allows for defining description which will be displayed next to the field.
- Full description – allows for defining description which will be displayed as a tooltip.
- Required field (parameter) – allows for specifying whether the system should require entering the value in a given field
- Section Field type – allows for selecting and defining properties related to the field type
- Define field type (parameter) – if the parameter is active, the user must define new field type, if it is not active, field Preferred field type is unavailable
- Predefined field type – this field is available, if the parameter Define field type is unchecked. It allows for selecting a field from the group of fields defined previously in Field types application.
- Category – this field is mandatory, if the parameter Define field type is unchecked. It allows for selecting field type. The following field types are available:
- Text
- E-mail address
- Uniform Resource Locator (URL)
- Date
- Date and time
- Classification
- Amount
- Price
- Amount in internal currency
- Price in internal currency
- Decimal
- Quantity
- Selection field
- Business entity
- Long text
Field types are described in detail in Field types article. After saving, the value cannot be edited.
- Value list (parameter) – checking of the value allows for:
- Defining predefined values in new field editor. The Default value field is preceded by [Additional data] field which allows for defining values available for selection when entering data.
- Defining predefined values from the level of the data (e.g., an item) for which the new field is being created. The defined field is preceded by [Additional data] field which allows for defining values available for selection when entering data.
- Default value – allows for defining default value for a field or, if the parameter Value list is activated, defining values available for that field, with the use of the [Additional data] button. If the Quantity, Amount or Price field type is selected, the field allows for entering a value and unit.
- Section Restrictions – depending on defined field type, it allows for defining restrictions for values entered in a defined field. Detailed description of restrictions for a specific field type can be found in the Field types article.
Instructions: Creation of a new field (parameter Define field type is inactive)
To create new field, it is necessary to:
- Open the application for which the field is supposed to be created.
- Select the Other fields tab or, for applications belonging to the Production module, tab Parameters.
- Click on the [New] button on the Other fields tab toolbar.
- Define field name in the Name field.
- Define description in the Field description field. It must be remembered, that the text defined in this field will be displayed next to the new field.
- Define field description in the Full description field. It must be remembered, that the text defined in this field will be displayed the field tooltip.
- If the system is supposed to require data input for the defined field, the parameter Required field must be checked.
- Deactivate the parameter Define field type in the Field type section.
- In the Field type section, in the Predefined field type field, select a field previously defined in the Field types application.
- Confirm by clicking on [Accept] button.
- To be able to edit the field, it is necessary to generate table schema, by clicking on the [Generate table schema button], available on the toolbar of the Other fields tab. For the Production module, parameters are confirmed with the use of the basic [Save] button.
Instructions: Creation of a new field (parameter Define field type is active)
To create new field, it is necessary to:
- Open the application for which the field is supposed to be created.
- Select the Other fields tab or, for applications belonging to the Production module, tab Parameters.
- Click on the [New] button on the Other fields tab toolbar.
- Define field name in the Name field.
- Define field description in the Field description field. It must be remembered, that the text defined in this field will be displayed next to the new field.
- Define field description in the Full description field. It must be remembered, that the text defined in this field will be displayed the field tooltip.
- If the system is supposed to require data input for the defined field, the parameter Required field must be checked.
- Activate the parameter Define field type in the Field type section.
- In the Category field, select the field type. Detailed description of field types can be found in the article Field types.
- If it is supposed to be possible to select values for the field, it is necessary to check the parameter Value list. If the parameter is active, next to the Predefined value field, the button [Additional data] is available, which allows for defining values available for the list of values.
- If selectable values are not required for the field, it is necessary to deactivate the Value list parameter.
- In the Predefined value field, define the predefined value for the field, if it is mandatory.
- In the section Restrictions, depending on selected field type, define restrictions for the values entered in the field. Detailed description of restrictions for a specific field type can be found in the Field types article.
- Confirm by clicking on [Accept] button.
- To be able to edit the field, it is necessary to generate table schema, by clicking on the [Generate table schema button], available on the toolbar of the Other fields tab. For the Production module, parameters are confirmed with the use of the basic [Save] button.