The Planning module allows for planning material deliveries and production schedule, so that the client can receive a complete product, in proper quantity and time. This article describes the business process of material requirement planning for an exemplary production item. For the described business process, a simple production structure will be created, containing the bill of material with one material. Once the sales order is created, the production item requirement is generated. After carrying-out the planning process in accordance with described configuration, a purchasing recommendation for the material necessary for the production and production recommendation of the production item necessary for covering the demand, are created.
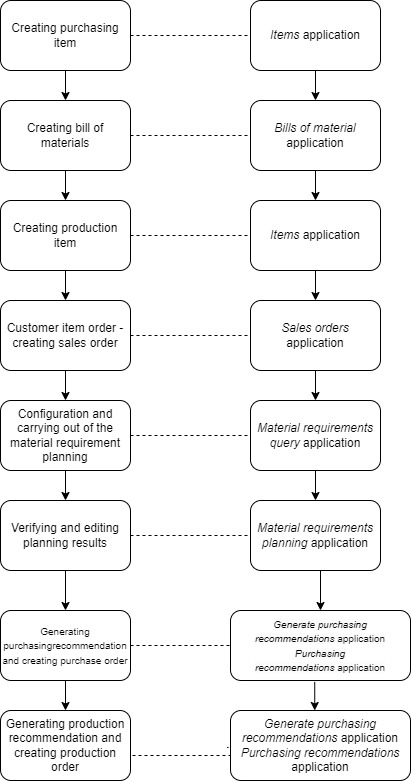
The example is composed of the following steps:
- Purchasing item creation
- Bill of material creation
- Creation of a production item with Sales view
- Sales order creation
- Creation and execution of the material requirement planning
- Preview end editing of the planning in the Material requirements query application
- Generating production recommendations
- Creating production order from a production recommendation
- Generating purchasing recommendation
- Creating purchase order from a purchasing recommendation
Create a purchasing item
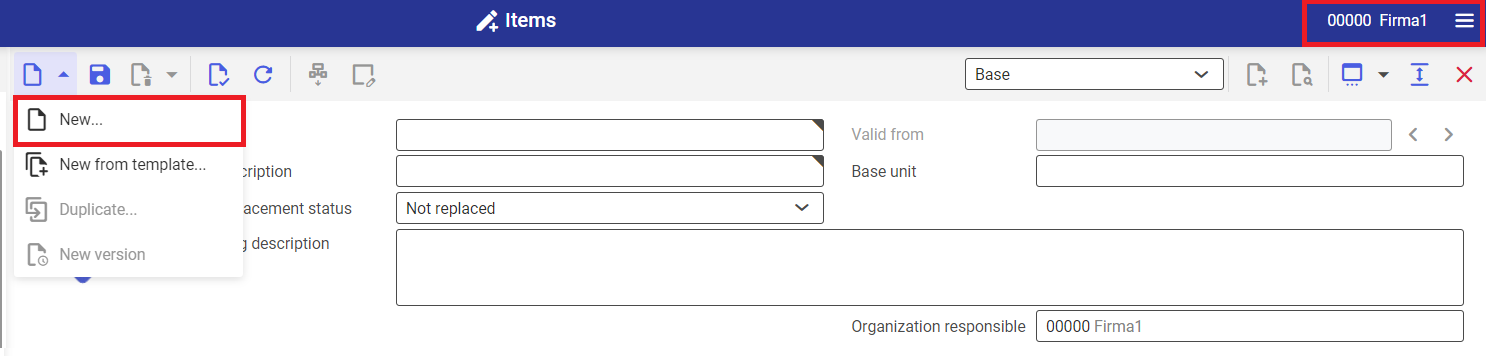
1. Open the Items application.
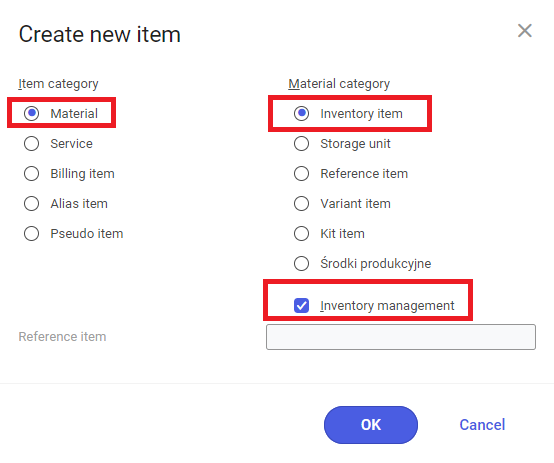
2. Create new item with the use of the [New] button. The Create new item dialog window is opened.
3. In the Create new item dialog window, select Material item category and Inventory item material category.
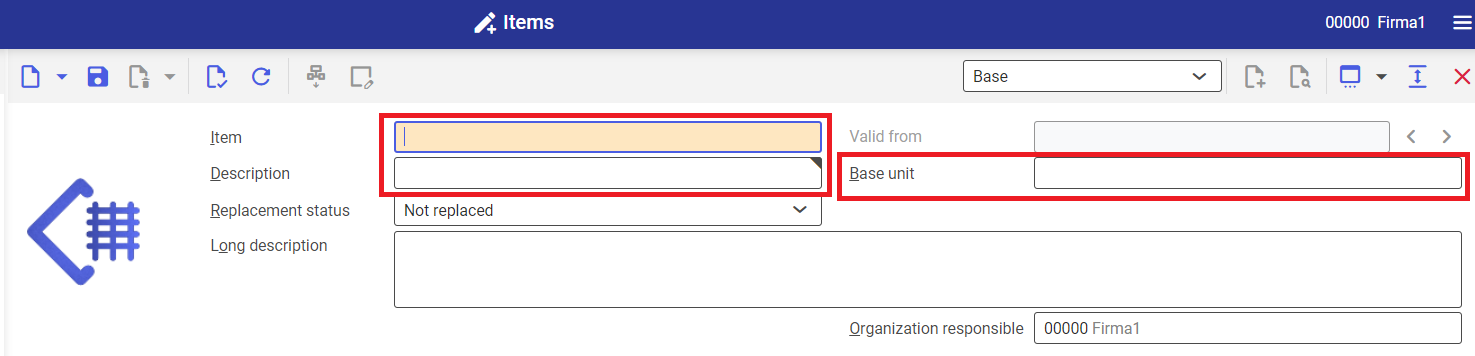
4. In the Base view, define:
- Name in the Item field
- Additional description in the Description field
- Item unit in the Base unit field
- Save created item with the use of the [Save] button
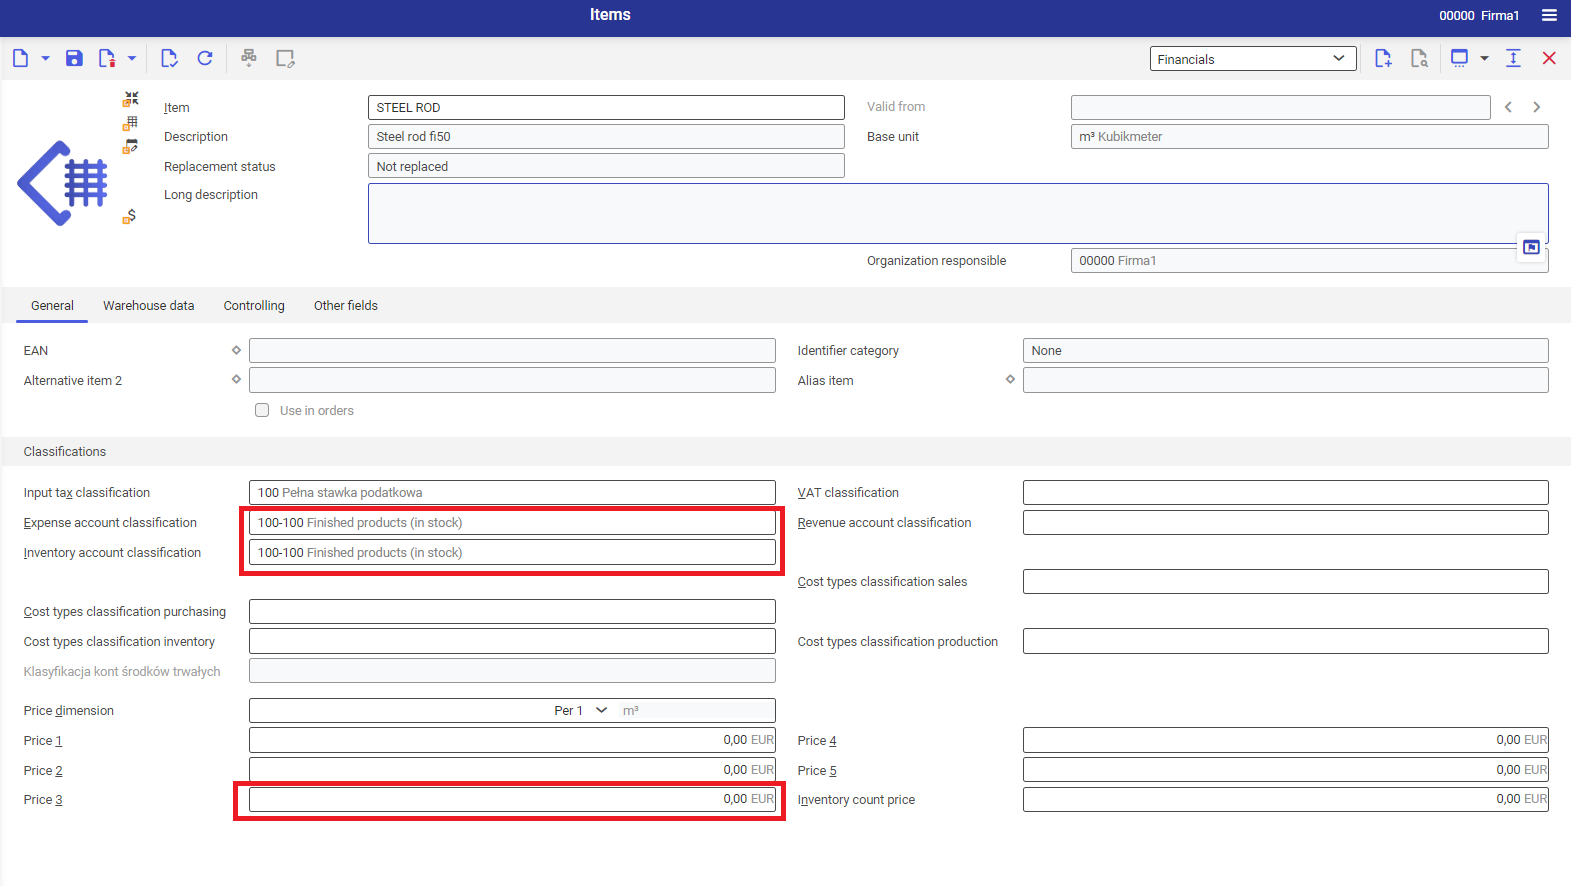
5. In the Financials view, define for the item:
- Input tax classification
- Expense account classification
- Inventory account classification
- VAT classification
- Revenue account classification
- Save the view with the use of the [Save] button
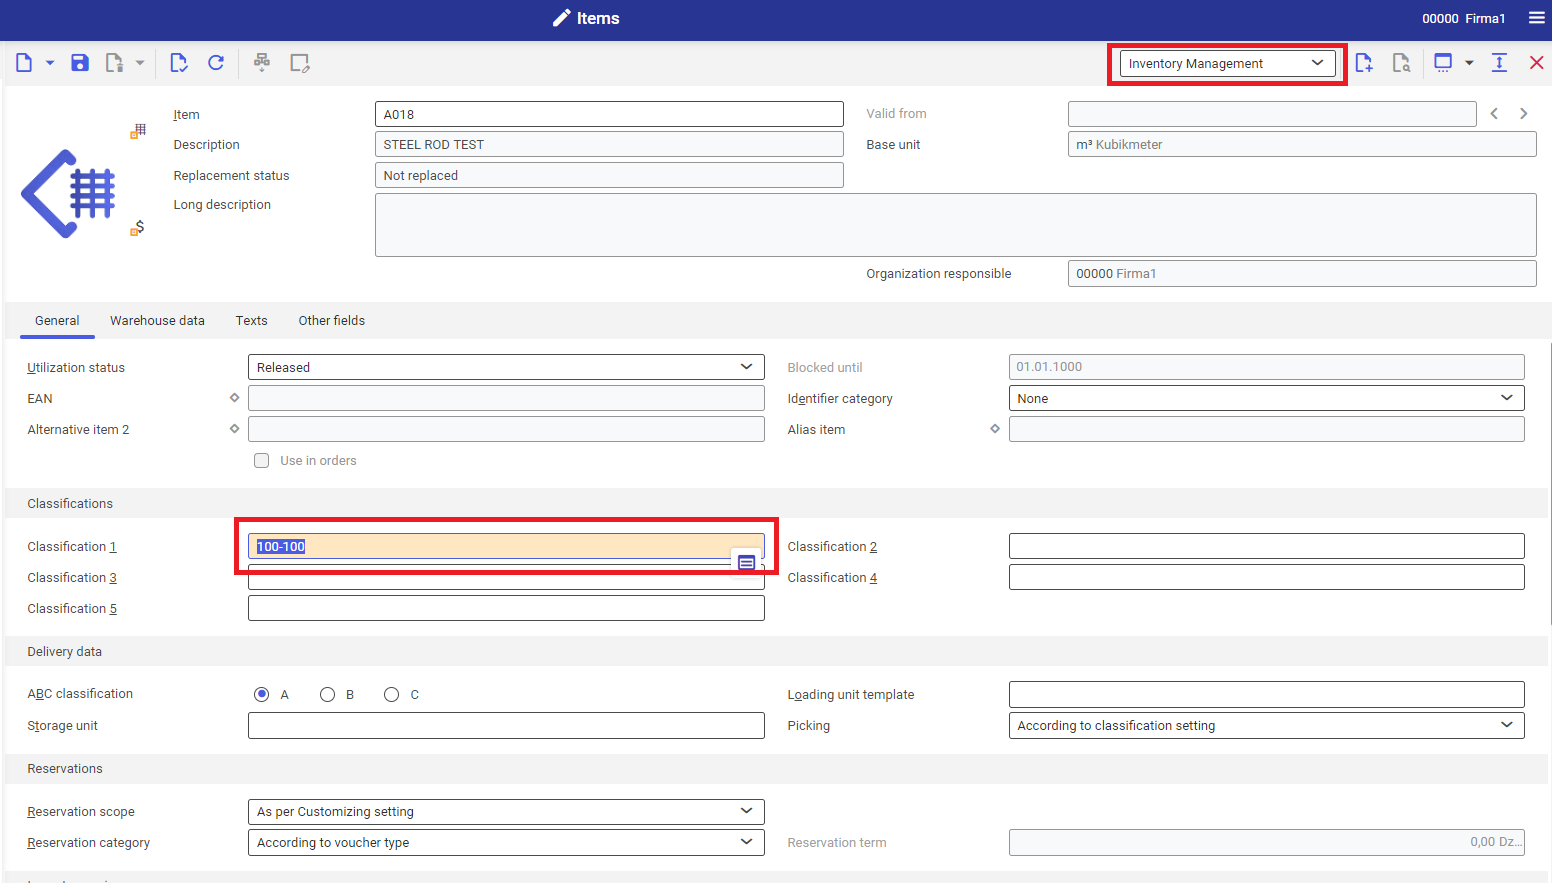
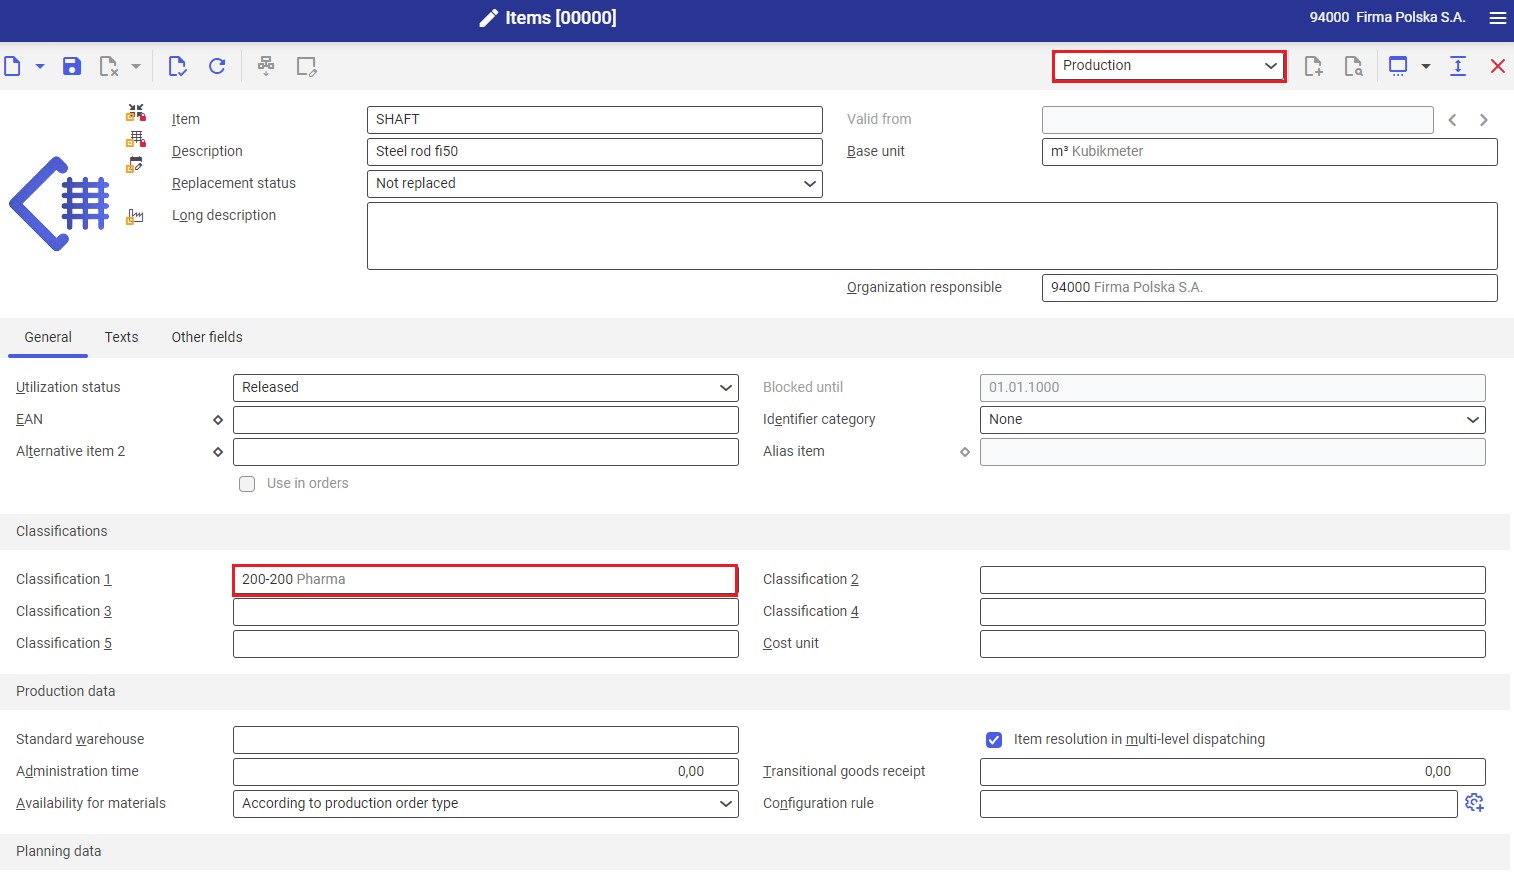
6. In the Inventory management view for the item, select appropriate warehouse item classification in the Classifications 1 view. Save the view with the use of the [Save] button.
7. Define the following data, in the Planning view:
- In the Reorder level field, define the value for which the system will generate the purchasing recommendation in case of using the Planning module
- In the Demand coverage field, select Internal purchase, because the item will be provided by the supplier.
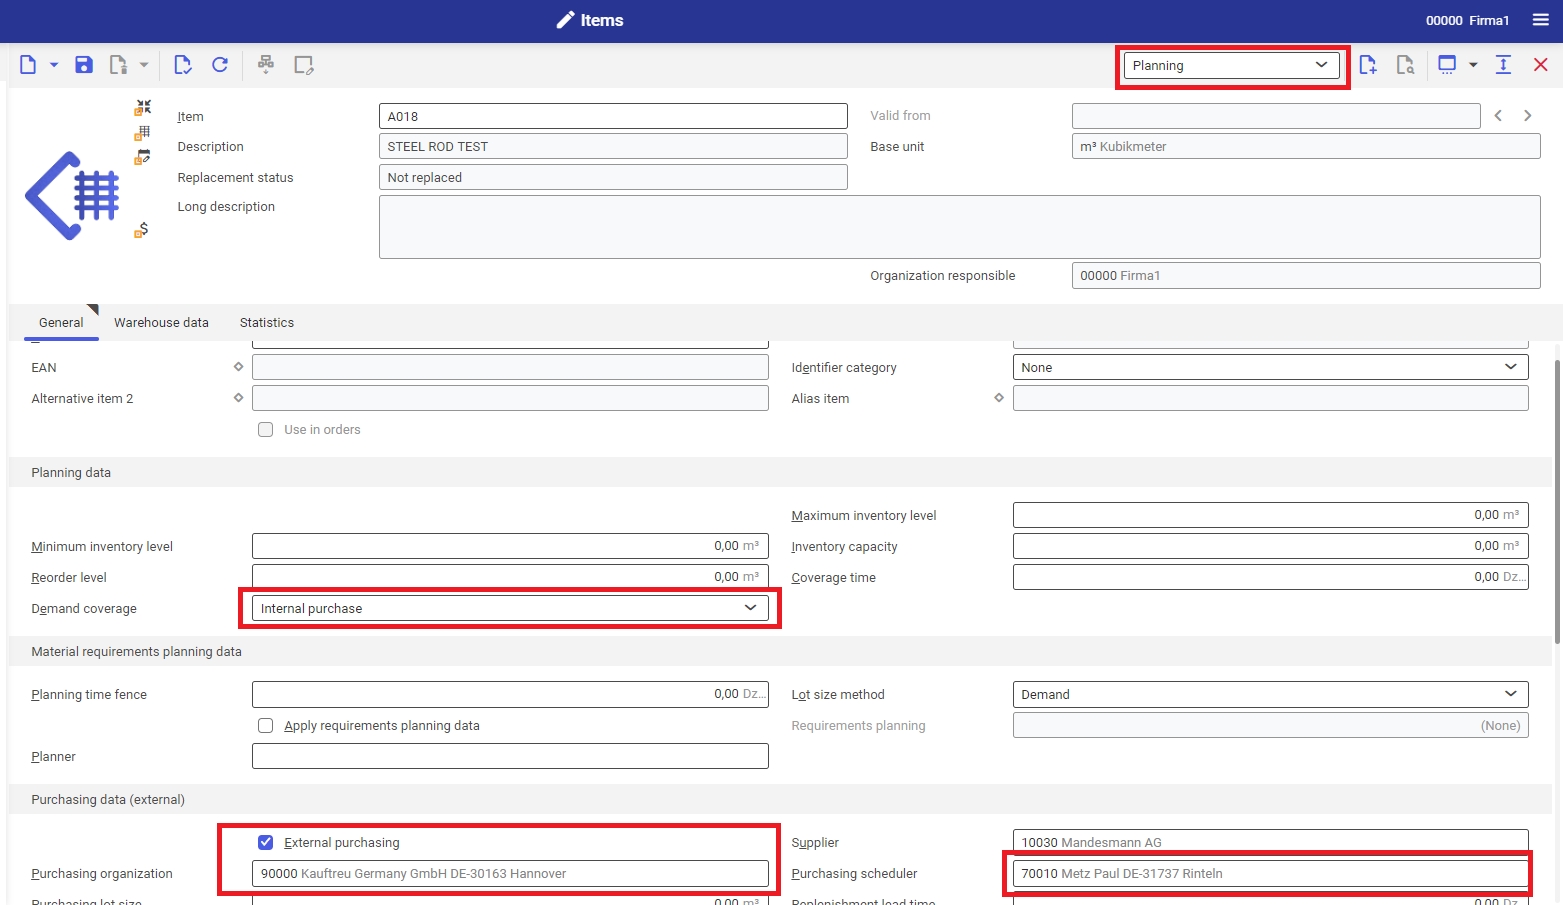
- In the Production data section, deactivate the default parameter Apply production data, because the item won’t be produced internally.
- In the Purchasing data (external) section, activate the Internal purchase parameter
- In the Purchasing organization field, select the company responsible for the purchase.
- In the Purchasing scheduler field, select the user responsible for the material requirement planning.
- In the Supplier field, select the supplier for the created item.
- In the Statistical section, in the Classifications field, select the rotation statistics classification.
- Save the view with the use of the [Save] button
8. Create the Purchasing view for the item and define the following data in it:
- Select the purchase items classification, in the Classification 1 field.
- In the Statistical data section, in the Classifications field, select the rotation statistics classification.
- Save the view with the use of the [Save] button.
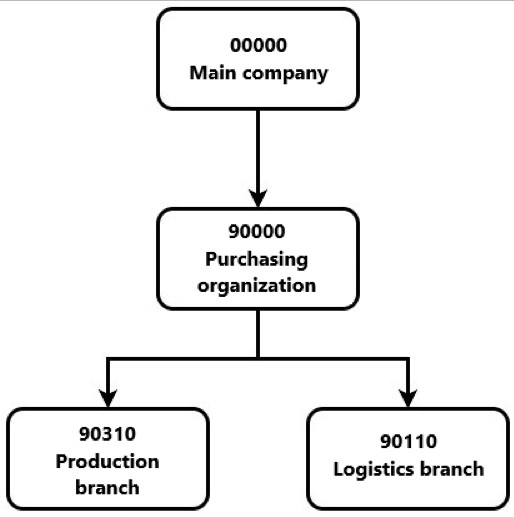
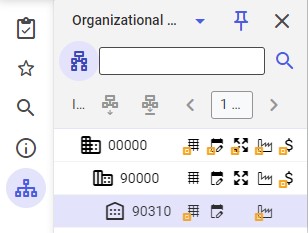
9. Copy the data defined in particular views to subordinate company organizations to enable the possibility of using the defined data by particular affiliates. For multi-level organizational structures, it is necessary to copy data to all organizations. The diagram below presents organizational scheme available in a multi-company environment.
To transfer the data created in particular views of the Items application to subordinate organizations, it is necessary to complete the following steps:
1. Log in to the organization for which created item views are to be copied.
2. Transferring of the Financials view is blocked in the system, because financials data may differ from organization to organization. If a subordinate organization is a purchasing unit, it is necessary to create Financials view afresh (repeat step 4).
3. Other views: Inventory management, Planning, Purchasing must be copied with the use of [Accept data for selected organization], available on the standard button bar.
4. After transferring item data for the purchasing organization, it is necessary to repeat the activity for the production unit.
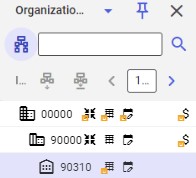
5. To verify the data correctness for lower structures, it is necessary to open the item’s organizational structure preview window with the use of the button [Organizational structure], which is available in the side menu.
Create a bill of material
1. Open the Bills of material application.
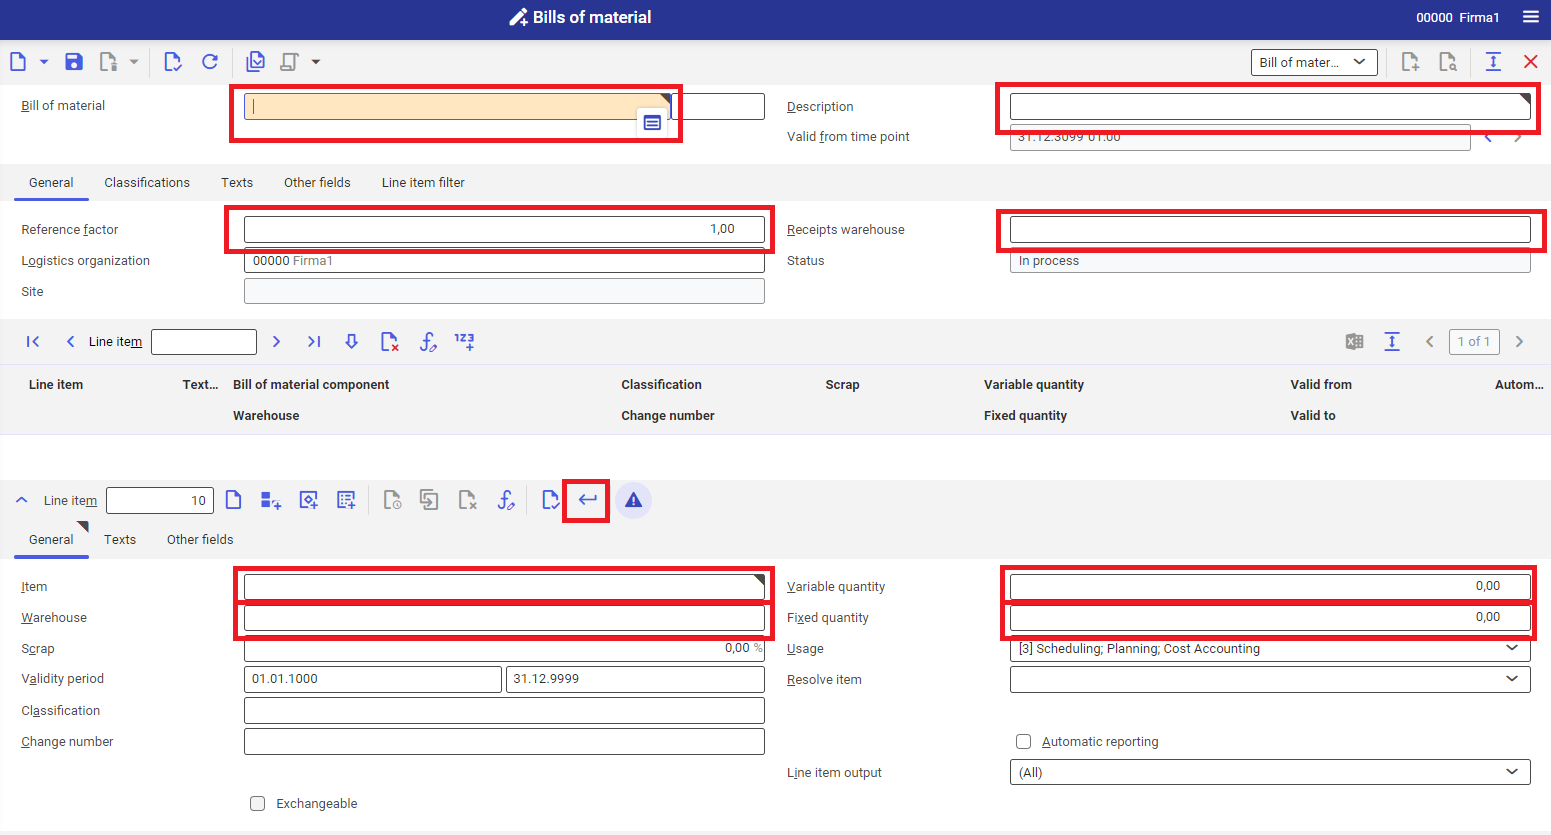
2. In Bill of material, define the name of the currently created bill of material.
3. In Description field, define the description of the currently created bill of material.
4. In Reference factor field, define reference quantity for the bill of material and unit. The system refers to the reference quantity when producing material. If the reference quantity is 2 and production of 10 pieces of the production item is ordered, the demand for production materials will be properly calculated in accordance with the following formula:

For the configured example, define value 1 and set pieces as the unit.
5. In Receipts warehouse field, select the warehouse in which the produced item will be received. Warehouses are created in Warehouses application and are assigned to an inventory management unit, which can be a production organization.
6. The line item editor allows for adding materials to the bill of material. To do so, it is necessary to:
- In field Item, add the material which is supposed to be added to the bill of material. Select previously created purchasing item.
- In Warehouse field, select the warehouse from which the production material will be taken.
- In Variable quantity field, define quantity and unit of the material required for executing defined reference quantity of the production item. Selected unit must be the same as the unit defined in application Items for the added material. For the configured example, define value 1 and set pieces as the unit.
- Add a line item to the bill of material with the use of the [Accept current line item] button.
7. Save created bill of material with the use of [Save] button and release it with the use of [Action] → [Release] button.
Create a production item
1. Open the Items application.
2. Select previously created purchasing item.
3. Duplicate the item by clicking on [New] → [Duplicate] button. Duplicate item dialog window is opened.
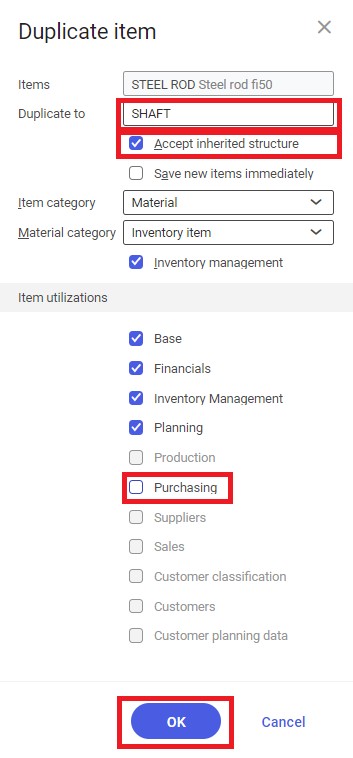
4. In the dialog window:
- In Duplicate to field, enter the name of created production item
- Activate Accept inherited structure parameter
- Deactivate parameter Purchasing – the view is not required for production items.
- Confirm the duplication process with the use of [OK] button.
5. Modify data in the Planning view. To do so:
- In the Planning data section, in the Demand coverage field, select Production value.
- In the Purchasing data (external) section, deactivate the Internal purchase parameter
- In the Production data section:
- Activate the Apply production data parameter
- In the Production scheduler field, define the production scheduler responsible for selected production. In case of dispatching of the material requirement planning, it is possible to plan items for the selected planner
6. Create the Production view for the production item In the Production view:
- Select the production items classification, in the Classification 1 field
- In the Production methods section, select the production method. For the configured example, it is required to select Bill of material.
- In the Production methods section, in the Bill of material field, assign the previously created bill of material

7. Create the Sales view for the production item. In the Sales view:
- Select the item classification, in the Classification 1 field. Classifications are created in application Classifications → Sales item classification 1.
- In the Billing data section, in the Item price classification field, select the price classification
- In the Statistical data section, in the Classifications field, select the rotation statistics classification
8. Copy created view to lower organizations of the company with the use of [Apply data for selected organization], so that they can be used by the affiliates.
9. Save the item with the use of [Save] button. A correctly created production item should have the following structure:
Create a sales order
1. Open the Sales orders application
2. Select the sales order type

3. Create a new sales order with the use of the [New] button
4. Select the ordering party (customer) in the Ordering party field.
5. Add the production item created in the previous step to the order:
- In the line item editor, in the Item field, enter the item name
- In the Total quantity field, enter the order quantity equal to 2 for the item and set pieces as the unit
- In the Delivery date select the date equal to the current date +7 days

- On the Prices tab, in the Price origin field, select Manual
- On the Prices tab, in the Gross price field, enter the item price
- On thePrices tab, in the first part of the Price dimension field, select Per 1 and in the second part, set pieces as the unit

- On the Account assignment tab, in the Revenue account field, select the account
- Add the line item to the sales order with the use of the [Accept] button.
6. Save the sales order with the use of the [Save] button and release it with the use of the [Release] button.
Create material requirements planning
- Open the Material requirements planning application
- Create new planning with the use of the [New] button

3. In the Material requirements planning field, define the planning name
4. In the Description field, define the description of the planning
5. In the Processing queue field, select the processing queue which will be used for the planning execution by the system
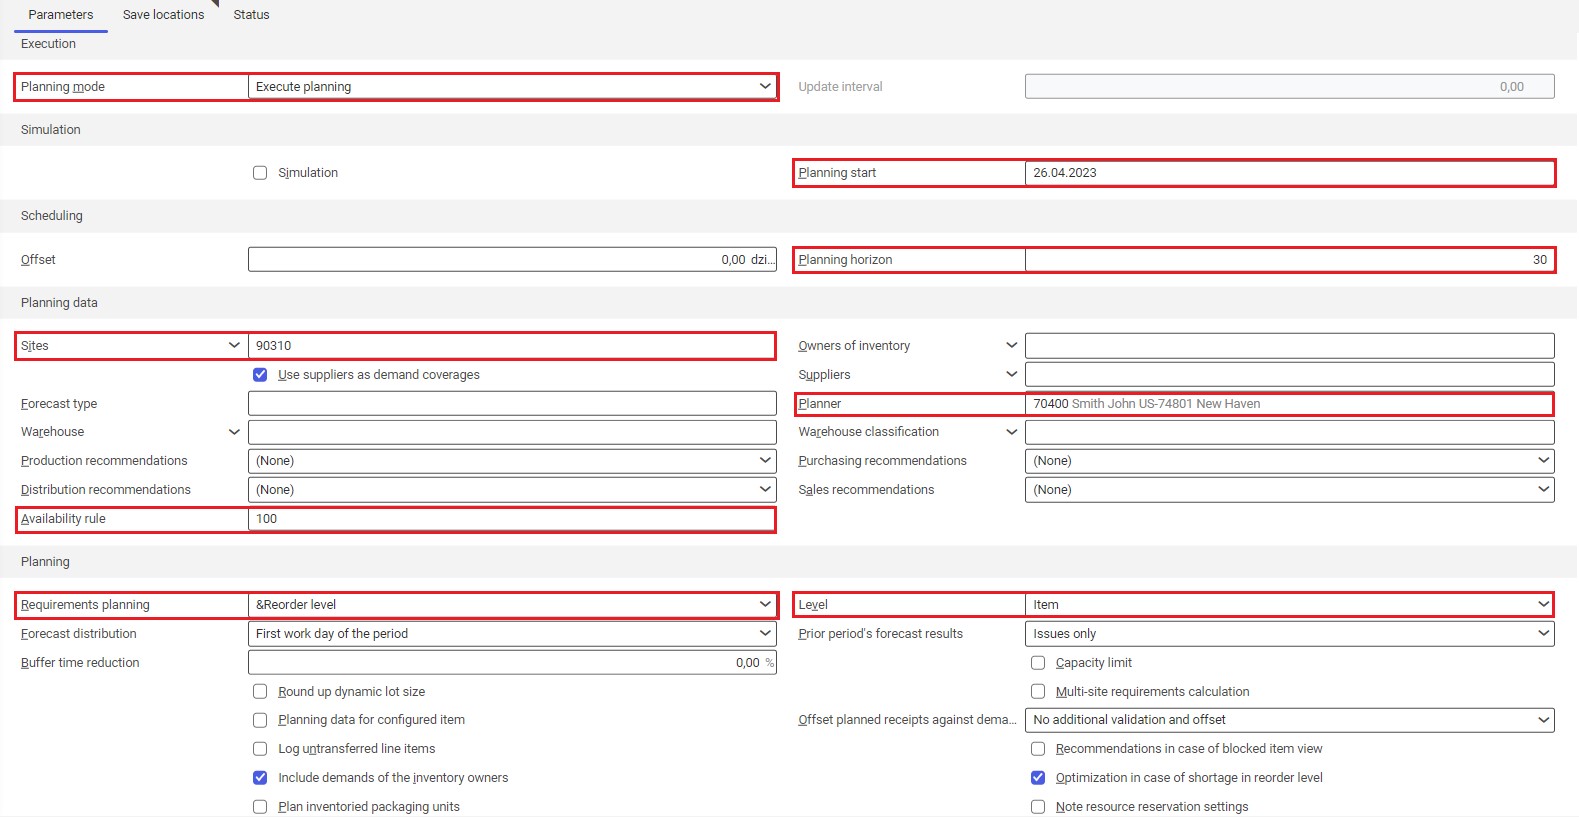
6. In the Planning mode field, select Execute planning
7. Set the current date as the planning start date
8. In the Planning horizon field, enter 30. It is the number of days added to the beginning of the planning, for which the system will carry out the material requirements planning.
9. In the Sites field, select the company sites for which the planning will be executed
10. In the Planner field, select the user defined in the Items application, in the Planning view, in the Production planner field
11. In the Availability rule field, select the rule for calculating the inventory levels
12. In the Save locations tab:

- In the Log file field, select the Kstore localization in which planning logs will be saved
- In the Backup file field, select the localization in which the planning data backup will be saved in Kstore
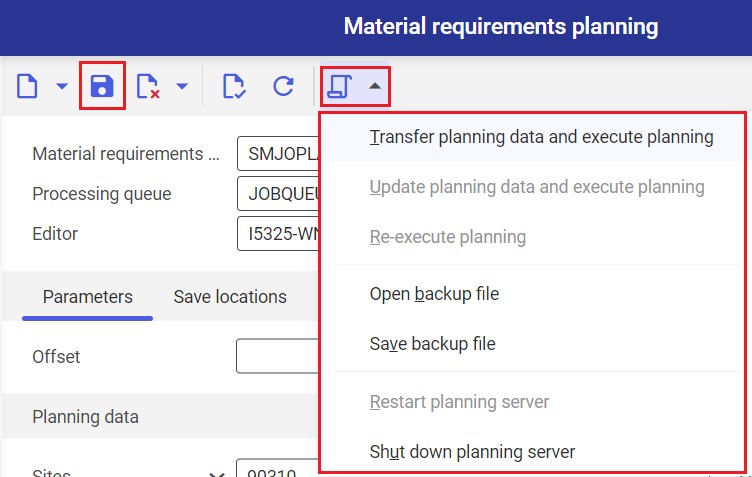
13. Save new planning with the use of the [Save] button
14. Start planning server with the use of the [Select action] → [Restart planning server] button
15. Execute material requirements planning with the use of the [Select action] → [Transfer planning data and execute planning] button
Preview and edit planning in the Material requirements query application
1. Open the Material requirements query application
2. Select planned item in the Item field
3. In the Time period field, define the planning period for which the data will be displayed in the work pane of the application
4. In the Material requirements planning view, select the material requirement planning whose results will be displayed in the application
5. In the Site field, select the organization for which the planning data of the item will be displayed

6. The work pane is divided into two parts:
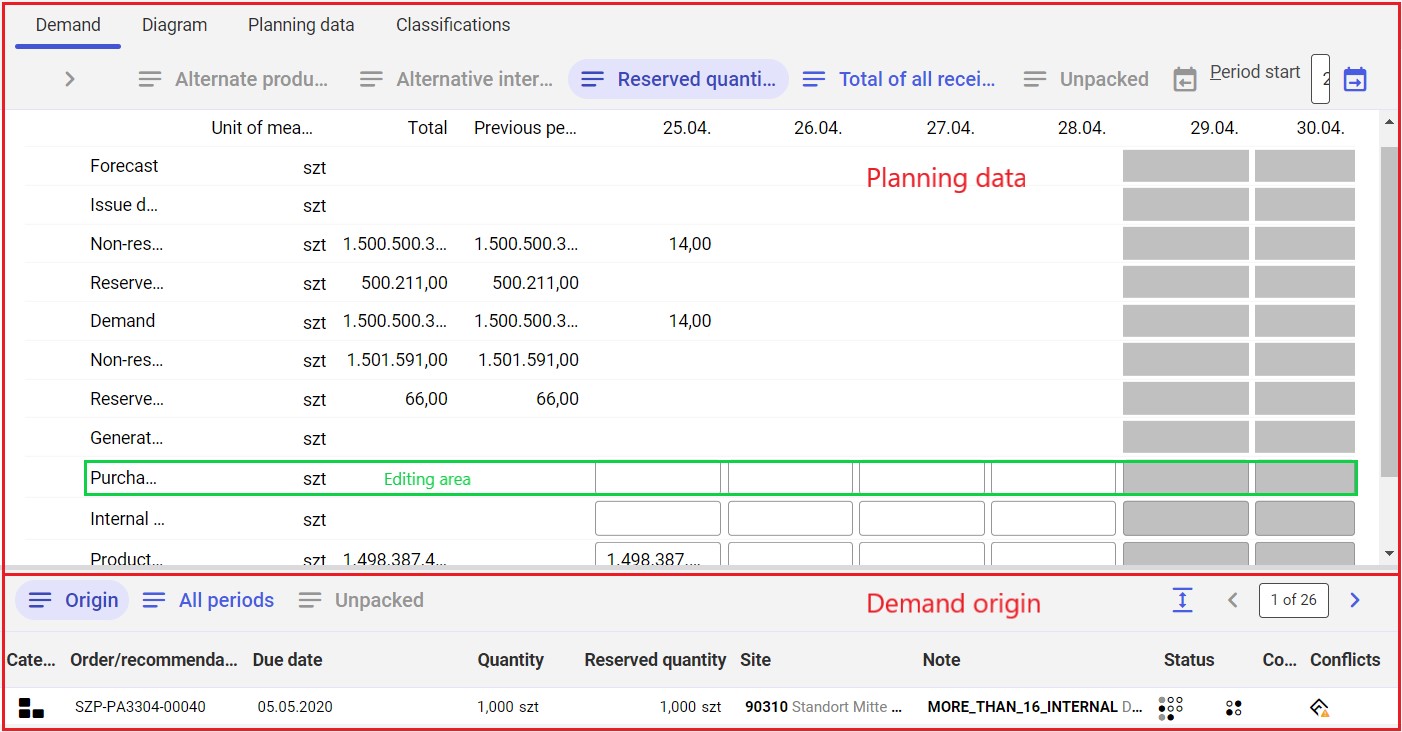
- In the preview, it is possible to see and modify planning results
- The list of recommendations contains generated material requirement recommendations and requirements existing in the system for selected item.
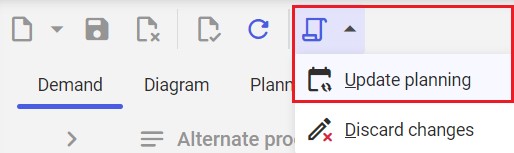
7. When modifying the planning data in the table, it is required to update the planning data by clicking on the [Select action] → [Update planning]
8. Verify the correctness of the planning data for the second item.
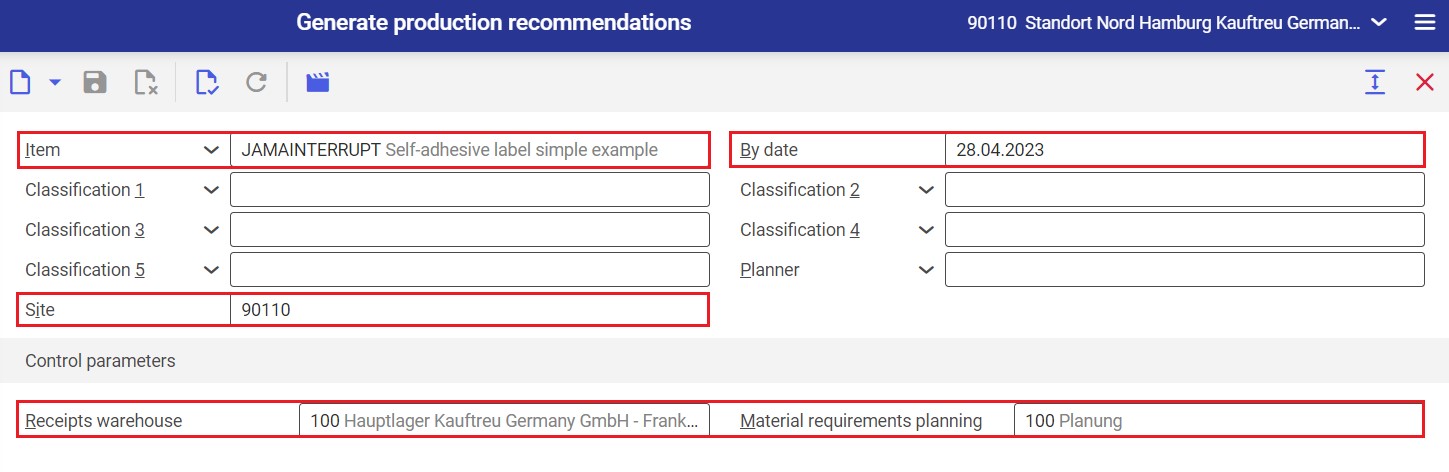
Generate production recommendations
1. Open the Generate production recommendations application
2. In the Item field, select the item for which the production recommendations will be generated
3. In the Site field, select the organization for which the production recommendations will be generated.
4. In the By date field, select the date from which the production recommendations will be generated
5. In the Receipts warehouse field, select the warehouse for which the production recommendations are to be generated. If the example is configured in the Comarch presentation environment, select value 100.
6. In the Material requirements planning field, select defined planning.
7. Generate production recommendation with the use of the [Generate production recommendation] button.
Create a production order from a production recommendation
1. Open the Production recommendations application
2. In the Item field, select the production item
3. In the work pane, generated production recommendation will be displayed
4. Select a generated production recommendation
5. Generate production order with the use of the [Execute] → [Generate production orders] button. The Generate production order from production recommendation dialog window is opened

6. In the Generate production order from production recommendation dialog window:
- In the Type field, select the type of the production order which will be created from the recommendation
- In the Employee responsible field, select your user in the system
- Create production order by clicking on the [In background] button
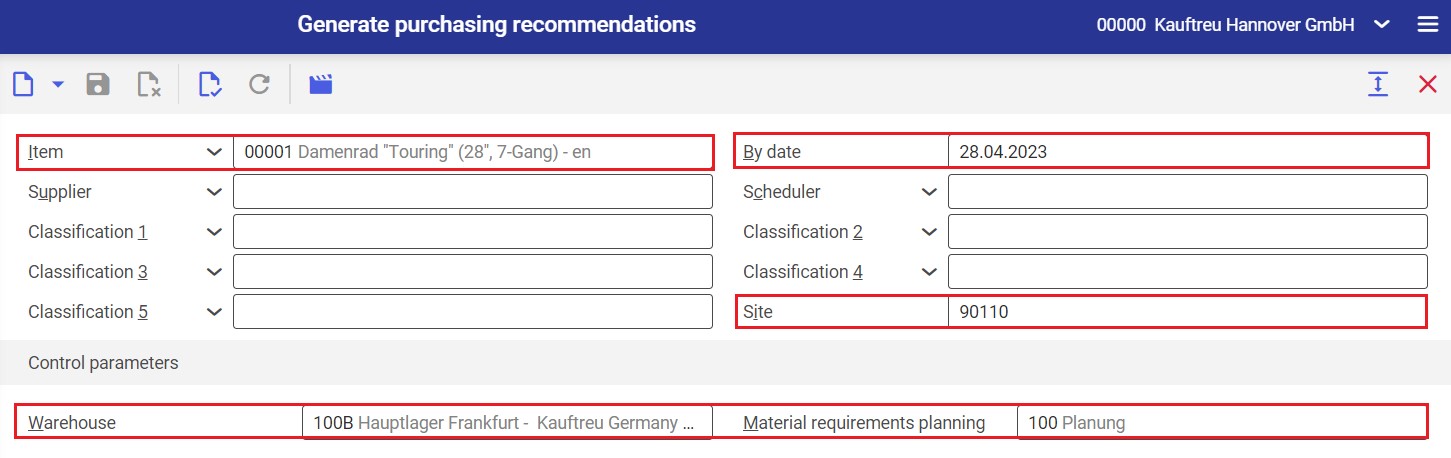
Generate a purchasing recommendation
1. Open the Generate purchasing recommendations application
2. In the Item field, select the item for which the purchasing recommendations will be generated
3. In the Site field, select the organization for which the purchasing recommendations will be generated
4. In the By date field, select the date from which the purchasing recommendations will be generated
5. In the Warehouse field, select the warehouse for which the purchasing recommendations are to be generated. If the example is configured in the Comarch presentation environment, select value 100.
6. In the Material requirements planning field, select defined planning
7. Generate purchasing recommendation with the use of the [Generate production recommendation] button
Create a purchase order from a planning recommendation
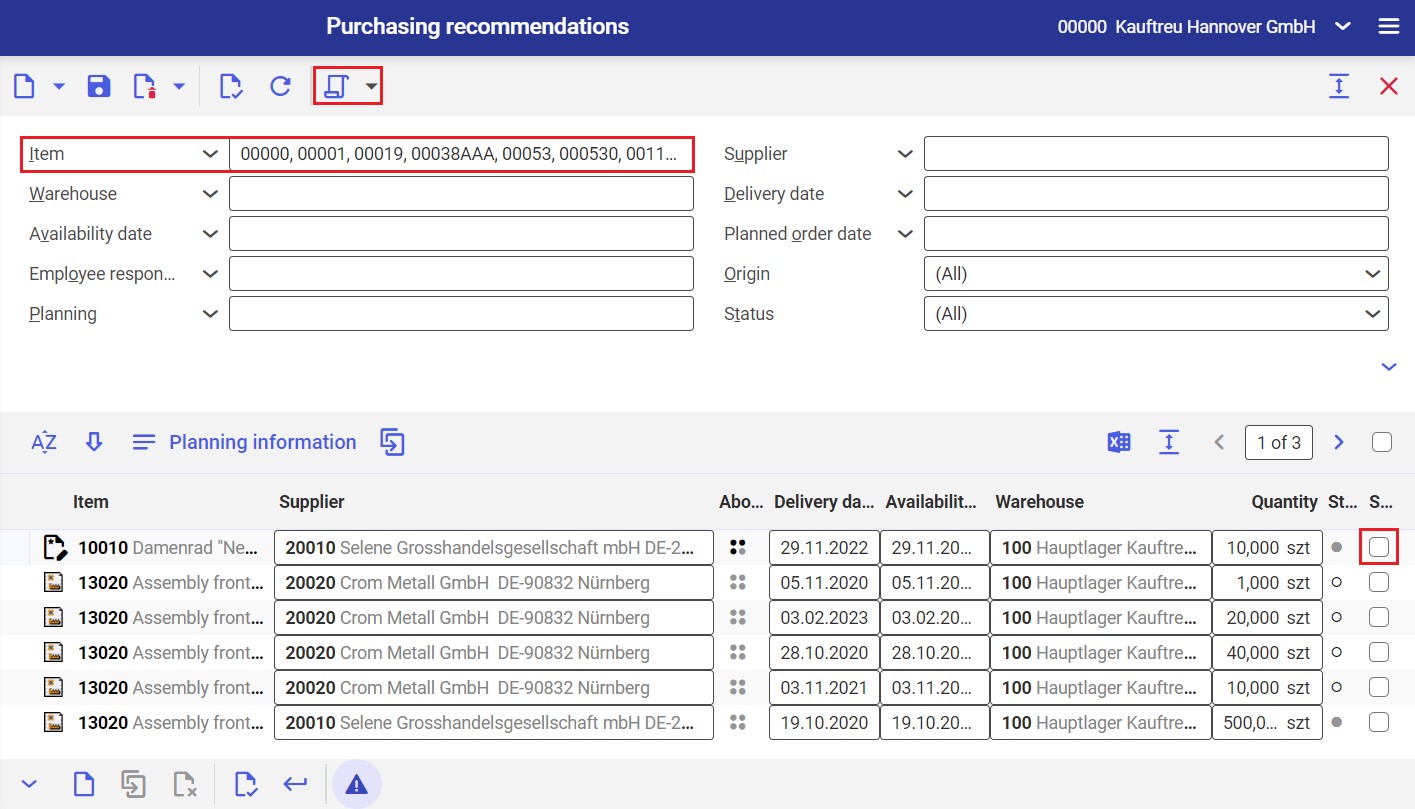
1. Open the Purchasing recommendations application
2. In the Item field, select the purchasing item.
3. In the work pane, generated purchasing recommendation will be displayed.
4. Select generated purchasing recommendation
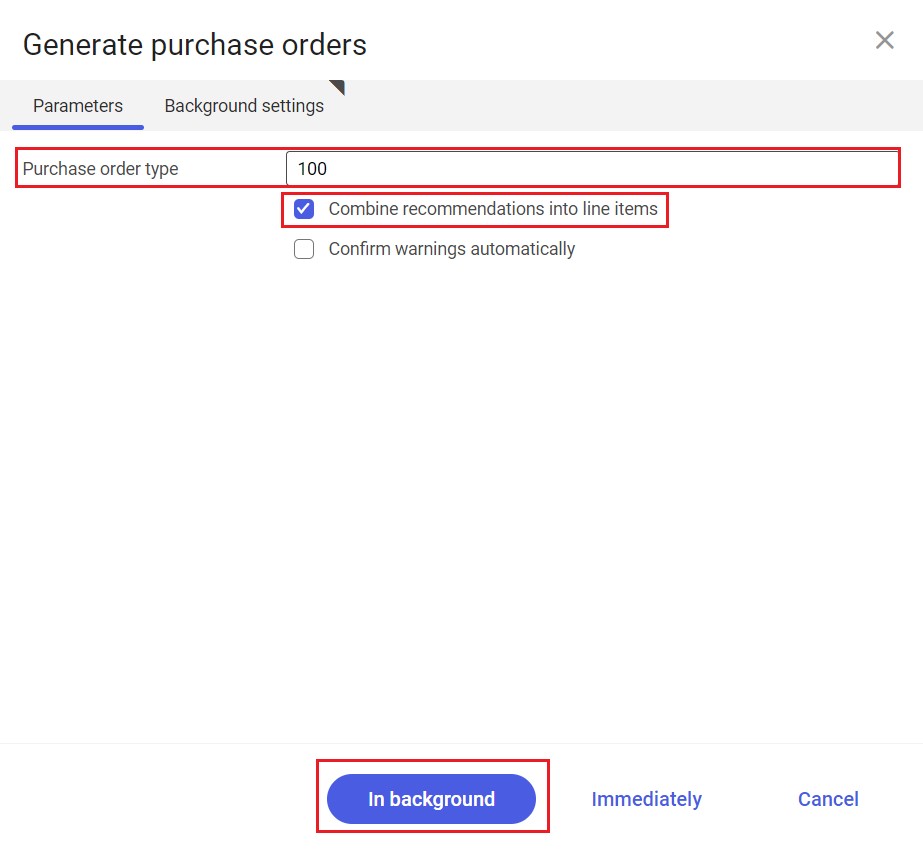
5. Generate purchasing order with the use of the [Execute] → [Generate purchasing orders] button. Dialog window Generate purchasing order is displayed.
6. In the dialog window Generate purchasing order:
- In the Type field, select the type of the purchasing order which will be created from the recommendation.
- Activate the Summarize recommendations for line items
- Create purchasing order by clicking on the [In background] button