
The Calculation module is used to determine costs of products on the basis of material and production costs. On the basis of the calculation schema defined in the Calculation schemas application, the user can enter additional variables, such as margin or discount, which will allow for calculating the final product price. Selected calculation results can be used for updating prices in price lists or updating estimate item price.
This article contains an exemplary business process allowing for calculating and comparing item costs on different production stages. Below, business process stages are presented:
- Creating new cost center
- Defining new service type
- Creating new cost type
- Defining cost rates
- Creating new item classification
- Attaching costs and classifications to the posting account
- Creating production structure
- Creating calculation schema
- Creating calculation schema
- Creating pre-calculation
- Creating production order
- Creating calculation in reference to the production order
- Posting production order
- Creating actual calculation in reference to the production order
- Creating comparison of product cost calculation
Creating new cost center
- Open Cost centers application
- Create new cost center with the use of the [New] button
- In the Cost center field, define the name of the new cost center.
- In the Description field, define the description of the new cost center.
- Save the new cost center with the use of the [Save] button.

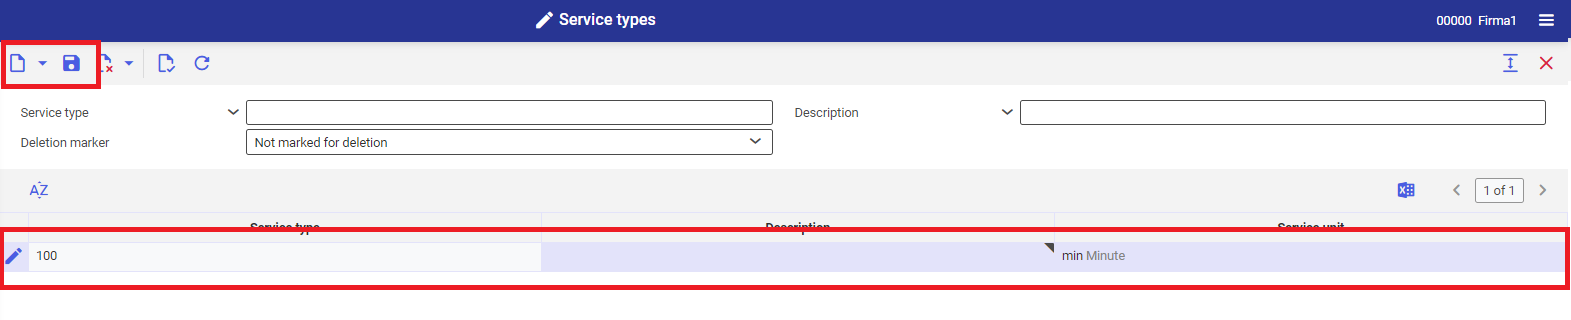
Defining new service type
- Open Service types application
- Create new service with the use of the [New] button. In the table of the work pane, new additional row will be generated.
- Define service type in the Service type column.
- Define service description in the Description table.
- Select service unit in the Service unit table.
- Save added service type with the use of the [Save] button
Creating new cost type
- Open Cost types application
- Add new cost type with the use of the [New] button.
- In the first part of the Cost type field, define the name of the new cost type.
- In the second part of the Cost type field, enter the cost type category.
- In the Description field, define the description of the new cost type.
- Depending on the financial settings within the company, define relevant settings in the tabs of the work pane.
- Save the new cost type with the use of the [Save] button.
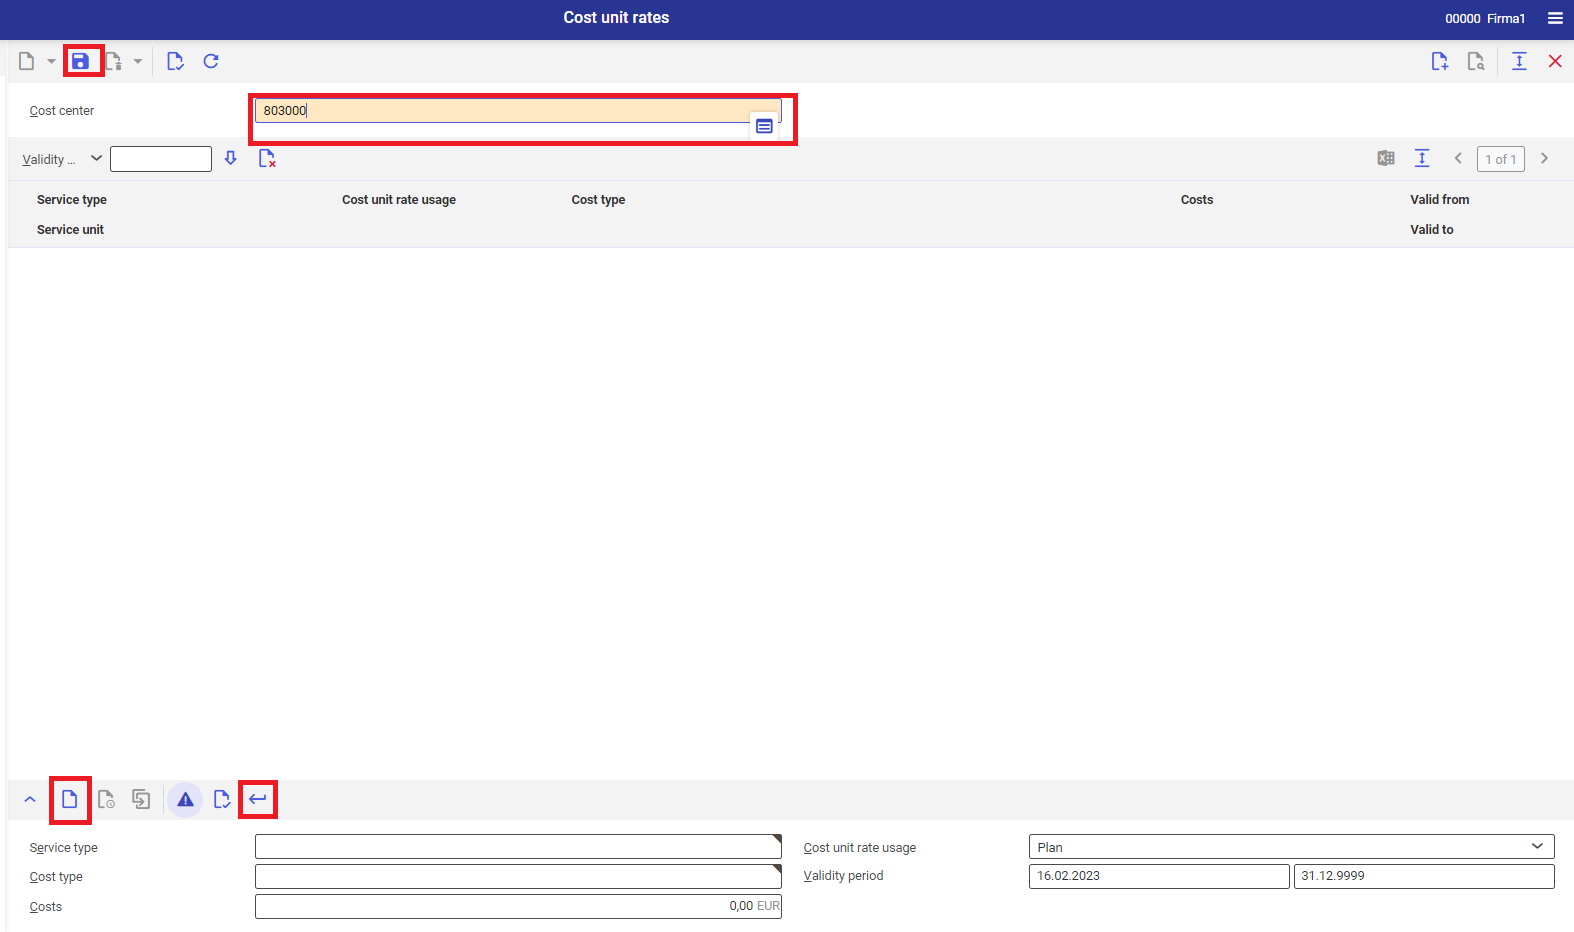
Defining cost rates
- Open Cost unit rates application
- In the Cost center field, select the cost center for which the cost rates will be created.
- In the item line editor, define new cost rate
- In the Service type, select the service for which the cost rate is being defined
- In the Cost unit rate usage, select the usage for the cost rate. The cost unit rate usage is selected in created calculation schema and, in accordance with the selection, the value of the cost rate will be retrieved for the calculation.
- In the Cost type, field select the cost type for which the cost rate is being defined
- In the Validity period field, select the validity period of the added cost rate
- In the Costs filed, define the cost for created cost rate.
- Add the cost rate to the cost center with the use of the [Accept current line item] button
- Save the assignment with the use of the [Save] button.
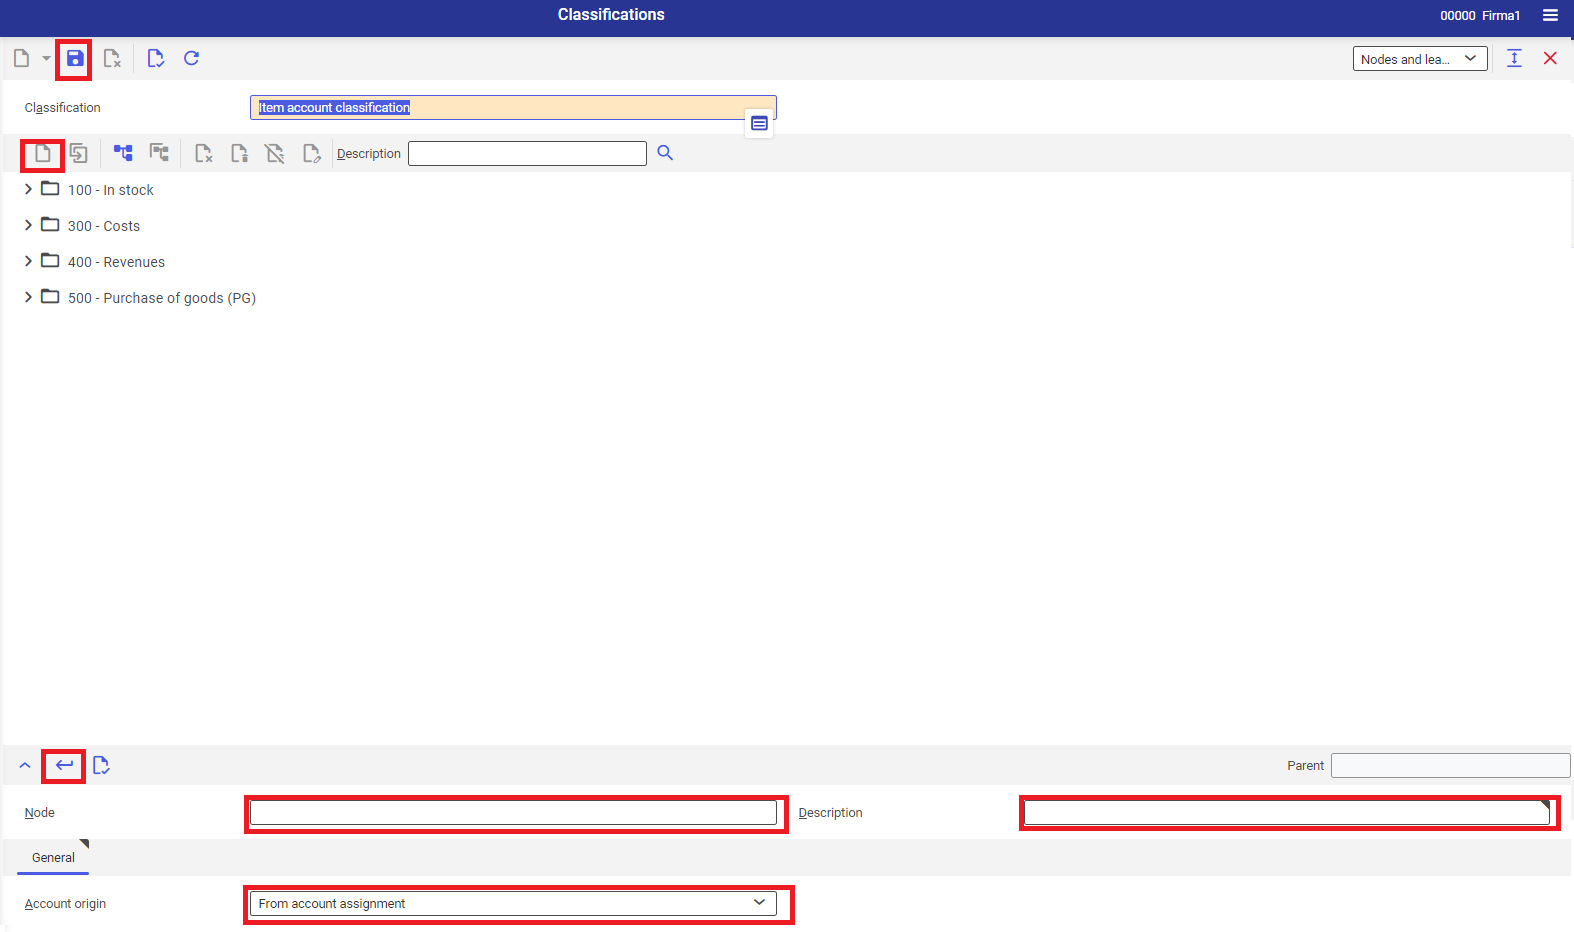
Creating new item classification
- Open Classifications application.
- In the Classification field, select Item account classification.
- Create new classification with the use of the [New nodes at the same level] button or
- In the line item editor:
- in the Node field, define the name of the new classification node
- in the Description field, define the description of the new classification node
- in the Account origin field, select From account assignment value.
- Add the classification note with the use of the [Accept] button.
- Save the classification with the use of the [Save] button.
Attaching costs and classifications to the posting account
- Open Account assignments application
- In the line item editor, in the General tab:
- create new assignment with the use of the [Create new line item] button
- in the Classification field, select the classification created in the previous step
- in the Account field, assign relevant posting account
- in the Usage field, select Inventory account
- in the Cost center field, assign the cost center
- in the Validity period field, define the validity period of the assignment

- In the line item editor, in the Cost types tab:
- assign relevant cost type in the Cost of goods cost type field
- assign relevant cost type in the WIP material usage cost type field
- assign relevant cost type in the Production revenue cost type field
- assign relevant cost type in the WIP production revenue cost type field
- assign relevant cost type in the Co-product revenue cost type field
- assign relevant cost type in the WIP co-product revenue cost type field.
- Add assigned data to the table with the use of the [Accept entries] button.
- Save the assignments with the use of the [Save] button.
Creating production structure
In order to carry out the calculation process, it is necessary to create the production structure in accordance with the procedure described in the article Example of production process configuration in the system, including the following changes:
- In the Item application → Financials view → Cost account classification field, assign to the item the classification created in the Creating new item classification chapter
- In the Item application → Financials view → Inventory account classification field, assign to the item the classification created in the Creating new item classification chapter
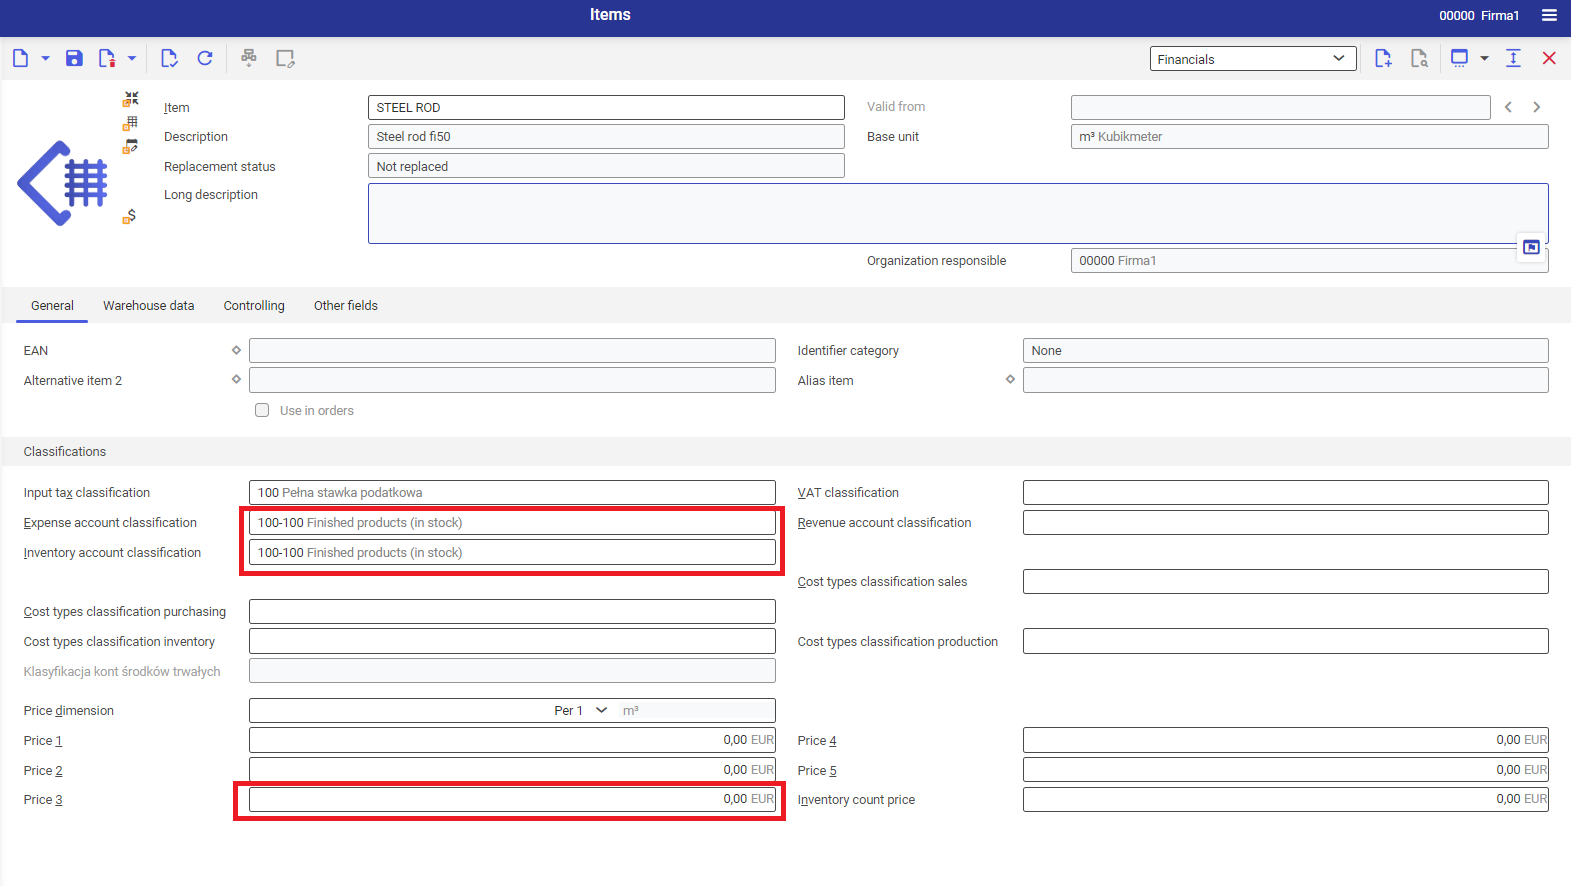
- In the Items application → Financials view → Price 1 field, define estimated item price
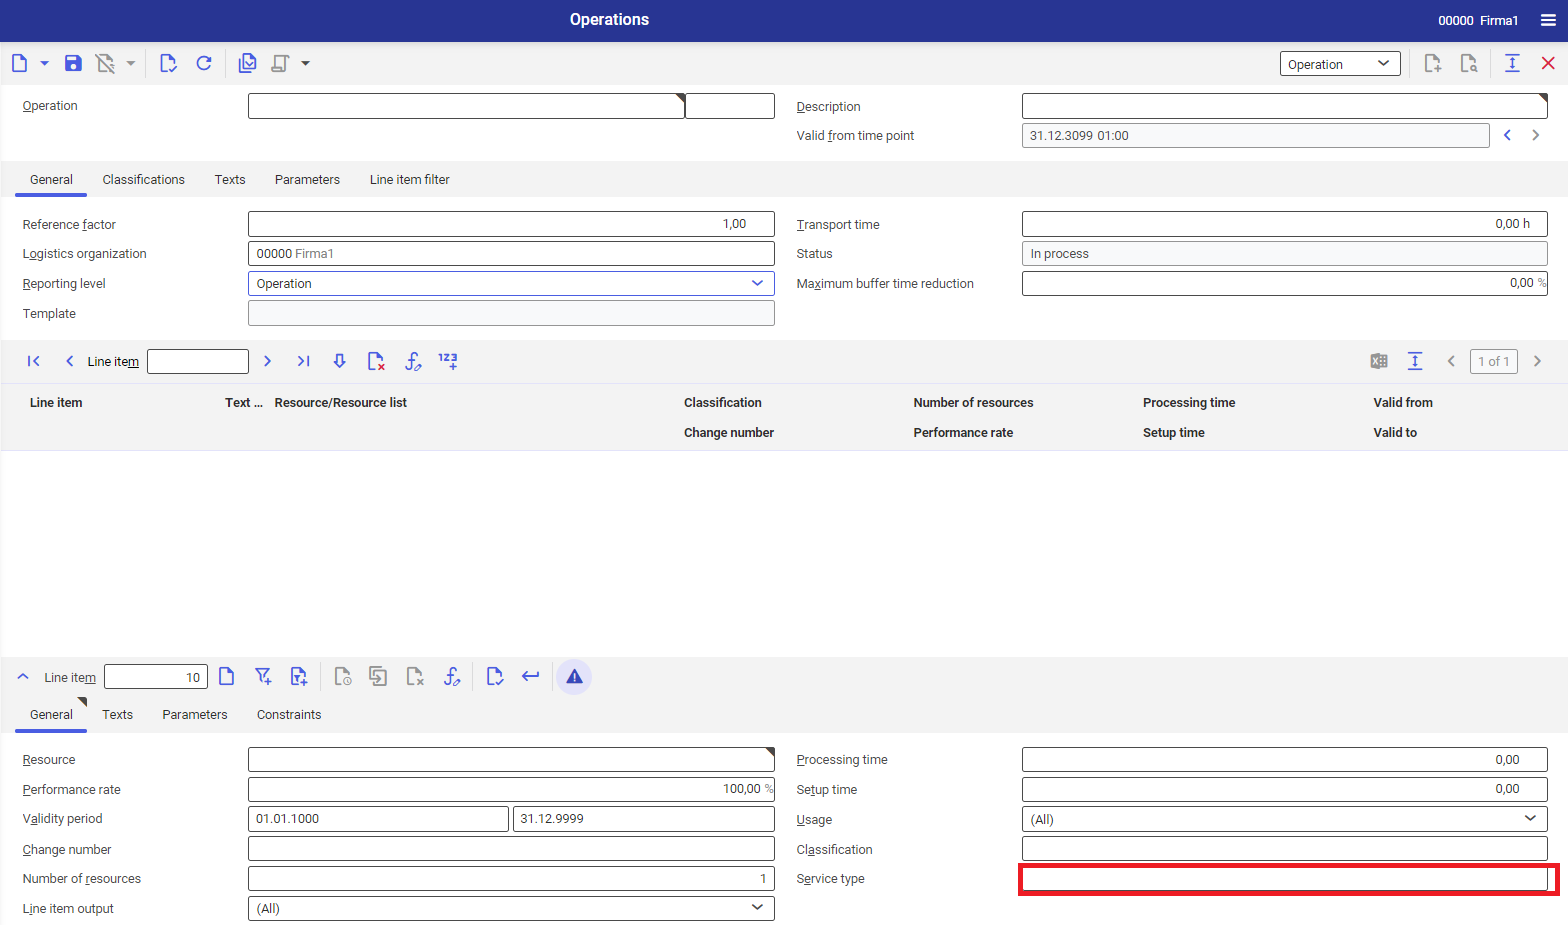
- In the application Resources → Cost center field, assign resources to the cost center for which
the structure of the account assignment from the previous chapters was created. - In the application Operations → in the line item editor → in the Service type field, assign newly created service type to the added resources.
Creating calculation schema
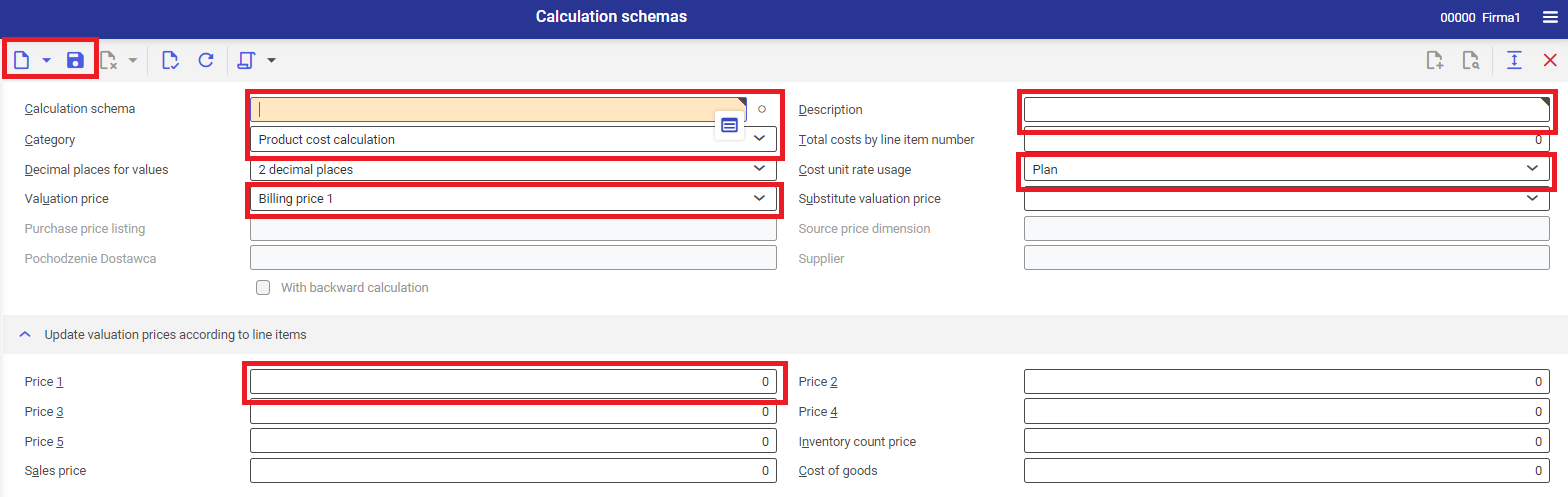
- Open Calculation schemas application.
- Create new calculation schema with the use of the [New] button.
- In the Calculation schema field, define the name of the created calculation schema.
- In the Description field, define the description of the new calculation schema.
- In the Category field, select Product cost calculation value.
- In the Cost unit rate usage, select the usage value for which the cos rate was created.
- In the Valuation price, select the price value according to which the production item will be evaluated.
- In the work pane, add formulas which will be the calculation formula for created calculation. To do so, it is necessary to:
- Add new line item with the use of the [New line item of current type] button.
- In the Line item field, enter the number of the formula row. Default formula numeration starts with 10 with 10 intervals, e.g., 10, 20, 30.
- In the Description field, define the description of the formula which is being added.
- In the Unit category, select the unit in which the calculations will be displayed.
- In the Calculation formula field, define the calculation formula. The list of formulas which can be used for the construction of a calculation schema, can be found in the Calculation schemas article. Example of a calculation schema can be found in the table below.
- Add calculation row to the table with the use of the [Accept current line item] button.
- In the Update valuation prices according to line items section, in the Price 1 field, define the number of the calculation row from which the amount according to which the Price 1 in the Items application, Financials view will be updated for the calculated item.
- Save created calculation scheme with the use of the [Save] button.
- Release created calculation scheme with the use of the [Select action] → [Release] button.
Creating calculation type
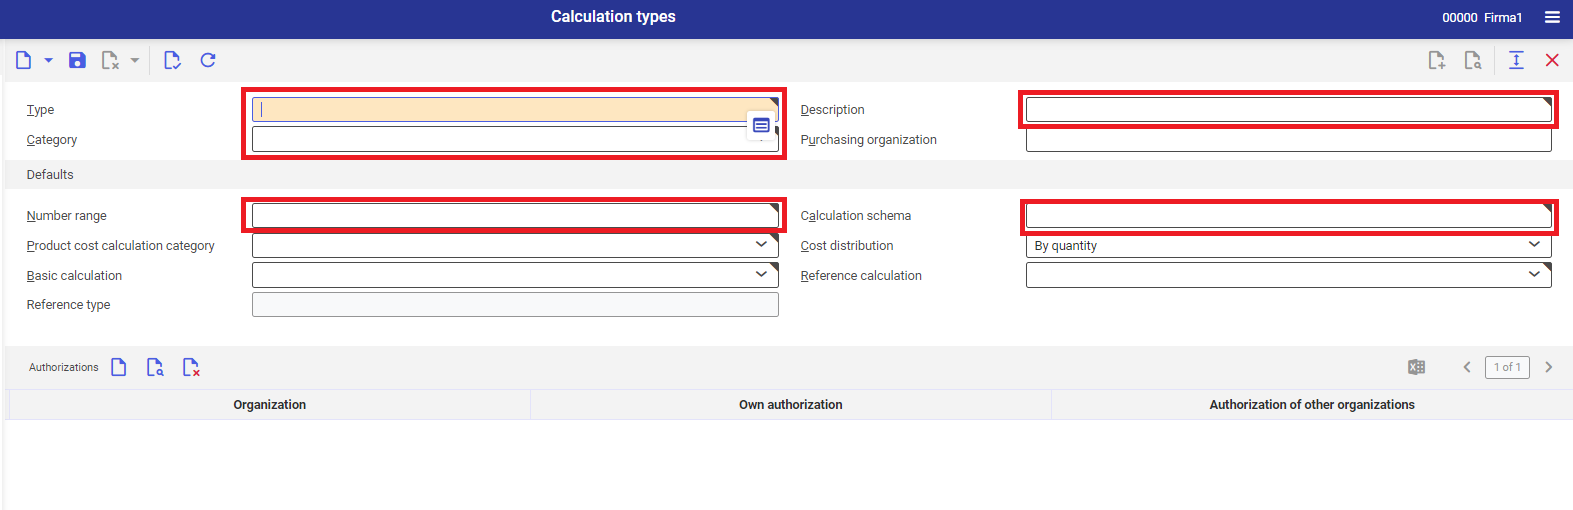
- Open Calculation types application
- Create new calculation type with the use of the [New] button.
- In the Type field, define the name of the calculation type.
- In the Description field, define the description of the calculation type.
- In the Category field, select Product cost calculation value.
- In the Number range field, assign the number range to the calculation type. Number ranges are created in the Number ranges application.
- In the Calculation schema field, assign previously created calculation schema to the calculation type.
- In the Product cost calculation category, select one of product cost calculation types.
- Save the calculation type with the use of the [Save] button.
Creating pre-calculation
- Open Product cost calculations application
- In first part of the Number field, select calculation type.
- Create new calculation with the use of the [New] button.
- From the drop-down menu of the calculation, type select Pre-calculation value.
- In the Description field, define the description of the product cost calculation.
- In the Calculation scheme field, select the calculation scheme which is supposed to be used for the calculation.
- In the Production item filed, select the production item for which the costs will be calculated.
- In the Calculation quantity, define the quantity and the unit for which the calculation will be executed
- Save the calculation with the use of the [Save] button.
- Carry out calculation with the use of the button [Select action] → [Calculate]. Dialog window Update product cost calculations is displayed.
- In the dialog window, it is necessary to:
- In the Validity field, select the date of the calculation creation.
- In the Employee responsible field, select the employee responsible for the calculation.
- Start the calculation with the use of the [In batch] button.
Creating production order
The process of creating of a production order is described in the Example of production process configuration in the system.
Creating calculation in reference to the production order
Repeat the steps from the Creating pre-calculation chapter, including the following changes:
- From the drop-down menu of the calculation, type select Calculation of the production order value.
- In the Production order field, select the order created in the Creating production order chapter.
- Carry out calculation with the use of the button [Select action] → [Calculate]. Dialog window Update product cost calculations is displayed.
- In the dialog window, it is necessary to:
- In the Validity field, select the date of the calculation creation.
- In the Employee responsible field, select the employee responsible for the calculation.
- Start the calculation with the use of the [In batch] button.
Posting order
Post production order. The process of posting of a production order is described in the Example of production process configuration in the system.
Creating actual calculation in reference to the production order
Repeat the steps from the Creating pre-calculation chapter, including the following changes:
- From the drop-down menu of the calculation, type select Final calculation of the production order value.
- In the Production order field, select the order created in the Creating production order chapter.
- Carry out calculation with the use of the button [Select action] → [Calculate]. Dialog window Update product cost calculations is displayed.
- In the dialog window, it is necessary to:
- In the Validity field, select the date of the calculation creation.
- In the Employee responsible field, select the employee responsible for the calculation.
- Start the calculation with the use of the [In batch] button.
Creating comparison of product cost calculation
- Open Compare product cost calculations application
- In first part of the Number field, select the product cost comparison type.
- Add new product cost calculation with the use of the [New] button.
- In the Description field, define the name of the comparison.
- In the Calculation 1 field, select the calculation created in the Creating pre-calculation chapter.
- In the Calculation 2 field, select the calculation created in the Creating calculation in reference to the production order chapter.
- In the Calculation 3 field, select the calculation created in the Creating actual calculation in reference to the production order chapter.
- Save the comparison with the use of the [Save] button.
- Compare created product cost calculations with the use of the [Select action] → [Compare calculations] button.