
Topic overview
Production module configuration requires the analysis of the company production process. The advanced character of the system enables complex handling of production processes. It is possible to include external or internal customers in the production, to produce by lots, to automatically assign serial number and to configure product at the moment of receiving production order.
In the first part of this article, the configuration of the production process is described, whereas in the second – its execution.
The business context of the production module usage is described with the use of the example of shaft turning process. The scheme below presents the production structure which should be created in order to correctly run the production process in the system.
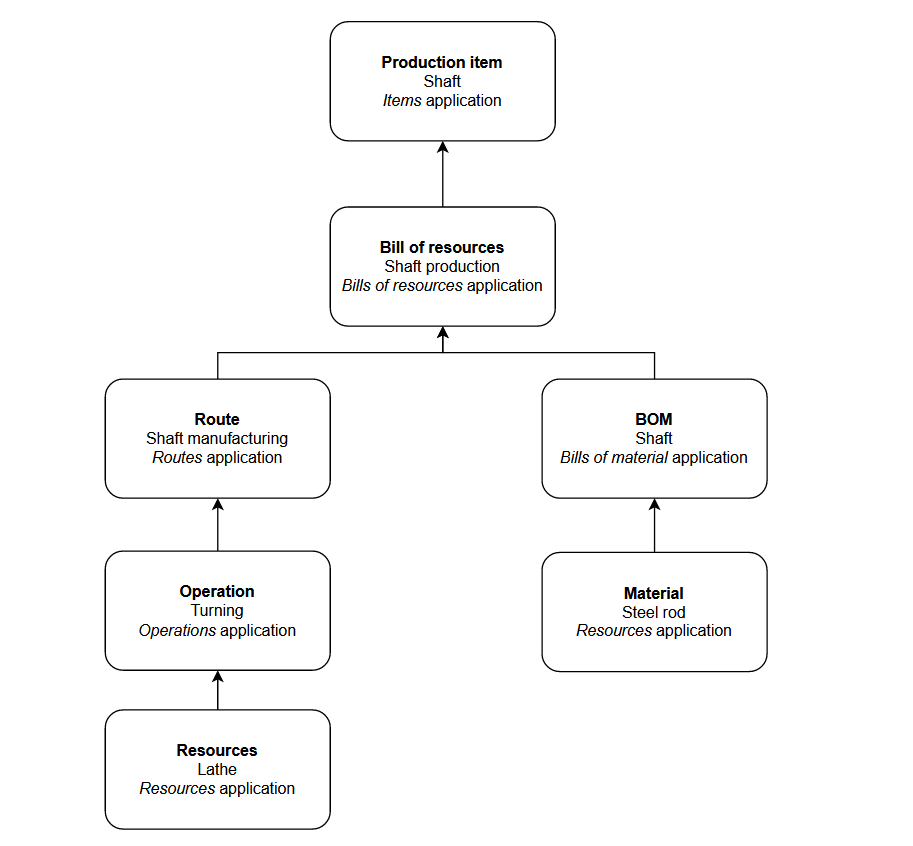
The configuration of the process in the system is divided into the following steps:
- creation of the purchasing item, which will be used as the material for shaft production
- creation of the bill of material containing the material defined in the previous step
- creation of the resource
- creation of the operation
- creation of
- creation of the production technology
- creation of the production item for which the production structure is being defined
Exemplary production processing is executed in the following steps:
- creation and starting of the production order
- posting activities related to the production order
- warehouse receipt of goods
Creating a purchasing item
During the production processes, analysis of make or buy is performed, which defines the provenience of the material used for the production. In the case of this business process, materials used for shaft production, are purchased. To create a steel rod, it is necessary to:
1. Open Items application in order to define new item.
2. To do so, it is necessary to select:
3. Item category: Material
4. Material category: Inventory item
5. Activate Inventory management parameter
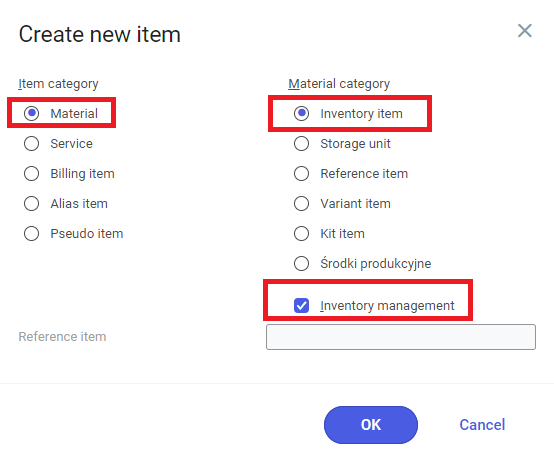
6. Accept the selection in Create new item window, by clicking on [OK] button. Base view will be created for the new item.
It is mandatory do define the item, its description and its base unit. For the item being created, the unit is m3.
7. Create Financials view for the item.
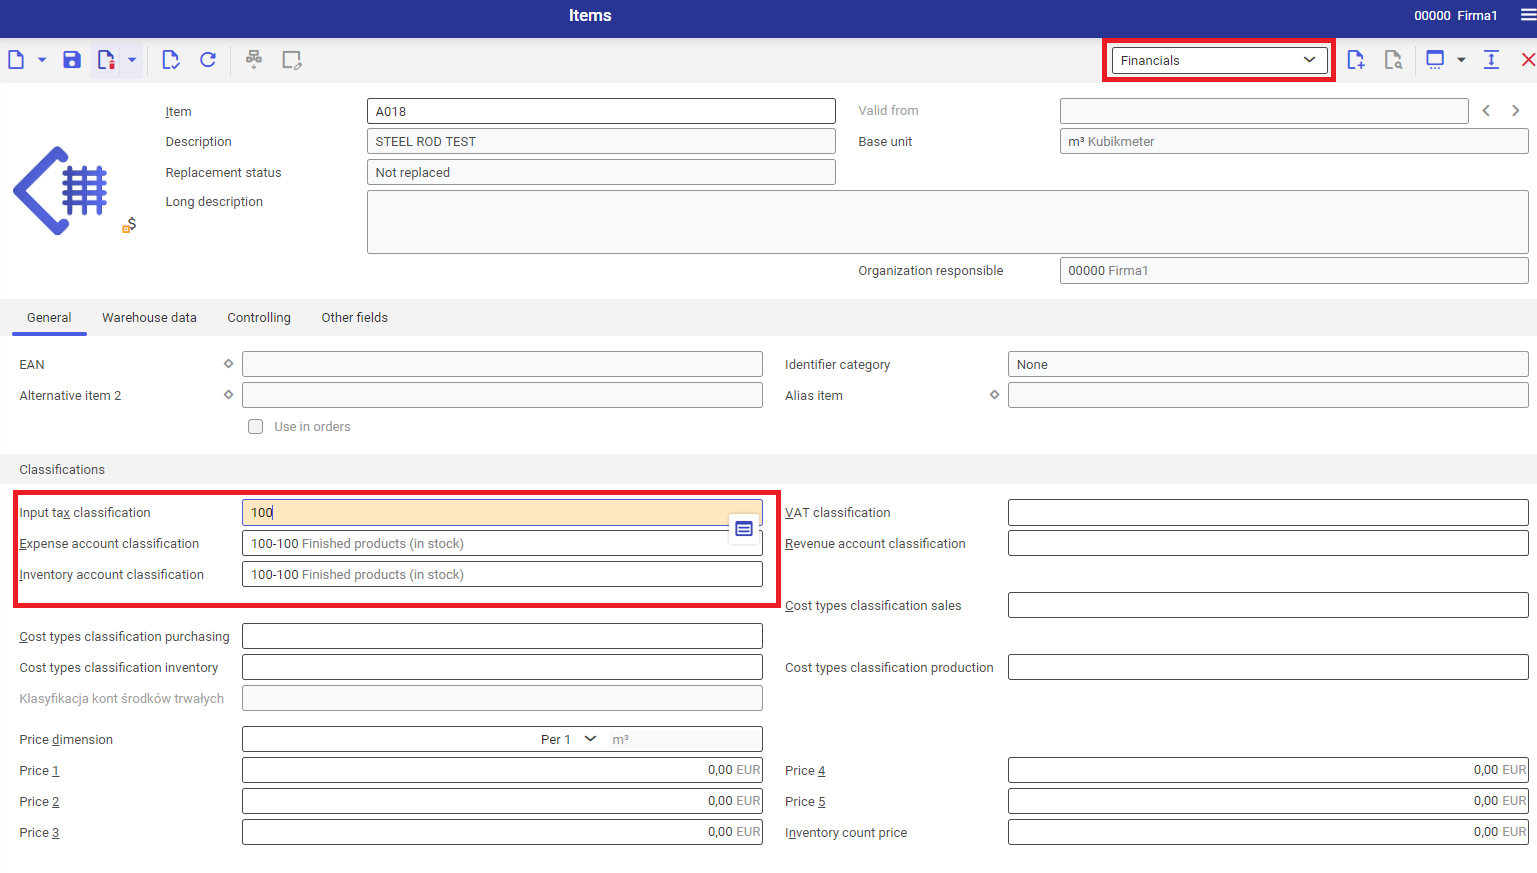
For a purchasing item, which is also stored internally, the following classifications must be selected:
- Input tax classification
- Expense account classification
- Inventory account classification
[Indicator] It is possible to use CTRL + LPM button combination, to go immediately to the application in which selected data is being defined. [/ndicator[
8. Create Inventory Management view for the item.
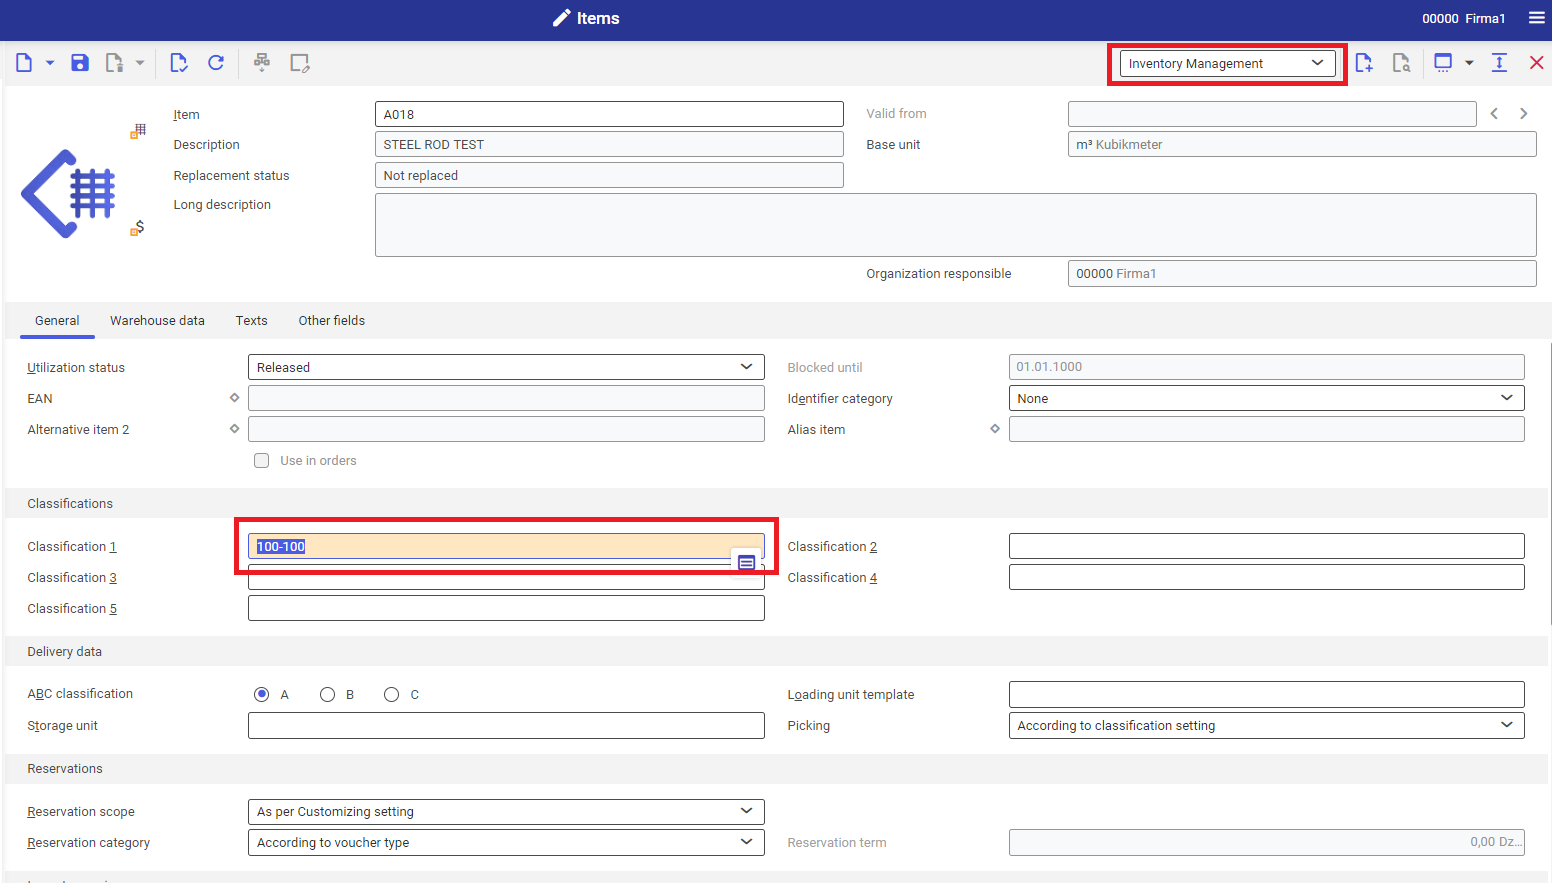
It is mandatory to define Classification 1 for the item. Classifications are created in application Classifications → Warehouse item classification 1.
9. Create Purchasing view for the item.
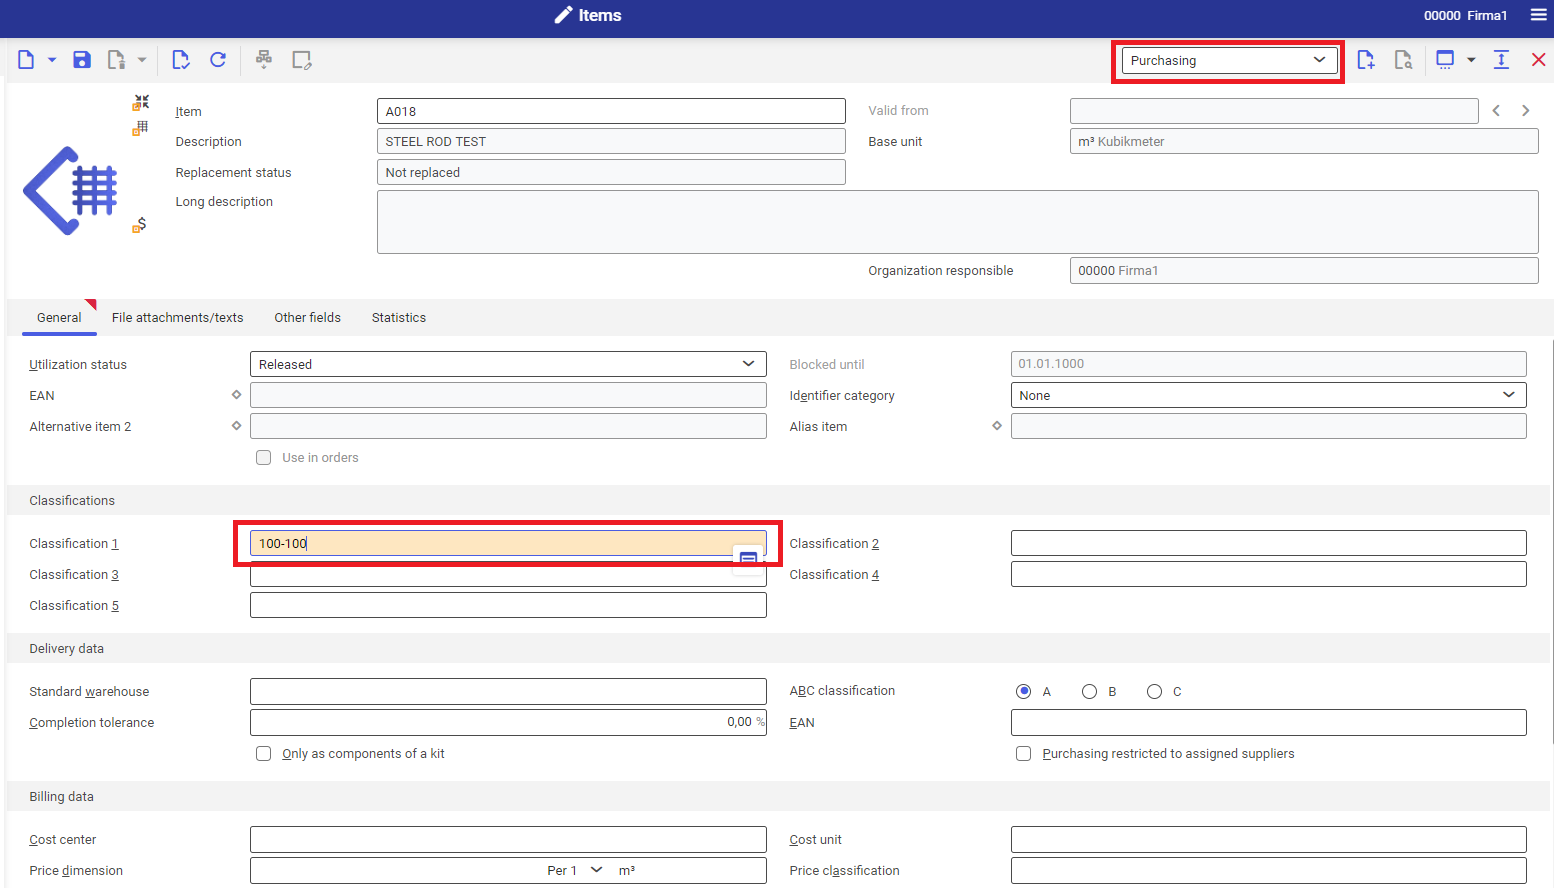
It is mandatory to define Classification 1 for the item. Classifications are created in application Classifications → Purchasing item classification 1.
10. Create Planning view for the item.
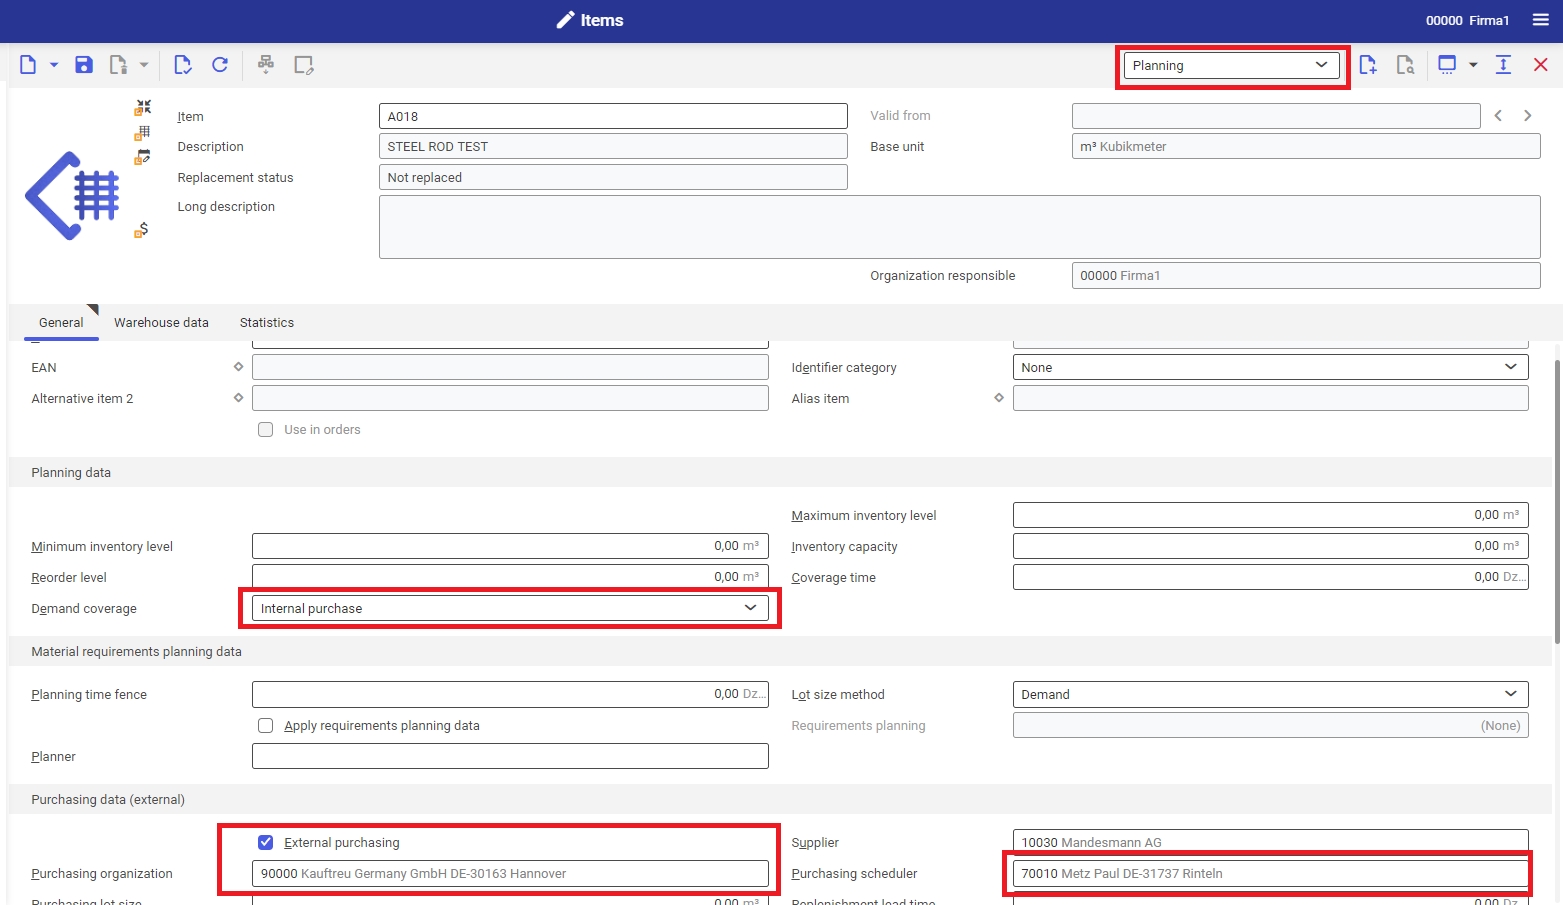
In Planning view, it is mandatory to define:
- In Planning data section, in Demand coverage field, it is necessary to select item source of origin. In the configured example, option Internal purchase is required.
- In case external purchase is selected, it is necessary to activate Purchasing data (external) section by checking parameter External purchase. The following fields are mandatory:
- Purchasing organization – here, it is necessary to select the organization responsible for purchasing in the organization. For the configuration of the example on presentation environment of Comarch company, organization 90000 must be selected.
- Planner – here, it is necessary to define planner responsible for a given purchasing item. In case of starting material demand planning, it is possible to plan items for a selected planner.
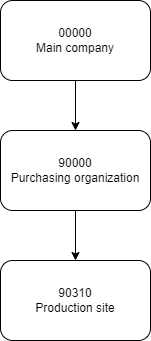
11. The views must be copied to lower company organizations, so that individual affiliates can use already defined information. For multi-level organizational structures, it is necessary to copy views to all organizations. The diagram below presents organizational scheme available in the test environment of the system.
To transfer created views to lower organization, in Items application, it is necessary to:
- From the drop-down menu placed under the standard button bar, select the organization for which created item views are supposed to be copied. For this example, it will be 9000.
- Transferring financials view is blocked in the system, because financials data may differ from organization to organization. If a subordinate organization is a purchasing unit, it is necessary to create Financials view afresh (repeat step 4).
- Other views: Inventory management, Planning, Purchasing must be copied with the use of [Accept data for selected organization], available on the standard button bar. To do so, it is necessary to open a given view and use the button.
- After transferring item data for the purchasing organization, it is necessary to repeat the activity for the production unit. For this example, it will be organization 90310. For the production unit, only Base, Inventory management, Planning and Production views are available, because it is not a purchasing organization.
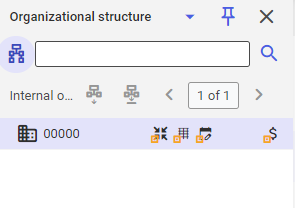
9. To verify the data correctness for lower structures, it is necessary to create item’s organizational structure preview window with the use of the button [Organizational structure]. A correctly created purchasing item should have the following structure:
Creating a bill of material
The main scope of the exemplary production process is processing input material into output material. The bill of material is an instruction for the system, which allows for processing materials into other materials. To create a bill of materials, it is necessary to:
1. In Bill of material define the name of the currently created bill of material.
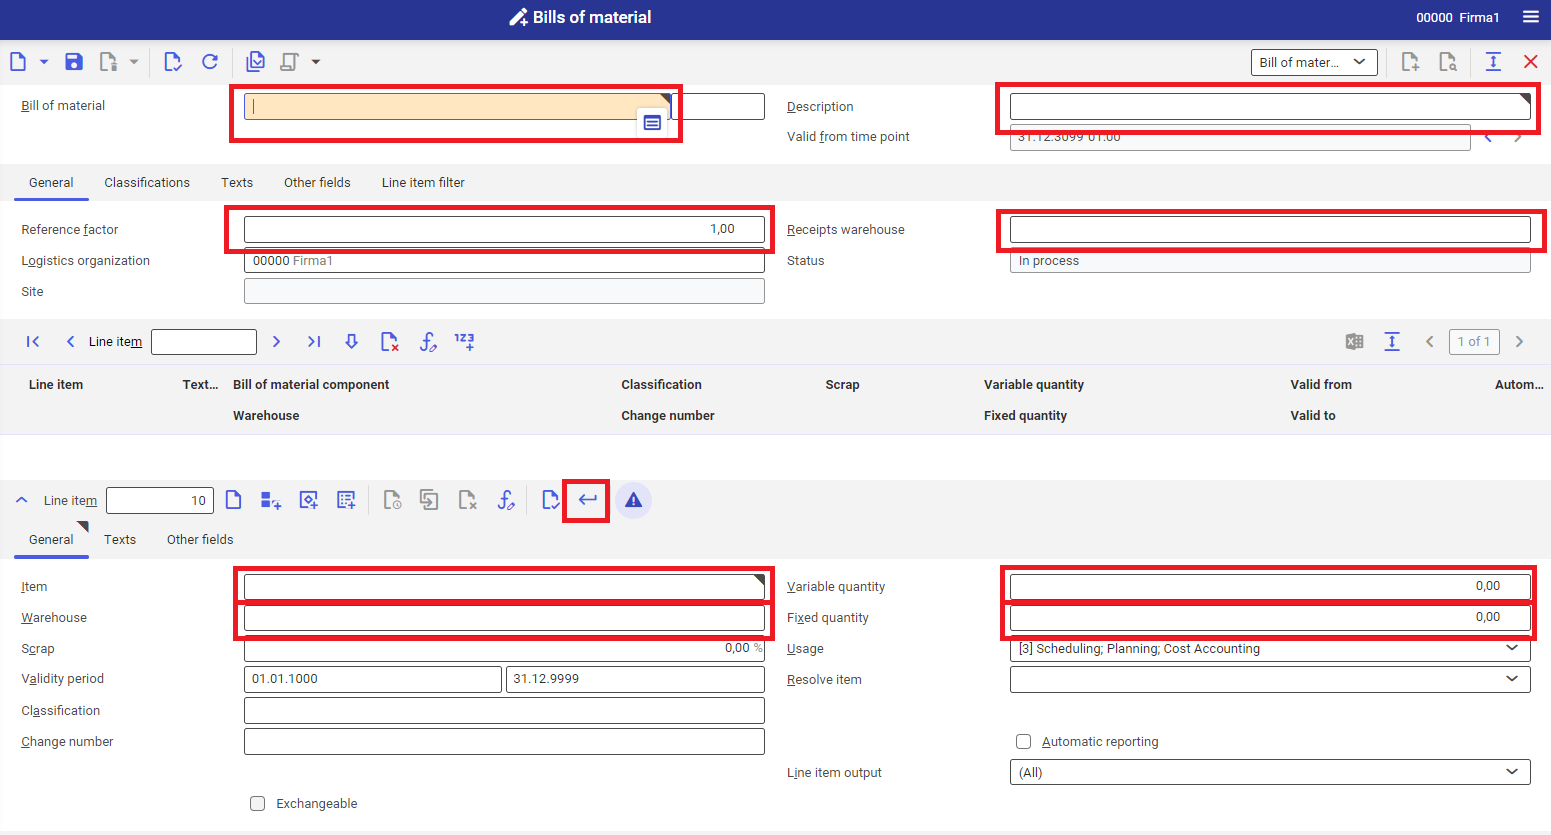
2. In Description field, define the description of the currently created bill of material.
3. In Reference factor field, define reference quantity for the bill of material and unit. The system refers to the reference quantity when producing material. If the reference quantity is 2 and production of 10 pieces of the production item is ordered, the demand for production materials will be properly calculated in accordance with the following formula:
4. For the configured example, define value 1 and set pieces as the unit.
5. In Receipts warehouse field, select the warehouse in which the produced item will be received. Warehouses are created in Warehouses application and are assigned to an inventory management unit, which can be a production organization.
For the configuration of the example on presentation environment of Comarch company, warehouse 100 must be selected.
6. The line item editor allows for adding materials to the bill of material. To do so, it is necessary to:
- In field Item, add the material which is supposed to be added to the bill of material. It is necessary to indicate previously created item.
- In Warehouse field, select the warehouse from which the production material will be taken. For the configuration of the example on presentation environment of Comarch company, warehouse 100 must be selected.
- In Variable quantity field, define quantity and unit of the material required for executing defined reference quantity of the production item. Selected unit must be the same as the unit defined in application Items for the added material. For the configured example, define value 2 m3.
- In Fixed quantity field, define quantity and unit of the material required for making production item. Entered quantity will always be fixed, regardless of the produced item quantity. Selected unit must be the same as the unit defined in application Items for the added material. For the configured example, define value 1 m3.
- Add the line item to the bill of material.
7. Save created bill of material with the use of [Save] button and release it with the use of [Action] → [Release] button.
Creating a resource
To define production process activity, the user must create resources which will be used by the production process for producing production item. To do so, it is necessary to:
- Open Resources application
- In Resources field, define the name of the resource
- In Description field, define the description of the resource
- In Production unit field, select the unit in which the given resource is supposed to work. The default value assigned in Capacity category field is Time-dependent – it limits the possibility of selection to time units only (seconds, minutes and hours). For the configured example, it is required to select hours.
- In Resource unit field, select the unit in which the given resource is supposed to conduct production. For the configured example, it is required to select pieces.
- In Cost center field, it is necessary to select the cost center for which the working time of the given resource will be calculated. For the configuration of the example on presentation environment of Comarch company, 10000 must be selected.
- In Valuation of gaps as interruptions field, select planned resource working time in case there is a break in the time available for production. For the configured example, select the possibility of reservations with gaps.
- I shift: 12:00 – 14:00 (2 hours)
- II shift: 14:00 – 17:00; 17:30 – 22:00 (3 + 4,5 hours)
- III shift: 22:00 – 22:30 (0.5 hour)
Impossibility of making reservations with break can be used, for example, when planning the work of furnaces which cannot be put out, e.g., for the night.
9. In Week time model field, it is necessary to select the time model of the resource work. A week model is defined in Week time models application, by connecting the data defined in applications Shifts and Time models. For the configuration of the example on presentation environment of Comarch company, 200 must be selected.
10. In Resource category field, select the category of the added resource. For the configured example, value Object must be selected.
11. Save created resource with the use of [Save] button.
Creating an operation
Resources are used in the operations to which they are assigned. To define new operation in the system, the user has to:
- Open Operations application
- Create new operation with the use of the button [New operation] → [Operation]. The created operation is an internal production operation. It is created for the production plant in which the production process is being configured.
- In Operation field, it is necessary to enter the operation name
- In Description field, define the description of the operation
- In Reference factor field, define reference quantity for the operation and unit. The system refers to the reference quantity when producing material. If the reference quantity is 1 and production of 10 pieces of the production item is ordered. The working time of the resource will be calculated properly calculated.
- For the configured example, define value 1 with pieces unit.
- In Inventory logistic organization field, it is necessary to define the organization which will be responsible for inventory management processes. For the configuration of the example on presentation environment of Comarch company, organization 90310 must be selected.
- In field Transport type it is possible to define additional transport time which will be added before and after the operation. For the configured example, it is required to define 1 hour.
- Line item editor allows for adding resources which will be used for performing the operation. To do so, it is necessary to:
-
- In field Resources, select the resource created previously in Resources application.
- In Processing time field, define the work time for the resource which is necessary for executing defined operation, for the reference quantity. The processing time must be defined in the time unit which was chosen for the resource in Resources application, in Production unit field. For the configured example, it is required to define 5 hours.
- In Setup time field, define time needed for preparing the machine to work. Regardless of produced quantity, this time will be always the same for the whole process and will not be recalculated by defined reference quantity. For the configured example, it is required to define 1 hour.
- In Service type field, define service category which allows for classifying production costs for a given operation. For the configuration of the example on presentation environment of Comarch company, 100 must be selected.
- Add resource to the operation with the use of [Accept current line item].
10. Save created operation with the use of [Save] button. If the versioning of production data is active or the status of created production data does not have Released status, release it by clicking on button [Execute] → [Release].
Creating a routing
In order to plan a full production process, it is necessary to create routing and assign to it operations indispensable for producing the production item. To do so, it is necessary to:
- Open Routings application
- Create new routing with the use of [New] button in Routing view.
- Define the name of the routing in Routing field.
- In Description field, define the description of the routing.
- In Reference factor field, define reference quantity for the routing and unit. The system refers to the reference quantity when producing material. If the reference quantity is 1 and production of 10 pieces of the production item is ordered – operation quantity will be appropriately recalculated. For the configured example, define value 1 with pieces unit.
- In Inventory logistic organization field, it is necessary to define the organization which will be responsible for inventory management processes. For the configuration of the example on presentation environment of Comarch company it assumes default value 90310.
- Line item editor allows for adding operations which will be used in the production process. To do so, it is necessary to:
- In Operation field, select an operation defined previously in Operations application.
- In Quantity field, define operation quantity necessary for executing the production process for the value defined in Reference factor field. For the configured example, it is required to define 1 piece.
- Add the operation to the routing by clicking on [Accept current line item] button.
8. Save created operation with the use of [Save] button. If the versioning of production data is active or the status of created production data does not have Released status, release it by clicking on button [Execute] → [Release].
Creating a bill of resources
For complex production process, definition of production technology might be helpful. It allows for assigning materials to operations of the production process in an order demanded by a given process. To do so, it is necessary to:
1. Open Bills of resources application
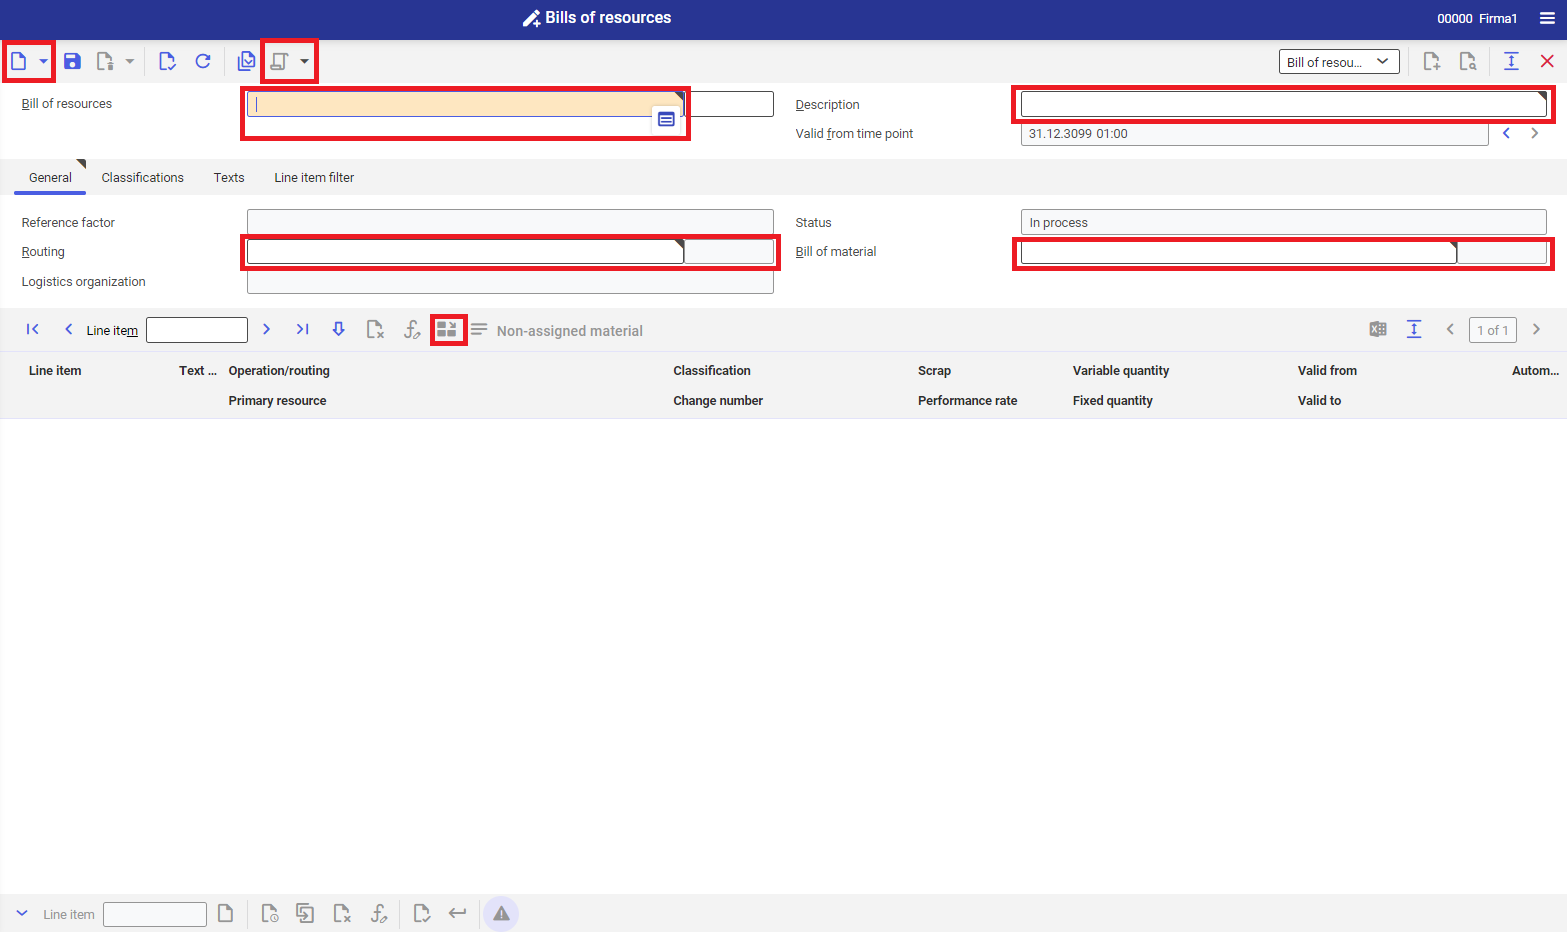
2. In Bills of resources field, define the name of the new bill of resources.
3. In Description field, define the description of the bill of resources.
4. In Routing field, in General tab, select the routing previously created in Routings application.
5. In Bill of material field, select the bill of material previously created in Bills of material application.
6. Save new bill of resources with the use of [Save] button.
7. Then, it is necessary to assign the materials to operations. It means that the material will be retrieved from the warehouse at the moment of initiating the production operation to which it is assigned. To do so, it is necessary to:
- Select operation line item in the table, to which selected materials from a given bill of materials will be assigned.
- Open Assign materials dialog window, by clicking on [Assign materials] button.
- Select materials, by checking the parameter next to those line items which are supposed to be assigned to selected operation.
- Confirm selection, by clicking [Assign] button
8. Save the bill of resources with the use of [Save] button.
Creating a production item
Creation of a production item is indispensable for executing the production process. To the production item, defined production structures must be attached. To do so, it is necessary to:
1. Open Items application.
2. Select previously created purchasing item.
3. Duplicate the item by clicking on [New] → [Duplicate] button. Duplicate item dialog window is opened.
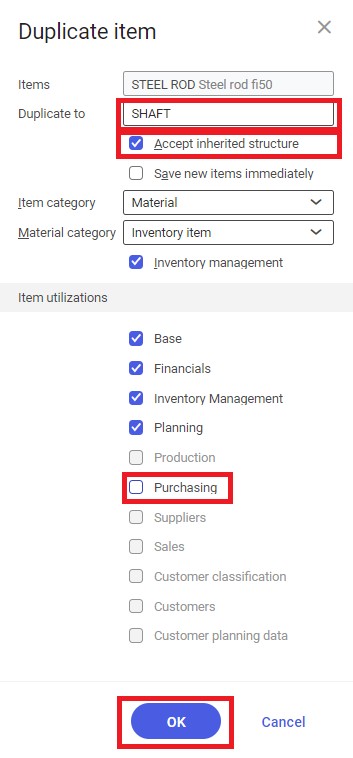
4. In the dialog window, it is necessary to:
-
- In Duplicate to field, enter the name of created production item
- Activate Accept inherited structure parameter
- Deactivate parameter Purchasing – the view is not required for production items.
- Confirm the duplication process with the use of [OK] button.
5. In Base view, change the base item unit in field Base unit. For the configured example, change the unit from m3 to pcs.
6. Modifiy data in Planning view.
- In Planning data section, in Demand coverage field, select Production value.
- In Purchasing data (external) section, deactivate External purchase parameter
- In Production data section
- Activate Apply production data parameter
- In Production scheduler field – define production scheduler responsible for selected production. In case of starting material demand planning, it is possible to plan items for a selected planner.
6. Create Production view for the item.
In Production view, it is necessary to:
- Select Classification 1 for the item. Classifications are created in application Classifications → Production item classification 1.
- In Production method section, select production method. For the configured example, it is required to select Bills of resource.
- In Production methods section, in Bill of material, Routing and Bill of resources field, assign previously created production structures.
7.Copy created view to lower organizations of the company with the use of [Apply data for selected organization], so that they can be used by the affiliates.
8. Save the item with the use of [Save] button. A correctly created production item should have the following structure:
Creating and dispatching a production order
The above-mentioned steps lead to the configuration of the item production structure. Creation of a production order initiates the production process in the system. To create the production order:
- Open application Production orders
- In first part of Production order field, select production order type. Production order type must be previously defined in application Production order types. In this application, input and output settings for production orders are defined. For the configuration of the example on presentation environment of Comarch company, production order type is 100.
- Create new production order of selected type with the use of [New] button. In the second part, production order number will be assigned automatically in accordance with assigned numbering scheme.
- In Item field, select previously defined production item.
- In Target quantity field, define the quantity of the item which is supposed to be produced. For the configured example, it is required to define 10 pieces.
- Go to Scheduling tab.
- In Scheduling category field, select the method of production planning. Detailed description of schedule types can be found in articles Start and Production orders. For the configured example, select Forward one level. It means that the system plans the production as fast as possible, starting from the beginning date, selected in Earlies begin field.
- Save created production order with the use of [Save] button.
- Start production order with the use of [Select action] → [Dispatch]. After defining the production structure and creating the production order:
- In Dispatching tab, fields Bill of resources, Bill of material and Routing are filled-in in accordance with defined production data.
- Assigned materials, operations and resources appear in the work pane table in quantities recalculated in accordance with the data defined in the production structure.
10. Release production order for production by clicking on [Select action] → [Release].
11. The production order has been planned for production. It is possible to display graphical preview of the planned order. To do so, it is necessary to:
- Open Resource allocation application
- In Order field, enter the type and number of created production order.
- Update application view by clicking on [Refresh] button.
- Open Diagram tab. The production order will be planned for production within two production changes along with gaps and free days (in accordance with the weekly model defined in the Resources application and the possibility of reservations with breaks).
Posting activities related to the production order
Posting activities related to the production order allows for releasing materials for productions and reporting the execution of production operations. To do so, it is necessary to:
- Open the Production issues application, which allows for issuing materials for production.
- In Order field, enter the type and number of created production order. After accepting, the material necessary for issuing appears in the table.
- In Post field, define the quantity of the material issued for production. For the configured example, receive a full issue in accordance with the production order requirement, that is 21 m3.
- Activate the parameter next to the line item in the table.
- Accept the production issue.
To do so, it is necessary to:
6. Open Operation postings application
7. In Order field, enter the type and number of created production order. After accepting, the operation necessary for executing the production appears in the table.
8. In Reported quantity filed, enter ne quantity of item which was produced during the planned operation. For the configured example, it is required to define 10 pieces.
9. In Reported setup time field, define time of preparation of the machine to work. For the configured example, it is required to define 1 hour.
10. In Reported processing time field, define time of the work of the machine. For the configured example, it is required to define 50 hours.
11. Activate Completed parameter next to the line item in the table.
12. Accept the report with the use of [Post operation] button.
13. Open application Production orders
14. Open previously created production order.
15. After reporting production order, the fields of actual quantity should contain the values of target quantities. It also means that the item has been produced in required quantity.
16. It is possible to receive produced quantity manually or automatically. In this example of production process, regarding the selection in Production order types, in Automatic reporting field of the value On receipt of goods from production, the goods will be automatically received into the warehouse after reporting the last production order operation.
Warehouse receipt of goods
If there is no automatic production item, after reporting the last production order, it is necessary to follow the instruction presented below. The last step in the production process consists of receiving produced item into the warehouse. To do so, it is necessary to:
- Open Receipts of goods application.
- Change the view to Production – it means that the reception of goods will be a reception from production.
- In the first part of Receipts of goods number field, select receipt of goods type. Receipts of goods type must be previously defined in application Receipt of goods types. In this application, input and output settings for the receipt of goods process. For the configuration of the example on presentation environment of Comarch company, 110 receipt of goods.
- Create new receipt of goods of selected type with the use of [New] button. As in the case of the production order, if the receipt is created correctly, in the second part of the Receipt of goods number, the document number should be assigned automatically in accordance with assigned numbering scheme.
- Add line item to the receipt of goods with the use of [Insert line items from orders] action. Insert line items from orders dialog box will be opened.
In the dialog window, it is necessary to:
- In Production order field, enter the number of the production order to whose production belong the goods which are to be received into the warehouse. Accept with the use of Enter key.
- The produced item will be displayed in the table
- In Quantity filed, enter the quantity which will be received in the warehouse
- Activate the parameter next to the line item in the table.
- Accept with the use of [Accept all selected] button.
- The line item will be added to the receipt of goods document line item editor.
6. Add the line item to the receipt of goods document, by clicking on [Apply] button.
7. Save the receipt of goods with the use of [Save] button.
8. Confirm the receipt of goods with the use of button [Select action] → [Post receipt of goods].
9. In opened dialog window Post receipt of goods, confirm the receipt of goods by clicking on [Output] button.
10. The received goofs, after printing, will be visible in the warehouse stock, which can be checked in application Cockpit: Inventories/items.