
Topic overview
This article describes the procedures for working with the Import data application with regard to partner data. These procedures contain general instructions, such as the sequence that must be followed to import partner data. Furthermore, this document discusses the preconditions and effects of partner data import. For a description of the Import data application itself, see the Import data article.
Definition of terms
Extensible Markup Language (XML)
It is a universal markup language used to represent different data in a structured way. XML allows structured data to be saved in a text file. The description language enables the definition, transfer, checking, and interpretation of data between applications and is especially suitable for structured data exchange. Content, structure, and information are separated for presentation in XML documents.
Separator-delimited text (CSV)
CSV (comma-separated values) is a file type in which the values of individual columns are delimited by a separator. Rows are delimited by line breaks. This separator must be known in order to import the file. Usual separators are, for example, the simple comma and the semicolon. Data saved in this format can be used and processed in numerous application programs. The simple, non-hierarchical structure of CSV means that this file type is not suitable for mapping complex data structures.
Tab-delimited Unicode text
This file type is similar to CSV, except that the separator is a tab and the character encoding is Unicode. Files in this format can be used in Microsoft Excel, among other applications. In order to save this file type in Excel, you must specify the file type with the same name in Excel.
General
Two categories of data exchange are distinguished in the system:
- Data exchange between existing Comarch ERP Enterprise systems
- Data import from an older system to a newly configured Comarch ERP Enterprise system
The data exchange between systems is described in detail in the Import data and Export data articles.
You can use various import formats. The following formats are available:
- XML format
- CSV format
- XLS format
- JSON format
Each format has special properties that affect the data import.
If import is carried out in XML format, all of the data desired can be imported
in a single import operation.
If import is carried out in CSV format, a different procedure is necessary. A technical limitation exists in that parallel 1:n relationships between business objects cannot be represented in one import file. That means, for example, that it is not possible to import supplier and customer data from one file. However, it is possible to work with references and, thus, to import most of the data within one import operation, even from multiple files. This plays a decisive role in the import speed.
1. Use the Partners application to create a sample partner and export it with the filter for import (sic) in the desired format and with the desired attributes
2. The sample file produced in this way can be used as a template for the import files to be generated
Processes
This chapter discusses the preconditions that must be met for importing partner data and the procedures for working with the Import data application:
- Importing data
- Necessary attributes for importing data from older systems
- Sequence
- Importing a new partner
- Importing a new partner role
- Importing a partner role for a subordinate organization
- Importing an inherited structure
Importing data
Instructions
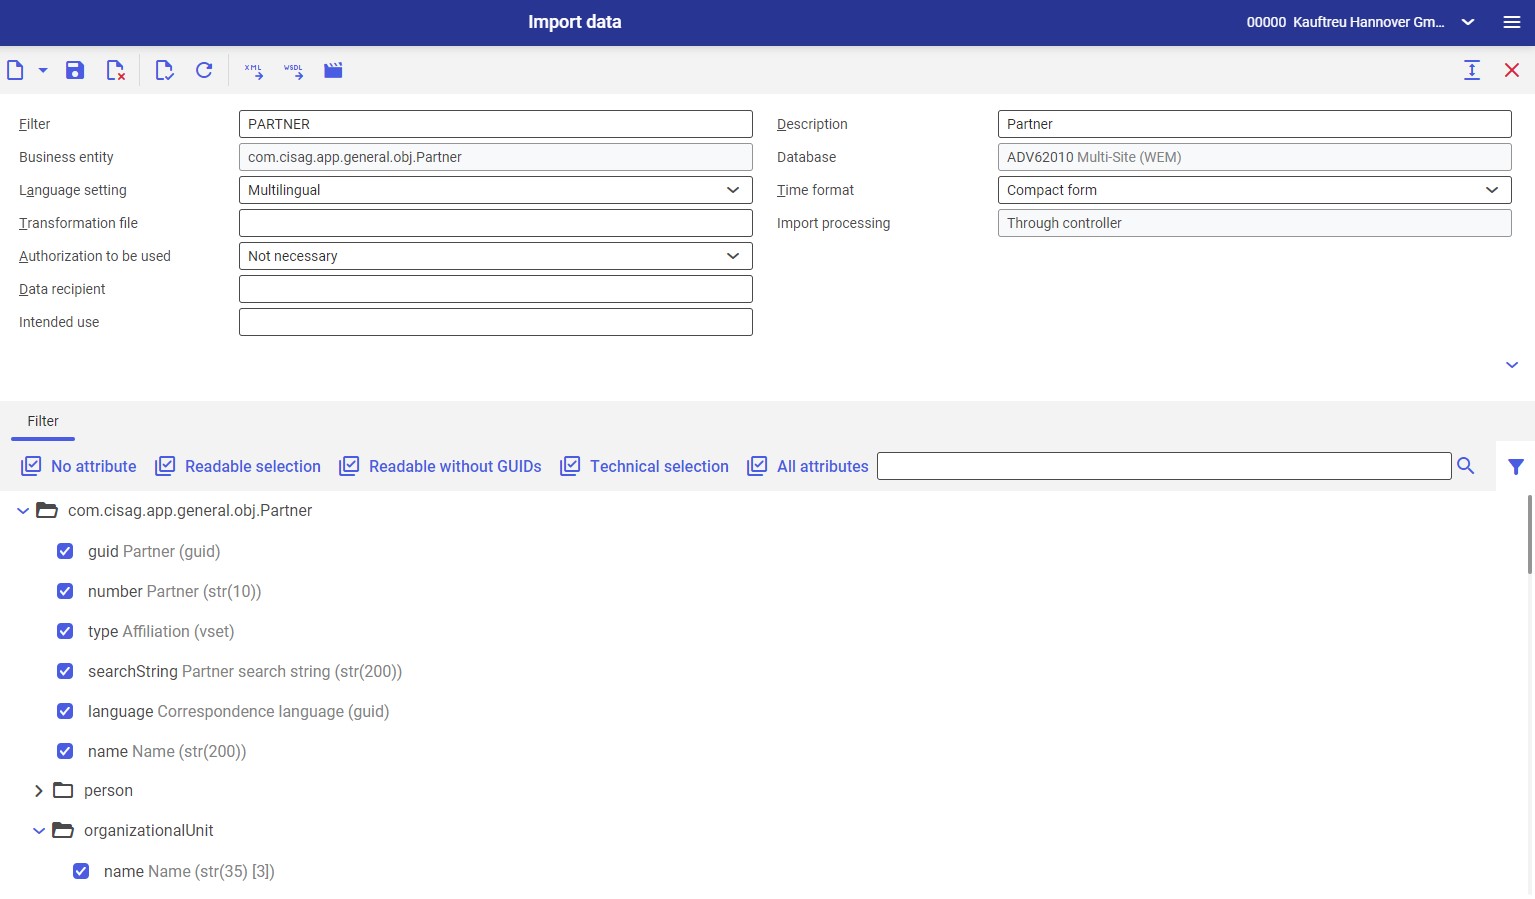
1. Open the Import data application
2. Select the Partner value in the Filter field
3. Select the filter for the com.cisag.app.general.obj.Partner business entity in the Business entity field
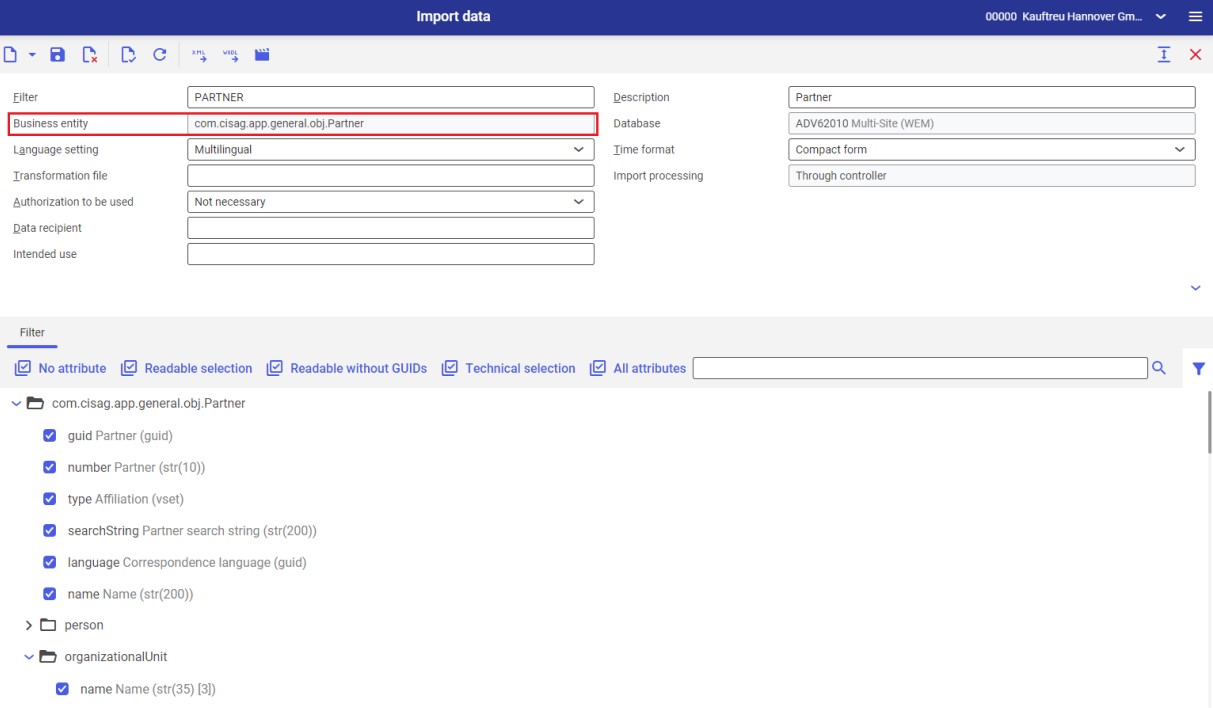
4. Selected filter attributes will be activated. If required, it is possible to further adjust attributes.
5. Click the [Import data] button in the standard toolbar
6. The Import data dialog window will open. The window makes it possible to adjust import file settings.
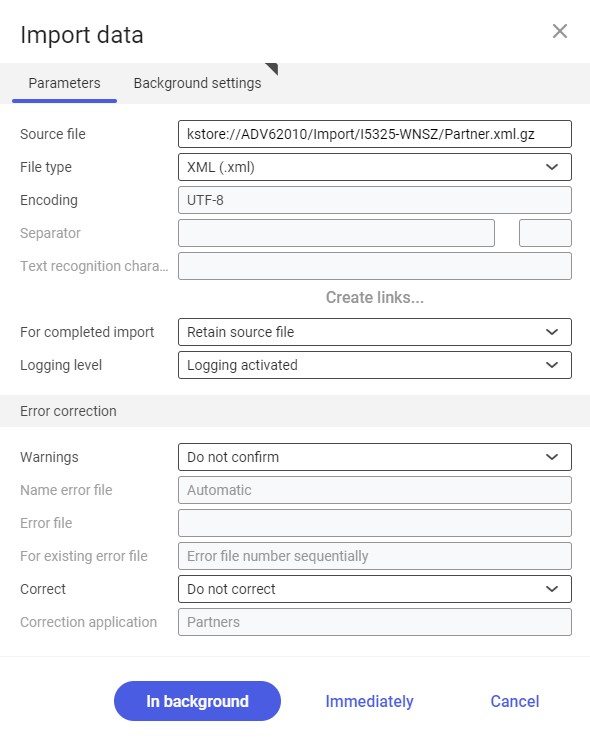
7. Click the [In background] button to initiate import
Necessary attributes for importing data from older systems
To import data from earlier versions of the system, it is necessary to specify at least the following attributes for each Partner business entity:
- Identification attributes (business key)
In most business cases you are probably using the business key, while the primary key is generated automatically when import is carried out.
- Required fields
The Partner business object cannot be assigned without the identification attributes. The required fields and identification attributes of individual business objects are summarized in the Identification fields and required fields chapter.
If the primary key of a business object consists solely or partly of an external key, the business object to which this external key refers must be resolved in the import file by means of its identification attributes.
the organizationalUnit attribute. This attribute refers to an organization that is, in turn, specified by an identification.
Sequence
If the user wants to import data items that are dependent on one another, it is necessary to follow the defined sequence.
Standard sequence
1. Employees of the company
2. Customer and suppliers that refer only to themselves in partner relationships (invoice recipient, delivery recipient, invoicing party, delivery partner)
3. Customers and suppliers that refer to other partners in partner relationships
4. Employees of customers and suppliers
5. Contact person relationships
6. Bank detail data of all partners
Standard sequence for a single-site environment
1. Base data
2. Financials data
3. Role data
Sequence and additional conditions for a multi-site environment
If the user wants to import a Customer, Supplier, or Marketing role, it is necessary to import the active OLTP client data for the relevant usage before any other organizations.
In the Partners application, it is also possible to maintain relationships to other partners, such as invoice recipients and contact persons, and therefore the sequence of partner data must also be observed during the import.
Importing a new partner
Preconditions
- The destination system does not yet contain any partners with the corresponding key
The business key is the attribute number for the Partner object. The primary key is the GUID technical identifier.
- A filter is available for the business object cisag.app.general.obj.Partner which contains attributes to be imported
Instructions
Perform the steps as described in the chapter Importing data. Data import can then be performed immediately or as a batch job. The system determines the time at which these processes start and initiates them. The user cannot influence the start time.
Importing a new partner role
Preconditions
- The destination system already contains a partner with the corresponding key. That is, the base data has already been imported.
- A filter is available for the business entity cisag.app.general.obj.Partner which contains attributes to be imported
- The data of the role to be imported relates to the organization of the active OLTP client (except employees and financials)
Instructions
1. Generate an import file that contains at least a partner number (partner code) and the data of the role to be imported. If the role also contains the organizationalUnit attribute, the field must always be filled in (this also applies to single-site environments).
2. Ensure that all required fields of the role to be imported (see section Identification fields and required fields) are specified
3. Perform the steps as described in the chapter Importing data
Importing a partner role for a subordinate organization
Preconditions
- The system is a multi-site environment
- The destination system already contains a partner with the corresponding key. That is, the base data has already been imported.
- A filter is available for the business entity cisag.app.general.obj.Partner which contains attributes to be imported
- Before starting the import, ensure that data for the corresponding role/view of the Partners application already exists
Instructions
1. Generate an import file that contains at least a partner number (partner code) and the data of the role (view in the Partners application) to be imported and its key (organizationalUnit)
2. Ensure that all required fields of the view/role to be imported (see section Identification fields and required fields) are specified
3. Perform the steps as described in the chapter Importing data
Importing an inherited structure
Preconditions
- The system is a multi-site environment or content-based authorizations are active
- The organization that is to inherit the data must be authorized for this role
- The organization must be a subordinate organization
- The destination system already contains a partner with the corresponding key. That is, the base data has already been imported.
- At the level of the organization, data must already exist for the corresponding role from which the destination organization is to inherit the data
- A filter is available for the business entity cisag.app.general.obj.Partner which contains attributes to be imported
Instructions
1. Generate an import file that contains at least a partner number (partner code) and the identification attribute
2. The inherited structure of the roles is defined in the OrganizationalUnitPartner business object. Each role having an inherited structure has a reference attribute in this business object:
| Role | Reference attribute |
|---|---|
| Suppliers | MaintainingPurchasingOrganization |
| Marketing data | MaintainingMarketingOrganization |
| Customers | MaintainingSalesOrganization |
In the reference attribute for the corresponding role, enter the organization from which the destination organization is to inherit data.
3. Make sure that the subordinate organization is also authorized to inherit data for the role to be imported.
4. Perform the steps as described in the chapter Importing data
Change via import
The import function allows the user to easily make changes to partners. For example, if the user wants to set the credit limit to a new value for all accounts receivables, this is also possible via an import operation.
Instructions
Generate a filter that contains a partner number, the key attribute of the role, and the fields to be changed. Then, export the corresponding partners, e.g. in CSV format. Change the relevant field in the file created. Then, import the file again with the generated filter.
The following example will change the credit limit to 50,000.
| Partner number/code | PartnerAccountingData.OrganizationalUnit | PartnerAccountingData. creditLimit.amount | PartnerAccountingData. creditLimit.Currency |
|---|---|---|---|
| 4711 | Firm 1 | 50,000 | EUR |
| 4711 | Firm 1 | 50,000 | CHF |
| 4713 | Firm 2 | 50,000 | CHF |
Deleting partners or roles
An import operation can also be used to flag existing partners or individual roles for deletion. Likewise, it is also possible to remove a deletion marker in this manner. Import has the same effect as pressing the [Mark for deletion] button in the Partners application.
To set a deletion marker, the corresponding business object is imported in the Delete mode. Likewise, the corresponding business object must be imported in the Delete mode in order to remove an existing deletion marker again.
This mode can only be set in XML format. More information may be found in the article Introduction: Data exchange.
| XML | Effect |
|---|---|
<Partner | If partner 4711 still has no deletion marker, it will now be marked in its entirety for deletion. That is, a deletion marker is also applied to all roles (views) in all organizations. If partner 4711 already has a deletion marker, it will be removed again for the base data. More information may be found in the article Procedures: Partners. |
<Partner | If the Customer role of partner 4712 still has no deletion marker, the Customer role will now be marked in its entirety for deletion. That is, a deletion marker is also applied to a given role (view) in all organizations. If partner 4711 already has a deletion marker, it will be removed again for the base data. More information may be found in the article Procedures: Partners. |
<Partner | If the Customer role of partner 4713 still has no deletion marker at the level of organization 90000, the Customer role at the level of this organization will be marked for deletion. If the Customer role of the partner already has a deletion marker at the level of organization 90000, it will be removed. |
<Partner | If the Financials role of partner 4714 still has no deletion marker at the level of organization 92000, the Financials role at this organization level will now be marked for deletion. If the Financials role of partner 4714 already has a deletion marker at the level of organization 92000, it will be removed. |
Import with CSV files
With CSV files, it is also possible to import multiple data, such as multiple roles and organizations, in one import run. For reasons of import speed, it is recommended to import as much information as possible in the first import operation.
The files should have the following structure:
1. The main file contains all information of the required base data
2. A subsequent file contains communication data
3. A subsequent file contains financials data
4. A subsequent file contains customer data
In this file, it is important that the first line with a partner number contain data for the active OLTP client organization.
5. Additional files could then contain data for additional roles (views)
It is important here that the sequence of partners in the individual files correspond to the sequence of partners in the main file. Individual partner numbers can be omitted if a partner is not assigned to a role. To import this data in one import operation, references must be defined. Partner numbers not contained in the main file must not be specified in the referenced files.
References of files
Instructions: Data import with references of files
1. Open the Import data application
2. Select the filter for the com.cisag.app.general.obj.Partner business object
3. Selected filter attributes will be activated. If required, it is possible to further adjust attributes.
4. Click the [Import data] button in the standard toolbar
5. The Import data dialog window will open. The window makes it possible to adjust import file settings.
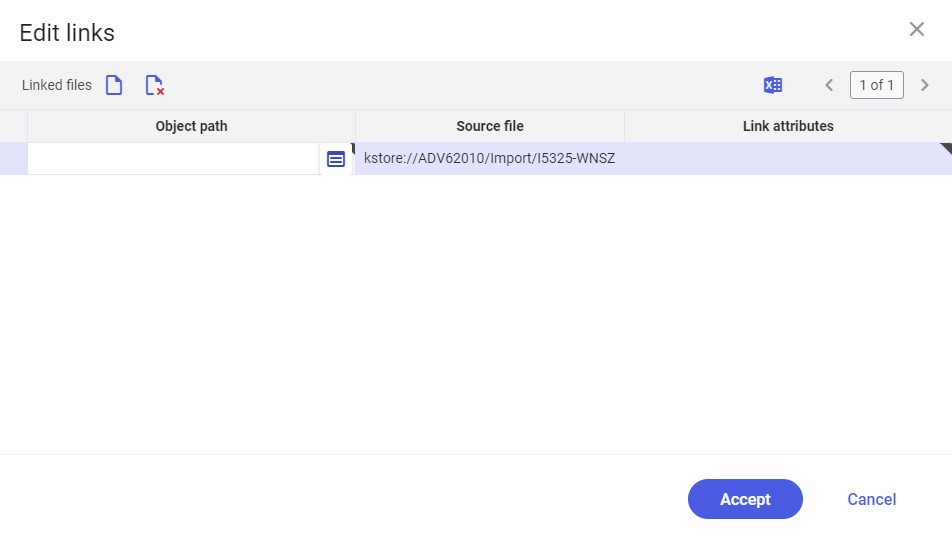
6. Click the [Create links…] button
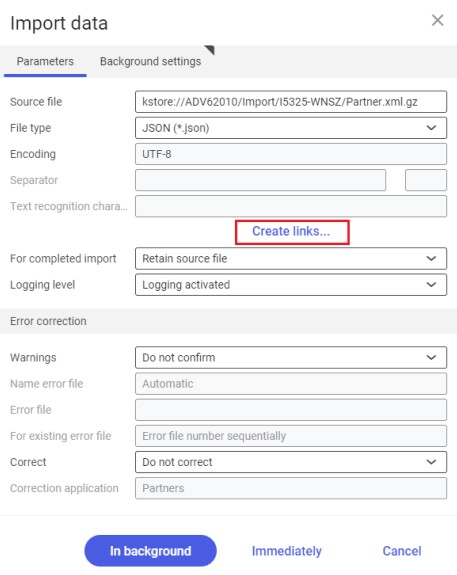
8. Specify the object path, the source file in the KStore repository and the referencing attribute
9. After the [Accept] button is selected, the system opens a window where it is necessary to select a processing queue
10. To start the file import, click the [In background] button
Examples
The structure of the base data file and the additional files is described below.
Base data file
| number | human | searchString |
|---|---|---|
| 4711 | false | Myers JSC |
| 4711 | false | Doe JSC |
| 4713 | false | Smith JSC |
Communication data file
| number | CommunicationData.commData | CommunicationData.commData |
|---|---|---|
| 4711 | +49 123 456 | 100 |
| 4711 | Xyz@myers.de | 200 |
| 4713 | +12 456 789 | 100 |
The 4712 file contains no communication data.
Financials data file
| number | PartnerAccountingData.Organizationa lUnit | PartnerAccountingData |
|---|---|---|
| 4711 | Firm 1 | false |
| 4711 | Firm 2 | true |
| 4713 | Firm 2 | true |
Customer data file
| number | Customer.OrganizationalUnit | Customer.OrganizationalUnit |
|---|---|---|
| 4711 | Active OLTP client | 100 |
| 4711 | Sales organization 1 | 100 |
| 4713 | Active OLTP client | 200 |
Supplier data file
| number | Supplier.OrganizationalUnit | Supplier.classification1 |
|---|---|---|
| 4711 | Active OLTP client | 100 |
| 4711 | Purchasing organization 1 | 100 |
| 4711 | Purchasing organization 2 | 100 |
All these files can be transferred in one import operation. The base data file is the main file. The other files are linked by means of references.
Bank details file
A bank details file can be imported afterwards in a further import operation.
| number | PartnerAccountingData.OrganizationalUnit | PartnerAccountingData |
|---|---|---|
| 4711 | Firm 1 | true |
| 4711 | Firm 2 | false |
| 4712 | Firm 1 | true |
In this case, the import is performed without references and the bank details file is the main file. It must be noted here that the bank details – as in the case of tax information (PartnerTaxIdentification) – are saved independent of the organization. However, they must be embedded in an organization-dependent PartnerAccountingData object.
Employee data file
| number | Employee. employee Number | Employee. employee Number | Employee. PartnerRelations. SourceOrganizationalUnit | Employee. PartnerRelations. SourceOrganizationalUnit | Employee. PartnerRelations. SourceOrganizationalUnit |
|---|---|---|---|---|---|
| 4711-A | 100001 | true | Active OLTP client | 4711 | Employee |
| 4712-A | 121212 | true | Sales organization 1 | 4712 | Employee |
In this case, the user should work with a reference again. The main file is a file that contains the base data of the employees. This file is referenced with the employee data file.
Contact partner relationships in the base view
| number | PartnerRelations.preferred | PartnerRelations.preferred | PartnerRelations.Target | PartnerRelations.Type. |
|---|---|---|---|---|
| 4711 | true | Active OLTP client | 4711-A | Contact |
| 4712 | true | Active OLTP client | 4711-A | Contact |
In this case, additional partners will also be referenced. For this reason, it is appropriate to import this file in an additional import operation.
Contact partner relationships in the Customer view
| number | Customer. OrganizationalUnit | Customer. PartnerRelations. preferred | Customer. PartnerRelations. OrganizationalUnit | Customer. PartnerRelations. Target | Customer. PartnerRelations. Type |
|---|---|---|---|---|---|
| 4711 | Active OLTP client | true | Active OLTP client | 4711-A | Contact sales |
| 4711 | Sales organization 1 | true | Active OLTP client | 4711-A | Contact sales |
Additional partners will be referenced in this case, as well. For this reason, it is appropriate to import this file in an additional import operation.
Example of importing the inherited structure of the Supplier role
| number | Organizational UnitPartner.supplier | Organizational UnitPartner.MaintainingPurchasing Organization | Organizational UnitPartner.OrganizationalUnit |
|---|---|---|---|
| 4715 | true | Active OLTP client | Purchasing organization 1 |
| 4716 | true | Purchasing organization 1 | Purchasing organization 2 |
In this example, partner 4715 in Purchasing organization 1 inherits the supplier data of the active OLTP client. Partner 4716 inherits the data of Purchasing organization 1 in Purchasing organization 2. This requires that partner 4715 be the supplier at the active OLTP client level and that partner 4716 maintain the supplier data itself in Purchasing organization 1 and that Purchasing organization 2 be a lower-level organization of Purchasing organization 1.
Identification fields and required fields
The required fields and key attributes (K) of the individual business objects are listed below. The identification fields and required fields are subject to changes and can also be expanded by partner adaptations.
Base data
Required field/Key attribute (K)
- number (K) – partner number
- human – flag indicating whether the partner is a person
- searchString – partner search string (it can also remain empty, in which case it is formed automatically)
- MaintainingOrganization – organization responsible (this attribute is only required for a multi-site environment or if content-based authorizations are active)
- Language – correspondence language
- type – affiliation
- surname – surname for persons
- gender – gender for persons
- name[0] – name 1 for organizations
- type – organization category
- postalCode – PLZ, required field status is dependent
- city – city
- country – country
Communication details
Required field/Key attribute (K)
- number (K) – partner number
- commData (K) – communication data (phone number, fax number, etc.)
- preferred – preferred communication data
- Method – communication method
Financials data
Required field/Key attribute (K)
- number (K) – partner number
- OrganizationalUnit(K) – organization
- TaxResidence – tax municipality
- birthDate – date of birth
- PaymentReason – payment reason
Required field/Key attribute (K)
Accounts receivable
- outputTaxClassification – VAT classification
- receivablesPartner – A/R account; the field is only required if the Financials function is activated in the Customizing application
- receivablesTemplate – account template of the accounts receivable; the field is only required if the Financials function is activated in the Customizing application
- creditLimit.amount – amount of the credit limit
- creditLimit.Currency – currency of the credit limit
- debtor – accounts receivable
- SalesCurrency – currency of the accounts receivable
- TaxRegister – tax register of the accounts receivable
- SalesPaymentTerms – payment term of the accounts receivable
Accounts payable
- outputTaxClassification – input tax classification
- payablesPartner – A/P account; the field is only required if the Financials function is activated in the Customizing application
- payablesTemplate – account template of the accounts payable; the field is only required if the Financials function is activated in the Customizing application
- creditor – accounts payable
- PurchasingCurrency – currency of the accounts payable
- TaxRegisterCreditor – tax register of the accounts payable
- PurchasingPaymentTerms – payment term of the accounts payable
Tax identification
VAT Id and Codice fiscale are managed in a separate business object. This business object is dependent on the organization, and the fields are not required fields. For the import, however, integration into one organization-based attribute (PartnerAccountingData) is required.
Required field/Key attribute (K)
- number (K) – partner number
- OrganizationalUnit(K) – organization
- PartnerTaxIdentification.taxIdentificationNumber – VAT identification
- PartnerTaxIdentification.localTaxIdentificationNumber – tax no.
The specification of the organization is only required in a multi-site environment. If the organization is not specified in a single-site environment, the organization is set to that of the active OLTP client.
Bank details
Required field/Key attribute (K)
- number (K) – partner number
- OrganizationalUnit (K) – organization
- BankAssignment.bank.country (K) – country
- BankAssignment.bank.code (K) – bank routing number
- BankAssignment.BankBranch (K) – bank branch
- BankAssignment.bankAccount (K) – account number
- BankAssignment.preferred – preferred bank assignment
The specification of the organization is only required in a multi-site environment. If the organization is not specified in a single-site environment, the organization is set to that of the active OLTP client.
Suppliers
Required field/Key attribute (K)
- number (K) – partner number
- OrganizationalUnit(K) – organization
- classification1 – classification 1
- deliveryDataInfo.DeliveryTerms – delivery term
The specification of the organization is only required in a multi-site environment. If the organization is not specified in a single-site environment, the organization is set to that of the active OLTP client.
Customers
Required field/Key attribute (K)
- number (K) – partner number
- OrganizationalUnit(K) – organization
- classification1 – classification 1
- deliveryDataInfo.DeliveryTerms – delivery term
Marketing
Required field/Key attribute (K)
- number (K) – partner number
- OrganizationalUnit (K) – organization
Employee
Required field/Key attribute (K)
- number (K) – partner number
- PartnerRelations.preferred – preferred (employer relationship)
- PartnerRelations.SourceOrganizationalUnit – organization
- PartnerRelations.Target – employee
- PartnerRelations.Type – relationship category, must always be of the Employee type
Partner organizational unit
Required field/Key attribute (K)
- number (K) – partner number
- OrganizationalUnit (K) – organization