
The Output currencies application may be used to print or send (as a file) relevant information about available currencies, according to parameters and settings defined.
With the use of a report, values entered in the Currencies application are retrieved.
The Output currencies application is composed of the standard toolbar and Parameters and Output settings sections.
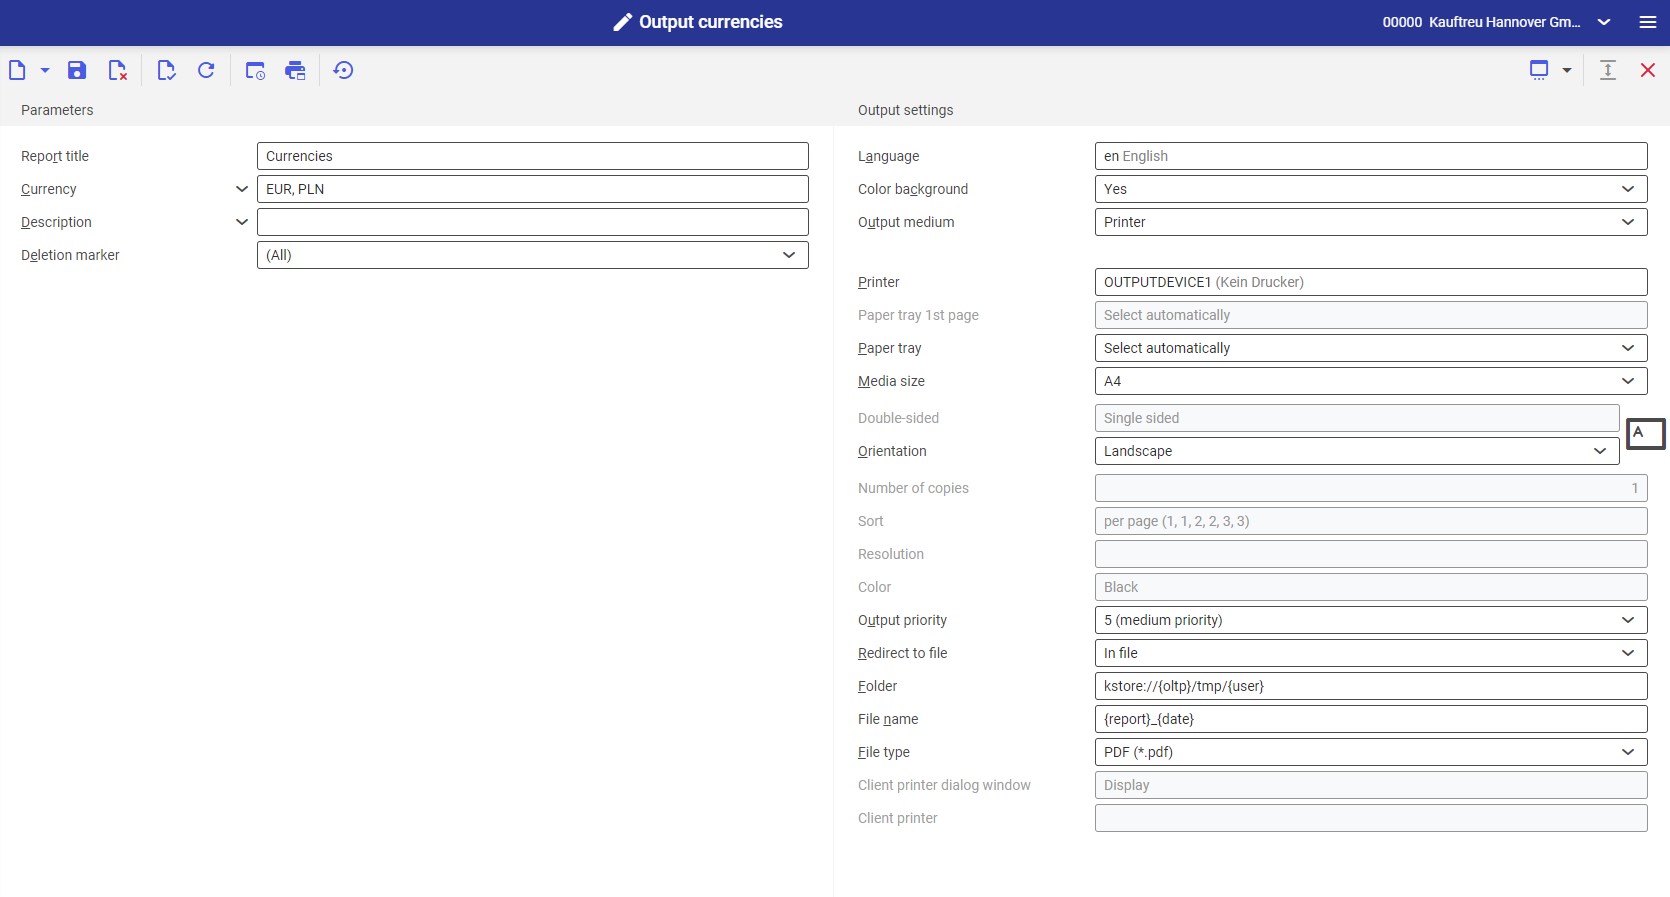
Parameters section
Using report parameters, it is possible to narrow down the number of currencies to be included in the report.
Available parameters:
- Report title – it allows defining an appropriate report title. By default, it is entered as Currencies.
- Currency – the field’s values are retrieved from the Currencies application and can be displayed by selecting the [Value assistant] button
- Description – it allows the user to manually define a currency description according to which currencies will be retrieved for printing
- Deletion marker – it allows defining which currencies are to be printed in the report:
- All (default)
- Marked as deleted
- Not marked for deletion
Output settings section
- Language – the default value is the original report language
- Color background (for tables) – it determines if report line items should have alternating background colors. The background color to be used is defined on the basis of the current theme selected in user settings.
- Output medium (required) – the field’s drop-down list allows selecting whether the report is to be printed or sent by fax or e-mail
After selecting the Printer option, the following fields are displayed:
- Printer – it allows selecting a device by selecting the [Value assistant] button
- Paper tray 1st page – it allows defining a paper tray for the first page of the printout
- Paper tray – it allows selecting a paper tray to be used by the printer
- Media size – the field’s drop-down list allows selecting a format in which the report should be printed. By default, it is set as A4.
- Double-sided – it allows defining whether the printout is to be single- (default value) or double-sided. For double-sided printouts, it is possible to have the printout flipped according to the longer or shorter edge.
- Orientation – it allows selecting a printout orientation from a drop-down list. The paper card icon on the right visualizes the selected orientation.
- Number of copies – number of printout copies. The field needs to be filled in manually.
- Sort – it specifies whether the printout is to be made according to copies (default) or according to page
- Resolution – this field displays available printout resolution settings for a selected printer. Available options include:
- Normal
- High
- Draft
- 200×1.200 dpi
- 600×600 dpi
- Color – it allows selecting color printout (if the printer supports this option) or leaving it in black and white
- Output priority – it determines the printout sequence according to an assigned priority. The drop-down list makes it possible to select parameters from 1 (the highest) to 9 (the lowest).
- Redirect to file – it allows redirecting the report. Available options include:
- No – the report will not be redirected
- In file – the report will be saved as a file
- In file and print – the report will be saved as a file and sent to a client printer
- Folder – this field is activated after selecting the In file option in the Redirect to file field. It makes it possible to select a folder where the report is to be saved.
- File name – this field is activated after selecting the In file option in the Redirect to file field. A file name needs to be filled in manually.
- File type – this field is activated after selecting the In file option in the Redirect to file field. It makes it possible to select a format in which the report is to be saved. By default, it is set as PDF
- Client printer dialog window – it displays the report printout’s dialog window
- Client printer – it allows the user to manually enter a client printer
After selecting the Fax option, the following fields are displayed:
- Fax (required) – it allows selecting one of the available devices
- Sender ID – fax sender data
- Control sequence – a string of characters applied to control fax. This number will be transferred directly to Comarch ERP Enterprise system.
- Fax number – in this field, enter the number of the receiving device
- Subject – a fax subject to be filled in manually
- Media size – it allows selecting the size of paper from a drop-down list. By default, it is set as A4.
- Output priority – it determines the sending sequence according to an assigned priority. The drop-down list makes it possible to select parameters from 1 (the highest) to 9 (the lowest).
- Resolution – this field displays available printout resolution settings for a selected fax device. Available options include:
- Normal
- High
- Draft
- 200×1.200 dpi
- 600×600 dpi
- Double-sided – it determines whether the report printout is to be single- (default value) or double-sided. This option is available if the fax device supports double-sided printing.
- Orientation – it allows selecting a printout orientation from a drop-down list. The paper card icon on the right visualizes the selected orientation.
- Send – it allows defining whether the document is to be sent immediately or after a specified period of time (definable in the field below)
- Time point sent – the time in which the document is to be sent
After selecting the E-mail option, the following fields are displayed:
- E-mail gateway (required) – using the [Value assistant] button, it is possible to select an e-mail gateway that is to be used to send the document
- From – the e-mail address of the message sender. By default, it is filled in with the address of the logged-in user.
- Reply to – the e-mail address to which the reply is to be sent. The field should only be filled in if the reply is to be sent to a person different than the message sender.
- To – it allows defining the e-mail address(es) of the recipient(s)
- Cc – it allows entering the e-mail addresses of persons who are to receive the message as a copy These addresses will be displayed to other recipients.
- Bcc – it allows entering the e-mail addresses of persons who are to receive the message as a copy. These addresses will not be displayed to other recipients.
- Subject – the message’s subject to be filled in manually
- Text – the message’s content (it can be entered as HTML or text only). To fill in the field, select the diamond icon – it opens a dialog window enabling the user to enter the message’s text.
- Attachment – it allows adding an attachment, e.g. an image or document, to the message
- File type – in this field, it is necessary to select a file type from a drop-down list By default, it is set as PDF
- Output priority – it determines the sending sequence according to an assigned priority: 1 – the highest, 9 – the lowest
Report result
After it is printed, the report looks as follows:
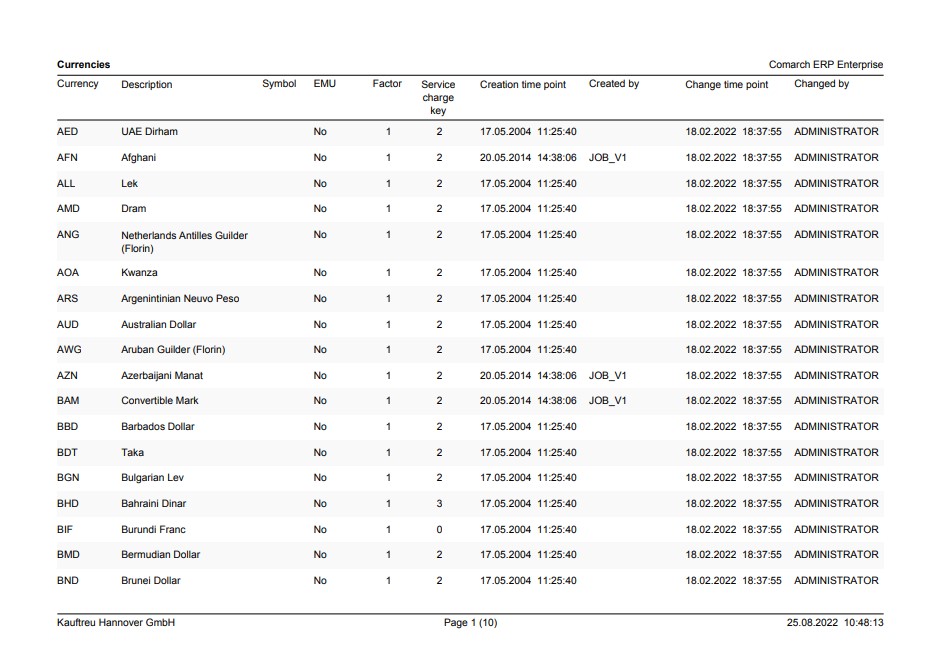
The columns contain the following fields:
- Currency – currency ID
- Description – the name of a selected currency
- Symbol – currency symbol
- EMU – information on whether a currency is an an Economic and Monetary Union (EMU) currency
- Factor – an exchange rate factor for conversions into another currency
- Service charge key – the number of decimal places set for a currency in the Currencies application in the Decimal places field
- Creation time point – the date and time of currency creation in the system
- Created by – the ID of a user who created a currency
- Change time point – the date and time of the last currency modification
- Changed by – the ID of a user who last changed a currency
Customizing
No settings need to be made in the Customizing application for the Output currencies application.
Report
Report related to the Output currencies application: com.cisag.app.general.rpt.Waluta.
Authorizations
Authorizations can be assigned by means of authorization roles, as well as by assigning an organization. The authorization concept is described in the Authorizations article.
Special capabilities
The Output currencies application has no special capabilities.
Organization assignments
Organizations do not need to be assigned for the Output currencies application.
Special features
The Output currencies application has no special features.
Authorizations for business partners
The Output currencies application is not released for business partners.