
The Output purchasing items application may be used to print or send (as a file) relevant information about purchasing items, according to parameters and settings defined. Documents may be archived or sent, e.g. by fax or mail.
The application is composed of the standard toolbar and Parameters and Output settings sections.
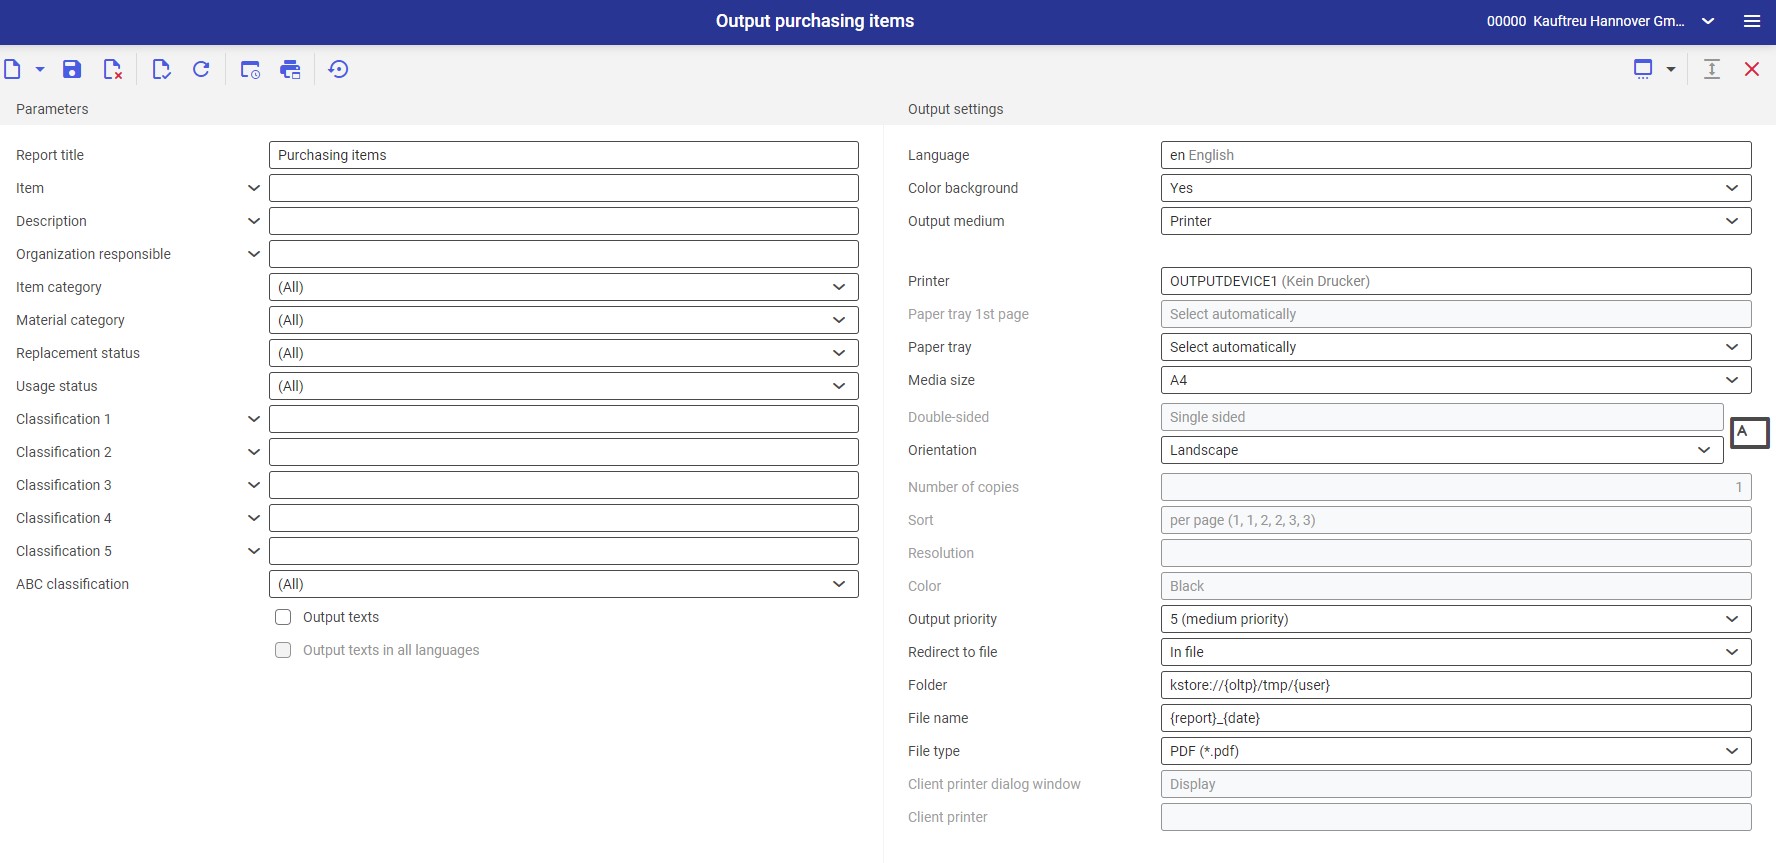
Parameters section
Parameters may be used to narrow down output criteria. Available parameters include:
- Report title – in this field, it is possible to manually enter a report name. The default value is Purchasing items.
- Item – it makes it possible to select one or more purchasing items. The user may enter a desired value manually or using the [Value assistant] button on the right-hand side of the field.
- Description – it allows the user to manually define an item description according to which items will be retrieved for printing. When making a printout, the system verifies consistency with the Description field on the item form in the Items application.
- Organization responsible – it allows the user to select an organization manually or with the [Value assistant] button. When making a printout, the system verifies consistency with the Organization responsible field on the item form in the Items application.
- Item category – it allows narrowing down items printed in the report using the Item category filter. An item category may be selected from a drop-down list. By default, all the options are selected in the list. An item category may be verified in the Items application by hovering the cursor over the item thumbnail.
- Material category – it allows narrowing down items printed in the report using the Material category filter. A material category may be selected from a drop-down list. By default, all the options are selected in the list. A material category may be verified in the Items application by hovering the cursor over the item thumbnail.
- Replacement status – the field makes it possible to select an item status. The status may be selected from a drop-down list. By default, the Not replaced option is selected. Available options include:
- Not replaced
- Replaced
- Replaced if availability = 0
- Expired
- Expired if availability = 0
The status of a particular item may be verified on the item form in the Items application.
- Usage status – the field makes it possible to select an item status. The status may be selected from a drop-down list. By default, all the options are selected in the list. Available options include:
- Released
- Blocked
The status of a particular item may be verified on the item form in the Items application.
- Classification 1 – a classification 1 may be selected using the [Value assistant] button on the right-hand side of the field. Item classifications are retrieved from the item form in the Items application (Purchasing view).
- Classification 2 – entering this classification is optional. Items are appropriately classified when entering values in the Items application (Purchasing view, General tab, Classifications section).
- Classification 3 – entering this classification is optional. Items are appropriately classified when entering values in the Items application (Purchasing view, General tab, Classifications section).
- Classification 4 – entering this classification is optional. Items are appropriately classified when entering values in the Items application (Purchasing view, General tab, Classifications section).
- Classification 5 – entering this classification is optional. Items are appropriately classified when entering values in the Items application (Purchasing view, General tab, Classifications section).
- ABC classification – it allows narrowing down the number of items printed in the report using an ABC classification assigned to a given purchasing item. The ABC classification involves assigning items a priority, with A being the highest priority and C the lowest. Priorities may be assigned to items in the Items application (Purchasing view, General tab, Delivery data section).
- Output texts – this parameter allows determining whether texts added to a particular item in the Purchasing view should be printed
- Output texts in all languages – this parameter allows printing all texts in other languages (if entered) that describe an item in the Purchasing view
Output settings section
- Language – the default value is the original report language
- Color background (required) – it determines if report line items should have alternating background colors. The background color to be used is defined on the basis of the current theme selected in user settings.
- Output medium (required) – the field’s drop-down list allows selecting whether the report is to be printed or sent by fax or e-mail
After selecting the Printer option, the following fields are displayed:
- Printer – it allows selecting a device by selecting the [Value assistant] button
- Paper tray 1st page – it allows defining a paper tray for the first page of the printout
- Paper tray – it allows selecting a paper tray to be used by the printer
- Media size – the field’s drop-down list allows selecting a format in which the report should be printed. By default, it is set as A4.
- Double-sided – it allows defining whether the printout is to be single- (default value) or double-sided. For double-sided printouts, it is possible to have the printout flipped according to the longer or shorter edge.
- Orientation – it allows selecting a printout orientation from a drop-down list. The paper card icon on the right visualizes the selected orientation.
- Number of copies – number of printout copies. The field needs to be filled in manually.
- Sort – it specifies whether the printout is to be made according to copies (default) or according to page
- Resolution – this field displays available printout resolution settings for a selected printer. Available options include:
- Normal
- High
- Draft
- 200×1.200 dpi
- 600×600 dpi
- Color – it allows selecting color printout (if the printer supports this option) or leaving it in black and white
- Output priority – it determines the printout sequence according to an assigned priority. The drop-down list makes it possible to select parameters from 1 (the highest) to 9 (the lowest).
- Redirect to file – it allows redirecting the report. Available options include:
- No – the report will not be redirected
- In file – the report will be saved as a file
- In file and print – the report will be saved as a file and sent to a client printer
- Folder – this field is activated after selecting the In file option in the Redirect to file field. It makes it possible to select a folder where the report is to be saved.
- File name – this field is activated after selecting the In file option in the Redirect to file field. It makes it possible to enter the report file’s name.
- File type – this field is activated after selecting the In file option in the Redirect to file field. It makes it possible to select a format in which the report is to be saved.
- Client printer dialog window – it displays the report printout’s dialog window
- Client printer – in this field, it is necessary to define a client printer
After selecting the Fax option, the following fields are displayed:
- Fax – it allows selecting one of the available devices
- Sender ID – fax sender data
- Control sequence – a string of characters applied to control fax. This number will be transferred directly to Comarch ERP Enterprise system.
- Fax number – in this field, enter the number of the receiving device
- Subject – a fax subject to be filled in manually
- Media size – it allows selecting the size of paper from a drop-down list. By default, it is set as A4.
- Output priority – it determines the sending sequence according to an assigned priority. The drop-down list makes it possible to select parameters from 1 (the highest) to 9 (the lowest).
- Resolution – this field displays available printout resolution settings for a selected printer. Available options include:
- Normal
- High
- Draft
- 200×1.200 dpi
- 600×600 dpi
- Double-sided – it determines whether the report printout is to be single- or double-sided. This option is available if the fax device supports double-sided printing.
- Orientation – it allows selecting a printout orientation from a drop-down list. The paper card icon on the right visualizes the selected orientation.
- Send – it allows defining whether the document is to be sent immediately or after a specified period of time (definable in the field below)
- Time point sent – the time in which the document is to be sent
After selecting the E-mail option, the following fields are displayed:
- E-mail gateway – using the [Value assistant] button, it is possible to select an e-mail gateway that is to be used to send the document
- From – the e-mail address of the message sender. By default, it is filled in with the address of the logged-in user.
- Reply to – the e-mail address to which the reply is to be sent. The field should only be filled in if the reply is to be sent to a person different than the message sender.
- To – it allows defining the e-mail address(es) of the recipient(s)
- Cc – it allows entering the e-mail addresses of persons who are to receive the message as a copy
- Bcc – it allows entering the e-mail addresses of persons who are to receive the message as a copy. These addresses will not be displayed to other recipients.
- Subject – the message’s subject
- Text – the message’s content (it can be entered as HTML or text only). To fill in the field, select the diamond icon – it opens a dialog window enabling the user to enter the message’s text.
- Attachment – it allows adding an attachment, e.g. an image or document, to the message
- File type – in this field, it is necessary to select a file type from a drop-down list
- Output priority – it determines the sending sequence according to an assigned priority: 1 – the highest, 9 – the lowest
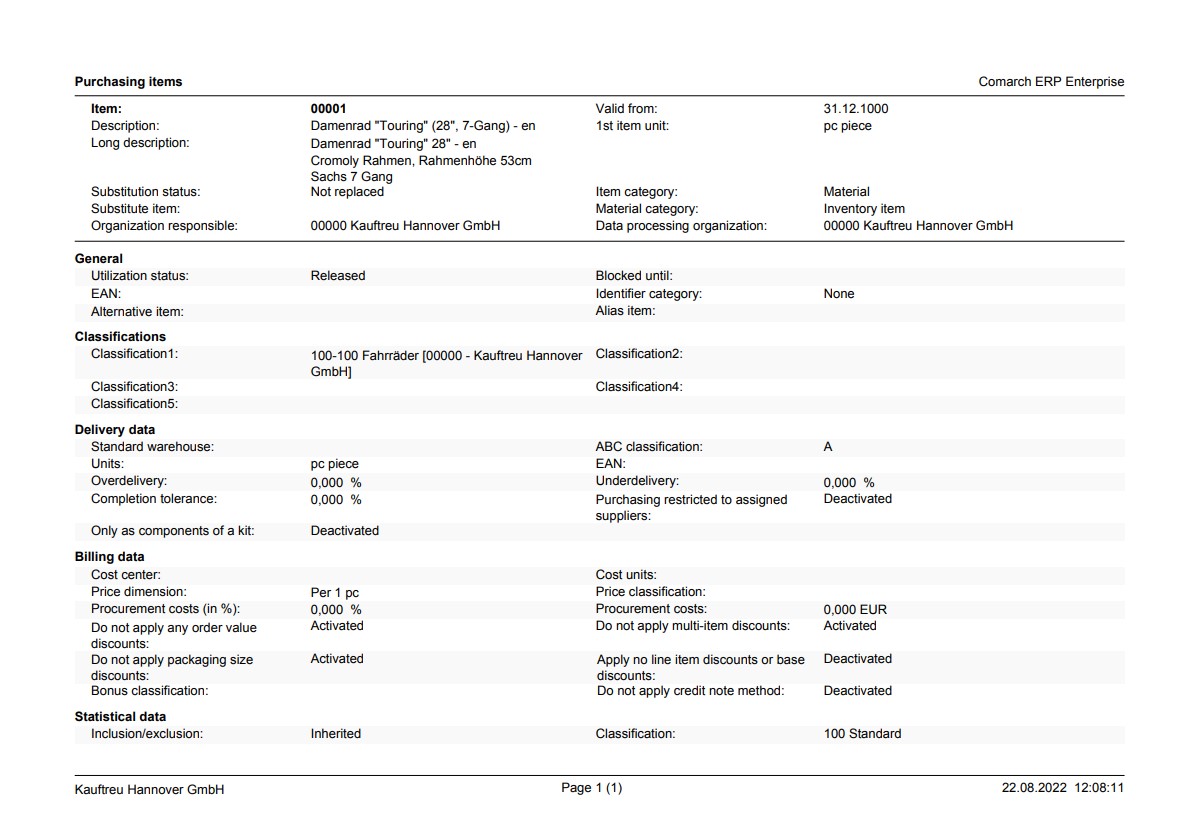
Report result
After it is printed, the report looks as follows:
Customizing
No settings need to be made in the Customizing application for the Output purchasing items application.
Report
The Output purchasing items application refers to the application Items (Purchasing view): com.cisag.app.purchasing.rpt.PurchaseItem.
Authorizations
Authorizations can be assigned by means of authorization roles, as well as by assigning an organization.
Special capabilities
The Output purchasing items application has no special capabilities.
Organization assignments
To ensure that a person can see the Output purchasing items application in the user menu and can open it, it is necessary to assign an organization to the user in the user’s master data. The organization must be assigned to at least one of the following organizational structures:
- Purchasing
Special features
The Output purchasing items application has no special features.
Authorizations for business partners
The Output purchasing items application is not released for business partners.