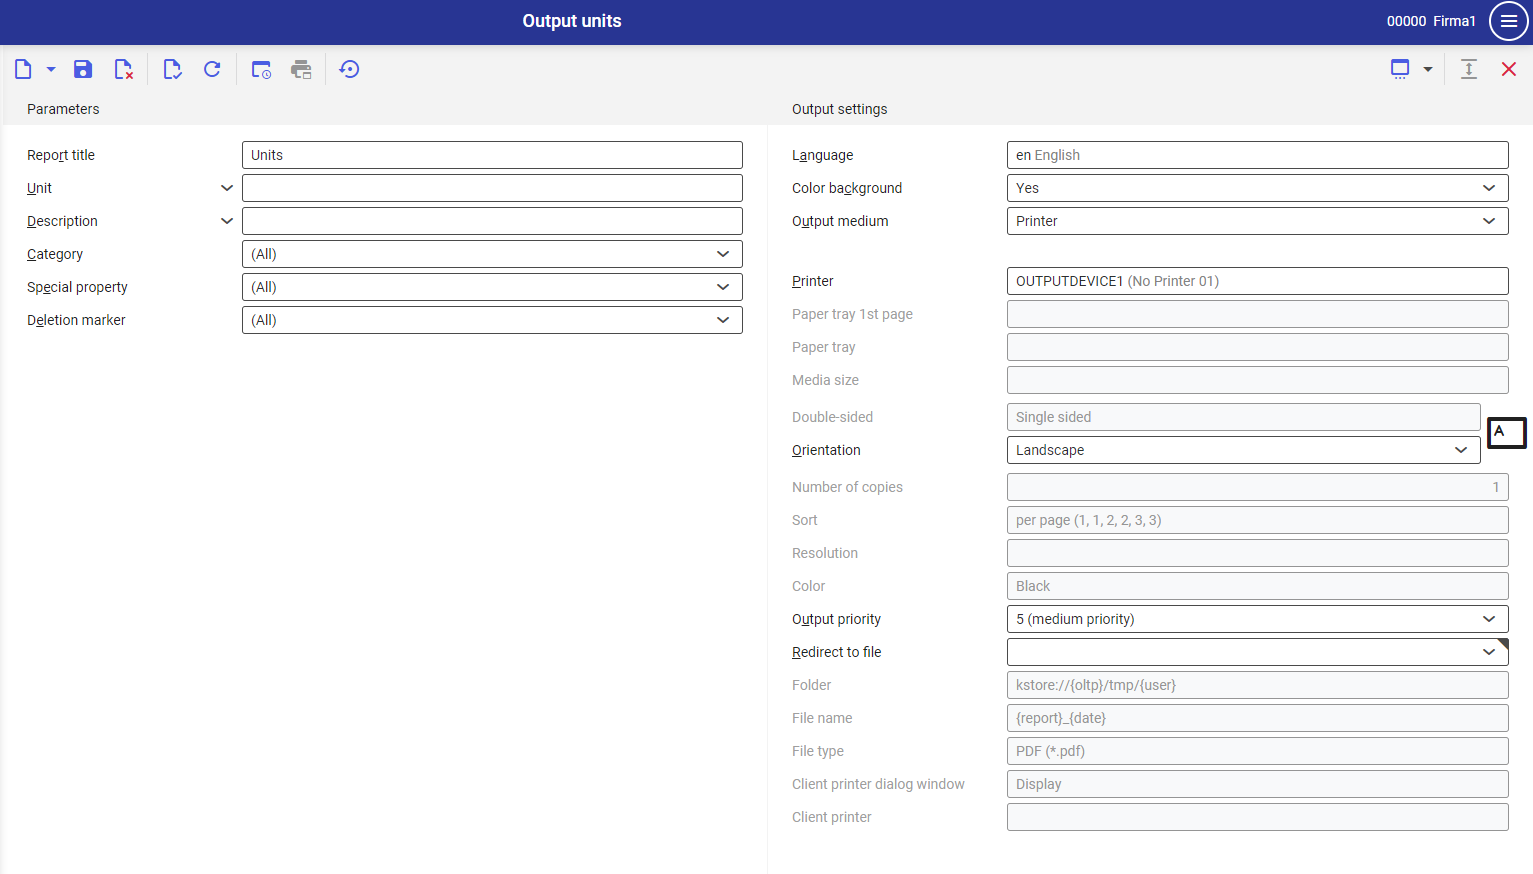
The aplication Output: Units allows for printing or sending as a file information regarding available units, in accordance with defined parameters and settings. With the use of the output, values entered in the application Units are retrieved.
The aplication Output: Units is composed of the standard button bar and sections Parameters and Settings.

Section Parameters
With the use of the parameters, the user can limit the criteria of searching items. Below, the functions of the parameters are explained.
- Report title – name of the report. It can be entered manually. The default value is Units.
- Unit – in this field, it is necessary to define units that are supposed to be presented on the report. The value of this field can be entered manually with the use of the [Value asssistant] button.
- Description – this field allows for manual insertion of the unit desctipition, according to which the units will be retrieved to the printout. During the printout the system verifies the compliance with the Description field in the Units application.
- Category – allows for limiting the units printed on the report to their type. Available values:
- (All) – default value
- Length (e.g., m)
- Area (e.g., m2)
- Volume (e.g., m3)
- Density (e.g., k/m3)
- Mass (e.g., kg)
- Time (e.g., min)
- Commercial (e.g., piece, box)
- Special property – with the use of this field, it is possible to limit the number of the units printed on the report to their properties. Available options:
- (All) – default value
- Leading unit – base unit in a system of measurement different than the base system
- None – units that do not have any special role in conversion or assignment
- System: density
- System: area
- System: length
- System: weight
- System: volume
- Second
- Minute
- Hour
- Day
- Month
- Year
HintFor the Length units category, the metric measurement system is defined and the unit Meter is defined as the base system unit for lenght and its marked as System: length. The Anglo-American system of measures is an additional system of measures. The basic unit of the additional system, Inch, is the leading unit.NoteUnits with the special property None can be created and manged once the leading and system units are already assigned.NoteOnly one unit of each category: density, area, lenght, weight, volume, can be assigned as a system unit, which means it must be created as first in the base system of measures. Such unit is used for making conversions between two systems of measure of the same category.
- Deletion marker – with the use of this field, it is possible to decide, in the context of deletion markers, which units are supposed to be printed on the report:
- (All) – default value
- With deletion marker
- Without deletion marker
Section Settings
- Language – the default value is the original report language
- Color background (refers to tables) – this field indicates whetehr in the report, rows are supposed to be alternately colored. Used background color is specificed on the basis of the current color scheme selected in the user settings.
- Output medium (mandatory field) –from a drop-down list, it is necessary to select option determining whether the report is supposed to be added, sent by fax or by e-mail.
After selecting the option Printer, the following fields appear:
- Printer – with the use of the [Value assistant] button it is necessary to select one of available devices. Once the physical printer is selected, other fields of this section are activated.
- Paper tray 1st page – in this field, it is possible to define paper tray for the first page
The option Paper tray 1st page is active, if in the printer settings there is a possibility of selecting paper tray for the first page.
- Paper tray – with the use of this parameter it is possible to select paper tray from which the printer takes the paper
- Media size – from a drop-down list it is possible select the format in which the report will be prined. By default, the A4 value is set.
- Double-sided – this parameter indicates whether the printout is to be one- (value selected by default) or two-sided. In case of two-sided printout, it is possible to flip it by the longer or shorter edge.
- Orientation – allows for selecting printout orientation from a drop-down list. Sheet of paper icon, placed on the right side of the row, presents selected printout orientation.
- Number of copies – number of copies of the printout, field filled-in manually
- Sort – this field indicates whether the printout is to be performed per copy (option selected by default) or by page.
- Resolution – this field dipslays printout resolution settings for selected printer. Available options:
- Normal
- High
- Draft
- 200×1.200 dpi
- 600×600 dpi
- Color – allows for selecting color printout (if the printer is provided with such option) or leaving it in black and white
- Output priority – this parameter specifies the printout sequence according to assigned priority. From a drop-down list it is possible to select parameters from 1 (the highest) to 9 (the lowest).
- Redirect to file – field allowing for redirecting report. Available options:
- No – the report will not be redirected
- In file – the report will be saved to a file
- In file and print – the report will be saved to a file and sent to the client’s printer, if such option is available
- Folder – field available after selecting the option Redirect fo file → In file. It allows for selecting the folder in which the report will be saved.
- File name – field available after selecting the option Redirect fo file → In file. Allows for entering the name for the report file.
- File type – parameter available after selecting the value In file in the Redirect to file field. Thanks to the parameter, from a drop-down list it is possible to select the format in which the report will be saved.
- Client printer dialog window – displays dialog window for the report printout
- Client printer – in this field, it is necessary to specify client’s printer
After selecting the option Fax, the following settings are displayed:
- Fax – selection of one of available devices with the use of [Value assistant button]. Once the physical printer is selected, other fields of this section are activated.
- Sender ID – fax sender data
- Control sequence – character string that will be used when controlling fax. This number will be transferred directly to the system.
- Fax number – in this field, it is necessary to enter the number of the receiving device
- Subject – fax subject, entered manually
- Media size – selection of paper size from a drop-down list. Domyślnie ustawioną wartością jest
- Output priority – this parameter specifies the dispatch sequence according to assigned priority. From a drop-down list it is possible to select parameters from 1 (the highest) to 9 (the lowest).
- Resolution – this field dipslays printout resolution settings for selected fax. Available options:
- Normal
- High
- Draft
- 200×1.200 dpi
- 600×600 dpi
- Double-sided – this parameter indicates whether the printout is to be one- (value selected by default) or two-sided. The option is available, if the fax has the option of double-sided printout.
- Orientation – allows for selecting printout orientation from a drop-down list. Sheet of paper icon, placed on the right side of the row, presents selected printout orientation.
- Send – in this field, it is necessary select whether the document should be sent immediately or after a specific timeout is reached (the timeout can be additionally defined in the field below)
- Time point sent – time within which the document is supposed to be sent
After selection the option E-mail, the following settings are displayed:
- E-mail gateway – with the use of the [Value assistant] button, it is possible to select the e-mail gateway through which the document will be sent
- From – e-mail address of the sender. This field is filled-in by default with the user’s e-mail address.
- Reply to – e-mail address to which the response should be sent. The field should be filled-in, only if the response is to be sent to a person different than the sender.
- To – field filled in with the e-mail address/addresses of the recipient/recipients
- CC – in this field, it is necessary to enter e-mail addresses to which te message is to be sent as copy. The receipients entered in this field will be visible to each other.
- BCC – in this field, it is necessary to enter e-mail addresses to which te message is to be sent as copy. These addresses will be not visibile for other receipients.
- Subject – field for entering the subject of the messagge, filled-in manually
- Text – message content (it is possible to choose normal text or HTML). To fill-in the field, it is necessary to click on [Additional data] button with the rhombus icon.
- Attachment – this button allows for adding an attachment to the message, e.g., image or document, if the selected gateway is provided with such option
- File type – attachment type selected from a drop-down list. By default, the value PDF is set.
- Output priority – this parameter specifies the dispatch sequence according to assigned priority. 1 – the highest, 9 – the lowest
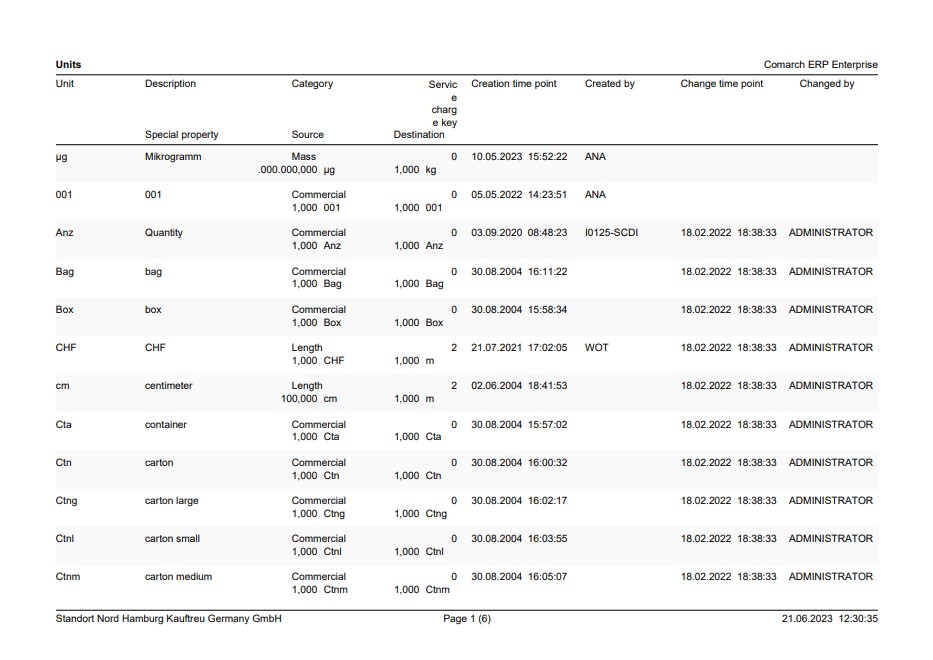
Output result
Following printout, the report looks as follows:

Customizing
In the Customizing application, there are no settings for the application Output: Units
Output
The aplication Output: Units refers to the application Units om.cisag.app.general.rpt.UnitOfMeasure
Authorizations
Authorizations can be assined both through authorization roles and by assigning organizations.
Special features
For the aplication Output: Units, there are no special features for the application.
Organizational assignments
Organizational assignment is not required For the application Output: Units.
Special capabilities
Organizational assignment is not required There are no special capabilities for the application.
Authorizations for Business Partners
The aplication Output: Units is not released for the business partners.
