
With the Output voucher document templates application, you can print or send as report document the information on available voucher document templates, according to parameters and settings defined. The values entered in the Voucher document templates application are retrieved with the report document.
The application contains a standard toolbar and is composed of the Parameters and Output settings groupings.
Parameters grouping
You can specify the search criteria and the consequent output result with the parameters. Therefore, parameters are used for record selection. Fields available in this grouping are the following:
- Report title – in this field, you can specify the name of the report document.
- Voucher document template – in this field, you can select templates to be output into the report document.
- Description – in this field, you can add a description to the report document being defined.
- Output medium – in this field, you can select a document template medium to be included in the report document. Selectable options are:
- (All)
- Printer
- Fax
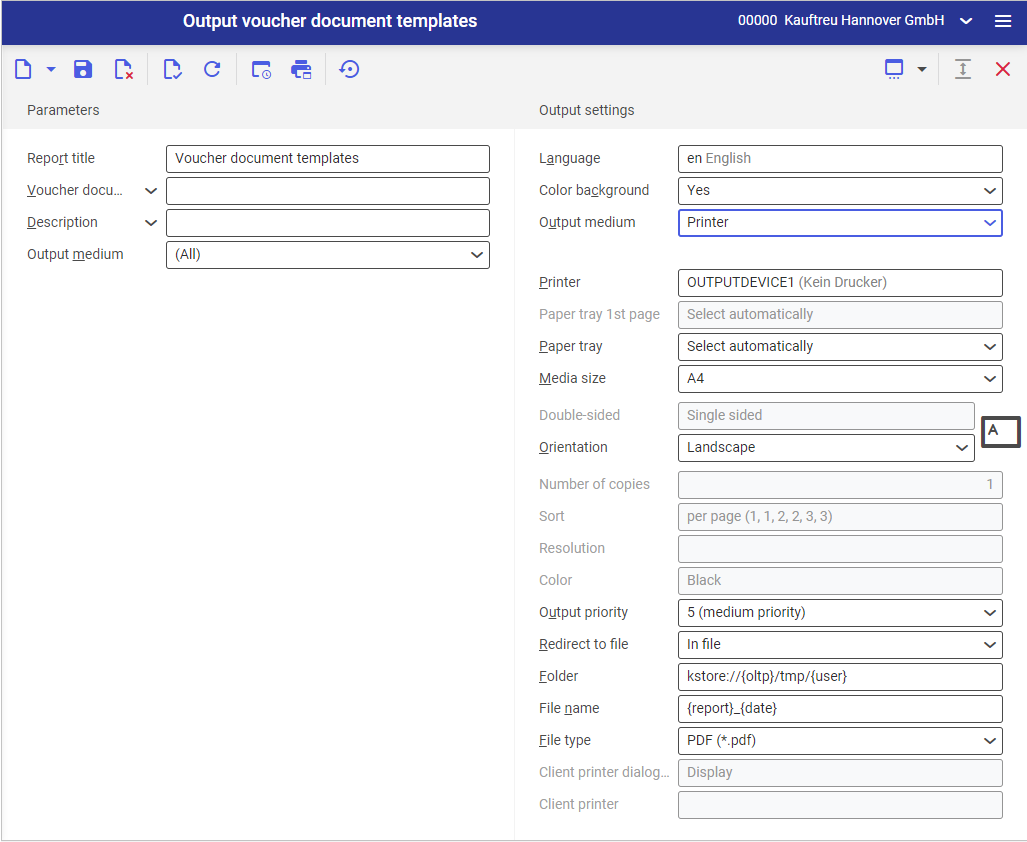
Output settings grouping
- Language – the default value is the original report language
- Color background – (applies to labels) specifies whether to color the alternate report rows. The color background is specified on the basis of the current theme selected in the user settings.
- Output medium (mandatory field) – in this field, specify whether the report is to be printed, sent by fax or e-mail.
Printer:
- Printer – select on available printer using the [Value assistant] button
- Paper tray 1st page – in this field, you can define a paper feed for the first page
- Paper tray – in this field, you can select a paper feeder to be used for paper feed when printing
- Media size – select a desired paper format from the drop-down list, in which the report will be output. The default value is A4
- Double-sided – determines whether the paper is printed on one side only (default setting) or on the front and the back. For double-sided printing, you can choose whether the margin for hole punching should be a long or short side.
- Orientation – in this field, you can select from the drop-down list whether the paper is printed in portrait or landscape format
- Number of copies – number of printout copies. This field should be completed manually.
- Sort – this field determines whether to print the report per copy (default option) or per page.
- Resolution – this field provides possible resolution settings for the selected printer. Available options are:
- Normal
- High
- Draft
- 200×1.200 dpi
- 600×600 dpi
- Color – in this field, you can select whether to print the document in color (if the device is a color printer) or grayscale.
- Output priority – specifies the printout sequence according to the assigned priority. Priority 1 is the highest, priority 9 is the lowest.
- Redirect to file – in this field you set whether to print out the document or output it as a file. Selectable options are:
- No – the report will not be redirected
- In file – the report will be output as a file
- In file and on client printer – the report will be output as a file and printed out
- Folder – this field is activated after selecting first the option Redirect to file → In file. In this field you select the folder for the output report.
- File name – this field is activated after selecting first the option Redirect to file → In file. The output file will be saved under the entered name.
- File type – this field is activated after selecting first the option Redirect to file → In file. In this field you can select the desired format for the output file. The default format is PDF.
- Client printer dialog window – opens the report printout dialog window
- Client printer – in this field, you can manually enter the client’s printer
Fax:
- Fax(mandatory field) – select one of the available fax machines in this field
- Sender ID – fax sender information
- Control sequence – in this field, you can enter a string for controlling a fax. This number is directly transferred to the ERP system.
- Fax number – enter the number of the receiving fax machine in this field
- Subject – enter the fax title in this field
- Media size – in this field, you can select the desired paper size. The default value is A4
- Output priority – specifies the output sequence according to the assigned priority. Priority 1 is the highest, priority 9 is the lowest.
- Resolution – this field provides possible resolution settings for the selected fax machine. Selectable options are:
- Normal
- High
- Draft
- 200×1.200 dpi
- 600×600 dpi
- Double-sided – determines whether the report is printed from the fax machine on one side only (default setting) or on the front and the back. This option is available for fax machines with double-sided printing option.
- Orientation – in this field, you can select from the drop-down list whether the paper is printed in portrait or landscape format
- Send – in this field, you can choose whether to send the fax immediately or after a specified time (this time needs to be specified in the field below)
- Time point sent – in this field, enter the time when the fax should be sent
E-mail:
- E-mail gateway (mandatory field) – using the [Value assistant] button you can select the e-mail gateway through which the document will be sent.
- From– e-mail address of the message sender. By default, the user’s default e-mail address is displayed in this field.
- Reply to – e-mail address to which replies will be sent. This field should be filled in only if the reply should not go to the sender’s e-mail address.
- To –e-mail address(es) of the recipient(s) are completed in this field
- Cc – enter the e-mail addresses of all who should receive a copy of your message. The e-mail addresses entered in this field are not concealed from all other parties.
- Bcc – enter the e-mail addresses of all who should receive a copy of your message. The e-mail addresses entered in this field are concealed from all other parties.
- Subject– the text entered in this field will appear in the subject line of the e-mail; it is entered manually
- Text– enter the e-mail message in this field (selectable options are text only or HTML). To write a text, select the diamond-shaped icon that will open a dialog window for typing a message.
- Attachment – in this field, you can insert an attachment such as an image or a document into the e-mail message
- File type– in this field, you can select the type of file that will be attached to the e-mail. The default format is PDF.
- Output priority – specifies the output sequence according to the assigned priority. Priority 1 is the highest, priority 9 is the lowest.
Output
For report relevant for the Output voucher document templates application is: Voucher document templates
com.cisag.app.general.rpt.DocumentOutputOptions
Special capabilities
The Output voucher document templates application has a special capability concerning actions. You can grant authorization to this function in the Authorization roles application.
Override voucher document templates: com.cisag.app.general.OverrideDocumentOutputOptions