
This document describes the procedures for handling the Items applications, e.g. how to add or edit items.
Add new item
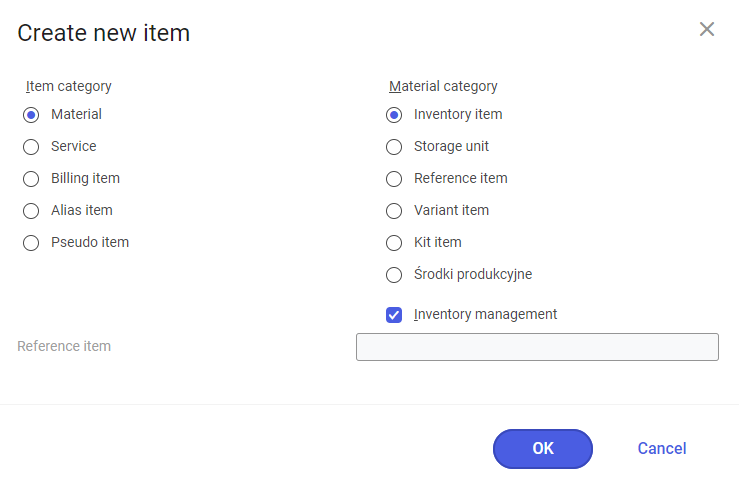
There are several methods of adding an item. After clicking on the button [Add], on the standard toolbar of the Items application, a dialog window is opened, where it is possible to select item type and material type.
Add new item of Material type
Material item can represent various material types.
Material type: Inventory item, Storage units
- Open the Items application.
- Click on [New] button on the standard toolbar.
- Dialog window Create new item template is opened.
3. In the dialog window, select item of Material type and material category Inventory item or Storage unit.
4. Use Inventory management option to decide, whether the item should be stored in the warehouse.
5. Click on [OK] button to confirm.
- The dialog window is closed and the new item is created.
6. Change or create an item number, if necessary.
7. Enter a unique description for the new item in the identification pane.
8. Enter a base unit for the new item.
9. Save the new item.
Material type: Reference item
- Open the Items application, Base view.
- Click on [New] button on the standard toolbar.
- dialog window Create new item template is opened.
3. In the dialog window, select item of Material type and material category Reference item.
4. Click on [OK] button to confirm.
- The dialog window is closed and the new item is created.
5. Change or create an item number, if necessary.
6. Enter a unique description for the new item in the identification pane.
7. Enter a base unit for the new item.
8. Save the new item.
Material type: Variant item
- Open the Items application, Base view.
- Click on [New] button on the standard toolbar.
- dialog window Create new item template is opened.
3. In the dialog window, select item of Material type and material category Variant item.
In the dialog window, when selecting variant item, field Reference item becomes available, which is used for specifying the item.
4.Select the item number of a reference item to which the variant item should refer.
5. Click on [OK] button to confirm.
- The dialog window is closed and the new item is created.
The item number of a variant item consists of two elements:
- Reference item number
- Complementary variant number
The variant number should be added manually when entering variant item. It consists of at least one character (number or letter). The item number must not exceed 25 characters. If the value is set to zero in the field Reference item length in Variants sub-grouping under Customizing, the variant item number must not increase the reference item number.
6. Enter a unique description for the new item in the identification pane.
7. Save the new variant item.
Material type: Kit item
- Open the Items application, Base view.
- Click on [New] button on the standard toolbar.
- Dialog window Create new item template is opened.
3. In the dialog window, select item of Material type and material category Kit item.
4. Click on [OK] button to confirm.
- The dialog window is closed and the new item is created.
5. Change or create an item number, if necessary.
6. Enter a unique description for the new item in the identification pane.
7. Enter a commercial unit in the Base unit field.
8. Save the new item kit.
Add new item of Service type
- Open the Items application, Base view.
- Click on [New] button on the standard toolbar.
- dialog window Create new item template is opened.
3. In the dialog window, select item of Service type.
4. Click on [OK] button to confirm.
- The dialog window is closed and the new item is created.
5.Change or create an item number, if necessary.
6. Enter a unique description for the new item in the identification pane.
7. Save the new service.
Add new item of Billing item type
- Open the Items application, Base view.
- Click on [New] button on the standard toolbar.
- dialog window Create new item template is opened.
3. In the dialog window, select item of Billing item type.
4. Click on [OK] button to confirm.
- The dialog window is closed and the new item is created.
5. Change or create an item number, if necessary.
6. Enter a unique description for the new item in the identification pane.
7. Enter a commercial unit in the Base unit field.
8. Save the new item.
Add new item of Alias type
- Open the Items application, Base view.
- Click on [New] button on the standard toolbar.
- dialog window Create new item template is opened.
3. In the dialog window, select item of Alias type.
4. Click on [OK] button to confirm.
- The dialog window is closed and the new item is created.
5. Change or create an item number, if necessary.
6. Enter a unique description for the new item in the identification pane.
7. Enter a commercial unit in the Base unit field.
8. Select an original item.
9. Save the new alias item.
Add new item of Externally Manufactured type
- Open the Items application, Base view.
- Click on [New] button on the standard toolbar.
- dialog window Create new item template is opened.
3. In the dialog window, select item of Externally Manufactured type.
4. Click on [OK] button to confirm.
- The dialog window is closed and the new item is created.
5. Change or create an item number, if necessary.
6. Enter a unique description for the new item in the identification pane.
7. Enter a commercial unit in the Base unit field.
8. Save the new item.
Add new item of Pseudo item type
- Open the Items application, Base view.
- Click on [New] button on the standard toolbar.
- dialog window Create new item template is opened.
3. In the dialog window, select item of Pseudo item type.
4. Click on [OK] button to confirm.
- The dialog window is closed and the new item is created.
5. Change or create an item number, if necessary.
6. Enter a unique description for the new item in the identification pane.
7. Enter a commercial unit in the Base unit field.
8. Save the new pseudo item.
Generate item from an item template
Preconditions
An item template already exists in the system.
Instructions
- Open the Items application, Base view.
- Click on [New from template] button on the standard toolbar.
- An item template search dialog window opens.
- Enter your search criteria in the search dialog and click on [START].
- The search dialog window displays the item templates that correspond to the search criteria.
5. Select the desired item template and click on [Accept].
- The dialog window closes and the item fields are populated with the corresponding fields of the item template.
6. Change the populated entries according to your needs, if necessary.
7. Click the [Save] button in the standard toolbar.
Duplicate items and their usages
In the system, it is possible to:
- duplicate items with all or selected usages for a new item
- duplicate only selected usages and add them to an already existing item.
Duplicate item in a single-site environment
This instruction refers to a single-site environment in which the function of content-based authorizations is deactivated.
Instructions
- Open the Items application, Base view.
- Open the item which you want to duplicate.
- Click on [New] button on the standard toolbar.
The Duplicate item dialog window appears.
4. Enter the item number in Duplicate field or change the default value, if necessary.
5. Select item type.
6. If Material item type was selected, it is necessary to select material type.
7. If Inventory item material type was selected, it is necessary to use the Inventory management option to see whether the new item is on the list.
- If the Inventory management function is activated, it is possible to select the following usages of the item: Inventory management, Production, Planning.
8. Select the item usage which you want to duplicate.
9. Click on [OK] button to confirm.
- The dialog window is closed and the new item is created.
10. Change the description and other data of the item, if required.
11. Click the [Save] button in the standard toolbar.
Duplicate item usage in a single-site environment
This instruction refers to a single-site environment in which the function of content-based authorizations is deactivated.
Instructions
- Open the Items application, Base view.
- Open the item which you want to duplicate.
- Open item usage view which you want to duplicate.
- Click on [Duplicate] button, next to the drop-down list placed next to the Add symbol on the standard toolbar.
- The Duplicate item dialog window appears.
5. Enter the item number in Duplicate field for the added item usage.
6. Select item usages that you want to copy.
7. Click on [OK] button to confirm.
- The selected item usages will be created for the specified item.
8. Change the entries according to your needs, if necessary.
9. Click the [Save] button in the standard toolbar.
Duplicate item in multi-site environment
- Open the Items application, Base view.
- Open the item which you want to duplicate.
- Click on [Duplicate] button, next to the drop-down list placed next to the Add symbol on the standard toolbar.
- The Duplicate item dialog window appears.
4. Activate the checkbox Accept inherited structure if you want to accept the organizational structure of the source item in the target item.
5. Enter the item number in Duplicate field for the added item usage.
6. If you have activated the checkbox Accept inherited structure you can al- so activate the checkbox Save new item immediately.
7. Select item type.
8. If Material item type was selected, it is necessary to select material type.
9. If Inventory item material type was selected, it is necessary to use the Inventory management option to see whether the new item is on the list.
If the Inventory management function is activated, it is possible to select the following usages of the item: Inventory management, Production, Planning.
10.Select the item usage which you want to duplicate.
11. Click on [OK] button to confirm.
The dialog window is closed and the new item is created.
If you have activated the checkbox Save new item immediately, the item is saved. In such a case, you can carry out the processing prior to duplication in the same organization. If the previously edited view has been duplicated, it continues to be the active view even after duplication.
12. Change the description and other data of the item, if required.
13/ Click the [Save] button in the standard toolbar.
Duplicate item usage in multi-site environment
1. Open the Items application, Base view.
2. Open the item which you want to duplicate.
3. Open item usage view which you want to duplicate.
4. Click on [New] button on the standard toolbar.
- The Duplicate item dialog window appears.
If a number range is saved for items in Customizing, the system automatically generates an item number for the item. You can change this item number manually.
5. Enter the item number in Duplicate field for the added item usage.
6. Select item usages that you want to duplicate.
7. Activate the checkbox Accept inherited structure if you want to accept the organizational structure of the source item in the target item.
8. Click on [OK] button to confirm.
- The selected item usages will be created for the specified item.
9. Change the entries according to your needs, if necessary.
10. Click the [Save] button in the standard toolbar.
Delete item
Normally, item data is not deleted directly and must first be marked for deletion. Only those versions of the item or one of its usages that have their entire validity period in the future can be deleted directly, since they cannot be used.
If the utilization of a reference item for a certain organization is marked for deletion, the utilization is also marked for deletion for this organization in all variant items.
Delete future item versions
Preconditions
- An item configuration data version, that will be valid only in the future, exists.
Instructions
- Open the Items application.
- If necessary, switch to the desired view.
- In a multi-site environment, select the organization for which you are editing the item.
- Select the future version that you want to delete, by selecting the scrolling button placed next to Valid from button.
- Click on [Delete] button on the standard toolbar.
The selected version of the item or item usage will be deleted.
Unmark for deletion
If you mark selected item for deletion in the Base view, the whole item and its usages will be marked for deletion.
Preconditions
- Item has not been already marked for deletion. It can be recognized by the presence of a red cross in the Item field.
- The user must have authorization for the responsible organization of the item. Otherwise, the [Mark for deletion] button will not be enabled.
Instructions
1. Open the Items application, Base view.
2. Open item for which you want to insert deletion mark.
3. Click on [Mark for deletion] in the standard toolbar.
- A confirmation dialog window opens with a warning that the item will be completely marked for deletion.
4. Confirm the warning if you really want to mark the financial data of the item for deletion.
- The item and all its item utilizations will be marked for deletion in all organizations and all versions.
Mark item usage for deletion
Preconditions
- The usage of the item has not been marked for deletion yet.
Instructions
- Open the Items application.
- Open item for which you want to insert deletion mark.
- Select the view in which you want to set a mark for deletion.
- In a multi-site environment, select the organization for which you are editing the item.
- Click on [Mark for deletion] in the standard toolbar.
- If you select an (active OLTP) client as organization in a multi-site environment, a confirmation dialog appears with a warning that the selected utilization will be marked for deletion in all organizations.
6. Confirm the warning if you really want to mark the item usage for deletion.
- The selected item usage contains a mark for deletion in all versions. If the (active OLTP) client is selected in a multi-site environment, the item gets marked for deletion in all organizations. If a reference item is involved, all the variant items generated from this item also get marked for deletion.
Unmark for deletion
Preconditions
- The item has been marked for deletion.
Instructions
- Open the Items application, Base view.
- Open the item you want to unmark for deletion.
- Click on [Unmark for deletion] in the standard toolbar.
- The item or selected utilization is unmarked for deletion in the selected organization.
Unmark item usage for deletion
Preconditions
- The item usage has been marked for deletion.
Instructions
- Open the Items application.
- Open the item you want to unmark for deletion.
- Select the view in which you want to unmark item usage for deletion.
- In a multi-site environment, select the organization for which you are editing the item.
- Click on [Unmark for deletion] in the standard toolbar.
- The item or selected utilization is unmarked for deletion in the selected organization.
Special changes
Certain changes require comprehensive and, in certain cases, time consuming tests in order to avoid data inconsistencies. If you undertake such changes, you receive a warning message in the first step. The tests are carried out only if you confirm this warning message.
Warning messages are displayed for
- Change in the base unit
- Change of parallel inventory units or related conversion factors
- Change in identifier type
A warning message is displayed before saving the possible changes. Upon its confirmation, the user verification is executed. If no errors are discovered, the item will be saved. Otherwise, error messages informing about the reason for which it is not possible to save the item, will be displayed.
Add image
An image makes it easier to identify an item. If you are creating a new item or loading an existing one, an item icon is displayed in the identification pane as an example. The procedure to add an image to the base data of an item has been explained below.
Preconditions
- If you want to link an image to an item, save the image file in the Knowledge Store of the corresponding OLTP database. It is not possible to link an image that is saved locally. In a multi-site environment, the user must be assigned to the responsible organization of the item.
Instructions
- Open the Items application, Base view.
- Load the item for which an image is to be saved in the identification pane.
- Right-click on standard icon in the identification pane.
- Choose the Edit command The Select file dialog box opens.
- Select the image to be displayed in the identification pane for the loaded item.
- Click the [Save] button in the standard toolbar.
Change organization
- In navigation panel, open tab Organizational structure. Here, all organizations to which the user has permissions, are displayed.
- Double click on the organization which is supposed to be opened. You can also return to the view at the same time, by double-clicking on one of the user’s icons. The system displays the data of the selected organization.
Take over data for selected organization
Preconditions
- The selected organization must be permitted to take over the data of another organization, e.g., only a purchase organization can accept vendors’ data.
Instructions
- Open the Items application.
- Open the selected item.
- Switch to the desired view on the standard toolbar to select the data to retrieve.
- Select organization for which the data is to be retrieved.
- After selecting the organization, button [Take over data for selected organization] becomes active.
- Click on [Take over data for selected organization] button on the standard toolbar.
- To save the data, click [Save] button.
The selected organization can use the retrieved data coming from the organization placed on a higher level of the organizational structure path.
Accept data processing for the selected organization
Preconditions
- The selected organization must be permitted to accept the data of another organization, e.g., only a purchase organization can accept vendors’ data.
Instructions
- Open the Items application.
- Open the selected item.
- Switch to the desired view on the standard toolbar to select the data to retrieve. Select organization for which the data is to be retrieved.
- Select organization for which the data is to be retrieved.
- After selecting the organization, button [Accept data for selected organization] becomes active.
- Click on [Accept data for selected organization] button on the standard toolbar.
- The retrieved data is subject to edition.
- To save the data, click [Save] button.