
Time is the most important factor in the production process. Timing determines when to order a material, start production, and ultimately when the customer receives ordered goods. In addition to variable processing times which are determined based on specific order quantities and processing times dependent from manufacturing technologies, there are also fixed times, which are independent of order quantities. These times are supplemented by idle periods, which can occur as buffer times between production process operations.
Definition of terms
- Administration time – time that comes before the start of a production operation – it is necessary to prepare the process
- Processing time – it results from the multiplication of an order quantity by a time required for the production of a single unit (also known as job time)
- Holiday model – holiday models are week time models that describe the capacity profile for holidays in accordance with the company calendar
- Idle period – time of inactivity before and after an operation
- Buffer time – a time reserve in production planning that allows operations to be postponed or done earlier. It is possible to do so in the Resource allocation application.
- Time-specific scheduling – a process in which the start and end time points of operations are calculated precisely to the millisecond
- Setup time – it refers to the time needed for preparation and follow-up tasks applied to a resource used to complete an operation
- Shift-specific scheduling – production planning based on production shifts
- Transport time – time required to transport goods to a recipient or to transport a material from one warehouse to another
- Transition time goods receipt – time during which the availability of items can be delayed, for example by high bay warehouse receipt processes, which can affect the quantity of items available in the warehouse
- Company calendar – it is based on a calendar year. It allows specifying holidays.
- Company calendar day category – a day category that can be defined and assigned to the company calendar. Default categories include: Working day, Non-working day, and Holiday.
- Week time models – they consist of time models and shifts assigned to each day. They allow determining capacity profiles, that is the production capacity of resources.
- Time models – they refer to a period of time and enable specifying the capacity of resources or resource groups
Time in production
The delivery date is always specified to the day and is calculated from the preferred date of the ordering party. The transport time is also specified to the day. The delivery date minus the transport time determines the shipping date.
Material requirements planning (reverse scheduling) makes it possible to calculate the planned target start date based on the production time.
The production time is composed of a “transitional goods receipt”, the actual production run, and an administration time preceding the actual production.
Working times and resource capacities
The work-relevant times are mapped via time models in order to define the theoretical capacities of time-dependent resources (means of production and persons in the production process).
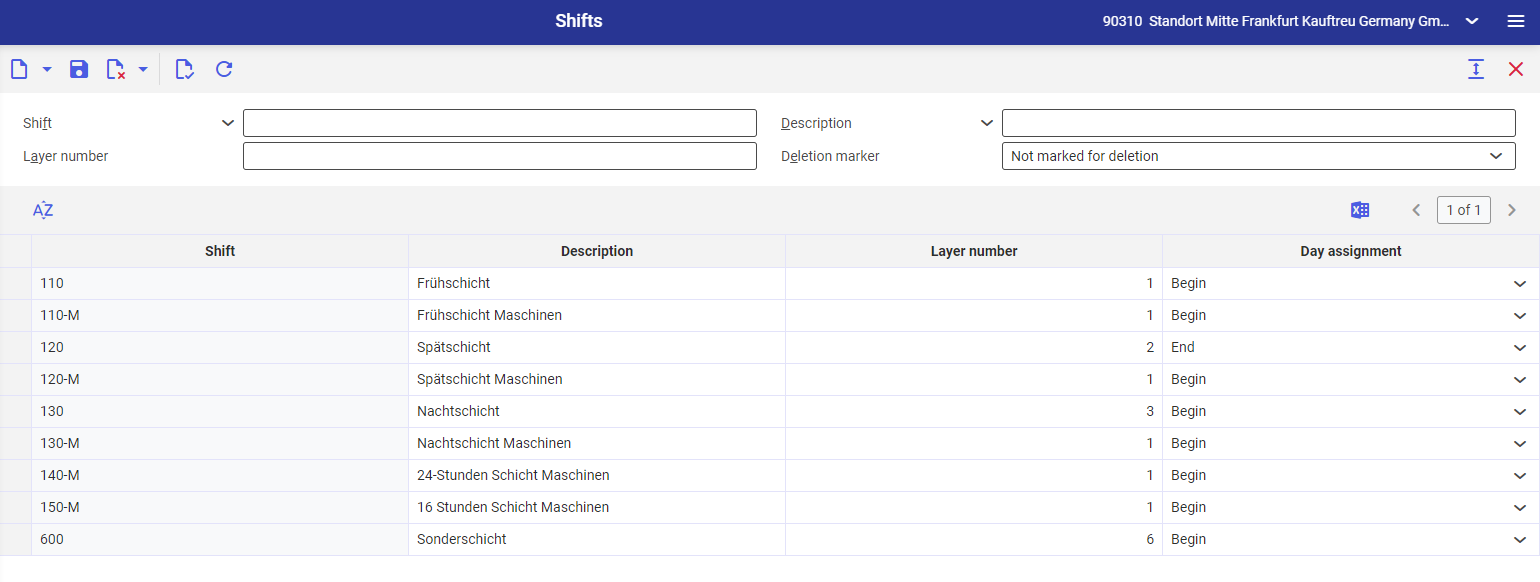
Shifts application
A shift is a period of the day assigned to a resource that allows the optimum management of production capacity. The Shifts application makes it possible to register and edit shifts. The application is composed of:
- Header – it contains the base data of a production shift
- Work pane – it contains the data of entered and defined production shifts
The toolbar contains the following buttons:
- [New] – it allows adding a new shift or duplicate an existing one. A new shift can be edited in the application’s work pane.
- [Delete] – it allows deleting a shift or marking/unmarking it for deletion. If a defined shift is already used in the Week time models application, it cannot be deleted.
The application header contains the following fields:
- Shift (required) – a shift’s identification name
- Description – an additional shift name
- Layer number – an integer determining an assigned layer number
- Deletion marker – it allows the presentation of objects marked for deletion (the Marked as deleted option), objects that are currently used (the Not marked for deletion option) or all objects (the All option)
Working time models
In order to define the theoretical capabilities of time-dependent resources (means of production and people in the production process), work-relevant times are mapped using time models. Working time models are templates with assigned hours – they allow the user to manage the working time of resources.
Definition of terms
- Holiday models – they are special week time models that include information about time availability on holidays. Holiday models are assigned to week time models and apply to days of the week that are holidays according to the calendar.
- Week time models – time models and shifts are assigned to each day of the week to produce a week time model
- Time models – they comprise a precise period of time, independent of the current day
Time models application
The application allows defining a precise working time.
The application is composed of:
- Header – it makes it possible to enter base data
- Work pane – it displays time details of a given shift
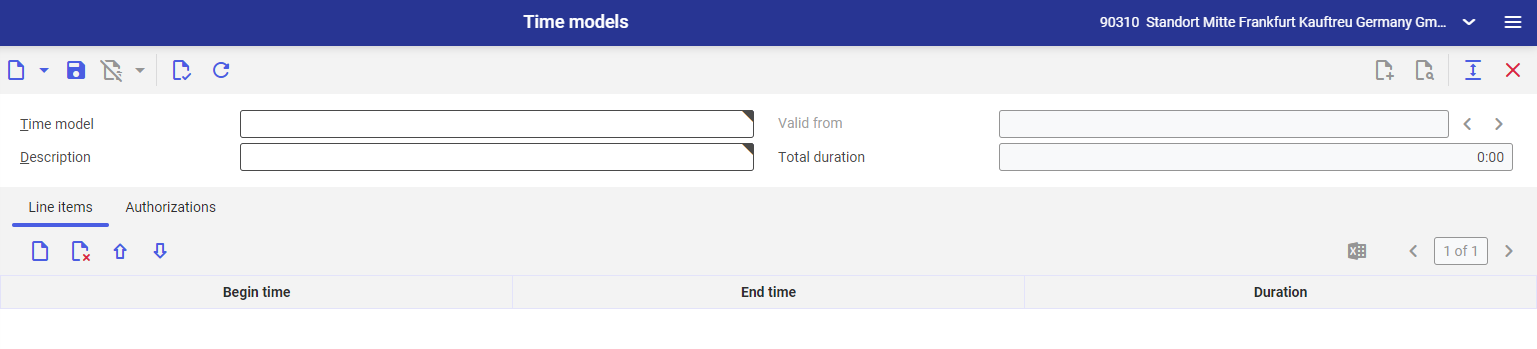
Header
The application header contains the following buttons:
- [New] → [New] – it makes it possible to add a new time model
- [New] → [New version] – it makes it possible to create a new version of a time model
- [New] → [Duplicate] – it allows duplicating an existing time model
The application header contains the following fields:
- Time model – the identification of a working time model
- Valid from – a period from which a given time model is to be used in the system
- Description – it makes it possible to define the description of a given time model
- Total duration – the sum of the Duration column values for a given time model
Work pane
The work pane of the Time models application is composed of the following tabs:
Line items tab
The tab contains a table allowing the definition of working time. The toolbar contains the following buttons:
- [New] – it allows adding a new working time line item to the table
- [Delete] – it allows deleting selected line items from the table. The line items will be removed after refreshing the view.
- [Move down] – it allows moving a line item down the table
- [Move up] – it allows moving a line item up the table
- [Output pages already displayed into file] – it exports table data into an XLS file
The table is composed of the following columns:
- Begin time – the start time of a defined working time
- End time – the end time of a defined working time
- Duration – the duration of a defined time slot
Authorizations tab
It allows assigning authorizations to a given working time to a selected organization.
Week time models application
The Week time models application allows the user to assign time models to each day of the week. The application retrieves data from the Time models and Shifts applications.
The application is composed of:
- Header – it makes it possible to enter base data
- Work pane – it displays a table with shifts and time models assigned to days of the week
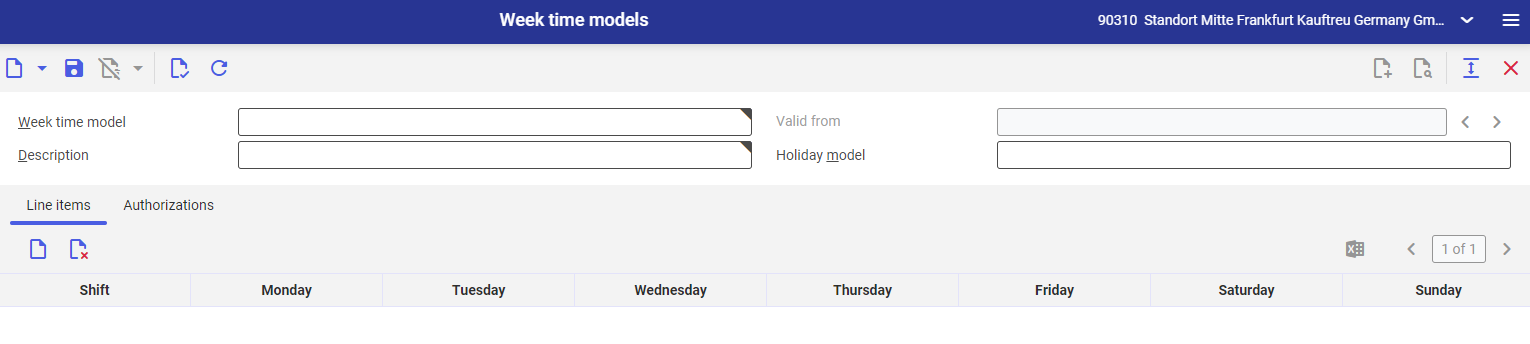
Header
The application header contains the following buttons:
- [New] – it makes it possible to add a new week time model
- [New] → [New version] – it makes it possible to create a new version of a week time model
- [New] → [Duplicate] – it allows duplicating an existing week time model
- [Delete] – it makes it possible to delete a current week time model. The user cannot delete a week time model that is currently used by a resource in the Resources application.
- [Delete] → [Mark for deletion] – it makes it possible to mark a week time model for deletion. The user cannot set the marker for a week time model that is currently used by a resource in the Resources application.
- [Delete] → [Unmark for deletion] – it makes it possible to remove a previously added deletion marker
The application header contains the following fields:
- Week time model – the identification name of a week time model
- Valid from – a period from which a given version of a week time model is valid. The field is activated after creating a new version of a week time model.
- Description – the additional name of a week time model. It is recommended to enter different names for particular time models.
- Holiday model – an assigned holiday model
Work pane
The work pane of the Time models application is composed of the following tabs:
Line items tab
The tab contains a table allowing the user to assign a working time from the Time models application to a production shift defined in the Shifts application. The toolbar contains the following buttons:
- [New] – it makes it possible to add a line item with a new shift to the table
- [Delete] – it allows deleting selected line items from the table. The line items will be removed after refreshing the view.
- [Output pages already displayed into file] – it exports table data into an XLS file
The table is composed of the following columns:
- Shift – a shift from the Shifts application
- Day of the week (Monday, Tuesday, etc.) – a time model assigned to a given shift and day of the week from the Time models application
- Duration – the duration of a defined time slot
Authorizations tab
It allows assigning authorizations to a given working time to a selected organization.
Import data
The Import data application makes it possible to import data to the system from other environments and previous system versions. In this case, it allows importing time models. Data may be imported through the following file formats: XML, CSV, XLS.
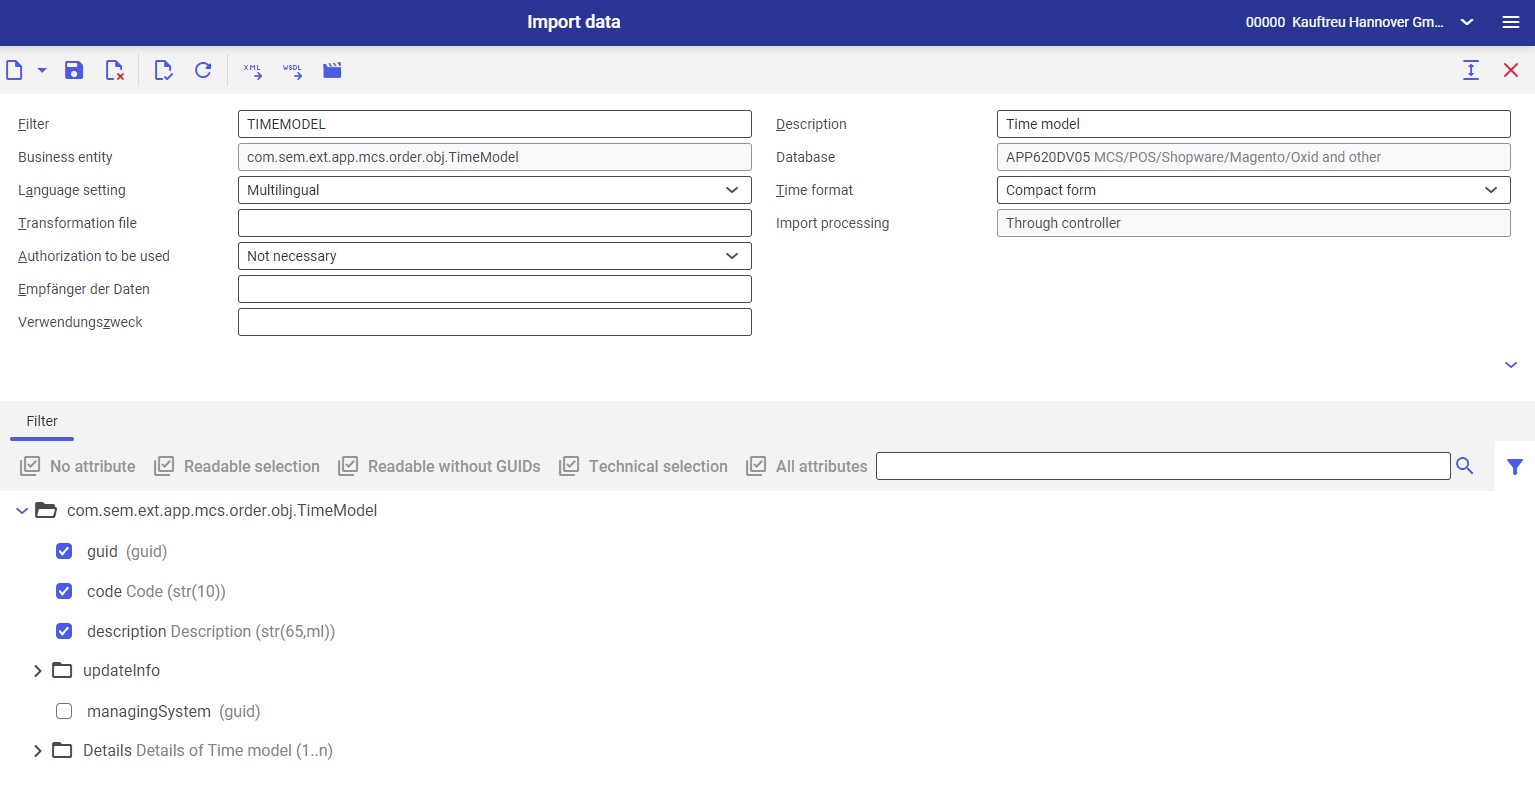
The application is composed of:
- Header – it allows the user to enter input instructions for an import operation
- Work pane – it makes it possible to select specific attributes for an import operation
Header
The application header contains the following buttons:
- [New] → [New…] – it allows initiating a new data import operation
- [New] → [Duplicate] – it allows duplicating an existing import operation
- [Export XML schema] – it exports an import schema in the XML format
- [Export WSDL schema] – it exports an import schema in the WSDL format
- [Import data] – it runs a data import operation
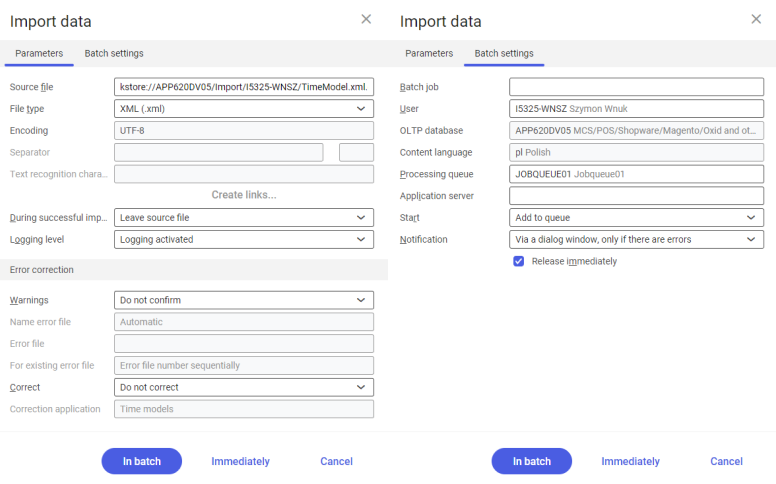
The Import data dialog window allows the user to define import settings.
Parameters tab
On this tab, the user can define an import source and specify the action in case of an error.
Batch settings tab
On this tab, the user can define import process data. In the Processing queue required field, it is necessary to select a task processing queue.
Fields available in the application header:
- Filter – it makes it possible to select data to be imported. In the case of production resources, it is necessary to select the filter TIMEMODEL.
- Business entity (non-editable) – it is assigned automatically after the user selects the filter Timemodel – com.cisag.app.general.obj.TimeModel
- Language setting – it determines the number of languages of imported data:
- Monolingual – it stores imported descriptions in a single language By default, it is the language of the user interface.
- Multilingual – it imports descriptions in multiple languages.
- Transformation file – it is a transformation standard file for XLST files (which converts and transforms documents). If it is not specified, transformation is not carried out during an import operation.
- Authorization to be used – it defines the requirement to have relevant authorizations when using a defined filter:
- Not necessary – authorizations are not required
- Mandatory – authorizations are required
- Data recipient – it saves in the operation log the import recipient data entered in the dialog window
- Intended use – it saves in the operation log the aim of a given operation entered in the dialog window
- Description – it is an additional filter name, used to facilitate searching
- Database (non-editable) – a database to which data is imported. The system always imports data to the database to which the user is currently logged in.
- Time format:
- Compact form – time data in the source file is encoded in a way that is compatible with the system
- Normalized form – time data in the imported file is broken down into components (date, time, time zone) and presented in a composite manner
- Import processing (non-editable):
- Generic – import through the generic function for entities without a defined controller
- Through controller – import for entities with a defined controller, i.e. a data processing type
Work pane
The work pane makes it possible to select attributes to be imported.
Data import process
In order to import data, it is necessary to:
- Click the [New] button
- The dialog window Find: Business entities and parts will be displayed
- In the Name field, it is necessary to enter the following values:
- For resources – Resource
- For resource groups – ResourceGroup
- Accept the entry with the [Accept] button
- By default, the filter described above should display
- Select attributes to be imported
- Accept the selection by clicking [Import data]. The Import data dialog window will open.
- Once data in the dialog window is defined, accept it with the [In batch] button that initiates the data import operation.
Reorganize production master data application
With the use of the Reorganize production master data application, it is possible to delete bills of material, routings, bills of resources, work stages, work stage templates, and resource lists marked for deletion in system applications. The application consists of the dialog window Execute batch application “Reorganize production master data.”
The application is composed of the following tabs:
Application tab
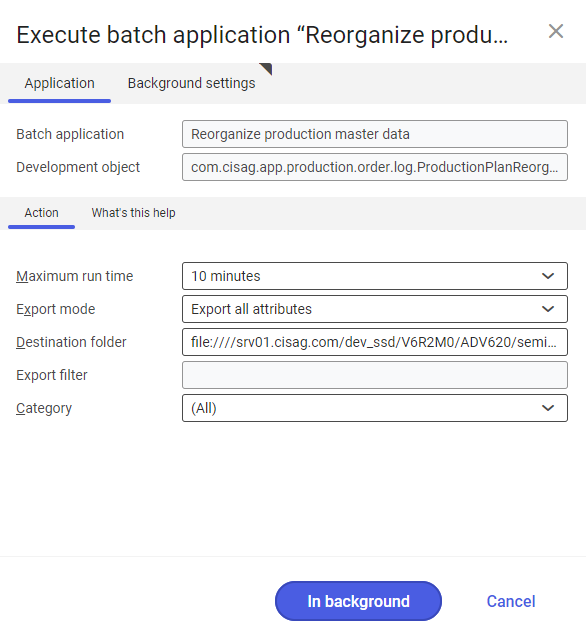
The application contains the following fields:
- Batch application (filled in automatically – non-editable) – the name of the application
- Development object (filled in automatically – non-editable) – a defined application database
Action tab
The tab contains the following fields:
- Maximum run time – it determines the run time of the batch application
- Export mode – the application allows the user to export data in order to archive it; the field contains the following options:
- Do not export – the application will not export data
- Export all attributes – the application will export all production data
- Export with filter – the application will export data according to a filter selected in the Export filter field
- Destination folder – it makes it possible to define a destination folder for exported data. If the option Do not export is selected, this field is deactivated.
- Export filter – it allows selecting an export filter
- Category – it makes it possible to select which data is to be reorganized:
- (All) – it selects all the following options
- Bill of material – it only reorganizes data in the Bills of material application
- Resource list – it only reorganizes data in the Resource lists application
- Operation – it only reorganizes data in the Operations application
- Routing – it only reorganizes data in the Routings application
- Bill of resources – it only reorganizes data in the Bills of resources application
- Operation template – it only reorganizes data in the Operation template application
Background settings tab
The tab allows defining data processing settings. It contains the following fields:
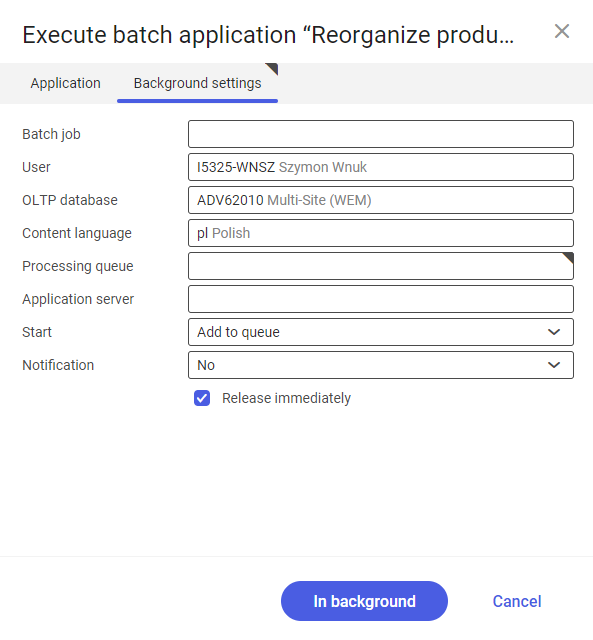
- Batch job – the name of a batch job
- User (filled in automatically – non-editable) – the user who orders data processing
- OLTP database (filled in automatically) – the system database, i.e. an environment where data processing is ordered
- Content language – the processing language of data export
- Processing queue (required) – it allows selecting a queue on the server for the purpose or task processing
- Application server – it allows selecting an application server for the needs of data processing
- Start – it allows defining the method of data processing initiation. The field makes it possible to select one of the following options:
- Add to queue – a task is added to a queue after other tasks to be processed
- At restart of application server – a task will be processed after the server is restarted
- Scheduled: external
- Scheduled: once only – after selecting this option, the user may define the fields Begin and Maximum run time which allow specifying the output time once
- Scheduled: as a series – after this option is selected, complementary parameters are displayed:
- Begin – the start time of a batch job. It is possible to define a date and time.
- Maximum run time – it allows defining the maximum run time for a job
- Timeout notification – if this parameter is selected, the system sends a relevant notification if the timeout of a given batch job expires
- Serial pattern – it allows defining a pattern for batch jobs
- End – it defines the end time for a batch job
- Series canceled – it is responsible for displaying notifications if a job is not completed successfully or an error occurs
- Notification – it allows the user to choose the notification method used after task completion. Available options include:
- No – the system does not notify about task completion
- Using a dialog window – the system displays a dialog window with information about task completion
- Via a dialog window, only if there are errors – the system displays a dialog window with information about task completion only if there are errors in the course of task processing
- By Workflow – the system displays information about task completion in the Messages panel
- By Workflow, only if there are errors – the system displays information about task completion in the Messages panel, only if there are errors in the course of task processing
- Release immediately – the parameter is selected by default. It immediately outputs or saves data to a file.