Contents
Comarch mPOS application has been adapted to work on mobile devices such as tablets. The application can be used on such devices in the vertical position. Also, the tablet mode supports additional application features:
- Customers
- Sales quotes
With the functionality of the tablet mode, the seller can provide advice to customers with regard to the parameters and specifications of items. Anywhere in the store, the employee can add a new customer form and generate a personalized sales quote.
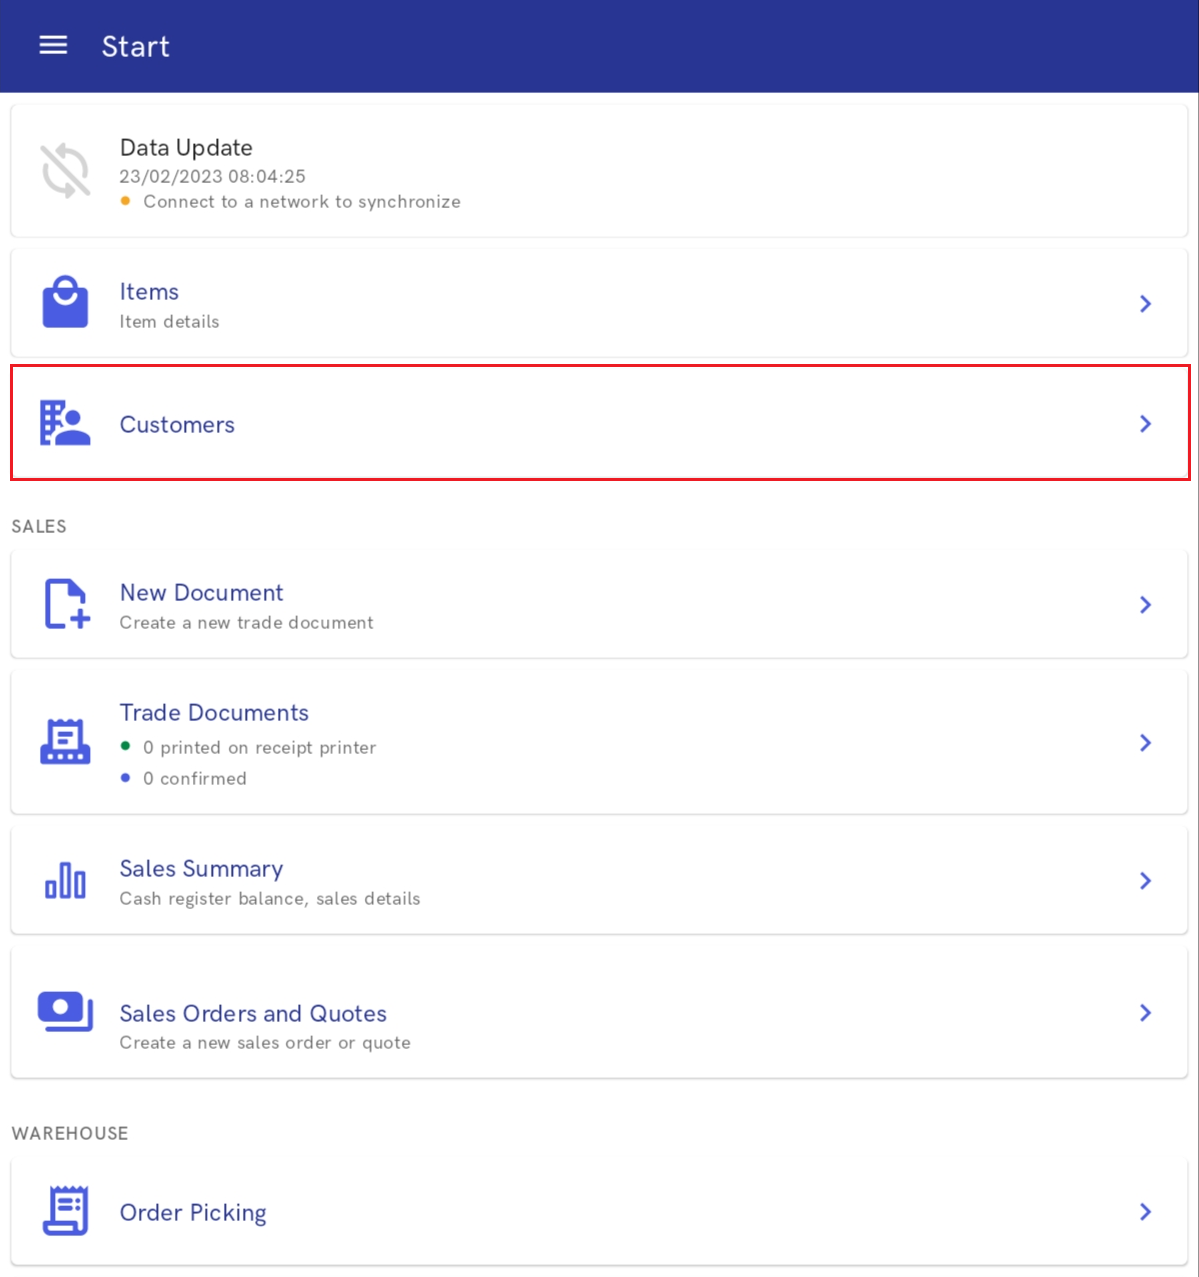
Customers
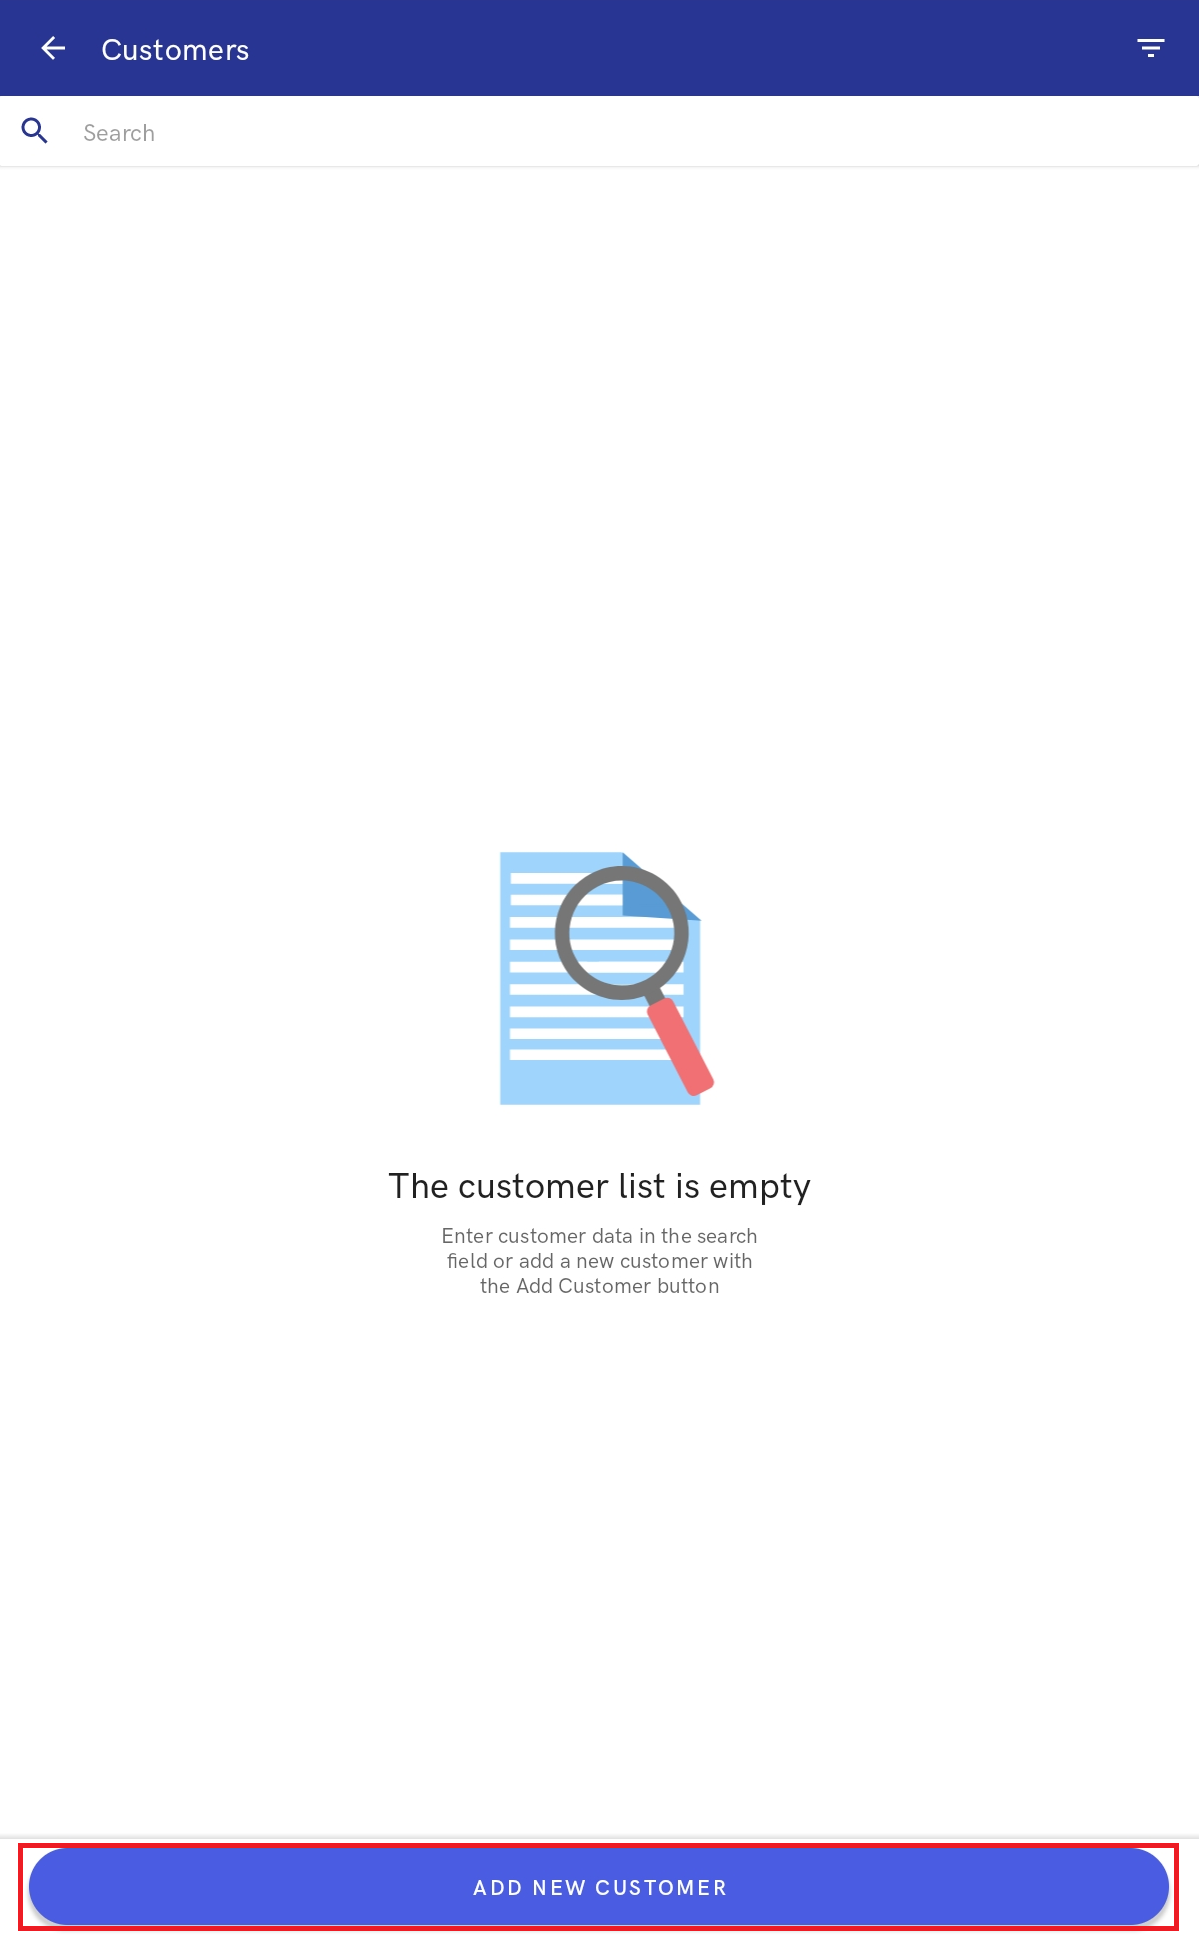
The Customers view can be accessed by selecting the [Customers] tile in the Start view or by selecting the [Customers] button in the side menu.

Customer list
Due to the privacy policy, the list of customers opened after selecting the [Customers] tile or button is always empty. The webPOS workstation displays the notification: “The customer list is empty. Enter customer data in the search field or add a new customer with the “Add Customer” button”. The list allows searching for customers who have been:
- Defined in the application
- Defined in the ERP system
- Shared with the mPOS workstation by the ERP system

The customer list contains the field Search that makes it possible to search for/limit customers presented on the list on the basis of:
- Customer code
- Customer name
- Zip code
- Phone number
- E-mail address
Search results are displayed as customer labels. A customer label presents the following details:
- Customer name
- Phone number
- E-mail address
- Address:
- City
- Street
- Zip code
Below the search results, the application displays the following notification: “No exact search results. Do you want to continue searching also in the ERP system?”. To continue searching for customers in the ERP system, select the [Search] button.
The top right corner of the view contains the filter button that makes it possible to sort results by customer name and search for customers on the basis of:
- Customer type – available options include:
- Retail Customer
- Business Entity
In the Customers view, it is possible to:
- Open customer details
- Open customer transaction history
- Add a new customer
- Edit an existing customer
Preview of the customer form
Once a given customer label is selected on the customer list, the application displays the preview of the customer’s details, divided into two tabs:
- Customer Details
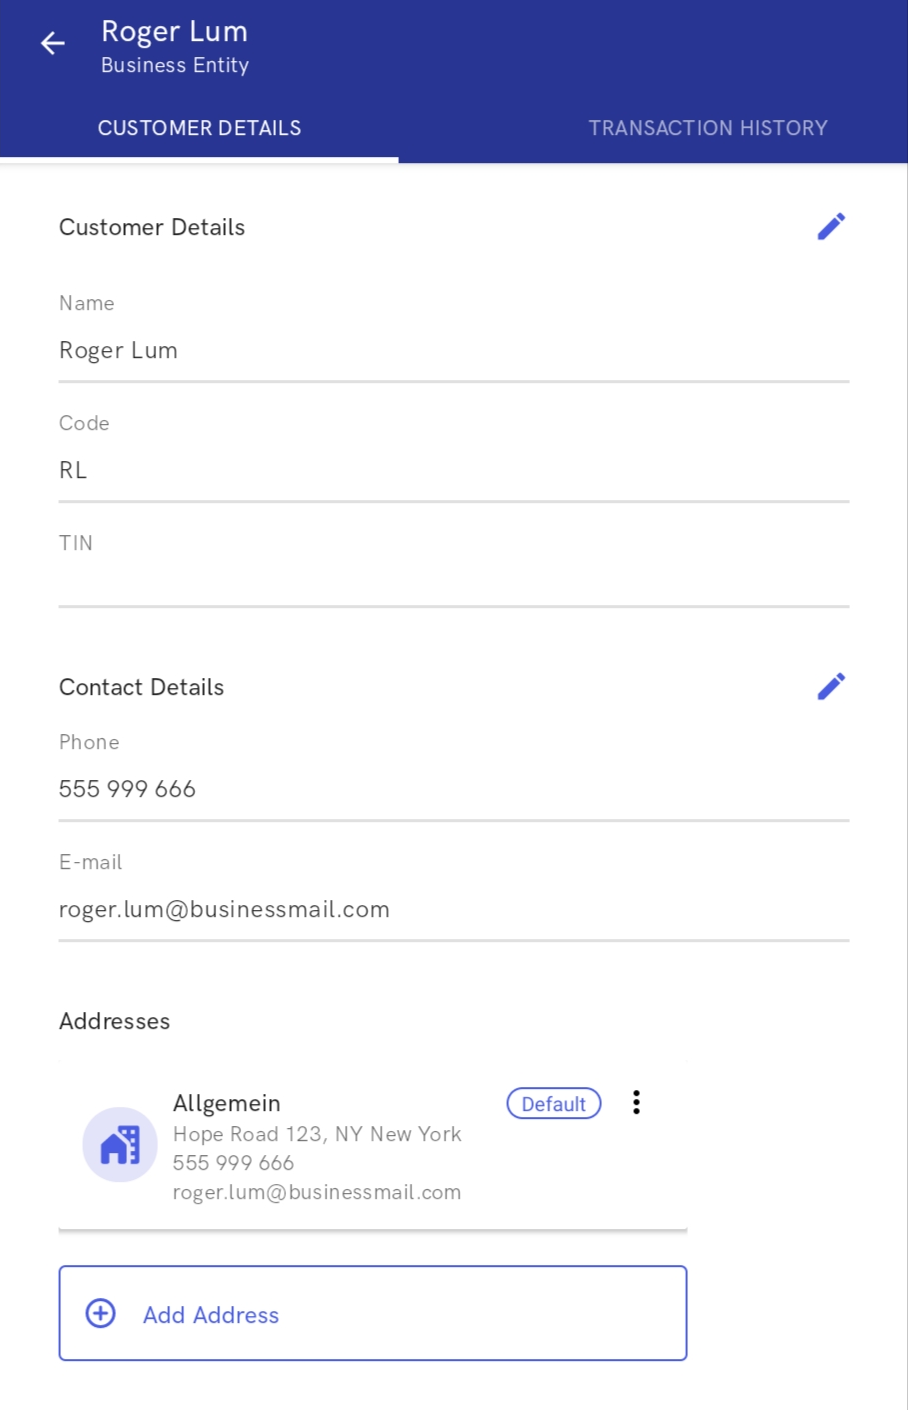
- Transaction History
Customer Details tab
The Customer Details tab presents:
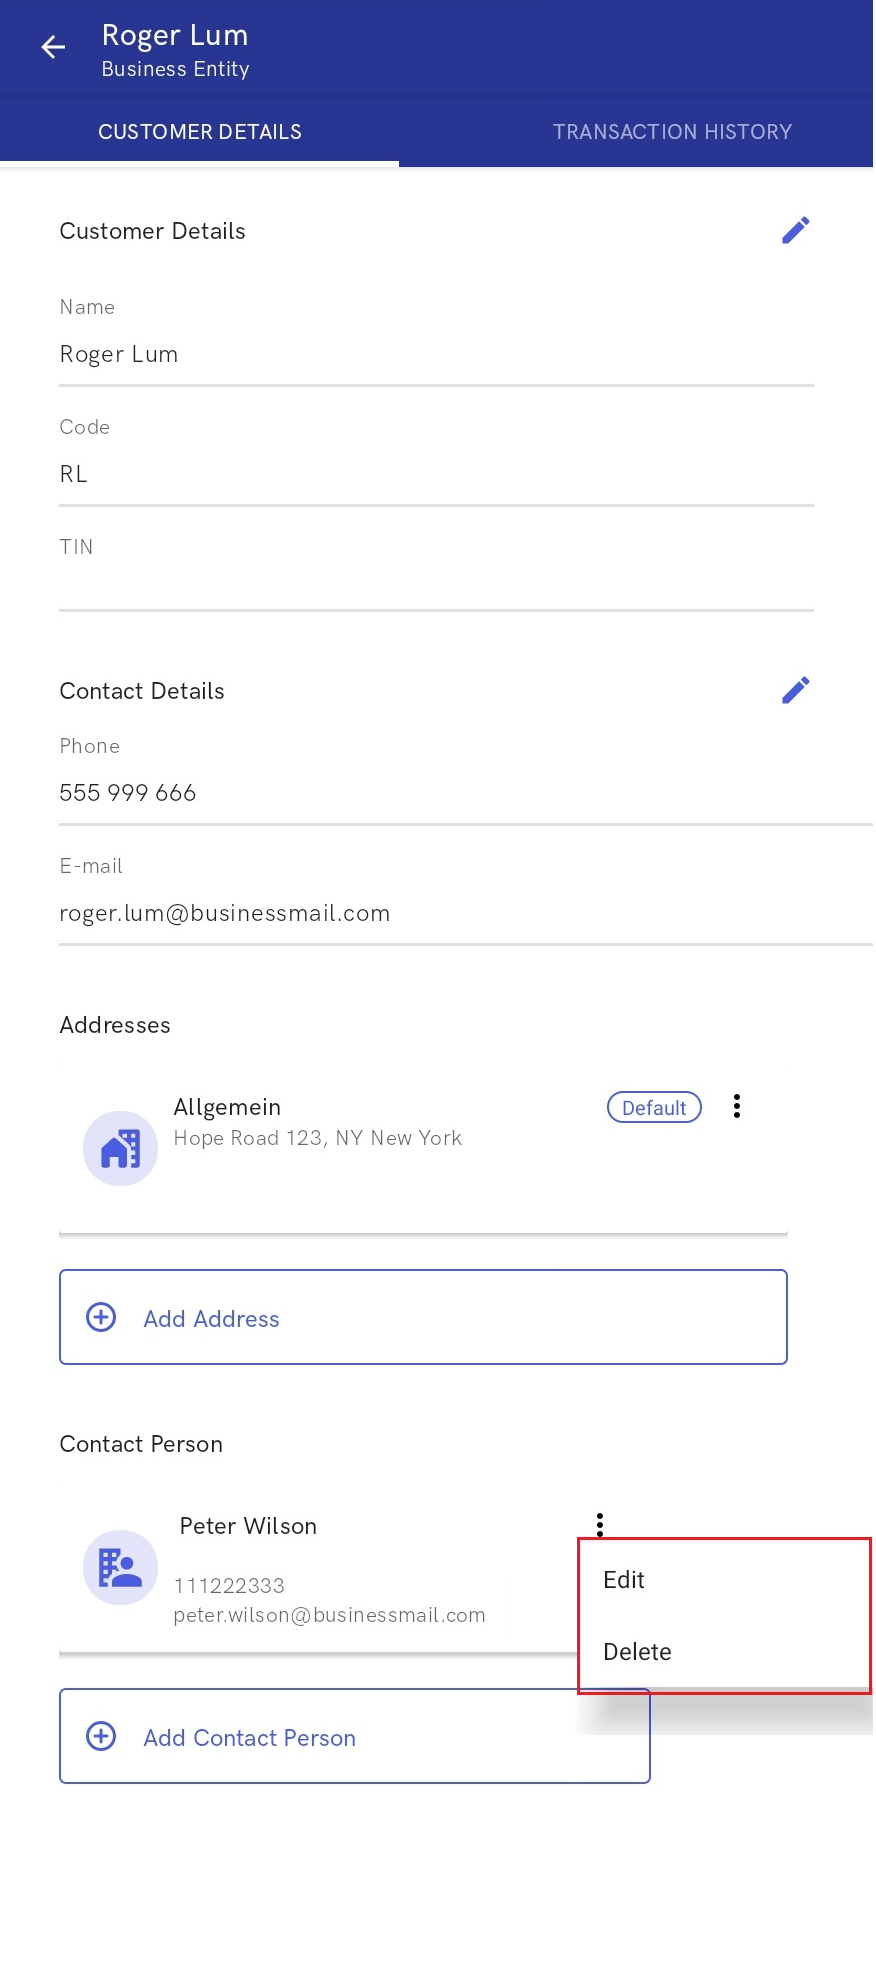
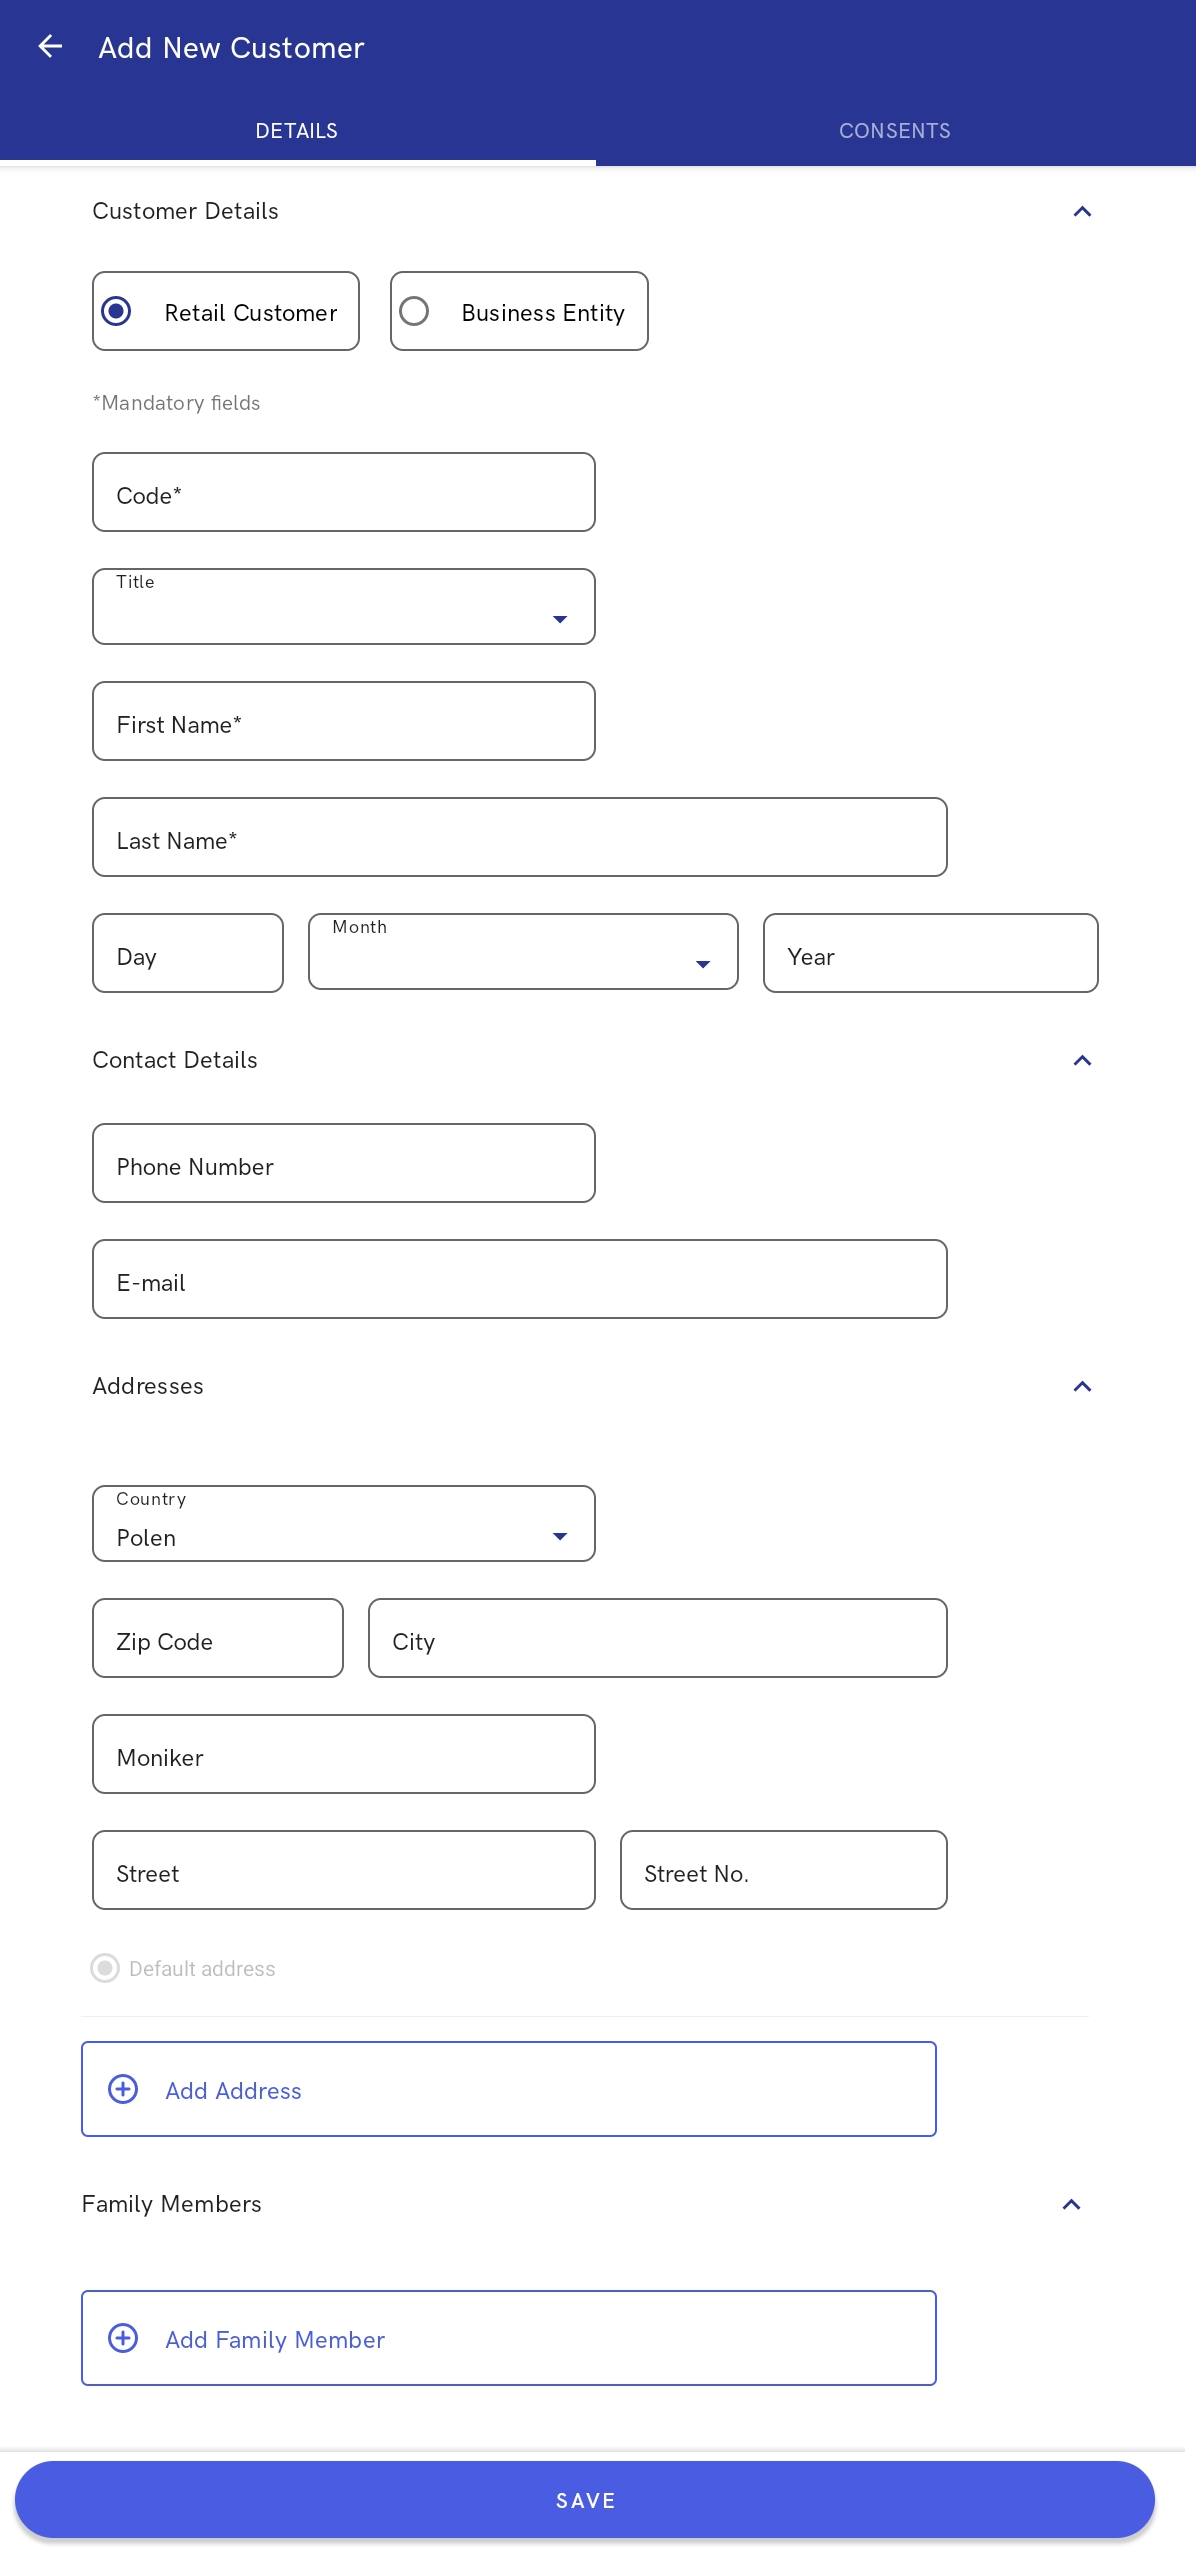
- Customer Details – this section includes basic information about a customer, such as the customer’s full name and code (in the case of retail customers) or name, code, and TIN (in the case of business entities). In this section, the operator can also edit data.
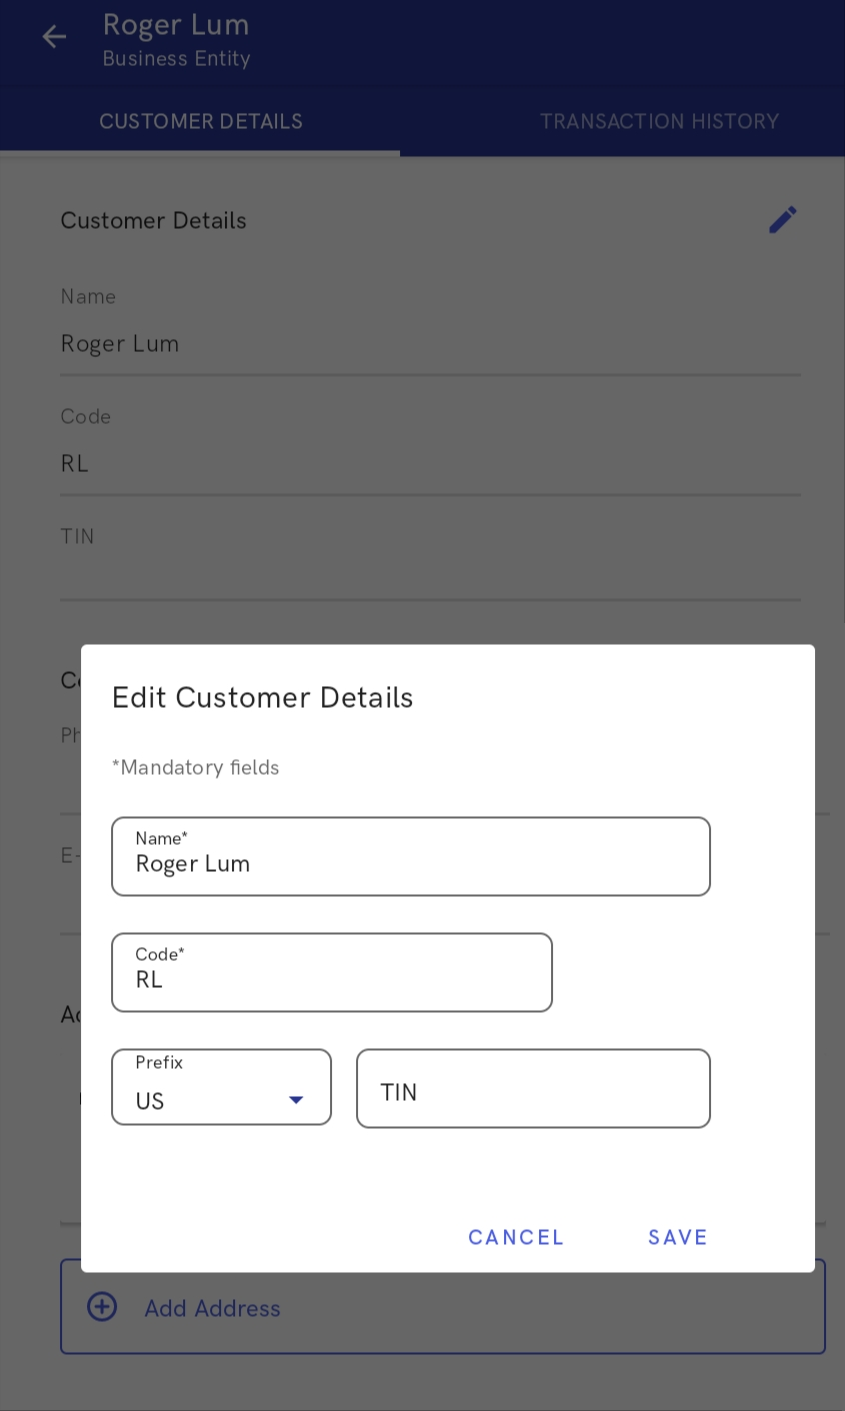
In the Edit Customer Details view, it is possible to edit the following data:
- For retail customers:
- First name
- Last name
- Date of birth
- Title
- Code
- For business entities:
- Name
- Code
- Prefix
- TIN
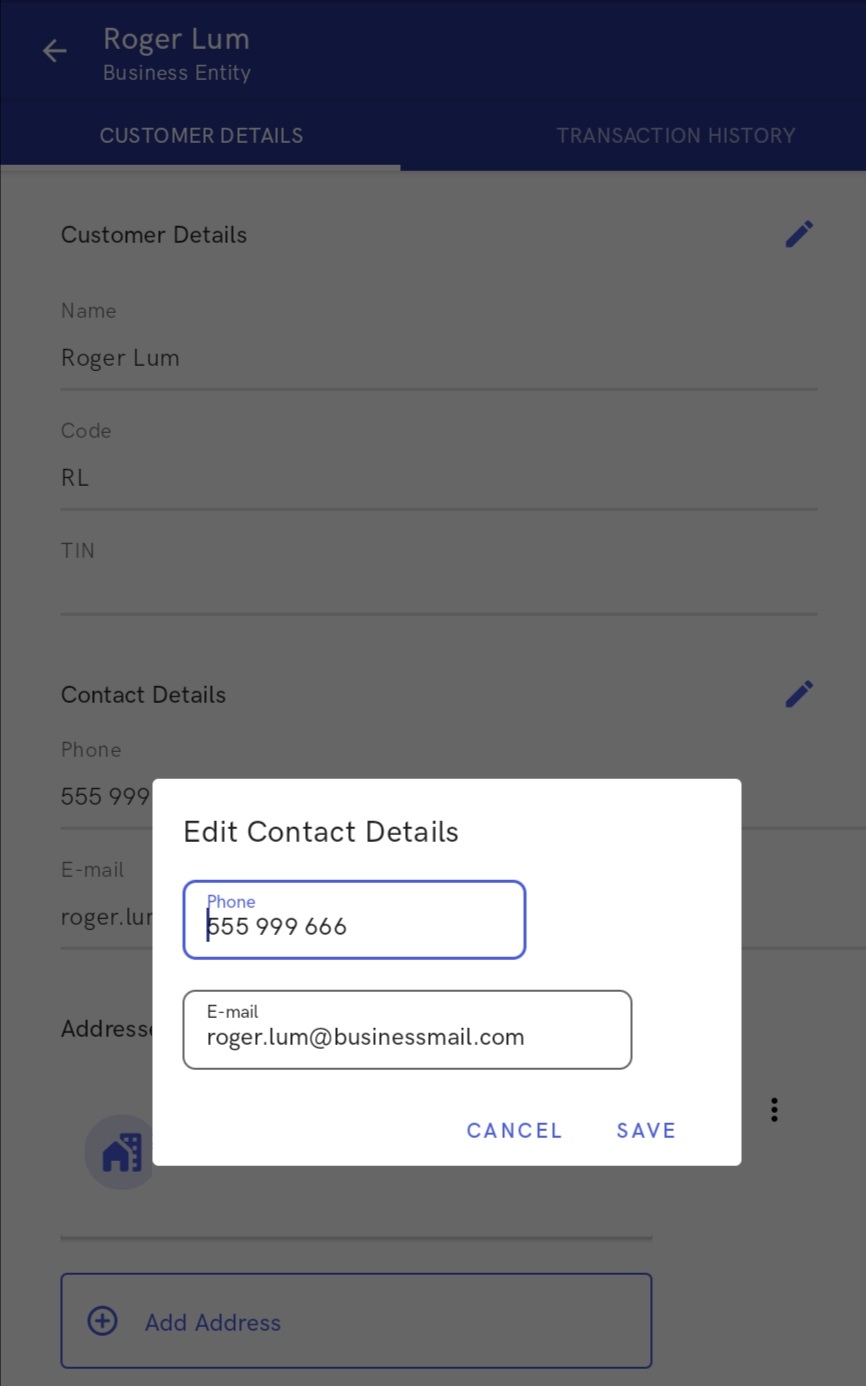
- Contact Details – this section includes customer contact data: phone number and e-mail address. In this section, the operator can also edit data.
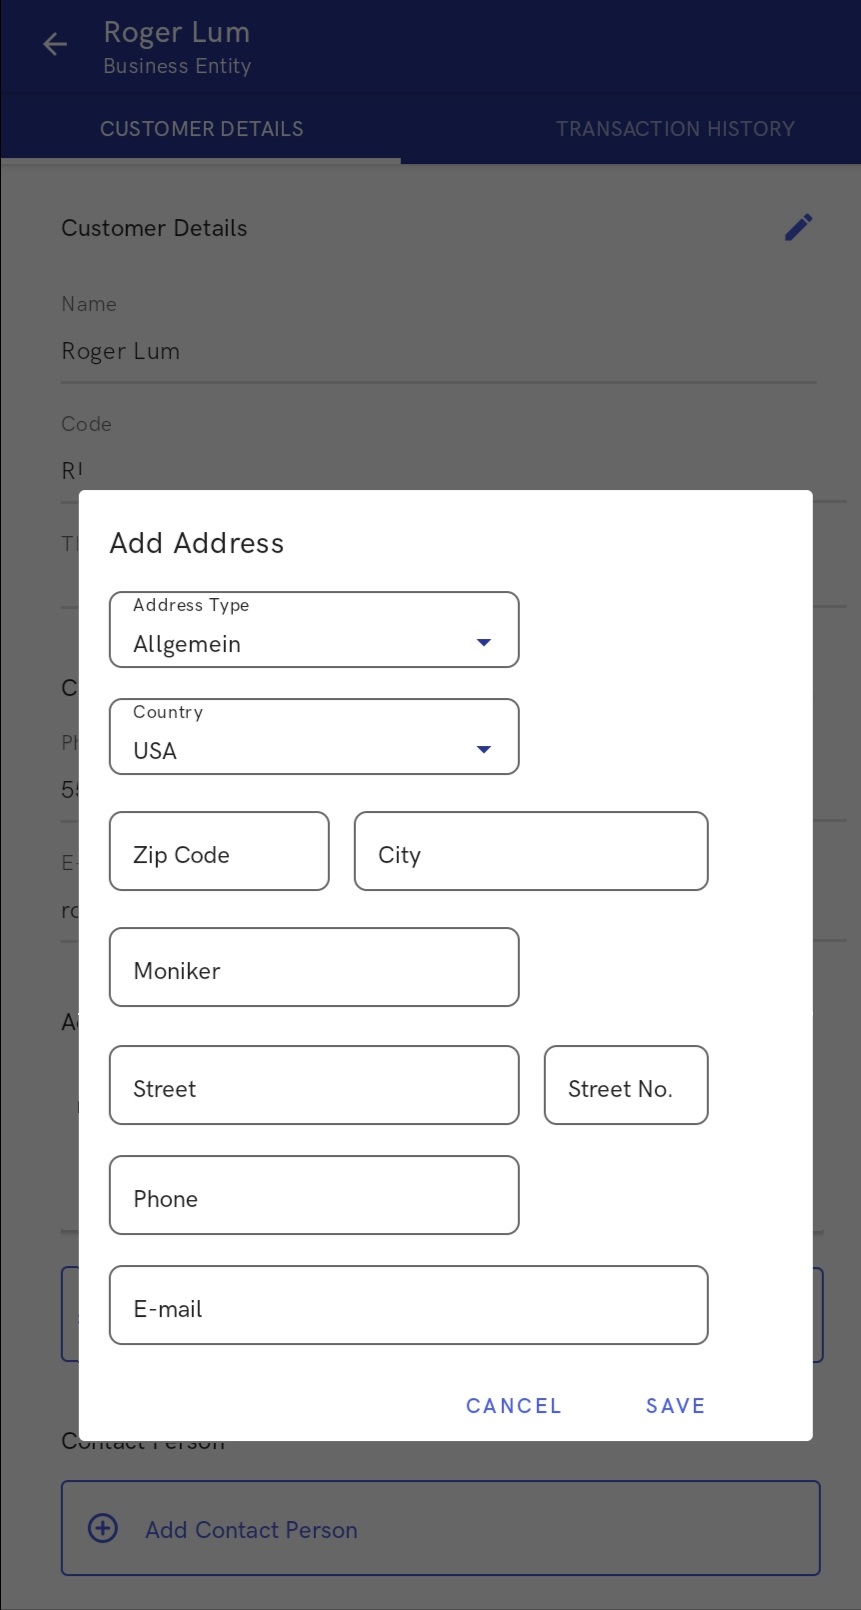
- Addresses – this section includes defined customer addresses and allows opening (and editing) the details of a given address. In this section, the operator can also add a new address.
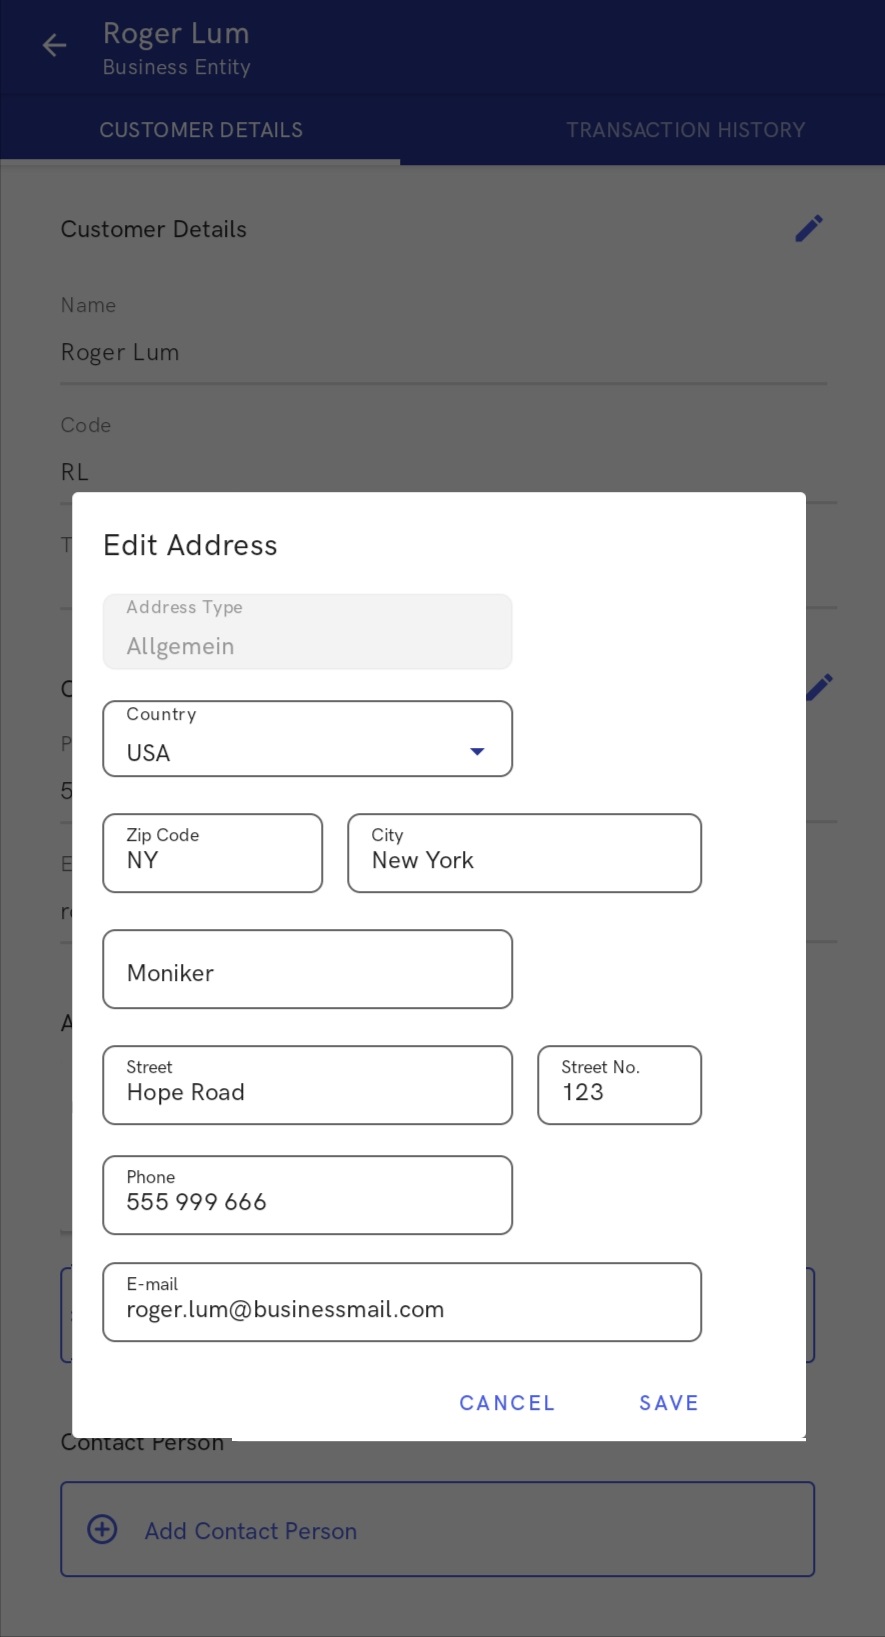
In the Edit Address view, it is possible to edit the following data:
- Address type
- Country
- Zip code
- City
- Moniker
- Street
- Street no.
- Phone
- E-mail address
To add a new address, select the [Add Address] button.
- Family Members/Contact Persons – this section displays defined family members/contact persons and allows opening (and editing) the details of a given family member/contact person. In this section, the operator can also add a new family member for a retail customer and a new contact person for a business entity.
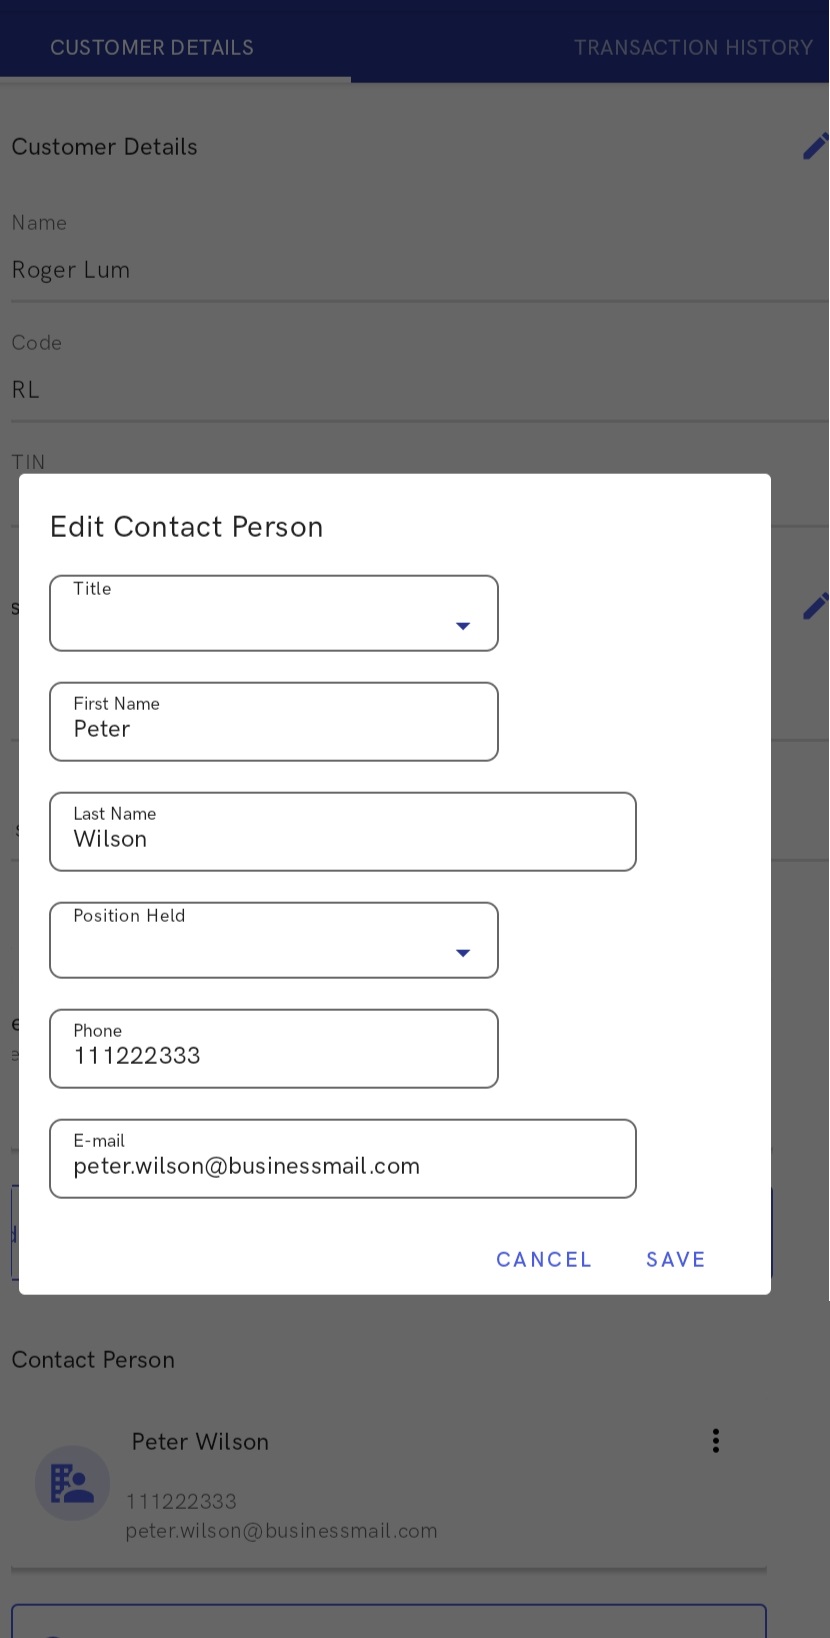
In the Edit Family Member/Edit Contact Person view, it is possible to edit the following details:
- Title
- First name
- Last name
- Type of relationship (for a family member)
- Position held (for a contact person)
- Phone
- E-mail address
To add a new family member, select the [Add Family Member] button; to add a new contact person, select the [Add Contact Person] button. The Family Members/Contact Person section contains two buttons:
[Edit] – it opens the editing view of family member/contact person details, depending on the customer type
[Delete] – it deletes the family member/contact person of a selected customer
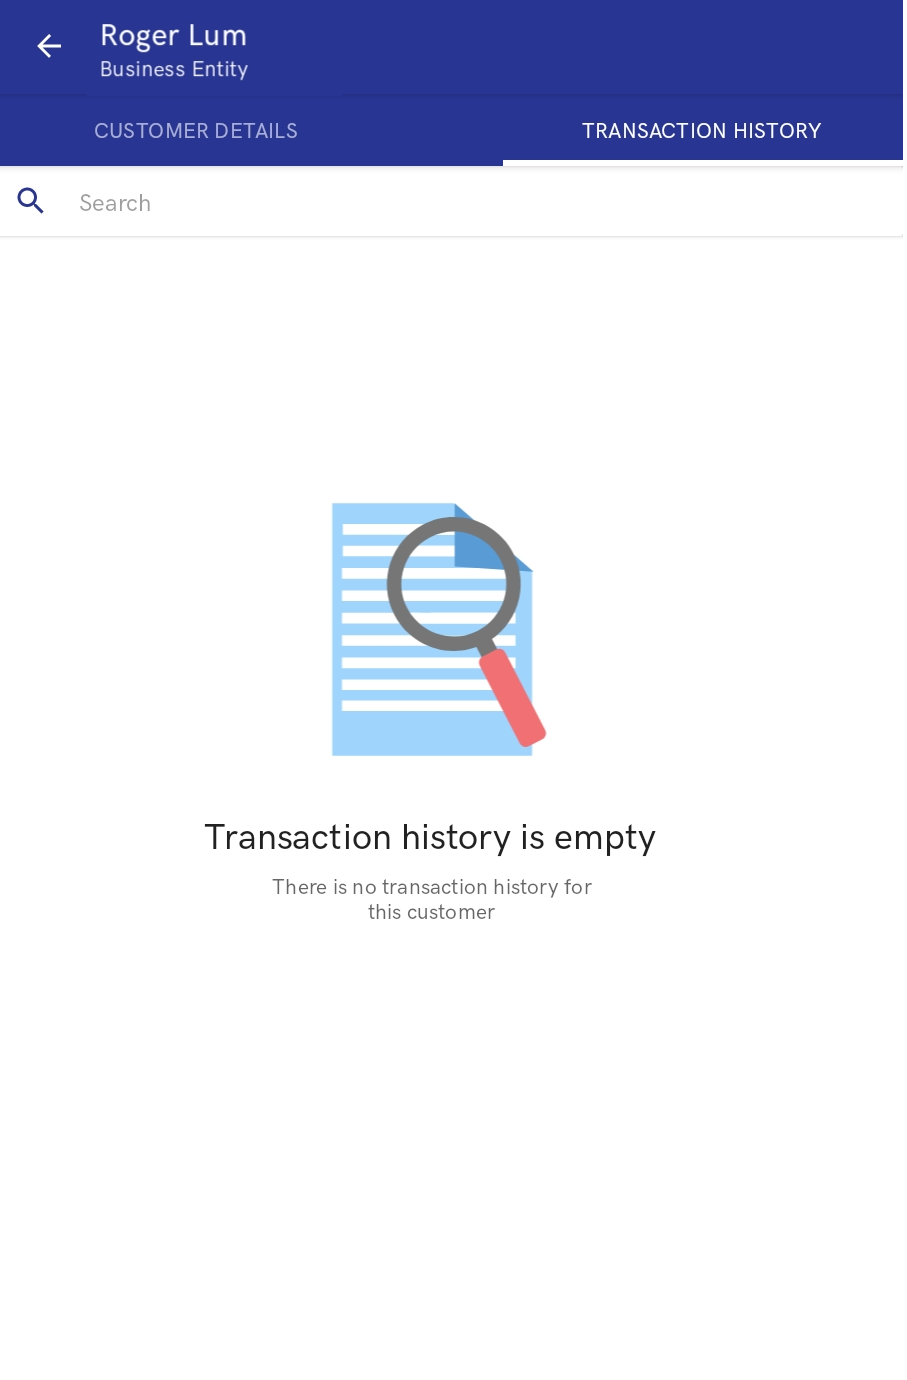
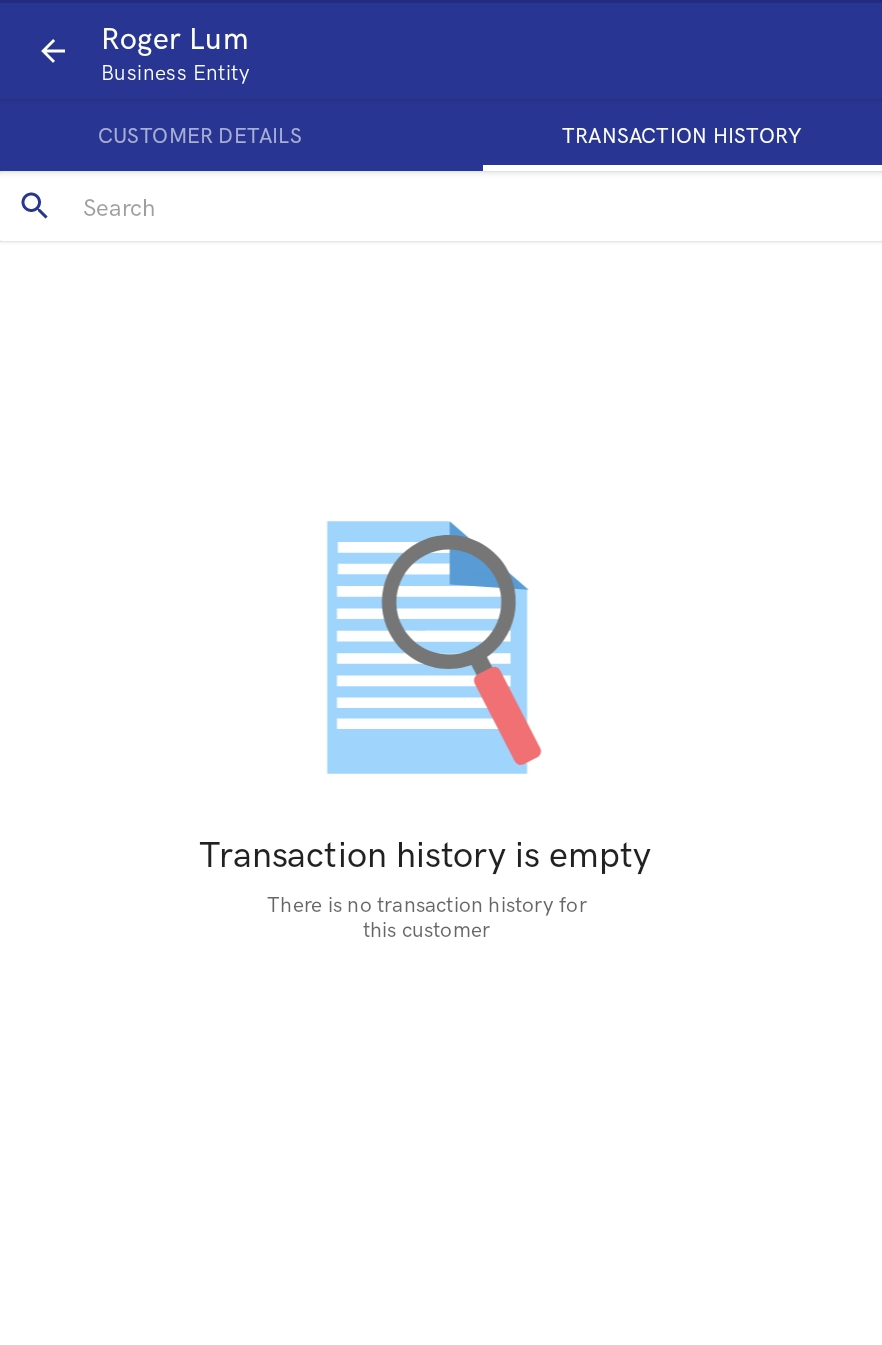
Transaction History tab
On the Transaction History tab of the customer preview, the operator can see the history of a given customer’s transactions. The search field allows searching for transactions on the basis of item names.
The list of transactions displays the following information:
- Item
- Document number
- Status
- Creation date
Selecting the [More] button displays further details:
- Item name
- UPC code
- Quantity
- Discount
- Regular price
- Discounted price
How to add a new customer
To add a new customer, select the button [Add] → [Retail Customer]/[Business Entity] in the Customers view.
- After selecting a retail customer, it is necessary to fill in the following data:
- Code (mandatory)
- Title
- First name (mandatory)
- Last name (mandatory)
- Date of birth
- Phone number
- E-mail address
- Country
- Zip code
- City
- Moniker
- Street
- Street no.
- After selecting a business entity, it is necessary to fill in the following data:
- Code (mandatory)
- Name (mandatory)
- Prefix
- TIN
- Phone number
- E-mail address
- Country
- Zip code
- City
- Moniker
- Street
- Street no.
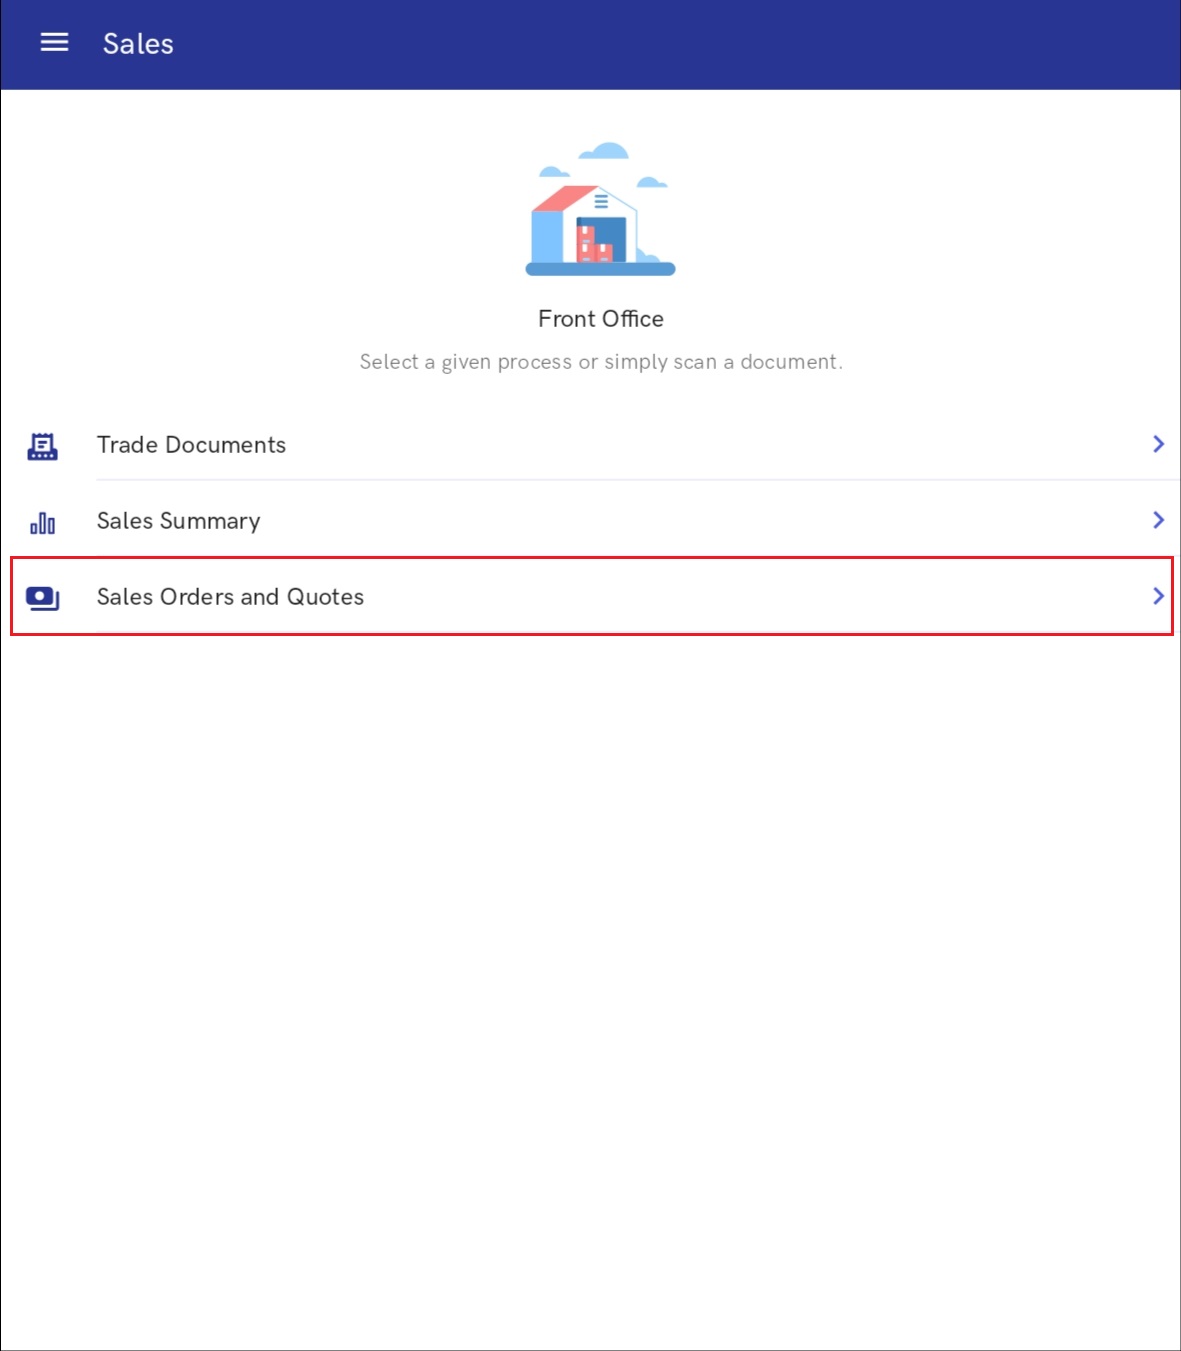
Sales quotes
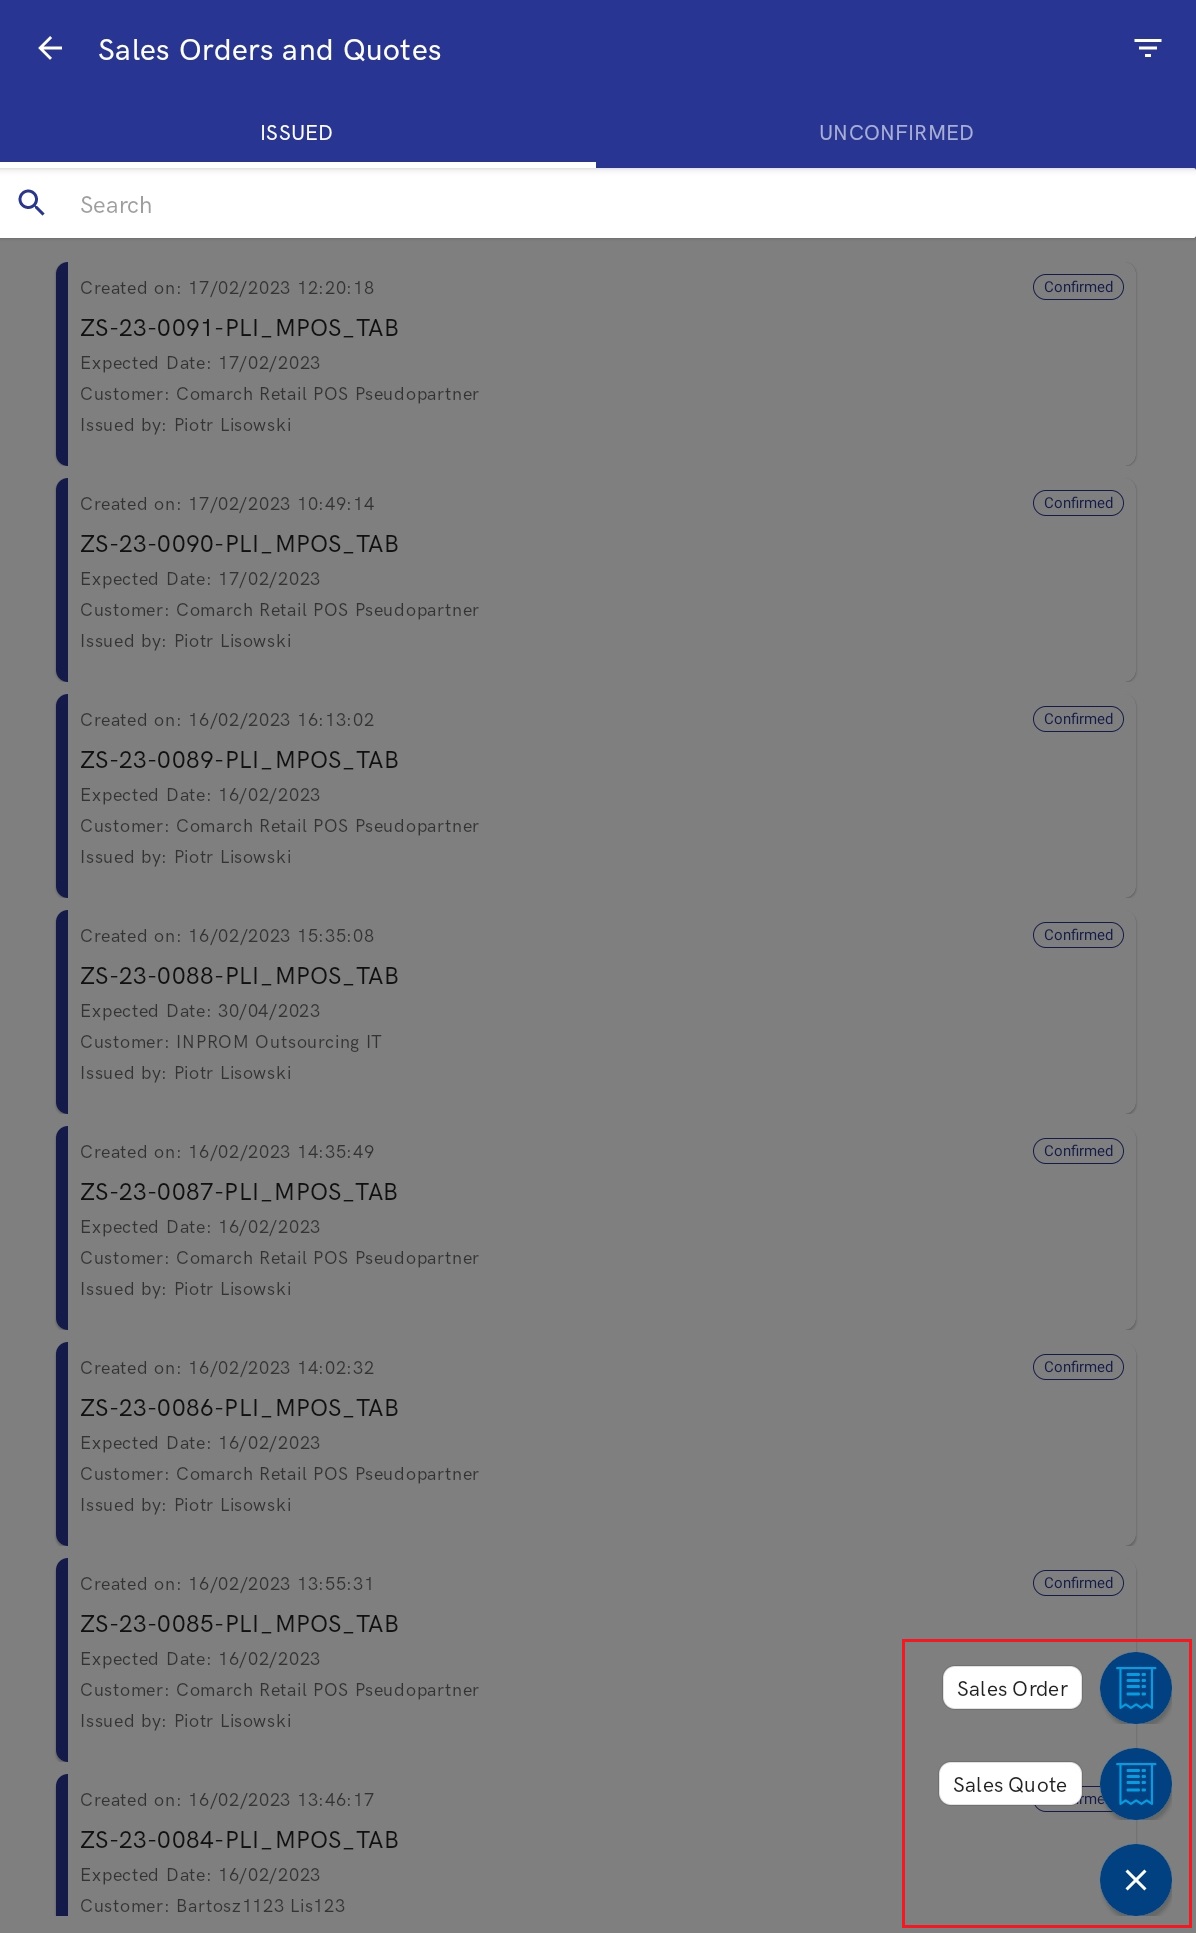
The Sales Orders and Quotes view can be accessed by selecting the [Sales Orders and Quotes] tile in the Start view or by selecting the [Sales] button in the side menu.

- Add a new sales quote
- Preview a sales quote
- Park a sales quote to edit it later on the same or another mPOS workstation
If connection with the ERP system is not established, the mPOS workstation displays a relevant notification.

The Sales Orders and Quotes view is divided into the following tabs:
- Issued – it contains confirmed sales quotes that are ready to be processed
- Unconfirmed – it contains parked sales quotes to be confirmed in the future
The top right corner contains the filter button that makes it possible to:
- Sort by:
- Date of Issue: Newest first
- Date of Issue: Oldest first
- Expiration Date: Newest first
- Expiration Date: Oldest first
- Filter by:
- Document Type:
- All
- Sales Quote
- Sales Order
- Date of Issue (as a date range)
- Total Quote Value (as a value range)
- Customer
- Status:
- Unconfirmed
- Pending
- Canceled
- Closed
- Completed
- Accepted
- Rejected
- Confirmed
- Document Type:
After the [Show Results] button is selected, the list of sales quotes is limited to results found on the basis of selected filters.
Search results are displayed as sales quote labels. A search quote label presents the following details:
- Handling person
- Sales quote number
- Creation date
- Customer name
- Expiration date
- Status (and an appropriate color)
The list of sales quotes contains the following buttons:
[Create] → [Sales Quote] – it adds a new sales quote document
[Continue] (available on the Unconfirmed tab) – it allows the user to continue creating a sales quote
[Delete] (available on the Unconfirmed tab) – it deletes a parked quote
Preview of the sales quote form
After a given quote label is selected on the list of sales quotes, the application displays the quote’s preview form. The quote preview presents the following details:
- Quote number
- Current status
- Quote creation date
- Handling person
- Customer
- Item list
- Payment form
- Due date
- Expected date
- Description
The sales quote preview form contains the following buttons (depending on the quote’s status):
[Print] – it prints the document
[Confirm] – it changes the quote’s status to Confirmed
[Associated Documents] – it opens the list of all documents associated with a given document
[Copy] – it allows copying the list of items to a new sales quote
[Discount Summary] – it opens the Discount Summary view
[Reject] – it opens a view allowing the user to select a reason for quote rejection
[Cancel] – it cancels a confirmed document for which no other document has been generated (or if such an associated document has also been canceled)
How to add a new sales quote
To create a new sales quote, select the button [Create] → [Sales Quote] in the Sales Orders and Quotes view.
- Customer – it allows changing the customer
- Items – it allows adding items using the [Add Item from Catalog] button or by scanning them; before scanning an item, select the scanning button in the top right corner
- Document Information:
- Payment Form – the default payment form is Cash
- Due Date – the default due date is retrieved from customer settings
- Expiration Date (by default: current date) – the quote’s effective date. Once the date expires, the quote can no longer be processed.
- Expected Date (by default: current date) – the quote’s expected date. It determines the date when a receipt should be issued for document items.
- Description – additional information
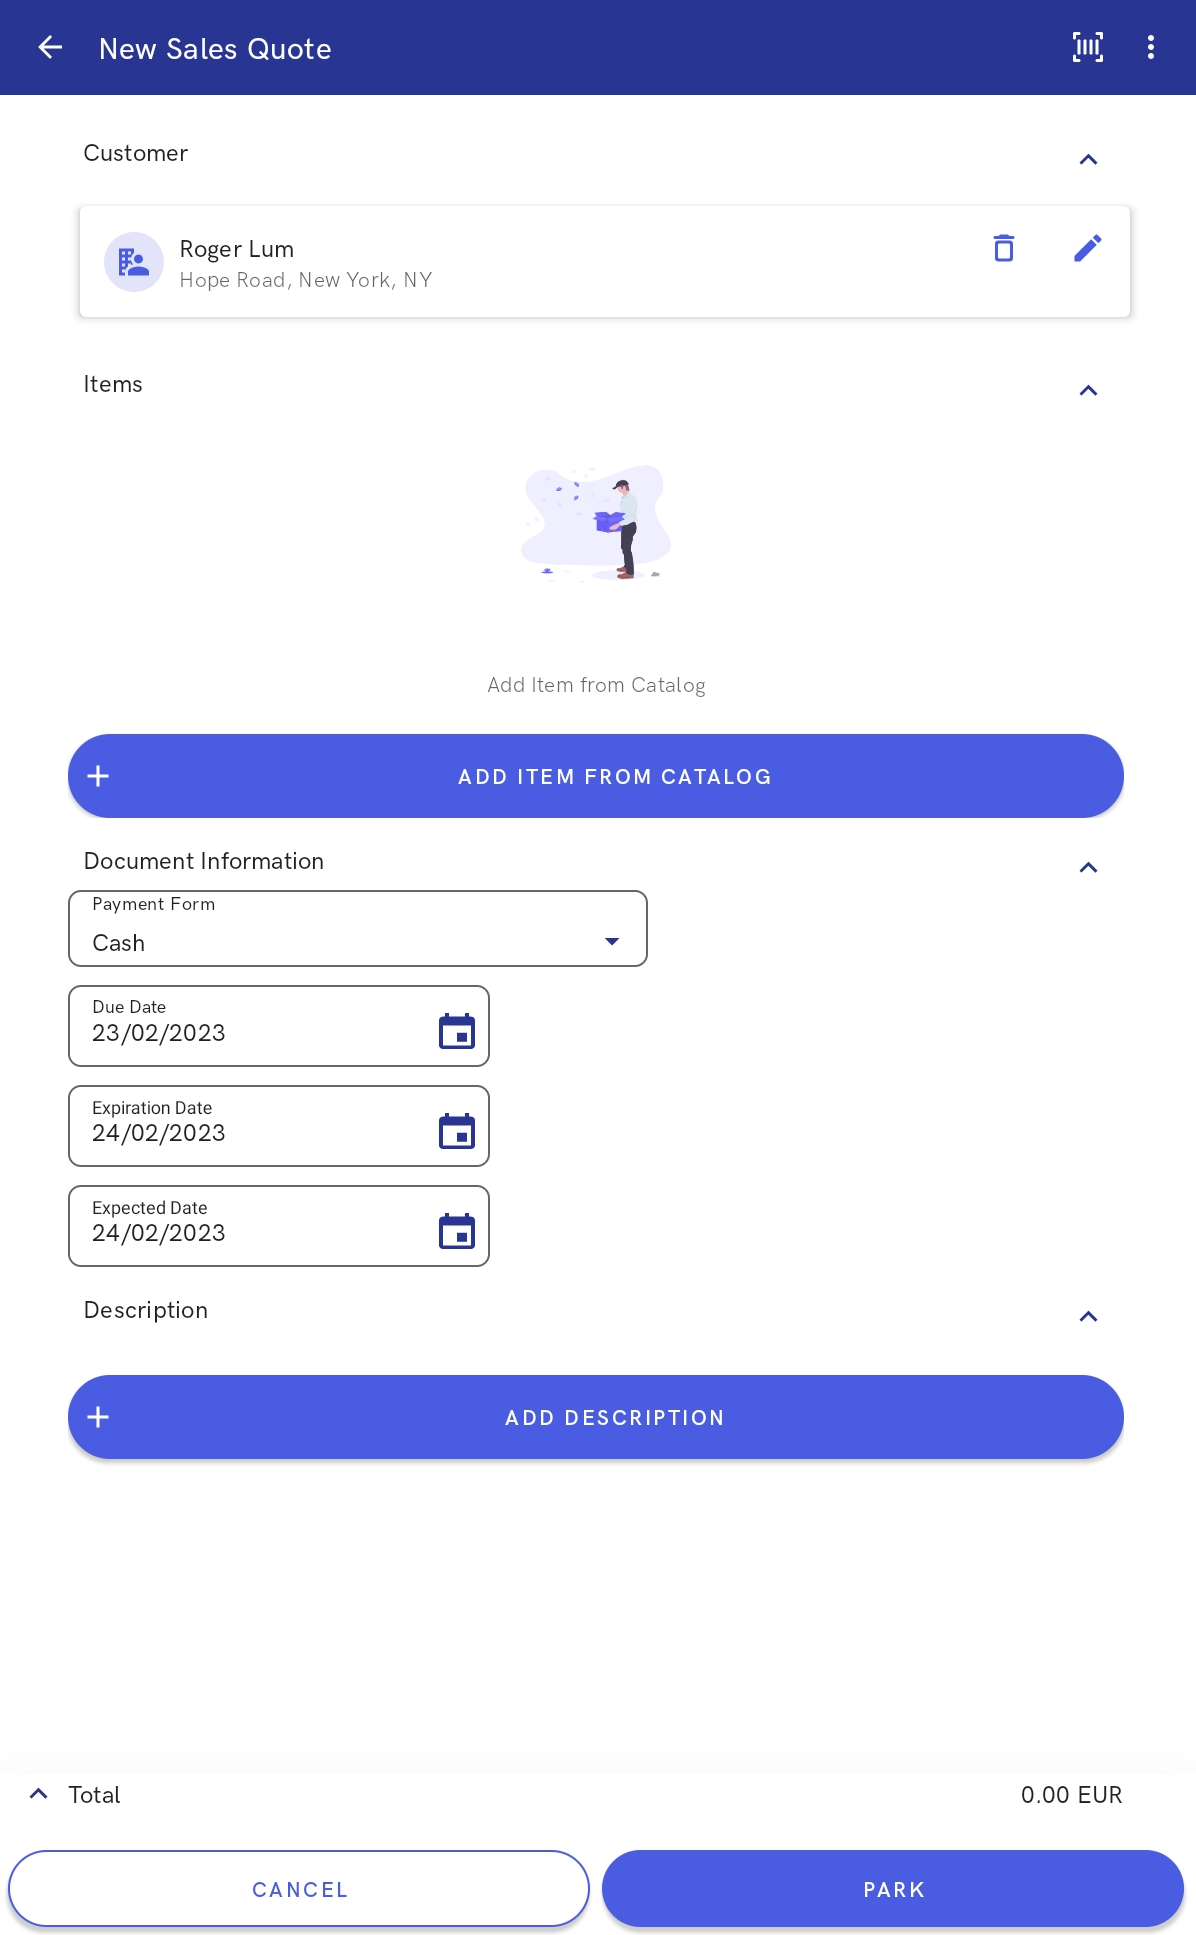
Also, the new sales quote form contains the following buttons:
[Park] – it saves the document, enabling the user to process it later or on another workstation
[Confirm] – it confirms the document; the button is made available after adding an item to the sales quote
[Cancel] – it cancels the addition of the new sales quote; the button is available if there are no items in the sales quote
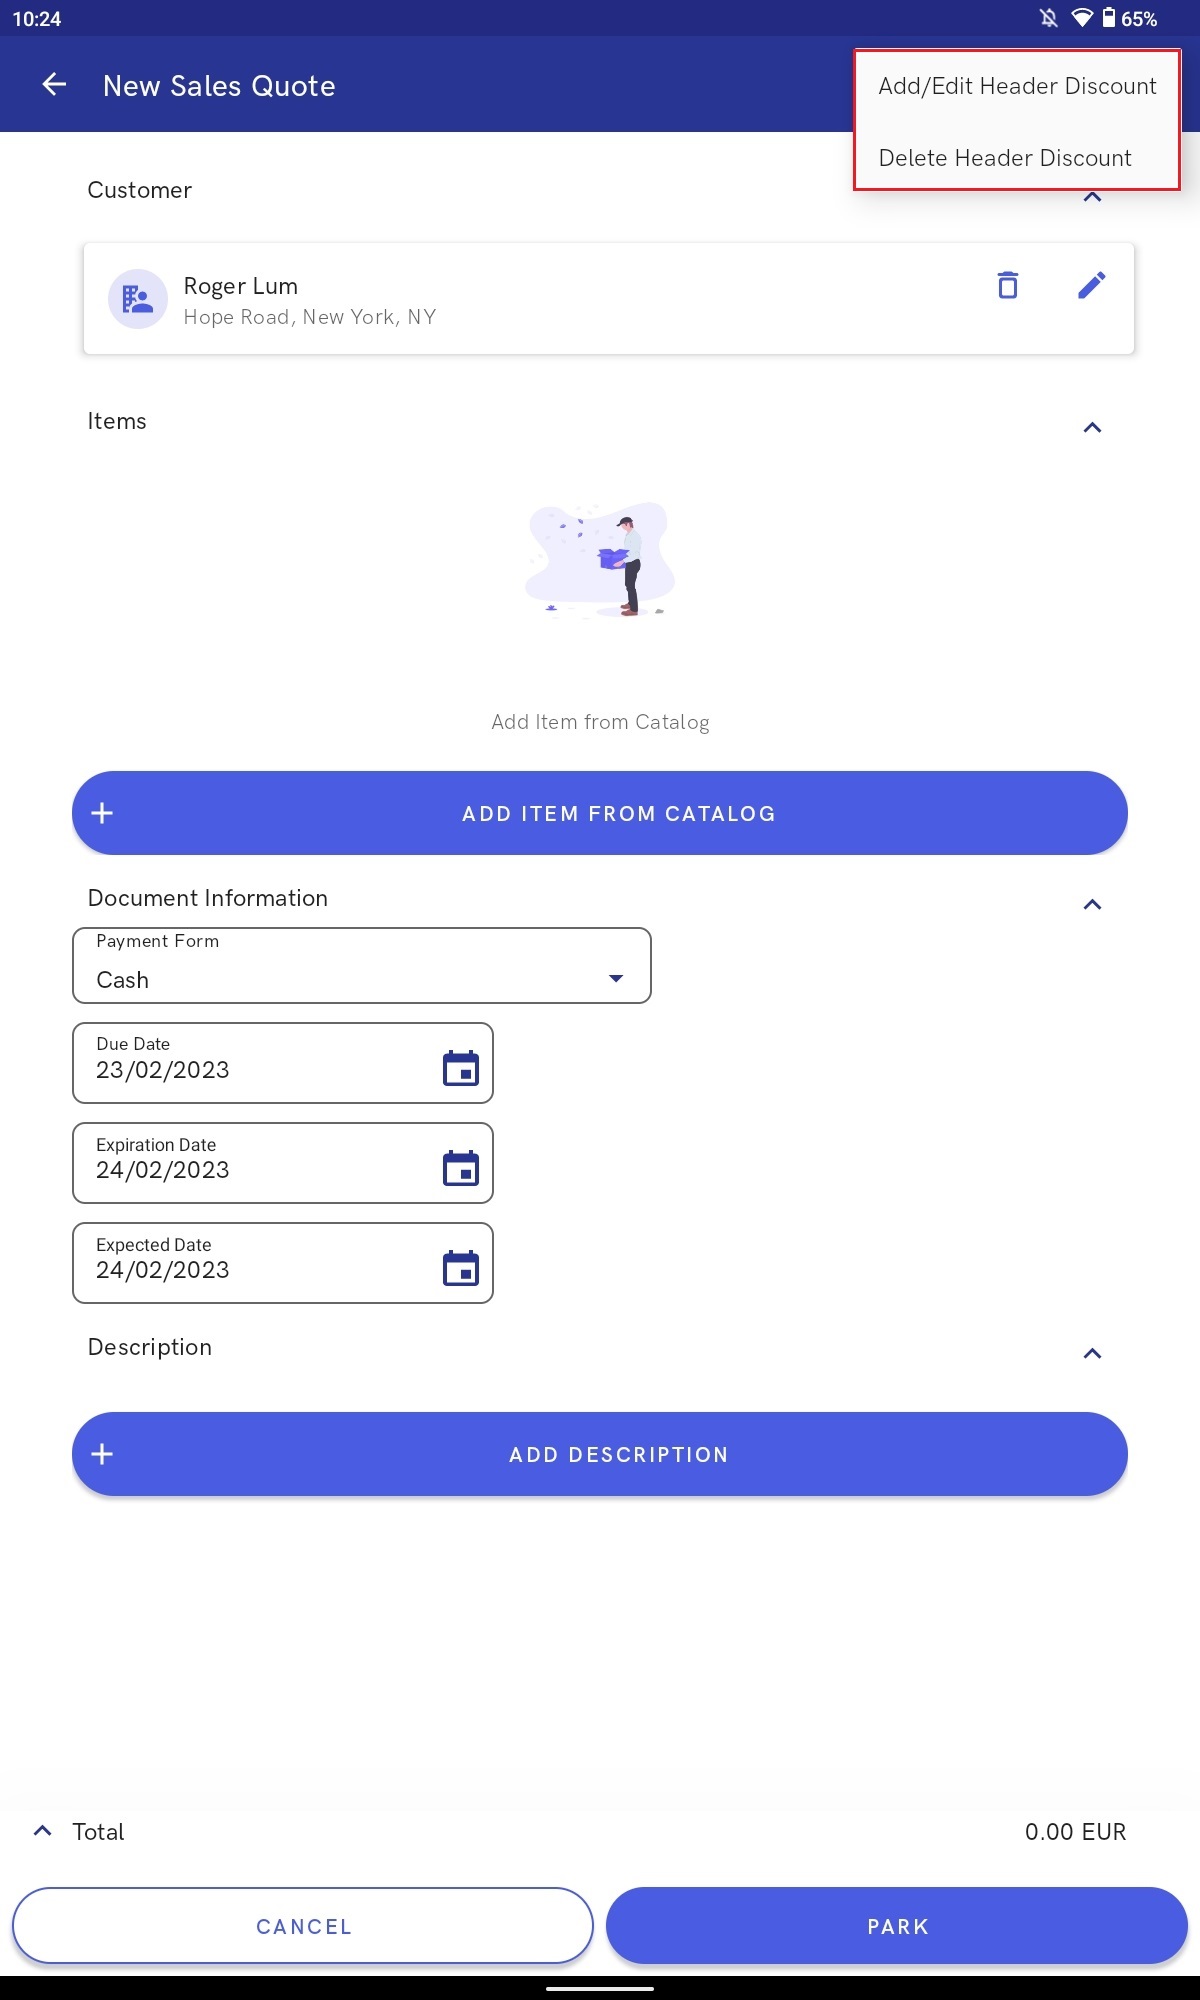
Except for the scanning button, the top right corner contains a button with the following options:
[Add/Edit Header Discount] – it allows adding a header discount. The maximum user discount can be defined in the application Comarch Retail POS operator rights on the Sales price and discount
[Delete Header Discount] – it deletes applied discounts
Preview of the item form
An item form may be previewed in Start → Items or from a document form; for instance, when creating a sales quote, the operator can select a relevant item label.
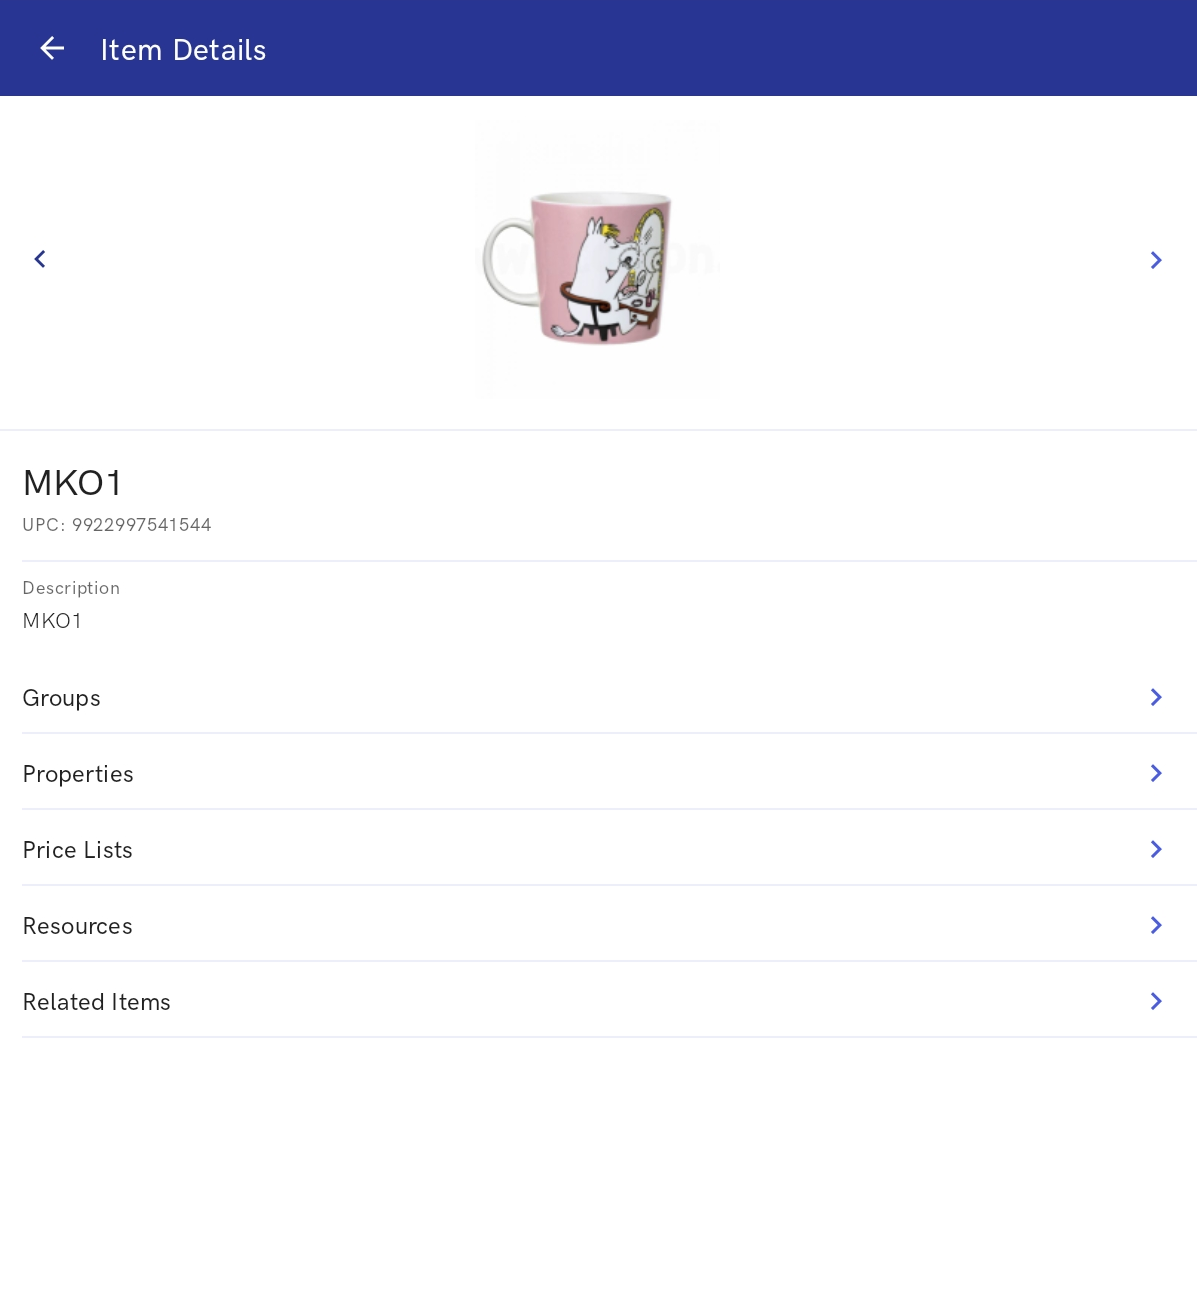
The item form preview window displays:
- Item name
- UPC code
- Image
- Description
- Groups tab – it presents an item category with its assigned subordinate groups and a path, e.g. Prepared products → Sweetbreads
- Properties tab – it presents such details as a VAT rate and item type, e.g. Item, Service
- Price Lists tab – it presents price lists to which a given item has been assigned
- Resources tab – it presents an available item quantity
- Related Items tab – it presents related items of the following types: Alternative, Cross sell, Upsell, Accessory
- Set Elements tab – it is displayed only for items of the Set type
Groups tab
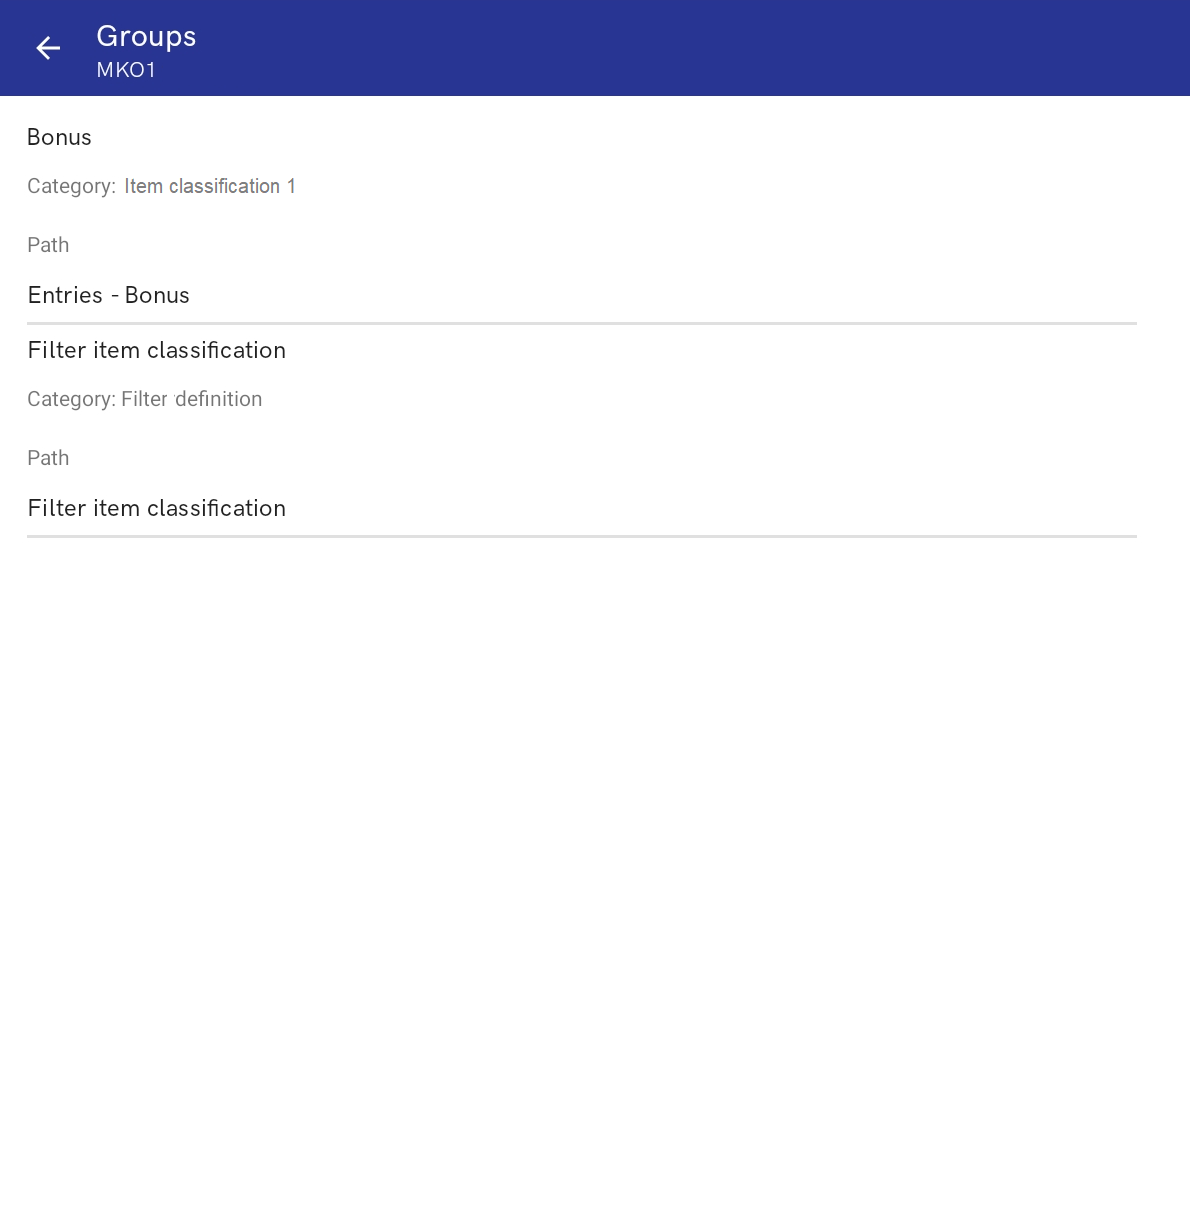
The Groups tab presents item groups to which a given item belongs. The list of groups contains the following information:
- Category
- Group
- Path – it determines the location of an item group in the item group classification category tree
Properties tab

The Properties tab presents:
- VAT rate
- Item type – Item, Service, Set, Voucher
- Values of item characteristics – for instance, a trade number
- Reverse charge – it indicates whether a given item is subject to the reverse charge procedure
- Item attribute values
Price Lists tab
The Price Lists tab contains the following columns:
- Price List – it displays the name of a price list from which a given price has been retrieved
- Price Type
- Unit
- Subtotal Price
- Total Price
- Currency
Resources tab
The Resources tab contains the following columns:
- Warehouse – it displays the name of an active warehouse available within a given sales channel
- Quantity
- Reservations
- Shortages
- Available Quantity – it displays an item quantity, taking reservations into account
Related Items tab
The Related Items tab is available if a given item has at least one related item. The list of related items is composed of the following columns:
- Name
- Relation Type – available options include:
- Alternative
- Accessory
- Cross sell
- Upsell
- Item Group – it displays a predefined item group from the ERP system
- Base Price – a total price
Set Elements tab
The Set Elements tab presents information on items that make up a set.
- Image
- Name
- Item type – Item, Service, Set, Voucher
- Price list – it displays the name of a price list from which a given price has been retrieved
- Price type
- Subtotal price
- Total price
- Currency
- VAT rate
- Quantity