Contents
General information
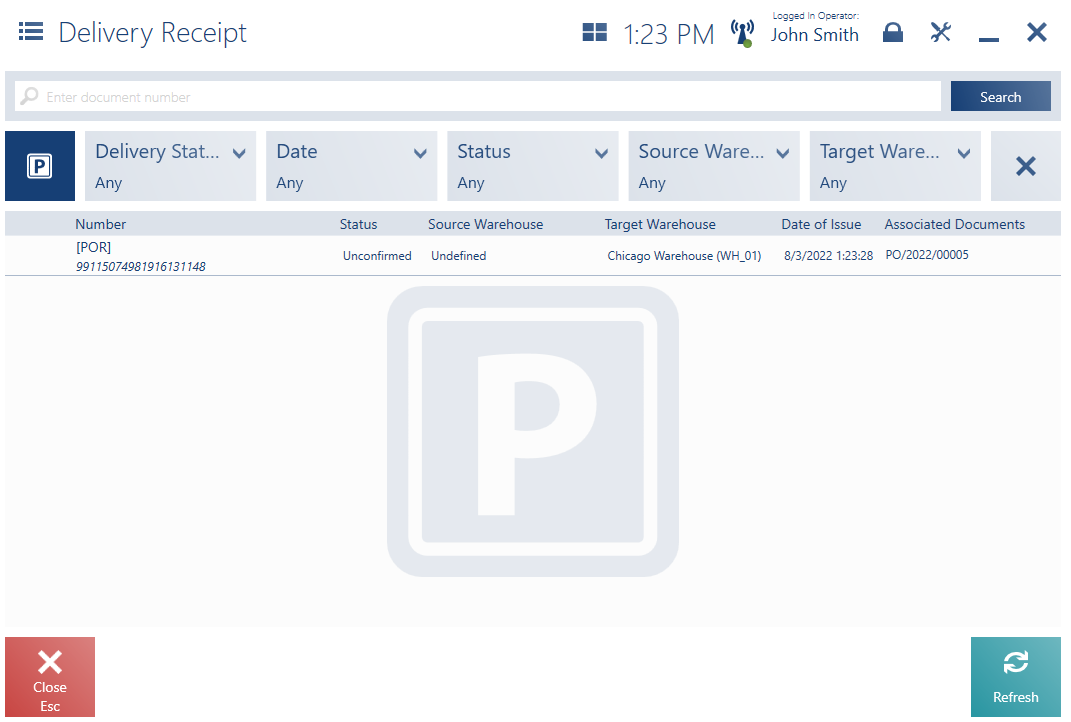
The tile [Back Office] → [Delivery Receipt] contains the list of delivery documents:
- WM- – issued from an external warehouse unavailable on a given POS workstation
- PO – issued in the ERP system for the POS warehouse
- POR – issued as PO receipt documents on the POS workstation

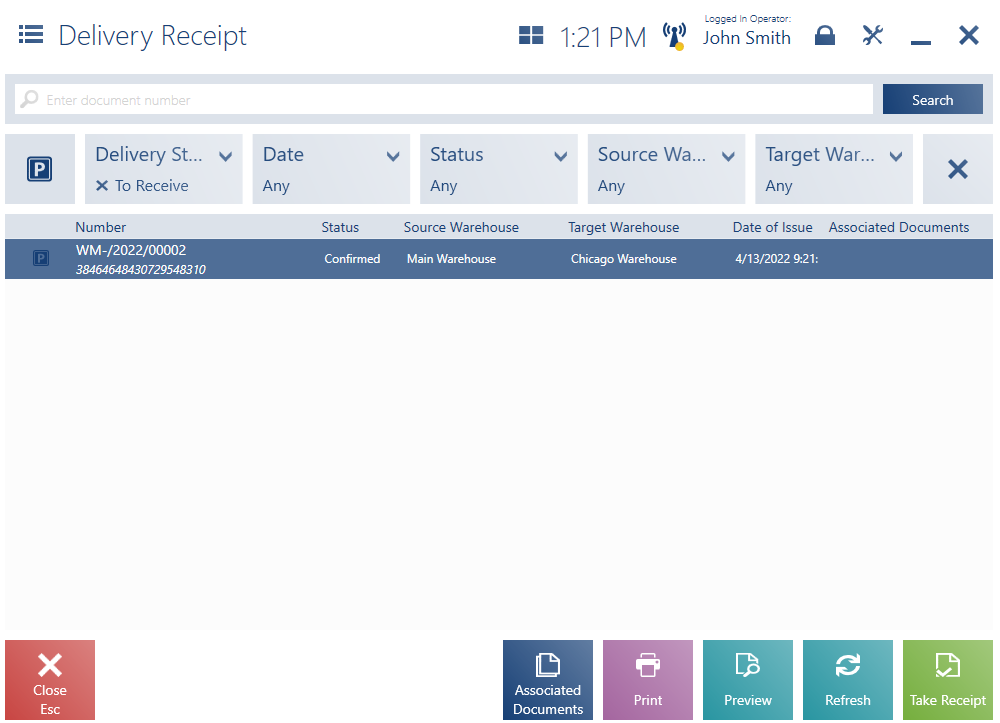
On the list of delivery receipts, it is possible to:
- Preview a WM-, PO, or POR document by selecting the [Preview] button
- Take receipt of a delivery by selecting the [Take Receipt] button
- Open the list of unconfirmed documents by selecting the [P] button
- Open the list of documents associated with a given document by selecting the buttons [Show More] or [Associated Documents]
- Cancel an RDR document by selecting the [Cancel] button
The upper part of the screen contains the text filter field and drop-down filters:
- Delivery Status – available options include:
- Canceled
- Received – confirmed documents with confirmed WM+ or POR associated documents, where the target warehouse is a warehouse available within the center to which a given POS workstation belongs
- To Receive – confirmed documents with no associated documents or with unconfirmed/canceled associated documents, where the target warehouse is a warehouse available within the center to which a given POS workstation belongs; also, PO documents for which there are confirmed POR documents but which are not completed yet
- Date
- Status – available options include:
- Canceled
- Closed
- Completed
- Confirmed
- Confirmed Quantity Total
- Pending
- Unconfirmed
- Source Warehouse
- Target Warehouse
The list of delivery receipt documents is composed of the following columns:
- Number
- Status
- Source Warehouse
- Target Warehouse
- Date of Issue
- Associated Documents
Hidden by default:
- Handled By
- Expected Delivery Date
- Expected
- Unsent
- Ordered
- Received
- Type
Receiving a WM- document
It is possible to receive a delivery by processing a WM- document that:
- Has the status Confirmed
- Has a generated but canceled WM+ document
- Has a target warehouse selected in the Target Warehouse field that is available for WM-/WM+ documents within the center to which the POS workstation belongs
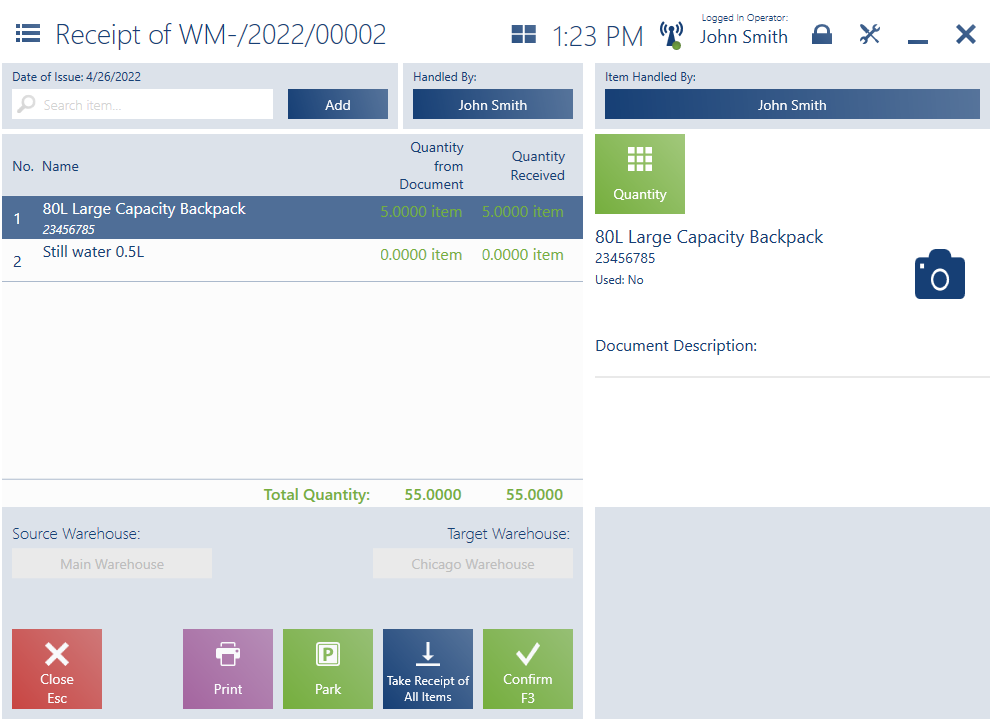
In the WM- document receipt form, it is necessary to enter delivered items:
- By selecting them from the item list
- By scanning them
- By manually changing the quantities of a given item
The WM- document receipt form is composed of the following columns:
- No.
- Name
- Quantity from Document
- Quantity Received
Hidden by default:
- Item Code
- Base Price
- Replenish Shortages in Shop (in cooperation with Comarch ERP Enterprise only)
- Ordered Quantity
- Rejected Quantity
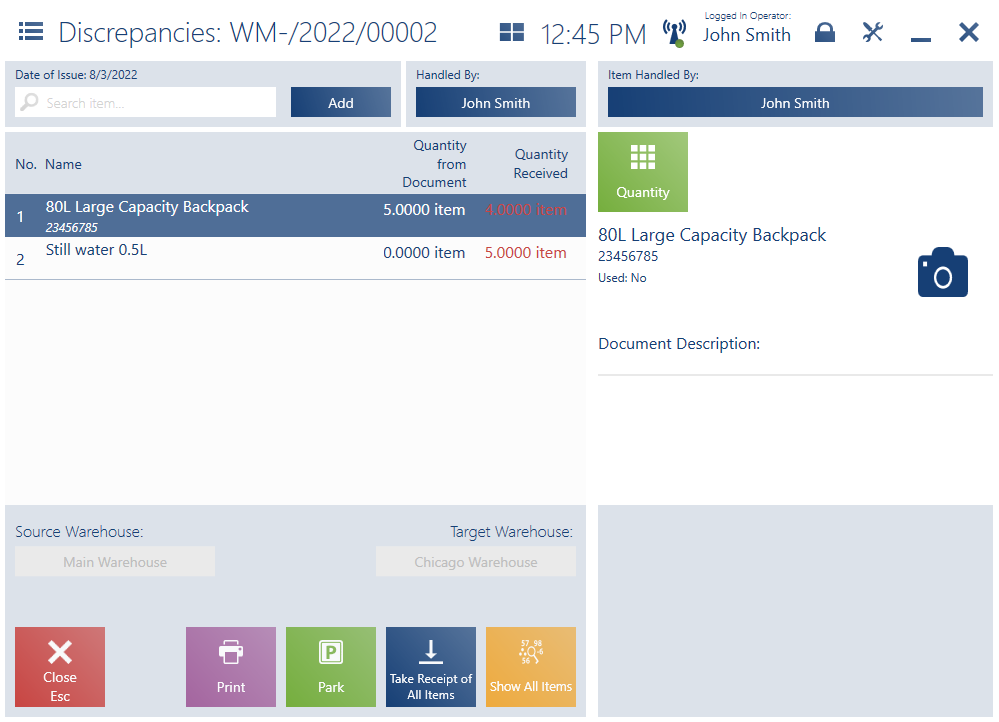
If an item has been entered with a quantity consistent with the Quantity from Document column, the item is marked in green in the document. Otherwise, in the case of discrepancies (over- or undersupply), it is marked in red (in the Quantity Received column).
The item button menu on the right-hand side of the screen makes it possible to:
- Change the quantity of a given item using the [Quantity] button
- Reject a given item in the case of discrepancies concerning the expected items using the [Reject] button
Below the list of document items, the screen presents information on:
- The sum of document item quantities
- The sum of received quantities
The bottom part of the document screen contains the following buttons:
- [Confirm] – it confirms a given document, generating a receiving and delivery report (RDR) and a confirmed WM+ document
- [Park] – it saves the document as unconfirmed to allow its completion later on
- [Print]
- [Take Receipt of All Items] – it receives all items from the WM- document
- [Show Discrepancies] – it becomes available if discrepancies are detected between quantities received and quantities from a document. Selecting it opens the Discrepancies window.
If a document with discrepancies is confirmed, the POS workstation displays the following notification: “There are discrepancies between the expected and received item quantities.”
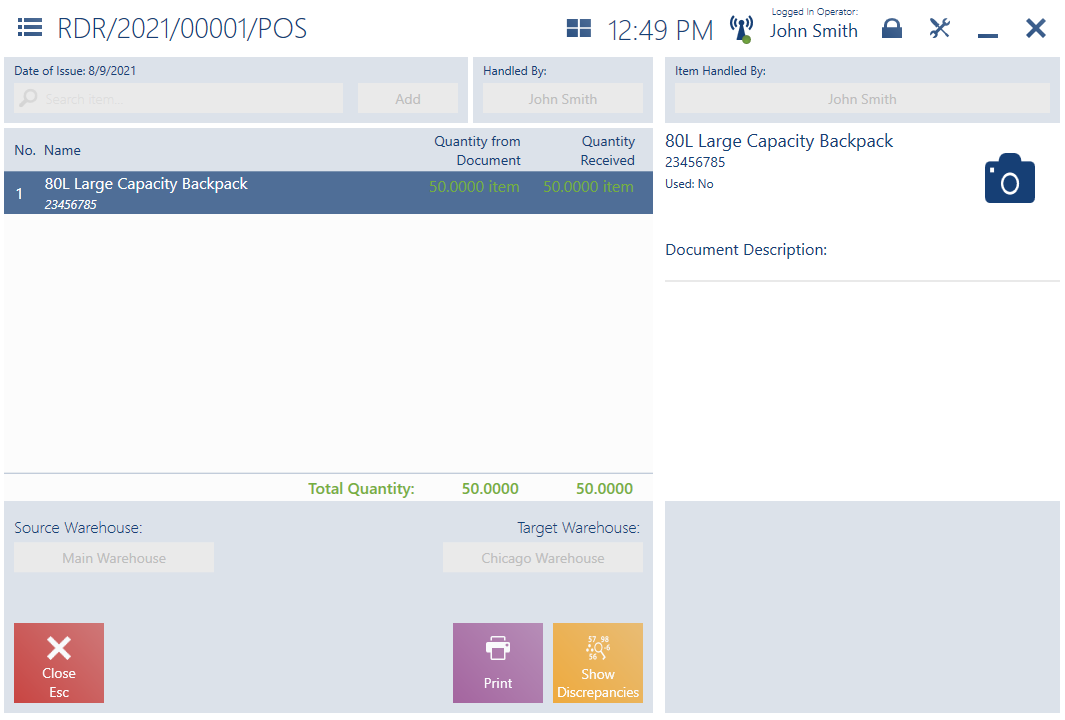
The RDR document preview form (in the case of delivery receipts both with and without discrepancies) looks similar as the WM- receipt document.
In the ERP system, it is possible to select a parameter enabling the automatic generation of IR+/IR- documents performed immediately after the confirmation of a document receipt in case there are discrepancies related to delivered items.
Displaying shortages in the shop (Comarch ERP Enterprise)
Comarch ERP Enterprise system contains a parameter making it possible to display a column Replenish Shortages in Shop in the delivery receipt view. The column’s value is calculated as follows: expected quantity on the shelves – (quantity in stock + quantity already received); furthermore, it is only displayed if it is greater than 0.
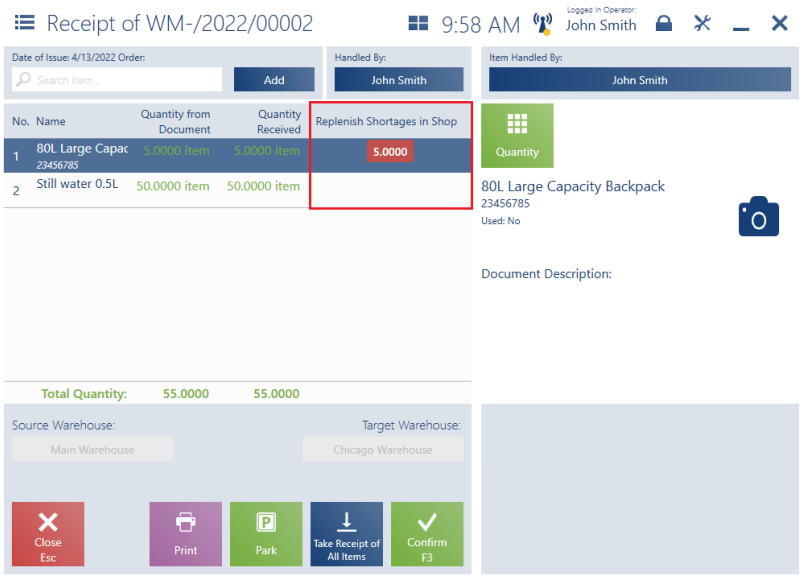
If the Replenish Shortages in Shop column displays information on shortages on the shelves, a warning sound is played upon the scanning of received items and the following notification is displayed: “Not enough items on the shelves. Please replenish the resources in the store”. Upon delivery receipt, the user should then set aside items that are missing from the shelves and bring them into the store.
Receiving a PO document
A purchase order (PO) is a trade document containing items or services ordered from vendors/sellers. A purchase order receipt (POR) is a document confirming the receipt of items from a vendor into stock under certain purchase conditions. It results in an increase in the quantity of resources in stock.
In Comarch ERP Standard system, dedicated configuration parameters synchronized by Comarch POS are available. The PO Receipts section located on the POS Workstations tab of the center form contains the following parameters:
- Add new items to PORs generated from POs (selected by default)
- Required reference number in manual PORs (unselected by default) – currently, the parameter is not supported
- Show ‘Receive All’ button in POR (unselected by default) – it displays the [Receive All] button on the POS workstation. Thanks to this, the operator can take receipt of all purchase order items.
The PO document form contains the Process in POS parameter – it needs to be activated in order to synchronize a given PO document on the POS workstation.
For a purchase order document issued in Comarch ERP Standard system to be processed on the POS workstation, the following conditions need to be met:
- Process in POS parameter selected on the PO form
- Transaction type: National
- Reverse charge parameter unselected
- Reception: Send purchase order, including the options:
- Order status “ordered”
- Status “released” without order document
The field determines the configuration of purchase orders that are to be sent to POS workstations.
- Parameter “Receipt all”- button: purchasing reception
Activating the parameter allows displaying the [Receive All] button on the POS workstation, which makes it possible to take receipt of all purchase order items.
The list of PO and POR documents may be accessed by selecting [Back Office] → [Delivery Receipt].
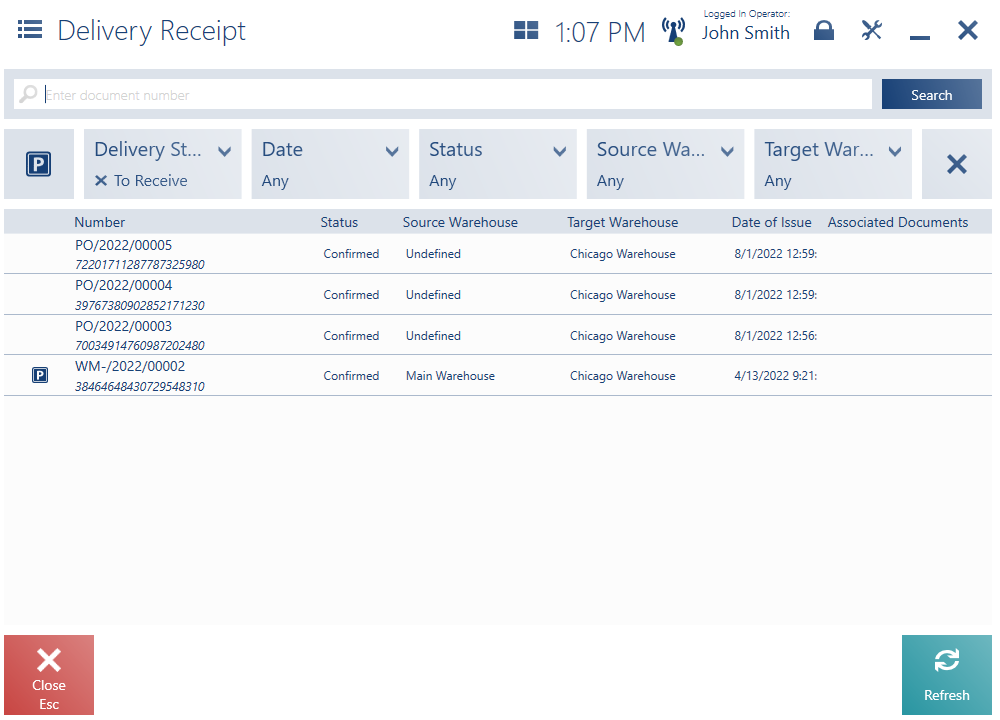
POR documents may be issued for PO documents that:
- Have been generated in the ERP system
- Have the status Confirmed or Pending
- Have no POR document generated in the ERP system
- Have a target warehouse selected in the Target Warehouse field that is available for PO documents within the center to which the POS workstation belongs
- Have the Process in POS parameter selected (in the case of Comarch ERP Standard)
The upper part of the list contains filters which make it possible to narrow down search results to specific PO and POR documents:
- Delivery Status – available statuses include:
- To Receive
- Canceled
- Received
- Date
- Status – available options include:
- Canceled
- Pending
- Closed
- Confirmed
- Completed
- Source Warehouse
- Target Warehouse
On the list of PO documents, the user can:
- Take receipt of a purchase order using the [Take Receipt] button
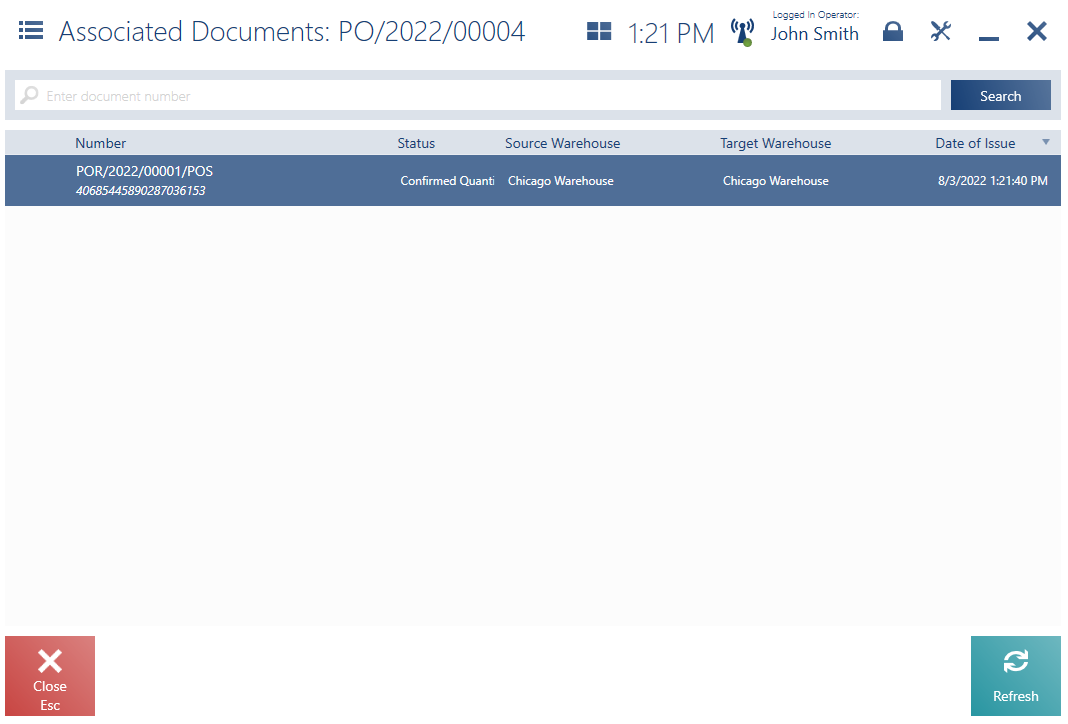
- Preview associated documents using the [Associated Documents] button or selecting [Show More] in the Associated Documents column if there is a number of associated documents
- Print a document using the [Print] button
- Refresh the list of delivery receipt documents using the [Refresh] button
- Open the list of unconfirmed documents using the [P] button. The list contains, among others, parked purchase order receipt documents.
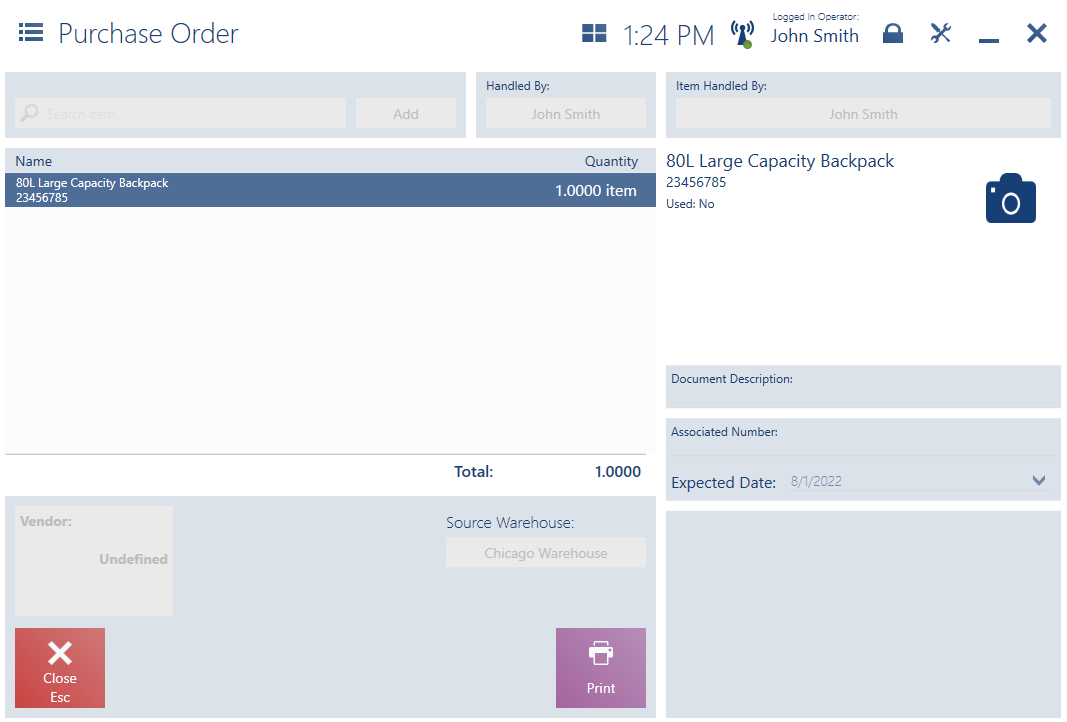
Purchase order documents are displayed in the read-only mode; it is not possible to modify any values defined in the ERP system. The PO document form contains information on:
- Items and their quantities
- A person responsible for the document in the ERP system
- A person processing items in the ERP system
- Vendor – since PO documents are sent to the store directly from the vendor’s warehouse
- Source warehouse
- Additional document description entered in the ERP system
- Attributes
- Associated number – the number is displayed in the document header and is a reference number assigned by the vendor
- Expected date
The PO document form is composed of the following columns:
- Name
- Quantity
- No. (hidden by default)
- Item Code (hidden by default)
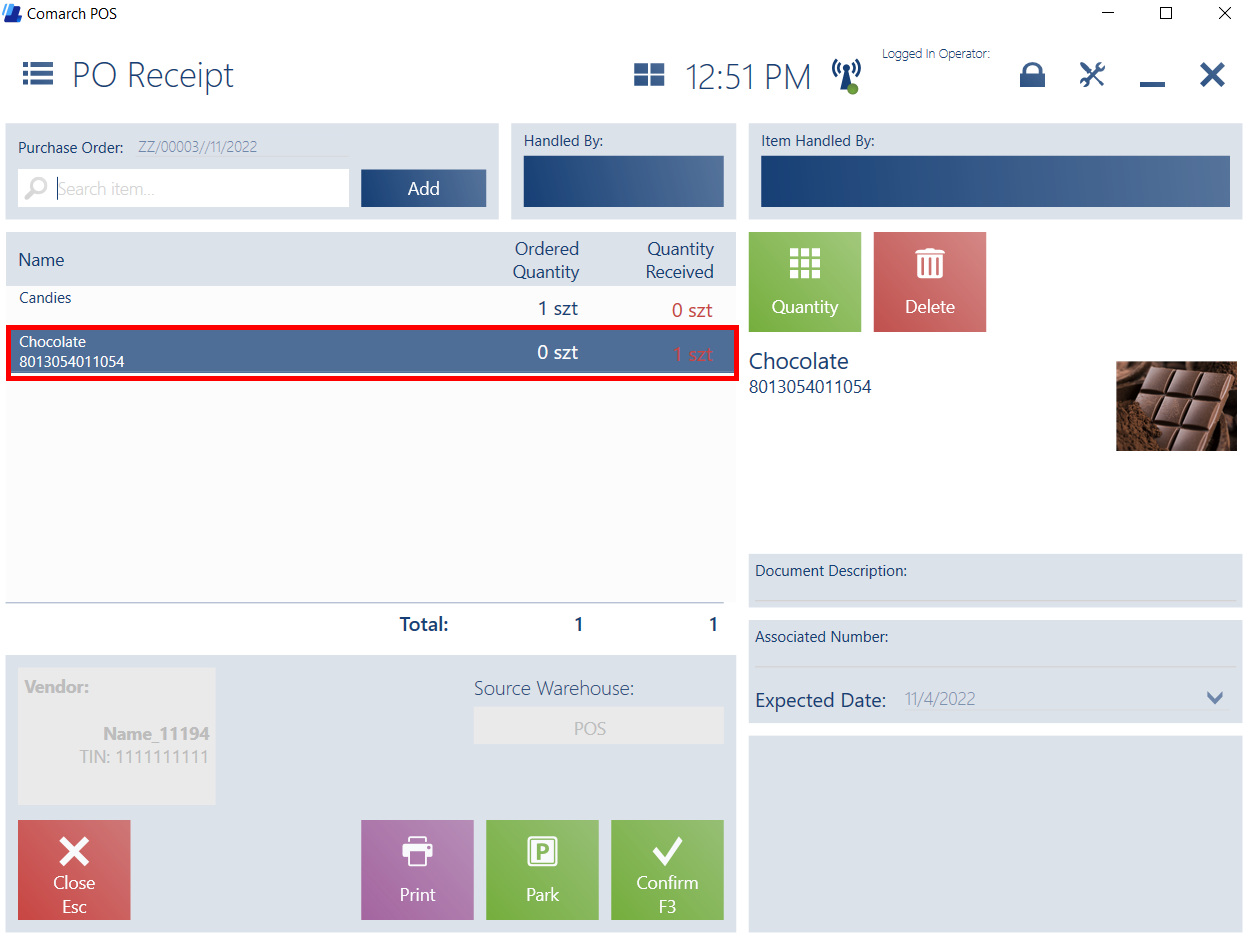
To take receipt of a purchase order, it is necessary to select the [Take Receipt] button, that opens the PO Receipt screen.
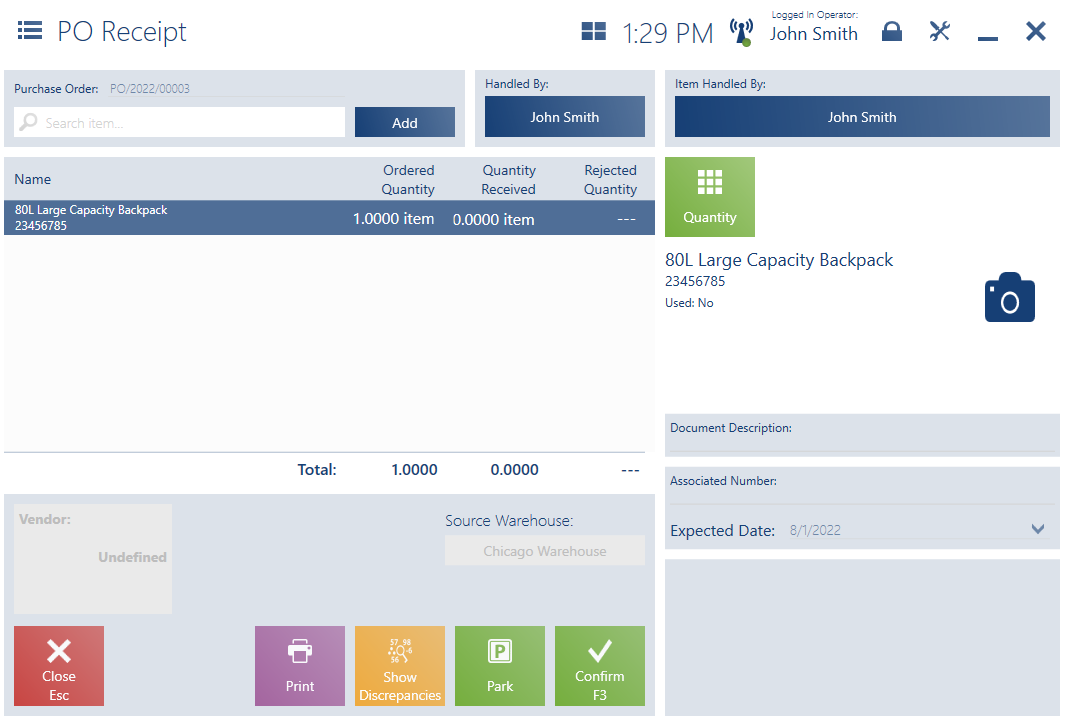
The PO receipt form is composed of the following columns:
- Name
- Ordered Quantity
- Quantity Received
- Rejected Quantity
Hidden by default:
- Subtotal Price
- Total Price
- Subtotal Value (as quantity x subtotal price)
- Total Value (as quantity x total price)
- The VAT direction set for POR documents generated from purchase orders
- Item Code
- Previous Deliveries
- No.
In the PO receipt form, it is necessary to enter delivered items:
- By selecting them from the item list
- By scanning them
- By manually changing the quantities of a given item
The item button menu on the right-hand side of the screen makes it possible to:
- Change the quantity of a given item using the [Quantity] button
- Enter a new item lot using the [Show More Details] button (if the FEFO method is used)
- Reject a given item in the case of discrepancies concerning the expected items using the [Reject] button. If an item is rejected, it is necessary to enter a reason for rejection in the Rejection window.
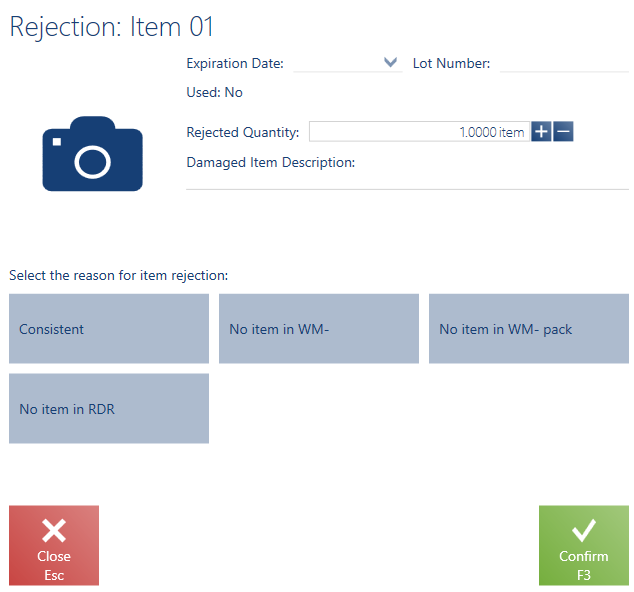
The Rejection screen contains:
- Item name in the screen header
- Item image (if added)
- Information on a lot number and expiration date
- Information of lot features (if added)
- Rejected Quantity field
- Damaged Item Description field
- List of reasons for rejecting the item
- [Confirm] and [Close] buttons
Below the list of document items, the application displays information on:
- The sum of quantities of ordered items
- The sum of received quantities
- The sum of rejected quantities
The right-hand side of the form contains detailed item information, including:
- Name
- Code (hidden by default)
- UPC/EAN code
- Attributes
- Image
Also, the document form contains information on the expected date.
The bottom part of the document window contains the following buttons:
- [Confirm] – it confirms a given document and generates the POR document
- [Park] – it saves the document as unconfirmed, enabling its processing later on
- [Receive All] – it makes it possible to receive all items with quantities corresponding to the order. The button is available after activating a relevant parameter in the ERP system.
- [Print]
FEFO method (Comarch ERP Enterprise)
If the FEFO method is activated for the POS workstation and the [Take Receipt] button is selected in the list of PO documents, the application displays the notification: “Would you like to manually set the properties of items with no expiration date saved in the barcode?“.
If the user opts out of setting these values manually, they will be set automatically as the default lot number and expiration date based on the existing algorithm.
It is possible to receive more than one lot of each item by:
- Scanning an EAN-128 code with a lot number or expiration date
- Manually adding information on the new lot using the [Show More Details] button
Rejecting outdated lots during a delivery receipt (Comarch ERP Enterprise)
On a POS workstation integrated with Comarch ERP Enterprise, the user cannot select a past date as the expiration date of received lots or scan a barcode with a past expiration date. In such cases, the application displays the notification: “Expired items cannot be received at the shop’s warehouse”.

Validation of a new lot number (Comarch ERP Enterprise)
In Comarch ERP Enterprise system, it is possible to define characters that can be used when creating a new lot number and specify an allowable number length.
If the user enters a lot number that does not comply with the defined conditions, the field will be marked in red and the notification will be displayed: “The defined lot number contains invalid characters or has an invalid length.”
If a code with a lot number that does not comply with the restrictions defined is scanned, Comarch POS application displays the notification “The scanned lot number contains invalid characters or has an invalid length” and opens a window with the lot number highlighted in red.
In Comarch ERP Enterprise system, it is also possible to specify whether letters entered in a lot number should be converted to uppercase, lowercase or left as entered by the user.
