
Contents
Inventory (Comarch ERP Enterprise)
The inventory process involves counting items in stock in order to verify potential discrepancies between the actual stock levels confirmed during the count and levels recorded in warehouse data.
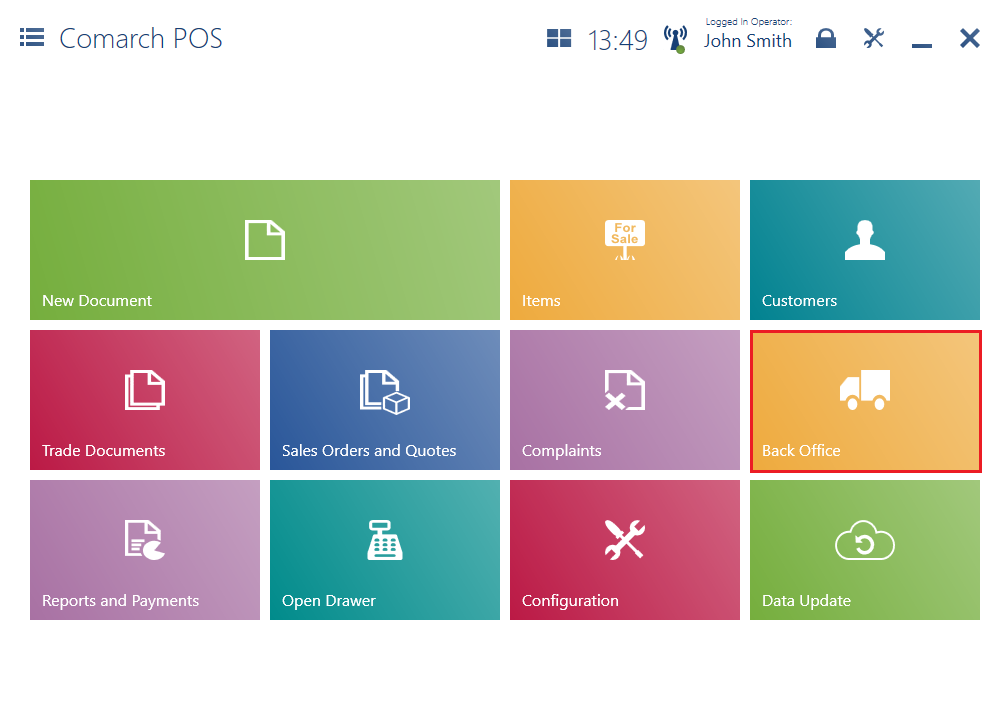
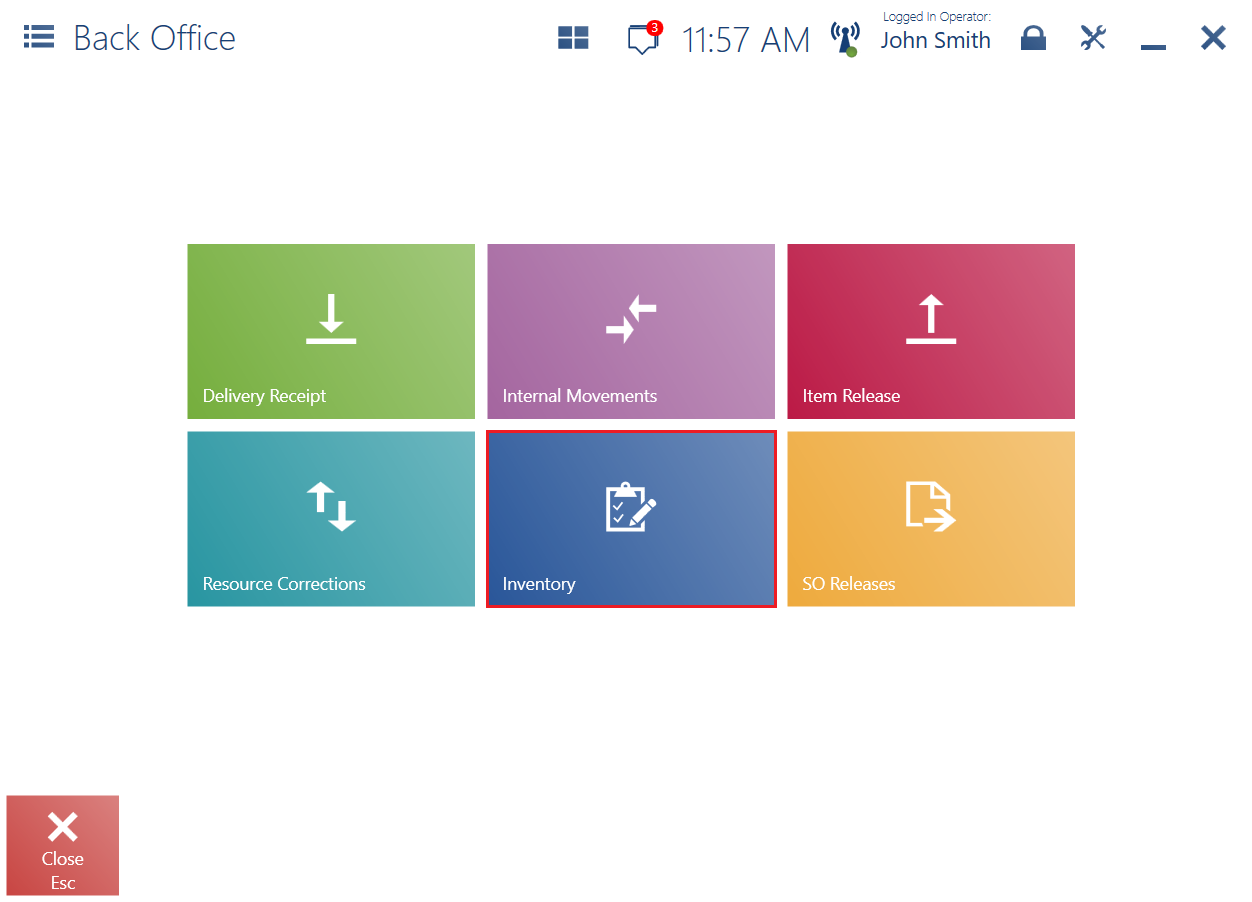
To open the list of inventory counts, select the [Back Office] → [Inventory] tiles.
To activate the inventory module in Comarch POS, the parameter Handle Inventory Counts at POS must be enabled in Comarch ERP Enterprise. The parameter is available in Customizing → Comarch Retail POS function → Backoffice, stocks tab.
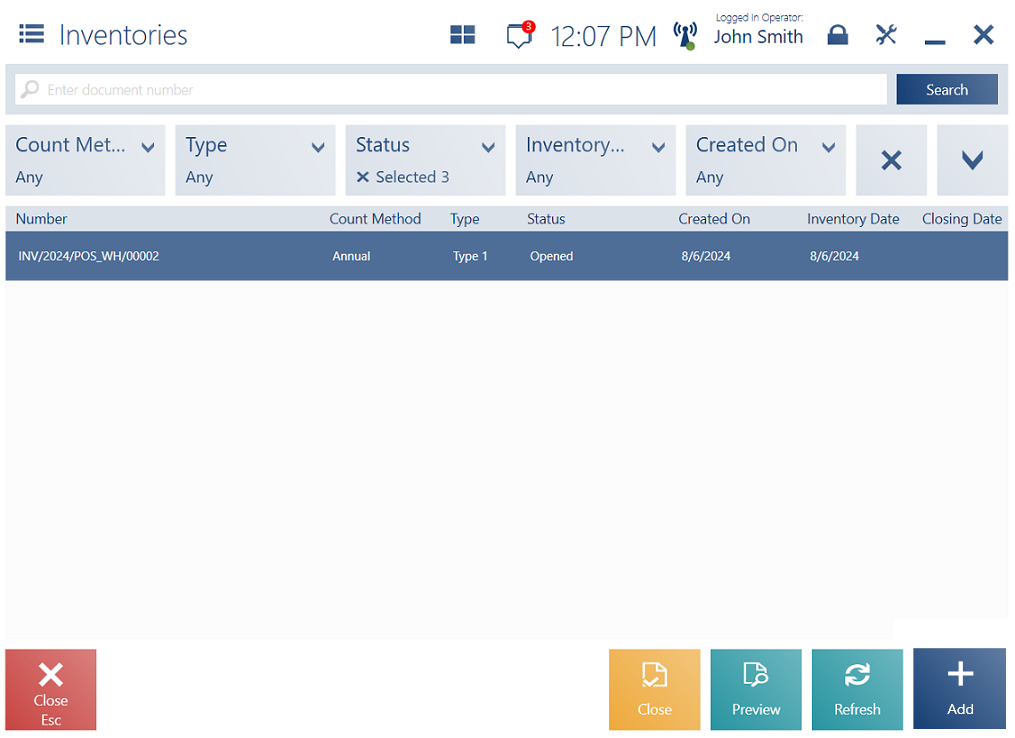
The list of inventories is composed of the following columns:
- Number
- Count Method:
- Annual – it is usually done once a year, e.g. at the end of the year
- Continuous – it is done regularly, e.g. once a month, once a quarter, or when necessary
- Type
- Status:
- Generated
- Opened
- Closed
- Reported
- Partially Reported
- Created On
- Inventory Date
- Closing Date
- Description
Hidden by default:
- Attributes – attributes are defined to record additional information about objects. In the inventory planning process, stores are divided into areas to which specific employees are assigned in order to avoid double-counting products. This allows additional identification and classification of documents. Attributes may have different formats, such as text, number, list, or date.
The upper part of the window contains the text filter field that allows you to browse the list according to inventory number and type.
You can also narrow the search results by using the drop-down filters:
- Count Method
- Type
- Status
- Inventory Date
- Closing Date
- Created On
In the list of inventories, you can:
- Preview an inventory using the [Preview] button
- Refresh the list using the [Refresh] button
- Close the list using the [Close] button
- Open an inventory using the [Open] button; the button is only available for inventories with the Generated Selecting the button changes a selected inventory’s status to Opened. An inventory can only be opened when the connection to the ERP system is active.
- Close an inventory using the [Close] button; the button is only available for inventories with the Opened An inventory can only be closed if all its sheets have been previously closed and when the connection to the ERP system is active.
- Add an inventory using the [Add] button
Inventory preview
After selecting an inventory from the list and clicking the [Preview] button, you can (depending on the inventory’s status):
- Print the inventory document
- Refresh the inventory sheets
- Open an inventory sheet if its status is Generated
- Close an inventory sheet if its status is Opened
- Preview an inventory sheet
- Edit an inventory sheet if its status is Generated
- Count items by making a readout for a selected sheet
- Delete an inventory sheet if its status is Generated
- Display the list of a sheet’s reports
- Save the inventory
- Preview document attributes
- Close the inventory
- Add a new inventory sheet (the options for adding a new sheet include the [Negative Stock] button – after the button is selected, an attempt is made to add each item whose system quantity is lower than its shortages, taking into account the warehouse selected in the inventory document).
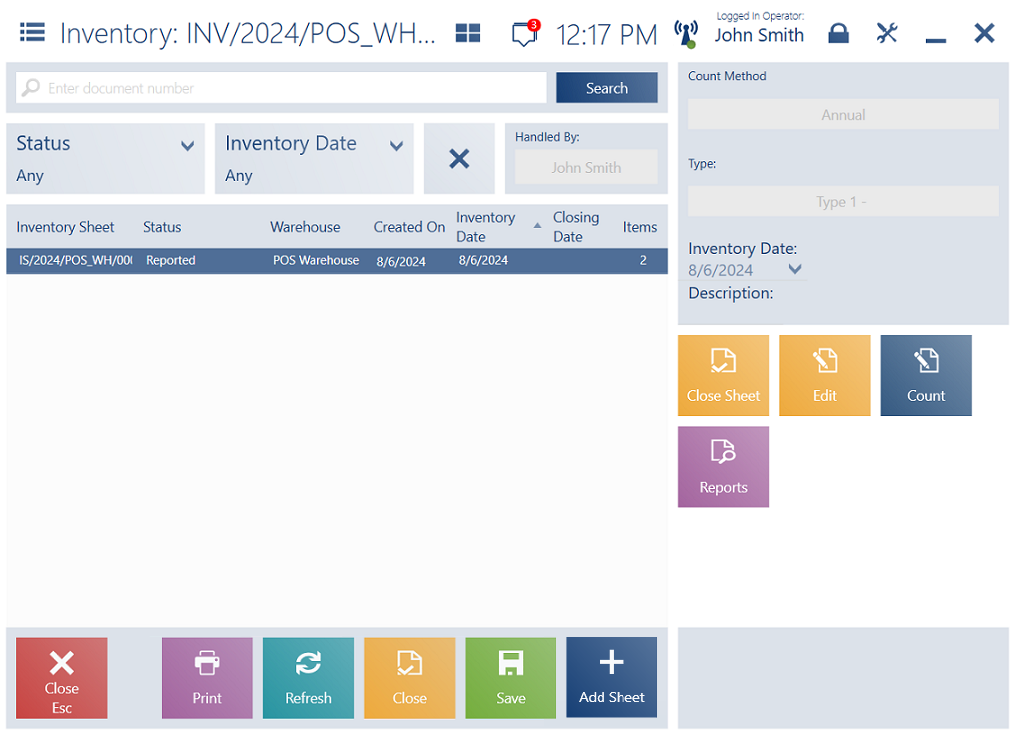
The inventory form is composed of the following columns:
- Inventory Sheet
- Status – available statuses include:
- Generated
- Opened
- Partially Reported
- Reported
- Closed
- Warehouse
- Created On
- Inventory Date
- Closing Date
- Items – the total quantity of items in a sheet
The upper part of the window contains filters that allow you to browse the list according to inventory status and date.
The inventory preview window contains the following buttons for inventory sheets:
- [Delete] – displayed for sheets that have not been opened yet; it requires active connection to the ERP system
- [Preview] – available for sheets with the Closed status
- [Edit]
- [Open Sheet]/[Close Sheet] – the [Open Sheet] button is available for sheets with the Generated status; in turn, the [Close Sheet] button is available for sheets with the status Reported or Partially Reported
- [Copy] – available for sheets with the Closed status; it opens a new sheet window containing items copied from the source sheet
- [Count] – available for unclosed sheets; it allows counting inventoried items
Also, the bottom part of the window contains the following buttons:
- [Close] – closes the list of sheets and returns to the list of inventories
- [Print]
- [Refresh]
- [Save]
- [Add Sheet] – adds a new sheet to the selected inventory
- [Open]
- [Close]
“The sheet contains at least one item which has not been opened yet. Would you like to delete all such items from the sheet?”
Inventory sheet
An inventory sheet contains the list of items that need to be counted as part of an inventory.
Adding a new sheet
To add a new inventory sheet for an inventory, select the [Add Sheet] button. A newly created inventory sheet contains the following columns:
- Line
- Item
- Item Code – hidden by default
- Status – available statuses include:
- Generated
- Opened
- Reported
- Closed
- System Quantity
- Reported Quantity
- Registered Reports
- Verification Required
- Shortages
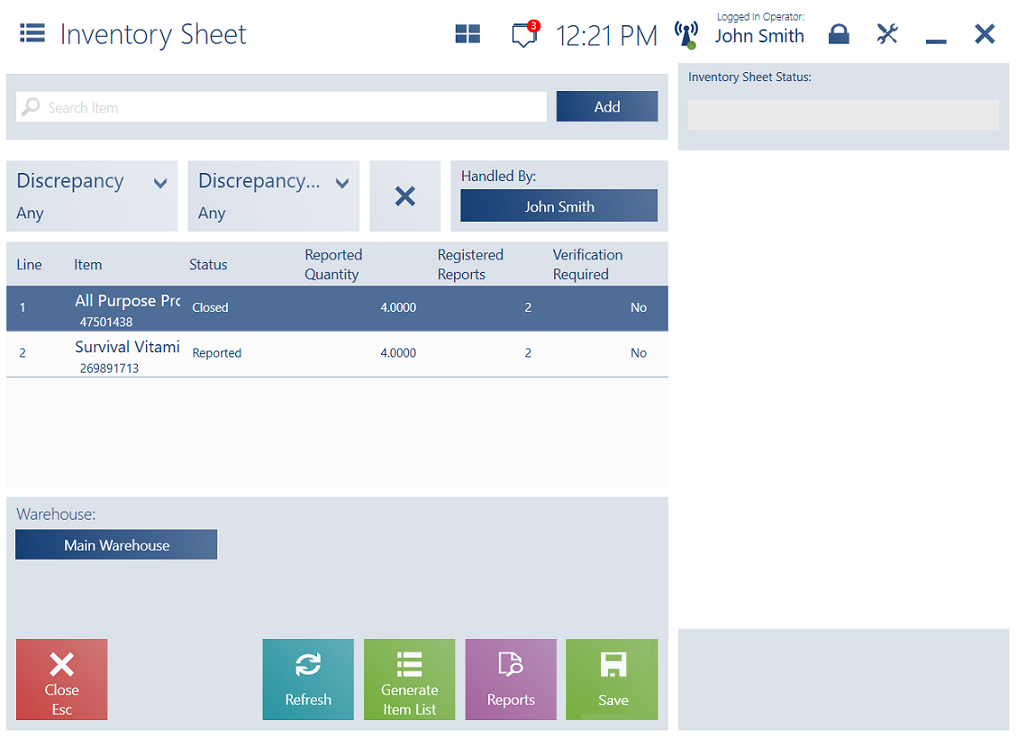
The bottom part of the window contains the following buttons:
- [Refresh] – updates the list of sheet items
- [Generate Item List] – adds a list of items meeting specified criteria to the sheet
- [Reports] – available if the inventory sheet has the Opened and Reported status
- [Save]
In the inventory sheet window, you can add items to be counted by using the [Add] button or scanning them. Items can be added if they have not already been added in connection with the same warehouse to any other sheet with a status other than Closed.
Another way to add items to be counted is to select the [Generate Item List] button.
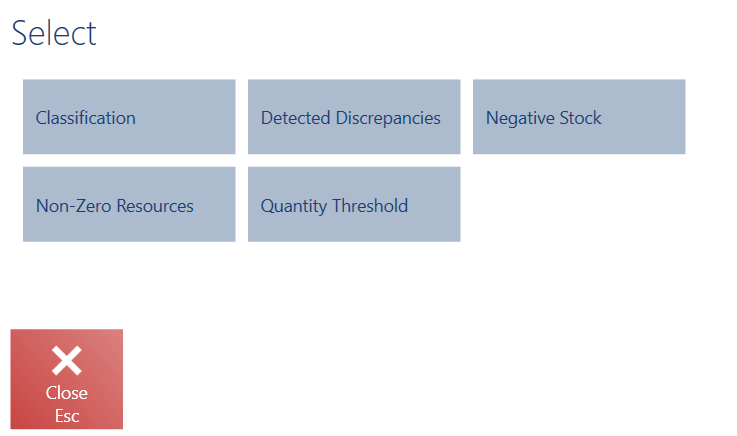
Selecting the button opens a window where you can select the criterion for generating the item list. Available options include:
- Classification – it displays a window with classification attributes. At the top, there is the Non-Zero Resources value selected by default.

- Non-Zero Resources – adds all items with non-zero resources in a warehouse subject to the inventory
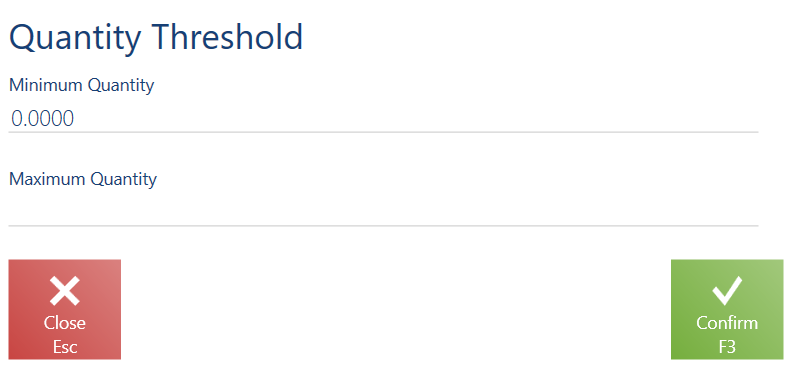
- Quantity Threshold – adds all items that meet a specified quantity threshold
- Negative Stock – adds all items with negative stock levels
- Detected Discrepancies – opens a window with the list of registered sheets that have one of the statuses: Closed, Reported, or Partially Reported. Selecting a sheet from the list adds all its items for which discrepancies have been detected (taking into account items with the Closed status).
After adding items, you can save the generated sheet.
In a saved, generated sheet, the following buttons are available:
- [Delete] – deletes the inventory sheet
- [Open Sheet] – opens a given sheet and allows you to add items to it
- [Edit] – allows you to edit the inventory sheet
- [Count] – generates a readout for the inventory sheet
- [Reports] – displays the list of readouts generated for the inventory sheet
Editing an inventory sheet
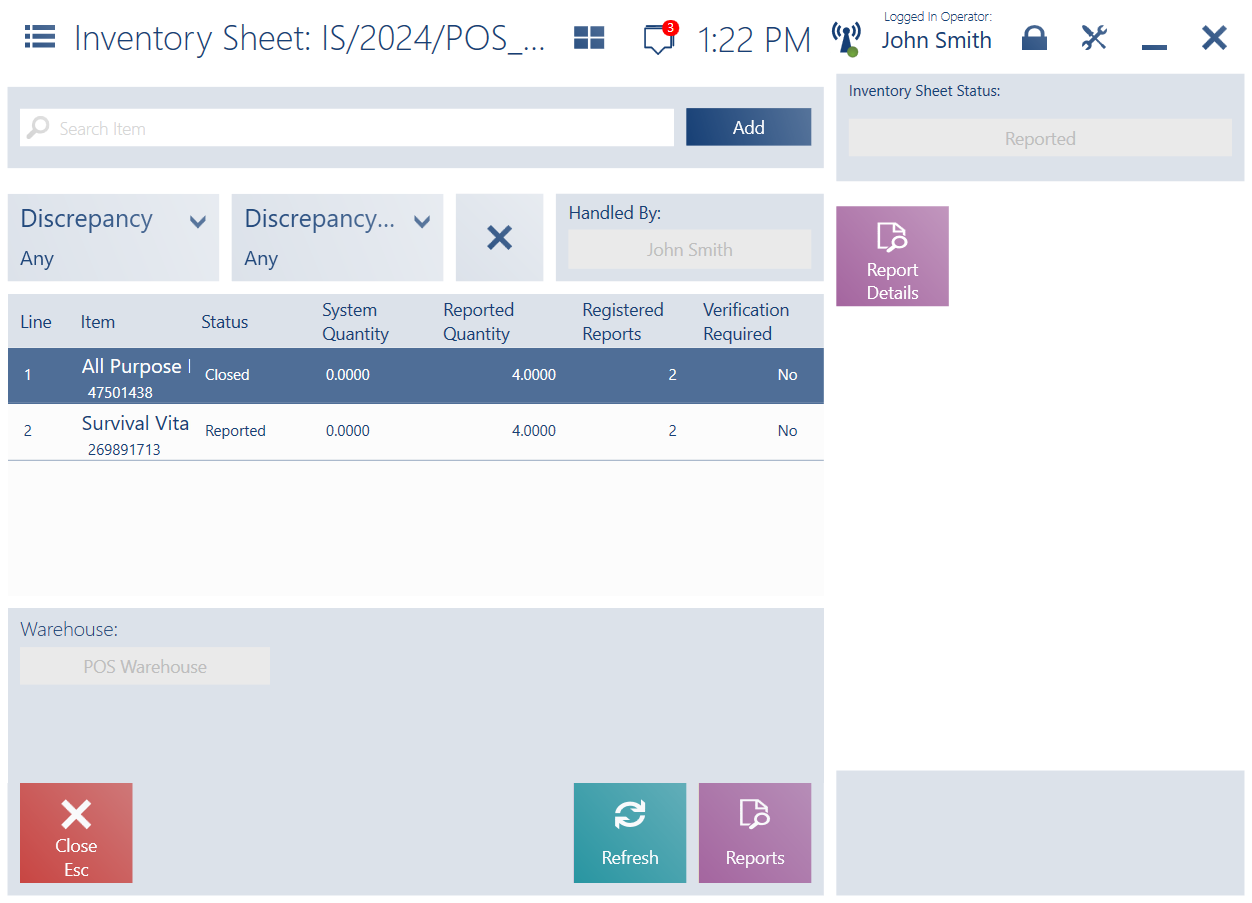
The list of inventory sheets contains the [Edit] button available after selecting a given sheet.
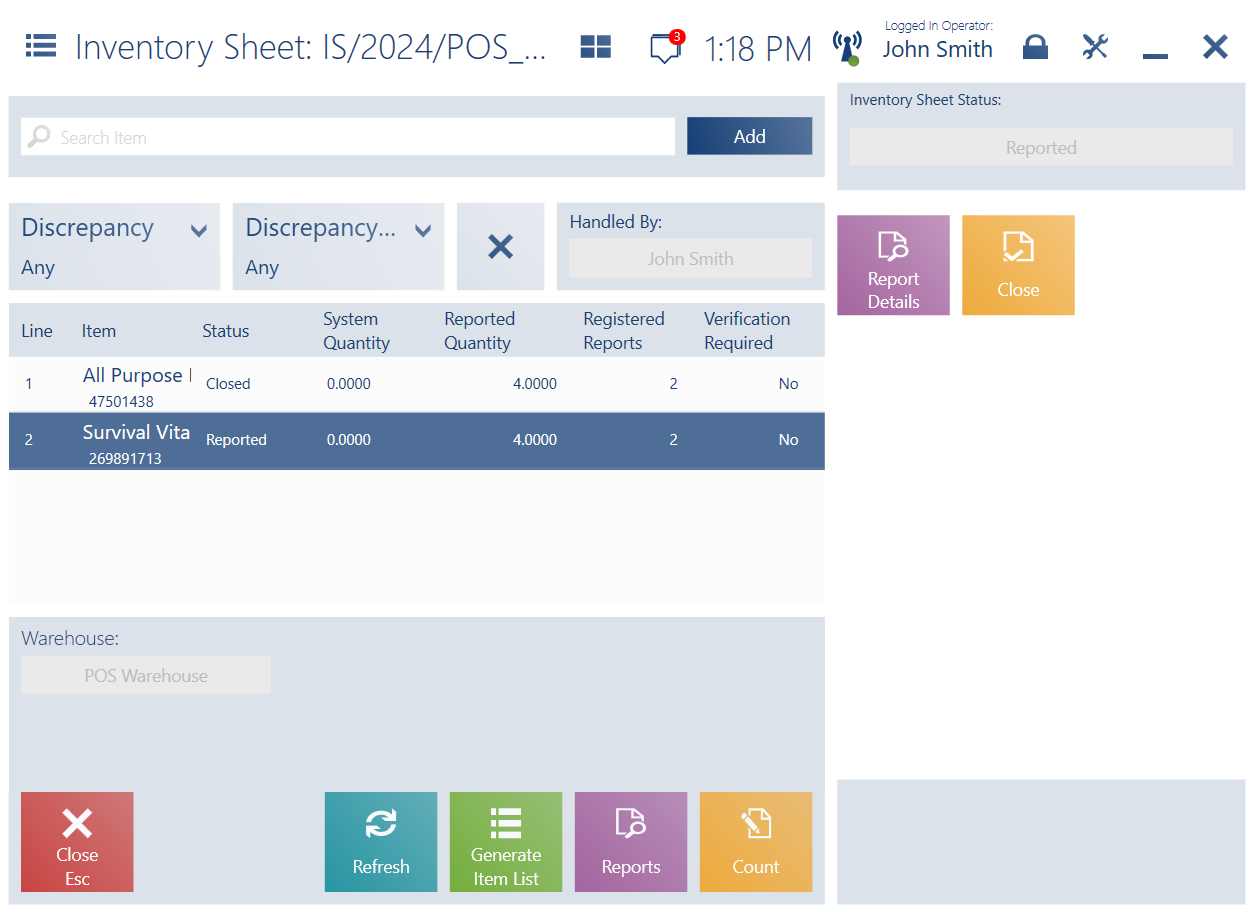
Inventory sheets contain the following columns:
- Line
- Item
- Status
- System Quantity – the currently available quantity of items whose status is other than Closed. For closed items, this is the quantity available at the moment of their closing.
- Reported Quantity – the item quantity stored in a given warehouse as reported following a count
- Registered Reports – the number of reports registered for a given item (including all report statuses)
- Verification Required
- Shortages
The upper part of the window contains filters that allow you to narrow down the list of displayed items:
- Discrepancy – presents items for which there has been a difference between the reported and system quantities, falling within an undefined range
- Discrepancy Percentage – presents items for which there has been a difference between the reported and system quantities, with the difference percentage falling within a specified range
The following buttons are available for unclosed sheet items:
- [Report Details] – opens a window with reports containing the selected item
- [Close] – changes the selected item’s status to Closed
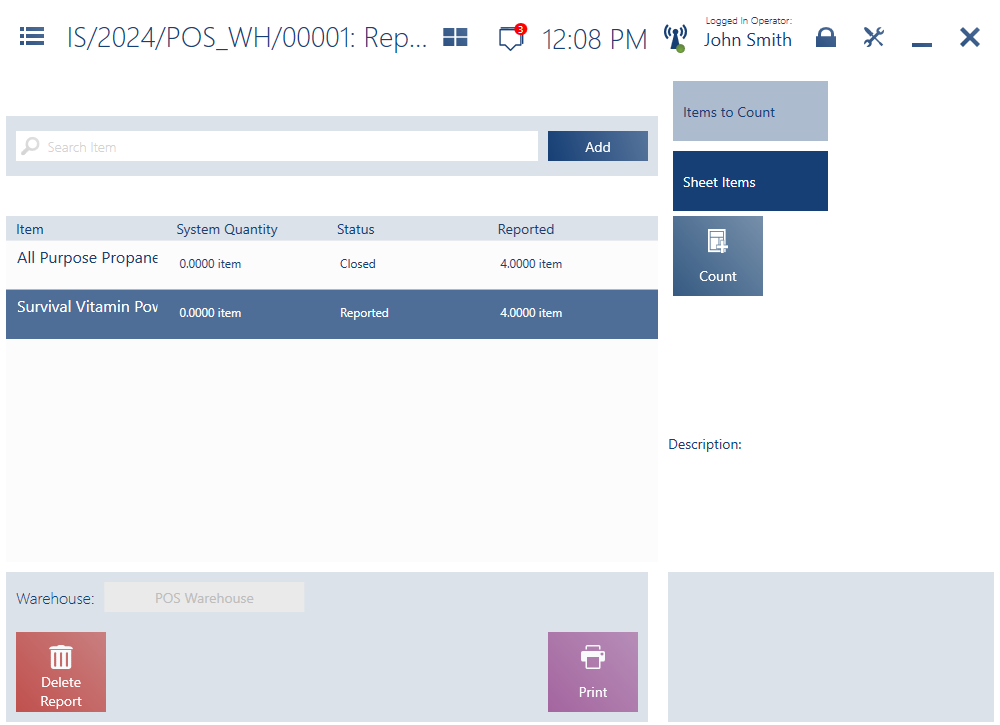
In the list of inventory sheets, you can also select the [Edit] button for a sheet with the Reported status and then press the [Report Details] button to preview reports for a selected sheet item.
Selecting the [Report Details] button displays a window containing the following elements:
- Sequence column
- Name of the user who carried out the readout
- Report creation date
- Reported quantity
- Status

The report window contains the following buttons:
- [Close]
- [Reject Report – allows you to reject a created report
- [Print]
Generating a report
A report can be generated in the inventory window – to do so, select a particular sheet and click the [Count] button.
In the generated report window, you can:
- Count all or selected sheet items
- Add a new item
- Preview attributes
The new report window is divided into two tabs:
- Items to Count – an empty list that you can use to start counting items
- Sheet Items – it contains items added to the sheet
A new report can be parked so that you can resume work on it at a later time.
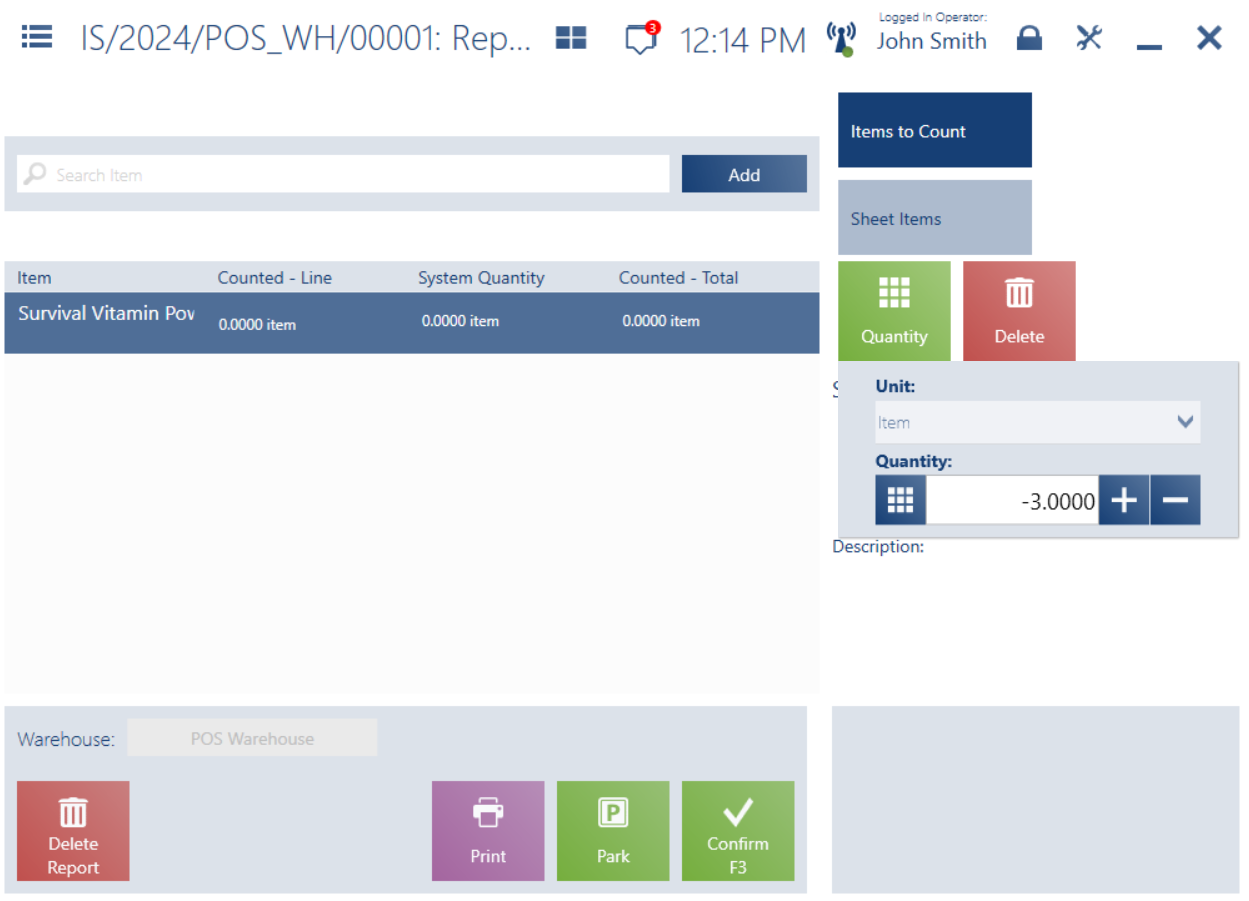
Items to Count tab
The Items to Count tab contains the following columns:
- Item
- Counted – Line – a quantity entered in a given sequence line with a unit of measure
- System Quantity – a quantity reported in a given sequence line with a unit of measure; depending on settings, blocking reservations can be taken into account
- Counted – Total – the total item sum in each associated counting sequence line
The generated readout/report window contains the following buttons:
- [Warehouse] – a non-editable field displaying the name of a warehouse relevant for a given sheet
- [Delete Report] – selecting the button displays a message for you to confirm the deletion
- [Print]
- [Park]
- [Confirm]
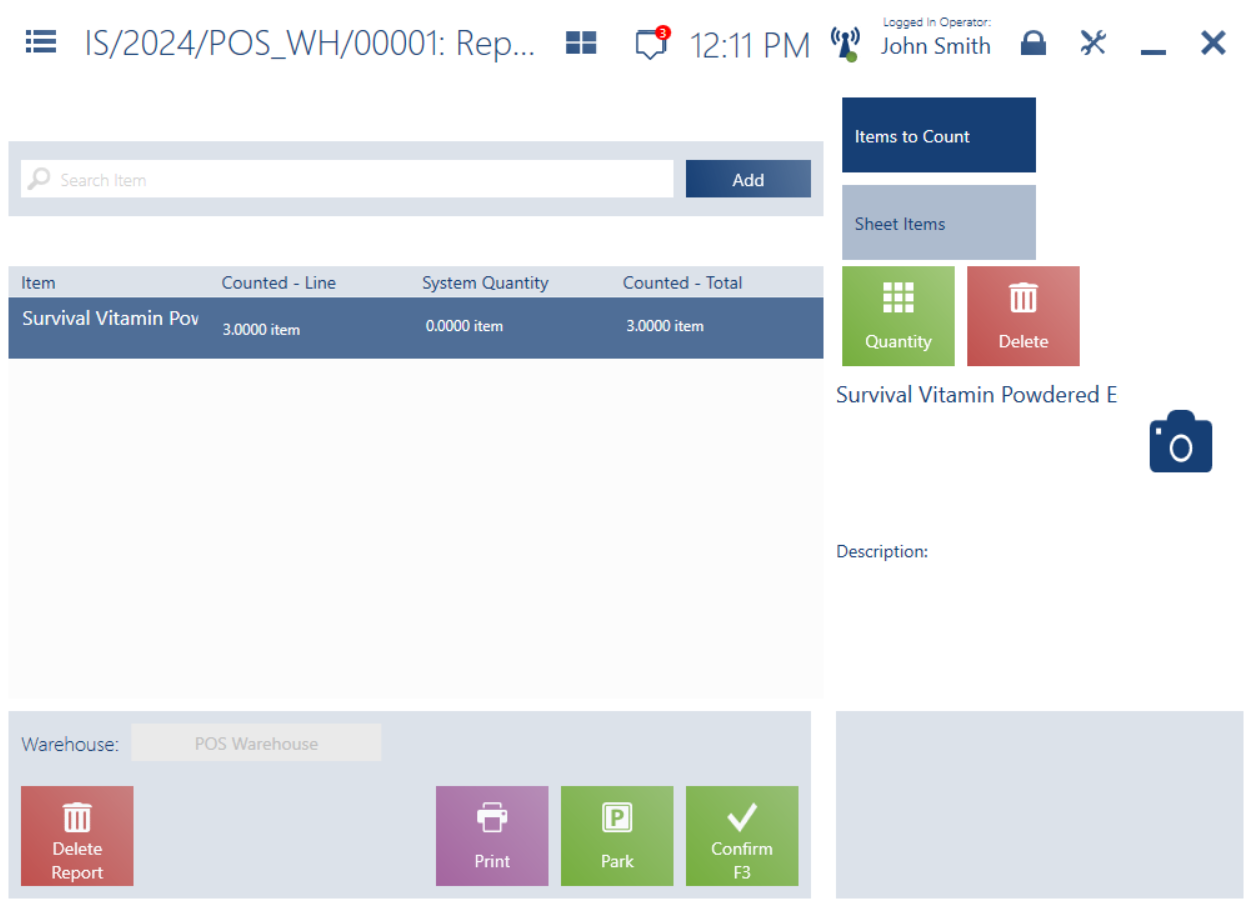
The following buttons are available for report items:
- [Quantity] – allows you to change the quantity of an item added to the readout/report
- [Delete] – selecting the button displays a message for you to confirm the deletion
- [Show More] – the button is displayed if an item has features defined
When you scan or add an item on the Items to Count tab:
- The application verifies whether the item has already been added to the inventory sheet and checks the context of the readout creation – depending on the status of the item line:
- Generated line status – the item will be added to the counting sequence and the status will be changed to Opened
- Opened line status – the item will be added to the counting sequence
- Reported line status – a message will be displayed, indicating that the selected item has already been reported and asking you if you would like to count it again
If you scan an item that has already been entered in another, unclosed report, it will not be added to the readout.
If you scan an item that is not included in the source inventory sheet, you will be asked whether the scanned item should be added to the list because it has not been selected for the inventory sheet.
The application behavior differs depending on the method of adding items to a readout/report:
- When you scan a barcode:
- The quantity and unit of the item added to the counting sequence is based on data stored within the barcode; if the FEFO method is enabled, the code is scanned without lot specification and the property selection window is displayed
- When you add an item manually:
- If the item has not been added to the counting sequence before, it is added to the readout as the first item with a zero quantity and a default unit of measure; the quantity can then be modified by selecting the [Quantity] button
- If the item has already been added to the sequence with either a zero quantity or a non-zero quantity as the first line item, an attempt to add it again manually displays a message indicating that the line item needs to be edited to change the reported item quantity. To do so, select the [Quantity] button.
- If the item has already been added to the sequence with a non-zero quantity but is not the first item in the current readout list, adding it again creates a new line in the report and adds the item to it with a zero quantity and a default unit of measure
A report can be confirmed if the counting sequence contains at least one line. Otherwise, an appropriate message is displayed, indicating that you cannot confirm reports with no items. If a report to be confirmed contains at least one item with a total reported quantity of 0, you will be prompted to confirm that the item has not been found in the warehouse.
Sheet Items tab
The Sheet Items tab of the new report window contains the following columns:
- Item
- System Quantity
- Status
- Reported – item quantity reported in other generated readouts/reports
- Shortages

On this tab, you can find the [Count] button, adding selected items to the report.
Closing an inventory sheet
To close an inventory sheet, select the [Close Sheet] button in the list of inventory sheets.
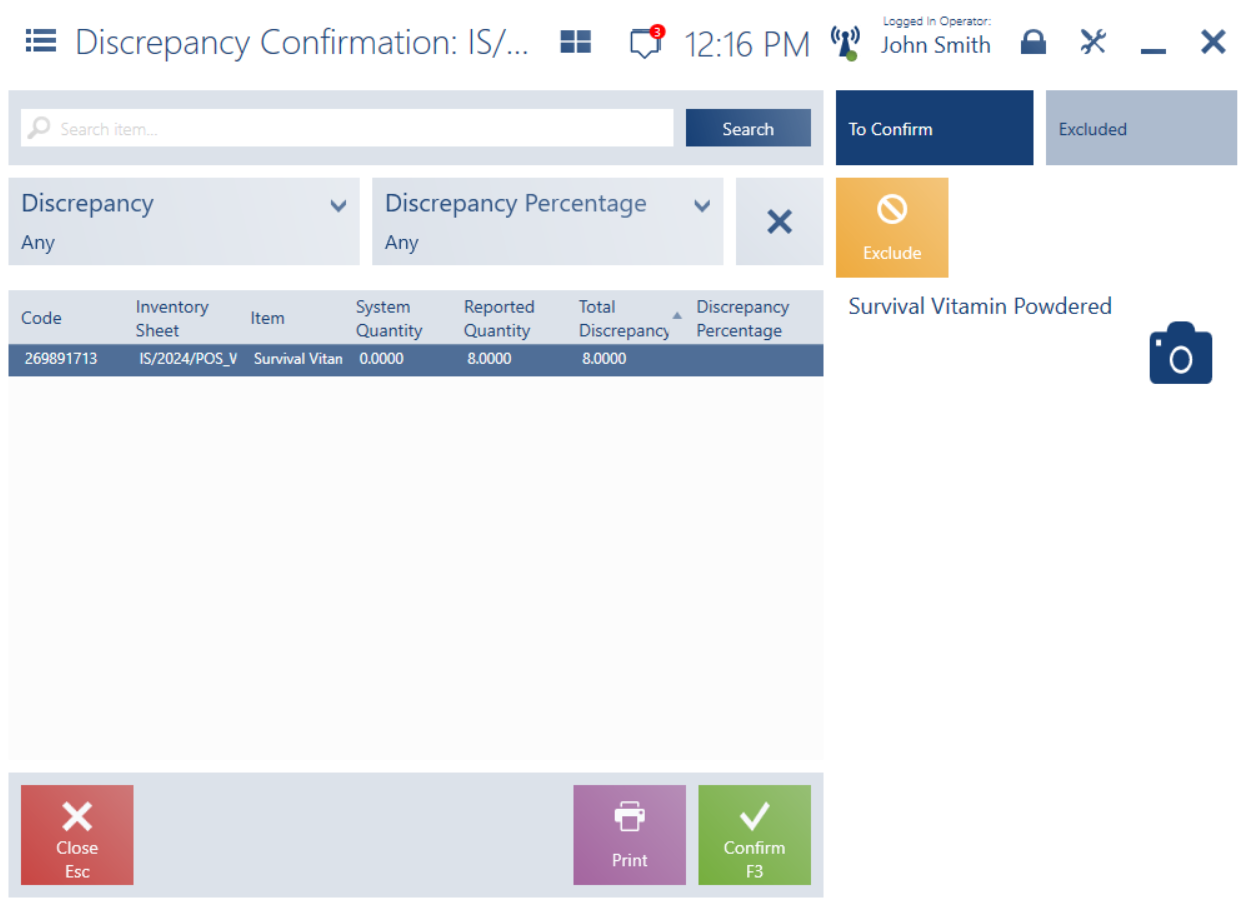
Reports enable the presentation of stock discrepancies detected during an inventory count. Discrepancy calculation is based on the correctly calculated system quantity. A discrepancy is detected when the system quantity of an item (quantity – shortages) is different from the reported quantity.
Shortages: 2
Reported quantity: 5
Result: Presented system quantity: 8
Presented shortages: 2
The Discrepancy Confirmation window is divided into two tabs:
- To Confirm – the list of items with discrepancies detected
- Excluded – the list of items excluded from the discrepancy confirmation
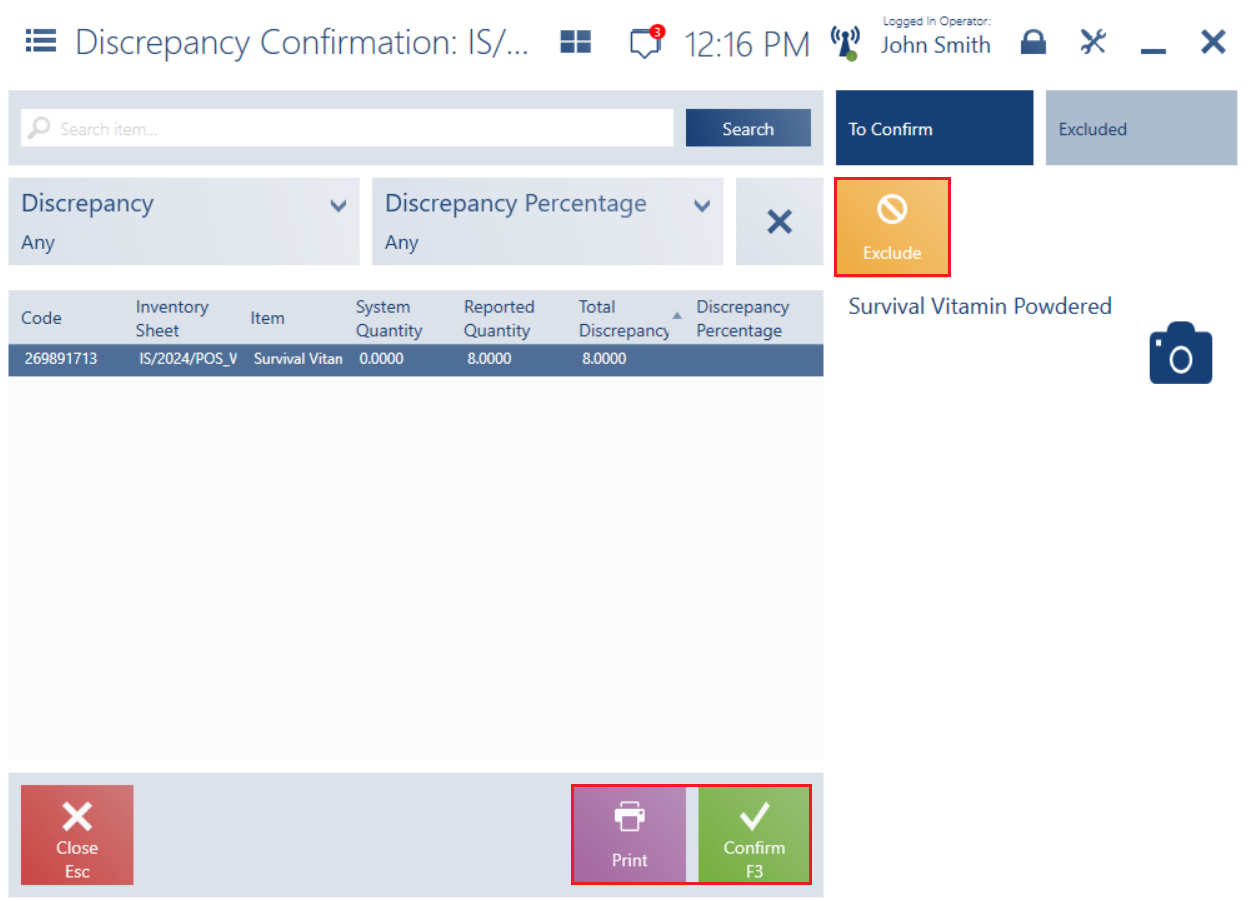
The discrepancy confirmation window allows you to:
- Exclude an item from the list of closed items using the [Exclude] button; selecting the button for an item moves that item to the Excluded tab
- Include an item in the discrepancy confirmation using the [Include] button on the Excluded tab
- Print the discrepancy confirmation using of the [Print] button
- Confirm the discrepancies using the [Confirm] button
The discrepancy confirmation window contains the following columns:
- Code – sheet item code
- Inventory Sheet – inventory sheet in which the discrepancy has been detected
- Item – item for which the discrepancy has been detected
- System Quantity
- Reported Quantity
- Total Discrepancy – the difference between the system and reported quantities
- Discrepancy Percentage – calculated as (total discrepancy/system quantity) * 100%; not applicable if the system quantity equals zero
- Shortages
The Discrepancy Confirmation window contains the following filters:
- Discrepancy
- Discrepancy Percentage
Whether a new inventory sheet is created based on discrepancies from another sheet or by any other means – it may happen that some or all of the indicated items cannot be added to it. The notification has been differentiated according to the situation to which it applies.
If the POS Agent service is not available on the POS workstation or connection to the Headquarters is not established, an appropriate message is displayed.
If an item is included on another inventory sheet whose closing in POS has not yet been synchronized by the ERP system, or if an inventory sheet has been closed and synchronized by the ERP system but has not been processed by the ERP system yet, an appropriate message is displayed.
If an item is included on another inventory sheet created by another user in the ERP system or on a POS workstation (item added manually or by discrepancy), an appropriate message is displayed.
Resetting shortages after an inventory process
When an inventory sheet item is being closed, its shortages are always reset to zero. If an item being closed contains lots, shortages are reset to zero for all of the lots.
Inventory (Comarch ERP Standard)
The inventory process involves counting items in stock in order to verify potential discrepancies between the actual stock levels confirmed during the count and levels recorded in warehouse data.
To open the list of inventory counts, select the [Back Office] → [Inventory] tiles.
To activate the inventory module in Comarch POS, the parameter Handle inventory count in POS must be enabled. The parameter is available on the POS center form in Comarch ERP Standard.
Additionally, on the POS Workstations tab of the POS center form contains the parameter Warn when adding an inventoried item into documents. If you activate this parameter, Comarch POS will display an appropriate message if an attempt is made to sell an item that is subject to an ongoing inventory process.
The list of inventories is composed of the following columns:
- Number
- Count Method:
- Annual – it is usually done once a year, e.g. at the end of the year
- Continuous – it is done regularly, e.g. once a month, once a quarter, or when necessary
- Type
- Status:
- Generated
- Opened
- Closed
- Reported
- Partially Reported
- Created On
- Inventory Date
- Closing Date
- Description
Hidden by default:
- Attributes – attributes are defined to record additional information about objects. In the inventory planning process, stores are divided into areas to which specific employees are assigned in order to avoid double-counting products. This allows additional identification and classification of documents. Attributes may have different formats, such as text, number, list, or date.
The upper part of the window contains the text filter field that allows you to browse the list according to inventory number and type.
You can also narrow the search results by using the drop-down filters:
- Count Method
- Type
- Status
- Created On
- Inventory Date
- Closing Date
In the list of inventories, you can:
- Preview an inventory using the [Preview] button
- Refresh the list using the [Refresh] button
- Close the list using the [Close] button
- Open an inventory using the [Open] button; the button is only available for inventories with the Generated Selecting the button changes a selected inventory’s status to Opened. An inventory can only be opened when the connection to the ERP system is active.
- Close an inventory using the [Close] button; the button is only available for inventories with the Opened You can only close inventories for which all sheets have been previously closed. Closing an inventory requires active connection to the ERP system.

Inventory preview
After selecting an inventory from the list and clicking the [Preview] button, you can (depending on the inventory’s status):
- Print the inventory document
- Refresh the inventory sheets
- Open an inventory sheet if its status is Generated
- Close an inventory sheet if its status is Opened
- Preview an inventory sheet
- Edit an inventory sheet if its status is Generated
- Count items by making a readout for a selected sheet
- Delete an inventory sheet if its status is Generated
- Display the list of a sheet’s reports
- Save the inventory
- Preview document attributes
- Close the inventory

The inventory form is composed of the following columns:
- Inventory Sheet
- Status – available statuses include:
- Generated
- Opened
- Partially Reported
- Reported
- Closed
- Warehouse
- Created On
- Inventory Date
- Closing Date
- Items – the total quantity of items in a sheet
The upper part of the window contains filters that allow you to browse the list according to inventory status and date.
The inventory preview window contains the following buttons for inventory sheets:
- [Delete] – displayed for sheets that have not been opened yet; it requires active connection to the ERP system
- [Edit] – allows you to edit a sheet, for instance to close counted items
- [Open Sheet]/[Close Sheet] – the [Open Sheet] button is available for sheets with the Generated status; in turn, the [Close Sheet] button is available for sheets with the status Reported or Partially Reported
- [Count] – available for unclosed sheets; it allows counting inventoried items
Also, the bottom part of the window contains the following buttons:
- [Close] – closes the list of sheets and returns to the list of inventories
- [Print]
- [Refresh]
- [Save]
- [Open]
- [Close]
“The sheet contains at least one item which has not been opened yet. Would you like to delete all such items from the sheet?”
Inventory sheet
An inventory sheet contains the list of items that need to be counted as part of an inventory.
Inventory sheets contain the following columns:
- Line
- Item
- Item Code – hidden by default
- Status – available statuses include:
- Generated
- Opened
- Reported
- Closed
- System Quantity
- Reported Quantity
- Registered Reports
- Verification Required
- Shortages
Editing an inventory sheet
The list of inventory sheets contains the [Edit] button available after selecting a given sheet.

- Line
- Item
- Status
- System Quantity – the currently available quantity of items whose status is other than Closed. For closed items, this is the quantity available at the moment of their closing.
- Reported Quantity – the item quantity stored in a given warehouse as reported following a count
- Registered Reports – the number of reports registered for a given item (including all report statuses)
- Verification Required
- Shortages
The upper part of the window contains filters that allow you to narrow down the list of displayed items:
- Discrepancy – presents items for which there has been a difference between the reported and system quantities, falling within an undefined range
- Discrepancy Percentage – presents items for which there has been a difference between the reported and system quantities, with the difference percentage falling within a specified range
The following buttons are available for unclosed sheet items:
- [Report Details] – opens a window with reports containing the selected item
- [Close] – changes the selected item’s status to Closed
In the list of inventory sheets, you can also select the [Edit] button for a sheet with the Reported status and then press the [Report Details] button to preview reports for a selected sheet item.
Selecting the [Report Details] button displays a window containing the following elements:
- Sequence column
- Name of the user who carried out the readout
- Report creation date
- Reported quantity
- Status

The report window contains the following buttons:
- [Close]
- [Print]
Generating a report
A report can be generated in the inventory window – to do so, select a particular sheet and click the [Count] button.
In the generated report window, you can:
- Count all or selected sheet items
- Add a new item
- Preview attributes

The new report window is divided into two tabs:
- Items to Count – an empty list that you can use to start counting items
- Sheet Items – it contains items added to the sheet
A new report can be parked so that you can resume work on it at a later time.
Items to Count tab
The Items to Count tab contains the following columns:
- Item
- Counted – Line – a quantity entered in a given sequence line with a unit of measure
- System Quantity – a quantity reported in a given sequence line with a unit of measure; depending on settings, blocking reservations can be taken into account
- Counted – Total – the total item sum in each associated counting sequence line

The generated readout/report window contains the following buttons:
- [Warehouse] – a non-editable field displaying the name of a warehouse relevant for a given sheet
- [Delete Report] – selecting the button displays a message for you to confirm the deletion
- [Print]
- [Park]
- [Confirm]
The following buttons are available for report items:
- [Quantity] – allows you to change the quantity of an item added to the readout/report
- [Delete] – selecting the button displays a message for you to confirm the deletion
- [Show More] – the button is displayed if an item has features defined
When you scan or add an item on the Items to Count tab:
- The application verifies whether the item has already been added to the inventory sheet and checks the context of the readout creation – depending on the status of the item line:
- Generated line status – the item will be added to the counting sequence and the status will be changed to Opened
- Opened line status – the item will be added to the counting sequence
- Reported line status – a message will be displayed, indicating that the selected item has already been reported and asking you if you would like to count it again
If you scan an item that has already been entered in another, unclosed report, it will not be added to the readout.
If you scan an item that is not included in the source inventory sheet, you will be asked whether the scanned item should be added to the list because it has not been selected for the inventory sheet.
The application behavior differs depending on the method of adding items to a readout/report:
- When you scan a barcode:
- The quantity and unit of the item added to the counting sequence is based on data stored within the barcode; if the FEFO method is enabled, the code is scanned without lot specification and the property selection window is displayed
- When you add an item manually:
- If the item has not been added to the counting sequence before, it is added to the readout as the first item with a zero quantity and a default unit of measure; the quantity can then be modified by selecting the [Quantity] button
- If the item has already been added to the sequence with either a zero quantity or a non-zero quantity as the first line item, an attempt to add it again manually displays a message indicating that the line item needs to be edited to change the reported item quantity. To do so, select the [Quantity] button.
- If the item has already been added to the sequence with a non-zero quantity but is not the first item in the current readout list, adding it again creates a new line in the report and adds the item to it with a zero quantity and a default unit of measure
A report can be confirmed if the counting sequence contains at least one line. Otherwise, an appropriate message is displayed, indicating that you cannot confirm reports with no items. If a report to be confirmed contains at least one item with a total reported quantity of 0, you will be prompted to confirm that the item has not been found in the warehouse.
Sheet Items tab
The Sheet Items tab of the new report window contains the following columns:
- Item
- System Quantity
- Status
- Reported – item quantity reported in other generated readouts/reports
- Shortages
On this tab, you can find the [Count] button, adding selected items to the report.
Closing an inventory sheet
To close an inventory sheet, select the [Close Sheet] button in the list of inventory sheets.
Reports enable the presentation of stock discrepancies detected during an inventory count. Discrepancy calculation is based on the correctly calculated system quantity. A discrepancy is detected when the system quantity of an item (quantity – shortages) is different from the reported quantity.
The Discrepancy Confirmation window is divided into two tabs:
- To Confirm – the list of items with discrepancies detected
- Excluded – the list of items excluded from the discrepancy confirmation
The discrepancy confirmation window allows you to:
- Exclude an item from the list of closed items using the [Exclude] button; selecting the button for an item moves that item to the Excluded tab
- Include an item in the discrepancy confirmation using the [Include] button on the Excluded tab
- Print the discrepancy confirmation using of the [Print] button
- Confirm the discrepancies using the [Confirm] button
The discrepancy confirmation window contains the following columns:
- Code – sheet item code
- Inventory Sheet – inventory sheet in which the discrepancy has been detected
- Item – item for which the discrepancy has been detected
- System Quantity
- Reported Quantity
- Total Discrepancy – the difference between the system and reported quantities
- Discrepancy Percentage – calculated as (total discrepancy/system quantity) * 100%; not applicable if the system quantity equals zero
- Shortages
The Discrepancy Confirmation window contains the following filters:
- Discrepancy
- Discrepancy Percentage
If the POS Agent service is not available on the POS workstation or connection to the Headquarters is not established, an appropriate message is displayed.
If an item is included on another inventory sheet whose closing in POS has not yet been synchronized by the ERP system, or if an inventory sheet has been closed and synchronized by the ERP system but has not been processed by the ERP system yet, an appropriate message is displayed.