A purchase cost statement (PCS) is based on documents registering the release of items from a warehouse, and it presents the purchase or acquisition cost of these items. Additionally, a purchase cost statement allows the user to determine a margin obtained from a given document.
The PCS list is available in the menu Warehouse → (Resources) → PCS List.
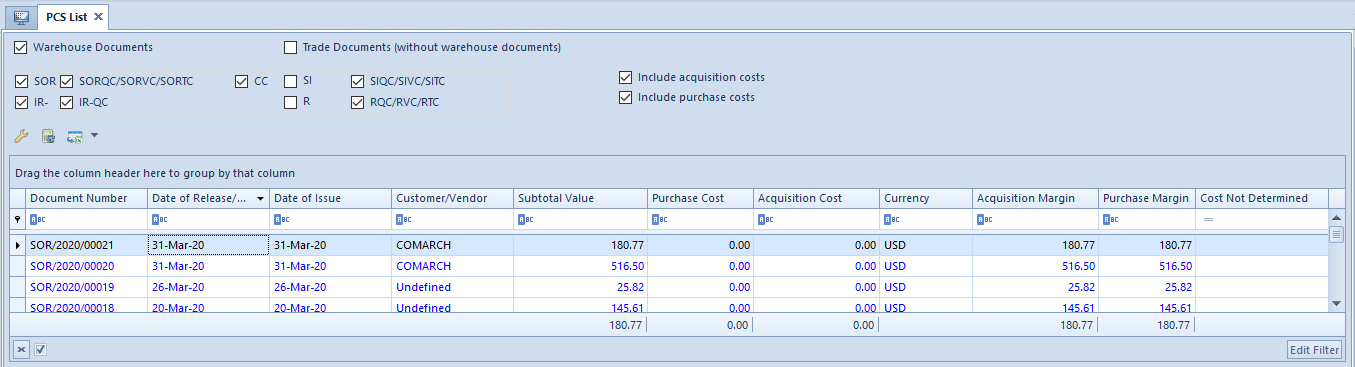
PCS list
Purchase cost statements may be analyzed on the basis of:
Warehouse documents – SOR, SORQC, SORVC, SORTC, IR-, IR-QC, and CC
Actual prime sales costs are presented in SO release documents (SOR). Costs displayed in trade documents (SI, SIQC, R, RQC) are estimated – they are planned, or simulated costs.
Selecting the parameter Warehouse Documents or Trade Documents automatically selects all documents belonging to a given group. Once at least one document type is deselected, the parameter of a given group is also deselected and the user may select any documents.
Next, it is necessary to specify costs to be included in the calculation:
Acquisition costs – the list presents the columns Acquisition Cost and Acquisition Margin
Purchase costs – the list presents the columns Purchase Cost and Purchase Margin
Both acquisition and purchase costs – the list presents all columns related to acquisition and purchase costs, as well as acquisition and purchase margins
After the user defines conditions and selects the button [Recalculate], the list displays all documents meeting the specified criteria – excluding canceled and initiated documents.
Details presented by the list include:
Document number
Date of release/sale specified in a given document
Document date of issue
Customer for whom a document has been issued
Document subtotal value presented in the system currency
Purchase and acquisition cost based on the value of resources retrieved to a document
Purchase and acquisition margin based on the prices of document items
Cost not determined – if a prime sales cost has not been determined in a document, a relevant column displays an exclamation mark
Currency – the system displays the symbol of the system currency of a company owning a document
Note
Purchase and acquisition values, as well as margins, are not visible for operators who do not have the permission Access to purchase prices. In such a case, the list only presents a subtotal document value.
Reverse charge
General information
Reverse charge is a mechanism transferring the obligation to calculate tax on a concluded transaction from a vendor to a customer. The list of items for national transactions which are covered by the reverse charge procedure is included in Appendix no. 11 to the VAT Act. Additionally, the list of services covered by the reverse charge procedure is included in Appendix no. 14 to the Act.
Configuration of reverse charge
In Company Structure → Company, it is necessary to select the parameter Handle reverse charge
In Configuration → VAT Rates, it is necessary to define a VAT rate for reverse charge
If reverse charge is to be used in connection with a customer/vendor, it is necessary to select the Reverse charge parameter on that customer’s/vendor’s form
If an item is to be covered by the reverse charge mechanism, it is necessary to select the Reverse charge parameter on that item’s form. Once it is selected, the system displays an additional field containing the list of active values from a generic directory which enable the classification of reverse charge for particular item types. Such values may be defined in Configuration → Generic Directories→ (General) → Reverse Charge Classification.
Handling of reverse charge in documents
The following document types may register the handling of reverse charge:
Quotes
Orders
Advance invoices and their corrections
Invoices (generated from a document and manual ones) and their corrections
SO releases and their corrections
PO receipts and their corrections
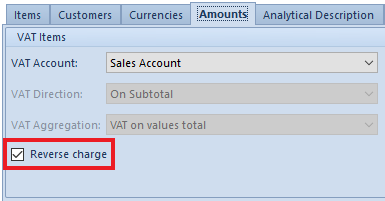
The Reverse charge parameter responsible for the handling of reverse charge in documents is available:
On the Amounts tab – the parameter value is either retrieved to a document from a customer/vendor form or can be selected manually if the following conditions are met:
The document status must be Initiated or Unconfirmed
The transaction type must be set as National. Changing the type to EU or Non-EU deselects the parameter and makes it impossible to edit it.
Note
In the case of national transactions, setting Export in the VAT Rates field does not update VAT rates for items to be covered by reverse charge. For such items, a VAT rate is retrieved according to VAT rate settings for reverse charge.
Reverse charge parameter on Amounts tab in sales invoice document
In document item details – the parameter value is either retrieved from a relevant item form or it can be selected manually, provided that the Reverse charge parameter has been selected on the Amounts Once it is selected, it is no longer possible to change a VAT rate for a document item. Deselecting the parameter retrieves a VAT rate from a relevant item form.
Reverse charge parameter in sales invoice item details
Transfer of the Reverse charge parameter’s settings upon document generation
Generation
Value of Reverse charge parameter for 1:1 generation
Value of Reverse charge parameter for n:1 generation
SQ → SO
PQ → PO
SO → SI
SO → SOR
PO → PI
PO → POR
The parameter value is retrieved
from a source document with a possibility to
change it.
If a final document (e.g. SO) is
generated from several source
documents (e.g. SQ1, SQ2), the
parameter will be selected in the
header of the generated final
document (SO) if it has been
selected in at least one of the
source documents (SQ1, SQ2).
SO → ASI
PO → API
The parameter value is retrieved
from a source document with no possibility to change it.
Not applicable.
SI → SOR
PI → POR
POR → PI
SOR → SI
The parameter value is retrieved
from a source document with no possibility to change it.
If a final document (e.g. SI) is
generated from several source
documents (e.g. SOR1, SOR2), the
parameter will be selected in the header of the generated final
document (SI) if it has been
selected in at least one of the
source documents (SOR1, SOR2).
Corrections issued to documents
The parameter value is retrieved
from a source document, with no possibility to edit it.
Not applicable.
Statistics
The statistics feature makes it possible to verify the weight/volume of all or selected document items. In order to check statistics, it is necessary to select the button [Statistics] available in the following documents:
SI, R, and their generated and manual corrections
PI and their generated and manual corrections
POR, SOR, IR+, IR-, and their corrections
SO, SQ, SOI
PO, PQ, POI
IO, WM-, WM+, PC
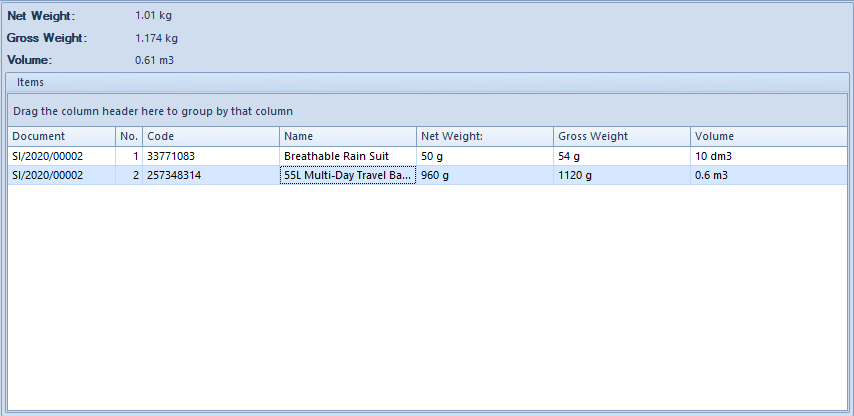
Selecting the button [Statistics] displays an additional window, where the user may verify the weight/volume of document items.
Statistics window opened from a document window
The window header displays:
Net Weight – the sum of items’ net weight presented in the basic unit of mass
Gross Weight – the sum of items’ gross weight presented in the basic unit of mass
Volume – the sum of items’ volume presented in the basic unit of volume
The Items list is composed of the following columns:
Document – a document in which a given list item is included
No. – an item number
Code – an item code retrieved from a document
Name – an item name retrieved from a document
Net Weight – a net weight retrieved from a document item, presented in the applied unit of mass
Gross Weight – a gross weight retrieved from a document item, presented in the applied unit of mass
Volume – a volume retrieved from a document item, presented in the applied unit of volume
Related items
Related items
The feature of related items makes it possible to associate items which are often sold with one another – e.g. shoes are often sold together with a shoe polish.
Item relations can be created in the following places of the system:
Sales → Related Items
Main → Items
Main → item form → Related Items
The Related Items list opened in the Sales menu is composed of the following columns:
Item Code – the code of an item for which a relation with another item has been created
Item Name – the name of an item for which a relation with another item has been created
Related Item Code – the code of an item/service/set related to another item
Related Item Name – the name of an item related to another item
Relation Type – a relation type is retrieved from Configuration → Generic Directories → General → Item Relation Types. The user can change a value displayed in this field.
Order of Relations (hidden by default) – this column is non-editable; it presents information on created relations with a given item. If an item BZKD is related with 3 items, the Order of Relations column will present 3 entries, with the order of relation defined as 1,2,3.
Source (hidden by default) – this column is non-editable; it presents information on the relation source:
Operator – a given relation has been created by the operator
Import from File – a relation has been created after items were imported from a file
Import from BI – a relation has been created with the use of import from BI
Other – a relation has been created with the use of, for instance, API
Note
Items which can be related to other items include merchandises, services, and sets (with the parameter Retrieve elements onto document deselected).
Creating relations
Item relations can be created with the use of one of the following buttons:
[Add] – it associates two items defined in the system
[Import] → [From BI] – it is based on reports from which the system retrieves related items
Import from a file
A file to be imported should contain the following columns:
Item code
Related item code
Relation type
To successfully complete the import:
A relation between a defined pair of items cannot already exist in the system
The same item cannot be paired
Items with codes defined in the file must be found in the system
Creating relations manually
The user can add new item relations:
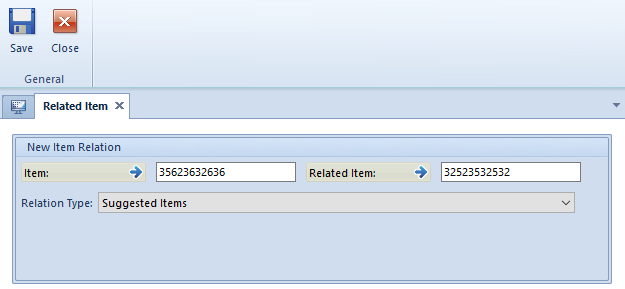
Selecting the [Add] button in Sales→ Related Items. Clicking the button opens a new relation window, containing the following elements:
Item – it enables the user to select an item for which a relation is to be created. An item can be added by entering its code, selecting it on the item list, or scanning its barcode.
Related Item – it enables the user to select an item to be related with an item entered in the Item It can be added by entering its code or selecting it on the item list.
Relation Type – it presents a default value retrieved from generic directories, with a possibility to change it
New item relation window
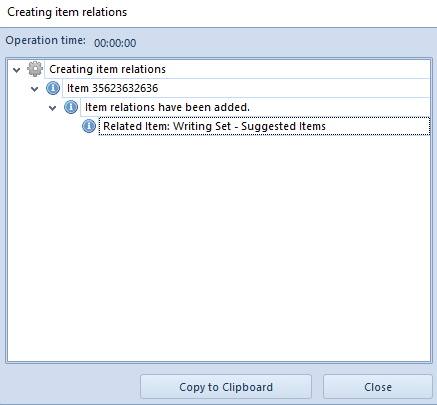
On the item list – for that purpose, it is necessary to select an item on the list and click the button [Add] in the button group Related Items. The system automatically displays the item list, enabling the user to select one/several items to be related. Once they are selected, the system displays a relation type window. After the user chooses a given type and saves changes, the Creating item relations window is displayed:
To verify whether particular items have been related to each other, it is necessary to open the item list, edit a given item’s form and open the tab Related Items.
Copying related items
On the item form, on the Related Items tab. In order to create a relation, the user needs to select the button [Add].
Related Items tab
Deleting item relations
By using the option [Delete], the operator may remove a particular item relation. After selecting relevant items and clicking [Delete], item relations will be removed.
Copying related items
This feature enables the user to assign/copy items related to other items. In order to do so, it is necessary to click the button [Copy from Item] available in the button group Related Items. After that, the system displays the item list, allowing the user to select one/several items to define the related item list, and subsequently associate them with each item connected with the operation.
The feature of copying related items is available in:
Main → Items
Main → Items → item form → Related Items
Selling related items
In SQ, SO, SI, R, and SOR documents, it is possible to sell related items. To do so, the following conditions need to be met:
An item must be added in a given document
A document’s status cannot be Confirmed or Posted
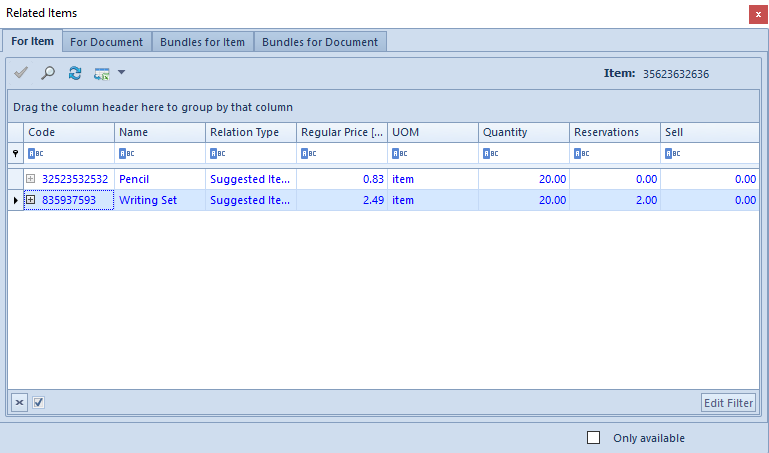
If these conditions are fulfilled, the button [Related Items] is active. Selecting the button opens a new window, where the user may select which related item is to be added to a document.
Adding a related item in a document
The window is composed of the following tabs:
For Item – it displays items related to an item for which the window has been opened
For Document – it displays all items related to all items added in a given document
Bundles for Item – it displays items included in a bundle promotion, related to an item for which the window has been opened
Bundles for Document – it displays items included in a bundle promotion, related to all items added in a given document
The Related Items window is composed of the following columns:
Code/Name – code/name of a related item
Relation Type
Regular Price – regular price from the most current price list
UOM – basic unit of measure of a given item, or an auxiliary unit set as default for a given document type
Quantity – item quantity available in a warehouse, excluding reservations. The quantity is displayed in a unit indicated in the UOM For items of the Service type, no quantity is displayed. For a set with a deselected/selected parameter Retrieve elements onto document, the quantity is determined for the lowest quantity of element of a set in the basic unit of that element. If the quantity of a given item is 0, such a value is set in the Quantity column in the window. If the quantity is different than 0, a recalculation into a number of sets in the basic unit of the element is made according to the pattern:
Element quantity = quantity of an element in a warehouse/quantity of an element required for a set’s basic unit
Set quantity = total available quantity of a set element.
If an auxiliary unit has been selected for a set, the recalculation is made according to settings specified on the set’s form.
To check the quantities/reservations for given set elements, it is necessary to expand an additional list by selecting the plus button next to the set’s name.
Reservations – reservations made in a warehouse available for a given document type, regardless of lots. The reservations are displayed in a unit indicated in the UOM For items of the Service type, no reservations are displayed. For a set with a deselected/selected parameter Retrieve elements onto document, the reservations are determined for all set elements in the basic unit of an element. If the quantity of that item is 0, such a value is set in the Reservations column in the window. If the quantity is different than 0, a recalculation into a number of sets in the basic unit of the element is made. The greatest quantity for the reservations of set elements is determined as the reservation. The recalculation is made according to the pattern:
Element quantity = reservation of an element in a warehouse/reservation of an element required for set’s basic unit
Set quantity = reservation of an element without decimal places (0 precision)
If an additional unit has been selected for a set, the recalculation is made according to settings on the set’s form.
To check the quantities/reservations for given set elements, it is necessary to expand an additional list by selecting the plus button next to the set’s name.
Available Quantity – this column is available for set elements (regardless of whether the Retrieve elements onto document parameter has been selected or not)
Sell – quantity that is to be added in a document. By default, the system suggests the quantity 0, with a possibility to modify it.
Below the list, there is a parameter Only available. Selecting it displays only those items, whose available quantity is greater than 0.
Items presented on the list, both on the tabs For Item and For Document, need to have the parameter Active selected on their forms. Additionally, it is not possible to double-display an item – each item may be displayed only once.
Example
An item set as related to a BL001BLU36 item is BL004MUS42.
Items set as related to a SHO023JEA38 item are BL004MUS42 and BEL001LEAONE.
In a sales invoice document, the user adds two items: BL001BLU36 and SHO023JEA38.
The Related Items window displayed after selecting the button [Related Items] presents the following details:
On the For Item tab – BL004MUS42 is displayed
On the For Document tab – BL004MUS42 is displayed (only once) together with BEL001LEAONE
In order to add related items in a document, it is necessary to select the button [Add To Document] on the list of related items or double-click the items to be added.
Margin control
Margin is a notion used to define a profit/surplus gained from the sales of items. The control of a minimum margin prevents selling items and services below a certain threshold level defined in percentage. The system makes it possible to automate the margin control process, owing to which the user does not need to manually calculate margins while processing sales transactions.
To control margins properly, it is necessary to:
Adjust the parameter Calculate margin on (System → Configuration → Trade)
Adjust the parameter Control margin on acquisition price (System → Configuration → Trade)
Define the percentage value of a minimum margin on a given item form, tab General (Main → Items)
Select the parameter Margin on a given item’s form, tab General, for each price list for released items, for which the system is to control a margin
The parameter Calculate margin on determines how a margin value and final sales price are calculated; it also defines what value range is to be available in the field Minimum Margin on the item form. The following calculation options are available in the system:
The Purchase price option does not bring any limits for the field Minimum Margin. With such configuration, a value set in this field specifies the proportion of a profit (a difference between a final sales price and a purchase/acquisition price) to a purchase/acquisition price (assuming that a purchase/acquisition price = 100%).
In the case of the Sales price option, the permitted value range for the field Minimum Margin is 0-100. With such configuration, a value set in this field specifies the proportion of a profit (a difference between a final sales price and a purchase/acquisition price) to a final sales price (assuming that a sales price = 100%).
If the user manually changes an item’s final price to a value incompliant with minimum margin requirements, an attempt to save the price brings the following results:
A red exclamation mark indicating an error is displayed next to the item’s value
The user is notified about what the minimum sales value of a given item should be in order to meet a minimum margin
In correction documents, the system prevents correcting item values in a way that would make a margin lower than a minimum margin
A minimum margin is only calculated if resources have been retrieved to a document. In the case of SO documents without resources and SI or R documents on shortages, the system does not control a minimum margin, as a purchase cost is unknown.
Margin control upon document generation
The SQ/SO document definition (Company Structure→ company form → Documents → SQ/SO) contains a parameter Control minimum margin during document generation. By default, the parameter is deselected, both while converting and creating a database. If the parameter is:
Selected – while generating SI/SOR/R documents from a SO document, or while generating a SO document from SQ, the system verifies whether minimum margin requirements have been met; if not, a price may be modified by a minimum margin value in relation to a price in the source document
Deselected – while generating SI/SOR/R documents from a SO document, or while generating a SO document from SQ, the system does not verify whether minimum margin requirements have been met. Relevant values are transferred from the source document.
Loyalty program
The loyalty program available in the system is based on a point system. On each price list, next to subtotal and total item prices on the tabs Sales and Purchase, it is possible to define a point value to be granted to customers for purchasing a given item. Points may either be positive or negative.
Price list with defined point values granted for purchasing an item
Rules of point calculation in the loyalty program
The current number of points collected by a given customer is displayed on the customer’s form, on the CRM Upon adding a new customer in the system, the number of points equals zero.
The number of points collected by a customer cannot be negative. If a customer has used all points, and a quantity correction is created to a document which has added a positive number of points to the customer’s account, the point balance may reach no less than zero.
Collected points may be used by creating special price lists for promotions, where items are assigned a lower price and a negative number of points – purchasing such items subtracts a relevant number of points from a customer’s account, decreasing that customer’s point balance
Negative points are calculated at the moment of item reservation, that is when adding an item to a sales invoice or receipt document. Positive points are calculated at the moment of invoice or receipt confirmation.
Printing invoices on a receipt printer
The system enables printing SI and ASI documents on a receipt printer, this way registering a given invoice document on the printer.
In order to make it possible to print invoices on a receipt printer, it is necessary to select the parameter Print invoices on a receipt printer in System → Configuration → Trade. Once the parameter is active, the user may either select or deselect the parameter Print in the header of SI and ASI documents.
The system automatically selects the Print parameter if:
A given document is being issued with the VAT direction defined as On Total
The document is being issued in the system currency
The primary customer in the document has the status of Retail Customer
A sales order document from which the SI/ASI is being generated has been issued with the VAT direction defined as On Total
At least one of the previous ASI documents generated from the same SO has been set as printable on a receipt printer
The SI is not being generated from a receipt document
The final SI is being issued with the VAT direction defined as On Total and at least one of the advance invoices deducted from this invoice has been set as printable on a receipt printer
While copying documents, the setting of the Print parameter is not copied from the source document – the system once again verifies whether all required conditions are met.
Manually editing the Print parameter
It is possible to edit the Print parameter if:
The parameter Print invoices on a receipt printer has been selected in the system configuration
A given document is not confirmed – its status is either Initiated or Unconfirmed
The document is being issued with the VAT direction set as On Total
The document is being issued in the system currency
The SI is not being generated from a receipt document
While the user edits the parameter:
The system does not verify the customer status – it is possible to set a SI/ASI document as printable on a receipt printer for a customer with the status Entity
It is possible to select the Print parameter in an advance sales invoice generated from a sales order with the VAT direction set as On Subtotal. The system asks the operator whether to activate the Print parameter in the ASI, even though it would not be possible to print the final invoice generated from such an order on a receipt printer.
Automatically changing the Print parameter
The system verifies whether all required conditions are met to automatically select the Print parameter if the user modifies:
The primary customer – with regard to the change of the customer status
The VAT Direction parameter
The document currency
Printing on a receipt printer
In order to print a document on a receipt printer, it is necessary to select one of the two available options:
Confirm and Print on Receipt Printer – if the document has not been confirmed yet
Print on Receipt Printer – if the document has already been confirmed, but has not been printed yet
The system prevents printing a document on a receipt printer if:
At least one of document items has the value of 0.00. If the Print parameter has been selected in a sales invoice document containing such an item, the system does not allow printing the document.
The value of deducted advance invoices in a given VAT rate exceeds the value of a transaction made in this VAT rate. In order to confirm such a document, it is necessary to deselect the Print parameter in the SI document or correct the quantity/value of document items.
If advance invoices cover the entire transaction in particular VAT rates, the final invoice is assigned the value of 0.00 and cannot be printed on a receipt printer. While confirming such a document, the system asks the user whether to confirm the document as non-printable on a receipt printer.
Printing advance and final invoices on a receipt printer
When printing an advance invoice which registers an advance payment for an order and has no document items, the system sends information from the document’s VAT table to a receipt printer.
The following data is presented in printouts made on a receipt printer:
Item name – Advance Payment Rate + VAT rate value with the % character
Quantity – always set as 1
Unit of measure – the symbol of a unit assigned as default to the main item group
Price, value – a total value displayed in the document currency for the sum of values in a given rate
In the case of a final invoice which deducts advance invoices, printing on a receipt printer is done with reference to the “final value”, that is the value decreased by advance invoices. Document items are not sent to a receipt printer; instead, the system sends values defined on the basis of the VAT table – it sums up values (both negative and positive) within a given VAT rate and sends such an “item” to a receipt printer.
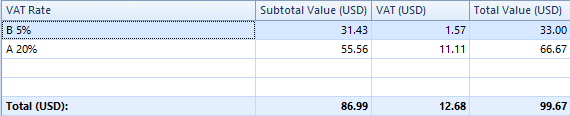
Example
Order items:
Advance invoice items:
Advance invoice VAT table:
On a receipt printer, receipt items will be defined as follows:
Advance Payment Rate 20% 1*66.67
Advance Payment Rate 5% 1*33.33
Filtering documents
The filter below the list of sales and advance invoices contains the field Printable Status. It enables the user to filter documents printable on a receipt printer; depending on a selected option, the system displays different documents:
Printable on receipt printer – documents with the Print parameter selected, both printed and not printed on a receipt printer
Unprintable on receipt printer – documents with the Print parameter deselected
Printed on receipt printer – documents with the Print parameter selected, already printed on a receipt printer
Not printed on receipt printer – documents with the Print parameter selected, not printed on a receipt printer yet
Reprinting documents on a receipt printer
In order to enable reprinting documents on a receipt printer in the system, a relevant operator group must have the permission Reprinting of documents on a receipt printer, granted in Configuration → Company Structure → Operator Groups → Other Permissions tab.
Due date at the end of the month – EOM
One of the methods for setting a due date is the End of Month formula. Defining a due date on the basis of this method is possible after selecting the parameter EOM in the header of a given document. The parameter can also be selected on the customer/vendor form, on the tab Trade – payment conditions set on this tab are transferred to trade documents when issuing them for a relevant customer/vendor.
An end-of-the-month due date may be set in the following documents:
SQ, SO, SI (with automatic and manual corrections), VSI (with corrections), R (with automatic and manual corrections)
ASI, ASIVC
PQ, PO, PI (with automatic and manual corrections), VPI (with corrections)
API, APIVC
DM, CM
SOR (with corrections)
PR, DL, LF
Due date fields in a trade document
Due date fields in the section Payment in the trade document header are composed of the following elements:
A field with the number of days to be added to a document’s date of issue in order to define a due date (the value is retrieved by default from the corresponding field on a relevant customer form)
The EOM parameter (the value is retrieved by default from the corresponding parameter on a relevant customer form)
A field with the number of days by which to correct an end-of-the-month due date (the value is retrieved by default from the corresponding field on a relevant customer form)
A due date
Fields related to a due date available in the document header are also available in the payment window of quote and order documents for the option Number of days from the invoice date of issue. In the case of other documents, the payment window only contains a due date field displaying the same value as the due date field in the document header.
Note
In the case of issuing both automatic and manual corrections to documents, payment conditions are also retrieved from a relevant customer form.
Until a given document is confirmed, due date settings can be edited, with the following conditions binding:
If the EOM parameter is selected, it is possible to change both the number of days by which a due date is to be postponed with reference to the document’s date of issue and the number of days by which an end-of-the-month due date is to be corrected
It is not possible to modify a due date – both in the document header and in the document payment windows
It is possible to deselect the EOM parameter – doing so grays-out and clears the field with the number of days for the Correct By option and enables the editing of a due date
If the EOM parameter has not been selected, the operator may select it and enter the number of days by which an end-of-the-month due date is to be corrected
The field with the number of days by which a due date is to be postponed with reference to the document’s date of issue is active regardless of the setting of the EOM parameter
Algorithm defining a due date in trade and warehouse documents
If the parameter EOM has been selected: Due date = Document’s date of issue + Number of days from the field Due Date + Postponement of the date to the last day of the month + Number of days from the field Correct By (either positive or negative)
If the parameter EOM has not been selected: Due date = Document’s date of issue + Number of days from the field Due Date
If the parameter EOM has been selected and a given document is not yet confirmed, it is possible to modify:
Number of days by which a due date is to be postponed with reference to the document’s date of issue
Number of days by which an end-of-the-month due date is to be corrected
It is not possible to modify a due date – both in the document header and in the document payment windows.
Copying documents
When copying documents, settings related to a payment form, number of days, and the EOM parameter will be copied from the source document to the new document. In turn, a due date in the new document is calculated according to the document’s settings – both in the header and in the payment windows.
Copying payment conditions while generating new documents from documents with the EOM parameter selected
Quotes
Generation
EOM-related due date has not expired
EOM-related due date has expired
SQ → SO
PQ → PO
(a due date selected in a SQ/PQ
payment is Due Date)
A due date is
transferred to a SO/PO document,
and the number of days in the field Due
Date is calculated on this basis,
the parameter EOM is deselected.
Payment conditions from the
customer/vendor form are
transferred to a SO/PO document and
the due date will be calculated on their basis.
SQ → SO
PQ → PO
(a due date selected in a SQ/PQ
payment is Number of days from the invoice date of issue)
All the parameters referring to payment conditions are transferred to a
SO/PO document, the due date is calculated on the basis of the date of issue of a
generated document and payment details transferred from the header.
PQ → SQ
Payment conditions are not transferred to a SQ. Upon adding a customer in a document, the parameters referring to payment conditions are transferred from this customer's form.
Orders
Generation
EOM-related due date has not expired
EOM-related due date has expired
SO → SI/R
SO → ASI →SI
SO → SOR → SI/R
PO → PI
PO → API → PI
(a due date selected in a SO/PO
payment is Number of days from the invoice date of issue)
All the parameters referring to payment conditions are transferred to a
SO/PO document, the due date is calculated on the basis of the date of issue of a
generated document and payment details transferred from the header.
SO → SI/R
SO → ASI →SI
SO → SOR → SI/R
PO → PI
PO → API → PI
(a due date selected in a SO/PO
payment is Number of days from the invoice date of issue)
The date due date is
transferred to a SI/R/PI document
and the number of days in the field Due
Date is calculated on this basis,
the parameter EOM is deselected.
Payment conditions from the
customer/vendor form are
transferred to a SI/R/PI document
and the due date will be calculated
on their basis.
SO → ASI
PO → API
(a due date selected in a SO/PO
payment is either Due Date or Number of days from the invoice date of issue)
The due date is determined according to an advance invoice's date of issue, and a
payment form is uploaded from the source order. If the payment
form is set in the order, then a payment form set in the advance invoice is
the one specified on the form of a customer/vendor the document is being
issued for.
Warehouse documents
Generation
EOM-related due date has not expired
EOM-related due date has expired
SI → SOR
R → SOR
SOR → SI
SOR → R
The due date is transferred to a generated document, and the
number of days in the field Due Date is calculated on this basis, the parameter
EOM is deselected.
SO → SOR
(a due date selected in a SO/PO
payment is either Due Date or Number of days from the invoice date of issue)
A number of days specified in the field Due Date is transferred to the SOR
document and the due date is calculated on this basis.
Corrections
When generating corrections (either manual or automatic) following the registration of other corrections, payment conditions for the generated corrections are retrieved from the source correction. An instance of a scenario where a correction is generated as a result of the registration of another correction may look as follows: SI → SOR → SIQC → SORQC or R → SI → SIQC → RQC.