Profile editor – general information

General information

Profile editor is a tool allowing the user to customize the main menu and interface of Comarch ERP Standard to individual needs and preferences.

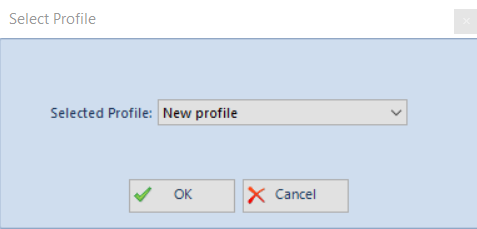
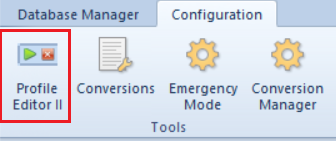
The profile editor is available in the database manager in menu Configuration.

Profile Editor button

Layout of profile editor

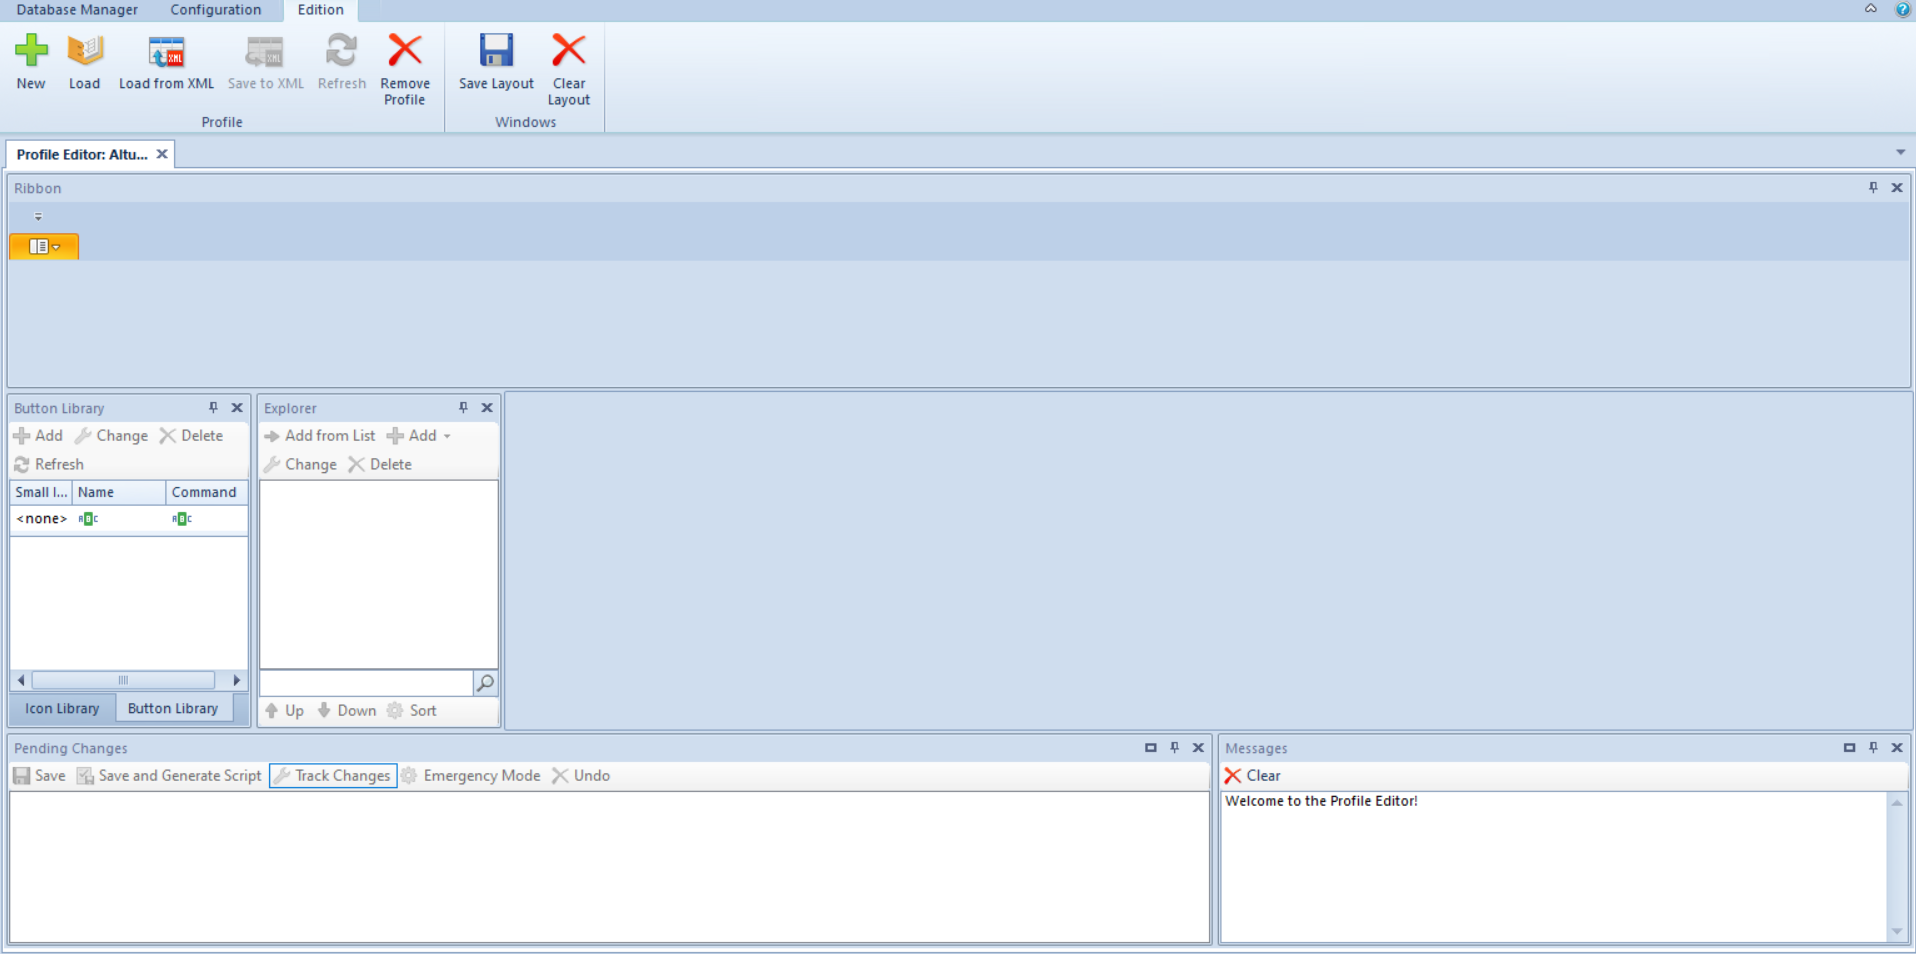
The layout of the profile editor is composed of several windows which can be freely   moved (detailed description of the functionality of window docking can be found in article Window docking).

The area of the profile editor is divided into main menu and workspace.

Default Profile Editor layout

Main menu

In the main menu, there are all buttons which allow the user to work with the profile editor. The list of displayed buttons depends on the context selected in the workspace.

Profile editor main menu

Buttons available in the button group Profile:

[table “” not found /]

Workspace

Below, elements available in the profile editor workspace, are listed:

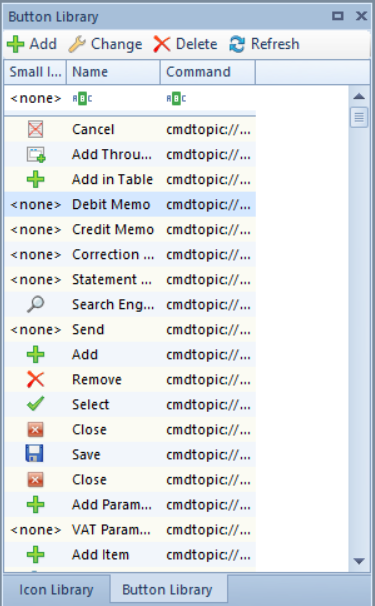
Button Library/Icon Library panel

  • Button library – this tab contains all the buttons created for the purpose of the system
  • Icon Library – contains the icon libraries which can be made available when adding buttons

Button Library panel


Below the panel header, in the Button Library tab, there are buttons useful for managing the changes in the button library. These buttons are the same as those available in the List button group of the profile editor menu.

The Button Library table is composed of the following columns:

  • Small Icon – presents small icon for given button
  • Name – presents button name
  • Command – presents command defined for a button

The tab Icon Library presents the library of icons used in Comarch ERP Standard and it is selected by default. It is also possible to change library.

  • Change library – checking this option allows the selection of a different icon library
  • Library – in this field, it is possible to select an application the given icon library will be applied for
  • Prefix – library providing information about icons
  • Apply – saves the changes made in the icon library

Icon Library panel


Pending Changes panel

Pending Changes panel includes all changes made in the profile before saving it in the database.

Pending Changes panel


Buttons available in the Pending Changes panel are the following:

[Save] – saves the changes made in the profile in a configuration database

[Save and Generate Script] – saves the changes made in the profile in a configuration database and enables to save the changes to a file with .txt extensio

[Undo] – withdraws the changes marked in the Current Changes panel

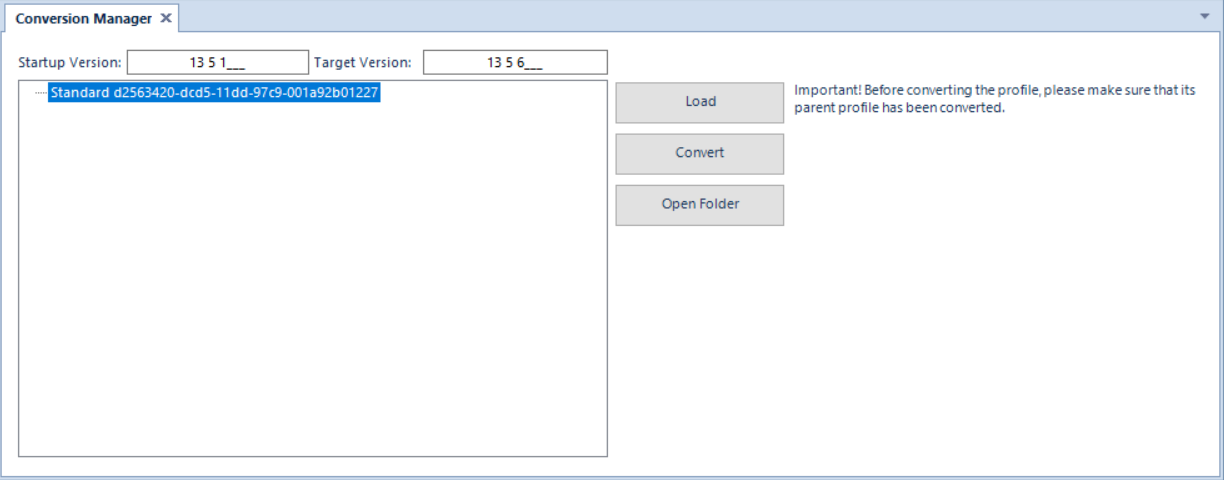
[Track Changes] – clicking on this button in case of saving changes enables propagating those changes to profiles   that are subsidiary to the one being edited by means of Conversion Manager tool

[Emergency Mode] – if changes are saved incorrectly, then this functionality allows for exporting recent changes to an xml file.  The function is dedicated to advanced users

Messages panel

Messages panel contains information about the errors and activities that occurred in the profile.

Messages panel


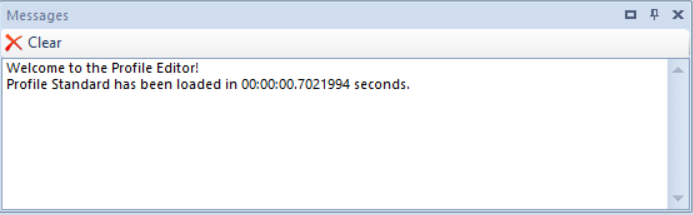
Button [Clear] removes all the messages recorded in the panel.

Explorer panel

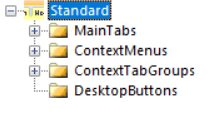
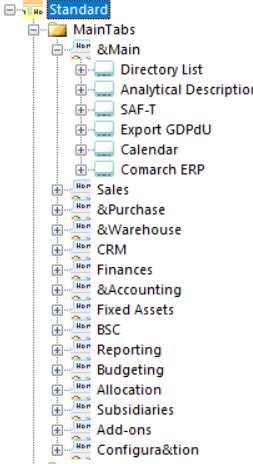
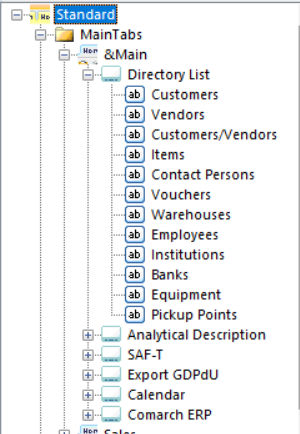
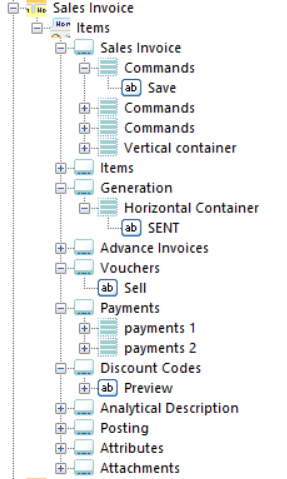
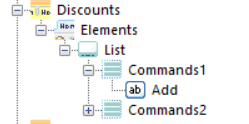
Explorer panel presents the structure of the profile including all its elements.

Explorer panel


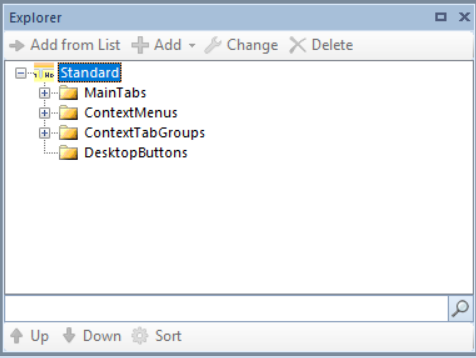
Buttons available below the header of the Explorer panel.

[Add from List] – adds the button selected in the buttons library to the element marked in the Explorer panel

[Add] – adds the selected elements to the element marked in the Explorer panel.  Available options:

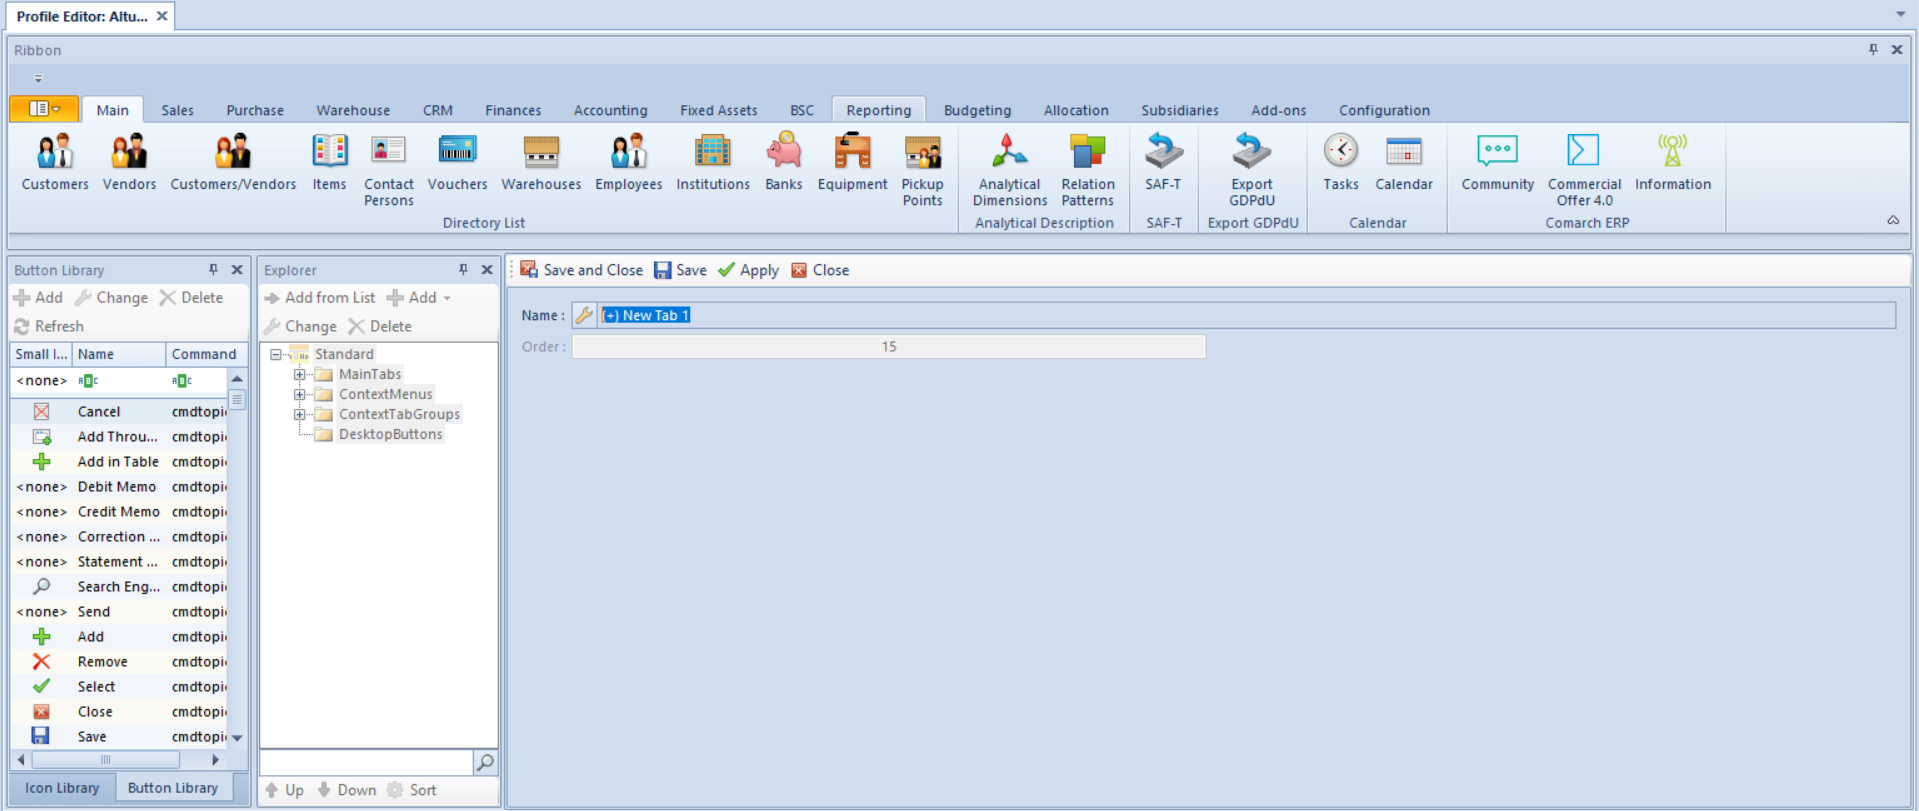
[Add Tab Group] – this button is available only when the highest level of the ContextTabGroups branch is selected A tab group is a set of tabs relating to one context in the system. It can be assigned only to one context and a context may have only one task assigned. Each place in the system is also called a context. Such places are, among others, document lists,   document forms, customer and vendor forms, employee forms, item forms, etc. The name of each tab group is   displayed in Comarch ERP Standard system above the main menu. A specific tab group is the MainTabs branch which is not assigned to any context, hence, it is its individual feature

[Add Tab] – this button is active only for a tab group selected under ContextTabGroups or for the entire MainTabs branch Individual tabs are the main components of the entire profile. They are grouped and assigned to contexts. Normally, a group of tabs contains two tabs, by default, one of which is editable from the level of Profile Editor. It is not, however, prevented from including more tabs in one group.

[Add Group] – this tab is available only for single tabs, which had been added with the help of [Add Tab] button

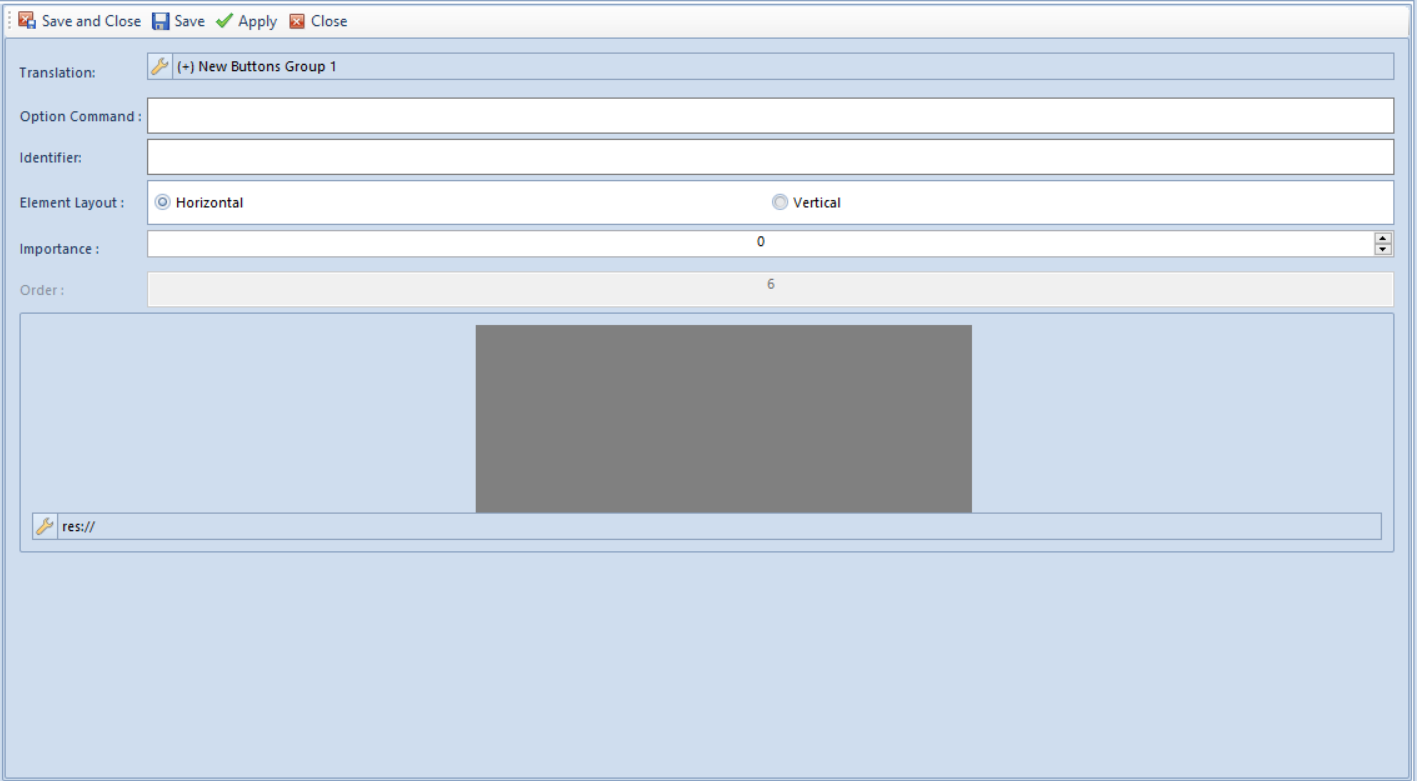
[Add Container] – this button is available for button groups or other containers. Button groups and containers are used to classify buttons in the main menu. Each tab may contain several button groups and containers.  Moreover, button groups can be named and the containers may include other containers   within. Using of button groups and containers improves transparency of tabs.

List button group with four vertical containers, available in Items tab in Sales Invoices tab group.  There are four vertical containers in the button group

Containers can be either vertical or horizontal. Container orientation depends on the position of buttons included   in it. Buttons in a vertical container are arranged downwards, whereas each column contains three buttons, maximum. Buttons in a horizontal container are arranged rightwards, whereas each row contains three buttons, maximum.

Note
The button group Printouts and Reports is generated automatically to each tab created   in the Profile Editor.  It can be neither edited, nor hidden or deleted.

Note
A container becomes visible not until at least three buttons are included in it. Otherwise, the line, which separates the container from other elements of the button group, will not be visible.

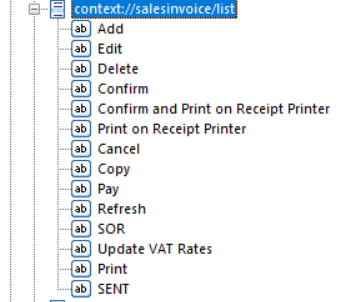
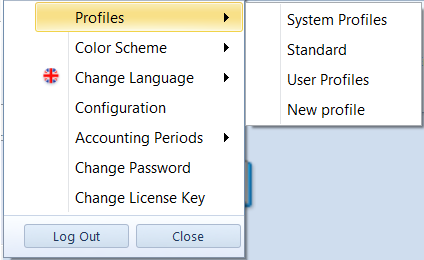
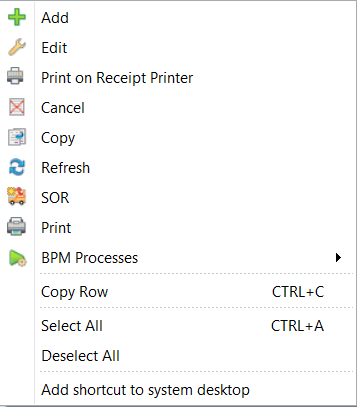
[Add Menu] – this button is available only for ContextMenus branch. A context menu is a group of options which are added to contexts which, in turn, contain lists, e.g., item list, customer/vendor list, invoice list, etc. The menu is activated by clicking the right mouse button. Only one menu can be assigned to each context. All the menus in ContextMenus branch are named after a context they are   assigned to

Example
In order to find the right menu, first it is necessary to find a group of tabs of the same context. A tab group Sales Invoices is attached to the context context://salesinvoice/list (figure below). After typing the context name in the search field of the ContextMenus branch, the menu   attached to the context is found.

Below is the same menu which is visible in Comarch ERP Standard system:

Note
The buttons [BPM Processes] and [Add shortcut to Altum desktop] are added   automatically to each context menu and they cannot be edited, hidden or deleted.

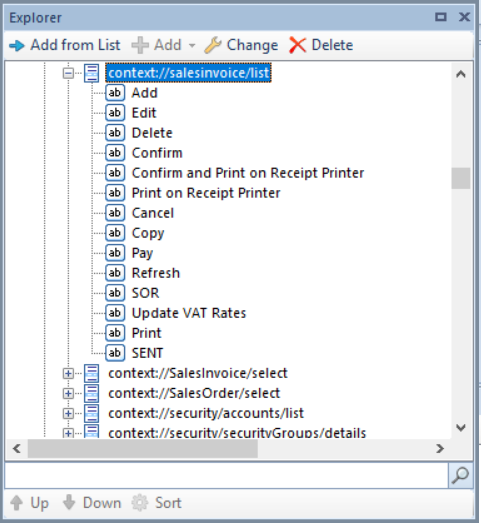
[Add To My Desktop] – this button is available for each single button in a tab. It adds a given button to Comarch ERP Standard desktop

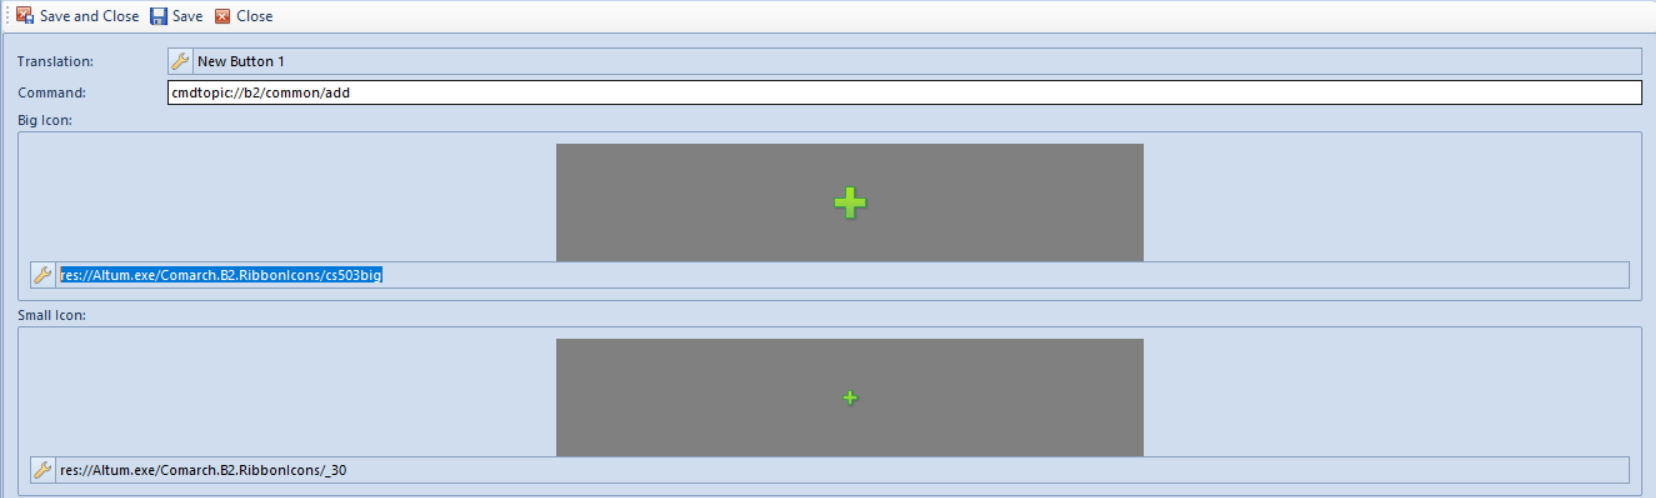
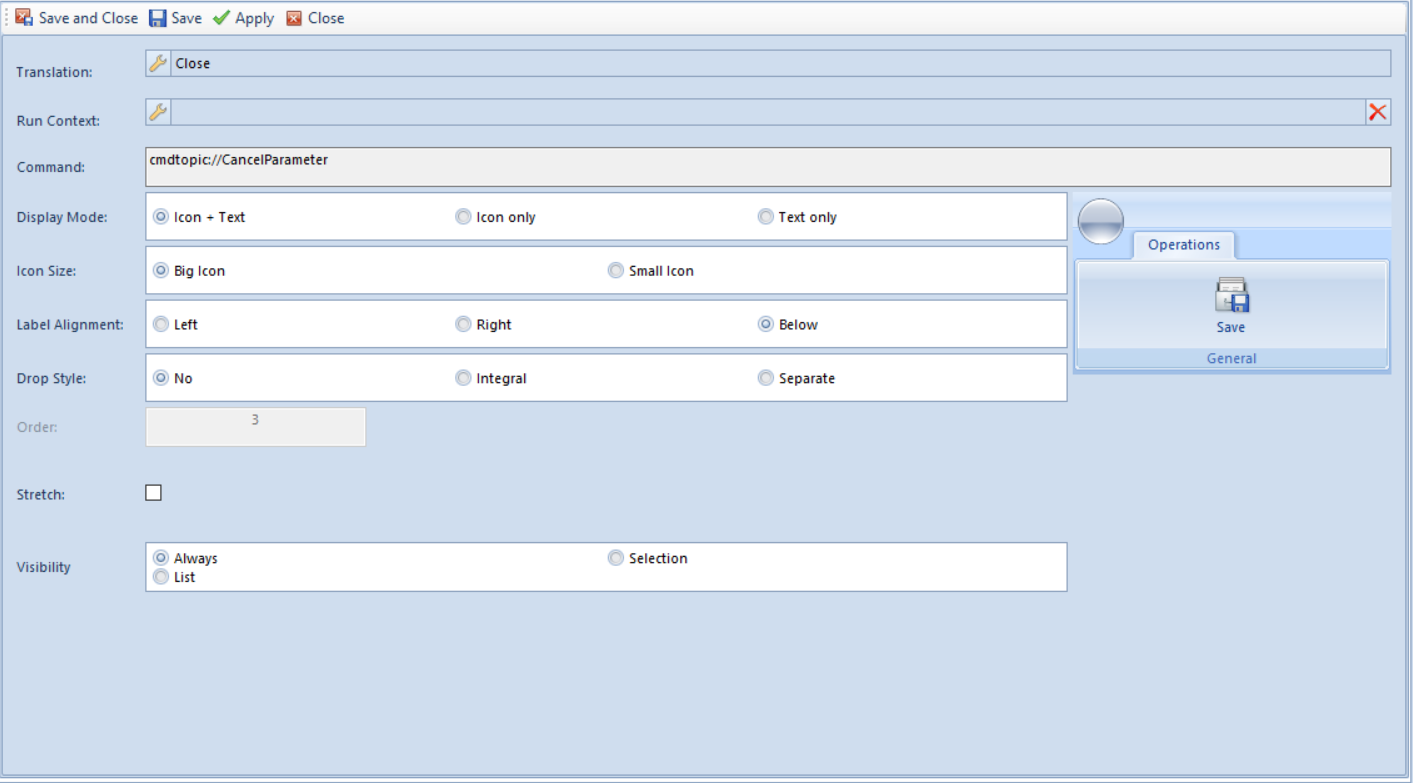
[Change] – opens the element modification window

[Delete] – removes the element marked in the Explorer panel

Buttons available in the lower part of the Explorer panel:

[Search] (magnifying glass icon) – searches through an element marked for filtering a given structure (MainTabs , ContextMenus, ContextTabGroups ) in terms of occurrence of entered phrase

[Up]/[Down] – buttons become active upon marking an element in a given group of elements and allow for chaning ints position against other elements

[Sort] – sorts elements of a selected structure in aplhabetical order

Preview panel

Preview panel simulates the layout of the main menu (ribbon) upon applying the change.

Preview panel


Profile composition

The purpose of the profile editor is to enable the user to interfere in the layout of the main menu (ribbon), context menu, quick access bar, or the ergonomic panel. An easy modification or addition of a profile is possible thanks to the created frame structure of the profile which composition is described in this article

Profile structure

The profile editor is composed, by default, of the Standard profile which can be edited in accordance with the user preferences. By clicking [Load] and selecting the Standard profile, the profile is automatically loaded.

Profile loading window

Each profile is composed of four standard elements: tabs MainTabs,, context menu ContextMenus, context tab groups ContextTabGroups, and desktop shortcuts Desktop Buttons. All these elements can be found in the Explorer panel.

Standard profile elements

The MainTabs branch contains the basic tabs, which are displayed in the main menu right after the system is started. From the level of these tabs, it is possible to open subsequent tab groups which are assigned to contexts.

Profile tabs

Button groups can be added to tabs and particular elements can be added to the groups.  For example, a group Directory List (name of the whole group) and the elements: Employees, Banks, Warehouses etc. were added to the tab Main.

Tab Main along with its elements

Another element of the profile is the context menu ContextMenus:

Context menu for the list of sales invoices and its elements on the tree of profiles

Buttons are added directly to context menus. After adding a button, there is no need to format it (its size, text location, etc.) Each button is formatted automatically.

The last component of the profile is context tab groups ContextTabGroups.

Context tab groups wlong with their elements on the tree of profiles


To the context tab groups, it is possible to add groups/context tab groups (e.g., Chart, Table, Discounts), and to the group/context tab group, it is possible to add a tab Items. Then, to this tab, it is possible to attach button groups (e.g.: Payments) and to the group, it is possible to add buttons (e.g. [Close], [Apply]).

Example
Tab Items is attached to Discounts context tab. Group List, containing containers Commands1 and Commands2, is added to the items. In the Commands1 container, there is [Add] button.

Button

In the profile editor, there is a separate section in the menu which allows for the addition, modification or deletion of a button. A new button can be added by clicking [Add] in the Button Library panel. A button form will then be opened:

  • Translation – button name and its translations in other languages
  • Command – command defined for the button
  • Shortcut to Command – allows to enter an abbreviation to the button by pressing the combination of the keys: Alt+key referring to the command
  • Big Icon – allows the selection of a big icon for given button
  • Small Icon – allows the selection of a small icon for given button

New button form

After defining the new button, it must be saved by clicking [Save] or [Save and Close] in the main menu.

A request to save the button will be registered in the Pending Changes panel. The button can be saved in the configuration database by clicking [Save] in the Pending Changes panel.


Creating and editing profiles

General information

To add a new profile, it is necessary to select button [Add] from the Profile Editor ribbon. A window opens, where the user can define the name of the new profile.

New profile name definition window

A profile can also be defined on the basis of already existing profile. To do this, you need to check the parameter Copy profile and then select a profile from the list of the available profiles. If checked, an appropriate entry, that combines the newly created profile with the profile on the basis of which the former profile was copied, will be created in the database. It won’t be possible to include the changes made in one profile can be included in associated profiles by checking the option Track changes after conversion.

Note
If the Track changes option is not marked, after converting the database to an upper version, it will not be possible to include changes included in the Standard profile in other profiles with the use of the conversion manager.

Message informing about creation of a new profile

The entered changes can be confirmed by clicking [OK]. The message confirming the creation of the new profile will then be displayed.

MainTabs tab

To add tabs to the main tab, mark a tab on the tree in the Explorer panel and then click [Add Tab]. A window presented below will then be opened:

New tab form

To add a tab, first the tab name must be given in the system language. The name can be typed upon clicking on the arrow symbol. In an opened window, apart from specifying the name, it is possible to define its translations in other languages and to define shortcuts. Translation can be provided upon prior selection of a language. After defining the tab name in the system language and possibly in other languages, the specified name must be confirmed by clicking [Confirm]. Setting on order is not required, but the editor allows the user to set the order of tabs in the menu individually.

A shortcut is created automatically for each tab and button (standard and added by operator). The system will select the first letter of the tab name. If there is already another tab or button with name starting with the same letter, the system will select the second letter or, if necessary, the following ones, until the shortcut of the tab or button is unique.

A button group is added to a tab by clicking [Add Button Group]. A button group form is then opened:

New button group

The name of the button group is defined in the group form the same way as in case of tab name.

  • Translation – group name in a given language
  • Option Command – if checked, it is possible to enter a command into the field
  • Identifier – provides information identifying a given group
  • Elements Layout – possible options are horizontal or vertical position of the button group
  • Importance – the bigger natural number the later it is collapsed when decreasing the application window
  • Order – field for specifying the order of buttons on the list
  • Big Icon – an icon can be selected from the list or entered manually

Form for adding new button to a button group

Adding an element (buttons) to a group consists in the selection of an appropriate button group in the Explorer panel to which the button selected in the Buttons Library panel must be added. The selected button must be confirmed by clicking [Append Button] available in the Elements button group. In an opened form, the user may define a target layout of the button in the main menu.

The form is composed of the following fields:

  • Translation – button name which will be displayed in a given language in the main menu. A name is defined in the entire profile editor in the same way (see chapter Main tabs)
  • Run Context – clicking on the button located in this field enables the selection of a context from the list to be run
  • Command – command running the button
  • Display Mode – method of presenting a button Icon + Text, Icon only, Text only
  • Icon Size – the size of the button’s icon; possible options are: Big, Small
  • Label Alignment – position of text against icon, possible options are: Left, Right, Below
  • Drop Style – collapsing method, possible options: None, Integral, Separate
  • Order – order of the button within a button group
  • Stretch – if checked, a button name will be stretched
  • Visibility – determines whether a button will be visible in a mode of List, Selection or Always
  • Quick Access Panel – is available only in the ContextMenus group and if checked, the button icon will appear in the quick access panel; the user may also define an order of the icon on the panel

ContextMenus context menu

A context menu is used in the system in all lists of documents/elements. By clicking the right mouse button on the list of elements, it will be presented in the form of a drop-down menu or a quick access bar which is available below the list. A new context menu is added by clicking [Add Menu] upon prior selection of the ContextMenus on the tree. A context menu form, where the buttons are grouped, is opened.

Form for adding new context menu

The form contains the following elements:

  • Translation – name of the menu in a given language
  • Context Group – enables the selection of context from the list
  • Context – command referring to an appropriate context in the system

Buttons are added to a context menu in the same way as in the case of the MainTabs tab.

ContextTabGroups context tabs

A new group of tabs is added by clicking [Add Context Tab Group] upon prior selection of the ContextTabGroups on the tree. A form presented below is then opened:

Form for adding new tab group

The form contains the following items:

  • Name – tab group name
  • Context – context name
  • Color – setting a color for a tab group

To add a new tab, upon marking a tab group on the structure tree, it is necessary to select [Add Tab] option. The following form is opened:

New tab form

To add a new button group, upon marking a tab on the structure tree, it is necessary to select [Add Button Group] option. The following form is opened:

New button group form

Group of buttons and buttons are added to the context menu in the same way as in the case of the MainTabs tab.

DesktopButtons desktop shortcuts

In Comarch ERP Standard, it is possible to add icons – shortcuts to a given place in the system. However, this option is available only for buttons in the Main Tabs.

In order to add a button icon to Comarch ERP Standard desktop, the option Add To My Desktop can be used, which is called from the drop-down menu upon clicking on the button [Add] in the Explorer panel menu. This option is active if in the Explorer panel an element located on the lowest level of the tree, i.e., a button, in the Main Tabs is selected. Upon selecting the option Add To My Desktop and saving changes, entry for a given button is copied to the DesktopButtons.

Adding icon to the DesktopButtons section

The button will appear on the desktop upon restarting the system.

Icons on desktop

Upon adding an icon, it is possible to:

  • freely arrange icons on your desktop of Comarch ERP Standard system, on the same basis as it is done in Microsoft operating systems
  • double-click on icon to activate the functionality associated with a given icon
  • activate context menu upon clicking the right mouse button on the icon or on desktop. Options available in context menu are the following:
    • [Show Small Icons] – changes size of icons displayed on the desktop
    • [Delete All Shortcuts] – removes all icons from the desktop
    • [Align Icons to Grid] – icons will be aligned according to grid
    • [Sort By Name] – icons will be sorted by name and arranged one under another, starting from the left upper corner
    • [Restore Default] – – if selected, the default icons layout on desktop is restored
    • [Show Web Toolbar] – shows a toolbar with references to community portals
  • Activate context menu for a given button by clicking on it with the right mouse button. The context menu contains the following options:
    • [Open] – opens a reference
    • [Delete] – removes a shortcut
    • [Properties] – opens the button properties window. In this window t is possible to enter translation of the button name in different languages and change the icon.

Context menu for a button


Conversion Manager

The conversion manager is a tool allowing for generating a script containing the differences between versions. The script can next be run in a selected profile generated on the basis of a standard profile with enabled tracking changes option. The script will add all the newly added buttons referring to the functionalities implemented in this version.

As in the case of the profile editor, the conversion manager can be started by selecting an appropriate button on the database manager ribbon.

Menu with highlighted Conversion Manager button


The conversion manager window contains the following buttons:

[Load] – uploads the profiles stored in a configuration database. The profiles are presented in the form of a tree – the profile, on the basis of which the other profiles were generated, is displayed on the top

[Convert] – creates a script which contains all the buttons available, by default, in the field Target Version

[Open Folder] – opens the location of a generated script

Conversion Manager window

In the Conversion Manager window, there is also information about the profile versions. Start and target versions are the points of reference for the generated scripts.

In the conversion manager, Track Changes option plays an important role. It can be checked while creating a new profile or saving changes made to the profile. Checking this option results in associating the two profiles. The original profile is the parent profile, while its copy, that is a newly generated profile, is the child profile. During conversion of a child profile, a script, which copies all the changes from parent profile to child profile, is generated. That script must be executed manually on configuration database.

Conversion Manager window with the tree of profiles available for the configuration database

When converting profiles, the system uses numbers of configuration database versions. Before starting the conversion of profiles, it is necessary to know the version of configuration database before its conversion. Version can be checked in the database manager in the main menu with the use of button [Check Version] available in Configuration Database button group. Moreover, the table below presents subsequent versions of Comarch ERP Standard system and configuration databases starting from version 5.5.

Comarch ERP Standard versionConfiguration database version
5.55.5.154
5.5.15.5.157
5.5.25.5.182
5.5.35.5.192
5.5.45.5.212
6.06.0.103
6.16.1.37
6.26.2.32
6.36.3.31
2015.07.0136
2015.17.1.14
2015.27.2.32
2015.57.5.36
2015.67.6.9
2015.6.17.6.9
2016.08.0.93
2016.18.1.29
2016.58.5.93
2016.5.58.5.104
2016.5.68.5.104
2017.09.0.57
2017.19.1.14
2017.59.5.86
2017.5.19.5.90
2018.0.110.0.95
2018.110.1.40
2018.1.110.1.41
2018.210.2.6
2018.510.5.49

Note
A profile for which the option Track Changes was not checked during its generation cannot be converted.

Note
Profiles must be obligatorily migrated after migrating Comarch ERP Standard system to a later version. During migration of configuration database, version of only Standard profile is upgraded. All other profiles need to be migrated manually with the use of Conversion Manager.

Note
If upgrade of system involves a big leap between versions, e.g., migration from version 5.5.x or 6.x to 2016.x, the generated converting script contains several tens of thousands of lines. Problems may occur in the SQL service, concerning execution of such large scripts. In such case, it is recommended to divide the script into smaller parts and convert a profile gradually from version to version, by specifying subsequent numbers of versions in fields Start Version and Target Version.


Assignment of profiles to user groups

Each profile can be assigned to any user group. Profiles are assigned on the form of selected operator group.

Forms of operator groups contain tab Profiles, in which it is necessary to assign a profile to a group.

Tab Profiles on the form of operator group

The tab Profiles is divided into two panels. In the first panel on the left, there are all the profiles not assigned to the edited operator group, whereas profiles assigned to the group are presented in the panel on the right. The number of profiles available for a single user depends on the number of operator groups the user is assigned to and on the center of company structure to which the user is currently logged on.

After assigning profiles, it is necessary to restart the system to be able to select new profiles in menu System Profiles.

Porifles menu in Comarch ERP Standard