The functionality of configuration tools allows for automatic generation of the following data:
Codes and/or names for newly added items
Codes for newly added customers/vendors
Numbers for newly added vouchers
Codes for newly added coupons
Thanks to configuration tools, a user can maintain nomenclature cohesion and coding present in the system.
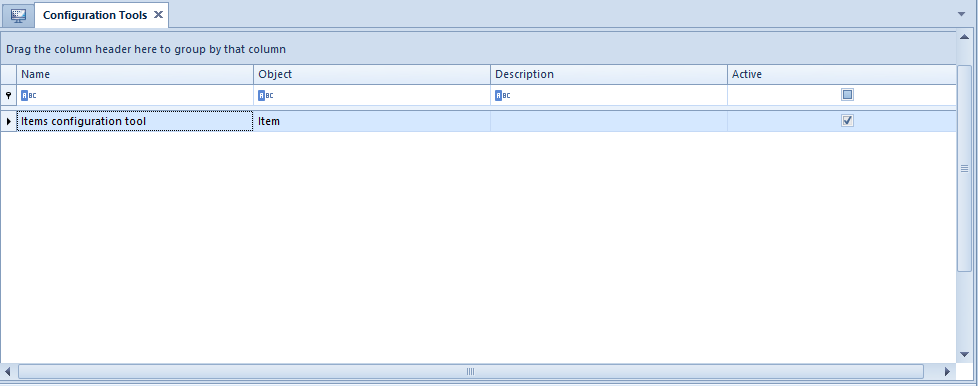
The list of configuration tools is available from the level of Configuration → General → Configuration Tools.
List of configuration tools
Defining a configuration tool
To add a new configuration tool, it is necessary to select [Add] button, which is available in the list of configuration tools.
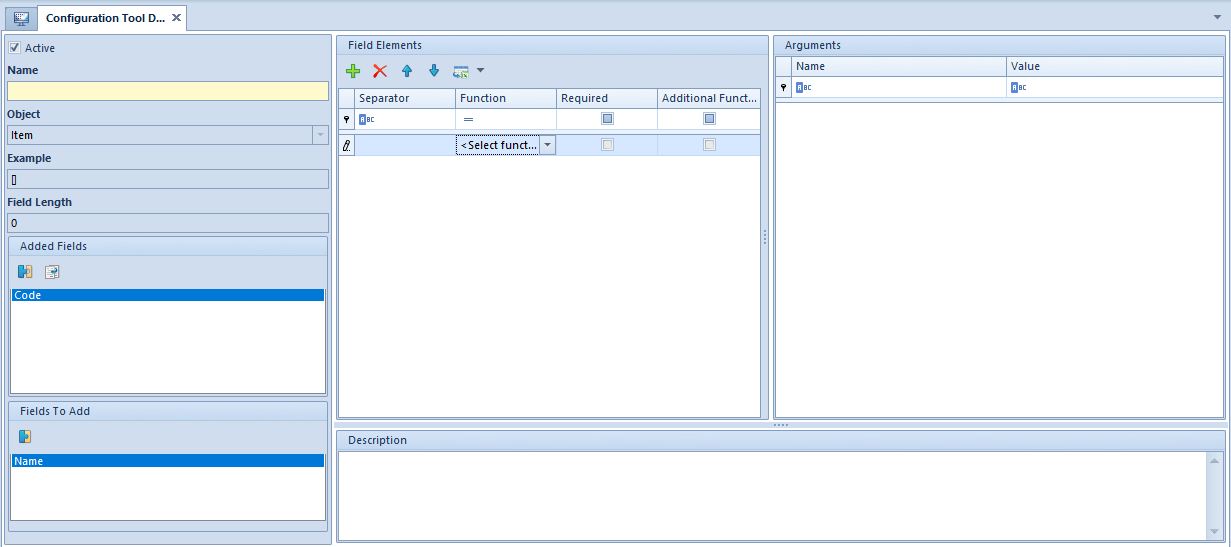
New configuration tool form
Configuration tool header
The header of a configuration tool form contains the following fields and sections:
Parameter Active – checked by default. Its deselection will make it impossible to use the configuration tool for generating object codes/names.
Name – mandatory field
Object – drop-down list of objects for which it will be possible to use the configuration tool:
Item
Customer/Vendor
Voucher
Discount Coupon
If the user selects the object Discount Coupon, the field will automatically be grayed out, regardless of the fact that the configuration tool has not been saved. In this case, a function Document SeriesCode is added. Only after this function is deleted can the user modify the field Object again.
Example – presents the structure of a configuration tool, composed of subsequent elements composted in section Field Elements
Field Length – presents total of characters presented for the argument Number of Characters in Arguments section, for each field element
Added Fields –fields to be defined with the use of the configuration tool, transferred from Fields To Add With the use of the [Detach] button, it is possible to move a given field back to the section Fields To Add.
Hint
The button [Copy], available in the Added Fields section, can be used during the creation of a configuration tool for Item object. It copies elements of an already added field and moves them to a field which is not added yet. This way, the user can move elements of the Code field to the Name field (such field will be added to the section Added Fields) and vice versa.
Fields To Add – fields which can be defined with the use of a configuration too. With the use of the [Attach] button, it is possible to move a given field back to the section Added Fields.
Section Field Elements
In Field Elements section, the user can define components of a field selected in the Added Fields section. Depending on configuration tool object, it is possible to use different functions to define field elements.
A subsequent element of configuration tool can be added/deleted with the use of the buttons [Add]/[Delete], whereas the order of elements in the configuration tool are set with the help of the [Up]/[Down] arrows.
Section Field Elements contains the following columns:
Separator – allows for entering a character which separates subsequent segments of defined code, name or number. In the case of empty character, the next element specified with given function is added to the previous one.
Function – allows for selecting from a drop-down list an expression which must be included in defined code, name or number. Codes, names and numbers of an object which are created with the use of a configuration tool, can be created by using various functions that refer to fields existing in the system. Depending on a configuration tool object and field type, the following functions are available:
Attachment
Attribute
Brand
Center
CN Code
Customer
Discount coupon
Document series code
Group
Manufacturer
Mask
Name
Price
SKU
Subsequent Number
Voucher Sort Series
Warehouse
Each function must be described with a set of arguments available in section Arguments. Depending on the selected function, there will be miscellaneous data displayed, which must be defined. Detailed description can be found in chapter <<Arguments>>
Required – column displayed for Item and Customer/Vendor Selecting this parameter means that it will not be possible to save customer/vendor or item form if no value is provided for this field element
Additional Function – column displayed for Item and Customer/Vendor If the parameter is selected, it means that a function will not be included in the code or name of a customer/vendor or item. For instance, the function Price is an additional function which purpose is to add an item to a price list during new item generation. Another example is the function Attachment which purpose is to add an attachment during new item generation
Section Arguments
The content of Arguments section depends on the function selected in section Field Elements. Below are the following arguments which can be defined:
Field – this argument is used for functions that refer to other objects than customer/vendor or item form. The argument indicates from which field of the associated object a value should be taken to create a code/name.
Example
The user wants a part of a code/name to depend on a manufacturer indicated on an item form. To do so, it is necessary to add the field element Manufacturer to the item form and defines Field argument, which allows to specify whether the name of a manufacturer should be retrieved from field Code, Name, Description or Attribute.
Attribute Name – this argument enables to indicate which attribute would be considered in the configuration tool
Level – this argument is connected with the function Group. It enables to mark an item group from which values will be included in the configuration tool
Number of Characters – this argument enables to indicate the length of a given customer/vendor/item code segment
From Character – this character enables to indicate from which character a value should be taken to a code segment. Values are very often entered in given fields in accordance with a certain pattern, in which part of the value is common for many objects and only its further part differentiates a given object
Completion of Missing Characters – parts of a code can be supplemented with additional characters in order to maintain a uniform code structure. The argument can be used when a value on the field indicated in the configuration tool has smaller number of characters than an argument value Number of Characters and a code length should be maintained
Completion Sign – this argument enables to indicate with which value a code part should be entered in the case when completion of missing characters was set for this function
Price List – argument used for Price Allows for indicating a price list from which the price making part of the code should be retrieved/
Currency – argument used for Price Allows for indicating a currency whose sign will make part of the code
Price Type – argument used for Price Allows for indicating the type of price (subtotal or total) whose sign will make part of the code
Available at Batch Addition – this argument indicates whether given function must be available in the matrix for batch addition
Values Attached at Batch Addition – this argument is dedicated for these functions which refer to objects that have a list of values and which are available at batch addition. This argument will decide if only default value or the full list of values will be displayed after activating the option of batch addition in the filter of a given function. An example of the function for which this argument can be applied is Brand
Default Value – this argument allows for specifying default value for selected function. It is mandatory for the function with checked parameter Available at Batch Addition
Number of Characters – this argument enables to define the number of digits that the Subsequent number function should contain
Start Number – allows for indicating the value with which numbering of records should start. This argument is important This argument is very important when combined with the argument Numbering Unique Codes.
Numbering Unique Records – allows for determining whether in case of using Subsequent Number function only duplicated values should be numbered or unique values too
Example
The user does not want to number unique records, but wants the first duplicated record to be marked with number 2, so checks the parameter Numbering Unique Records and defines Start Number as 2. With a configuration tool defined this way, the records can look in the following ways:
BD-12345678-1134-370 – first record
BD-12345678-1134-370-002 – duplicated record
Code Format – this argument enables defining of a regular expression. The function id constructed according to RegEx syntax, similarly as <<code format in definition of item group or customer/vendor group>>. In case of random characters, the following sets can be used:
[A-Z]
[a-z]
[0-9]
Example
Code format in the following form: [a-e]{3}[0-1] will generate string of characters composed of 4 elements. The first three of them will be selected from set {a, b, c, d, e}, while the last one will be selected from set {0, 1}.
Note
The following expressions are not supported:
Expressions containing special characters
\d
\w
\s
*
+
{n,}
Language – argument used for functions whose values can be saved in different languages
Defining new operator group
To create a new operator group, it is necessary to select the button [Add] from Groups button group, placed in ergonomic panel above the list of operators. A newly opened form of an operator group contains the menu with standard buttons of saving changes and closing without saving changes.
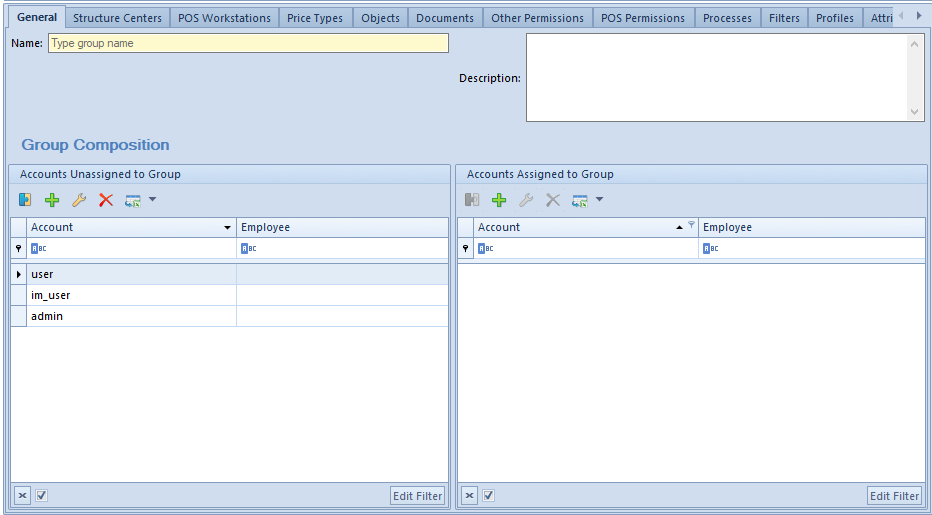
New group form ─ tab General
Tab General
In the upper part of the tab General, there is a mandatory field Name, where it is necessary to specify the name of the newly created operator group. In Description field it is also possible to provide additional information which will be presented on operator form, in section Operator Groups/Other Groups.
Group Composition section is divided into two windows:
Accounts Unassigned to Group ─ list of all operators defined in the system
Accounts Assigned to Group ─ list to which selected operators, making part of a defined group, are added
By selecting the buttons [Add To Group] and [Remove From Group], it is possible to decide which operators will be assigned to the newly created group.
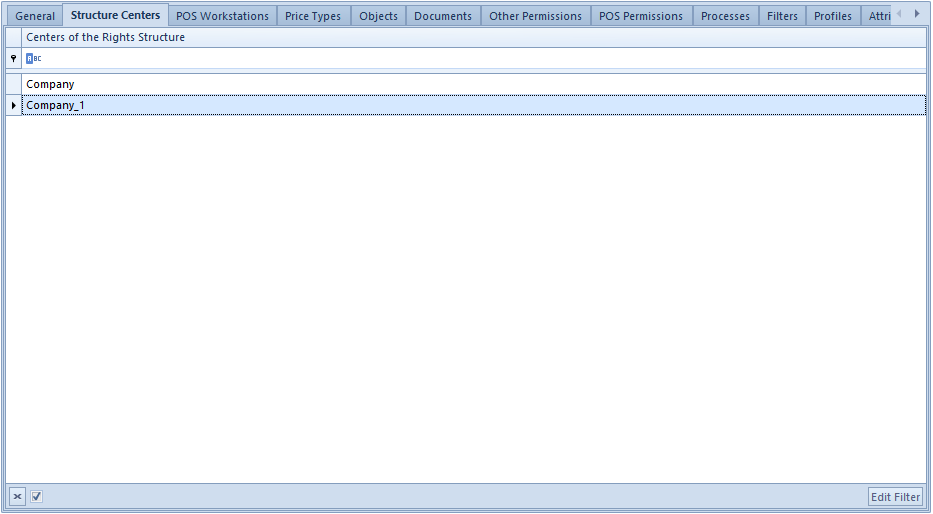
Tab Structure Centers
Here it is necessary to add centers of the company structure the newly added operator group will be attached to. Owing to that, operators from that group will be able to login to the attached center.
New group form ─ tab Structure Centers
Tab POS Workstations
To the newly created group can be added POS Workstations to which operators of that group will be able to log in. To do so, it is necessary to click on [Attach] button and select from the list of workstations the workstations to be attached to the group. To detach workstations from the group, it is necessary to highlight it and select [Detach] button.
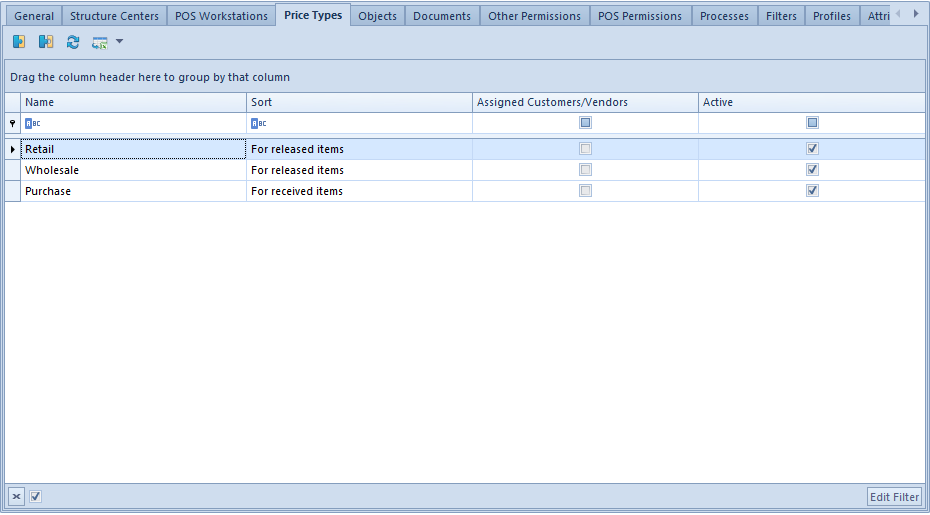
Tab Price Types
Thanks to the possibility of assigning a price type to an operator group, operators from that group can have access to price lists defined on the basis of the attached price type.
New group form ─ tab Price Types
The list of attached price types displays information about name and sort of price type, assigned customers/vendors and activity status of a given type.
Tab Objects
Here the operator assigned to group B2_admin may manage permissions of an operator group to objects defined in the system.
New group form ─ tab Objects
The list of objects provides information referring to Area in which a given object is included as well as its Type (name). To each object the following rights can be granted:
Read – the right to accessing the basic list of objects of a given type and previewing its details
Add – the right to adding a given object type in the system
Modify – the right to editing (modifying) saved documents (objects) of given type
Delete – the right to removing objects of given type
In the menu there are buttons used for managing permissions. A user can select option All Permissions or select particular permissions to any object from the list.
Buttons of managing permissions
With the use of the key combination Ctrl + A, it is possible to highlight all rows of the list and select/deselect a given permission for all the objects at the same time.
It is also possible to select/deselect permissions directly from the list level by checking/unchecking parameter in a column with given permission.
Example
A user has all permissions to a given object granted, but cannot edit it. This can be connected with the fact that this object may be using other objects to which the logged in operator is not entitled to.
For instance, if the user does not have the right to read payments and is attempting to edit a registered sales invoice, he will not be able to preview that invoice (despite having all the rights to the object of sales invoice type).
Note
During database conversion to the recent version of Comarch ERP Standard, permissions to Report object, that is Cash-Bank Report, will be granted automatically to all operators in all groups.
Tab Documents
Detailed description of the tab can be found in article Document types.
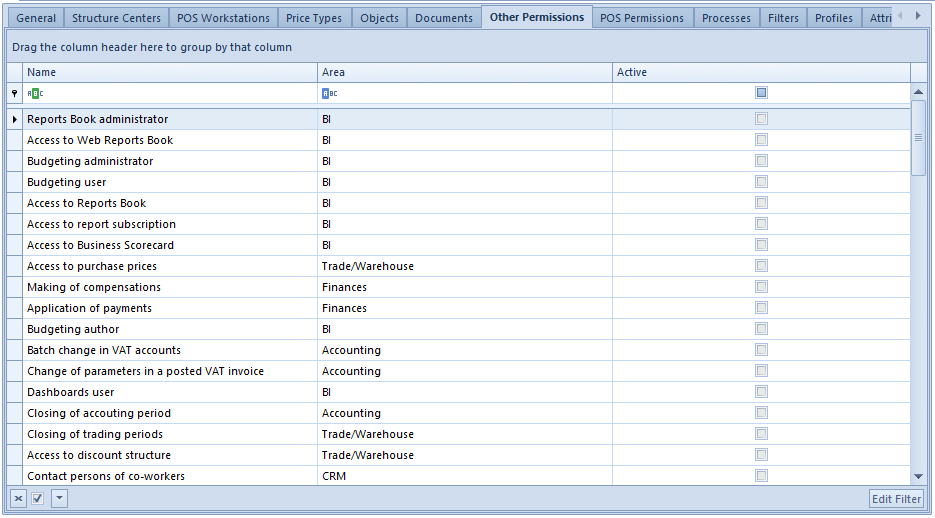
Tab Other Permissions
From the level of this tab, it is possible to assign permissions to operator groups, which concern performing of specific actions in particular areas of the system.
New group form ─ tab Other Permissions
Assigning of permissions is performed with the use of [Select]/[Deselect] buttons in the menu or directly on the list, in Active column.
List of permissions from General area:
Batch addition of items
Update of item codes/names – defines the right to updating codes/names of items in Batch Operations section
Creation of many sessions – possibility of logging in many times to the system
Batch operations on attachments ─ detailed information
Management of object availability in the rights structure
Access to the system configuration – permissions to the system configuration available from the level of System → Configuration
Using of free document number ─ possibility of using free numbers from a pool of numbers available in the numerator on accounting and trade documents
Creation of SAF-T files
Creation of SAF-T files
Modification of interface – if this parameter is checked, for an operator there will be option Customize Layout available under the right mouse button
Configuration of object change history ─ provides permissions to configure the history of object change available from the level of History → Configuration
Access to the history of personal data modifications – permission to previewing detailed history of changes applied on a customer, contact person or employee form
Descriptions of the other permissions can be found in articles dedicated to corresponding functional areas of the system. [Trade/Warehouse, Finances, Accounting, CRM, BI]
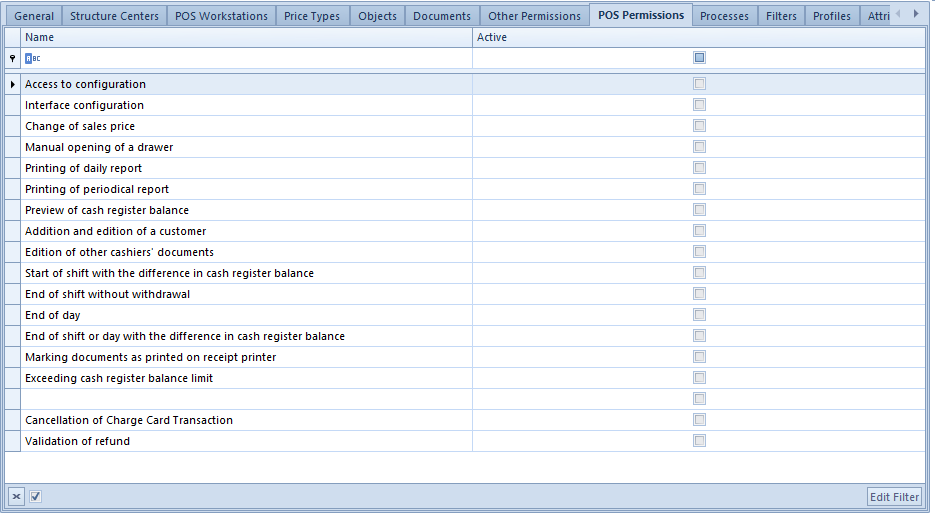
Tab POS Permissions
In this tab, permissions to POS workstations are granted for a given group of operators.
New group form ─ tab POS Permissions
Detailed description of permissions can be found here.
Tab Processes
In this tab, it is possible to add and remove selected BPM processes by clicking on the buttons [Attach] and [Detach].
Tab Filters
This tab includes all filters created with the use of filter builder and attached to an operator group.
By means of clicking on [List] button, which redirects an operator to the list of filters, it is possible to define a new filter and attach an operator group to it. Owing to that, operators from that group can use the attached filters.
Tab Profiles
In this tab, by means of clicking on the buttons [Attach] and [Detach] it is possible to associate profiles created with the use of Profile Editor with operator groups. Owing to that, operators from a given group, upon logging in to the system, will have access to functionalities shared within the attached profile.
Tab Attributes
In this tab, it is possible to attach attributes to an operator group.
Operator’s account
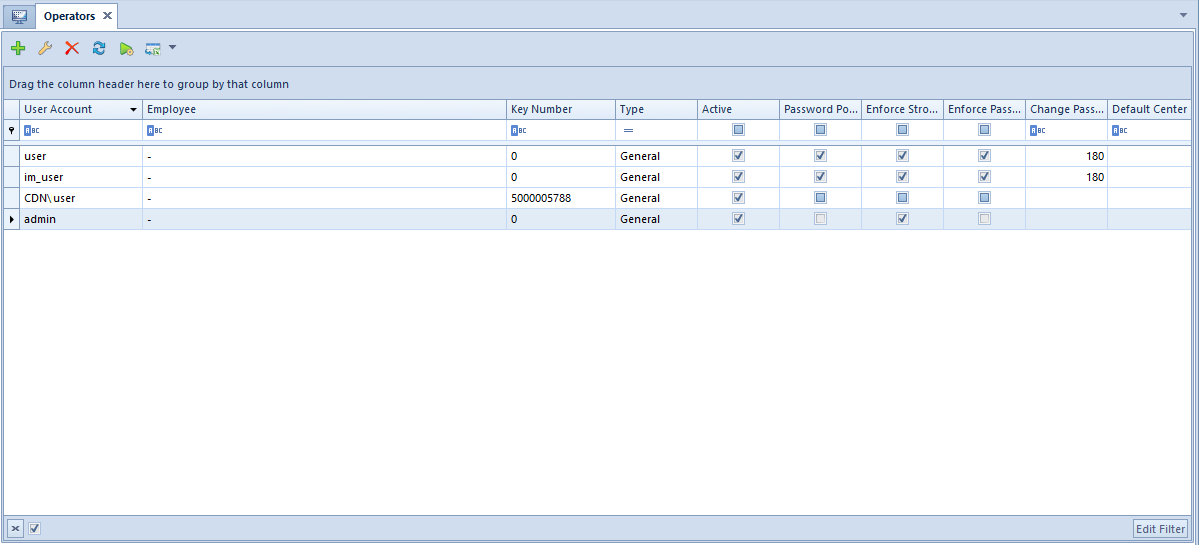
List of operators’ accounts
Only an operator assigned to group B2_admin can manage accounts of operators. For other users, option Operators, available from the level of the menu Configuration → Company Structure, is inactive.
List of operators
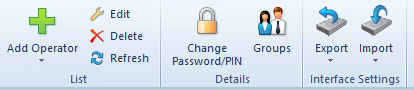
In the menu of the list of operators defined in the system, the following button groups are available:
List – <<standard buttons>> allowing for managing the list
Details – buttons used for defining passwords and managing associations with the group
Change Password/PIN – change of operator’s password
Groups
Interface Settings – allows for managing interface settings for a highlighted operator
Export – button active upon marking one operator, it allows for saving the settings of forms and lists to a file. It is possible to select one of the following options: Export Forms Only or Export Lists Only
Import – button active upon marking one or more operators, it allows for importing interface settings of forms and lists from file for the marked operator(s). It is possible to select one of the following options: Export Forms Only or Export Lists Only The import is carried out upon confirming message: “Interface settings for all selected operator groups will be overwritten with settings from the file. Do you want to import?”. In case of selecting file with invalid format, an appropriate message is displayed.
Menu of the list of operators
In the system, the following operator types are available:
Internal – operator who has login on SQL server and can log on to Comarch ERP Standard system
External – operator who is not associated with login on SQL server and cannot log on to Comarch ERP Standard system. Such operator can log on to other applications, e.g., Comarch POS.
General – operator with two login passwords: SQL and internal password, who can log on to both Comarch ERP Standard and other applications.
Note
In case of converting a database from previous system versions, the following types will be assigned to operators:
General – if operator’s account has not been associated with an employee or has been associated with one employee only
Internal – if operator’s account has been associated with an employee who has also been associated with other operators
Adding a new operator
In menu List, it is necessary to select button [Add] and select an appropriate operator type – Internal, External or General. Depending on selected type, a form for adding a new operator oopens.
Form of new operator of General type
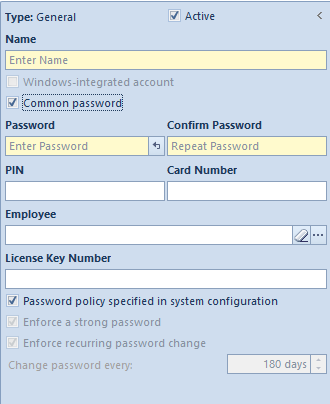
Fields and parameters common for all operator types:
Type – not editable field, indicates type of operator being defined
Active – parameter selected by default. Unchecking the parameter makes it impossible for an operator to log on to the system.
Name – field used to insert a unique operator name
Receipt Printer Symbol – allows for entering the name of the operator which will be printed on documents printed on receipt printer. By default, the option of copying operator’s name is checked and it can be changed or remain empty.
Password – the user can insert a login password manually or use [Generate Random Password] button
Confirm Password – field for verification of the password entered in the field above
PIN – number composed of 6 digits maximum for the purpose of logging in to external applications
Card Number – electronic card number (up to 50 characters) used for the purpose of logging in to external applications
Employee – this field allows for selecting an employee in order to associate it with operator’s account. The field contains […] button, clicking on which opens the list of employees defined in the system. In the system, it is possible to associate the same employee with many internal operators but only with one external or general operator. When attempting to attach such employee to an operator, an appropriate message is displayed.
License Key Number – number of license key, used while registering Comarch ERP Standard system
Password policy determined in system configuration – once this parameter is deselected, the user can separately define the following parameters for a specific operator:
Enforce a strong password – if this parameter is selected, the operator’s password should be composed of minimum 8 characters, and contain at least one upper- and one lower-case letter, at least one digit, and at least one of the following special characters: (!@#$%^&*(){}[]\|:”;'<>?,./).
Enforce recurring password change – checking the parameter allows for specifying password expiration date.
Note
The operator WMSadmin is not subject to password policy. It is not possible to edit the abovementioned parameters on the form of such an operator.
For Internal and General operators, the following option is available:
Windows-integrated account – if name is specified in domain/user scheme for an operator, this parameter is automatically checked and the operator’s account will be tantamount to his Windows-integrated account. Additionally, option <password from Windows> will be available. in fields with password
The following option is available for General operator only:
Common Password – this parameter is checked, by default, which means that password specified for an operator is the same both for login to Comarch ERP Standard system and other external applications, e.g., Comarch POS. If the parameter is unchecked, field External Password is displayed along with password confirmation option.
Operator form – parameter Common Password
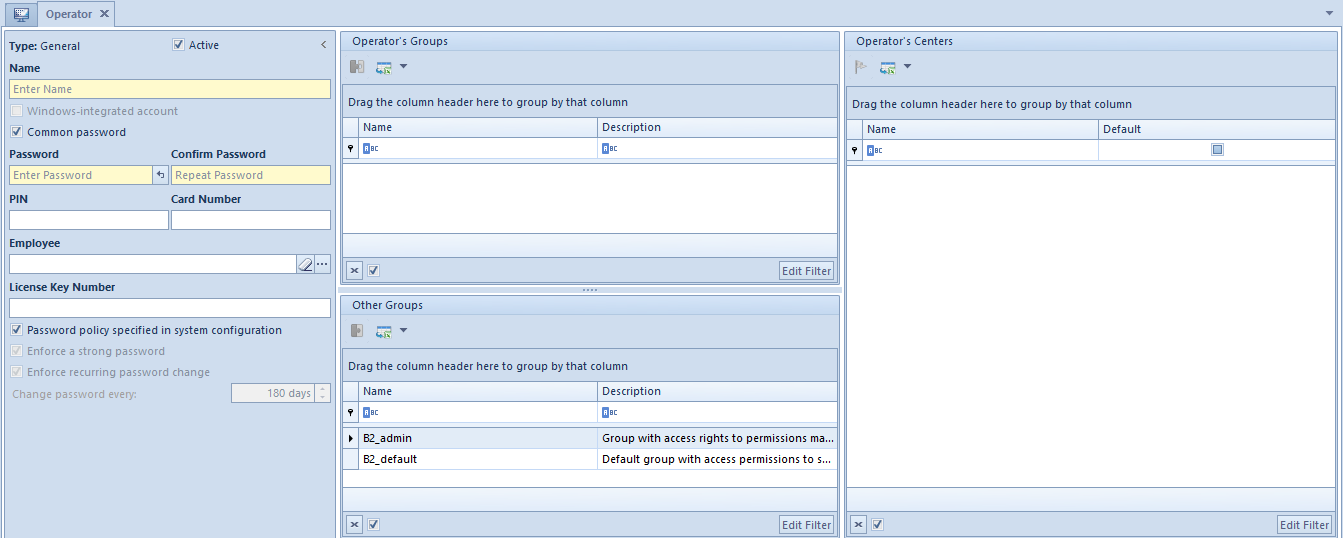
In the middle part of the form, in sections Operator Groups and Other Groups, the user can assign an operator to appropriate groups, with the use of [Add To Group]/[Remove From Group] buttons. In this place, it is also possible to define a new operator group – menu Groups.
On the right side of the form, in an information window, operator’s Centers of Structure are presented in accordance with the group to which the operator is assigned.
After entering all necessary data and confirming them with the [Save] button, the newly added operator appears on the list.
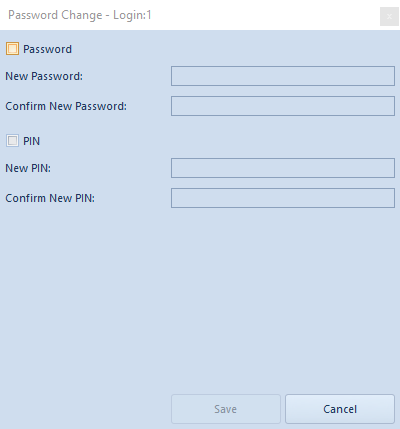
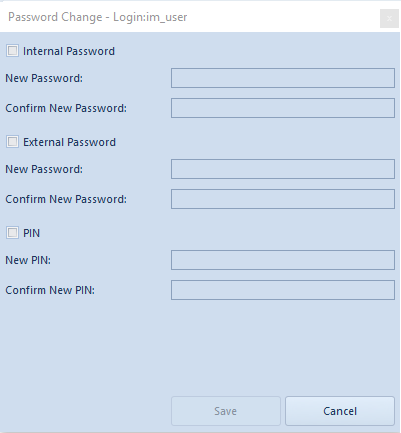
Changing operator’s password
Operator’s password/PIN can be changed both from the level of operator list as well as operator form, in menu Details. Upon clicking on the button [Change Password/PIN] a windows for changing credentials opens. After selecting an appropriate option it is possible to edit relevant fields.
To change a password/PIN, it is necessary to enter current password/pin, new password/PIN and confirm it.
Window for changing password for Internal operator
For a General operator, instead of the possibility of changing one password, the following options are available: Internal Password and External Password
Window for changing password for General operator
An operator with administrator permissions is able to change passwords of other operators without necessity to enter their current data.
s not possible to change password for currently logged-in operator whose account is defined as Windows-integrated account. The button [Change Password/PIN] opens the window for changing internal password and PIN. A Windows-integrated account password must be changed in Windows. [/alert]
Examples of using configuration tools
Below, exemplary situations in which it is possible to use configuration tools in order to maintain nomenclature cohesion of objects present in the system, are described.
Example
In CA Clothes&Beauty company customer/vendor must have information about country prefix and subsequent number on the list included in its code.
First, it is necessary to determine country prefix as a value of attribute assigned to center in which a given customer/vendor is added to the system. In order to do so, the following data is entered by a user. To do so, the user adds attributePrefix of List type with the following values: FRA, POL and GER. Then, assigns the attribute to the objectCompany Structure Center and assigns appropriate attribute values to particular company structure centers.
Then, the user adds a new configuration tool for Customer/Vendor object with attached field Code and the following functions selected:
Center – this function must retrieve 3 characters of country prefix and therefore, in the function arguments, the following options are defined for it:
Field – Attribute
Attribute Name – Prefix
Number of characters – 3
From Character – 0
Subsequent Number – this function must provide subsequent number of a customer/vendor and therefore, in the function arguments, the following options are defined for it:
No Separator
Number of Digit –10
Start Number – 1
Numbering of Unique Codes – selected
Next, the saved item configuration tool must be attached to customer/vendor group pattern. In order to do so, option Configuration Tool must be selected instead of Code Format next to Code field and appropriate configuration tool must be selected from the list.
When adding a new customer/vendor from the level of center Trade Department (POL), the customer/vendor code will be automatically filled in with default values according to the defined configuration tool functions: POL0000000001.
Adding a subsequent customer/vendor from the level of center Trade Department (FRA) will automatically fill in its code with values: FRA0000000001.
Example
In CA Clothes&Beauty company code of each item included in item group Clothing must include information about item manufacturer, its brand, CN code and year of manufacturing, as well as have an image assigned.
Before adding a configuration tool, the user has to:
Add attribute Year of Manufacturing of List type with values, g., 2014, 2015, 2016 and attach it to object Item
Manufacturer – this function must retrieve only first four characters from manufacturer code and therefore, the following options are defined for it:
Default value – COMARCH
Number of characters – 4
From Character – 0
CN Code – this function must retrieve two characters of CN code, starting from 6. sign of a code and therefore, the following options are defined for it:
Field – CN Code
Default value – 85299092
Number of Characters –2
From Character – 6
Brand – this function must retrieve four characters from brand values, whereas in case of a shorter expression, it must replace the first character with an underline “_” and therefore, the following options are defined for the function:
Field – Value
Default value – ABC
Number of Characters – 4
From Character – 0
Completion Sign – “_”
Completion of Missing Characters – Prefix
Attribute – this function must retrieve Year of Manufacturing attribute and therefore, the following options are defined for it:
Attribute Name – Year of Manufacturing
Default Value – 2016
Number of Characters – 4
From character – 0
Attachment – this is an additional function which must automatically add a specific image to a new item and therefore, the following options are defined for it:
Default value – any attachment added in Comarch ERP Standard system
Next, the saved item configuration tool must be attached to Clothing item group. In order to do so, option Configuration Tool must be selected instead of Code Format next to Code field and appropriate configuration tool must be selected from the list.
When adding a new item to Clothing item group, code/name of the item will be automatically filled in with default values according to the defined configuration tool functions: COMA92_ABC2016. Moreover, that item will have attribute Year of Manufacturing with value 2016 attached in tab Attributes as well as a selected image added in tab Attachments.
Changing manufacturer, CN code, brand or attribute values on the form will update relevant value in item code/name.
Operator groups – General information
The list of operator groups is available in the menu Configuration → Company Structure → Operator Groups.
There, the user can also add or edit groups and assign new operators to them. Also, all permissions to objects in the company structure are defined from the level of operator groups.
Note
Each modification of permissions for an operator group requires logging out and then logging in to the system again.
To be able to manage Operator groups the user must belong to the group B2_admin, otherwise buttons [Operator Groups] and [Operators] are grayed-out.
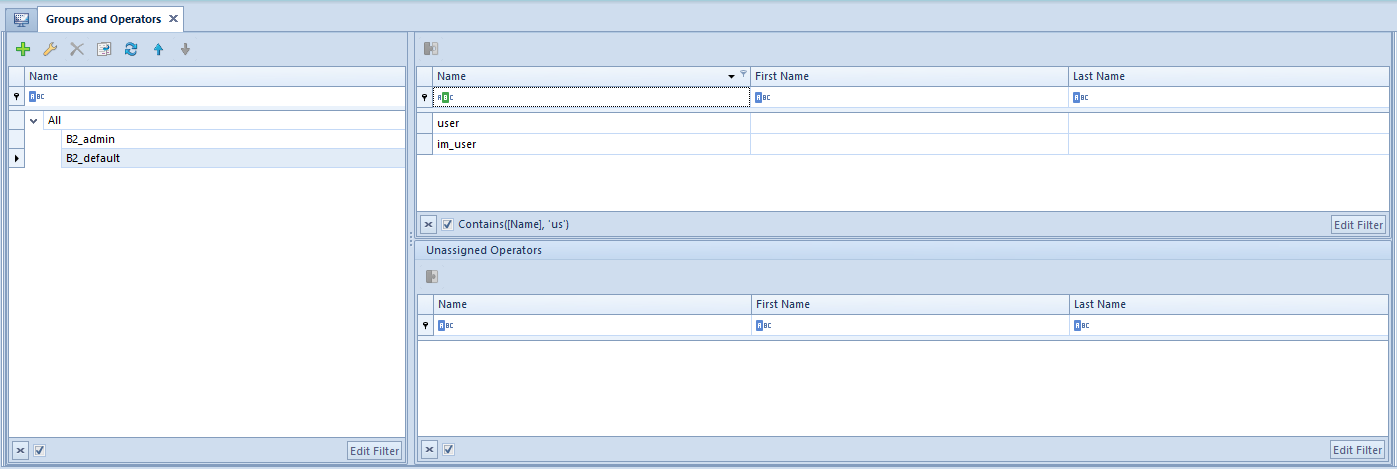
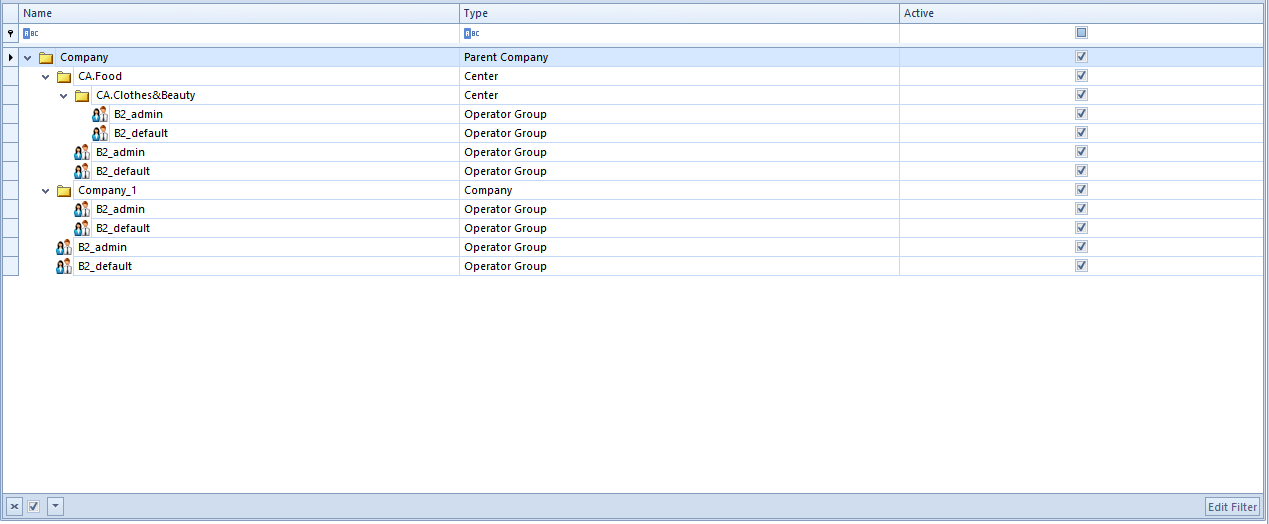
The window of operator groups is composed of tabs Groups and Operators.
Tab Groups
Tab Groups is divided into two sections. On the right side, in the section Groups, the tree of operator groups defined in the system is presented. By default, there are two groups available in the system: B2_admin and B2_default. The user can add new groups. Section Operators contains the list of all operators added to a given groups. On the list, there are columns Name, First Name and Last Name, which presents information about employee, provided that an employee is associated with an operator account.
List of operator groups
The group B2_admin is created by the system when generating a database. It cannot be deleted from the system, but it is possible to attach or detach operators’ accounts from it. Operators assigned to the group by default – admin, CDNwww, SearchAdmin and the operator creating the database have rights do manage all the permissions, to apply changes in the centers of the company structure and to assign operators to the groups.
Group B2_default includes all the operators defined in the system. Each new operator is assigned automatically to that group; therefore, it is important that the group has the least permissions to objects in the system.
Upon marking a given operator group in the section Groups, in the lower part, on the right side, additional section Unassigned Operators appears. An operator can be assigned to the selected group upon indicating an operator and then selecting the button [Attach To Group] which is available directly above the list or in the button group Assignments. To
To remove an operator from a group, it is necessary to indicate the operator attached to a group in the Assigned Operators group and select the button [Detach From Group].
For the tab Groups, standard buttons allowing for adding/editing/deleting object from the list and for refreshing the list, are available. Button [Copy] creates analogical group with the name of the copied group and a subsequent number in brackets, for example, if an operator copies group called Sales Representatives, group Sales Representatives (1) is created.
Tab Operators
Tab Operators is divided into three sections:
Operators – list of all operators available in the system
Groups – presents a group/groups to which an indicated operator is assigned
Other groups – list of other groups defined in the system
In the tab Operators, it is possible to <<add new operators>> to the system and to assign them to existing groups.
Additionally, in the ribbon menu, there are buttons for exporting and importing interface settings for indicated operator group:
[Export] – this button is active upon selecting one operator group and it enables saving interface setting to file for the selected group. The file takes on default name in form la with possibility to change it
[Import] – this button is active upon selecting one or several operator groups and it enables importing interface settings from file for the selected group(s). The import is carried out upon confirming the following message: “Interface settings for all selected operator groups will be overwritten with settings from the file. Do you want to import?”. If a file in improper format is selected, relevant message is displayed: “Invalid file format or the file is damaged. Cannot import the settings.”
Hint
It is possible to import any file in appropriate format, both one created in result of export of settings for operator groups as well as for an operator.
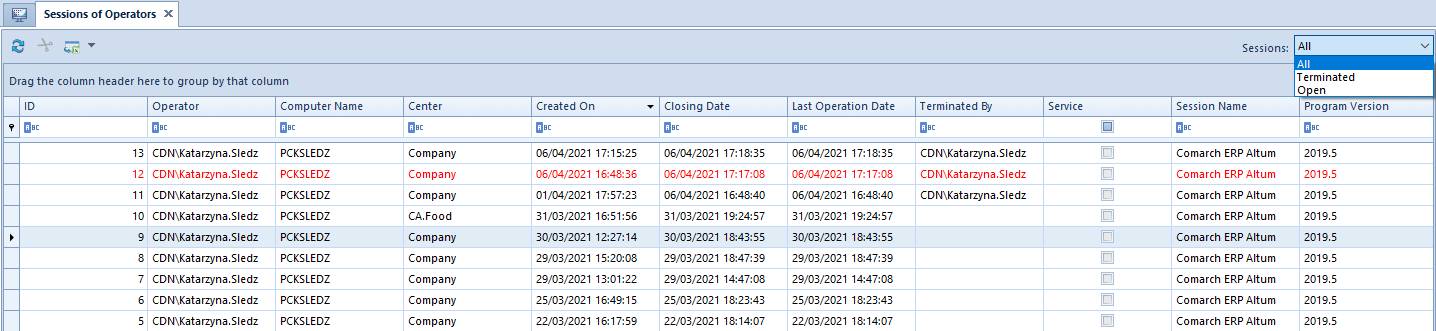
Operator sessions
In menu Configuration → Company Structure, Operator Sessions functionality is available, which is used for handling sessions of operators and previewing the history of logging of all operators to the system. Only an operator assigned to group B2_admin has access to the functionality.
List of operator sessions
Current operator session is marked in red. In the upper right corner of the window, there is a filter for the list of sessions, containing the following options: All, Terminated, Open.
The list of operator sessions presents the following data:
ID ─ session ID
Operator ─ operator who started a session
Center ─ unit of the company structure where a session was started
Created On ─ date in which a session was started
Closing date ─ date on which a session was closed
Last Operation Date ─ date of the last action initiated in a given session
Terminated by ─ operator who terminated a session
Service ─ parameter indicating whether a session originates from an external service, e.g., Mobile
Session name ─ name of a system or application on which a session was started
Company database version
Program version
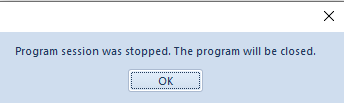
Next to the standard buttons for updating, importing and exporting list to an excel sheet, there is a button with scissors symbol which allows for interrupting an active session of a specific operator, e.g., in order to unblock the documents which were blocked after the system had been closed abnormally.
Note
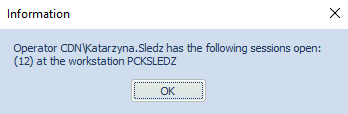
An operator cannot terminate his or her current session.
The operator whose session was terminated will receive the following message:
Whereas, if an open session of a given operator already exists, the following message is displayed after that operator logs in to the system:
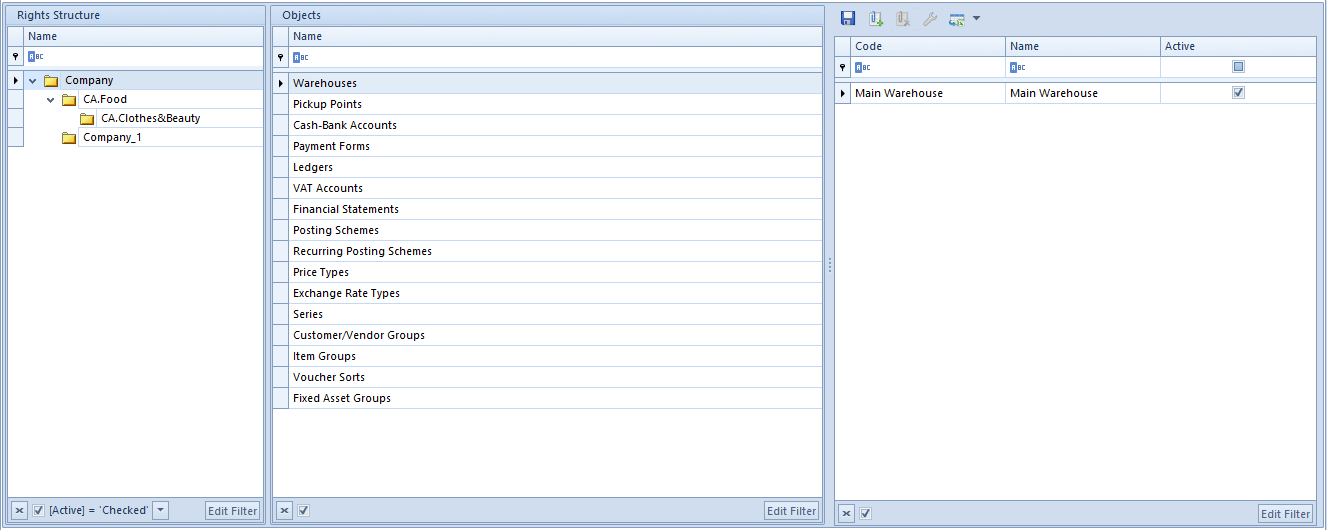
Objects availability – General information
Object Availability panel is used to manage availability of objects dedicated for particular centers of the company rights structure. This functionality is available for users included in operator groups with granted permission Management of object availability in the rights structure. Permissions can be assigned to operator groups from the level of Configuration → Rights Structure → Operator Groups → tab Other Permissions.
Managing of object availability can be performed:
globally for all the centers, in menu Configuration → Rights Structure → Object Availability
locally, within a specific center, in menu Configuration → Rights Structure → center form → [Object Availability] button. The window of rights structure is not available from that level.
The panel of object availability is composed of the following sections:
Rights structure ─ company structure tree with the possibility of adding columns, hidden by default, providing information about type and activity status of a center (the window is available from the level of Configuration → Rights Structure → Object Availability only).
Objects ─ objects available for assigning to a given center. The list contains a column with object name and, in case of selecting a child center, parameter Get From Parent Center. If the parameter is checked, a child center “inherits” the values of objects from the parent center. Deactivating the parameter allows user for assigning manually values of objects to a child center. A column Area,
List of values assigned to a selected type of object ─ in case of a parent company, centers of Company type and child centers with unchecked parameter Get From Parent Center, there are buttons [Attach]/[Detach] available in the menu, which allow for attaching or detaching a specific object from the list of values. Upon clicking [Attach], a list of objects defined in Comarch ERP Standard system opens, from which a given object should be selected with the use of [Select] button. Additionally, in case of some objects, there is button [Edit] available, which enables additional configuration of objects being attached. Button [Save] saves the entered changes for an object, whereas [Export To Spreadsheet] button allows for exporting data from the list to a spreadsheet.
Panel Objects Availaibility along with the list of objects of the main company
Note
In case of centers of Comarch e-Shop and Mobile type, it is not possible to check the parameter for objects which cannot be inherited from a parent center.
Objects added to the system from the level of any structure center are automatically added to the parent company (root) and to the company (center of Company type) parent to the given center. Availability of those objects in other child centers (within the company) depends on setting of the parameter Get From Parent Center.
All objects defined in the system are displayed only in the parent company (root). From the level of a child center (while being logged-in to that center), a given list of objects, e.g., warehouses, contains objects attached to a company (center of Company type) which is parent to that center. Since the list includes also objects which are not attached directly to the center in which the list is displayed, their edition is limited, e.g., tab Stock Level Management is not provided for a warehouse not available in that center
Subordination structure
Subordination structure tree
Subordination structure is a set of organizational units of a company and employees assigned to them. Owing to hierarchical presentation of the structure, based on the list of employees defined in the system, a user is provided with information about relations between employees, irrespective of the company rights structure.
The company structure window is available from the level of Configuration → Company Structure → Subordination Structure.
Tree of the subordination structure
Subordination structure is presented in form of a tree. The main tree group is Root group to which all the other organizational units and employees are attached. Root group can be edited in any way but it cannot be deleted. A user can define own organizational structure of a company and establish any relations between employees.
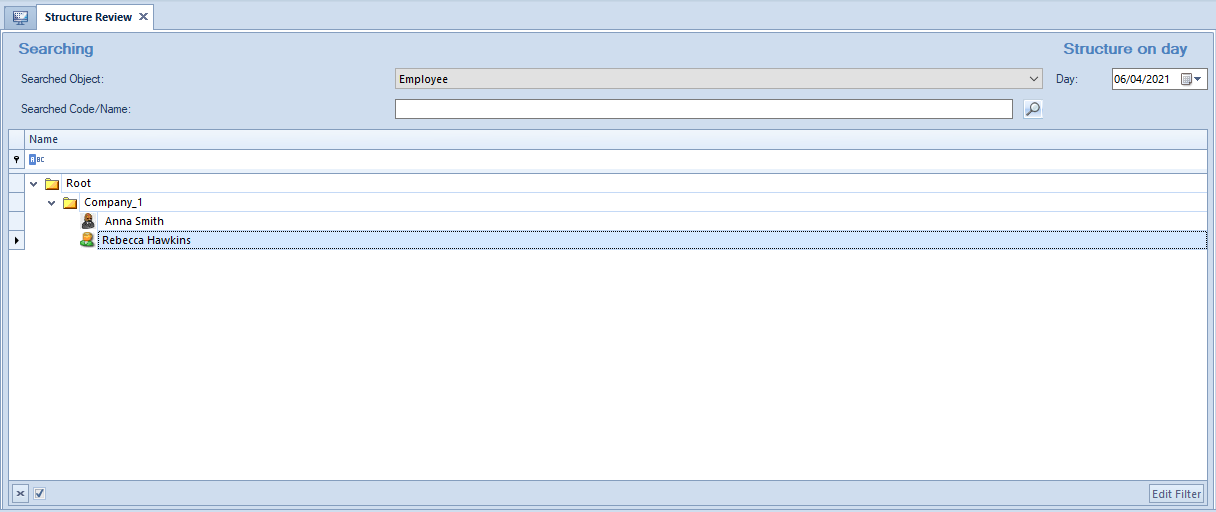
Section Structure on day allows user to preview history of company structure on a given day. The date can be entered manually or selected from a built-in calendar.
Section Searching is particularly useful in case the structure is very complex. In order to search a given object in the structure, it is necessary to specify the searched object (Employee or Organizational Unit) in Searched Object field, type the first and last name of employee or name of organizational unit in Searched Code/Name field. Then click [Search] in the Structure button group or click on the magnifying glass icon available next to the field Searched Code/Name to start searching. The searched objects will be highlighted in the tree structure.
In the menu, there are standard buttons for adding/deleting/saving a given object (organizational unit or employee) in the tree structure and for refreshing it.
Moreover, an employee selected on the structure tree can be marked as manager in a given organizational unit by clicking [Manager] → [Promote To Manager]. An opposite process can be performed with the use of button [Manager] →[Downgrade From Manager].
Button [Show Subordinates] displays a list of all employees subordinate to a given manager in the structure.
List of employees subject to the manager in the subordination structure
Defining organizational units
Organizational unit is any unit operating within company structure e.g. center, location, department, etc.
In order to add an organizational unit, mark the Root group (or a unit subordinate to it) on the structure tree and then click on the [Add] button and then [Add Unit].
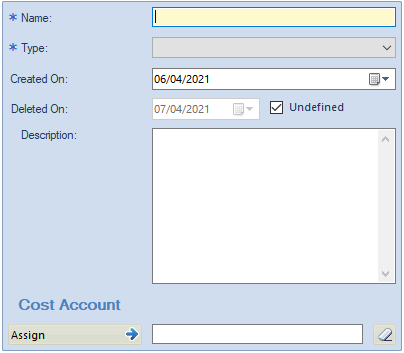
Form of organizational unit definition
Name – name of an organizational structure must be a unique value
Type – drop-down list to which it is possible to add own types of organizational unit with the use of button [Add Type] in the menu
Adding of organizational unit type
Editing of a given unit type is performed in Edit in place mode, so directly on the list. Upon saving the changes and closing the list, click on [Refresh Types] for the data to be updated in field Type.
Created On – allows user to define date of organizational unit creation. Date of creation of a subordinate unit cannot be earlier than its parent unit creation date. It can be entered manually or selected from a built-in calendar.
Deleted On – allows user to define date on which unit will stop existing in company structure. Unit date of deletion cannot be later than its parent unit deletion date. It can be entered manually or selected from a built-in calendar.
Description – in this field it is possible to enter additional notes to the added organizational unit
Cost Account – this section allows user to determine organizational unit as a cost unit in the company subordination structure. Button [Assign] opens the list of cost accounts, from which it is necessary to select the account which is to be assigned to the unit. Clicking on the button with eraser icon erases the selected account. More information can be found in article <<Chart of accounts>>.
After filling in the form and saving changes, a unit is added to the subordination structure tree.
The subordination structure must be defined in order to be able to activate <<CRM module>> in the system.
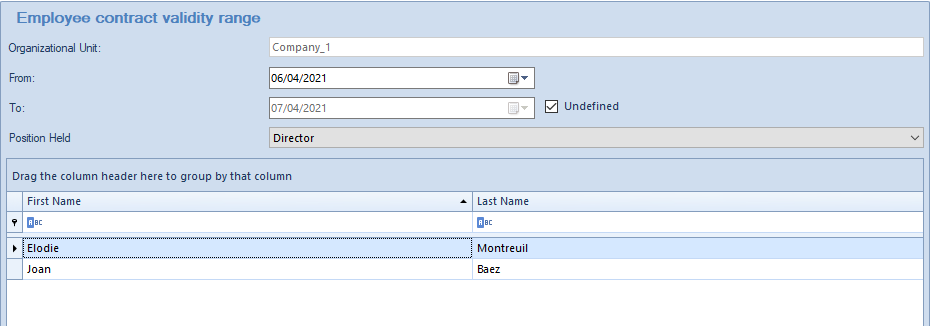
Adding an employee to organizational unit
In order to add an employee to an organizational unit, mark ta given organizational unit on the structure tree and then click on the [Add] button and then [Add Employee]. A list of employees will be displayed, from which a specific employee must be selected.
Employee selection window
From the level of employee selection window, it is possible to specify duration of employee contract validity range, that is the date of assigning that employee to an organizational unit (in field From) and the date from which the employee no longer belongs to the company subordination structure (in field To).
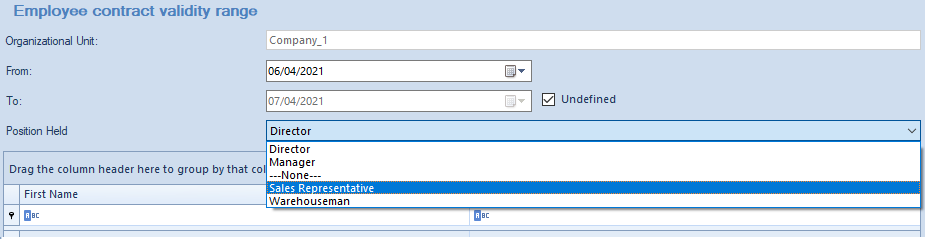
Field Position Held allows for assigning appropriate position from among <<positions defined>> in the system to an employee.
List of defined positions.
After filling in the data and clicking [Select], an employee will be added to the subordination structure tree.
Rights structure
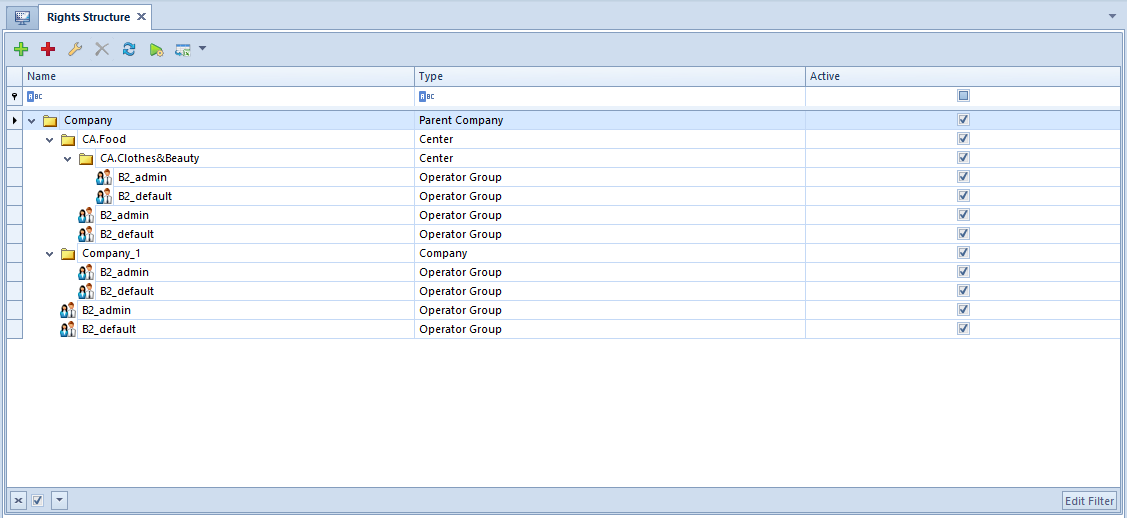
In menu Configuration → Company Structure → Rights Structure there is a list of all centers defined in the system. From this level it is possible to add new centers to the company structure.
Exemplary rights structure tree
The list is presented in from of a tree, which clearly shows relations between centers (inferiority, superiority and the parallelism) and the operator groups assigned to the centers.
Column Type displays type of a structure center, whereas column Active indicates centers to which it is possible to log in.
For newly created databases, the rights structure contains only one center ─ Main Company. This is the main center of the company structure (root) to which other centers can be attached.
During conversion of database from Comarch ERP Standard system versions previous to version 2015.0, an appropriate window referring to configuration of the rights structure conversion is displayed.
Selecting the option Leave the main node unchanged means that a given company will become the parent company. Whereas selecting the option Convert the main node to centerof Company type adds a new main node – Parent Company – one level up in the rights structure.
The multi-company models make it possible to handle many companies in one database. In this case, Parent Company node can act as:
an administration center from the level of which it is possible to access all the data, objects and documents used in child centers
a company running operating activity and being add the same time superior to all the other companies (centers of Company type)
Center of Company type can be treated as an equivalent to one of enterprises in a holding, while other centers of the structure correspond to an organizational unit within a given company.
Standard buttons for editing/deleting a given object (center) from the structure tree and for refreshing it are available in the menu bar. Editing of a given company from the rights structure level enables accessing the same functionalities as when editing a company (to which a user is currently logged-in to) from the level of Configuration → Company Structure → Company.
Moreover, it is possible to create a shortcut to editing of a given center on the system desktop by selecting option [Add shortcut to system desktop], available in the context menu (opened upon clicking the right mouse button).
Buttons [Up] and [Down] allow for managing location of a selected center in the structure. Button [Attach Group] opens the list of operator groups defined in the system. Here the user can select a group which will be attached to a center. Button [Detach Group] detaches a group from the structure center. Operators not included in any of the groups attached to a given center are not able to login to that center.
Note
The group B2_admin cannot be detached from the main structure center.
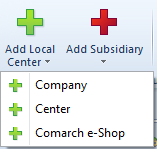
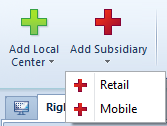
Buttons for defining new rights structure center:
[Add Local Center] – opens form for defining a new local center of the rights structure, depending on selected type:
Company
Center
Comarch e-Shop
[Add Subsidiary] – opens a form for defining a new distant center of the rights structure of the Mobile type
Adding a center of the Company type
In order to add a new center of Company type, click [Add Local Center] and then [Company].
Note
A center of Company type can only be added to the parent company.
In opened company form, it is necessary to fill in relevant details in the side panel and the respective tabs of the company form and determine permissions which are available upon clicking on [Object Availability] button. Detailed information can be found here.
Note
For a center of the Company type, there must be a default price type (for released and received items) assigned as well as an exchange rate type (for which base currency is consistent with system currency of a company). Otherwise, it will not be possible to save the company form.
Adding a local center
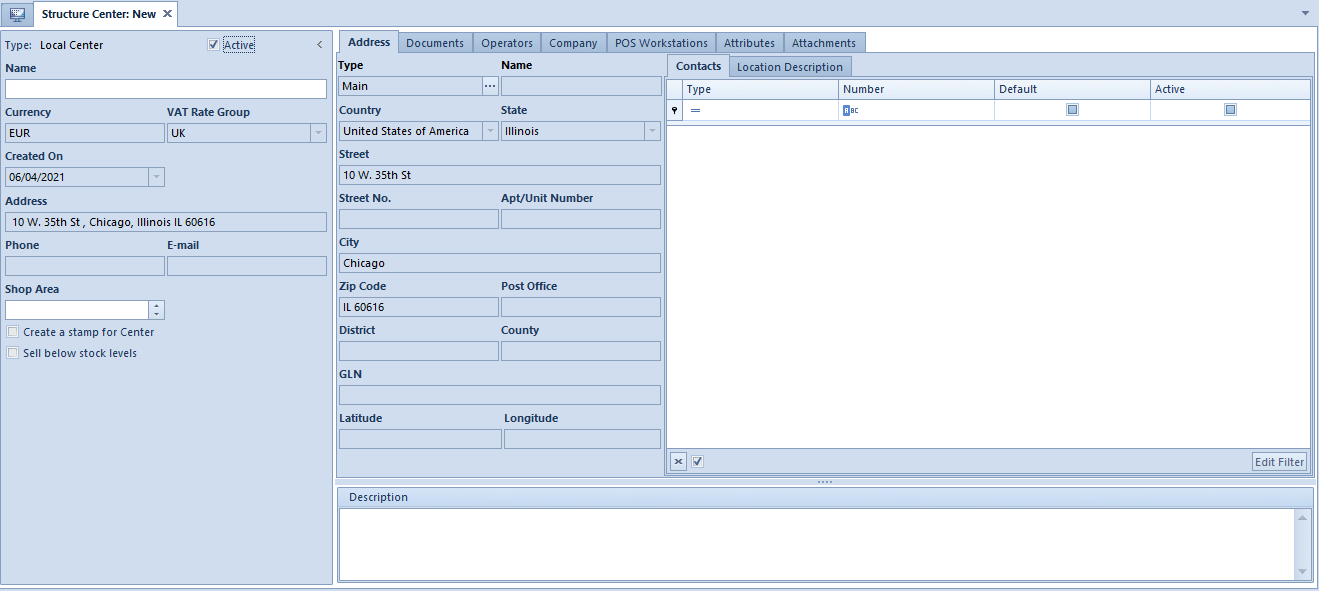
In order to add a new local center, click [Add Local Center] and then [Center]. Subsequent steps of defining a center are the same as those described above.
Additionally, in the lateral panel, there is parameter Create a Stamp for Center, which allows for displaying different address details than those of a company in document printouts.
Form of new local center
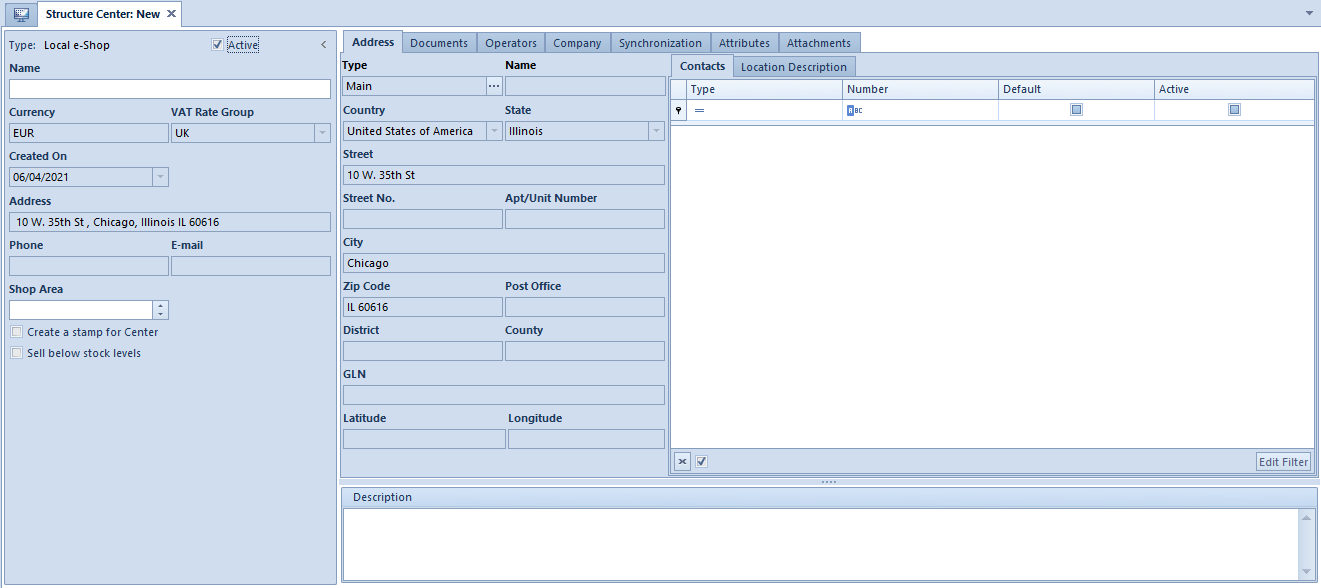
Adding a center of the Comarch e-Shop type
In order to add a new center of Comarch e-Shop type, click [Add Local Center] and then [Comarch e-Shop]. A center of Comarch e-Shop type is defined in the same way as a local center, but in case of a center of Comarch e-Shop type, data in Synchronization tab and permissions to additional objects: Customer/Vendor Groups, Item Groups, Generic Directory Value, Additional Units of Measure, and Consents must be specified from the level of Object Availability panel.
Form of new center of e-Shop type
Adding a subsidiary of the Mobile type
In order to add a subsidiary of Mobile type, click [Add Subsidiary] and then [Mobile]. A subsidiary of Mobile type is defined in the same way as a local center, but in case of a subsidiary of Mobile type, data in Synchronization tab and permissions to objects: Customer/Vendor Groups and Item Groups must be specified from the level of Object Availability panel.
Positions
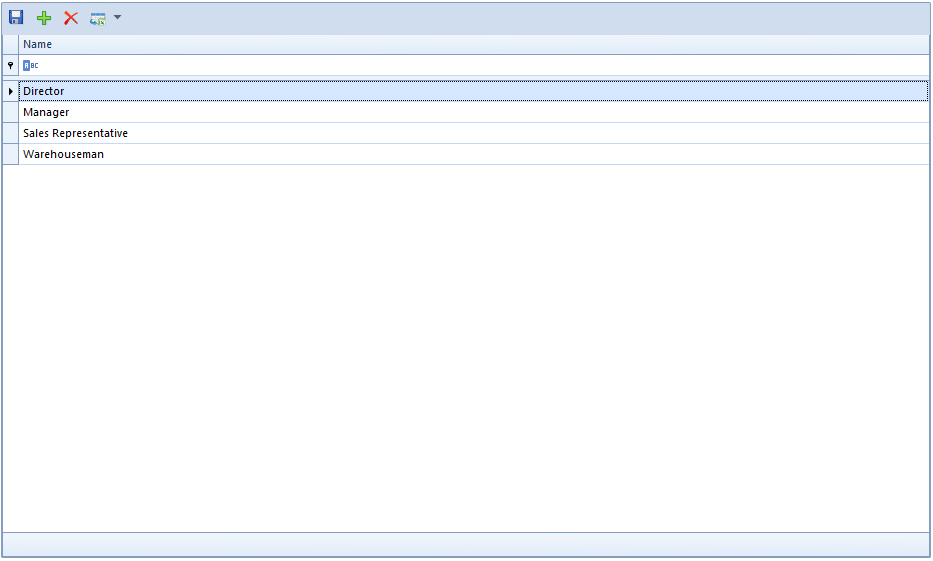
The list of positions is available from the level Configuration → Company Structure → Positions.
Positions defined by the user can be assigned to employees in the company subordination structure.
List of positions
In the menu, there are standard buttons for adding/deleting an object (position), saving changes, as well as refreshing and closing the list.
Button [Add] adds another row on the list, where it is possible to define a new position. Upon entering the name of the position and saving changes, the list of position becomes available in the window Selecting Employee which appears during the process of adding an employee to the <<subordination structure>>.
List of positions available when adding an employee to the subordination structure
Company structure – Company
General information
In menu Configuration → Company Structure, there is information about a company to which a user is currently logged-in.
The data is presented:
on the main company form ─ if the user is logged-in to the main company or its child center
on the form of a center of Company type ─ if the user is logged-in to a center of company type or its child center
Form
In the left panel of the form, there is basic information about the company, whereas on the right side, there is information included in a currently selected tab, and a field allowing the user to enter an additional description of the company.
Form of center of Company type
Basic information referring to a company:
Type – type of structure center
Active ─ parameter indicating activity status of a given canter (it cannot be deactivated for the main company)
Name
Created On ─ Non editable field
Currency – field for selecting system currency. Button […], which opens the list of currencies defined in the system, is active for the main company and for centers of Company type until changes on the form are saved. For child centers, system currency of the parent company is set, by default. For newly created databases, system currency is consistent with language of a database is set for the parent company.
Note
In French version of the system during creation of a database, chart of accounts is created by default. Owing to that, button […] in Currency field is inactive for the parent company. It will be possible to change system currency of the parent company once the chart of accounts is deleted.
VAT Rate Group ─ default VAT rate group assigned to a company. The field is active for the parent company and for centers of Company type, until the first document is issued. The system allows for assigning of different VAT rate groups to centers of Company type, owing to which it is possible to determine various VAT rates for an item or item group in dependence of a company. The list of VAT rate groups is available from the level of generic directories <<>>.
Company Name ─ field for selecting a customer/vendor the company can be associated with. Upon clicking on the ellipsis button […], the following message is displayed: “The company data will be filled in with information (Code, Name, Tin, EIN, URL, Legal Form, Industry, SIC) of the selected customer/vendor. Do you want to continue?”. Upon accepting the message, the system automatically fills in the mentioned fields according to data defined on selected customer/vendor form and marking that customer/vendor as internal (tab Trade of a customer/vendor form). One customer/vendor can be associated with one center of Company type only. An internal customer/vendor can be changed until he/she is used in the system or a center with which he/she is associated is used, e.g., by means of issuing a document for that customer/vendor.
TIN – TIN of a company or of the associated internal customer/vendor. This field is composed of a drop-down list of prefixes for individual countries and a field for entering the number. It must be specified in case of multi-company structure enterprises. When logging in to the system, the entered TIN is verified with the TIN registered in user’s license key.
EIN – EIN of a company or of the associated internal customer/vendor
Legal Form – field with a drop-down list for selecting legal form of a company
CID – creditor identification number applied for entities without TIN number
SIC Industry – field for selecting a standard industrial classification number and a relevant industry branch <<>>
Address ─ main address presented as company seal on document printouts. In order to change the main address, it is necessary to click on […] button which opens a list of defined addresses. From this level it is necessary to add end edit contacts which will be presented on the form, in fields Phone and E-mail.
Telephone
Email
URL ─ website address
Below, the user can expand an additional section and complete the form with data regarding a relevant authority which registered the company upon its creation:
Registering Authority
Registry Name
Number in Registry
Registration Date
Share Capital
Paid-in Capita
Shop Area ─ additional field for specifying the area of a shop (building) in square meters
The parameters available below are divided into three areas:
section Trade
<<Sell below stock levels>> ─ parameter allowing for selling items which are currently not available (no resources in warehouse). The value of the parameter can be changed at any moment during work with the system. The possibility to uncheck it depends on shortages registered in the system. Until they are deleted, the parameter is greyed out.
Monitor SENT transport – this parameter makes possible monitoring the carriage of goods by road. It is available only for centers of Company Detailed description can be found in article <<>>.
section Accounting
Split payment under Polish law – parameter activating handling of the split payment functionality for company It is available if the PLN currency is selected Detailed description: <<>>.
Register compensations – allows the registration of compensation documents in the company. More information …
Compliance with French VAT Law ─ parameter available if the VAT rate selected is: Selecting the parameter brings a number of functional changes in the system, resulting from the adaptation of the system to the requirements of the French VAT law:
Retail sales blockade – it blocks, among others, the handling of receipts and their corrections, printing invoices on a receipt printer, or the handling of sales and advance invoices and their corrections if no customer TIN is given in a document. Detailed description:
Keeping a record of special events – the system logs events specified by the law in order to track the operational consistency of the system and data integrity.
Digital signature verification – the functionality is available for invoices, receipts, duplicate receipts, special events, Grand Total Period reports, and archives is available from the level of Configuration → Tools → Digital Signature Verification <<>>.
Printout history ─ handling of the functionality of identifying duplicates of receipts printed on POS workstations. More information: <<>>
Grand Total Reports – handling of the list of reports generated on POS workstation available in menu Sales → Grand Totals (Tax Files). In the field Archive Folder located under the parameter Compliance with French VAT Law, t is possible to choose a drive location where tax files will be saved. More information: <<>>
section Fixed Assets
360 days in a year for straight-line method – if the parameter is active and depreciation begins in the course of a month, write-offs will be generated proportionally to the number of depreciation days during the given month. If the parameter is not selected, depreciation write-offs will be calculated for the entire month.
Round-off amount added last month – if this parameter is selected, write-offs for particular months are calculated in such a way that they are equal, while the remaining pennies are included in the write-off for the last month of the accounting/calendar period. If the parameter is not selected, pennies are kept as part of the write-off for a month, for which they have been calculated.
In the menu, there are standard buttons allowing for saving and closing the form, as well as [Objects Availability] button which allows for managing objects within a given company. More information regarding the functionality can be found in article <<Objects availability>>.
The other buttons available in the menu differ in dependence of selected form tab.
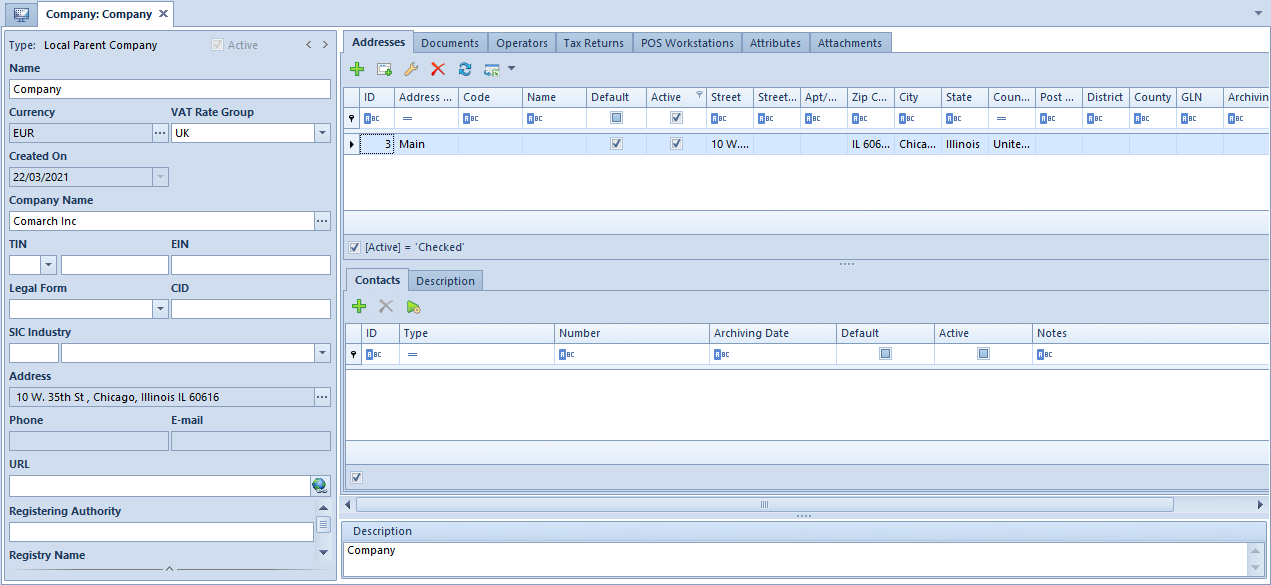
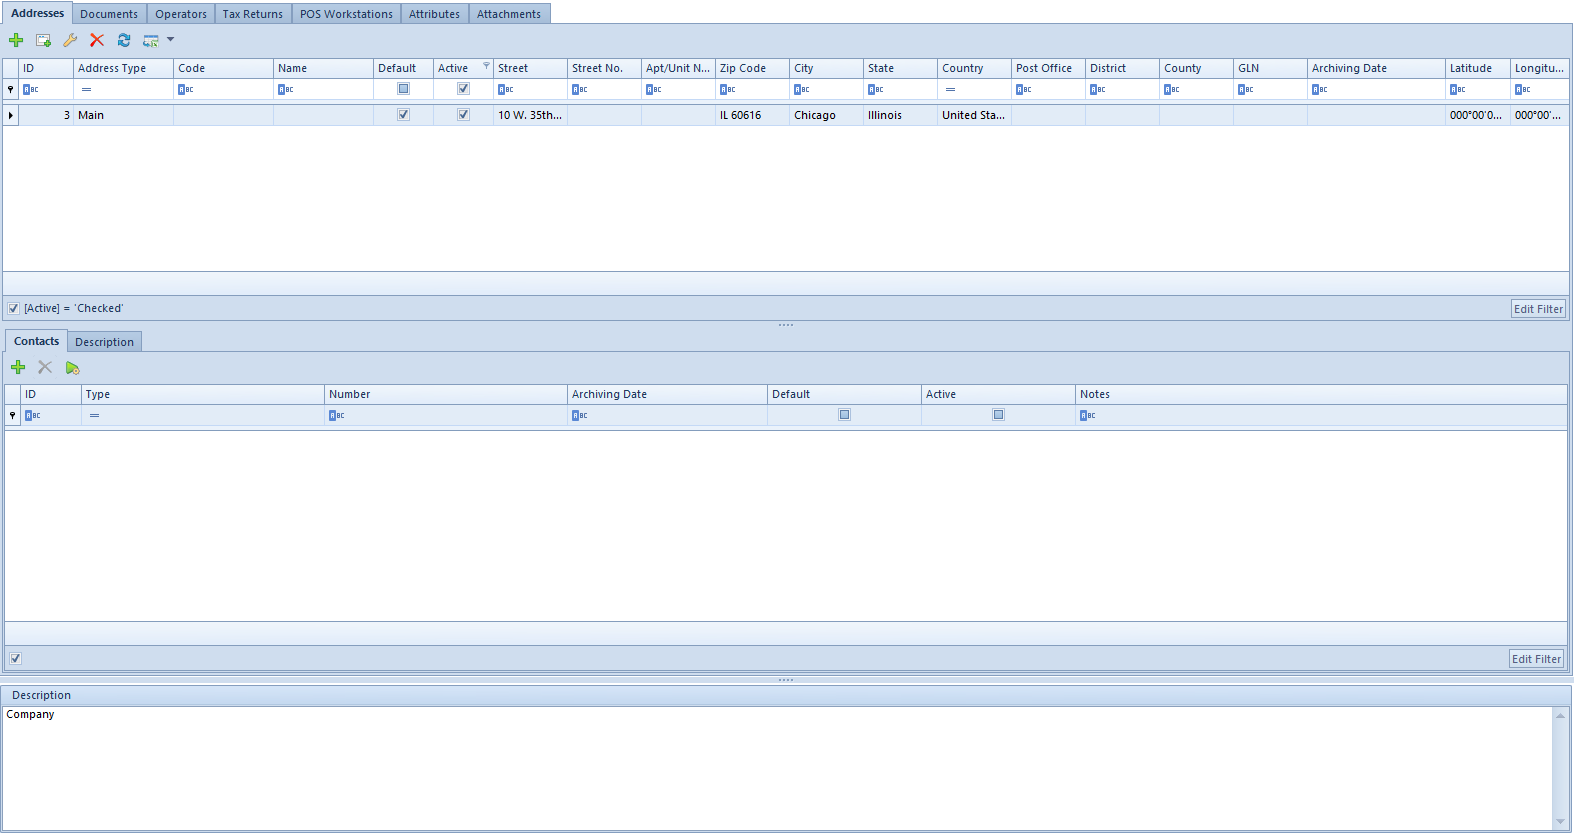
Tab Addresses
Tab Addresses contains information referring to addresses defined for a given company. A user can add, delete and edit addresses as well as contacts assigned to them.
Note
The tab is available for centers of Company type only. In centers of Center type, there is a tab Address which presents the address of a center being edited, and another tab Company, which presents address details of a company a given center is attached to.
Company form – tab Addresses
In the upper section of the window, there is a list of defined addresses and in the columns, data referring to its address and parameters determining whether a given address is active or default, are presented. For a newly added address, the parameter Active is checked by default. Unchecking it makes a given address an archival address, e.g., it cannot be selected in a document.
Example
In the system, a document including a specific center address was issued. Then, the user has updated the postal code of the center. In such case, an archival copy of the previous address is created and the address is replaced with the current address. After unchecking the filtering parameter in Active column on the list, in the column Archiving Date the
In the middle section of the window, there is a list of contacts assigned to an address selected in the upper part and Description tab. A user can add the following contact types: Phone No., Private Phone No., Office Phone No., E-mail, Fax, Messenger: GG, Messenger: Skype. For each contact type it is possible to define only one default contact. It is not possible to deactivate a default contact type. A date since when the contact is no longer active appears in column Archiving Date.
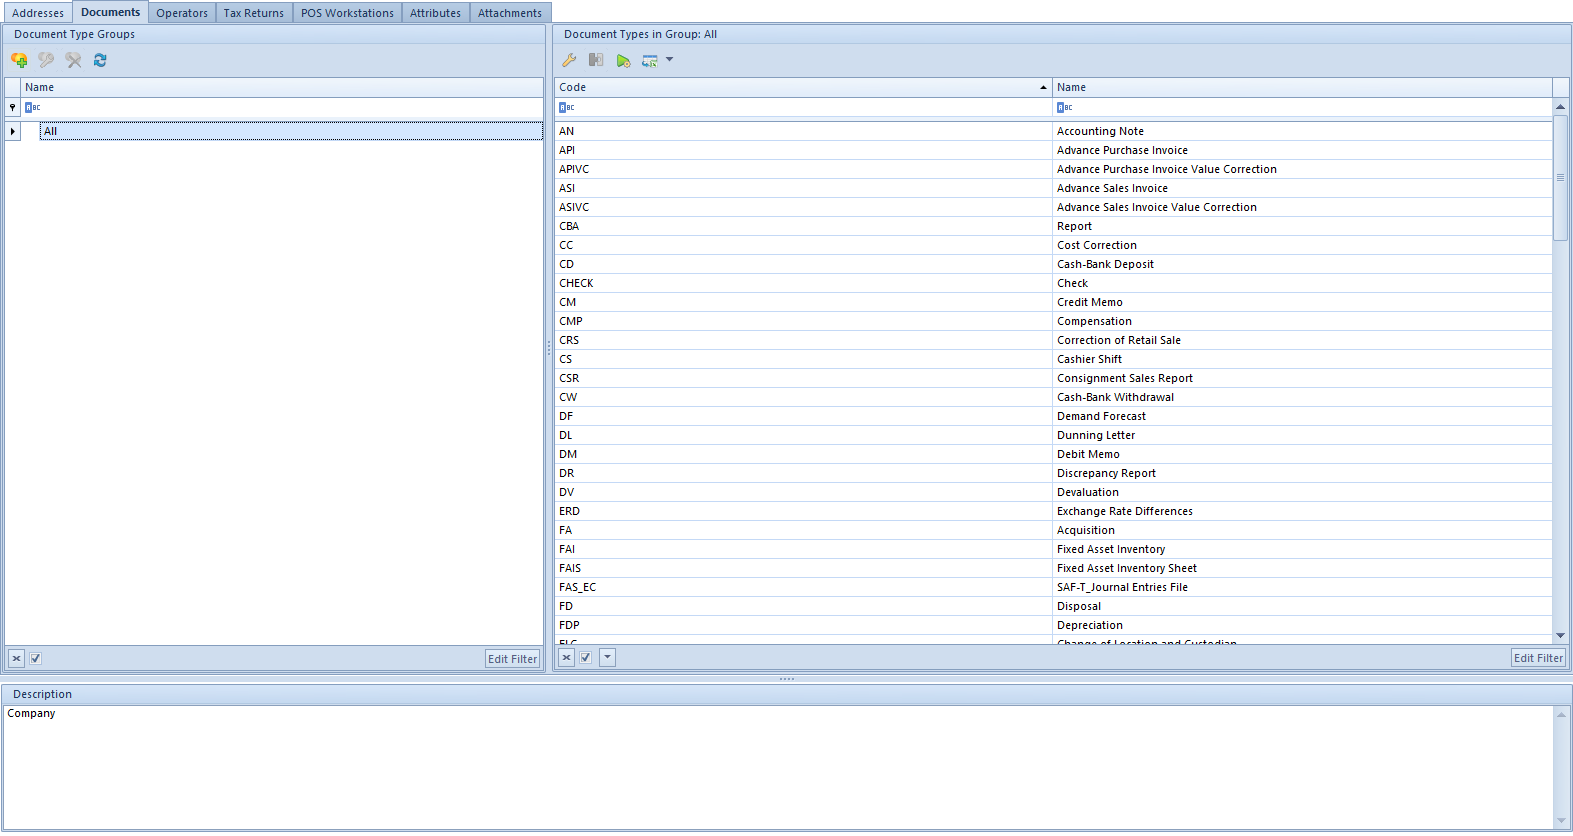
Tab Documents
Tab Documents allows for editing the document types and its layout is the same as window available upon selecting Configuration → Documents → Types. However, from the level of the structure center edit form, the user has more possibilities referring to document configuration. With the use of [Attach to Group] button it is possible to assign particular types of documents to selected group of documents.
Tab Documents on the form of the main company
In addition to the possibility of assigning document types do groups created by the user, it is also possible to determine the visibility of document groups in a given structure cent. When editing a document group, upon clicking [Attach] in panel Visibility, it is possible to indicate structure centers in which all documents included in that group are to be visible. Button [Detach] allows for performing the opposite operation.
Because the document types are described in this manual in chapter Document types, here you will find the description of the additional tabs and fields which are available when editing a given document type
Below, are described additional tabs and fields in addition of a given document type, which are not available in the document configuration performed from the level of Configuration → Documents → Types.
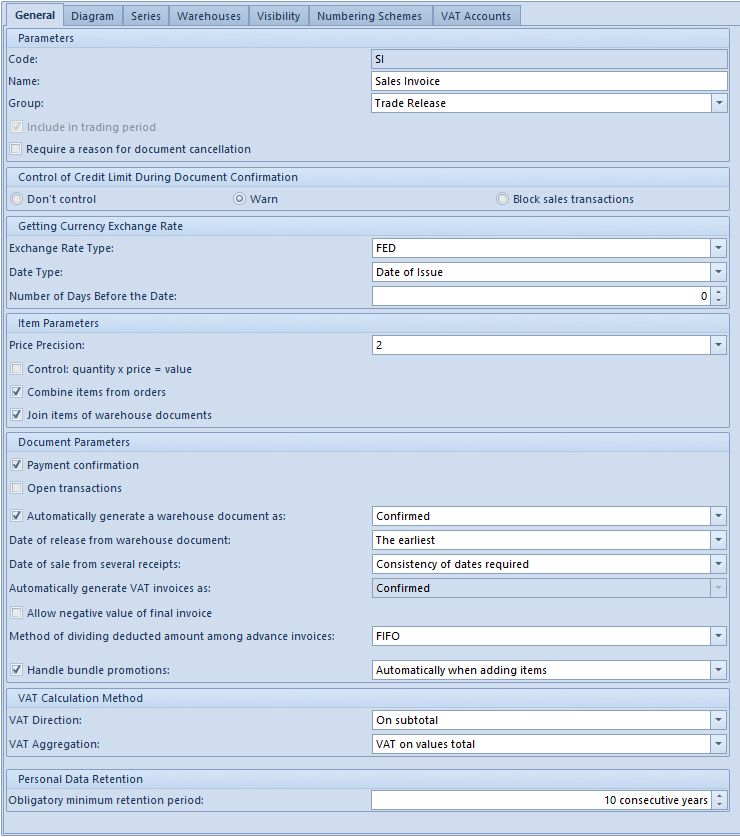
Tab General
In General tab of edited document type, there are basic information about a document type provided as well as additional parameters referring to configuration of the type within a given center, which concerns, among other, control of credit limit, retrieving of exchange rates, price precision, generating of warehouse documents or VAT calculation method.
SI document form on company edition form
Parameters of particular document types are described in <<Article>>.
Tab Series
After adding a series do edited document type, it is contained in a document numerator (provided that the numerator includes element Document Series).
Tab series on the form of document type
In order to attach a series to a document type, click on the button [Attach] and select proper series available within a given center from the opened list. For a series to be available on the list, it must first be added to the center from the level of Object Availability panel. To detach a series, mark it on the list and click on the button [Detach]. When creating a new document, there will be series available which are included in this tab and have parameter Active checked. The series with parameter Default checked will be selected, by default.
From the level of this tab, it is possible to associate a document numeration series with selected VAT account. More information can be found in article <<>>.
Tab Warehouses
For some types of trade/warehouse documents it is possible to attach warehouses defined in the system. Owing to that, when issuing a new document, a user can decide, e.g., from which warehouse items added onto a document are to be collected.
Tab Warehouses on the form of company type
In order to attach a warehouse to a document type, click on the button [Attach] and select proper warehouse available within a given center from the opened list. For a warehouse to be available on the list, it must first be added to a center from the level of Object Availability panel. To detach a warehouse, mark it on the list and click on the button [Detach]. When creating a new document, there will be warehouses available which are included in this tab and have parameter Active checked. The warehouse with parameter Default checked will be selected, by default.
Note
Only warehouses of Local and Consignment type can be attached to document types. However, IQC and IO documents constitute an exception, because for them it is possible to attach also a warehouse of Distant type. Owing to that, it is possible to create an item quantity calculation or an internal order for subsidiaries (distant centers) attached to a company. Moreover, for IQC document it is possible to check several warehouses as Default. This way, these warehouses will be automatically added onto item quantity calculation. More information can be found in article <<>>.
In Warehouses tab, the following parameters are also available:
Operations on one warehouse – if checked, then when issuing trade documents, it will be possible to add an item only from one warehouse (checked as Default).
Prefer default warehouse – if checked, then when adding items to documents, items from the default warehouse are collected first, according to the selected queue method (FIFO, LIFO) and only then items from the other warehouses, also according to the selected queue method, are collected. The parameter affects only trade documents, because operations made on warehouse documents always concern only one warehouse. This parameter is checked automatically if parameter Operations on one warehouse is checked
Tab Visibility
List of documents in particular centers of company structure may differ and not all documents are visible in all centers. The visibility of documents in particular centers is determined by the user, however, the following rules must be observed:
A document issued by a given center is visible for all the parent centers in a given branch of the structure
A document issued by a given center is invisible for all the child centers in a given branch which are equal to one another
Example
Exemplary company structure
The center Company sees all the documents issued in that center and all those which were issued by all its child centers.
The local center Accounting sees those documents which were issued in that center. However, it does not see documents issued in the center Shoes4UOU and Main Company. Moreover, it does not see documents issued in other local centers, that is Management and Warehouse because they are equal to each other.
The center of Company type Shoes4You_DE only those documents issued in that center of this structure. However, it does not see documents issued in the center Main Company and other companies, that is Shoes4You and Shoes4You Accessories (equal to each other) and in their child centers.
For each document type, it is possible to specify the centers of the same level, child centers and those assigned to another branch of the structure for which the documents must be visible (even though the above-specified rights do not say so). The rule, stating that if a document is visible for a given center, it is also visible for all the parent centers, still applies.
Tab Visibility on the form of company type
With the use of the button [Attach]it is possible to select from the list of company structure a center in which a given document should be visible. In order to remove the visibility of the document from a given center, it is necessary to mark it on the list and click on the button [Detach].
Example
The user logged in to the center Main Company attaches the local center Management in the tab Visibility. This means that a user logged in to the center Management will be able to preview all the documents (of a given type) issued in the center Main Company.
VAT Accounts tab
From the level of this tab, it is possible to assign many VAT accounts and select the default VAT account for a given type of document.
Tab Vat Accounts on the form of SI document type
In order to attach VAT accounts, click on the button [Attach] and select an account from the opened list of VAT accounts. To detach an account, mark it on the list and click [Detach]. It is also possible to determine which account should be default for a given document type by checking the parameter Default. More information can be found in article <<>>
Tab Operators
Information regardin this tab can be found in article <<>>.
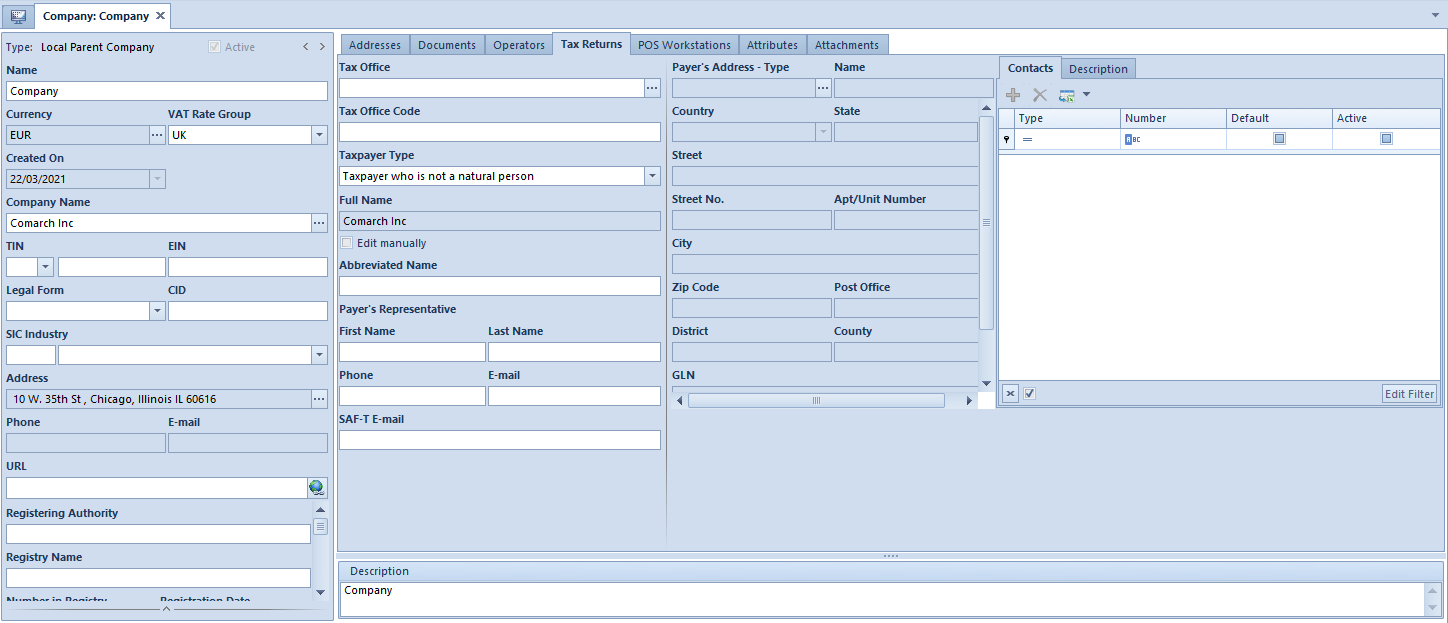
Tab Tax Returns
This tab Tax Returns allows entering information necessary to submit a tax return.
Note
The tab Tax Returns is available only in the case of editing the parent company or a center of the Company type.
The layout of this tab changes depending on type of payer selected in field Taxpayer Type.
Tab Tax returns for a taxpayer not being a natural person
Available fields:
Tax Office ─ name of the tax office which will be assigned to a company. Button […] opens the list of offices defined in the system.
Tax Office Code ─ field completed automatically upon selecting an appropriate office or can be filled in manually.
Taxpayer Type ─ drop-down list with the following options:
Natural person ─ opens additional fields which should be completed: First Name, Last Name, Date of Birth and Nin
Taxpayer who Is not a natural person
Full Name ─ field filled in automatically with the company name retrieved from the company header. Upon selecting Edit manually option, it is possible to change data.
Abbreviated name ─ abbreviation of company’s name
In Payer’s Representative section, it is possible to specify the following data referring to a person representing a company, such as: First Name, Last Name, Phone, and E-mail.
SAF-T e-mail ─ indicated e-mail address will be automatically added to SAF-T file form
Data regarding taxpayer’s address, in the middle section of the tab, is retrieved with the use of the button […] available in the Payer’s Address ─ Type field, which opens a window with the list of addresses defined in the system.
Tab POS Workstations
In this tab it is possible to add points of sale attached to the center in which the user is currently working. From the level of this tab, it is also possible to define a new POS workstation. Detailed information about parameters available in this tab as well as instruction on how to add points of sale can be found in <<article>>.
Tab Attributes
This tab allows for attaching an attribute to a structure center according to the rules described in <<article>>.
Tab Attachments
This tab allows for attaching an attachment to a structure center according to the rules described in <<article>>.