Configuration of document types

An appropriate configuration of document types available in the system allows for using them in a correct way. Buttons [Types], [Numerators] and [Series] related to the configuration of document types are placed in menu Configuration, in Documents button group.

Documents menu

In the group, there are also <<[Comission Invoices]>> and <<[Tac Returns]>> buttons.

Document types

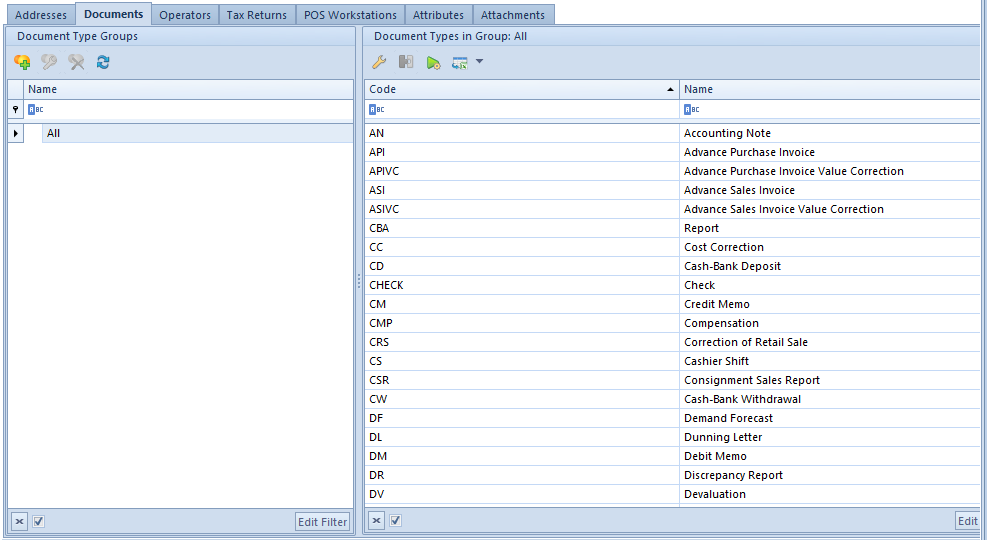
Managing of documents of a given type can be performed from the level of the list of documents (Configuration → Documents → Types). The list is predefined in the system and the user cannot add new items to it.

Hint
The tab Document types is similar to tab Documents which can be found on the company or center configuration form (menu Configuration → Company Structure → Comapny) and which offers wider possibilities for configuring documents (additional parameters, possibility of specifying the visibility of document groups in a given structure center).

List of document types

On the left side of the window, there is the tree with <<groups of document types>>.  On the right side, there is the list of document types belonging to a given group along with their codes and names.

Menu of the list of document types


The menu of the list of document types contains <<standard buttons>> allowing for adding/editing/deleting groups of document types and for editing items of the list of document types.

It is possible to define own groups of document types and and to assign them to selected document types defined in the system. Such operation can be performed with the use of [Add Group] button which is placed in the main menu or above the tree of document groups.

Edition of document types

In order to edit a document type, it is necessary to highlight a given item on the list and then, from the level of the main menu or of the panel placed above the list of documents, select the button [Edit] (this option is available also in the context menu). A form of document type opens.

Tab General

Tab General of Sales invoice document


 The tab General contains basic information regarding document type. Section Parameters  is composed of the following elements:

  • Code – document code, defined by the system (non-editable field)
  • Name – document name, defined by the system
  • Group – drop-down list allowing for assigning a document to a group, contains predefined values:
    • Non-grouped
    • Trade Release
    • Trade Receipt
    • Warehouse Receipt
    • Warehouse Receipt
    • Accounting
    • Cash-Bank
    • Complaint
    • Debit Collection
    • Fixed Assets
  • Include in the trading period – if the parameter is checked, a given document type is included in <<trading periods>>. The parameter is available for trade and warehouse documents only.
  • Include invoices whose 150/90 of days passed in the month for which a tax return is calculated – parameter available for <<VAT-ZD document>>.

Section Item Parameters contains Price Precision drop-down list which allows for determining a maximum <<price precision>>, that is a number of decimal places with which it will be possible to enter price in a given type of document. It is available only for those documents in which it is possible to enter price/value (e.g. sales invoice, purchase invoice, PO receipt, fixed asset acquisition document etc.).

Tab Diagram

Tab Diagram of Sales Invoice document type

 The tab Diagram presents a graphic scheme of possible statuses a document can adopt. Possible statuses:

  • Initiated – document form has been opened but it has not been saved
  • Unconfirmed – document saved as unconfirmed, editable
  • <<Confirmed Quantity Total>>
  • Confirmed – document confirmed or saved permanently, not editable
  • Posted
  • Printed – document printed on a receipt printer
  • Posted/Printed – document posted and printed on a fiscal printer
  • Closed – document closed
  • Pending – a document is being processed (regards e.g., complaints or orders)
  • Processed – document processed (regards e.g., complaints or orders)
  • Deleted – a document has been deleted and is not visible in the system
  • Canceled
  • Reversing Entry – regards journal entries, a confirmed journal entry has been deleted (reversed)
  • Reconciled – regards <<CD>> document, a document has been reconciled, which means that data from the bank statement is compliant with journal entries

Edition of document status

Edition of Initiated status of Sales Invoice document type

 Double-clicking on the field with status name of a document type or checking the field and selecting the button [Edit] from the main menu opens a side panel, which allows the user to edit status name and change the color in which a document in a given status is displayed on the list.

Edition of permissions

Edition of permissions to pass through Initiated and Unconfirmed statuses of Sales Invoice document type

 Double-clicking on an arrow placed between fields with statuses of a document type or marking the arrow and selecting the button [Edit] from the main menu opens a side panel, which allows the user to edit permissions to passing through statuses, that is, e.g. confirming a document with Initiated status. Checking/unchecking the parameter placed next to the name of a given operator group grants or withdraws these permissions.

To pass to the definition of another status/permission it is necessary to save or cancel entered modifications with the use of buttons [Save]/[Cancel] placed in the main menu.

 Detailed description of the tab Dimensions can be found in article <<>>.

Detailed description of the tab Analytical Description can be found in article <<>>.

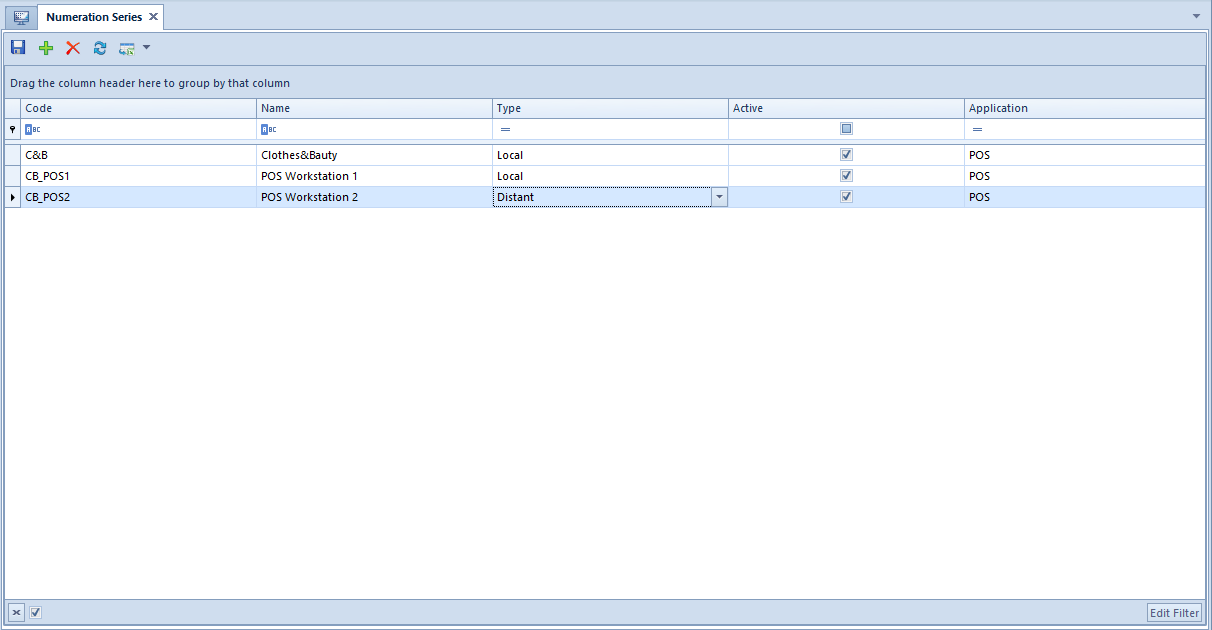
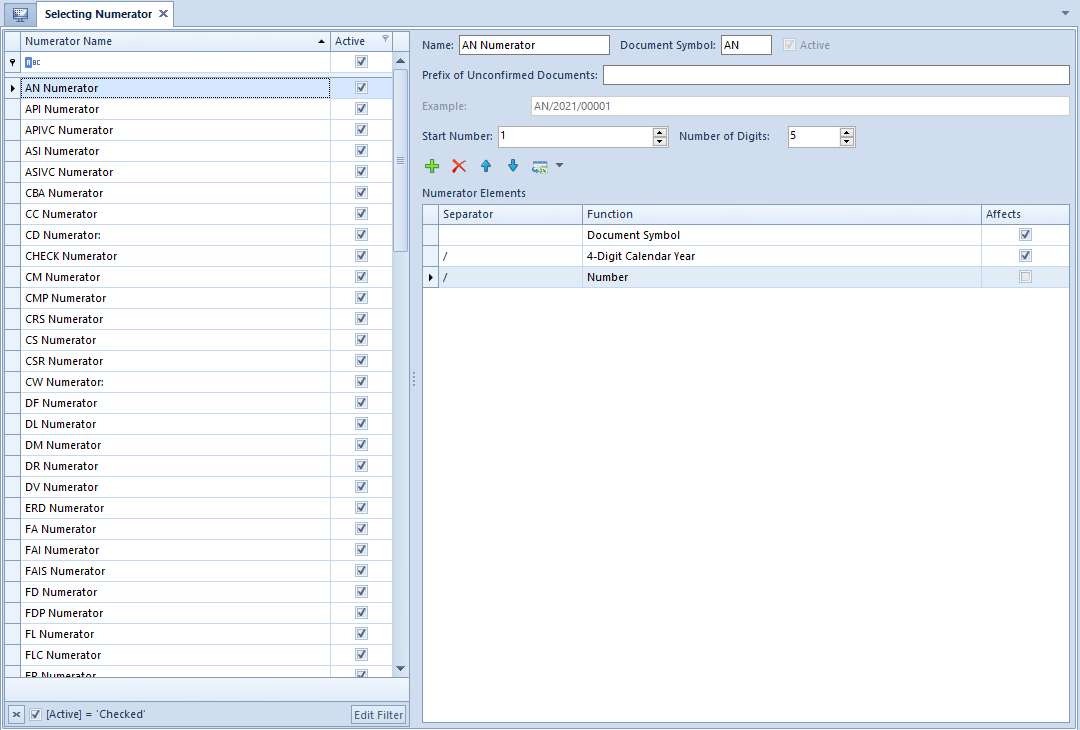
Tab Numeration Schemes allows for assigning many numerators to a given document tape and for indication which of them will be default. More information regarding numerators of documents can be found in article <<Numerators>>.


Series

General information

Numeration series can make part of a document <<numerator>> and allows for maintaining the appropriate numeration of documents. This is particularly essential when there are more points of sale attached in the <<rights structure>>. In such case, each workstation should have its own series to be able to check where a given document was issued. In order to open the list of series, from the menu Configuration and the Documents list of buttons, select the button [Series].

Menu of the list of series

 The menu of the list of series contains <<standard buttons>> allowing for adding/deleting/saving and refreshing items on the list.

List of numeration series

The list is composed of the following columns:

  • Code ─ numeration series code, visible in the numerator containing the series
  • Name ─ numeration series name
  • Type ─ drop-down list allowing for selecting the type of numeration series, available values: Local and Distant
  • Active ─ if the parameter is checked, it is possible to use a series on a document
  • Application ─ drop-down list allowing for determining whether a given series is to be used in the system or as a series identifying a POS workstation. Available values: Comarch ERP Standard and POS

Defining a numeration series

In order to define a numeration series, click on the button [Add], placed in the main menu or directly above the list of numerations. After that, a new, empty row will appear on the list of series. Fields Code and Name are mandatory. The value of the code must be unique. The parameter Active is checked by default and can be unchecked at any moment during the work with the system. Field Application can be edited until a series is saved.

Attaching series to the centers of company strucutre

List of numeration series attached to a center

In order to attach a series to many <<document types>> within a given center, it is necessary to open the menu Configuration Company Structure → Objects Availability. Then, on the list Rights Structure, mark a given center and on the List of objects, Series item. Then, on the right side, a list of numerations series is presented. With the use of buttons available in the main menu or above the list, it is possible to attach/detach selected series. On the form of series edition (button [Edit] in the main menu or in the panel above the list of series), it is possible to select documents for which a given series is to be applied.

Series can be also assigned to particular document types within a given center. In order to do so, it is necessary to open the menu Configuration → Company Structure → Rights Structure → edition form of selected center.

Tab Documents on the form of center edition

To attach a series to selected document type, it is necessary to open the tab Documents, and then the edition form of selected document type, where tab Series is available. In the tab, with the use of [Attach] and [Detach] buttons available in the main menu or above the list of series, it is possible to attach and detach series of document numerations defined in the system.

Tab Series of a document type


Numerators

General information

Each one of document types can have its own numeration scheme (i.e., numerator) defined, according to which a number is assigned automatically to a document at the moment of its issuance. A numerator can be freely modified by the user. Handling of numerators can be performed from the level of Configuration → Documents → Numerators.

Note
Numerator can be modified until the first document of a given type with that numeration scheme is issued.

List of numerators

On the left side of the window, the list of numerators is displayed, whereas on the right side, edition form of selected numerator is presented. Next to the list of numerators, there is Active column. The column is provided for information purposes only. An operator with permission Change of numerator granted can change numerator. After applying changes to an existing numerator and clicking on [Save Current] button, the edited numerator is deactivated by the system and replaced by a new numerator with the same name.

Configuration of Change of numerator permission

Before carrying out the operation the operator must confirm selection in the window with message regarding changing of numerator.

Menu of the list of numerators

The menu of the list of the list of numerators contains <<standard buttons>> allowing for adding, deleting and saving numerators along with their elements.

Numerator form

Numerator form is composed of the following elements:

  • Name ─ numerator’s name
  • Document Symbol ─ document’s code which will be presented in the numerator, value retrieved automatically from a <<document type>> definition, but it can be modified by the user. A document symbol can be composed of letters or digits only.
  • Unconfirmed Documents Prefix ─ prefix differentiating unconfirmed documents. It serves to assign the next available number to unconfirmed documents during their generation (when confirmed, the prefix is not included in a given number).
  • Example ─ example of a numerator including values defined by the user
  • Start Number ─ Numeric value with which document numbering in a numerator will begin
  • Number of Digits ─ number of digits of which document number in a numerator will be composed, e.g., if the number of digits in the number is 4 and document number is 1, the number will be 0001

Numerator Elements list contains a list of elements which form document numerator. The list is composed of the following columns:

  • Separator ─ symbol separating particular elements of a numerator, symbol / is defined by default in the system
  • Function ─ function performed by a given element in a numerator, drop-down list containing the following values possible to select:
    • Document Symbol ─ value from the field Document Symbol, mandatory element, must be unique within the system
    • Month – numeric value defining the month in which a document a document was issued. After selecting this function, parameter Two-digit month appears on the edition form. If it’s checked, month is displayed in a two-digit form, e.g., May – 05.
    • 4 or 2- Digit Calendar Year – four- or two-digit calendar year retrieved from the system date of a computer
    • Financial Year ─ sign of <<accounting year>>. An accounting year can differ from calendar year.
    • Number ─ changeable part of document numeration. For each issued document of a given type, the system will increase section with number at rate of 1. Number can consist of unlimited number of digits and it will be displayed with leading zeros, e.g., number of digits in number equals 4, number of document will be: 0001 Number start digit and its length are set with parameters Start Number and Number of Digits
    • Document Series ─ series associated with a document type. Detailed information regarding document series can be found in article <<Series>>.
    • Warehouse ─ code of warehouse in which documents are issued
    • Account – name of <<VAT account>>
    • Unconfirmed Documents Prefix ─ value retrieved from the field Unconfirmed Documents Prefix. Using of the element is recommended for numerators of reports and cash/bank transactions. If a database is generated in the Polish language this parameter is not mandatory, whereas in the French language version this parameter is mandatory and is set as “B”.
  • Affects ─ if the parameter is checked, a given element affects document numeration. It means that ever time that element of the numerator is changed, the document numeration will start from the beginning, that is from number 1.

Numbering chronology control

 Section Control the numbering chronology during document confirmation is available only for databases   created in French language. This functionality can be used in documents covered by the mechanism of prefix numeration:  JE, OB, IR+, IR-, PI, SI, SIVC, PIVC, PIQC, SIQC, SO, PO, WM+, WM-, VSI, VPI, VSIC, VPIC, AN, ERD, R, RVC, RQC, SOR, SORVC, SORQC, POR, PORVC, PORQC, OBC, RE, CHECK, VPIUA, VSIUA, VPICUA, VSICUA, PQ, SQ, SRS, CRS, ASI, API, ASIQC, ASIVC, APIQC, APIVC.  It contains the following parameters:

  • Don’t control
  • Warn – the following message will be displayed while confirming a document with the following warning: “In the system, there are already documents with later date of issue (respectively a date of receipt or a posting date). The numbering chronology will be disturbed. Would you like to save the document? [Yes]/[No]”
  • Write lock – when a document with the write lock is to be confirmed (even if there is another document in the system with the earlier date than the last confirmed document of a given type, which has already been cancelled), the following message will be displayed: “Cannot save the document. In the system, there are   already documents with later date of issue. Change the document date of issue [date] and save the document.”  This parameter can only be changed when all documents of the same numeration scheme have been confirmed.

Defining new numerator

To add a new numerator, click on [Add] in the main menu, in the Numerators button group.  A form of newly created numerator will be open, where it is necessary to complete Name and Document Symbol fields. The user can freely fill in the other fields and add selected numerator’s elements. During definition of numeration scheme, the following rules must be observed:

  • A numerator does not have to be composed of all available elements. It must contain at least two of them, that is: Document Symbol and
  • Each numerator must have unique name
  • Elements of a numerator must be unique
  • Values of numerator’s elements cannot be empty
  • Each element must be separated with separator
  • Order of elements is unrestricted
  • Numerator can contain maximum 9 sections
  • Numerator cannot contain both of the following elements at the same time: 4 – Digit Calendar Year and 4– Digit Calendar Year
  • Calendar Year and Financial Year cannot be present in one document number at the same time
  • Account is not obligatory but it should appear in numeration of documents from Cash/Bank module, because it allows to obtain separate numeration of reports and entries within particular accounts

Note
Numerator can be deleted until it is used in the system for the first time.

Assigning numerators to document types

For a defined numerator to be available for a given document type, it is necessary to add it to the list of numerators available in the tab Numbering Schemes on the <<edition form of a document type>> (Configuration → Documents → Types → document type edition form).

In case there are many numerators assigned to one document type, when issuing a document, the system uses the numerator for which Default parameter is checked on the list of numerators.

Numeration of confirmed documents will be continuous in the following order:

  • date of issue of a document
  • date of receipt/issue ─ for PI, PIQC, PIVC, PIAC, API, APIC, POR, PORQC, PORVC, PORAC documents if value in Numbering by Date column is appropriately specified in tab Numeration Schemes of a given document type definition
  • date of registration/issue ─ for accounting documents

 Using of free document number

When a saved document is deleted, its number is released and it can be reassigned to an issued document.

To enable the functionality, it is necessary to activate permission Using of free document number in tab Other Permissions for a given operator group (Configuration → Company Structure → Operator Groups → operator group edition form).

If date of issue on the deleted document is the same   as system date, the released number is assigned to a subsequent newly created document whose date of issue   is the same as on the deleted document. If the date of issue on the deleted document is different from system   date, a gap occurs in the document numeration and the system automatically assigns a subsequent number.