When creating BPM processes, it is possible to use VB language syntax. For instance, initial values can be assigned to parameters in such way or operations on numbers or texts inside processes can be performed.
Operators
Visual Basic supports the following types of operators:
Operation Name
VB.NET
C#
T-SQL
A less than B
A < B
A < B
A < B
A less than or equal to B
A <= B
A <= B
A <= B
A equal to B
A = B
A == B
A = B
A greater than B
A > B
A > B
A > B
A greater or equal to B
A >= B
A >= B
A >= B
A different from B
A <> B
A != B
A <> B
A or B
A OrElse B
A | | B
A OR B
A and B
A AndAlso B
A & & B
A AND B
Assigning decimal value 10,1 to A
A = 10.1D
A = 10.1m
A = 10.1
Assigning floating-point value
10,1 to A
A = 10.1R
A = 10.1
A = 10.1
Negation of A
Not A
!A
-
Combining strings
”a” & b.ToString()
”a” + b.ToString()
‘a’ + b
The first element of T table
T(0)
T [0]
-
Creating an object of nullable integer type
New Nullable(Of Int32)
New Nullable()
-
Invoking a method with SalesInvoice generic type
ObjectFactory.Create(Of SalesInvoice)()
ObjectFactory. Create()
-
Converting an object object into type Type
DirectCast(object, Type)
CType(object, Type)
(Type)Object
-
Null value
Nothing
null
NULL
A is not a null
A IsNot Nothing
A !=null
A IS NOT NULL
A is a null
A is Nothing
A == M
A is of Type type
TypeOF A Is Type
A Is Type
-
Creating a directory of String types key and Decimal values and initiating it with”KOS” key of value 2.0D
New Dictionary(Of String, Decimal)() From {{"KOS", 2.0D}}
new Dictionary() {{"KOS", 2.0m}}
-
Creating an object of DocumentEventParams type and initiating its property DocumentId with value 169
New DocumentEventParams() With {.DocumentId = 169}
new DocumentEventParams() {DocumentId = 169}
-
Assigning a text value: Text to variable A
A ="Text"
A ="Text"
SET @A = 'Text'
Assigning a text value in inverted commas: “Text” to variable A
A ="""Text"""
A ="\"Text\""
SET @A = '"Text"'
Using a conditional operator to assign a text value to a variable of string type A on the basis of the value B (if B equals to Nothing, A will equal to String.Empty, otherwise, A will equal to B)
A = If(B Is Nothing, String.Empty, B)
A = B == null ? String.Empty : B
-
Creating an anonymous method
IEnumerable.Find(Function(c) c.Code.Equals("PL"))
IEnumerable.Find(c => c.Code == "PL")
Note
It is necessary to remember about correct types when comparing. For example, expression “73” <“9” returns True, because the first character in the first expression is classified higher than in the other one. If first characters are equal, then the next character from both expressions is compared, etc.
Intellisense mechanism
Comarch ERP Standard BPM has its own Intellisense mechanism. Intellisense is a form of automatic completion. At the same time, it is designed for documenting and disambiguating names of variables, functions and methods. Using the mechanism is a convenient way to get access to descriprions of functions, and partially to the list of their parameters.
Intellisense mechanism
Integration with BI
In the Comarch ERP Standard BPM system, it is possible to use reports created in Comarch Business Intelligence. Before proceeding to the BPM configuration, it is necessary to:
Install Comarch Business Intelligence module
Create BI databases for the company database (DW, LOG, META and REPO) and transform the company database.
BPM configuration in terms of BI
To add business activities associated with BI, in the references of a given process, it is necessary to select two assemblies:
BI.Integration.dll
BI.Integration.Interfaces.dll
Detailed description of the process of importing of assemblies can be found in article References.
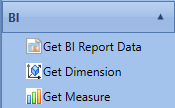
BI activities
Retrieving data from a report
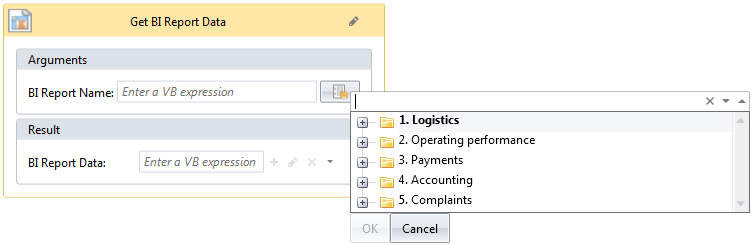
Retrieving data on the basis of a report is performed by selecting an appropriate report in the definition of the activity Get BI Report Data. Additionally, when indicating a report, a list of BI reports is retrieved from BI. Below, there is an example of opening a list of OLAP reports grouped by an analytical cube.
Selecting a BI report from the level of activity
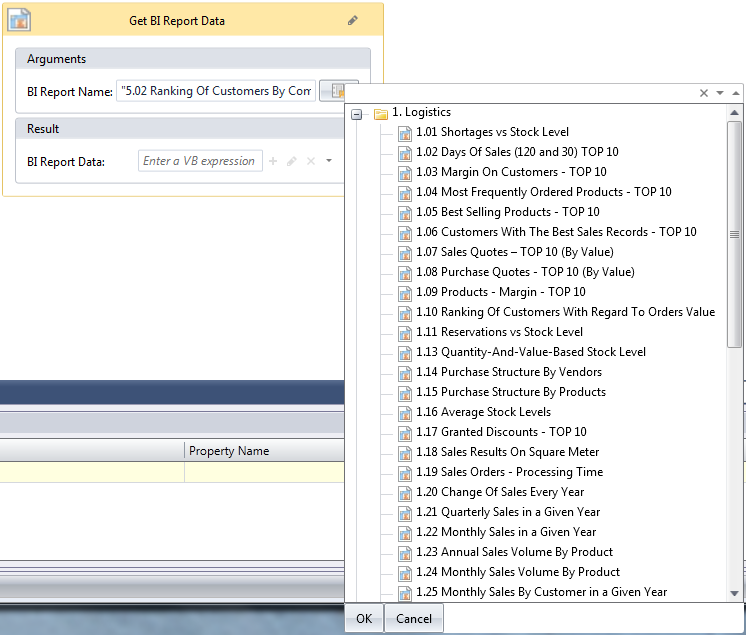
After expanding each group, a list of BI reports available in a given area, is presented. After placing the mouse cursor over a selected report, the user can preview more details regarding it. A report description contains the following data: Created On, Cube Name, Dimensions, Measures and Filters.
BI report details from the level of an activity
Standard processes using BI
In the system, there are three standard processes which are based on BI reports:
Inform about Payment Delays On The Basis of BI Report
Update Items Delivery Date On The Basis of BI Report
Generate a Series of Questionnaires for Top Vendors on the Basis of BI Report
To use the above-mentioned process, it is not necessary to add new the assemblies, as in case of creating individual processes. After importing the processes, the assemblies will be added automatically.
Apart from the above processes, there are two associated with each other processes which send BI subscription
Subscribe BI Report Part 1 of 2
Subscribe BI Report Part 2 of 2
To ensure proper operation of sending reports from to the task inbox, the following conditions must be fulfilled:
When creating a BI report subscription, it is necessary to set an appropriate subscription type.
Starting BPM processes from the level of BI
It is possible to run BPM processes from the level of the list of items and customers/vendors in BI reports. To do so, it is necessary to add the following contexts in the process:
Items in BI Reports
Customers/Vendors in BI Reports
More information regarding contexts can be found in article ERP Context.
Starting a process
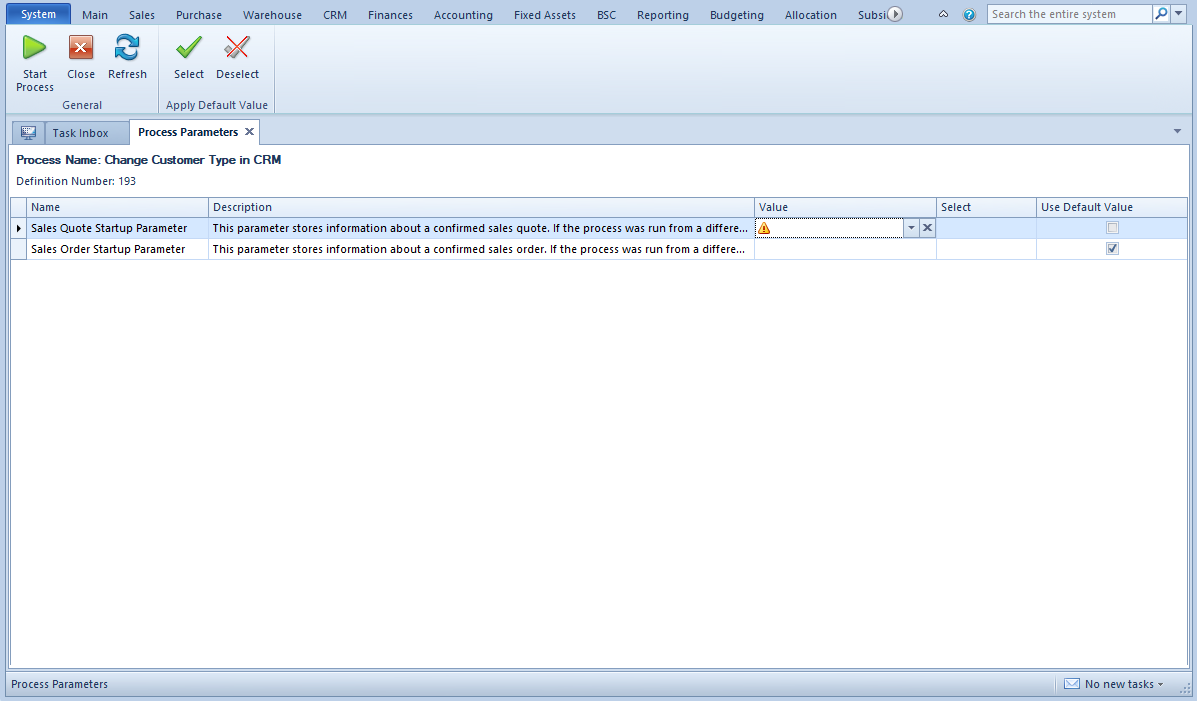
Starting of processes with parameters to complete
BPM processes can be started in the ERP context, from the level of the process designer or from the level of the task inbox. To start a process, it is necessary to select the [Run] button and select process from a drop-down list and click on Run.
Starting Process From The Level of the Task Inbox
If there are not startup parameters defined for a process, the user, when starting that process, will be able to complete them. Parameters with default value will be completed automatically along with the column Use Default Value Parameters without completed value will be marked with an exclamation mark symbol.
Process startup parameters
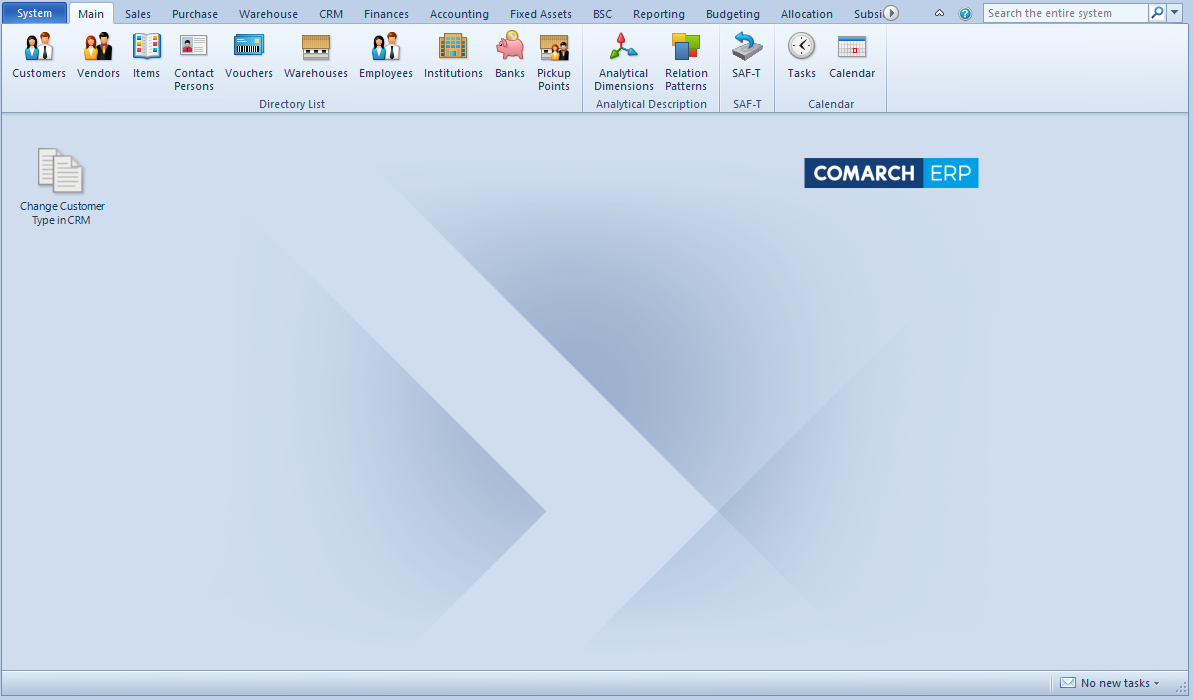
In case the user does not complete startup parameters, a question is displayed before starting the process.
Message with question in the case of an uncompleted parameter value
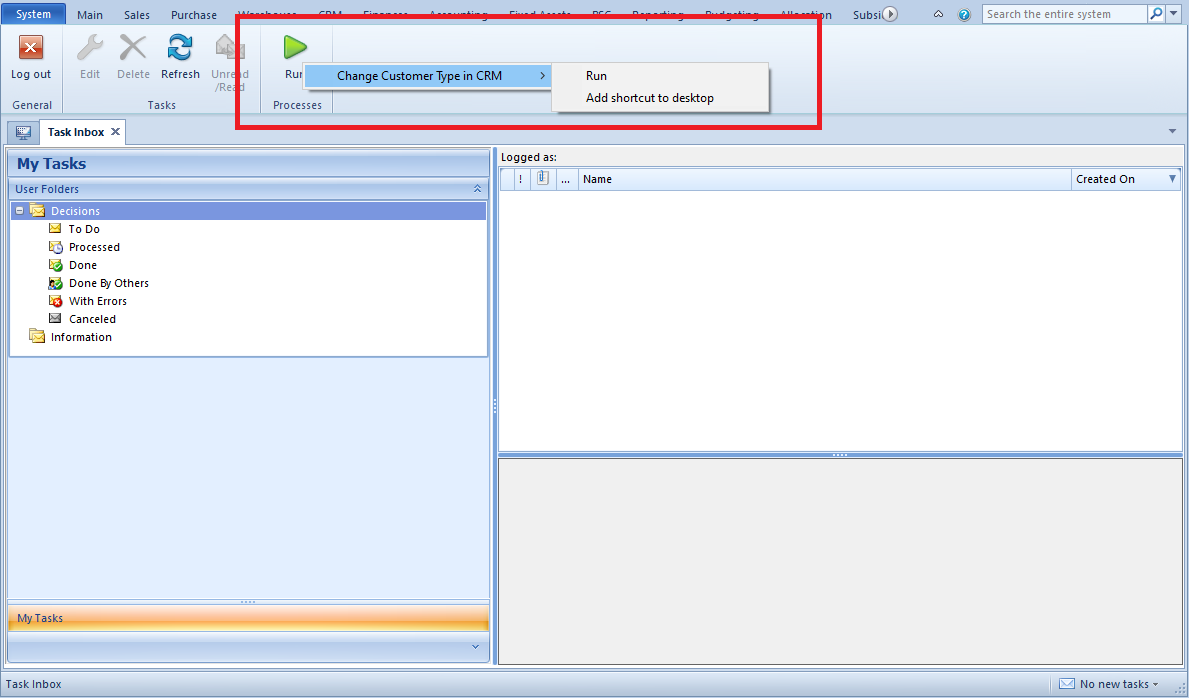
Shortcuts to process initiation
BPM processes can be also started with the use of a shortcut created on the application desktop. To add such shortcut, it is necessary to select the [Run] button and select process from a drop-down list and click on Add shortcut to desktop.
Adding process shortcut to the application desktop
In the next window, it is possible to select icon and shortcut name.
Shortcut properties
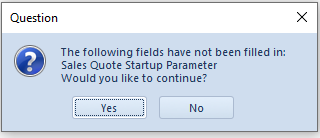
The shortcut will be available on the application desktop. After double clicking on the icon, the process will be initiated according to the provided description.
Working with tasks
Tasks and information received by the task inbox during the work remind of e-mail messages, however they offer much more possibilities related to the integration with the Comarch ERP Standard System.
Each task is defined in the process editor with the use of Send Decision and Send Information activities. The activities make part of the <<standard activities>> group named <<Tas Inbox>>.
Task inbox activities
Decision is a task which requires user’s activity. A process is stopped and awaiting user’s decision. A situation in which a process sends a task to many recipients and continues its work after receiving first response, may occur. In such case, subsequent decisions are not relevant from the process’ point of view and the process transfers the task to Done folder for the operator who started the activity and Done By Others in the task inboxes of the rest of recipients. Information is a task which can be read only.
User’s folders
Note
Decisions are not handled by the local processes.
After setting complete or detailed <<tracking profile>>, the user can preview process execution from the level of the tax inbox. In the inbox, for each task, tab Preview is added. In the tab, it is possible to preview the current status of process execution. It regards all decisions which were made or are waiting for user’s actions. A decision which requires user’s reaction will be highlighted in yellow.
Preview during decision’s execution
Three dots presented under a current decision mean that this is not the last decision to be made within the process. After completing the process, the user can preview it in the Done directory. Completed decisions are displayed in green and, besides information regarding the operator, contain information about decision which was made.
Preview of completed decisions
Note
It is not possible to delete an operator who has active tasks in the task inbox.
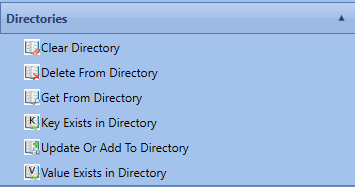
Directories
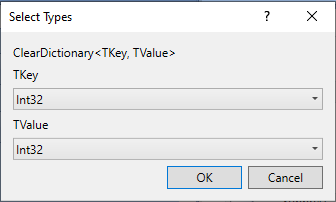
In the group, there are activities allowing for executing of operations on directories defined as groups of key-value pairs. Before adding an activity from that group, it is necessary to specify key and value type.
Directories activity category
Selecting keys and values type for a directory
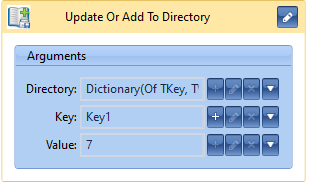
Update Or Add To Directory
Allows for adding values for a specific key to a directory. If the key already exists in the directory, the value will be updated.
Update Or Add To Directory activity
Key Exists in Directory
The activity verifies whether in a given directory, there is an entry containing a specific key. The result is a logical variable assuming True value, if the key exists in the directory and False value, if it does not exist.
Key Exists in Directory activity
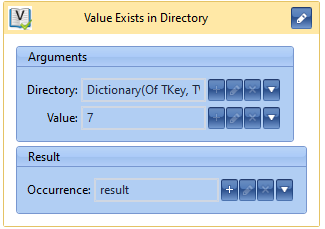
Value Exists in Directory
The activity verifies whether in a given directory, there is an entry containing a specific value. The result is a logical variable assuming True value, if the value exists in the directory and False value, if it does not exist.
Key Exists in Directory activity
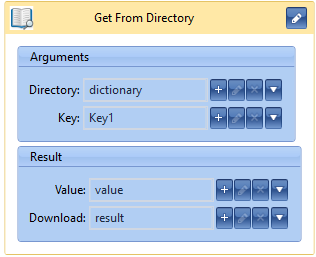
Get From Directory
The activity retrieves a value from a directory on the basis of a specific key. The result, besides the value, is a logical variable containing the information whether the entry was retrieved.
Get From Directory activity
Delete From Directory
The activity deletes an entry from a directory on the basis of a specific key. The result, besides the value, is a logical variable containing the information whether the entry was deleted.
Delete From Directory activity
Clear Directory
The activity deletes all entries from a directory.
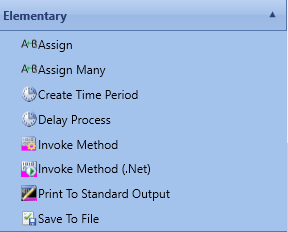
Elementary
This group contains activities which make it possible to assign values to variables or to execute methods.
Elementary activities category
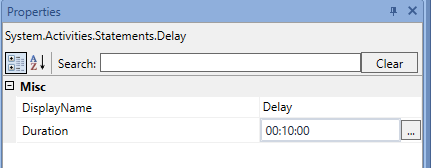
Delay Process
The activity allows for stopping a process for a time specified in the property window. Such process remains with active status, which means that it is not possible to execute another process making part of a current thread. The process status is not saved in a database.
Properties of the activity Delay Process
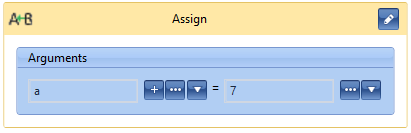
Assign
With the use of this activity, it is possible to assign value to a selected variable.
Assign activity
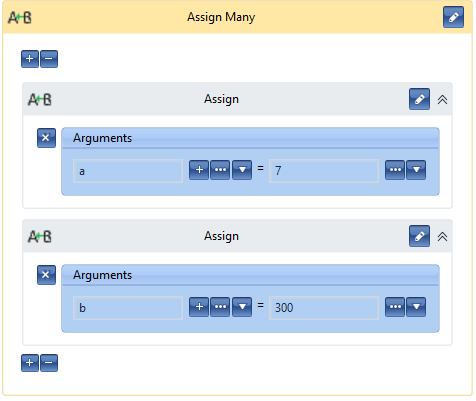
Assign Many
Consists of assigning values to variables in batch, thanks to which it is not necessary to use many Assign activities, one after the other.
Assign Many activity
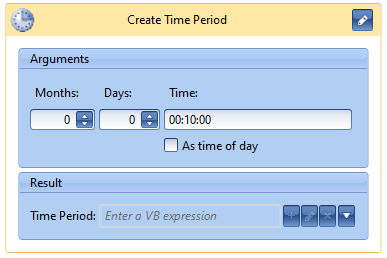
Create Time Period
The activity allows for generating a variable of TimeSpan type which stores a time period and can be used as an argument, for example, in the Delay Process activity.
Create Time Period activity
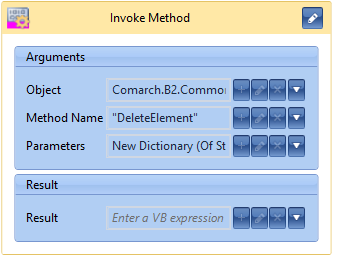
Invoke Method
The activity allows for executing any system method inside of a process.
Example
Calling DeleteElement method on a sales invoice document.
To the Flowchart, it is necessary to transfer the Invoke Method activity and complete the following fields:
Parameters – new dictionary initiation: New Dictionary (Of String, Object) From {{“document”, FS},{“elementId”, FS.Elements(0).Id}}
Result – a blank field can be left
Invoke Method activity
The activity Invoke Method completed this way will delete the first item from the invoice which was previously uploaded to the process.
Invoke Method (.Net)
This activity is similar to the Invoke Method activity. One of the fields TargetType or TargetObject must be specified to enable execution of a non-instance or instance method. In the property window, it is possible to specify method parameters or assign its result to a variable.
Invoke Method (.Net) activity
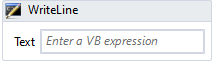
Print To Standard Output
Allows for writing a given text in the BPM server console. Optionally, in the activity properties, it is also possible to specify the author of the text.
Print To Standard Output activity
Save To File
With the use of this activity, it is possible to save data to a file. The data must be given in the binary form (byte array). It is also necessary to ender the file path along with the file name and specify whether the file has to be overwritten, if it already exists in the given location.
Save To File activity
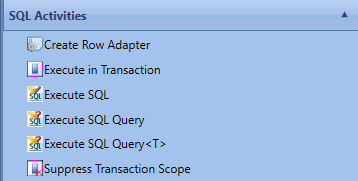
SQL Activities
SQL Activities category contains categories executing operations directly on a database.
SQL Activities activities category
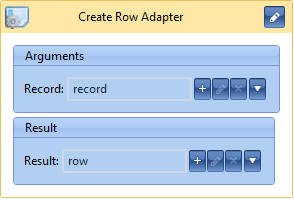
Create Row Adapter
The activity is used for creating SqlRecordAdapter object from IDataReader object, which allows for an easier analysis of an SQL query results.
Create Row Adapter activity
Suppress Transaction Scope
After using this activity, all operations within it are executed beyond a transaction, which means that in case an execution error occurs, a current object status will be saved in a database and no changes will be undone.
Suppress Transaction Scope activity
Hint
If a global process is started from a local process, then Start BPM Process activity should be placed in the Suppress Transaction Scope activity.
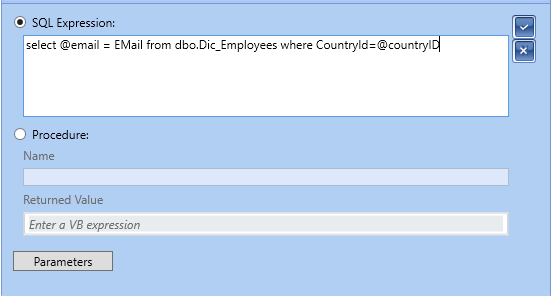
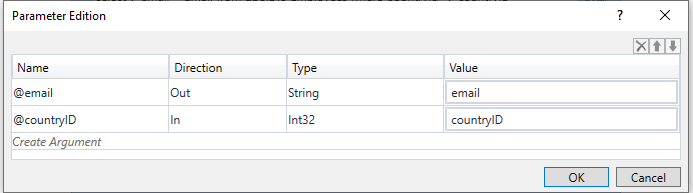
Execute SQL
The activity allows for executing an SQL query on a company database from which a process is started. Input parameters can be transferred to such query and data can be retrieved to variables with the use of output parameters.
Activity Execute SQL
Execute SQL activity parameters
Execute in Transaction
Using of this activity opens an internal transaction in an already existing transaction of a BPM process. Changes introduced by means of the activity to a database will be canceled in case and error (exception) occurs during its execution.
Execute in Transaction activity
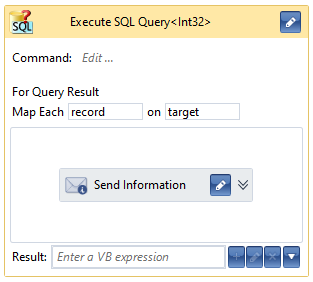
Execute SQL Query
This activity allows for executing an SQL query analogic to the Execute SQL. Additionally, for each returned row, with the use of a query, it is possible to define specific transactions.
Execute SQL Query activity
Besides the activities described for Execute SQL Query, it allows for creating a list of objects of a given type and adding to it objects on the basis of rows which are results of an SQL query.
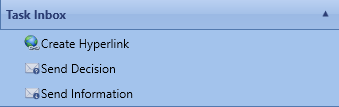
Task Inbox
Tab Task Inbox contains three activities
Task Inbox activities category
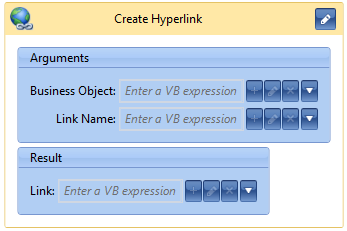
Create Hyperlink
With the use of this activity, it is possible to create a hyperlink to a business object which can be used later, e.g., when sending information to the user. From the level of the task inbox, with the use of that reference, it is possible to open an object form.
Create Hyperlink activity
Send Decision
The activity stops a process activity and sends to the operator/operator group a message informing about the necessity of making a decision. The working of the process will be continued after the user selects one of the options available in the task inbox.
Send decision activity
Example of a decision in the task inbox
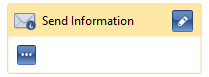
Send Information
The activity allows for sending information to the task inbox of a specific operator, operators or operator groups. Unlike the Send Decision activity, the action does not stop a process and does not require any operator’s action.
Send Information activity
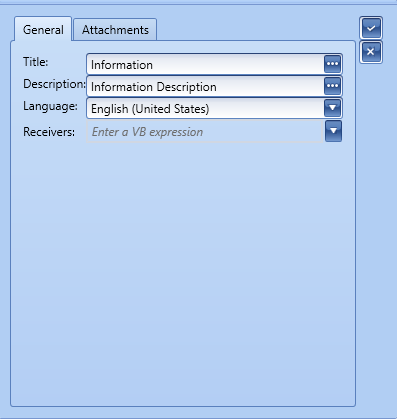
After selecting […] button, a window for editing message content, recipients, subject, is opened. In the window it is also possible to add attachments to the message being sent.
Edition of an information
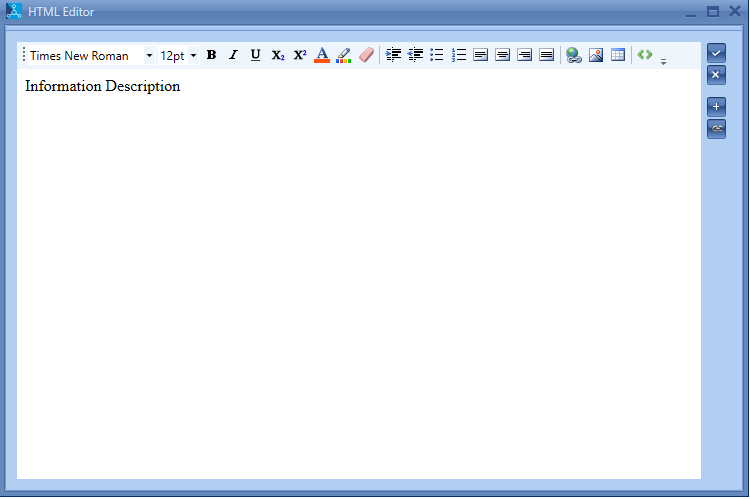
After clicking on […] button placed next to the information description, a window for editing message content appears. The HTML editor provides the elementary edit options, such as: selection of the type, size or color of a font, setting of bold, underline, italic, creation of bulleted list and tables, insertion of hyperlinks and images. It allows also for opening the source code view (HTML) to edit manually (button with red frame in the image below) when the basic functions of the editor are not sufficient.
Edition of information content
After switching to the mode of manual edition of the HTML code, it is possible to use tags compliant with the HTML, CSS standard handled by the Internet Explorer browser. Style sheets should be defined directly in the code or, optionally, they can be imported from external WWW sources.
On the right side, there are buttons used for adding variables and hyperlinks to business objects. After selecting a variable or a hyperlink, the content will be added automatically in braces.
Hint
It is possible to contain .NET expressions in a message content. Example of use of the if. statement.
@{if(SalesInvoice.IsNullOrDBNull,”Generation of sales invoice failed”,”Generated sales invoice:“+SalesInvoice.Numerator.Text)}
For creating messages, it is also possible to use JavaScript scripts.
Below, there is a list of good practices, that lis suggesions, thanks to which the work with processes can turn out easier and processes more effective.
Readibility
Using flowchart as a main avctivity
It is neccessary to group activities with the use of the activity Sequence/Flowchart activities with the same scope (e.g. adding a SI item or setting a customer/vendor) and name and localize them in a proper way.
Multiculturalism
Names of variables and input/output arguments should have English names or be abbreviations of English names
Default names shoud be changed and <<translations>> should be added to them.
Descriptions of parameters should contain information about the use of a given parameter.
A process should have name and added desription.
The names of exported .wdf files should be in English.
Handling of errors
It is necessary to complete fields left empty, e.g. e-mail address, to prevent eocurring of exception NullReferenceException
It is necessary to use TryCatch activity, if it’s possible, in order to catch busness exceptions. Information about errors can be sent to the task inbox
Configuration possibilities
It is necessary to perform parametrization of process operation, e.g. by adding the possibility of selecting a center with permissions of which the process is to be performed.
Oermaters of SQL queries should be associated with variables or arguments to facilitate modifciation of process working.
Performance
When preparing processes, it is necessary to remember that they must work on production databases. A test database used for verification of processes should correspond to the production database in termos of the quantity of data, so that already in the production phase it is possible to identify performance problems.
A user should pay attention to the method of determining scopes for variables. In case a given variable is used e.g. only inside a given sequence, its scope should not be set.
To improve memory performance, it is possible to set unused variables to null in the further part of a process. When a process is waiting for decisions, the data regarding it is saved in the datatabse. The less data is in the database, the less cache memory and memory in the database is occupied.
Loggin in to the Task Inbox
Task Inbox is a tool integrated with the Comarch ERP Standard system by means of which an employee can control whole BPM process flow (within possessed authorizations) and receive information regarding execution of processes.
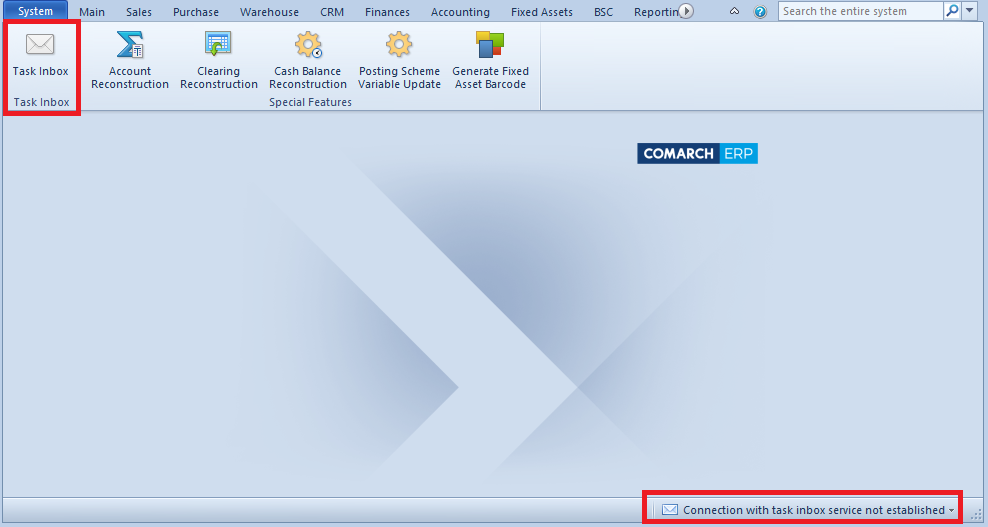
The Task Inbox can be opened in two ways: with the use of a button available in Add-ons tab or from the level of the bottom desktop bar.
Opening task inbox
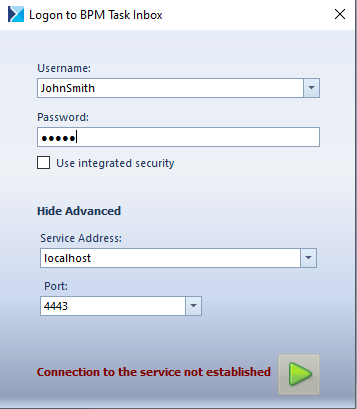
If the Inbox Service Host service is started, the login port is not blocked and is compliant with the one set in BPM configuration, the system logs-on automatically to the task inbox. Otherwise, the log-on window is displayed
Logging-in to the task inbox
In the window, it is necessary to enter user’s access data. After clicking on [Show Advanced] button, it is necessary to select the Inbox Service Host service address and the port set in the BPM configuration.
If the user is logged in to the task inbox during the work with the Comarch ERP Standard System, in the right bottom corner of the screen, there is information regarding new tasks in the inbox.
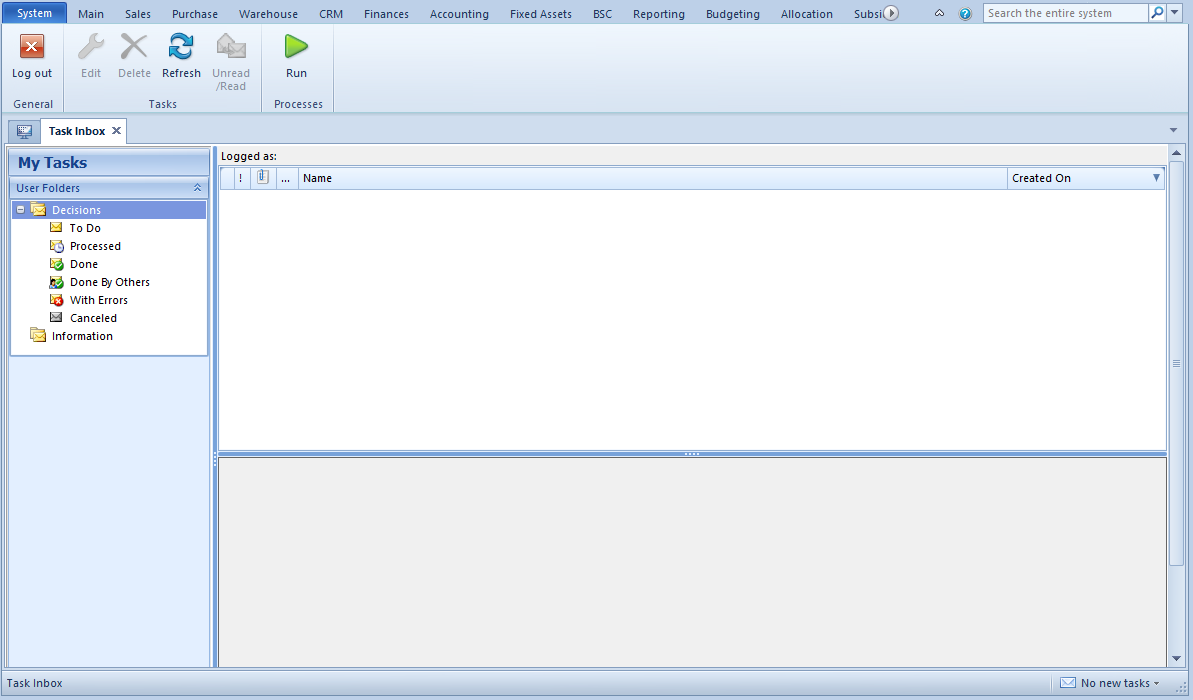
To log-out, it is necessary to select [Log out] button, placed in the main menu of the task inbox.
Task Inbox window
Working in different languages
Translating processes
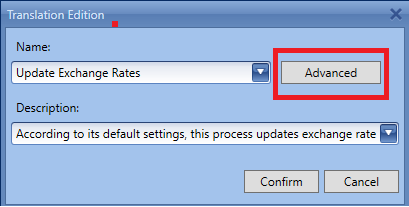
To add/edit the name and description of a process in another language, it is necessary to mark such process and select [Rename], and next [Advanced] button.
Changing name and translations of a process
Editing process name
Editing process translations
To add translation to a process, it is necessary to select the plus button, choose the language and complete the name field. To edit a translation, it is necessary to mark a given entry and modify relevant fields. After entering the modifications, click on [Confirm] button.
Translating activities
To add/edit translations for activities in the BPM editor, it is necessary to click on the pencil icon placed on the element. These translations are defined in the same way as process translations.
Translating activities
Editing activities translations
Translating parameters
To add/edit translations of <<parameters>>, it is necessary to select […] button during the edition of the filed to which the translation is to be added. It can be done both for the name and description.
Translating parameter
Editing parameter translations
Translating tracking profiles
To add/edit translations of <<tracking profiles>>, it is necessary to select [Translations] button when editing or adding new profile.
Translating tracking profile
Editing tracking profile translations
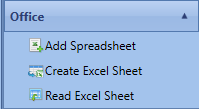
Office
The activities of Office group allow for integrating spreadsheets of the Microsoft Office system with the application Comarch ERP Standaed BPM. Thanks to them, the user can download and save data to spreadsheets or create new ones. To be able to use the actvities of the Office group, first, it is necessary to <<add reference>> Comarch.Workflow.Office.Integration. It is a standard reference, already uploaded to the system. The user must only select a reference for a given process.
Reference for integration with the Microsoft Office system
The group contains three activities:
Office activities catgory
Add Spreadsheet
The activity adds a spreadsheet structure A variable of SpreadsheetDocument type is created The property of an object of SpreadsheetDocument. type is Records which contains a list of rows of a given spreadsheet. Each row object contains Cells property which contains the list of columns in a given row.
Add Spreadsheet activity
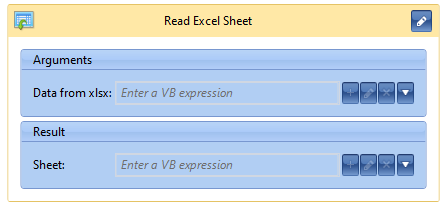
Read Excel Sheet
The activity allows for reading data from a spreadsheet. As an arguments, it is necessary to enter the data from the file. The result is a spreadsheet – variable of SpreadsheetDocument. document type.
Hint
A file can be read, for example, from a <<parameter>> which must be previously defined as FileDataType type. The file data is stored in the FileDataType.Data property.
Read Excel Sheet activity
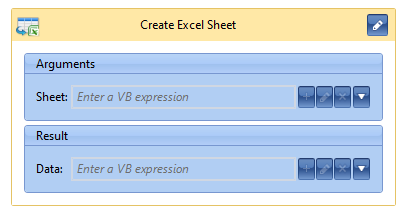
Create Excel Sheet
The activity generates binary data on the basis of an indicated sheet.
Example
After generating binary data it is possible to generate an attachment from it, by Crate Attachment activity. An attachment created this way is added to a list of attachment previously created by Create Attachment List activity. A sheet can be sent to the task inbox of an employee or send via e-mail.
Read Excel Sheet activity
Error handling
The group allows for handling exceptions returned by the application in case an unexpected error occurs during the execution of an operation or in process places planned by the author.
Error Handling activity category
Rethrow
The activity can be used only in Catch field of TryCatch activity. It throws again an exception which was already handled.
Throw
The activity throws an exception indicated by the process author. The exception should be defined in Properties window. It is also possible to use exceptions available in Comarch ERP Standard API.
Properties of the activity Throw
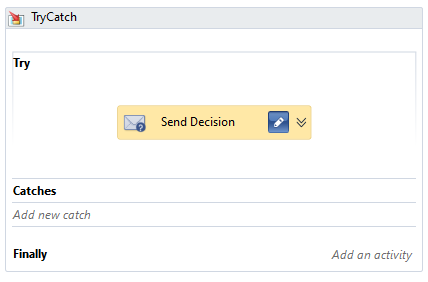
TryCatch
In case an exception occurs during the execution of operations contained in Try field, execution of the action will be interrupted and actions defined in Catch field will be started. Regardless of whether an exception occurs or not, at the end the operations indicated in Finally field will be executed.
TryCatch activity
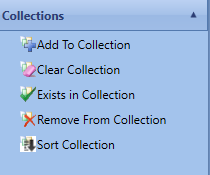
Collections
This group contains activities executing operations on collections, e.g., on lists. Before adding any activity regarding a collection, the user has to specify its type. A type can be any Comarch ERP Standard object, numeric or textual variable etc.
Collections activity category
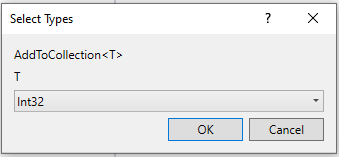
Selecting collection type
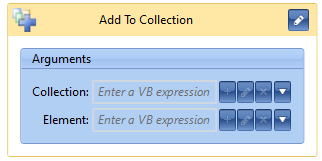
Add to Collection
The activity adds an item to a collection. It is necessary to indicate a collection to which the item is to be added.
Add to Collection activity
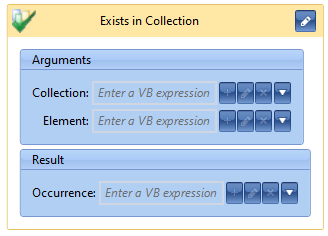
Exists in Collection
The activity verifies whether a given item exists in a collection. As a result, it returns the logical value True, if such item exists in the collection. Otherwise, the value False is returned.
Exists in Collection activity
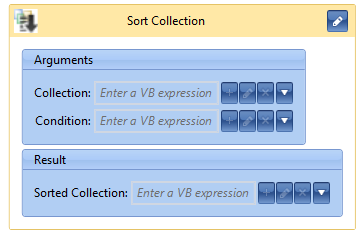
Sort Collection
With the use of this activity, it is possible to sort a collection. It is necessary to specify a condition in textual form (“ASC” or “DESC”) which will determine whether a collection should be ordered in ascending/descending way. In case a collection contains more than one filed, it is possible to select the filed by which the sorting is supposed to be carried out, by entering its name under the (“Name DESC”) condition. After a comma, it is possible to add another condition, if a collection is to be sorted, e.g., first, by name and then by ID.
Sort Collection activity
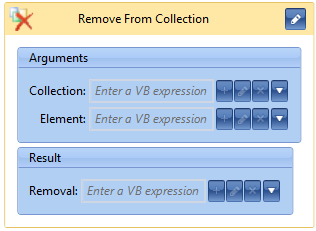
Remove From Collection
The activity allows for removing a selected item from a collection. As a result, a logical value specifying whether the process has executed the operation correctly, is returned.
Remove From Collection activity
Clear Collection
With the use of this activity, it is possible to remove all items from a given collection.
Clear Collection activity
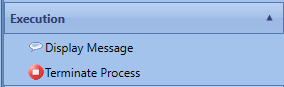
Execution
Execution group contains two activities:
Execution activities category
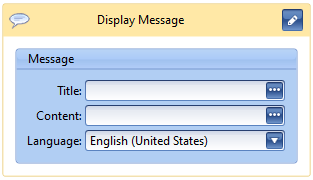
Display message
The activity allows for displaying messages for users in the interface. As arguments, it is necessary to enter subject and content of a message. Both values can be added along with their translations.
Display Message activity
Note
The Display message activity is available for local processes only.
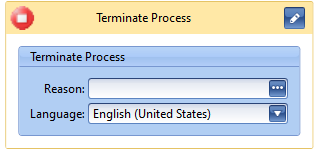
Terminate Process
The activity allows for permanent interruption of execution of a process instance. To add the activity in a proper way, it is necessary to complete field Reason, entering a text containing the reason for the interruption of the process. It will be visible for the user form whom the process will execute that activity.
Terminate Process acttivity
Flowchart
Flowchart group contains activities allowing for adding additional activity trees to a process.
Flowchart activity category
FlowSwitch
The activity allows for executing specific operations depending on the value of the input parameter which can be also an expression. Default value is set at the moment when the input parameter is not equal to any other value defined in FlowSwitch. It is possible to select any parameter type from among types available in Comarch ERP Standard or added by the user in references.
FlowSwitch activity
Flowchart
This activity contains a process scheme analogical to the one created automatically by the editor when adding a process, if no sequence is selected. More information regarding creating a process can be found in article <<Adding new process>>.
Flowchart activity
Condition
This activity is similar to the FlowSwitch activity. The difference consists of the fact that a condition which can be true or not, is verified. Depending on the result, the process executes indicated operations.
Condition activity
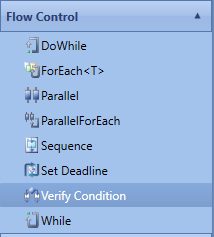
Flow control
Flow control
The activitires in Flow Control group are used for multiple repetition of operations, introduction of conditionals, limitation of processes in time or definition of operations for parallel execution.
Flow control activities category
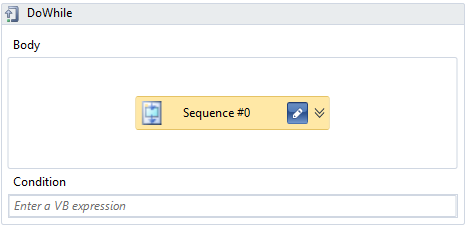
DoWhile
The activity executes operations in a loop until a specific condition is fulfilled.
DoWhile activity
Note
The activity DoWhile will be executed always at least once, because the condition is verified every time after execution of instructions defined in Body sections.
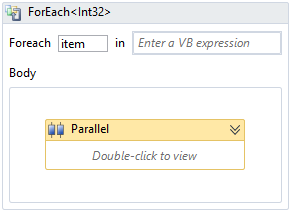
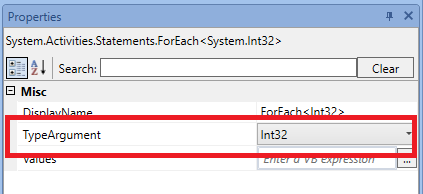
ForEach<T>
The activity allows for executing operation for each item in collection. To use the activity in a proper way, it is necessary to remember to set in the tab Properties the appropriate type of variables included in the collection.
For each activity
Setting types of collection elements for ForEach activity
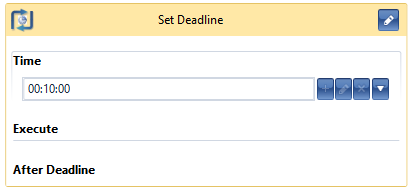
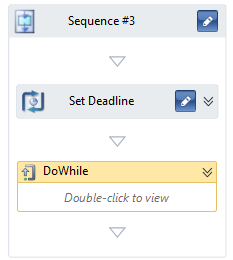
Set Deadline
The activity allows for limiting the time of executed operations. The process will be executing instructions declared in Execute tab maximally for the period specified in Time tab. If the time gets exceeded, the process will execute operations from After Deadline tab.
Set Deadline activity
Note
Set Deadline activity is not available for local processes.
Parallel
Allows for parallel execution of operations, activities or subprocesses.
Parallel activity
ParallelForEach
The activity allows for defining parallel execution of operations for each element. It is a combination of ForEach and Parallel activities.
Sequence
In a sequence, operations are executed one-by-one. It is not possible to branch them. To change execution order, it is sufficient to drag an activity higher or lower.
Sequence activity
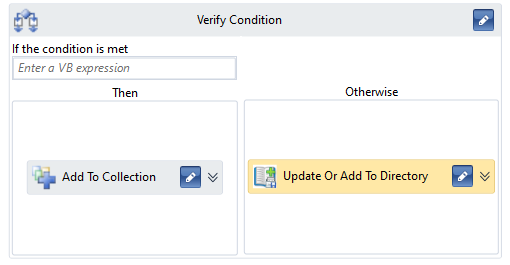
Verify Condition
The activity verifies whether a given condition is real. If yes, it executes instructions placed on the left side, if not – on the right. Upon clicking with the right mouse button on the activity, it is possible to select Add Branch option. It allows for executing a subsequent conditional, if the first condition is not fulfilled (analogically to elseif instruction)
Verify Condition activity
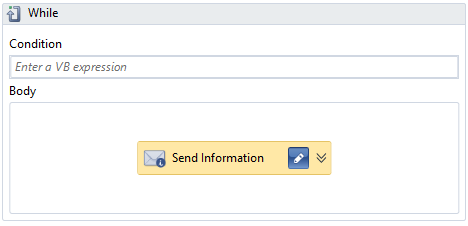
Activity analogical to the activity DoWhile. The difference consists of the fact that in this case a condition is verified always before a loop is executed.
While activity
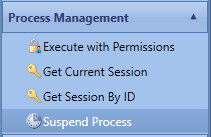
Process management
The activities in Process Management group are used for handling permissions.
Process Management activities category
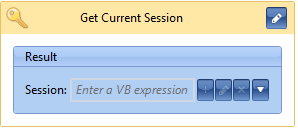
Get Current Session
The activity retrieves an object containing information about the current session within which a process is being executed. Such session contains, e.g., information about the center with whose permissions the process is being executed.
Get Current Session activity
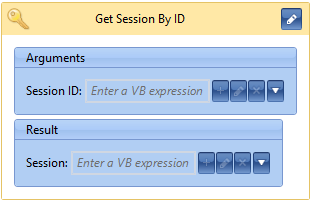
Get Session By ID
This activity allows for retrieving of any session on the basis of its ID.
Get Session By ID activity
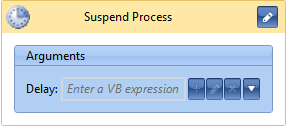
Suspend Process
With the use of the Suspend Process activity, it is possible to suspend execution of a process for a determined time. When a process is suspended, the BPM server queued is released, which allows for starting next process. An important property of the activity is the fact that after process suspension its status is saved in database. It is strictly related to the parameter Continuation of interrupted instances, which is described in article Advanced settings.
Suspend Process activity
Hint
Before suspending a process it is recommended to set variables to null, if it is possible. It is a good practicewhich allows for saving memory resources.
Note
It is not possible to use the activity Suspend Process in a local process.
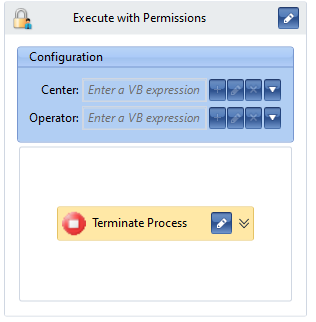
Execute with Permissions
By default, a process is executed with the permissions of the operator and center set for that BPM process (global processes) or of the Comarch ERP Standard application (local processes). To be able to execute a part of a process with permissions of another center and/or operator, it is necessary to use the Execute with Permissions activity.
Execute with Permissions activity
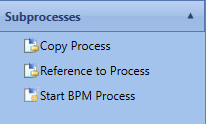
Subprocesses
Subprocesses group contains activities responsible for associating of a given process with other processes available in a database.
Subprocesses activity category
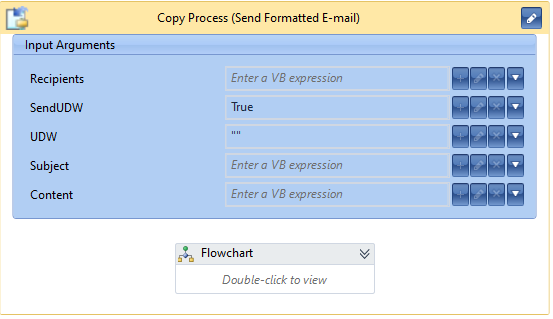
Copy Process
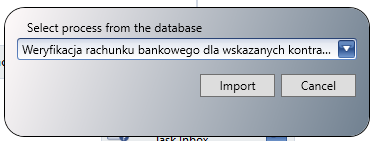
The activity adds an editable copy of a process from the assembly. When adding the activity, the user must indicate the process which is supposed to be added.
Importing of a process during the addition of the Copy Process activity
In the activity window, it is possible to set input and output parameters, preview and edit process definition.
Copy Process activity
Note
The Copy Process activity is not available in the local processes.
Reference to Process
This activity is similar to the Copy Process activity. An indicated process becomes subprocess. When creating a reference, current input and output arguments, that is subprocess signature, are read. After changing the signature, it is necessary to refresh manually the references in all process which refer to the reference.
Note
The Reference to Process activity is not available in the local processes.
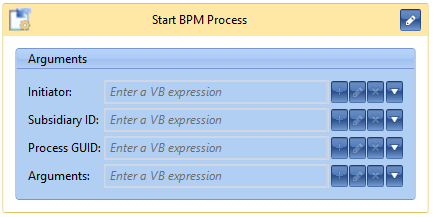
Start BPM Process
The activity allows for starting a BPM process from the assembly for selected subsidiary. As arguments, it is necessary to specify the ID of a distant center or insert Nothing (in such case the process will start in a local subsidiary. It is also necessary to complete the global ID (GUID) which can be found in a hidden by default column of the process assembly. The initiator is the user with whose permissions the process will be started. It is also possible to transfer process arguments as a dictionary, where the key is the parameter name and the value is an object.
Start BPM Process activity
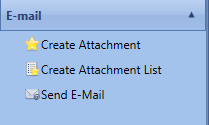
E-mail
In E-mail category, there are 3 activities.
Activities in E-mail category
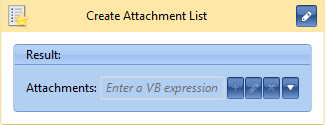
Create Attachment List
The activity allows for initiating a list of attachments. Attachments can be added to the list and sent by means of an e-mail.
Create Attachment List activity
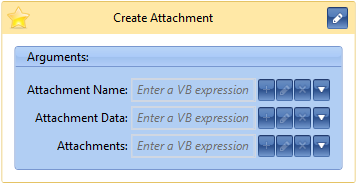
Create Attachment
Allows for creating new attachment which, after being added to the list of attachments, can be sent in an e-mail. To create an attachment, it is necessary to specify its name, data and previously created list to which the attachment will be added.
Create Attachment activity
Send E-Mail
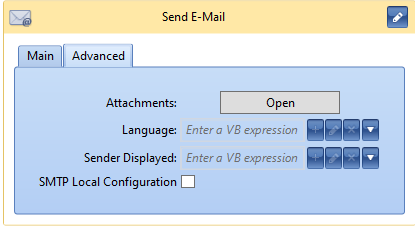
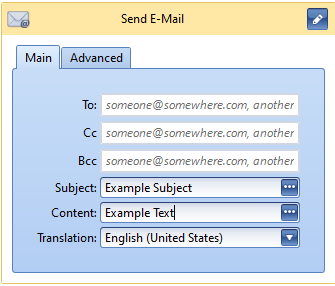
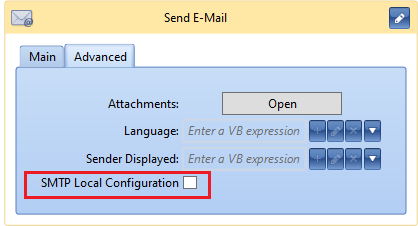
With the use of this activity, it is possible to send a message to a specific addresses. The content of a message can be edited in a HTML editor, the same as is used for information and decisions. Completing of textual field To is mandatory. In Advanced tab, it is possible to add attachments, set language and sender, as well as use SMTP Local Configuration
Send E-mail activity
Advanced settings -f e-mail message
ERP Context
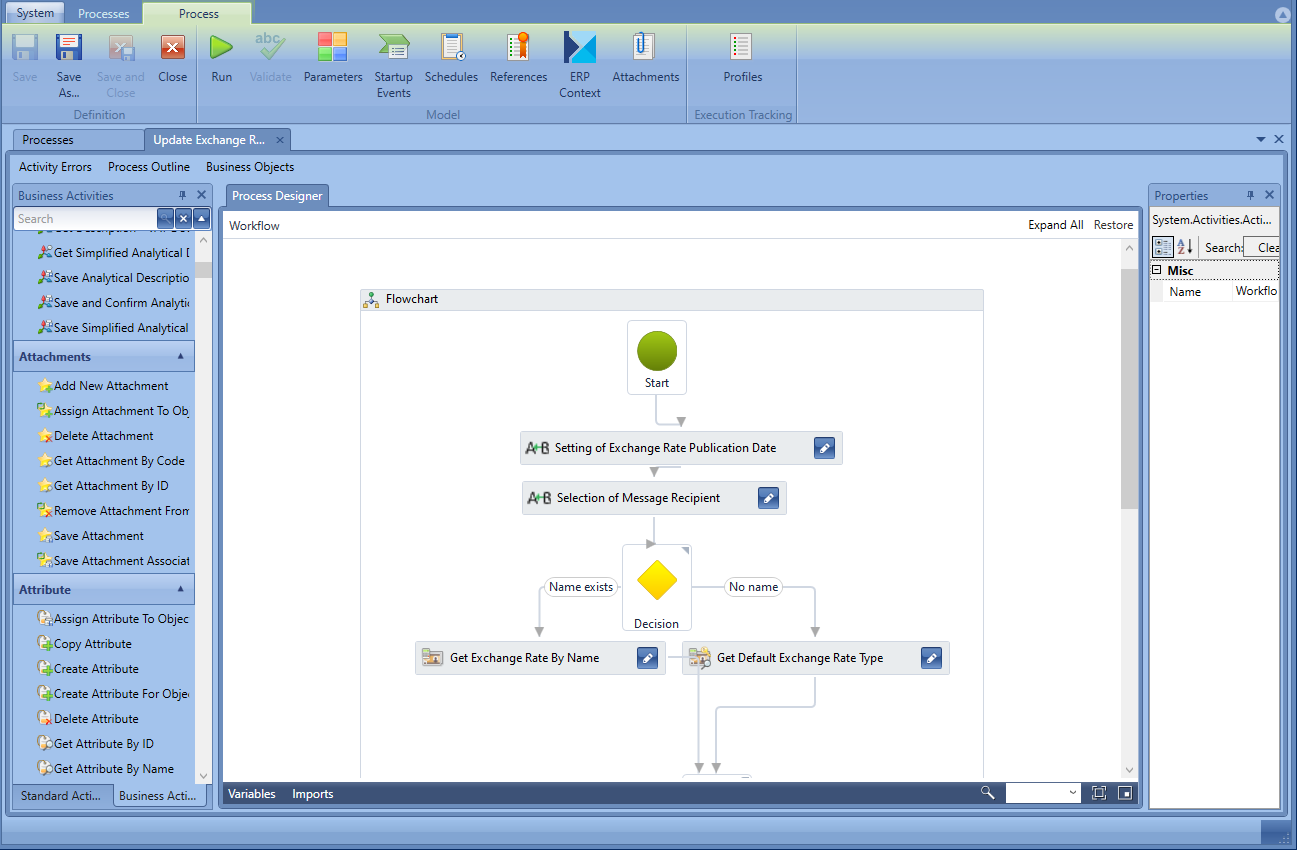
The functionality of contexts allows for assigning a global process to a Comarch ERP Standard object from the level of which the process is to be started. A list or object (e.g., invoice) detail can be used as a context. To define a context, it is necessary to select [ERP Context] button from Model group of buttons.
Starting window with context definition
A window, where it is possible to assign values retrieved from a given context to specific process parameters, is opened.
Window for defining context
In the section of startup parameters, there is a list of all user’s parameters marked as Startup. Below, there is a list of available objects of the Comarch ERP Standard system along with information about the type of a given parameter. Assigning an object to a parameter makes a process visible for a given object, whereas the value of such parameter, upon contextual startup, is automatically completed with the value of the object property.
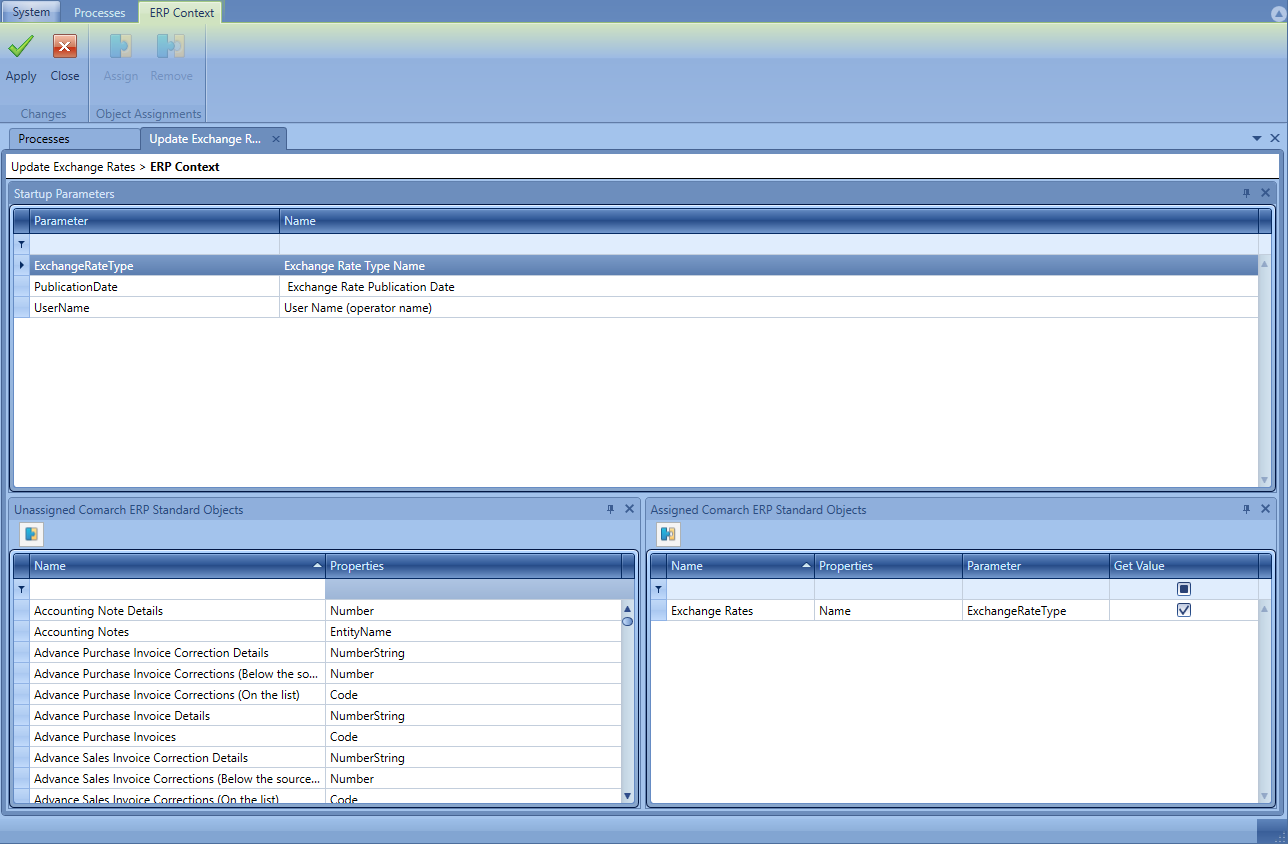
Example
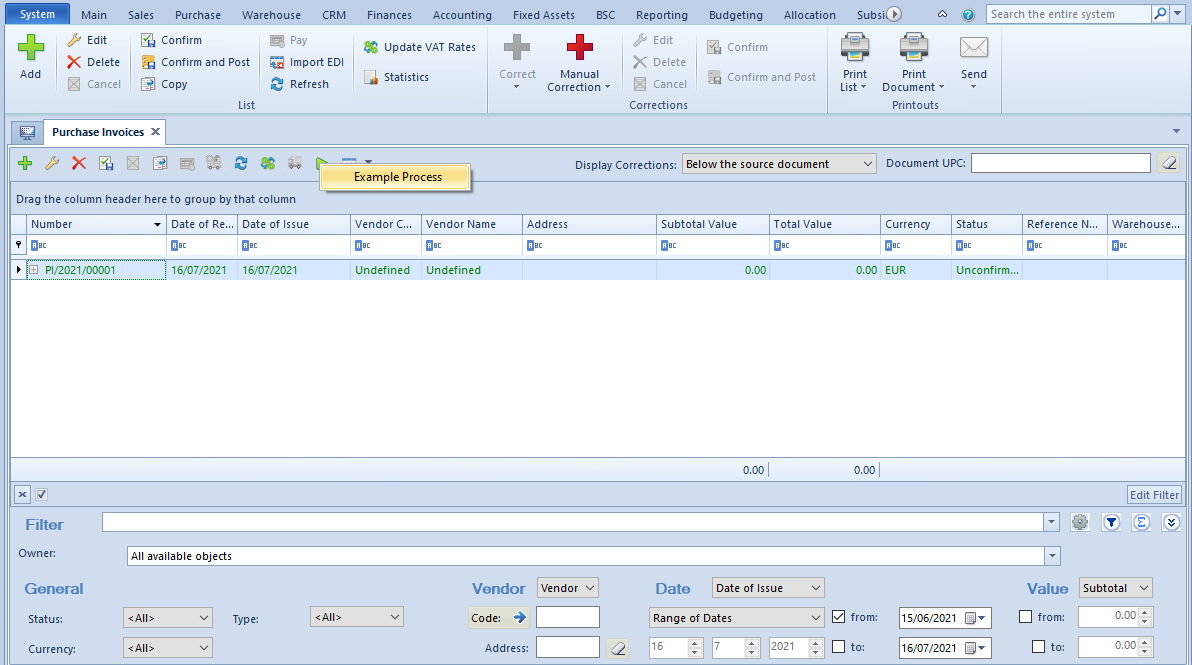
A process executes some operations on a purchase invoice document (PI). When starting the process from the level of the Task Inbox, as process parameters it is necessary to specify document ID and transaction date. So it is possible to define a context in such a way as to make it possible to start the process from the level of the list of PI and for document ID and transaction date to be completed on the basis of selected item. To do so, in the window of the context definition, it is necessary to associate process parameters with the list of purchase invoices (select object on the right side and click on [Assign]). Option Get Value should remain checked.
Context example – ID association
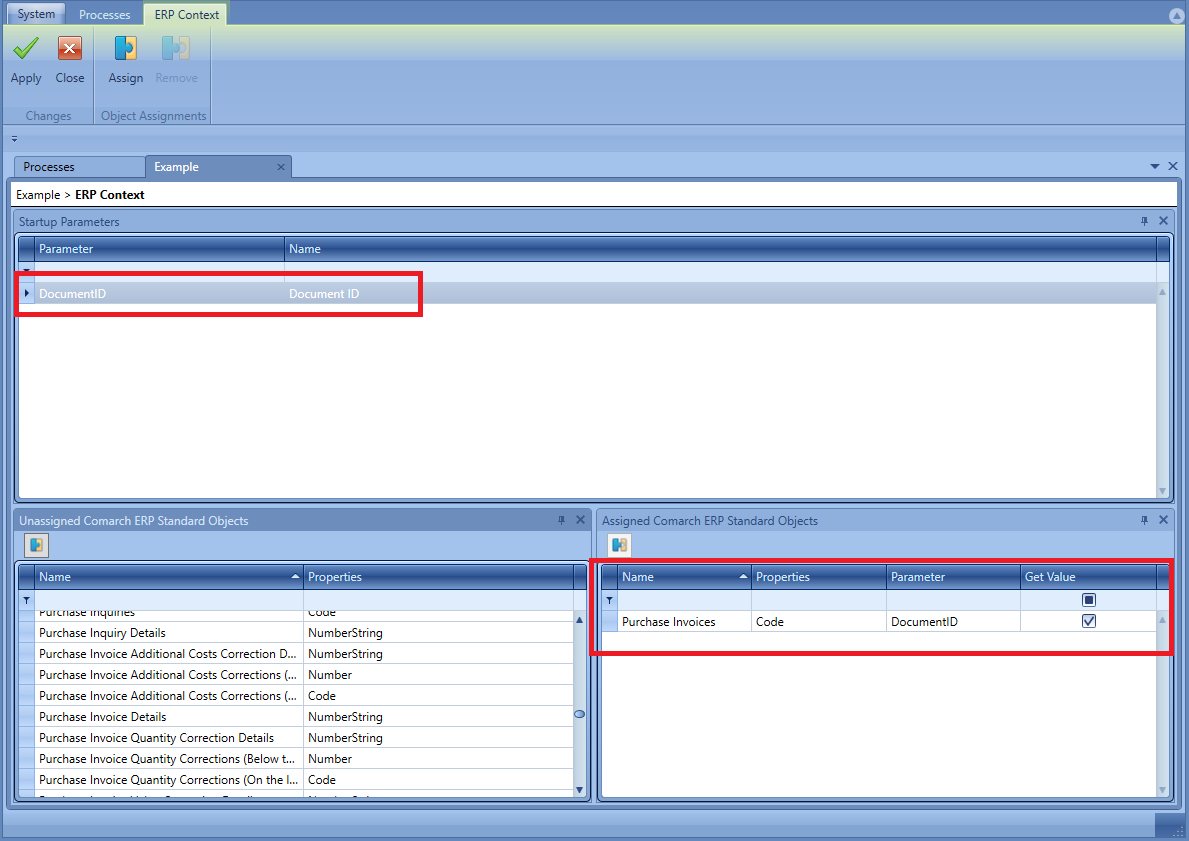
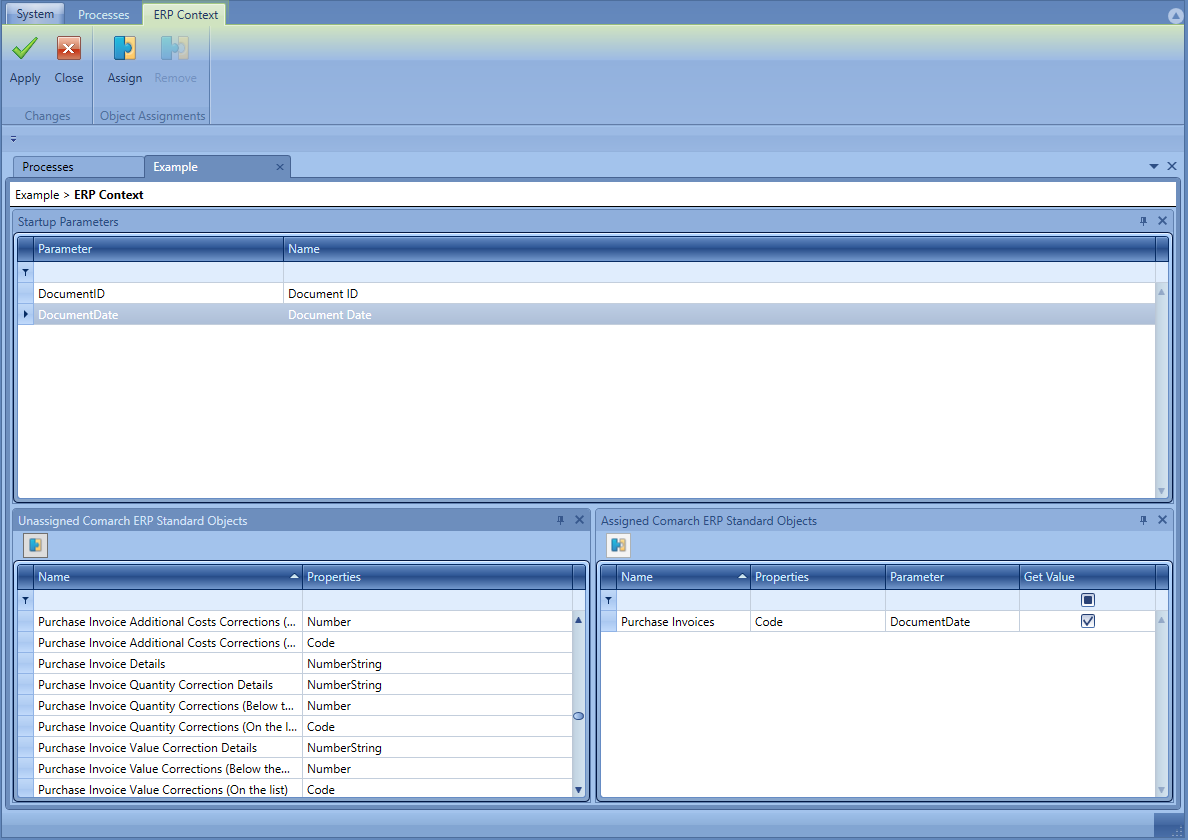
Context example – date association
After applying the changes, saving the process, publishing it and assigning appropriate permissions, it will be possible to start the process from the level of the list of purchase in voices in the Comarch ERP Standard system.
Starting process from context
References
References refer to .dll assemblies which extend standard system functioning, e.g., by adding author activities. To use a given reference in a process, it is necessary to add it to the system. It is done by selecting button [Import] from References group of buttons which is available from the level of the process assembly and next, by selecting appropriate files from the disc. It is also possible to export references.
Hint
For a proper functioning of added extensions, it may be necessary to restart the Comarch ERP Standard system.
Adding references to the system
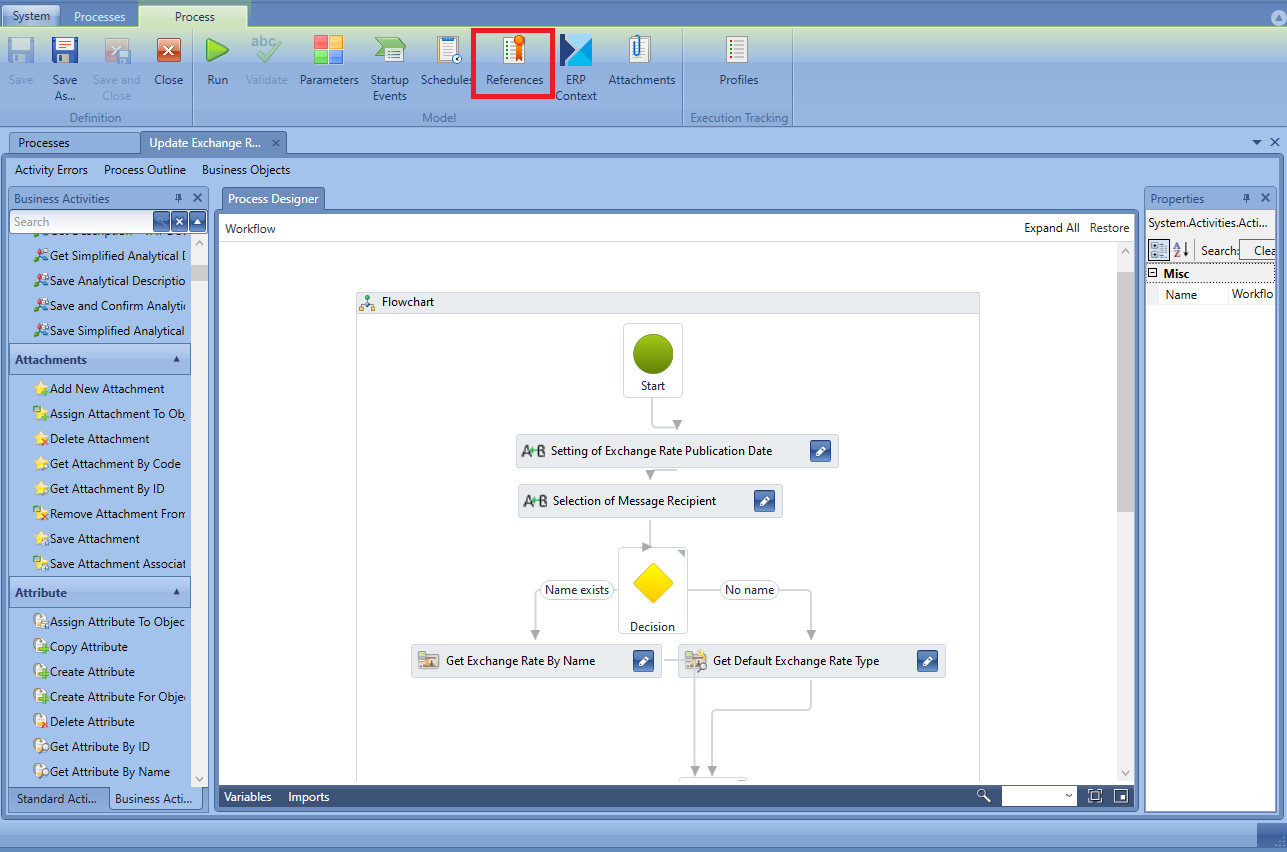
After uploading references to the system, it is possible to add them to particular processes. In process edition window, it is necessary to click on [References] button, available in Model group of buttons.
Opening window for adding references to a process
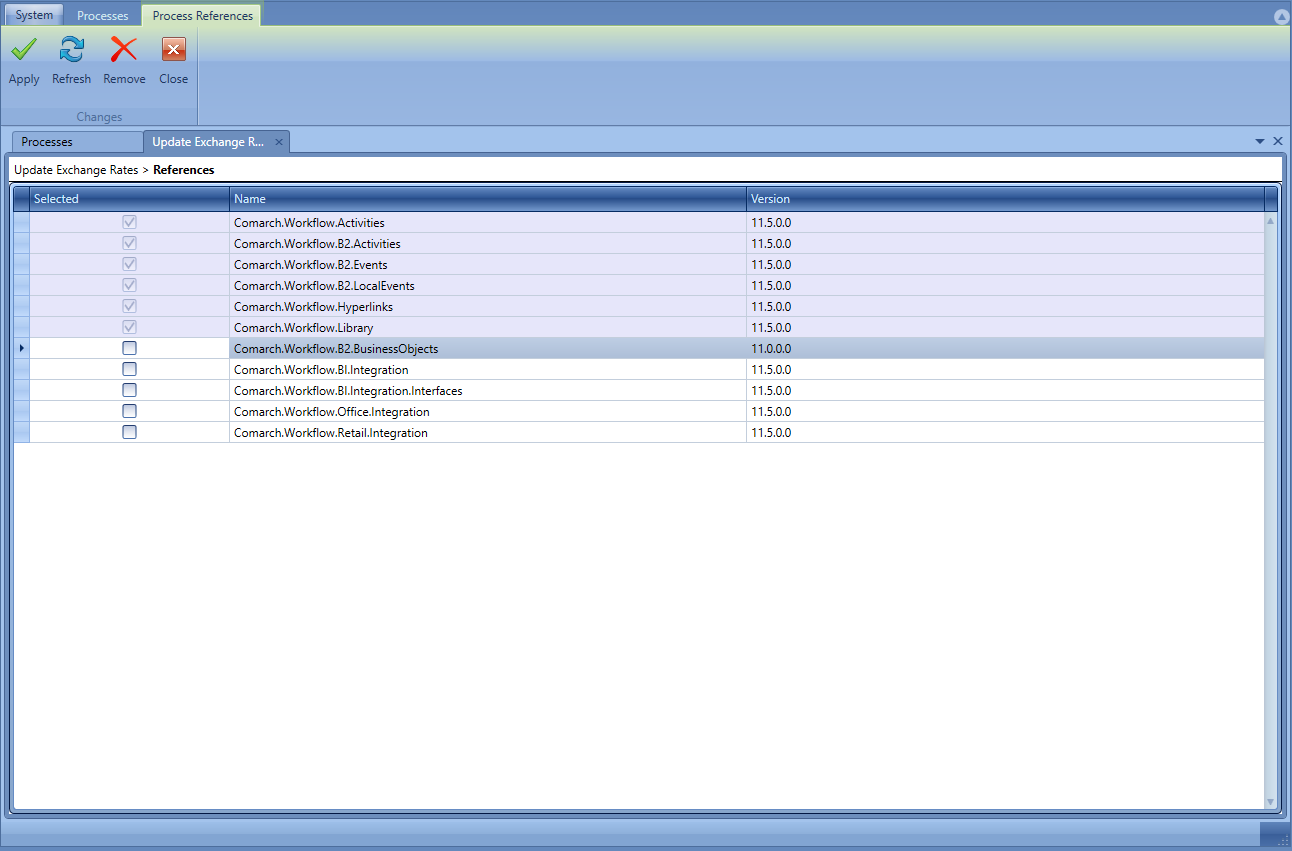
On the list of references, there are standard references which cannot be deleted. Additionally, the user has access to standard assemblies for integrating the Comarch ERP BPM with Comarch Business Intelligence, Microsoft Office or Comarch Retail POS.
List of references
After being added to the system, own, dedicated references are automatically displayed on the list of references available from the level of process definition. After selecting a reference and clicking on [Apply] button, it is possible to use the created extension.
Note
Upon importing new version of a process which refers to newer own assemblies, it is necessary to restart the BPM server service to retrieve new extension definitions.
Schedules
Besides manual and automatic triggering of processes on an event, the system allows for starting processes according to defined schedules.
Note
Schedules are available for global processes only.
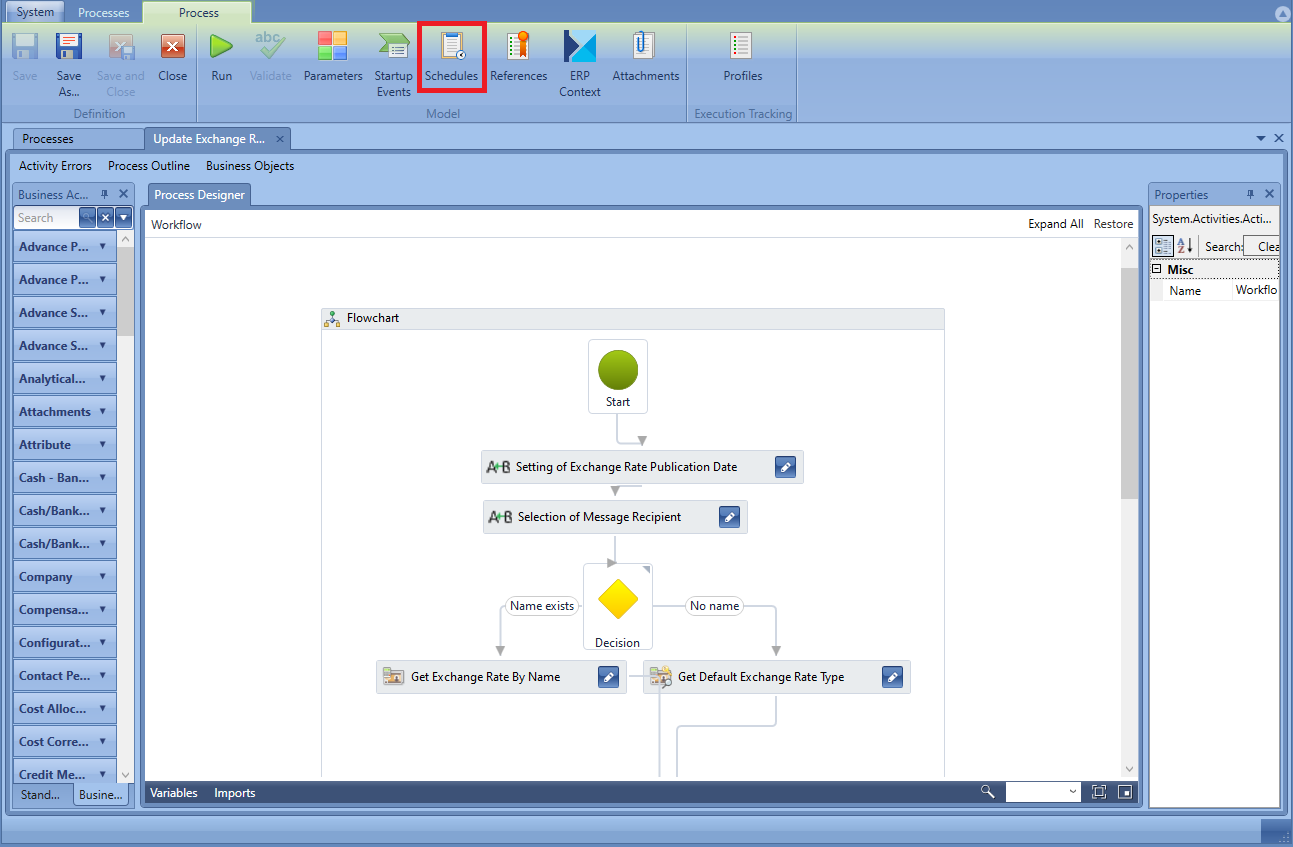
To add a schedule to a process, it is necessary to select [Schedules] button, available in Model group of buttons.
Opening window of process schedules
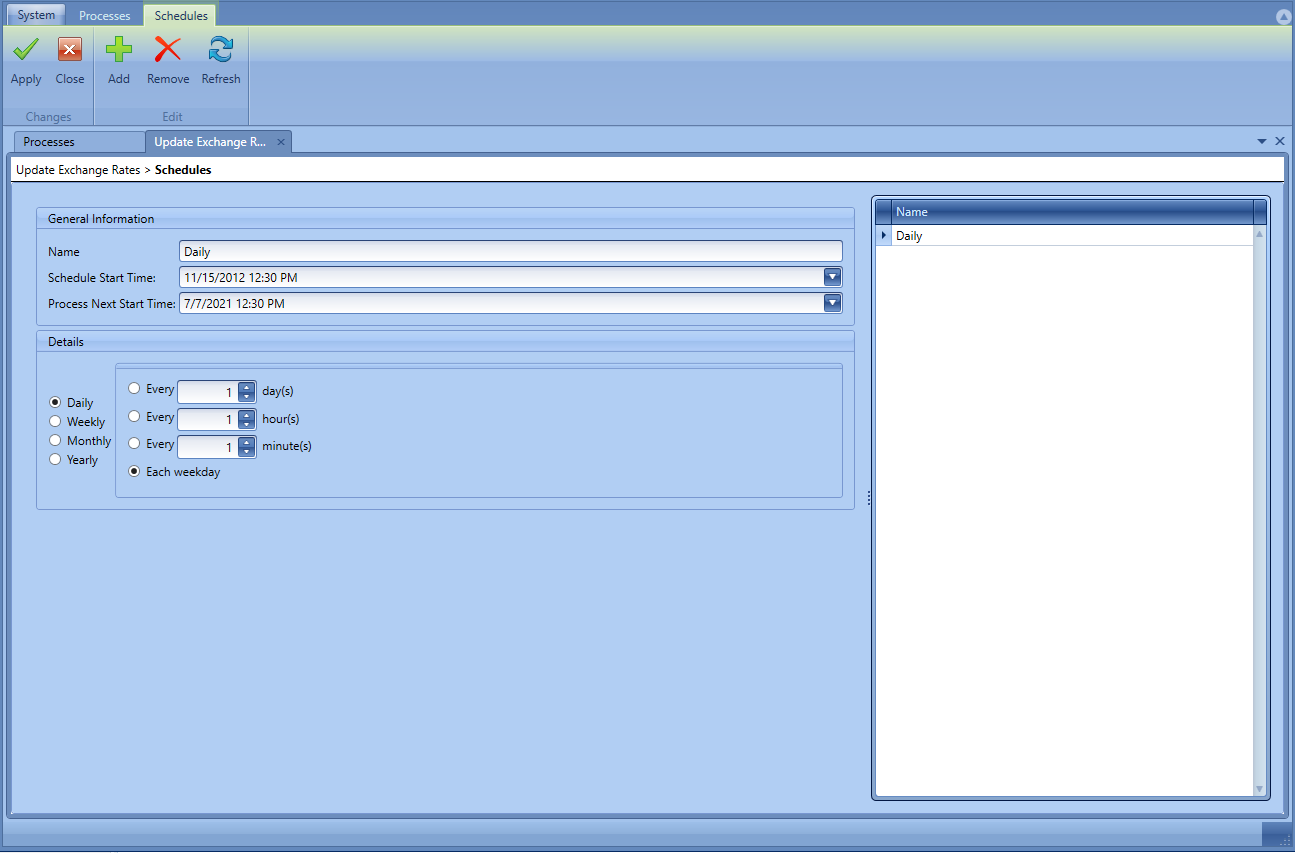
In case there are no defined schedules for a process, the system asks whether the user wants to create a new schedule. After answering Yes a window for defining a schedule with a list of schedules is opened, where it is possible to add new schedules and delete existing ones by means of [Add] and [Delete] buttons. On the left side of the view, details regarding schedule currently marked on the list, are displayed.
Window for defining schedules
A schedule can be defined as daily, weekly, monthly or yearly.
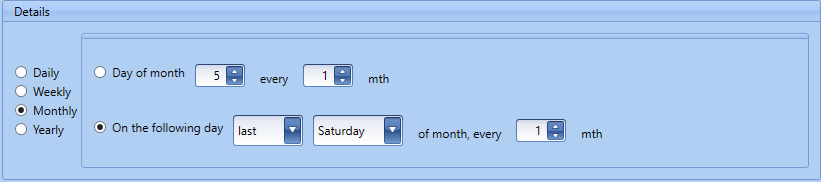
Example
To allow a process to start automatically each last Saturday of a month, it is necessary to:
Select Monthly schedule type
Select option On the following day
Select day – from drop-down lists it is necessary to select options last and Saturday
Define period of schedule validity – in this case, it is necessary to select option every 1 mth, because the process is supposed to be started every month.
Schedule example
Note
In case the BPM server is deactivated, processes are not executed, but they are queued. It means that they will be executed after the server is started. In the case of processes with schedules, when the server is started, in a queue there can be only one instance of such process. Subsequent startups of that process are not queued.
Sartup events
Startup events enable automating starting of a process before or after execution of a specific operation in the Comarch ERP Standard system.
Example
It is possible to define a process that will automatically compete item’s attribute after it is saved.
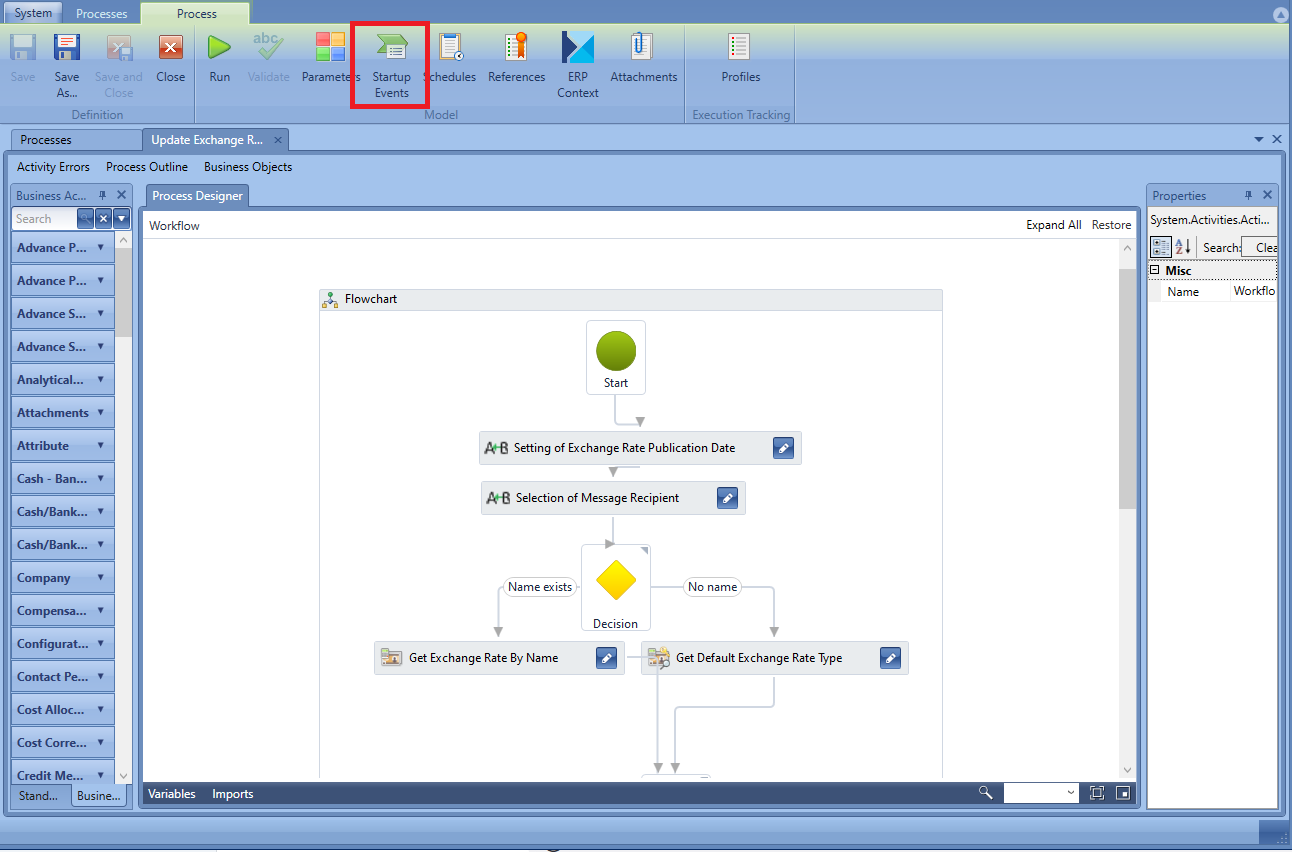
Startup events differ depending on process type (local or global). They can be selected when adding a new process or when editing a process, by selecting [Startup Events] button, available in Model group of buttons.
Opening window for selecting startup events
A list of startup events grouped by names of objects available in the system is opened.
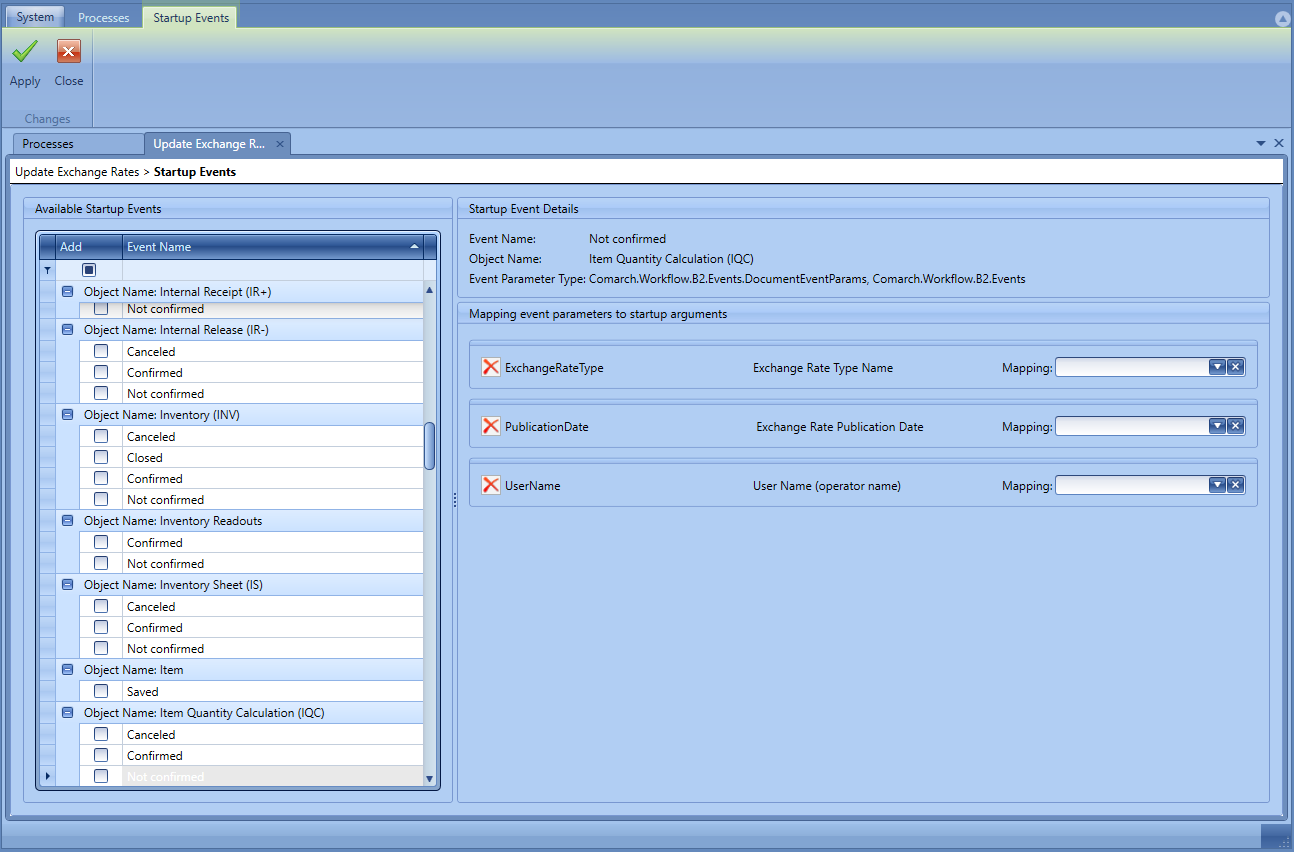
Startup events selection window
On the left side of the window, it is possible to select those startup events, which will trigger a process. Along with an event, parameters can be sent to a process. They can be selected from the drop-down list of a given startup event. These values can be connected with parameters by means of mapping. Mapping section is located on the right side of the section containing startup event details.
Selecting event parameter
Hint
One of the most common arguments of startup events is DocumentEventParams. It is available for all events regarding documents. It contains the following information:
CurrentStateType– current document status
DocumentId– document ID
DocumentTypeNamespace – parameter identifying document type
PreviousStateType – previous document status
This parameter is generated for events of global processes only.
Note
Processes Copy Attribute From Customer Form To Sales Complaint (SCL) and Display Message About Customer Submitting Complaint (SCL) use the same startup event. It is necessary to ensure that the last modification is executed for the second process. Otherwise, data returned by both processes might be incorrect.
Parameters
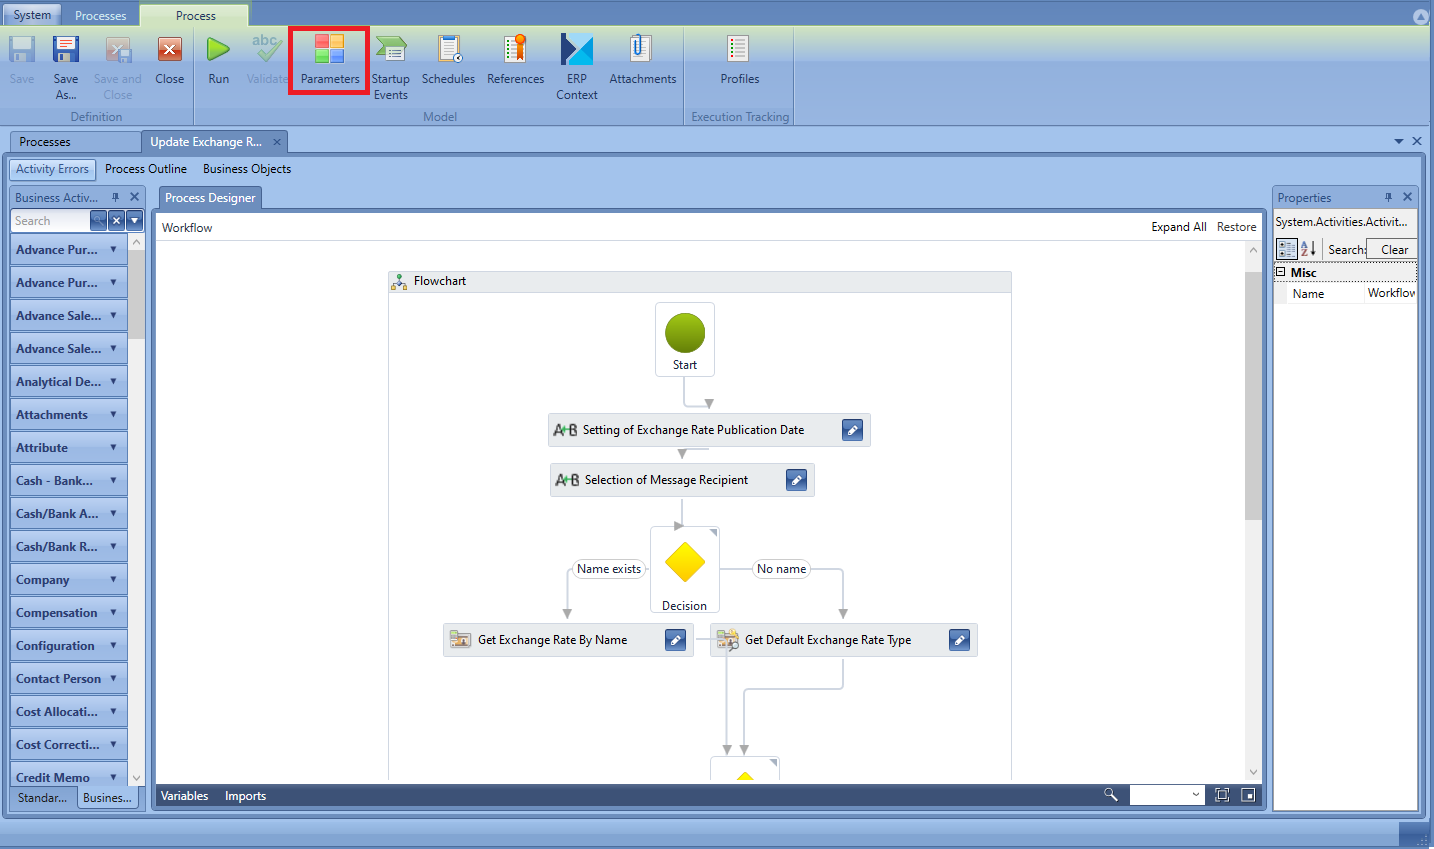
Parameter is a variable being a part of a process. To open a list of parameters, it is necessary to click on [Parameters] button, available in Model group of buttons.
Opening the list of parameters
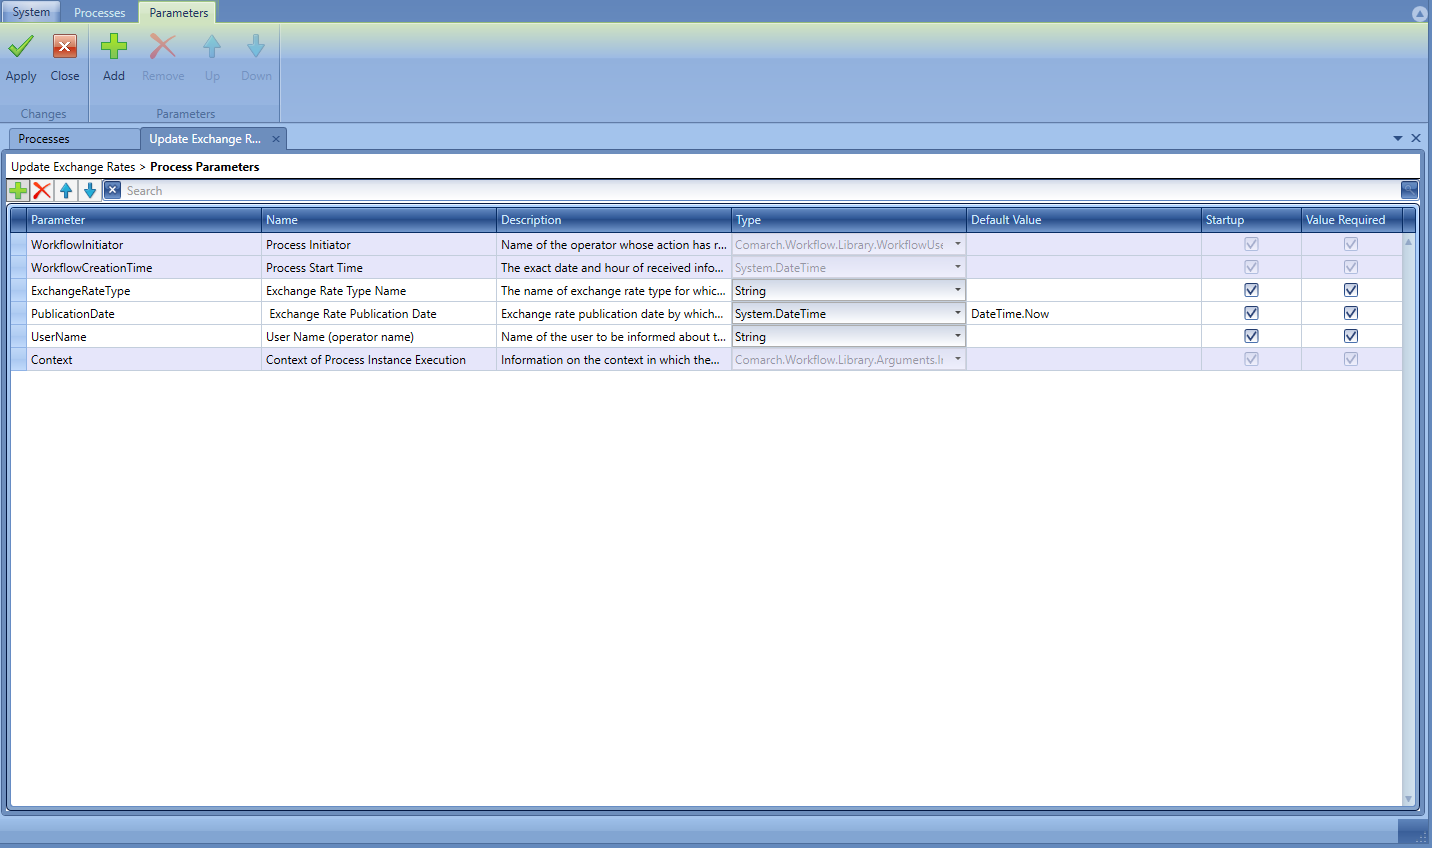
A list containing all parameters defined within a user’s process, as well as default system parameters, is opened.
List of process parameters
Each process has three default parameters:
WorkflowInitiator – process initiator
UserName – name of the operator who has started the process manually or name of the operator for BPM service in the case of an automatic process startup
WorkflowUserId – operator’s ID
Context – context in which the process is being executed
Instance – information about the process instance, its definition and type
Session – information about process session, center and company for which the process was started. This parameter can be used, for example, to retrieve a current center by its ID.
StartMode – information about the method in which the process was started
WorkflowCreationTime– time of process initiation
To add a parameter, it is necessary to select [Add] button and select variable type and parameter’s textual type (Parameter column).
Hint
Variable type can be chosen from a drop-down list containing types available in the whole system. Recently used variable types are available on the list on the next selection.
Additionally, it is possible to set the following options:
Name – name presented for the user during the manual process startup
Description
Default Value– value assumed by a parameter if it is not specified by the user when starting a process
Startup – if the option is checked, a parameter can be transferred from outside during a process startup. If the option is unchecked, also Value Required option is automatically unchecked.
Value Required – after checking the option, a parameter is presented on the list during the manual process startup in the Comarch ERP Standard system and its value ca be set or changed. If the user does not select that option and the option Startup is checked, it is necessary to enter the default value.
Example
To transfer a file to a process, a new parameter named File, of FileDataType type, is added. The fields Startup and Value Required remain unchecked.
Example of a prameter of File type
When starting a process for the File parameter, it is possible to select a file which will be transferred to the process. The path to the indicated file will be entered to the parameter.
Process simulator
Process editor allows for verifying process execution with the use of a built-in simulator. Functioning of a process can be verified for different process configurations without the necessity of starting the BPM service.
Note
The process simulator works on company database to which the BPM process designer is logged-in. All changes applied by a process started in the simulator will be saved in the database.
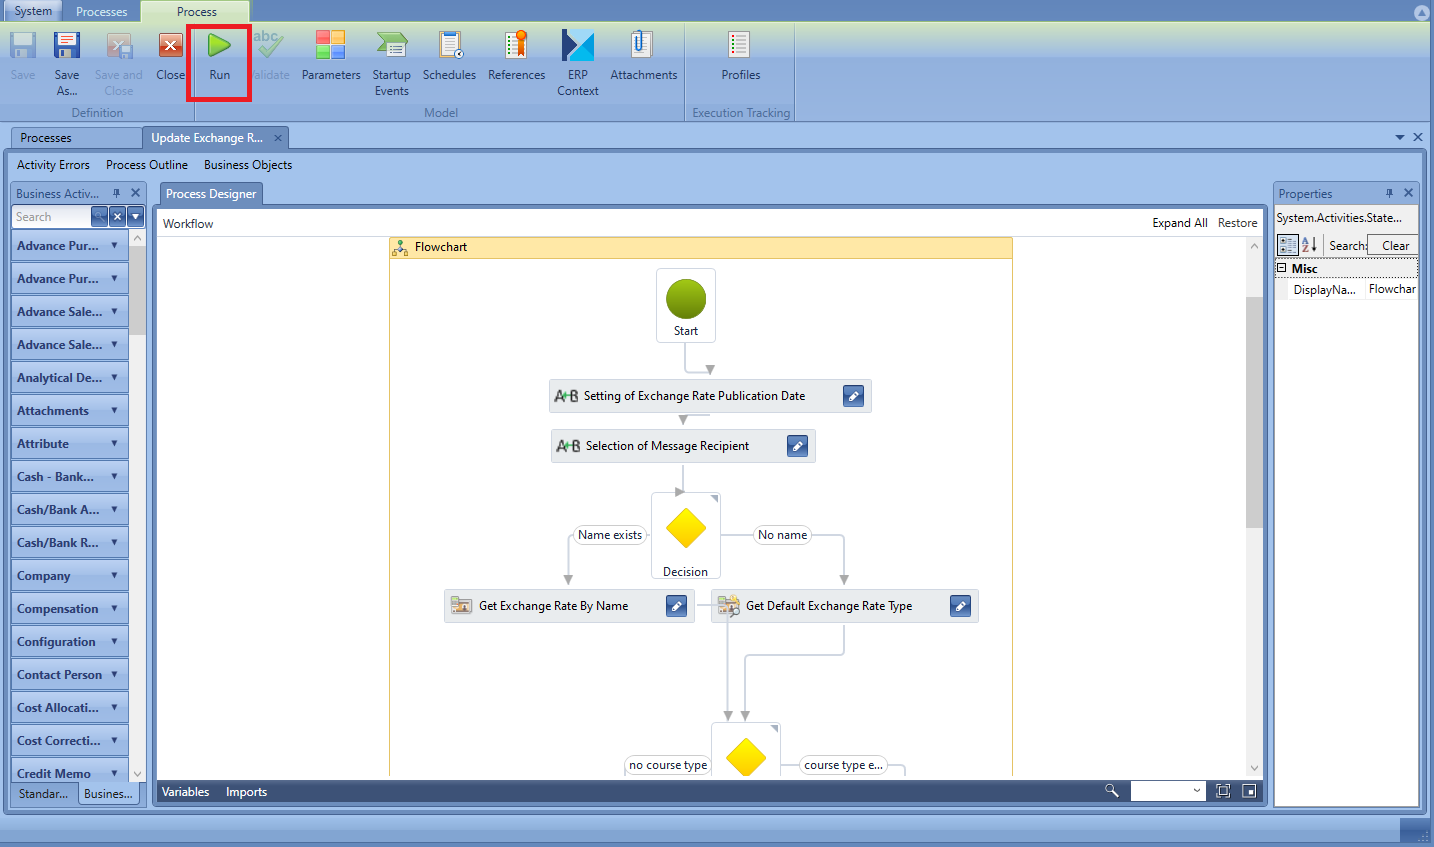
To open the process simulator window, select button [Run], available from the level of the process modification window
Starting process simulator
In the process simulator window, a preview of analysed process is available.
Process simulator window
Simulation will be started upon clicking on [Run] button and specifying tracking profile.
Note
When using the process simulator, it is necessary to define default startup parametrs, because it is not possible to enter them in a process in the same way as it happens when starting a process from the level of the Task Inbox.
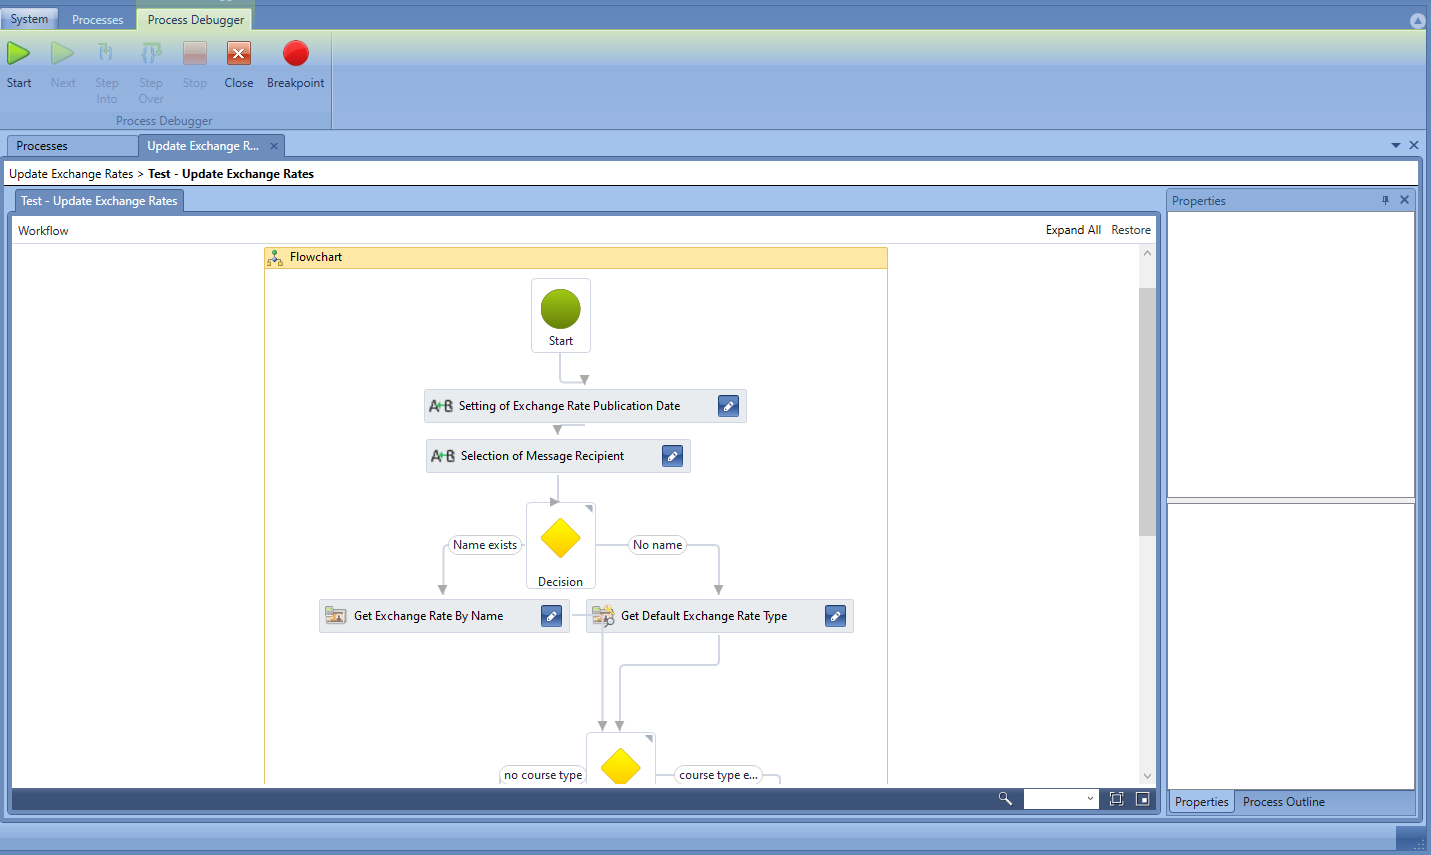
Buttons [Next], [Step Into] and [Step Ober] are active after the user selects his/her own breakpoints. A breakpoint can be set by clicking on a given activity and selecting [Breakpoint] button. A red dot will appear next to the selected activity. Now, during the elaboration, the process will stop after reaching that point. To resume the activity, user’s action is necessary.
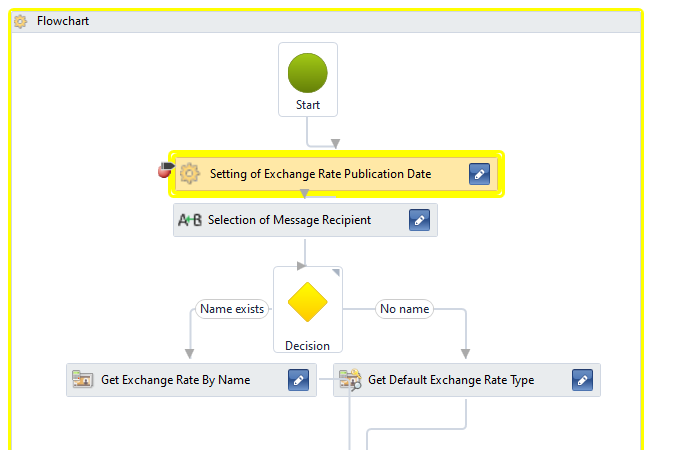
Activity with added breakpoint
During the simulation, activities have borders in three colors:
Yellow – the activity is just being executed
Green – the activity has been executed successfully
Red – an error occurred during activity execution
Execution tracing and properties view are the same as in the case of process monitoring.
Process modification
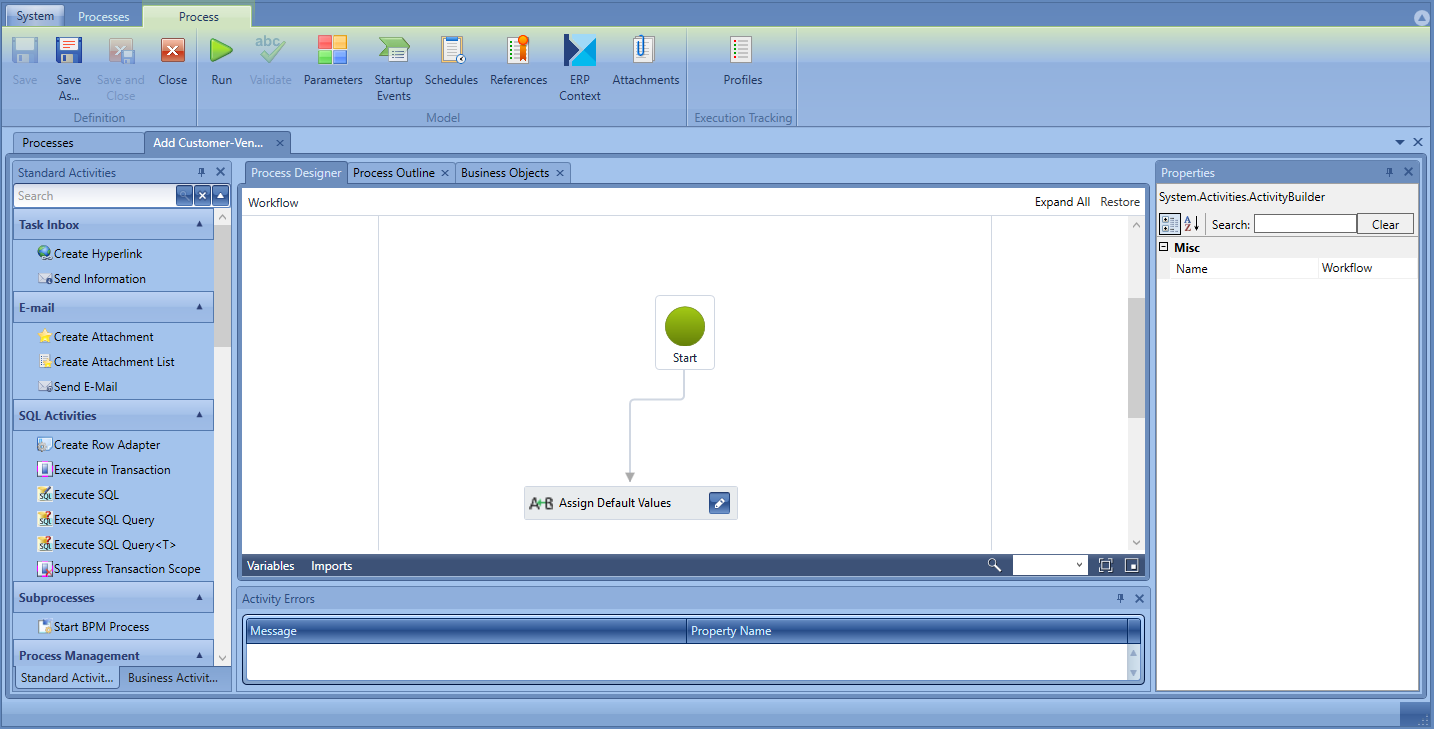
After creating a new process or opening an existing process to editing mode, a modification window is opened. In Process Designer tab, it is possible to create a process flowchart by adding relevant activities with the use of the drag and drop method.
Process edition window
On the right side of the window, there is an activity list. The user can select from among standard and business activities. Standard activities are described in detail in Selected standard activitiescategory.
Variables and imports
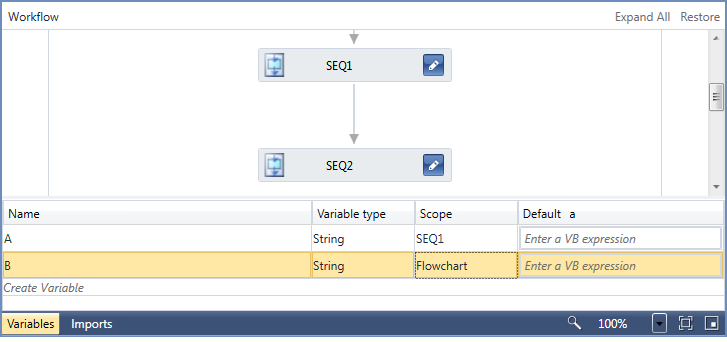
Below the working pane (Process Editor tab), there are buttons [Variables] and [Imports]. From this level, it is possible to handle variables used in a process, create new variables and delete existing ones. It is also possible to change a variable, its visibility range and define its default value.
Variables in a process
Example
Process is composed of Flowchart activity which contains two sequences: SEQ1 and SEQ2. Variable defined for the scope of the SEQ1 sequence will be not visible for the SEQ2 sequence nor for Flowchart.
Variable defined for the Flowchart range will be visible for all process elements, because variables are visible for a given activity and its child elements.
Example of variables scope in a process
In the Imports tab, there are imported namespaces The list contains standard references and references imported by the user. The process of adding new namespaces is described in Referencesarticle.
Imports in a process
Activity errors
Below, there is Activity Errors section. It contains messages about incorrectly configured activities. Such message contains information about error’s localization and reason. If error regards an activity, upon clicking on the message, the user us transferred to that activity. The messages are generated on the basis of errors identified by the validator which verifies the correctness of used activities.
Activity errors
Note
It is not possible to save a process, if there are activity errors.
Structure, properties and business objects.
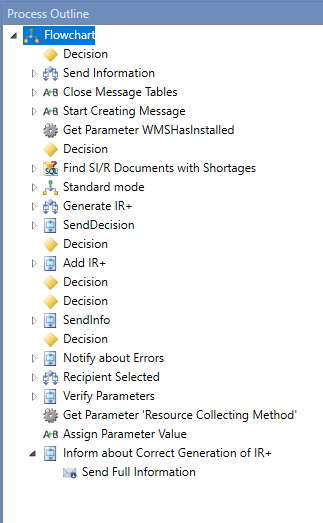
Section on the right side presents additional information about process. In Process Outline tab, there are all activities used in the process ordered in a tree structure.
Process outline
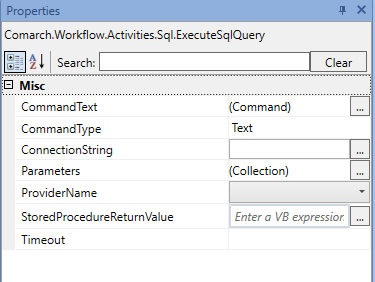
In Properties tab, it is possible to modify parameters of a selected activity. The list of properties works in contextual mode, which means that it is displayed depending on activity marked in the work pane.
List of properties of activities
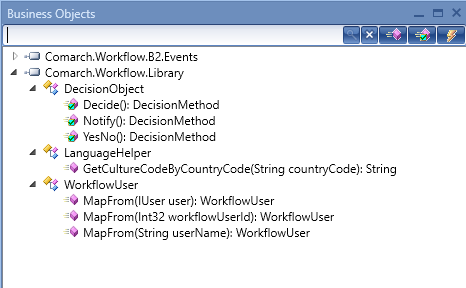
Tab Business Objects presents advanced view of a process outline. It contains all methods and events available in a process.
List of business objects
Adding new process
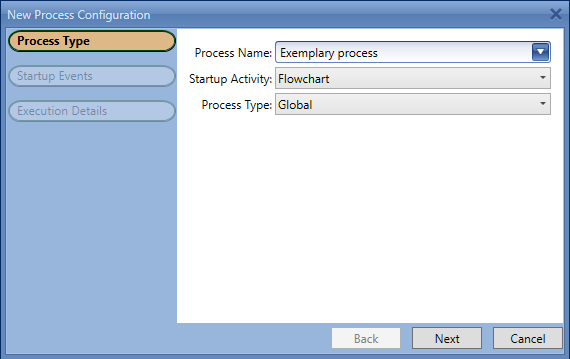
To add a new process, it is necessary to select [Add] button, available in the window of process assembly. A new process configuration window opens. In the first stage, it is necessary to select the type of the startup event (flowchartor sequence) and the process type (local or global). At this moment, the name field is not mandatory, it can be completed when saving the process for the first time.
Process type
In the second stage, the user can select any number of startup events. They determine the moment in which a process should be started automatically. An example of such event is After saving an item. For each process type, different startup events are available. Moreover, for local processes it is necessary to select at least one event.
Startup events
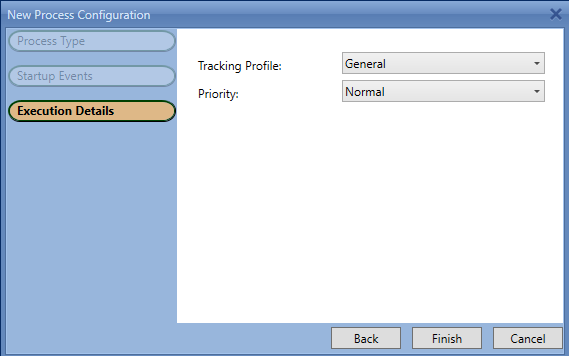
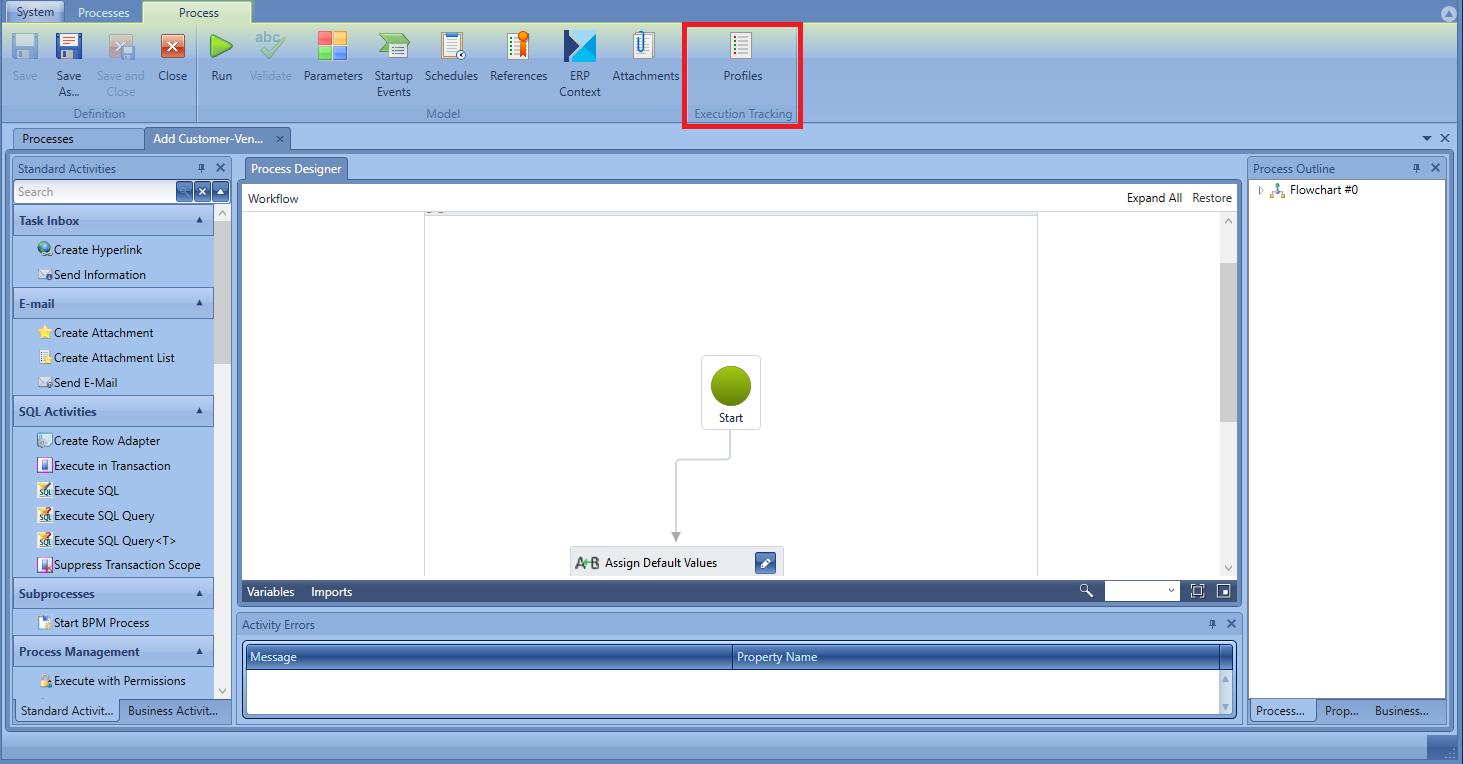
In the last step, it is possible to change the method of process execution. Two parameters are available: Tracking Profile and Priority, which are described in detail in article Process execution settings.
Note
For local processes, it is not possible to set the priority.
Execution details
After completing all steps, a new process window will be opened.
Documentation
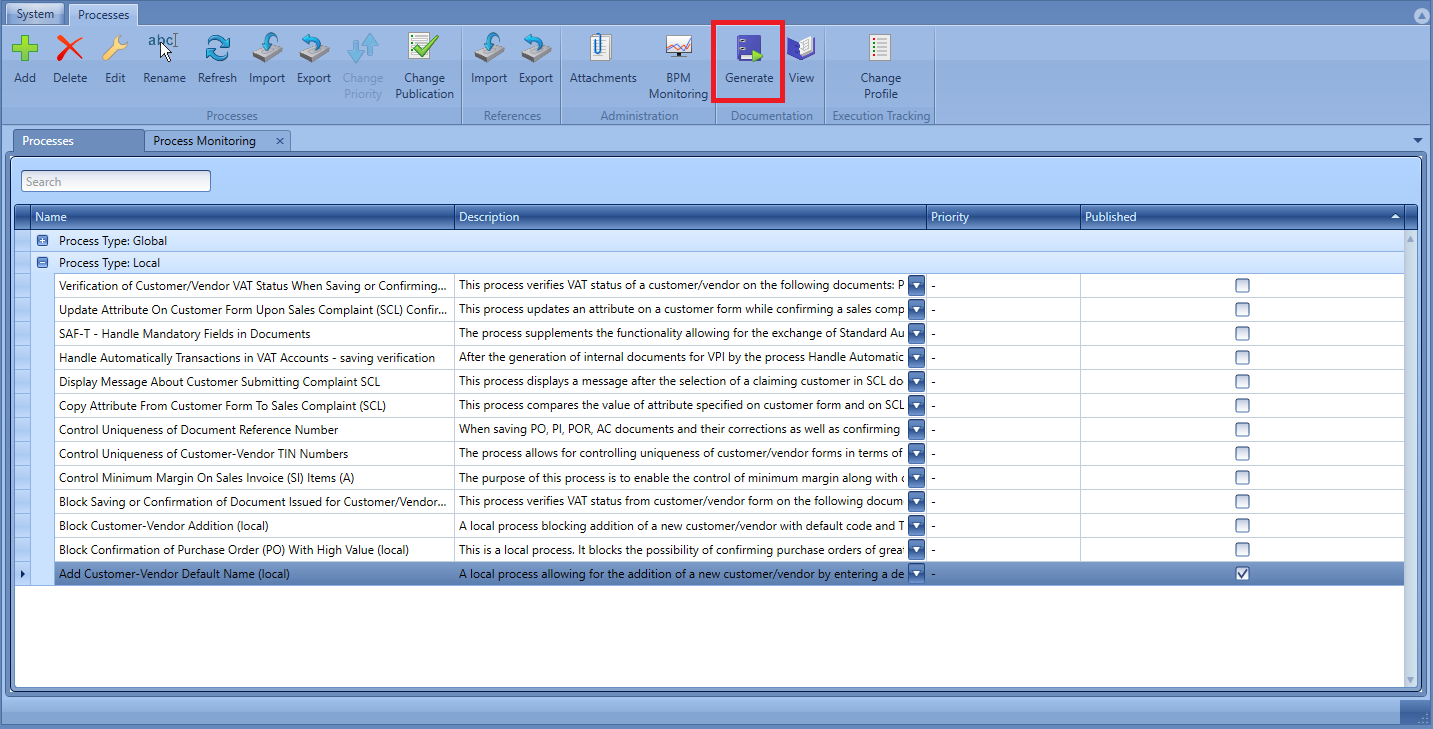
The system enables generation of documentation for any process available in BPM process designer, on the basis of its description, parameters, references and schedules. It contains also a process layout in the form of an image representing general scheme of an activity tree. To generate a documentation, from the level of the process assembly, it is necessary to select one or more processes and select [Generate] button, available in Documentation group of buttons.
Generating process documentation
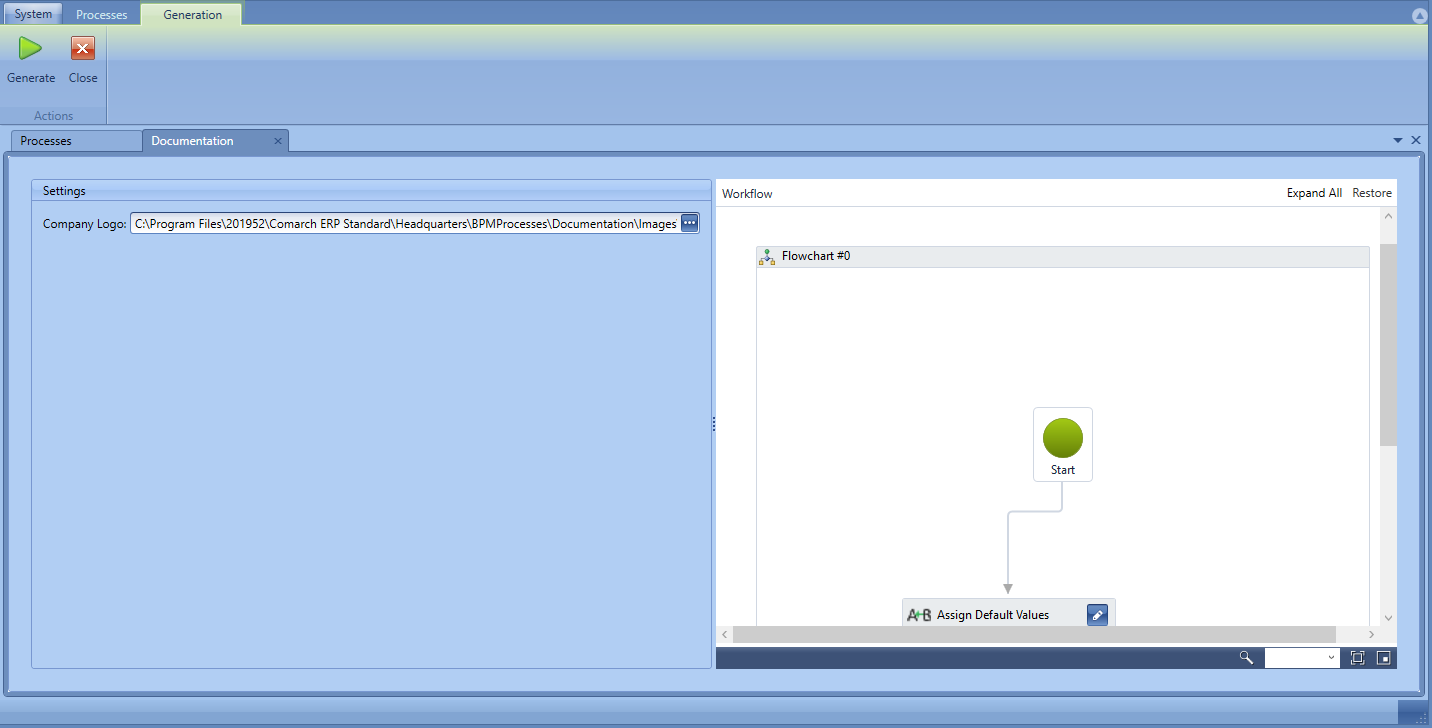
Upon starting the generation, a window with settings will open in which it is possible to add a company’s logo. On the right side, there is a layout of marked process. In case more than one processes are marked, the layout presents the first of the marked processes.
Window with documentation settings
Upon selecting the [Generate] button and specifying a path for saving the documentation, an html file with description or descriptions of selected processes will be generated.
Exemplary documentation
For standard processes, the documentation is available upon clicking on [Show] button. Descriptions of particular standard processes can be also found in article <<Standard processes>
Process monitoring
Process Monitoring allows for analysing a process flow and for identifying errors encountered during its execution. To start Process Monitoring, from the level of the window of process assembly, it is necessary to select [BPM Monitoring] button.
Starting Process Monitoring
The window of Process Monitoring is divided into 3 sections:
List of instances (1) – contains all running process instances. Each of them can assume one of 4 statuses:
Started – the process is being executed
Waiting for Response – the process was paused intentionally or is expecting a user’s decision. More information regarding decisions can be found in article Task Inbox.
Note
In the case of an error in a process with a decision, statuses of all decisions, which were taken earlier, change – they are transferred to a folder named With Errors and are additionally marked as unread.
Error – some errors occurred during the process To display detailed information about errors, it is necessary to set the tracking profile as detailed or complete.
Completed – process executed correctly
Process flow (2) – visible upon double clicking on a given instance or selecting [Show Execution Status] button. Allows for previewing process execution. For the complete or detailed profile, activities are marked according to their execution status parent activities take on the status of child activities. For example, if one of the child activities is executed with an error, that activity and its parent activity will be marked in red.
Execution details (3) – depending on selected tracking profile, contains information about particular activities and the instance itself. Above the list of details, there is general information regarding process execution, such as: execution time, operator or tracking profile. In the bottom part, there are tabs Properties and In the first of them, it is possible to preview the settings of each activity. The second tab presents the structure of a process in a form of a tree.
Hint
Exceptions handled with the <<TryCatch activity>> are not visible as instance errors. The user should remember about that in case a process does not produce desired effect, but it is visible in Process Monitoring as correctly completed.
Note
If there are started process instances at the moment of a crash or an intentional deactivation of BPM Server service, then the instances will remain in this status. Upon the renewed service activation, they will not be continued from the moment they were interrupted. Such instances can be restarted automatically if the option Continuation of Interrupted Instances has been checked in the BPM Configuration.
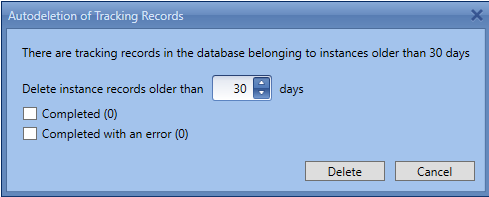
From the level of the Process Monitoring window, a function of deleting archival process tracking records is available. After selecting [AutoDelete] button a window for specifying period and type of deleted data is displayed.
Autodeletion of tracking records
It is also possible to delete tracking instances manually by means of [Delete] button. In the case of instances presented as started, records can be deleted after determined time, defined in the configuration (24 hours, by default).
Attachments
In the Comarch ERP Standard BPM system, it is possible to assign attachments to processes, e.g., in order to send them via e-mail. An attachment can be, for example, an image or a spreadsheet. There are two ways of adding attachments: from the level of the global list and from the level of the local list.
Global list
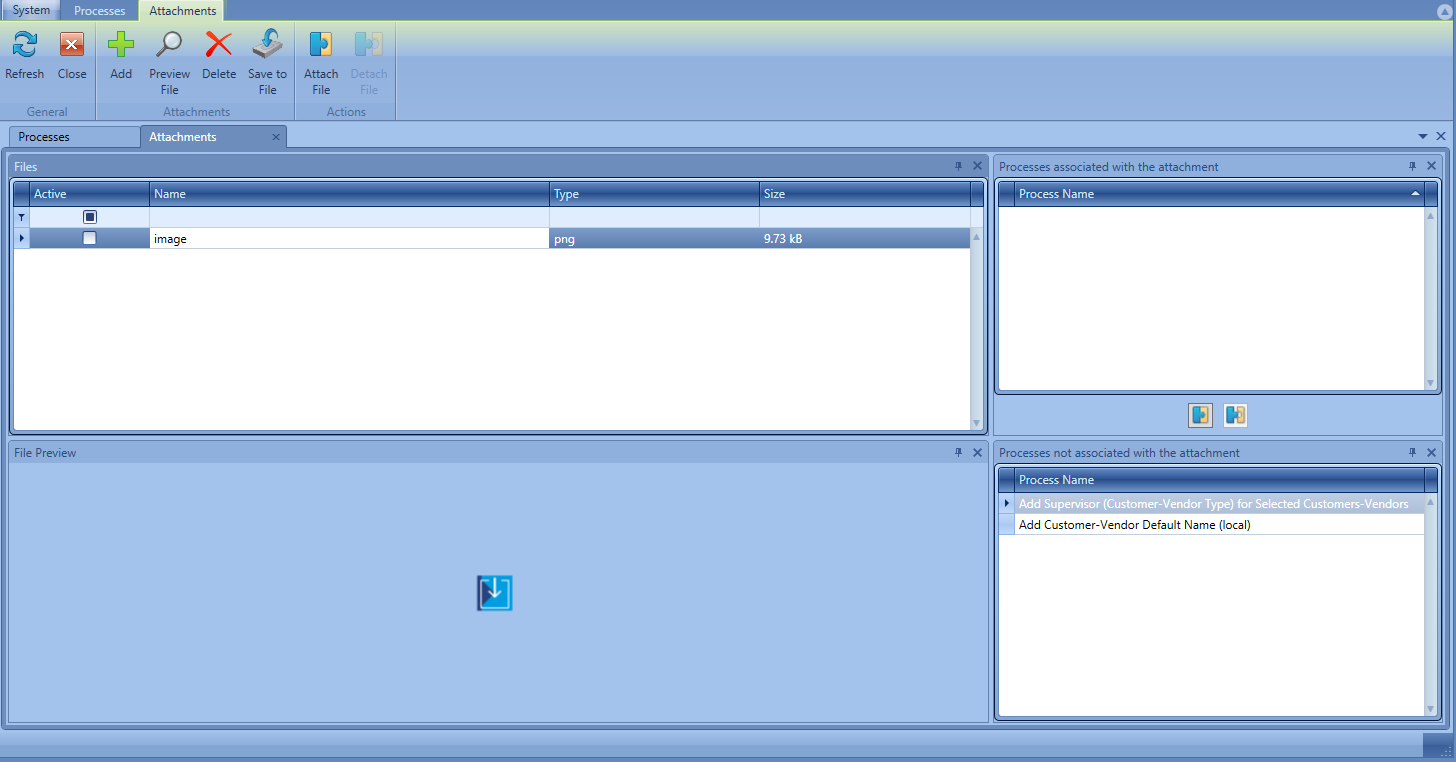
From the level of the window of processes library, it is possible to open the global list of attachments, by selecting the [Attachments] button from the group of buttons Administration. It is used to handle attachments within all process in the assembly. The user can add files and attach them to particular processes. In case the attachment is an image, it is possible to preview it in File preview section.
Global attachment list
To add an attachment to a process, it is necessary to:
Load an attachment to the list with the use of [Add] button.
Check the attachment in Files section
Check the process in section Processes not associated with the attachment
Select [Attach file] button
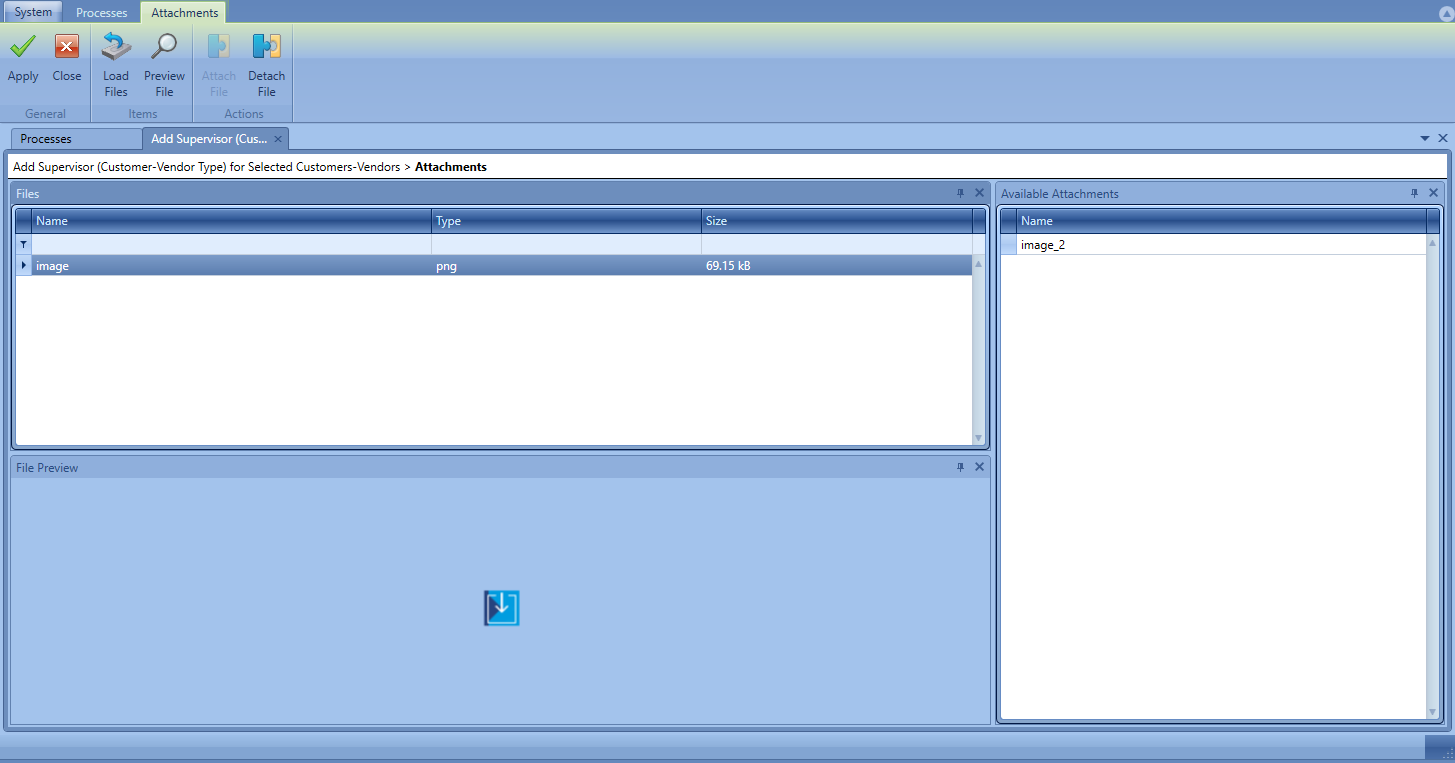
Local attachment list
The local list is opened from the level of the process modification window. It contains attachments used in a current BPM process. The difference between the local and the global lists consists in the fact that the local list concerns only one, currently modified process and therefore in the window there are no sections related to the selection of a process. Instead of them, the window contains a list of previously added attachments. Associating of an attachment with a process is performed by means of the button [Attach file], available in the menu.
Process execution settings
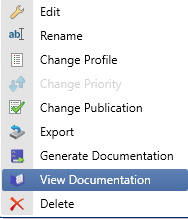
From the level of BPM process designer, it is possible to set parameters of a process affecting its visibility, priority or method of tracking in the system. Those parameters can be changed from the level of the main menu or upon clicking with right mouse button on selected process.
Process menu available under the right mouse button
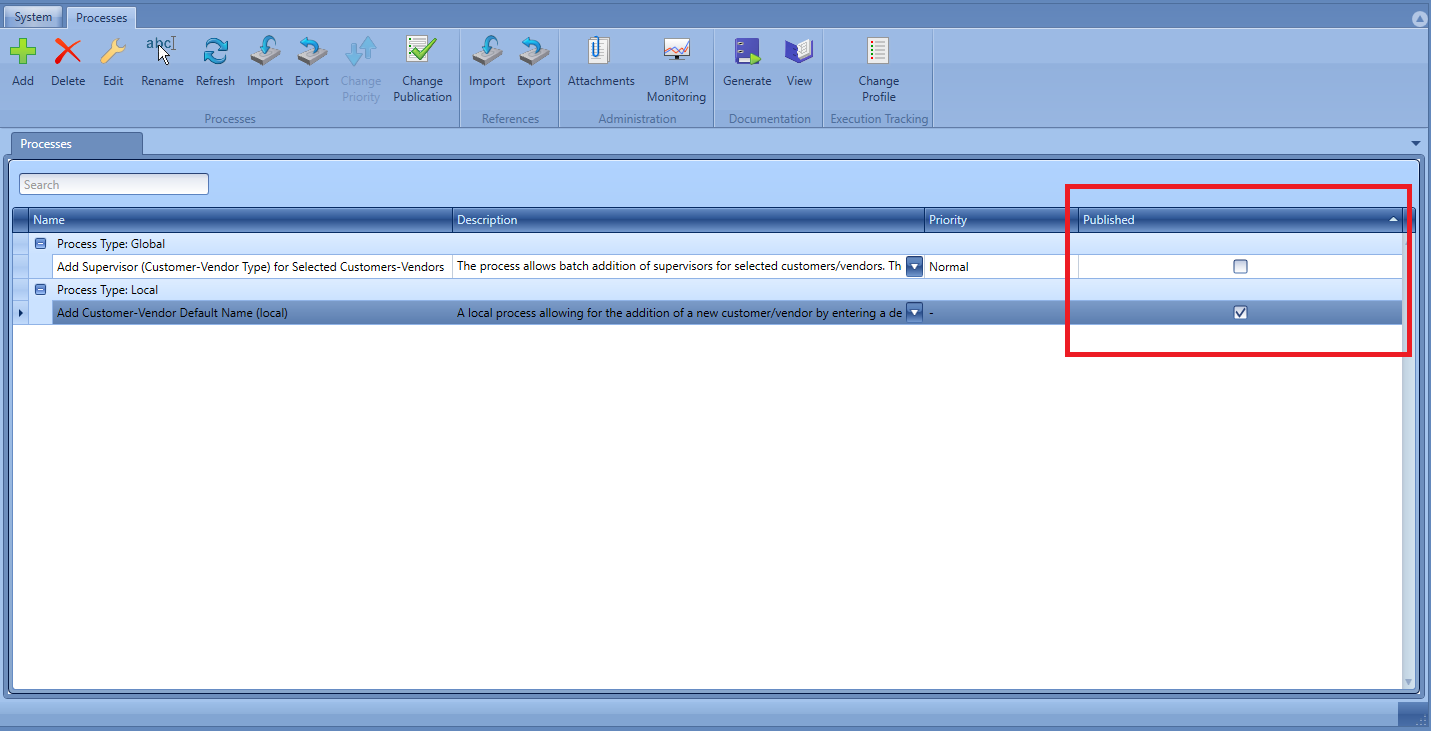
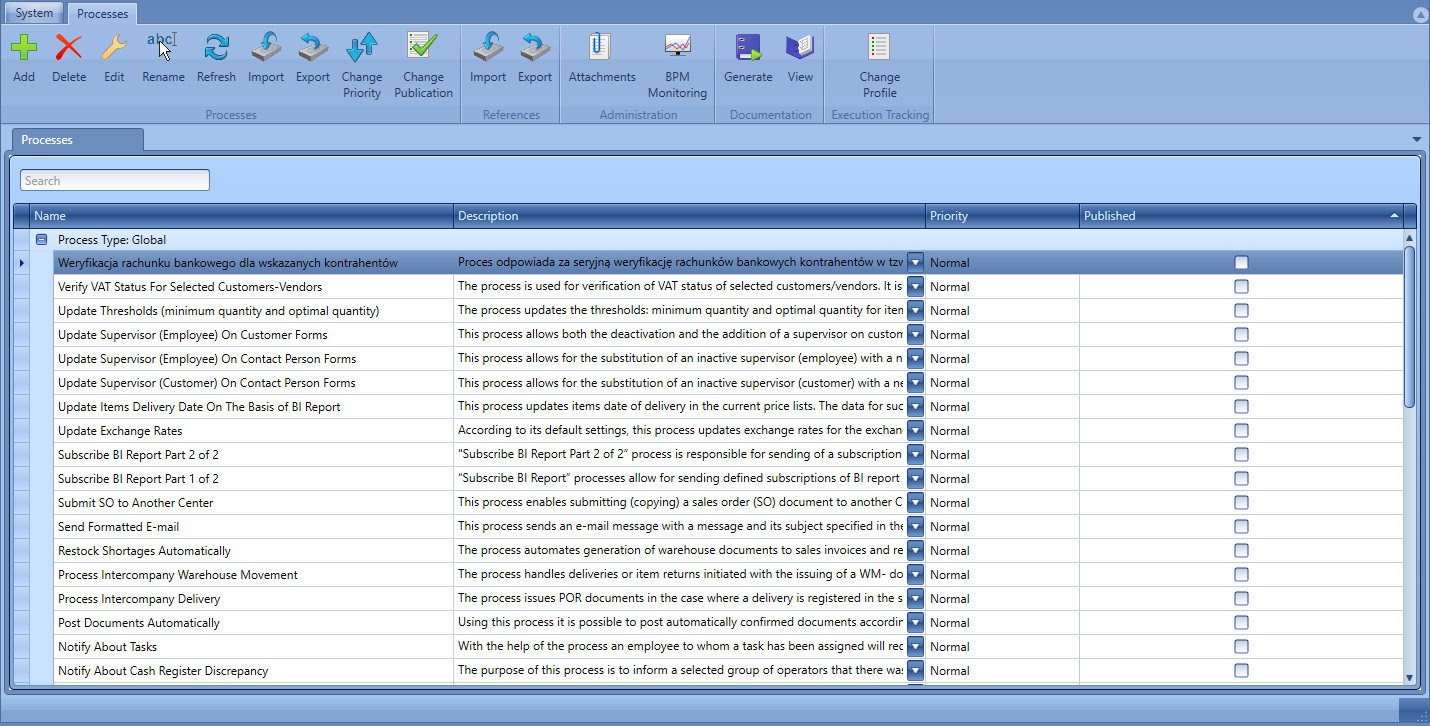
Process publication
In order to use a process, it is necessary to publish it with the use of [Change Publication] button. The information indicating whether a process has been published can be found on the list of processes, in Published column.
Information about process publication
Priority of processes execution
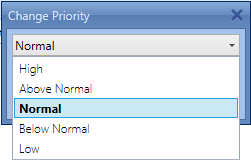
From the level of the list of processes it is possible to specify the priority of execution of a process, by clicking on [Change Priority] button. By default, the priority of all global processes is set to normal. In such case the order of processing all planned processed is determined by FIFO mode. It means that processes are executed in that order in which they have been started and added to the queue. Assigning higher priorities to processes which are more important as regards operational activities will allow them to be executed first.
Selecting process priority
Note
Upon setting a high priority for complex and time-consuming processes, process with lower priorities might not be executed because they will be continuously placed at the end of the queue.
Changing a priority for a process definition does not affect the time for execution of already queued (started) processes. It is not possible to speed up or postpone an already queued process.
Tracking profiles
From the level of the list of processes it is possible to change tracking profiles defining detail level of diagnostic information saved in the database when executing a process. Such information is used during the work with process monitoring. Normally, in the system there are 4 profiles available:
Selecting tracking profile
Hint
It is recommended to use the profile of detailed and complete tracking only in justified cases, e.g., when implementing a newly created process or verifying a process which generates errors. The higher level of detail of a tracking profile, the more data is stored in the database, as a result of which the execution of a process is slower.
From the level of the window of process addition/modification, it is possible to open the list of tracking profiles. To do so, it is necessary to select [Profiles] button, available in the main menu. Detailed description of adding and editing processes can be found in article Process modification.
Selecting profiles from the level of process addition/modification
List of tracking profiles
From the level of the list of tracking profiles, besides of selecting profiles, it is also possible to add, modify or delete them. The user can also select a given profile as default.
Note
It is not possible to modify or delete standard tracking profiles.
The user can define his/her own tracking profiles by selecting the type of information which will be subject to the analysis.
Window for adding an exemplary tracking profile
Solving problems
Upon installing the Comarch ERP Standard BPM application, Problem Solver application becomes available. It is able to report the most frequent errors regarding the communication between a database and BPM or BPM services. Before starting work with the Problem Solver tool, it is necessary to make sure that the user logging-in to the application has system administration role (sysadmin) on SQL server.
Note
Before using the Problem Solver it is necessary to disable BPM services.
Note
It is recommended to run the Problem Solver after restoring a database from its backup copy or moving it to another SQL server.
The application can be started from the level of the main Comarch ERP Standard directory or by clicking on the first aid kit button, available in the Comarch ERP Standard BPM access window.
Starting problem solver from the level of BPM logon window
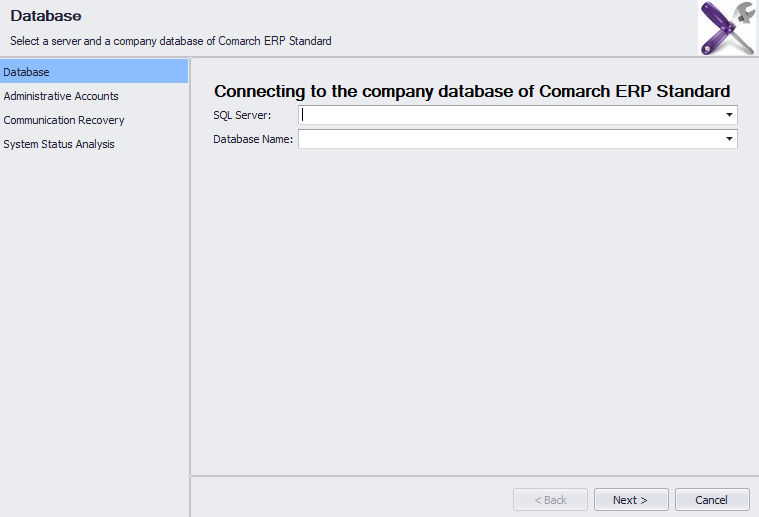
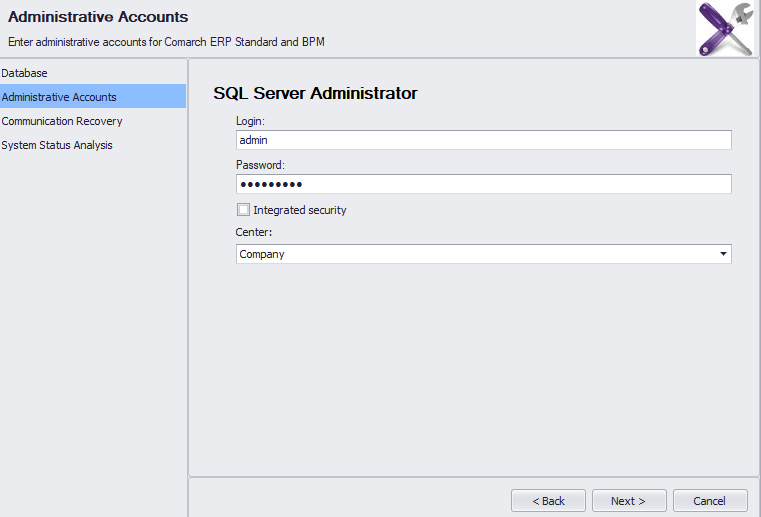
First two steps of work with the Problem Solver are very similar to those in BPM configuration tool – it is necessary to define database, SQL server and administrator’s account access data.
Selecting server and database
Selecting administrator’s account and center
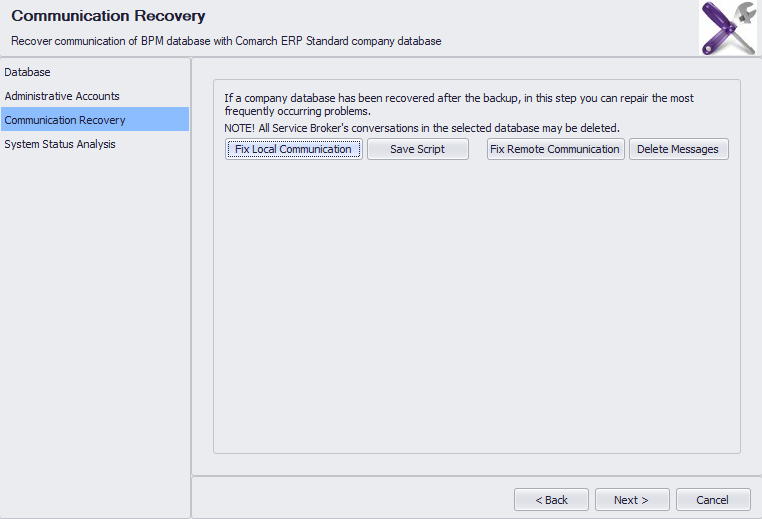
In Communication Recovery tab, with the use of [Fix Local Communication] button, it is possible to execute a script on a database, which recovers communication between BPM services and Comarch ERP Standard. In that window, it is also possible to delete messages blocking the functioning of the Service Broker service.
Note
Using Delete Messages option is recommended only if there are blocking messages in a database, since it deletes also started process instances.
Communication recovery
Hint
When starting BPM server, communication recovery scripts are started automatically. If there are no other errors in the system, it is not necessary to start the Problem Solver tool.
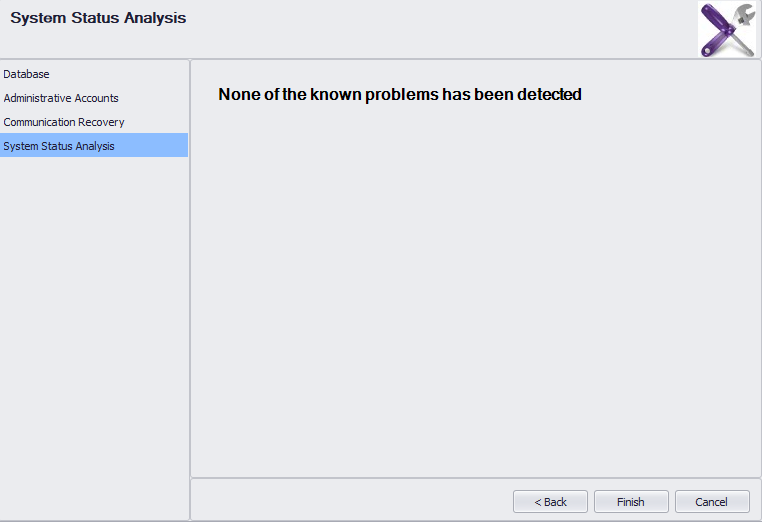
Option System Status Analysis detects known system errors which can be fixed automaticaly.
Option System Status Analysis
Permissions
Permissions to BPM process designer
In the Comarch ERP Standard system, it is possible to modify permissions to BPM process designer The permissions are available from the level of Configuration → Company Structure → Operator Groups → <group> → Objects
Permissions to BPM process designer
Depending on the setting selected in the window, a user belonging to a gicven group can perform actions in BPM process designer in accordance with the following table:
Operations in BPM process designer
Read
Add
Modify
Delete
Entering BPM process designer
X
Adding a process
X
Editing an existing process
X
Deleting a process
X
Saving a process
X
Save as a process
X
X
Change of publication
X
Change of name
X
Process simulation
X
Import of processes
X
X
Export of processes
X
X
X
Process monitoring
X
X
X
Import of business objects
X
Deleting business objects
X
Editing tracking profile
X
Change of default tracking profile
X
Deleting a profile
X
Adding a tracking profile
X
Deleting tracking data
X
Stopping an instance
X
Automatic deletion
X
Adding an attachment
X
Deleting an attachment
X
Saving an attachment to a file
X
Connecting an attachment to a process
X
Disconnecting an attachment from a process
X
Previewing an attcahment
X
X
Changing an attachment name
X
Permissions to start particular processes
On the form of operator group, there is tab Processes, which allows for assigning processes published in designer to particular operator groups.
Assigning published processes to a given operator group
To permit an operator belonging to a given group to start a global process from the level of the task inbox, an object or a list, it is necessary to check a given process in the window placed on the left side, select [Attach] button and save chabges. Permissions to processes are withdrawn in analogical way, by detaching a process.
Example
The administrator has imported a <<standard process>> Post Documents Automatically and published it. In order to make it possible to run the process only for employees from accounting department, the administrator can create Accounting group and grant permissions to the process to this group only.
Importing/exporting processes
In the Comarch ERP Standard BPM system, it is possible to transfer BPM processes between databases or to load standard processes to the system. For this purpose, the mechanism of importing and exporting processes is used.
Note
After migrating the Comarch ERP Standard system to a higher version, it is necessary to import once again all standard processes in order to update them.
Import
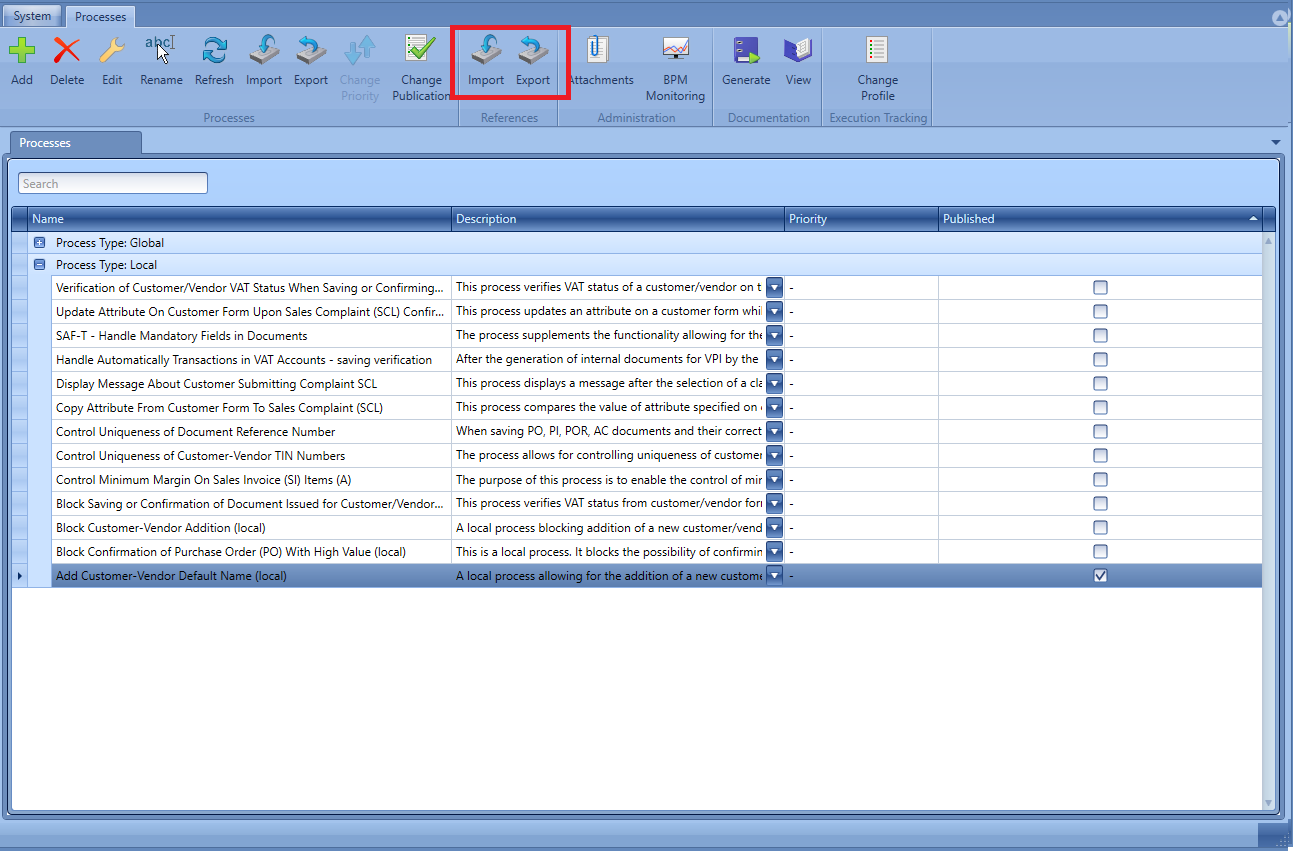
To import a process to the process assembly, from Process Assembly group of buttons, it is necessary to select [Import] button.
Process import
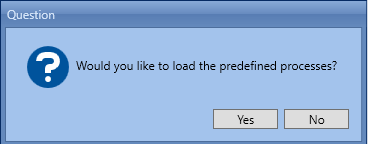
When importing processes for the first time, that is when the process assembly is empty, the system asks the user whether to load standard processes.
Message asking whether to load predefined processes
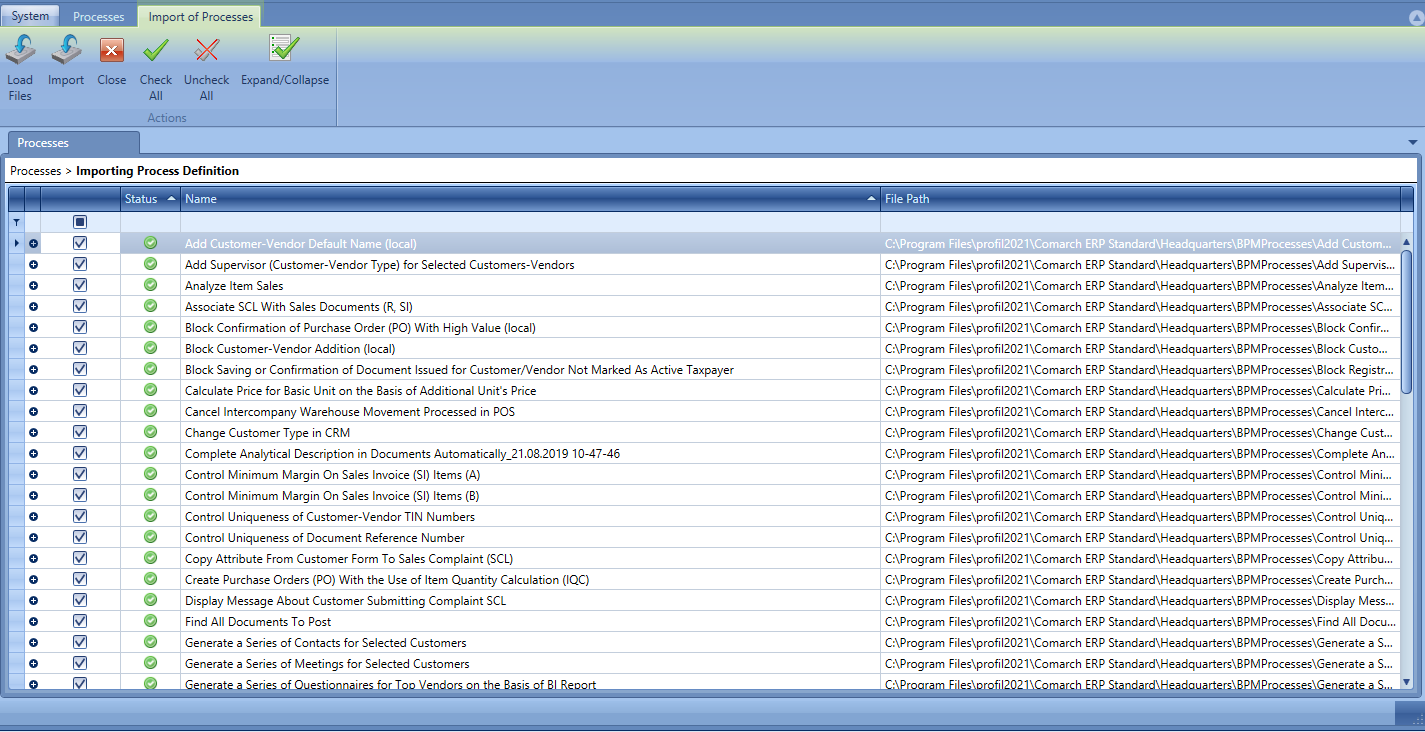
Upon selecting Yes, the system loads a list of all processes available within a standard installation of the system.
List of loaded standard processes
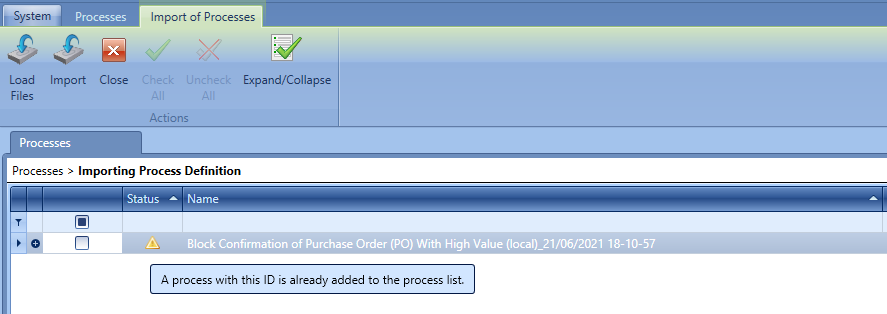
Upon selecting No, an empty list is opened. To add a process to the list, it is necessary to use [Load] button and select a file with. wdf extension. At this stage, the process is subject to a preliminary validation. A process loaded correctly will be marked with a green symbol in Status column. Whereas an incorrectly loaded process marked with a warning or error symbol providing information about the reason of the occurred problem.
Note
It is possible to import a process marked with a warning, but it is not possible to import a process loaded with an error to the assembly.
Example of a warning message displayed during a process upload
Hint
Files of standard processes can be found in the main installation directory of the Comarch ERP Standard application, in BPMProcesses folder.
From the level of that list a user can also preview details of an imported process. To do so, it is necessary to mark a given process on the list and select [Expand/Collapse] button.
Details regarding an imported process
To finish the import of processes to the assembly, it is necessary to select [Import] button. The system will inform the user about a correct completion of the operation.
Information about finished import
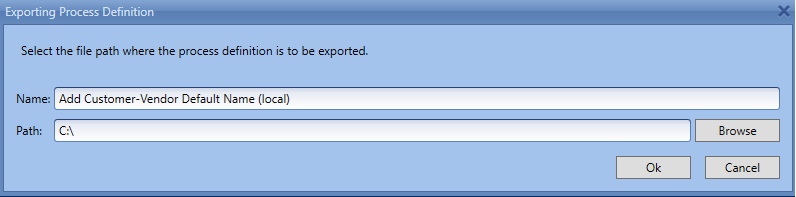
Export
To export a process, it is necessary to select a given process and click on [Export] button, available in the Process Assembly group of buttons. A window for inserting file name and saving path of the exported file, will be opened.
Process export
Getting started with process designer
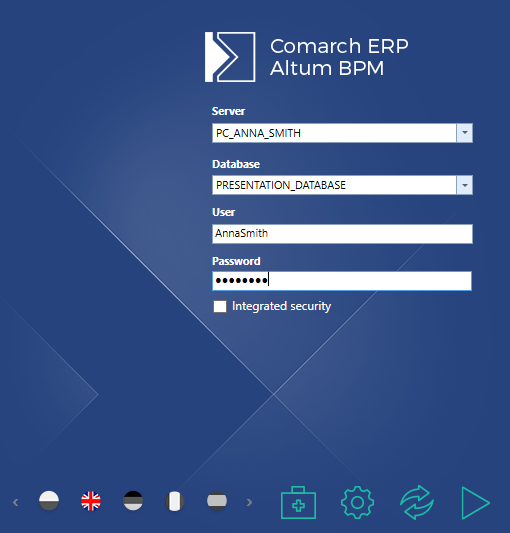
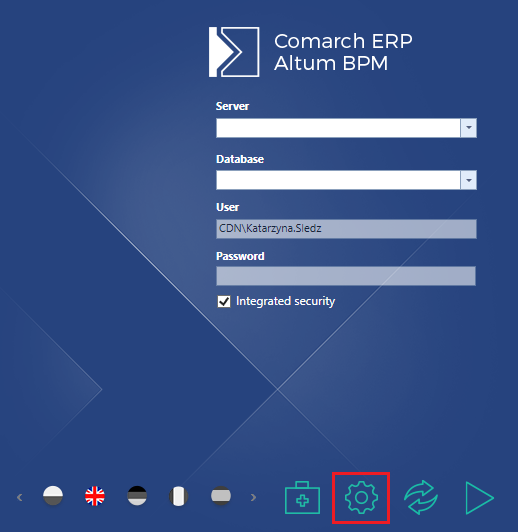
BPM process designer is an application which allows for handling BPM processes, as well as for defining their structure and functioning. Upon starting the Comarch ERP Standard BPM application, first the logon window is opened.
Comarch ERP Standard BPM logon window
In the logon window, it is necessary to enter the name of database and the name or address of the server hosting the database. It is also necessary to specify user’s data/ Analogically to the Comarch ERP Standard system, it is possible to select the option of integrated security.
The application language can be also changed during the work with the process designer, which has been described in article Process designer configuration.
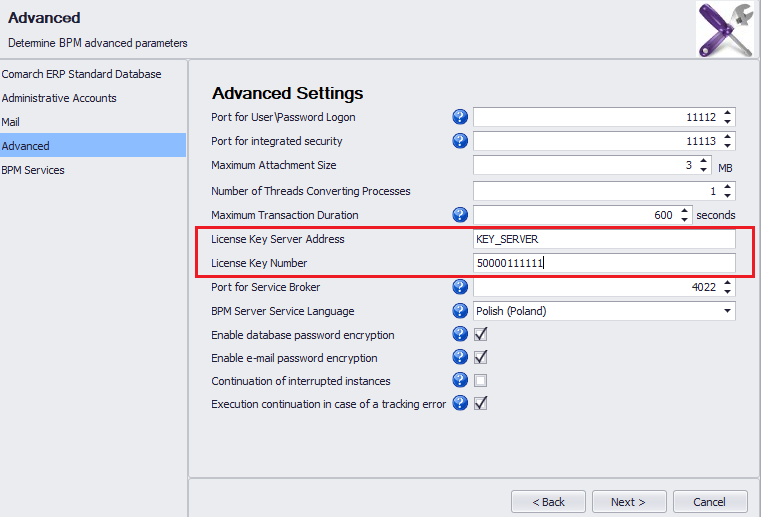
In case for the operator there is no configured license, a window for specifying license key server and its number, is opened.
License server selection
Upon correct completion of the above-mentioned data and selection of a company structure center, the application is opened in full screen mode.
BPM process designer interface
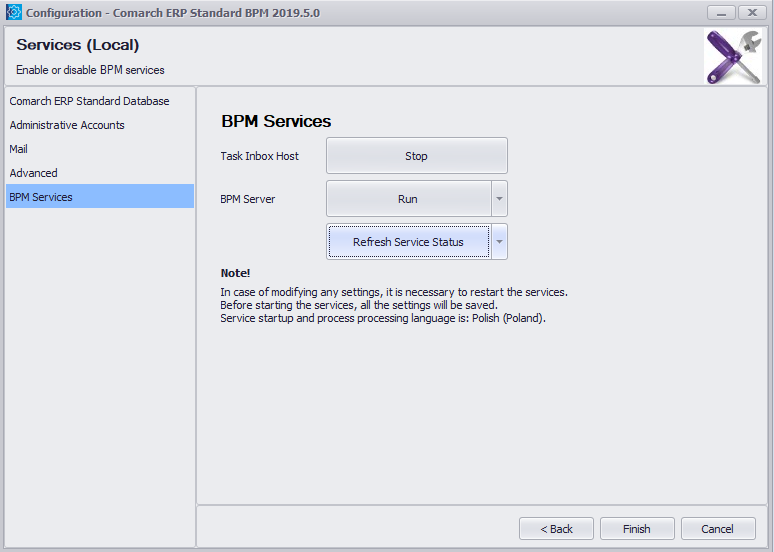
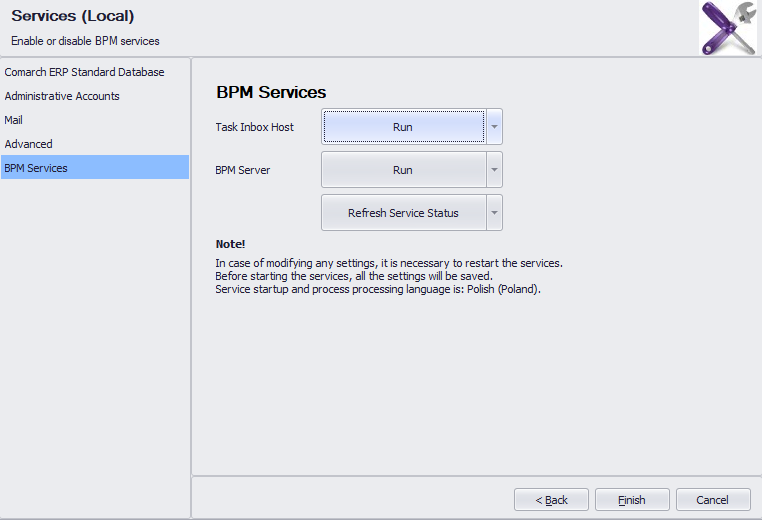
BPM Services
BPM services allow the communication between application Comarch ERP Standard BPM and Comarch ERP Standard. The services can be run by registration to the running operating system services (button [Run]) or in console mode.
Services in console mode
In order to start services as a console program, it is necessary to select arrow placed on the right site of the [Run] button and select Run as command-line program option. With the use of this functionality, it is possible to preview server logs in real time.
Starting BPM services as console program
[Alert] Closing the console window stops a given service. [/alert]
Registration of services
When changing services account, it is necessary to unregister services and register them again. To unregister services, click on the arrow button, places on the right side of [Refresh Service Status] button and select option Unregister Services. On the buttons used for running and stopping services, appears information Unregistered Service.
Configuration tool window in case of an unregistered BPM service
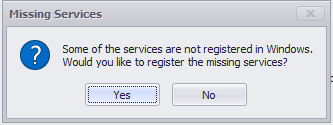
To register services, click on the [Refresh Service Status] button and select button [Yes] in the window with the following message. The message will be displayed also when opening BPM Services tab in case the services are not registered.
Information about missing services in the Windows system
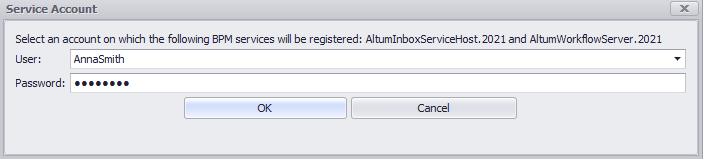
Then, it is necessary to enter system user data for which the services are to be registered. From a drop-down list available in User field, it is also possible to select Local system account button. In such case, a service will be registered on the account currently used by the user.
Access data necessary for registering BPM services
BPM server logs
The BPM server saves logs on an ongoing basis. They can be found in C:\ProgramData\Comarch ERP Altum\Logs\. The logs allow for analyzing historical events of the BPM server in order to verify its actions, execution of processes or starting up of schedules.
In the above-mentioned directory, there are also logs of BPM configuration tool, process designer and task inbox service.
Process designer configuration
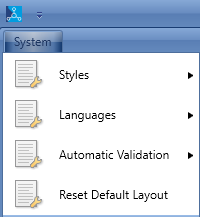
In the BPM process designer, with the use of [System] button, it is possible to customize layout, language and the settings of process validation.
List of process designer settings
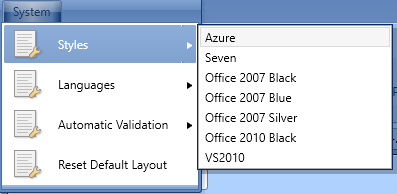
Upon expanding the menu Styles, the user can change the look of the application scheme. Azure style is set, by default.
Changing interface style
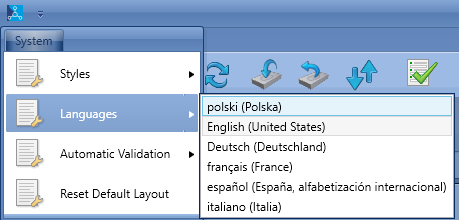
The menu Languages allows for setting selected application language. Upon changing the language, it is possible to work with the process designer in the selected language version.
Changing language
Note
For Windows 7 + .NET Framework 4.5 environment, it may happen that no process can be created or modified after changing the language. To solve the problem, install suitable language packs: Microsoft .NET Framework 4.5 Language Pack.
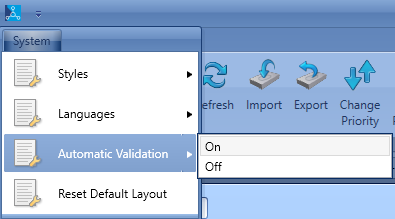
In the menu Automatic Validation, it is possible to disable validation of modified processes. More information regarding Validator can be found in article Process modification.
Modification of the settings of automatic validation
Option Reset Default Layout allows for restoring previous settings after restarting the application.
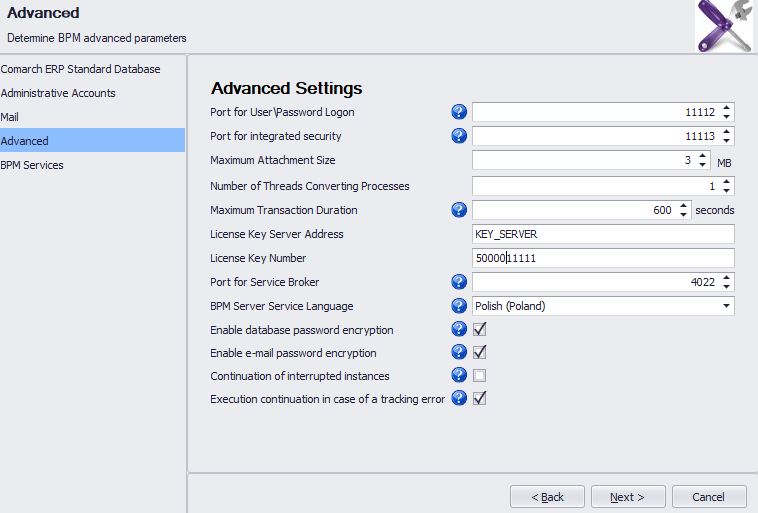
Advanced settings
In the tab Advanced Settings of the BPM configuration tool, it is possible to set one of additional parameters regarding the work with the system. Some of them are described in this article.
Advanced settings in the BPM configuration tool
The first two parameters are ports used for logging-in to the task inbox. By default, these are 4443 and 4444 ports.
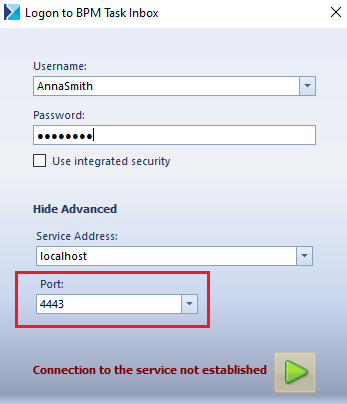
Hint
If other than default ports are entered, it is good to remember them, because it is necessary to enter them when logging-in to the task inbox.
Selecting port during the access to the task inbox.
Parameter Number of Threads Converting Processes determines to what extent computer’s processor will be loaded during the execution of a process. The lower the value is, the lower amount CPU resources is occupied.
Maximum Transaction Duration indicates time after which a BPM process will interrupt its work even though the transaction is not finished.
Example
In a database with several billion items, the user creates a process which adds a specific attribute to each item. Since there is a huge amount of data to elaborate and limited computing power, such operation can take more than 15 minutes. In such case it is good to modify the parameter Maximum Transaction Duration, by setting a higher value.
Otherwise, the user creates an incorrect process, which, at a certain stage, starts to execute an infinite loop. Thanks to the Maximum Transaction Duration parameter, the system does not cause computer’s freezing because it interrupts the process execution after determined time.
It is also possible to set a specific port for the Service Broker service, BPM service language and encrypting of passwords.
Parameter Continuation of interrupted instances specifies whether the execution of processes interrupted for unseen reasons (e.g., computer shutdown because of a blackout) should be continued after restarting of the service.
If the parameter Execution continuation in case of a tracking error is checked, a process will be executed regardless of tracking errors. However, successive entries in Process monitoringrelated to that process instance may not contain full tracking data.
Mail configuration
BPM processes allow for sending e-mail messages. To do so, it is necessary to configure a mailbox from which the messages will be sent. There are two ways of configuring such mailbox:
From the level of BPM configuration tool
From the level of an employee form in Comarch ERP Standard
BPM configuration tool
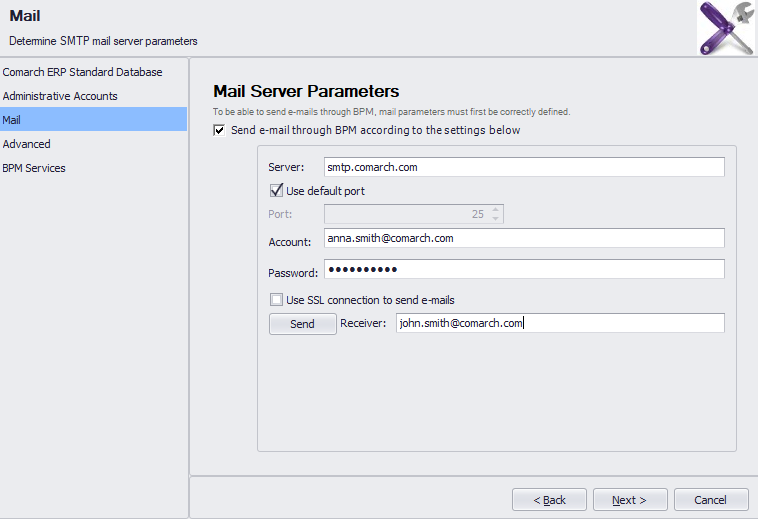
Setting of correct parameters in the tab Mail of the BPM configuration tool:
Mailbox configuration for BPM
It is necessary to complete mail server parameters:
Server – mail server name
Port – upon unchecking the option Use default port, it is possible to specify the port through which BPM will communicate with the Inbox
Account – address of e-mail account from which the messages will be sent
Password – e-mail account login password
USE SSL connection to send e-mails – enables to encrypt e-mails
Note
It is necessary to ask service provider for e-mail server parameters.
After entering all data, the user can send a test e-mail to the address entered in Receiver field.
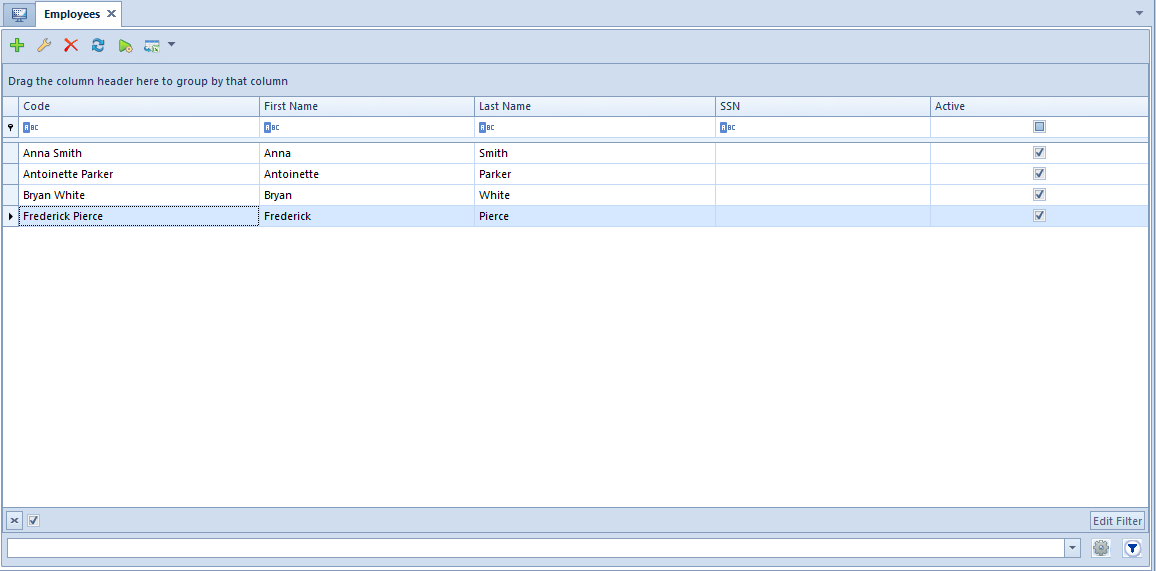
Employee form
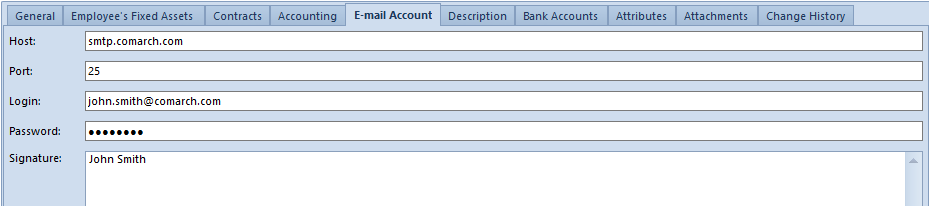
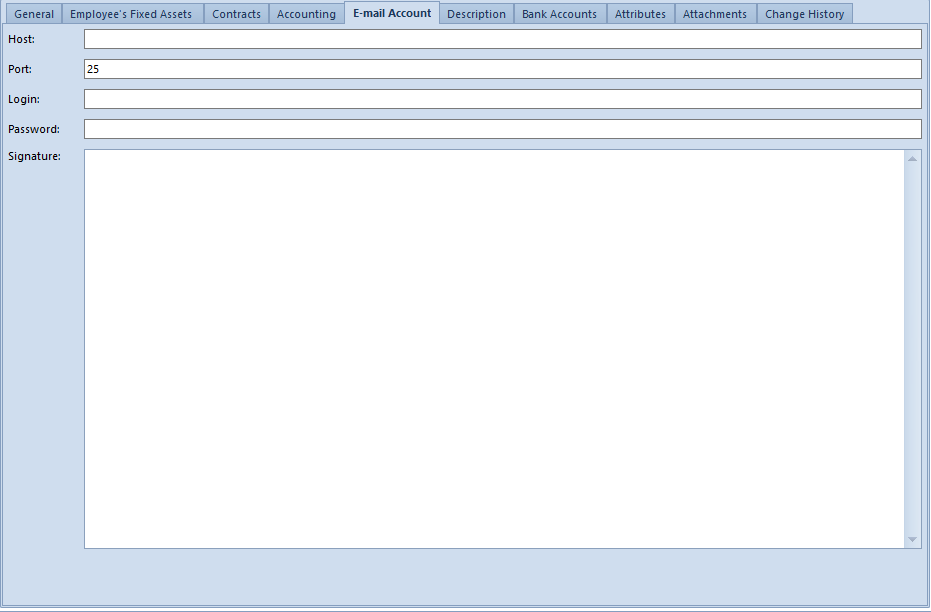
Configuration of mailbox from the level of the E-mail Account tab available on employee form in the Comarch ERP Standard system:
Configuration of e-mail account from the level of employee form
If the user wants to use mail server defined on the form of an employee, then, when adding <<Send E-Mail>> activity, in the tab Advanced, it is necessary to check SMTP Local Configuration parameter. If the parameter is unchecked, the system uses permissions defined in the BPM configuration tool.
Local e-mail configuration in Send E-Mail activity definition.
Basic configuration
Before starting to use BPM application, it is necessary to properly configure the system. It is done with the use of BPM configuration tool. The application intuitively guides a user through all the steps of the configuration. By default, after installing the component Comarch ERP Standard – Headquarter Server, the application shortcut is placed on the desktop. An alternative method of starting the configuration tool is clicking on a button available in the Comarch ERP Standard logon window.
Starting BPM configuration tool in the logon window
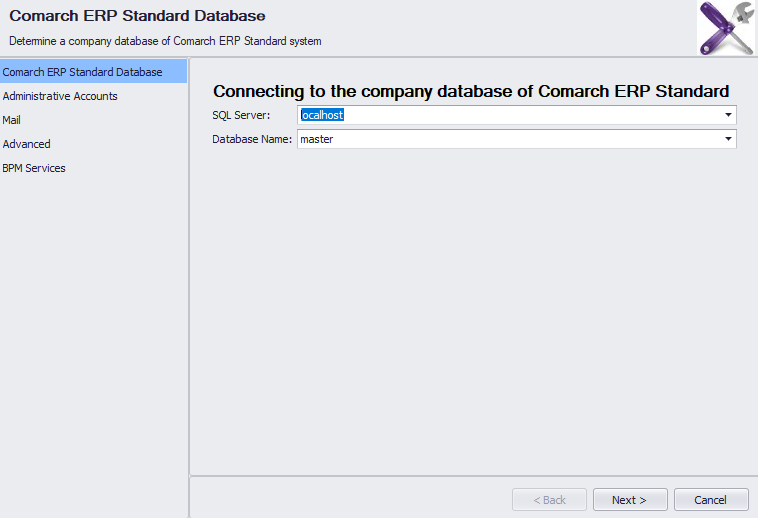
To perform processes correctly, it is necessary to select the company database with which the application will cooperate and name or IP address of the server of the database.
Database selection window
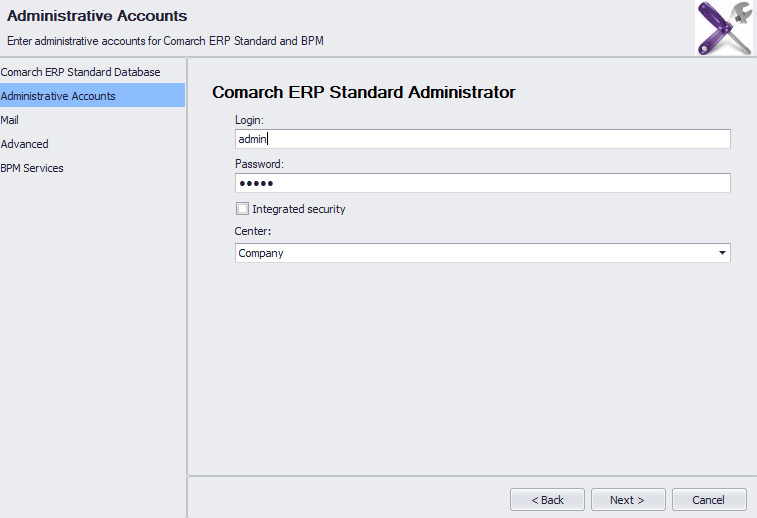
Next, the access to the database must be authorized with the use of an operator with appropriate <<permissions>> granted. In the window, also the center, within which the BPM service functions, is selected.
Access data configuration window
Note
It is recommended to make sure that the account specified for the BPM services belongs to the B2_admin operator group and selected center is on the top of the rights structure. Such configuration ensures bigger flexibility when it comes to execution of processes in several centers or companies and handling of permissions itself can be modified directly through processes.
Configuration of the mail account data is not required for the basic functioning of processes. Detailed description of the functionality can be found in article <<Mail account configuration>>.
In the tab Advanced, it is necessary to select server key and insert key number so that the system is able to verify the license.
License configuration
Detailed description of the other parameters can be found in article <<Advanced settings>>.
The last step is starting BPM service with the use of [Run] button, available in BPM Services tab. The current status of services can be refreshed by clicking on [Refresh Service Status] button. BPM services are described in detail in <<BPM services>> article.
BPM service starting window
Installing the application
Comarch ERP Standard BPM application is installed automatically together with Comarch ERP Standard, on the server workstation.
Tree of products for a server workstation
In the case of a client workstation, process designer, BPM services or Problem Solver tool are not included in the installation. It is possible to connect the system to an external task inbox.
Tree of products for a client workstation
After installing the application, on the desktop, shortcuts to process designer and process configuration too, are related. Detailed description of the installation process can be found in category <<Comarch ERP Standard Auto Update>>.
Note
In the main Comarch ERP Standard directory, you can find 32-bit versions of BPM process designer and BPM configuration tool, which are dedicated to 32-bit operating systems
Glossary
To be able to use the BPM tool integrated with the Comarch ERP Standard application, it is worth getting to know the following terms:
Acitvity
Elementary component of each BPM process. Activities are used to control a process, get object, execute actions on them, get and operate data in a company database.
BPM Configuration Tool
Application guiding user step by step through the stages of BPM services configuration.
BPM process
Set of sequenced operations and calculations which, following one another. Processes may replace or extend the existing system functionalities or function as a new functionality.
BPM Process Designer
Application used to create, control and handle BPM processes.
BPM Server
Service ensuring proper functioning of global BPM processes. The service runs in the background of BPM processes and it is not necessary to interrupt the work with the Comarch ERP Standard system.
Global process
Process which uses BPM Server service in order to run. Global processes are executed in the background and do not disturb users working with the system. They can be started with the use of schedules, startup events or manually. Global processes allow for
Inbox Service Host
Service necessary for task inbox functioning. If the service is not enabled, the user cannot log-in to the task inbox and receive information form BPM processes.
Local process
Process which does not BPM Server service in order to run. Such processes mainly extend Comarch ERP Standard’s logic by an additional validation or slightly modify objects. Execution of a process is integrated with Comarch ERP Standard’s functioning. Local Process must be always started with the use of startup events.
Problem Solver
Application used for solving problems regarding communication between BPM Server, company database and Service Broker service.
creating decisions which should be made by the user and which affect further execution of a process.
Process monitoring
Tool for tracking the execution status of all the BPM. It allows for tracking, step by step, operations executed by a process. With the use of the process monitoring it is possible to, for example, reveal errors in a process created by the user.
References
.dll libraries which contain add-ons dedicated to BPM process designer, e.g., new startup events, new activities, business objects, etc.
Service Broker
Service functioning on SQL server. It is used for queuing BPM processes.
Task inbox
Platform for receiving information and making decisions, which are sent to a user by BPM process. For a proper functioning of the task inbox, the Inbox Service Host service must be enabled. The task inbox is available from the level of Comarch ERP Standard application.
Fixed asset opening balance – example
Example
Opening balance value at fixed asset registration:
Depreciation area associated with a calendar year
The receipt of a fixed asset: Administration Building was taken on: 3/2/2017
Initial value: 500 000.00 USD, FAC: 105, depreciation method: straight-line at 2,5%. The building was renovated in 2018 and its value increased by 10 000.00 USD.
Write-offs for December 2018 amounted to 22 062.50 USD.
The fixed asset was registered in the system on 1/15/2017.
After completing the basic information and changing the acquisition and receipt dates to 2/3/2017, in the field Initial Value, initial value of fixed asset amounting to 500 000.00 USD was entered, in the field Value Updated at the Beginning of Period, value 510 000.00 USD (amount increased by the renovation cost) was entered, in the field Write Offs at the Beginning of Period, value 22 062.50 USD was entered.
After saving the fixed asset form, the following documents were generated:
FA for the amount of 500 000.00 USD with the date of issue: 3/2/2017
FR for the amount of 10 000.00 USD with the date of issue: 12/31/2018 (depreciation date set to 1/1/2019)
FDP for the amount of 22 062.50 USD with the date of issue: 12/31/2018
Depreciation area associated with an accounting period
The receipt of a fixed asset: Administration Building was taken on: 3/2/2017
Initial value: 500 000.00 USD, FAC: 105, depreciation method: straight-line at 2,5%. The building was renovated in 2018 and its value increased by 10 000.00 USD.
The company has a custom accounting period which begins on the 1st of February and ends on 31st of January of the successive year.
Write-offs for January 2019 amounted to 29 000.00 USD.
The fixed asset was registered in the system on 2/10/2019
After completing the basic information and changing the acquisition and receipt dates to 2/3/2017, in the field Initial Value, initial value of fixed asset amounting to 500 000.00 USD was entered, in the field Value Updated at the Beginning of Period, value 510 000.00 USD (amount increased by the renovation cost) was entered, in the field Write Offs at the Beginning of Period, value 29 000.00 USD was entered.
After saving the fixed asset form, the following documents were generated:
FA for the amount of 500 000.00 USD with the date of issue: 3/2/2017
FR for the amount of 10 000.00 USD with the date of issue: 12/31/2019 (depreciation date set to 1/1/2019)
FDP for the amount of 29 000.00 USD with the date of issue: 12/31/2019
Balance-sheet depreciation area associated with a calendar year and tax depreciation area associated with an accounting period
The receipt of a fixed asset: Administration Building was taken on: 3/2/2017
Initial value: 500 000.00 USD, FAC: 105, depreciation method: straight-line at 2,5%. The building was renovated in March 2018 and its value increased by 10 000.00 USD.
The company has a custom accounting period which begins on the 1st of February and ends on 31st of January of the successive year.
Write-offs for January 2018 amounted to 22 062.50 USD.
The fixed asset was registered in the system on 2/10/2019
After completing the basic information and changing the acquisition and receipt dates to 2/3/2017, in the field Initial Value, initial value of fixed asset amounting to 500 000.00 USD was entered, in the field Value Updated at the Beginning of Period, value 510 000.00 USD (amount increased by the renovation cost) was entered, in the field Write Offs at the Beginning of Period, value 22 062.50 USD was entered.
After saving the fixed asset form, the following documents were generated:
FA for the amount of 500 000.00 USD with the date of issue: 3/2/2017
FR for the amount of 10 000.00 USD with the date of issue: 12/31/2019 (depreciation date set to 1/1/2019)
FDP for the amount of 22 062.50 USD with the date of issue: 12/31/2010
Adding inventory sheet
Fixed asset inventory sheets (FAIS) are added within a given <<inventory document>>
To add an inventory sheet, click on [Add] button. A form of inventory sheet will open.
The form of an inventory sheet is composed of the following elements:
Side panel
Sheet number – generated automatically by the system, according to the document numerator
Value – sum of initial values of fixed assets included in an inventory document
Name – sheet name entered by the user
Date of Issue – day in which the inventory sheet was added
Description
Tab General
For the tab General, <<standard buttons>> are available, and additionally:
[Confirm] – button active for an unconfirmed sheet to which items are added, allows for its confirmation
[Open] – button active for a confirmed sheet, provided that the inventory document is not confirmed or closed. Allows for re-opening and modifying a confirmed sheet.
[Cancel] – button active for a confirmed sheet, provided that the inventory document is not confirmed or closed. Allows for canceling an inventory sheet.
[Add] – allows for adding a fixed asset directly on the list
[Add From List] – opens the list of fixed assets and allows for selecting fixed assets which will be added to the form
Note
Fixed assets under construction are not subject to inventory.
Note
A fixed asset can be added to an inventory sheet only once within a given inventory.
Note
Fixed asset are added to an inventory sheet regardless of the date in which they were received for utilization. The date of issue of an inventory sheet indicates the day in which the sheet was added.
[Transfer Quantities] – enables automatic completion of Actual Quantity column with the values retrieved from System Quantity column for selected items
[Import] – allows for adding fixed assets to the sheet:
From file – on the basis of the data from a txt. file. In such file, it is necessary to enter information in the following order: barcode, system quantity, location, custodian – the data must be separated with the use of a semicolon. It is mandatory to indicate the barcode of a fixed asset already existing in the system. In case the quantity is not entered in the file, the colum Actual Quantity will be completed with value 1.
On the basis of a collector readout – with the use of a collector. It is necessary to connect a collector to the workstation on which an inventory is being registered and select [Read From Collector] button. The system verifies whether on inventory sheets there are fixed assets scanned by the collector. If a fixed asset is present on the sheet, it will be omitted; otherwise, it will be added along with data indicated on the collector (system quantity, custodian and location).
[Generate Inventory] – allows for adding new inventory for items selected on a sheet. The button is active when an inventory is confirmed, canceled or completed. When generating an inventory from this level, the system verifies whether there is no unconfirmed inventory for selected fixed assets. The fields will be completed in the same way as if the inventory was issued manually.
The list of sheet items is composed of the following columns:
Actual Custodian – editable field in which it is possible to indicate an employee from the list of employees
Registered Location of Use – recent fixed asset location of use
Actual Location of Use – editable field in which it is possible to indicate a location of use from the list of generic directories
Initial Value
System Quantity – column completed with the following values (on the basis of data available in the system):
0 – fixed asset disposed, sold or without FA document
1 – fixed asset in use with generated FA document
Actual Quantity – editable column, completed manually with the use of the button [Transfer Quantities] or on the basis of data imported from file or collector readouts. The column assumes one of the following values:
0 – (default value) – no fixed asset; fixed asset disposed or sold
1 – fixed asset in use
Difference – difference between the system quantity and the actual quantity
Discrepancy Status – discrepancy graphic symbol
Fixed Asset Attachment (column hidden by default)
In case there is a shortage (the system quantity is lower than the actual quantity), the whole row is displayed in red. In case there is an overstock (the system quantity is higher than the actual quantity), the whole or wis displayed in blue. In case there is an inconsistency between the location or custodian, relevant cells containing different data, are displayed in orange.
Tabs Attributes, Attachments and Change History
Detailed description of the tabs Attributes, Attachments and Change History can be found in article <<Tabs Discount Codes, Analytical Description, Attributes, Attachment and Change History>>.
Adding fixed asset inventory document
General information
An inventory document is composed of <<inventory sheets>> which contain a list of <<fixed assets>> along with quantities resulting from documents and actual quantities.
To add a fixed asset inventory document, from the level of the menu Fixed Assets -> Inventories, select button [Add]. A form of inventory document will open.
Fixed asset inventory document form
An inventory document is composed of the following elements:
Side panel
Number – number generated automatically by the system on the basis of document numeration tool
Confirmation Date – non-editable field, filled-in with the system date at the moment of confirming a document. If the date of issue on an inventory form is later than the date of inventory document confirmation, when confirming a document, the system asks whether to change the date of document confirmation to the latest date of issue from the sheets.
Blockade – decides whether an unconfirmed inventory document should block the possibility of modifying <<forms of fixed assets>> and of generating <<documents>> to all fixed assets of the company or only for fixed assets included in a given inventory document. By default, the option of blocking all fixed assets is set, but the setting can be changed until the first <<inventory sheet>> is added.
Date Set upon Document Generation – decides with what date should be generated documents of fixed assets resulting from discrepancies. Such documents can be generated with inventory completion date (default setting) or a current date. The value of the parameter can be changed regardless of the document status.
Owner
Description – field for providing an additional description
Tab General
In the tab General, a list of inventory sheets added within a given inventory document, is presented. Detailed description of the inventory sheet can be found in article <<Adding inventory sheet>>.
Tab Associated Documents
Description of the tab can be found in article <<Tab Associated Documents>>.
In the tab Associated Documents → System, there is information regarding fixed asset documents which were created on the basis of a given inventory.
Tabs Attributes, Attachments and Change History
Detailed description of the tabs Attributes, Attachments and Change History can be found in article <<Tabs Discount Codes, Analytical Description, Attributes, Attachment and Change History>>.
Fixed asset revaluation (FR)
General information
A FR document is registered in the system when the value of a fixed asset is changed, for instance, as a result of its enhancement or modernization.
A FR document can be generated:
automatically when saving a <<fixed asset form>>
manually
A FR document is generated automatically while saving a fixed asset of Fixed Asset or Intangible Asset type, provided that the Value Updated at the Beginning of Period has been specified on the fixed asset form for any of the depreciation areas. A FR document created this way, has date:
of transaction set to the last day of the previous calendar year and the date of inclusion in depreciation to the first day of a calendar year − if all depreciation areas are associated with a calendar year
of transaction set to the last day before the accounting period including date of physical addition of a fixed asset and the date if inclusion in depreciation to the first day of the accounting period including the date of physical addition of a fixed asset − when all depreciation areas are associated with an accounting period
Note
If for a given fixed asset, at least one depreciation is associated with a calendar year and the other depreciation areas are associated with an accounting period, then FR documents will be created with the date of transaction set to the last day of the previous calendar year and the date of inclusion in depreciation to the first day of a calendar year. The user can modify these dates from the level of FR document.
Values provided in the FR document affects in the subsequent period the fixed asset total value as well as its value updated at the beginning of period.
A FR document can be registered from the level of:
the menu Fixed Assets → Fixed Asset Documents
the menu Fixed Assets → Fixed Assets upon selecting first particular fixed asset records
the tab Fixed Asset Documents on the form of fixed asset
A FR document can be generated to the fixed assets for which a <<FA document>> has been generated and which have not been fully disposed or sold. To add a FR document, select the button [Add Document] followed by the option [Revaluation] available in the drop-down list. A form for entering data will open.
FR document form
The form of a FR document is composed of the following elements:
Side panel
Number – document number granted automatically by the system according to the document numbering definition.
Depreciation (Balance-Sheet/Tax/IAS-IFRS) – fields of information purpose. Their visibility depends on the activated depreciation areas in the <<system configuration window>>. They present total values of items for particular depreciation areas.
Date of Issue
Reference Number – number entered by the user for the purpose of additional identification of the document
Owner – center to which the user registering a document is assigned. This field is not editable.
Tab Items
In this tab, it is possible to add, edit, copy, delete as well as to export to a spreadsheet the items of FR document.
In the system, an item can be added into a document in two ways: directing in the table or through form.
Adding FA document item in the table
To add an item directly in the table, select the button [Add] from the button group Items. A new row will appear in the item table. Here it is necessary to select a fixed asset as well as to complete the following columns: Date of Transaction, Analytical Description Area, Value (Balance-Sheet/Tax/IAS-IFRS) as well as the column Description that is hidden by default. Provided data will also be updated on the fixed asset form.
Adding FR document item through form
To add FR items through form, select the button [Add Through Form] from the button group Items.
A window Item Details will open with the following fields:
Side panel
Code – fixed asset code selected from the fixed asset form
Name – value completed automatically on the basis of the fixed asset form. The names of fixed assets are displayed in the system logon language.
Date of Transaction – the date of transaction is by default copied from document header and is changeable. On the basis of the transaction date, the date of reception and the date of acquisition on a fixed asset form are specified.
Analytical Description Area – selectable from among the depreciation areas activated in the <<system configuration window>>. The analytical description areas that on a fixed asset form have been selected in the Analytical Description tab are activated by default. Depending on the selected options, the document can be described analytically according to the values of the indicated depreciation area.
Depreciation (Balance-Sheet/Tax/IAS-IFRS) – available options that can be completed depend on the depreciation areas activated in the <<system configuration window>> and on the <<fixed asset form>>. The value that is specified first for one of the active areas is copied automatically to other areas (both active and inactive areas). Changes to either of the active value are not copied to other active areas.
Recognition Date – this date is available only in the document item details window (it is not available on the document item list). It is, by default, set to the first day of the month following the date of transaction. It determines the date on which the value of the fixed asset subject to depreciation must be changed.
Description – section for additional information on a given document item.
Tabs Attributes and Attachments
Detailed description of the tabs Attributes and Attachments can be found in article <<Tabs Discount Codes, Analytical Description, Attributes, Attachment and Change History>>.
Tab Analytical Description
From the level of document item, in the field Analytical Description Area it is possible to specify a depreciation area by which the values of analytical description can be completed in fixed asset documents from. Depreciation areas can be selected from among the areas activated in the <<system configuration window>>.
Detailed description of the functionality can be found in category <<Analytical description>>.
Tabs Attributes, Attachments and Change History
Detailed description of the tabs Attributes, Attachments and Change History can be found in article <<Tabs Discount Codes, Analytical Description, Attributes, Attachment and Change History>>.
Depreciation (FDP)
General information
An FDP document is registered in the system in order to calculate the depreciated value of a fixed asset. Depreciation is a type of cost related to gradual wear and tear of fixed assets and intangible assets. However, it does not generate cash outflow.
An FDP document can be generated:
automatically when saving a <<fixed asset form>>
with the use of button <<[Depreciation/Amortization]>>
manually
An FDP document is generated automatically while saving a fixed asset of Fixed Asset or Intangible Asset type, provided that the Value Updated at the Beginning of Period has been specified on the fixed asset form for any of the depreciation areas. An FDP document created this way, on item details, has date:
of transaction set to the last day of the previous calendar year − if all depreciation areas are associated with a calendar year
of transaction set to the last day before the accounting period including date of physical addition of a fixed asset − when all depreciation areas are associated with an accounting period
Note
If for a given fixed asset, at least one depreciation is associated with a calendar year and the other depreciation areas are associated with an accounting period, then FD documents will be created with the date of transaction set to the last day of the previous calendar year. The user can modify these dates from the level of FD document.
Values specified in an FDP document affect the parameters Write Offs at the Beginning of Period and Write Offs in Current Year available on the form of fixed asset.
Description of how to generate write-offs using the option [Depreciation/Amortization] can be found in article <<Generating depreciation and depreciation plan>>.
An FDP document can be registered from the level of:
the menu Fixed Assets → Fixed Asset Documents
the menu Fixed Assets → Fixed Assets upon selecting first particular fixed asset records
the Fixed Asset Documents tab on the form of fixed asset
An FDP document can be generated to the fixed assets for which a <<FA document>> has been generated and which have not been fully disposed or sold. To add an FDP document, select the button [Add Document] followed by the option [Depreciation] available in the drop-down list. A form for entering data will open.
Form of an automatically generated FDP document
The FDP document form is composed of the following elements:
Side panel
Number – document number granted automatically by the system according to the document numbering definition.
Depreciation (Balance-Sheet/Tax/IAS-IFRS) – fields of information purpose. Their visibility depends on the activated depreciation areas in the <<system configuration window>>. They present total values of items for particular depreciation areas.
Date of Issue
Reference Number – number entered by the user for the purpose of additional identification of the document
Owner – center to which the user registering a document is assigned. This field is not editable.
Tab Items
In the system, it is possible to add document items in two ways: directly in the table or through form.
Adding GDP document item in the table
To add an item directly in the table, select the button [Add] from the button group Items. A new row will appear in the item table. Here it is necessary to select a fixed asset as well as to complete the following columns: Date of Transaction, Analytical Description Area, Depreciation (Balance-Sheet/Tax/IAS-IFRS) as well as the column Description that is hidden by default.
Adding FDP document item through form
To add FDP items through form, select the button [Add Through Form] from the button group Items.
A window Item Details will open, containing the following fields:
Side panel
Code – fixed asset code selected from the fixed asset form
Name – value completed automatically on the basis of the fixed asset form. The names of fixed assets are displayed in the system logon language.
Date of Transaction – the date of transaction is by default copied from document header and is changeable
Analytical Description Area – selectable from among the depreciation areas activated in the <<system configuration window>>. The analytical description areas that on a fixed asset form have been selected in the Analytical Description tab are activated by default. Depending on the selected options, the document can be described analytically according to the values of the indicated depreciation area.
Depreciation (Balance-Sheet/Tax/IAS-IFRS) – available options that can be completed depend on the depreciation areas activated in the <<system configuration window>> and on the <<fixed asset form>>. The value that is specified first for one of the active areas is copied automatically to other areas (both active and inactive areas). Changes to either of the active value are not copied to other active areas.
Description – section for additional information on a given document item. In FDP documents generated via the option [Depreciation/Amortization], the description is automatically filled with the following information “Automatic generation of write-offs for [month and year]”. The same description appears in an FDP document after the parameter Write Offs at the Beginning of Period is specified on the form of fixed asset.
Tabs Attributes and Attachments
Detailed description of the tabs Attributes and Attachments can be found in article <<Tabs Discount Codes, Analytical Description, Attributes, Attachment and Change History>>.
Tab Analytical Description
From the level of document item, in the field Analytical Description Area it is possible to specify a depreciation area by which the values of analytical description can be completed in fixed asset documents from. Depreciation areas can be selected from among the areas activated in the <<system configuration window>>.
Detailed description of the functionality can be found in category <<Analytical description>>.
Tabs Attributes, Attachments and Change History
Detailed description of the tabs Attributes, Attachments and Change History can be found in article <<Tabs Discount Codes, Analytical Description, Attributes, Attachment and Change History>>.
Fixed asset form
General information
A fixed asset form is used to register a new asset, to preview already registered assets or to make necessary corrections and changes.
To add a new fixed asset, in the menu Fixed Assets → Fixed Assets select the button [Add] from the List button group. A new form for entering fixed asset data will open.
Fixed asset form
A fixed asset form is composed of the following elements:
Side panel
ID – a subsequent fixed asset number that is granted automatically and is non-editable
Under Construction – parameter specifying whether a fixed asset is complete or under construction. For a fixed asset u under construction, tab Depreciation is unavailable and fields Date of Receipt, Acquisition Date and FAC are inactive. Until the parameter gets unchecked for a fixed asset, FA document is not generated and it is not possible to generate depreciation write-offs and depreciation plan. To a fixed asset under construction, in tab Acquisition/Disposal Documents, it is possible to attach particular documents related to the investment. A fixed asset under construction can be disposed and in such case a FD document will be generated.
Code, Name, Inventory Number – mandatory fields; a fixed asset name can be provided in different languages supported in the system. Fixed asset names are displayed in the language selected as a logon language. Values in the fields Code and Inventory Number must be unique.
Note
Changed asset code or name is not updated in already existing documents.
Barcode – field providing information about fixed asset barcode. The field can be completed:
manually, on fixed asset form
after clicking on [Generate code] button, which is available on the right side of field Barcode on fixed asset form – the field Barcode will be filled in with the value from Inventory Number field
after clicking on [Generate Fixed Asset Barcode] button, which is available from the level of the menu Add-ons, in Special Features group of buttons, the field Barcode on a fixed asset for will be completed with the value retrieved from the field Inventory Number
Type − possibility of indicating one of three predefined options: Fixed Asset (predefined value), Intangible Asset and Equipment. Depending on selected type, different depreciation methods are available. Field active until <<FA document>> is generated.
FAC − <<fixed asset classification>> symbol selected from the fixed asset classification list. A tax depreciation rate is completed on the basis of the selected symbol. The field can be edited, if the parameter Under Construction is unchecked.
Location of Use – value selected from the relevant <<generic directory>> (menu Configuration → GenericDirectories → FixedAssets → LocationofUse). This field is active until a <<FA document>> is generated. The location of use can be changed directly in the FA document or via a <<FLC document>>.
Custodian – employee responsible for a given fixed asset, who is selected from the <<employee list>>. This field is active until a <<FA document<< is generated. The custodian can be changed directly in the FA document or via a <<FLC document>>.
Acquisition date − field active, if the parameter Under Construction is unchecked. Until a FA document is generated, the date from a fixed asset acquisition document with the earlies date available in the tab Acquisition/Disposal Documents. As an acquisition date one of the following dates can be retrieved:
purchase date − for purchase invoice and VAT purchase invoice correction
correction date − for purchase invoice correction
sales date − for VAT sales invoice
transaction date − for accounting note
Date of Receipt – date on which a fixed asset was received for utilization. The date of receipt cannot be earlier than the acquisition date. The parameter is active until a <<FA document>> is generated and if the parameter Under Construction is unchecked.
Acquisition Document – value in this field is completed automatically with document numbers from the table Acquisition Documents available in the Acquisition/Disposal Documents tab. Selecting the magnifying glass symbol redirects the user to the tab Acquisition/Disposal Documents.
Purchase Method – value selected from the relevant <<generic directory>> (menu Configuration → GenericDirectories → FixedAssets → Purchase Method)
Date of Disposal (Sale) – after selecting this parameter, it is possible to choose one of two date types: Date of Disposal, Date of Sale. The date of disposal (sale) cannot be earlier than the acquisition date. To be able to tag an asset of Fixed Asset or Intangible Asset type as disposed or sold, it is necessary that a FA document be generated for that asset. Saving the asset form generates automatically a <<FD document>>. In the case of disposed/sold assets, it is no longer possible to edit their depreciation−related parameters and to delete the documents of a given fixed asset.
Disposal (Sale) Document – value in this field is completed automatically with document numbers from the table Disposal (Sale) Documents available in the Acquisition/Disposal Documents tab. Selecting the magnifying glass symbol redirects the user to the tab Acquisition/Disposal Documents.
Reason for Disposal (Sale) – value selected from the relevant <<generic directory>> (menu Configuration → GenericDirectories → FixedAssets → Reason for Disposal/Sale)
Depreciation Areas – selected from among the depreciation areas that have been activated in the <<system configuration window>>. When adding new fixed assets, the same depreciation areas are by default activated as the ones activated in the fixed asset group to which the fixed asset is assigned.
Tab Depreciation
Note
The tab Depreciation is available when the parameter Under Construction is unchecked.
In the tab Depreciation, the following fields and parameters are available:
Balance On – used to verify the data on a specified day
In case more than one depreciation area is selected in the system configuration window, the values of the parameters in the Depreciation tab can be copied to other depreciation areas respecting the rules described in article <<Configuration of parameters>>.
Depreciation Method – indicates the method of calculating write-offs for a fixed asset. Available depreciation methods depend on the type of asset:
Straight-line – this method is available for assets of Fixed Asset or Intangible Asset A monthly write-off is calculated as asset’s current value multiplied by tax depreciation rate and by coefficient and then divided by 12 months. In the case of assets depreciated seasonally, the value of an annual write-off is divided by the number of months in which the asset is depreciated. This depreciation method takes into accounts the history of write-offs, that is in case a write-off is not calculated in one month or is calculated manually for a different value, then the difference will be compensated in a consecutive month. According to this method, a write-off is calculated on the asset’s current value. The system also controls the correctness of the values of cumulative write-offs from the beginning of a year.
Declining balance – this method is available for assets of Fixed Asset or Intangible Asset A monthly write-off is calculated as asset’s current value reduced by the amortization value for the previous period. This value is multiplied by tax depreciation rate and by coefficient and then divided by 12 months. In the case of assets depreciated seasonally, the value of an annual write-off is divided by the number of months in which the asset is depreciated. This depreciation method takes into accounts the history of write-offs, that is in case a write-off is not calculated in one month or is calculated manually for a different value, then the difference will be compensated in a consecutive month. According to this method, a write-off is calculated on the asset’s current value decreased by the values of the write-offs from previous years. The system also controls the correctness of the values of cumulative write-offs from the beginning of a year. If an annual depreciation amount was to be lower in the case of the declining balance method than the amount of the write-offs calculated according to the straight-line method, the system will calculate write-offs according to the straight-line method.
Activity – this method is available for assets of Fixed Asset or Intangible Asset A monthly write-off is calculated as asset’s current value multiplied by tax depreciation rate and by coefficient and then divided by 12 months. In the case of assets depreciated seasonally, the value of an annual write-off is divided by the number of months during which the asset is depreciated. This depreciation method does not take into account the history of write-offs, thus, the values of write-offs in the case of this method are always the same.
One-time – this depreciation method is available for all types of assets. The program calculates a single write-off amounting to the current value of a fixed asset.
Not subject – this depreciation method is available for all types of assets. No write-off is here generated.
Depreciation Rate – rate by which write-offs are calculated. It is completed automatically on the basis of the <<FAC>>. This parameter is not editable for One-time method (for this method, it is set to 100% by default) and for Not-subject method (for this method, it is set to 0% by default).
Coefficient – rate increasing coefficient by which a depreciation rate is multiplied. Methods One-off and Not subject are set, by default, to 1 and this setting is not changeable.
Depreciation Months – number of months during which a fixed asset will be depreciated. This parameter is editable only for the straight-line method. Value of this parameter is calculated on the basis of depreciation rate and coefficient.
Seasonality – this parameter enables the selection of months in which a fixed asset must be depreciated seasonally, that is only in the selected months of a year. It is editable for depreciation methods other than One-time and Non subject.
Depreciation Suspension – this parameter enables the selection of months in which depreciation of a fixed asset is suspended temporarily. Selecting the button opens the window Depreciation Suspension in which it is possible to specify the year during which the suspension applies. This parameter is editable for the depreciation methods other than One-time and Not subject.
Depreciation Start Date – date as of which write-offs will be generated. For particular methods, the program suggests the following dates, by default:
One-time method – date of receipt
Not subject method – empty record
other methods – the first day of month following the month in which the asset was received for utilization
Initial Value – value of fixed asset acquisition or production. It can be completed manually. Otherwise, it will be calculated automatically on the basis of the values of the documents selected in section Acquisition Documents under the tab Acquisition/Disposal Documents.
Note
Fixed asset’s initial value is editable on the form of fixed asset until a FA document is generated. If a FA document was already generated, then the value can be changed directly in the FA document, in which case it will be updated also on the fixed asset form.
Value Updated at the Beginning of Period – value of fixed asset on the first day of a given tax year or accounting year, taking into account all the fixed asset devaluations. Until the fixed asset form is saved the first time, this parameter is editable if:
the date of receipt is earlier than the system date for the depreciation area associated with a calendar year
the date of receipt is earlier than the current accounting period for the depreciation area associated with an accounting period.
Note
If for a given fixed asset one depreciation area is associated with a calendar year and the second one with an accounting period, then on FR and FD documents, as operation date, the last day of the previous calendar year will be set. The data is editable and can be changed by the user.
Total Value – final value after taking into account all fixed asset devaluations on the day specified in the Balance On field. This value is calculated automatically and is not editable.
Write Offs at the Beginning of Period – value of write-offs generated in previous financial years. This parameter is editable on the same rules as the Value Updated at the Beginning of Period until the fixed asset form is saved the first time.
Write Offs in Current Year – value of write-offs generated in a given financial year up to the month being analyzed. This value is calculated automatically on the basis of depreciation documents.
Cumulative Depreciation – value of write-offs generated in a given financial year up to the month being analyzed as well as that of the write-offs at the beginning of the period. This value is calculated automatically on the basis of depreciation documents.
Current Subtotal Value – fixed asset value taking into account all its devaluations as well as the generated write-offs. This value is calculated automatically.
Tab Groups
Classification Categories – there is one predefined and non-editable classification category: Fixed Assets. No other classification categories can be added.
Groups – provides information about the code, name and location of the fixed asset group to which a fixed asset is assigned. A fixed asset can be assigned only to one group. Selecting the button [Edit] redirects the user to the fixed asset group, where it is possible to change the group to which the fixed asset must be assigned.
Tab Acquisition/Disposal Documents
Upon selecting the button [Attach] in tab Acquisition/Disposal Documents, it is possible to indicate the document list from which to attach documents. Available options are:
Purchase Invoices
Sales Invoices (available in section Disposal Documents/Sale Documents)
VAT Accounts
Accounting Notes
Journal Entries
Without Document – using this option it is possible to enter manually the number of the document on the basis of which a fixed asset has been registered
Documents selected in the Acquisition/Disposal Documents can be detached at any time with the help of the option [Detach]. If a FA document is already generated, then detaching a document does not affect the fixed asset’s initial value.
Sections Acquisitions Documents and Disposal (Sale) Documents provide information about a document number, date and value.
The column Document Number presents the number of a reference document and if it is missing – the document system number.
The column Document Date provides information about a document date of issue.
Depending on the document type, the column Document Value will present the value of:
purchase invoice – sum of subtotal values in the system currency
VAT purchase invoice – for the parameter VAT Deductions set to Yes or Conditionally, a subtotal value in the system currency is presented, whereas for the parameter VAT Deductions set to No, a total value in the system currency is presented
VAT sales invoice – subtotal value in the system currency
accounting note – entry amount from an accounting note
journal entry – entry amount from a journal entry
without document – value entered by the user
In the case of documents selected as acquisition documents, their values affect the initial value of a fixed asset, provided that the fixed asset was not associated with a <<FA document>> when attaching the documents.
Section Disposal Documents (Sale Documents) is activated upon selecting the parameter Disposal Date in the side panel of the fixed asset form. The section name changes depending on the date type: Date of Disposal, Date of Sale.
Tab Fixed Asset documents
In the tab Fixed Asset documents, a list of documents generated for a given fixed asset is displayed.
In this list, it is possible to add, review, delete and print documents of a particular fixed asset.
This tab works on the same rules as the list of fixed asset documents, which description can be found in article <<Fixed asset list>>.
Tab Accounting
The table Default Accounts available in this tab lists all the default <<bookkeeping accounts>> that are assigned to a given fixed asset. By selecting a checkbox in the column Create Account, it is possible to create an account for a given object if such account does yet exist. The table presents the accounts available in the company to which an operator is logged in within a given accounting period.
Tab Analytical Description
Analytical description improves the analysis of the company’s financial results. On the fixed asset form, it is possible to specify a depreciation area by which the values of <<analytical description>> can be completed in fixed asset documents. Depreciation areas can be selected from among the areas activated in the <<system configuration>> window.
To be able to <<assign analytical dimensions>> to fixed assets, first it is necessary to assign appropriate analytical measures to the object Fixed Assets (menu Configuration → Company Structure → Object Dimensions). After analytical dimensions are assigned, it is possible to define an analytical description on the form of both fixed asset group and fixed asset, itself.
Tab Availability
When adding a new fixed asset form, the center, to which an operator is logged in, is set as the object owner entitled to object modification. The operator can change the owner of the fixed asset, its availability in centers and manage the edit permissions.
Detailed description of this tab can be found in article <<Objects availability − general information>>.
Tab Attributes, Attachments, Change History
Detailed description of these tabs can be found in article <<Tabs Discount Codes, Analytical Description, Attributes, Attachment and Change History>>.
List of inventories
Inventory consists in taking an actual physical inventory of quantity levels of all tangible assets, as well as reconciling any differences between the status ascertained during an inventory (actual status) and the status resulting from <<fixed asset register>>
The list of fixed asset inventories is available from the level of the menu Fixed Assets, under [Inventories] button
List of fixed asset inventories
On the list of fixed asset inventories, there are <<standard buttons>> and, additionally:
[Confirm] – allows for confirming selected inventory documents. An inventory document can be confirmed when all of its sheets have Confirmed or Canceled status
[Close] – allows for closing selected inventories. For closed inventories, it is possible to generate <<documents reconciling discrepancies>>. It is not possible to open a closed inventory
[Unconfirm] – allows for opening unconfirmed inventory sheets. Opening of inventories changes status of all <<inventory sheets>> to Unconfirmed (does not apply to canceled sheets)
[Copy] – enables to copy a confirmed or canceled inventory document. When copying, only item sheets which were not canceled, are transferred.
[FLC] – button available after marking closed inventory documents\, allows for generating FLC document in case there are non-compliances regarding location or custodians of fixed asset
[FD] – button available after marking closed inventory documents, allows for generating FD document in case a shortage occurs during the inventory
[Alert] When adding/copying an inventory document, the system verifies whether a given fixed asset has already been included in other, unconfirmed inventory or in another sheet of that inventory. If yes, it will not be added to the current inventory sheet. [/alert]
The list of inventories is composed of the following columns:
Number – inventory document system number
Date – inventory document confirmation date
Status
Documents – fixed asset documents generated from an inventory document
Owner (column hidden by default)
Fixed asset disposal (FD)
General information
A FD document is registered in the system when a fixed asset is partially or entirely disposed
Note
Unlike other types of fixed asset documents, a FD document is posted in absolute terms.
An FD document can be added:
automatically upon selecting first the parameter Date of disposal/Date of sale available on the form of fixed asset
automatically on the basis of an inventory, upon selecting [FD] button available in Generation group of buttons, if there are shortages resulting from the inventory
manually
A FD document is generated automatically while saving a fixed asset of Fixed Asset or Intangible Asset type, provided that the parameter Date of Disposal/Date of Sale has been selected on the fixed asset form. Disposal of a fixed asset blocks the option of editing or deleting the documents generated for that asset as well as the option of changing its depreciation-related parameters. Moreover, on a FD document, the parameter Date of Transaction, available on item details, is not subject to edition.
A FD document can be added from the level of:
the menu Fixed Assets → Fixed Asset Documents
the menu Fixed Assets → Fixed Assets, upon selecting first particular fixed asset records
To add a FD document, select the button [Add Document] followed by the option Disposal available in the drop-down list. A form for entering data will be opened.
Fixed asset disposal document form
The form of FD document is composed of the following elements:
Side panel
Number – entered by the system according to the document numbering definition
Value (Balance-Sheet/Tax/IAS-IFRS) – fields of information purpose. Their visibility depends on the activated depreciation areas in the system configuration window. They present total values of items for particular depreciation areas.
Depreciation (Balance-Sheet/Tax/IAS-IFRS) – fields of information purpose. Their visibility depends on the activated depreciation areas in the system configuration window. They present total item values from the column Depreciation for particular depreciation areas.
Values provided in a FD document into the columns Value (Balance-Sheet/Tax/IAS-IFRS) affects in the subsequent period the fixed asset total value as well as its value updated at the beginning of period, whereas value provided into the columns Depreciation (Balance-Sheet/Tax/IAS-IFRS) affects the asset’s write-off values.
Date of Issue – for a FD issued manually, current date is set by default, with a possibility of changing it. For a FD generated automatically, the date from the Date of Disposal/Date of Sales is set by default, with a possibility of changing it
Reference Number – number entered by the user for the purpose of additional identification of a document
Owner – by default, center to which the user registering a document is assigned. This field is not editable.
Tab Items
In this tab, it is possible to add, edit, copy, delete as well as to export to a spreadsheet the items of a FD document.
A document item can be added into a document in two ways: directing in the table or through form.
Adding FD document item in the table
To add an item directly in the table, select the button [Add] from the button group Items. A new row for entering data will appear in the item table. Here it is necessary to select a fixed asset as well as to complete the following columns: Date of Transaction, Analytical Description Area, Value (Balance-Sheet/Tax/IAS-IFRS), Depreciation (Balance-Sheet/Tax/IAS-IFRS) and Description and Fixed Asset Attachment columns which are hidden by default. Provided data will also be updated on the fixed asset form.
Adding FD document through form
To add FD items through form, it is necessary to select button [Add Through Form] from Items group of buttons.
It opens Item Details window which contains the following fields:
Side panel
Code – fixed asset code retrieved from the <<fixed asset form>>
Name – value completed automatically on the basis of the fixed asset form. The names of fixed assets are displayed in the system logon language.
Date of Transaction – by default, the date from document header is retrieved, with a possibility of changing it for documents added manually. For FD documents generated automatically, the field is not subject to edition.
Analytical Description Area – selectable from among the depreciation areas activated in the <<system configuration>> window. Depending on the selected options, the document can be described analytically according to the values of the indicated depreciation area.
Value (Balance-Sheet/Tax/IAS-IFRS) – available options that can be completed depend on the depreciation areas activated in the <<system configuration>> window and on the <<fixed asset form>>. The value that is specified first for one of the active areas is copied automatically to other areas (both active and inactive). Changes to either of the active values are not copied to other active areas.
Depreciation (Balance-Sheet/Tax/IAS-IFRS) – available options that can be completed depending on the depreciation areas activated in the system <<configuration window>> and on the <<fixed asset form>>. The values are calculated automatically on the basis of the generated write-offs. They are calculated proportionally to the fixed asset’s disposed value and they are editable.
Recognition Date – this date is available only in the document item details window. It is, by default, set to the first day of the month following the date of transaction. It determines the date on which the value of the fixed asset subject to depreciation must be changed.
Description – section for additional information on a given document item.
Tab Attributes and Attachments
Detailed description of the tabs Attributes and Attachments can be found in article <<Tabs Discount Codes, Analytical Description, Attributes, Attachments and Change History.>>
Example
Fully disposed fixed asset
Fixed asset: Delivery truck purchased and received to utilization on 2/15/2017, initial value: 50 000.00 USD, depreciation method: straight-line, depreciation rate: 20%.
Write-off were generated for a total amount of 19 166.66 USD:
2017: 8 333.33 USD (from March to December)
2018: 10 000 USD
2019: 833.33 (January)
A decision to dispose the fixed asset was taken on 2/19/2019.
In order to generate a FD document automatically, in the side panel of the fixed asset form it is necessary to select the parameter Date of Disposal and set the date to 2/19/2019. A reason for disposal can also be selected from the relevant generic directory and a disposal document can be attached.
After the fixed asset form is saved, the fixed asset will be presented on the fixed asset list in orange and the system will generate automatically a FD document with the date of issue 2/19/2019 and for the following amounts:
Value (Balance-Sheet): – 50 000 USD
Depreciation (Balance-Sheet): – 19 166.66 USD
Example
Partially disposed fixed asset
Fixed asset: Delivery truck purchased and received for utilization on 2/15/2017, initial value: 50 000.00 USD, depreciation method: straight-line, depreciation rate: 20%.
Write-off were generated for a total amount of 19 166.66 USD:
2017: 8 333.33 USD (from March to December)
2018: 10 000 USD
2019: 833.33 (January)
A decision to dispose partially the fixed asset was taken on 1/31/2019 – amount: 20 000 USD.
In order to dispose partially the fixed asset, it is necessary to generate manually a FD document for the amount of -20 000 USD. Write-offs will be calculated proportionally to the disposed value of the fixed asset and will be amounting to -7 666.66 USD. This amount is editable.
From February 2019, write-offs will be generated in the value descreased by the disposed value of the fixed asset.
Tab Analytical Description
From the level of document item, in the field Analytical Description Area it is possible to specify a depreciation area by which the values of analytical description can be completed in fixed asset documents from. Depreciation areas can be selected from among the areas activated in the system configuration window.
Note
FD document is described analytically in the absolute terms.
Detailed description of the functionality can be found in article <<Analytical Description>>.
Tabs Attributes, Attachments and Change History
Detailed description of the tabs Attributes, Attachments and Change History can be found in article <<Tabs Discount Codes, Analytical Description, Attributes, Attachments and Change History>>.
Change of location and custodian (FLC)
A FCL document is registered in the system when the custodian or the location of use of a fixed asset is changed.
A FCL document can be generated manually.
Note
Only one custodian and one location of use can be selected for a given fixed asset.
A FCL document can be registered from the level of:
the menu Fixed Assets → Fixed Asset Documents
the menu Fixed Assets → Fixed Assets upon selecting first particular fixed asset records
the Fixed Asset Documents tab on the <<form of fixed asset>>
To add a FCL document, select the button [Add Document] followed by the option Change Location and Custodian available in the drop-down list. A form for entering data will open.
FLC document form
The form of FCL document is composed of the following elements:
Side panel
Number – document number granted automatically by the system according to the document numbering definition
Change the location of use – selecting this parameter activates a drop-down list from which it is possible to select the location of use defined in the <<relevant generic directory>> (menu Configuration → Generic Directories → Fixed Assets → Location of Use).
Change custodian – selecting this parameter activates the option of selecting an employee from the <<employee list>>
Date of Issue
Owner – by default, center to which the user registering a document is assigned. This field is not editable.
Tab Items
An item can be added into a document in two ways: directing in the table or through form.
Adding FCL document item in table
To add an item directly in the table, select the button [Add] from the button group Items. A new row for entering data will appear in the item table. Here it is necessary to select a fixed asset as well as to complete the column: Date of Transaction. In the document item list, there are also non-editable columns of information purpose: Previous Location of Use and Previous Custodian as well as the column Description (hidden by default).
Adding FCL document item through form
To add FCL items through form, select the button [Add Through Form] from the button group Items.
A window Item Details will open, containing the following fields:
Side panel
Code – fixed asset code retrieved from the <<fixed asset form>>
Name – value completed automatically on the basis of the fixed asset form. The names of fixed assets are displayed in the system logon language.
Date of Transaction – the date of transaction is by default copied from document header and is changeable
Previous Location of Use – information and non-editable field presenting the recent location of use of a fixed asset in reference to the date of transaction
Previous Custodian – information and non-editable field presenting the name of the recent custodian of a fixed asset in reference to the date of transaction
Description – section for additional information on a given document item
Tabs Attributes and Attachments
Detailed description of the tabs Attributes and Attachments can be found in article <<Tabs Discount Codes, Analytical Description, Attributes, Attachments and Change History>>.
Note
A FCL document is not subject to posting and cannot be described analytically.
Note
Tab Attributes, Attachment and Change History
Detailed description of the tabs Attributes and Attachments can be found in article <<Tabs Discount Codes, Analytical Description, Attributes, Attachments and Change History>>.
Fixed asset acquisition (FA)
General information
A FA document is registered in the system when the receipt of a fixed asset is taken for utilization.
A FA document can be generated:
automatically, when saving a <fixed asset form>>, if the parameter Under Construction is not checked
automatically, on the basis of an <<inventory>>, upon selecting the [FA] button from Generation group of buttons, if there is a surplus in the inventory
manually
A FA document is generated automatically while saving a fixed asset of Fixed Asset or Intangible Asset type, provided that an initial value has been specified on the item form for any of the depreciation areas. Values provided in the FA document affects the fixed asset’s initial value.
Note
With one FA document it is possible to take receipt of many fixed assets. But one fixed asset can be received with only one FA document.
A FA document can be registered from the level of:
the menu Fixed Assets → Fixed Asset Documents
the menu Fixed Assets → Fixed Assets upon selecting first particular fixed asset records
the Fixed Asset Documents tab on the form of fixed asset
To add a FA document, it is necessary select the button [Add Document] followed by the option Acquisition available in the drop-down list. A form for entering data will appear.
FA document form
The form of FA document is composed of the following elements:
Side panel
Number – document number granted automatically by the system according to the document numbering definition.
Value (Balance-Sheet/Tax/IAS-IFRS) – fields of information purpose. Their visibility depends on the activated depreciation areas in the <<system configuration window>>. They present total values of items for particular depreciation areas.
Date of Issue – document date of issue
Reference Number – number entered by the user for the purpose of additional identification of the document
Owner – center to which the user registering a document is assigned. This field is not editable.
Tab Items
In this tab, the user can add, edit, delete or export to a spreadsheet items of FA document.
.In the system, it is possible to add items to a document in two ways: directly in the table or through form.
Adding FA document item in the table
To add an item directly in the table, select the button [Add] from the button group Items. A new row will appear in the item table. Here it is necessary to select a fixed asset as well as to complete the following columns: Date of Transaction, Custodian, Location of Use, Analytical Description Area, Value (Balance-Sheet/Tax/IAS-IFRS) as well as the column Description (hidden by default). Data completed in the table will be updated on the <<fixed asset>> form, accordingly.
Adding a FA document item through form
To add FA items through form, select the button [Add Through Form] from the button group Items.
A window Item Details will open. In the side panel of that window, there are the following fields:
Side panel
Code – it is possible to indicate a code from <<fixed asset form>>
Name – value completed automatically on the basis of the fixed asset form. The names of fixed assets are displayed in the system logon language.
Date of Transaction – the date of transaction is by default copied from document header and is changeable. Based on this date, the acquisition date and the date of receipt are specified on the fixed asset form.
Custodian – employee responsible for a given fixed asset; a custodian is selected from the <<list of employees>>
Location of Use – value selected from the <<generic directory>> (menu Configuration → Generic Directories → Fixed Assets → Location of Use)
Analytical Description Area – selectable from among the depreciation areas activated in the <<system configuration window>>. The analytical description areas that on a fixed asset form have been selected in the Analytical Description tab are activated by default. Depending on the selected areas, the document can be described analytically according to the values of the indicated depreciation area.
Value (Balance-Sheet/Tax/IAS-IFRS) – available options that can be completed depend on the depreciation areas activated in the <<system configuration window>> and on the <<fixed asset form>>. The value that is specified first for one of the active areas is copied automatically to other areas (both active and inactive areas). Changes to either of the values are not copied to other active areas.
Description – section for additional information on a given document item.
Tabs Attributes and Attachments
Detailed description of the tabs Attributes and Attachments can be found in article <<Tabs Discount Codes, Analytical Description, Attributes, Attachments and Change History>>.
Tab Analytical Description
From the level of document item form, in the field Analytical Description Area it is possible to specify a depreciation area by which the values of analytical description can be completed in fixed asset documents. Depreciation areas can be selected from among the areas activated in the <<system configuration window>>.
Detailed description of the functionality can be found in category <<Analytical Description>>.
Tab Attributes, Attachment and Change History
Detailed description of the tabs Attributes and Attachments can be found in article <<Tabs Discount Codes, Analytical Description, Attributes, Attachments and Change History>>.
List of fixed asset documents
The list of fixed asset documents is available in the menu Fixed Assets under the button [Fixed Asset Documents]. From the level of the list, it is possible to add, preview, post and print the fixed asset documents.
List of fixed asset documents
On the list of fixed asset documents, there are <<standard buttons>> and additionally:
[Add Document] – adds documents of fixed assets
After clicking on the [Add Document] button, drop down list containing values: Acquisition, Revaluation, Disposal, Depreciation, Change of Location and Custodian becomes available.
Fixed asset documents can be generated automatically by the program or manually from the level of:
the <<fixed asset list>> upon selecting particular fixed asset records
the Fixed Asset Documents tab available on the <<fixed asset form>>
the fixed asset document list
Detailed information regarding the types of fixed asset documents can be found in category <<Fixed asset documents>>.
The list of fixed asset documents is composed of the following columns:
Type
Number
Date of Issue
Status
Currency
Revaluation (Balance-sheet/Tax/IAS) – the number of such named columns depends on the number of depreciation areas activated in the system configuration window
Depreciation (Balance-sheet/Tax/IAS) – the number of such named columns depends on the number of depreciation areas activated in the system configuration window
Description (hidden by default)
Owner (hidden by default)
Source (hidden by default) – information whether a document was generated automatically or added manually
Detailed description of functioning of the filters can be found in category <<Searching and filtering data>>>
In addition, the list of fixed asset documents can be narrowed to a fixed asset indicated in the filter. After selecting such fixed asset, it is necessary to click on the [Filter] button. Once a fixed asset is selected in the filter, it is possible to preview it with the use of … button.
Generating depreciation and depreciation plan
General information
Depreciation is a type of cost related to gradual wear and tear of fixed assets and intangible assets. However, it does not generate cash outflow.
Generating depreciation
A FA document can be generated either automatically when saving a fixed asset form or manually. For detailed information, refer to chapter <<Depreciation (FDP)>>.
A depreciation document can also be generated using the option [Depreciation/Amortization] available in the menu Fixed Assets → Fixed Assets in the button group Generation for the fixed assets selected on the list.
After selecting the button [Depreciation/Amortization], it is necessary to specify the month and year for which a depreciation document will be generated as well as to specify the document date of issue. After changing a depreciation month, a date in the field Document Date of Issue is, by default, set to the last day of a given month. The date of issue is editable.
Window for generating depreciation write-offs
Note
Document date of issue represents the date of issue from a document header. A date of transaction in the details of document item is always set to the last day of month for which write-offs are being generated. The date of transaction is editable.
Note
Depreciation is calculated in a single-batch for the fixed assets selected on the list and one <<FDP document>> is then generated.
Upon completing the process of generating a depreciation document, a log containing information about the process is generated. It presents the code of the fixed asset and the values of generated depreciation write-offs.
If a fixed asset is not subject to depreciation or was fully depreciated, disposed or sold, or if write-offs generation was suspended or if an asset is depreciated seasonally, the reasons for failure to generate write-offs for that asset will be presented in the log.
Generating depreciation plan
A depreciation plan presents anticipated write-offs for a specified period.
A depreciation plan is generated for the fixed assets selected on the list upon selecting the button [Depreciation Plan] that is available in the menu Fixed Assets → Fixed Assets in the button group Generation.
Selecting the button [Depreciation Plan] opens a window Depreciation Plan with the following parameters:
Date Range – range of dates for which a depreciation plan must be calculated
Ignore assets fully amortized – selecting this parameter activates the list of depreciation areas. The system will verify the selected depreciation areas in terms of whether a fixed asset has already been fully depreciated. A depreciated plan is generated for a fixed asset if the current subtotal value for the selected depreciation plan equals zero.
Include disposed assets – parameters unchecked by default. After checking it, when calculating a depreciation plan, disposed or sold fixed assets are also taken into account. In case the parameter Ignore assets fully amortized is checked, the parameter Include disposed assets is deactivated and grayed-out by default.
After specifying the values of the parameters, it is necessary to collect the button [Recalculate] to generate a depreciation plan.
A depreciation plan is, by default, grouped by the column Code and is composed of the following columns:
Code/Month
Total Value (Balance-Sheet/Tax/IAS-IFRS) – total value at the beginning of period, calculated according to the date range for which the depreciation plan is being calculated
Depreciation (Balance-Sheet/Tax/IAS-IFRS) – write-offs generated in particular months
Planned Depreciation (Balance-Sheet/Tax/IAS-IFRS) – planned write-offs calculated according to the algorithms intended for depreciation methods
Subtotal Value (Balance-Sheet/Tax/IAS-IFRS) – subtotal value at the beginning of period, calculated according to the date range for which the depreciation plan is being calculated
Planned Subtotal Value (Balance-Sheet/Tax/IAS-IFRS) – forecast subtotal value of a fixed asset, if planned depreciation write-offs are generated
columns hidden by default:
FAC
Method (Balance-Sheet/Tax/IAS-IFRS) – depreciation method by which write-offs must be calculated for a given depreciation area
Inventory Number
Rate Coefficient (Balance-Sheet/Tax/IAS-IFRS) – depreciation rate specified for a given depreciation area
Coefficient (Balance-Sheet/Tax/IAS-IFRS) – depreciation write-off specified for a given depreciation area
List of fixed assets
The list of fixed assets is available in the menu Fixed Assets under the button [Fixed Assets] and is composed of section related to fixed asset groups as well as the fixed asset list. From the level of this list, it is possible to add new fixed assets and review the existing fixed asset records.
List of fixed assets
On the list of fixed assets, there are <<standard buttons>> and additionally:
[Copy] – allows for copying fixed asset form. The following values are copied to the form of a new fixed assets: value of the parameter Under Construction, Code, Name, Type, FAC, Location, Custodian, Purchase Method, Depreciation Method, Depreciation Rate, Coefficient, Number of Months, Seasonality, Depreciation Suspension, Analytical Description, Attributes and Attachments
[Depreciation/Amortization] – <<generates write-offs>> for selected fixed assets
[Depreciation Plan] – <<generated depreciation plan>> for selected fixed assets
[Add Document] – allows for adding <<fixed asset documents>>
[Fixed Asset Documents] – allows for previewing documents of fixed assets. The button is available, if one fixed asset is marked on the list. Clicking on the button opens the <<list of documents>> of the marked fixed assets, from the level of which it is possible to add, edit, delete, post or print fixed asset documents.
The fixed asset list is a historical list. On this list it is possible to verify the data on a specified day selected in the field Balance On. By default, the list of fixed assets presents balance as of the current date.
For the parameter Balance On, it is possible to select one of the following values:
Day – presents the values of fixed assets on a selected day
Month – presents the values of fixed assets on the last day of the selected month
Year – presents the values of fixed assets on the last day of the selected calendar year
The list of fixed assets is composed of the following columns:
Code
Name
Inventory Number
Type
Date of Receipt – date of receipt retrieved from the form of fixes asset or empty column in the case of a fixed asset under construction
Status – receives such values as In Use, Disposed or Sold depending on the selected date: Date of Disposal/Date of Sale on a <<fixed asset form>>
Currency
Regular Value (Balance-sheet/Tax/IAS) – the number of columns presenting a regular value depends on the number of depreciation areas activated in the <<system configuration window>>
Subtotal Value (Balance-sheet/Tax/IAS) – the number of columns presenting a subtotal value depends on the number of depreciation areas activated in the system configuration window
Columns hidden by default
Date of Disposal
Date of Sale
FAC
Location of Use
Description
Custodian
Under Construction – non-editable column. The option is checked, if on the form of a fixed asset, the parameter Under Construction is checked.
Current Total Value (Balance-sheet/Tax/IAS) – the number of columns presenting a total value depends on the number of depreciation areas activated in the system configuration window
Depreciated By Multiple Areas – non-editable column. The option is checked, if on the form of a fixed asset, more than one depreciation area has been activated.
Owner
Attachment – attachment miniature is presented in this column
Disposed fixed assets are highlighted on the list in red, whereas sold fixed assets are presented in orange.
Detailed description of the functioning of filters can be found in category <<Searching and filtering data>>.
Fixed asset groups
General information
Defining fixed asset groups in the form of a tree makes it easier to classify and group the registered objects. From the level of that tree, it is possible to create additional groups according to the user’s preferences. On the form of fixed asset group, default values and settings of parameters with which <<fixed asset forms>> will be created. A given fixed asset can be assigned only to one group/child group.
List of fixed asset groups
On the list of fixed asset groups, there is one predefined group – Main Group. It is a primary group in reference to all other fixed asset groups. It is not possible to delete it, but it can be edited in any way. Below the main group, there are also three predefined child groups: Means of Transport, Technical Devices and Machines, and Equipment, which can be freely edited and deleted.
Fixed asset groups are supported with <<standard buttons>> as well as the following additional buttons:
[Cut] – moves a given group or its records to another group on the tree. It cuts a selected fragment and saves it into the clipboard (as in other programs, such as Word).
[Paste] – pastes a previously cut fragment saved in the clipboard
Buttons and , located by the names of fixed asset groups on the tree, are used for collapsing and expanding a given structure level. The buttons appear by the name of the fixed asset group to which a child group has been added.
Classification – there is only one predefined classification: Fixed Asset, which is not editable. It is not possible to add other classifications.
Below the fixed asset group tree, there are also the following options:
Show codes – presents group codes in the fixed asset group structure
Show names – presents group names in the fixed asset group structure.
Adding fixed asset group
To define a new fixed asset group, select button [Add] from Group Tree group of buttons and complete the form with basic information about the fixed asset group. When adding a new child group, the values of some parameters are set on the basis of the parent group. Parameters of fixed assets are set on the basis of the parameters defined on the form of the group to which a given fixed asset is being added.
Fixed asset group form
The form of fixed asset group is composed of the following elements:
Side panel
Code and Name – mandatory fields. A fixed asset group can be defined in different languages that are supported in the system. The name of a newly added group must be provided in the language in which the user is currently logged on to the system. The name of fixed asset group is always displayed in the currently selected logon language. If the name is not provided in the logon language, then it is displayed in the system language (database language).
Update patters and Update fixed assets – these update options are not available when adding a new fixed asset group. If any of the fields (except for the Type field) is modified in the edited fixed asset group, both the parameters are activated.
For both update types, one of three available options can be selected:
Changed fields – conditional – the fields in fixed asset groups/fixed assets will be updated according to their modifications made in the pattern. The update will apply only to the fields that had had the same values before they were changed.
Changed fields – unconditional – the fields in fixed asset groups/fixed assets will be updated according to their modifications made in the pattern. The update will apply only to the modified fields, regardless of their previous values.
All fields – unconditional – all the fields in fixed asset groups/fixed assets will be updated according to their modifications made in the pattern, except for the ones that would detriment their uniqueness (type and inventory number).
Tab Pattern
The tab Pattern is composed of the following elements:
Pattern → General
In the tab Pattern → General, it is possible to specify the parameters that are next copied to child groups and to fixed asset forms:
Under construction – parameter specifying whether fixed assets added to the group will be marked by default as Under construction
Type – value selected from a drop-down list: Fixed Asset (default value), Intangible Asset and Equipment. The selected type determines the availability of various depreciation methods.
FAC – symbol selected from the fixed asset classification. A tax depreciation rate is completed on the basis of the selected symbol
Inventory Number – inventory number of a faced asset, it is not subject to conditional or unconditional update. Field Code Format/Configuration Tool allows for assigning automatically an inventory number on the basis of created definition. Methods of defining configuration tools are described in article Configuration tools.
Location of Use – value selected from the relevant generic directory (menu Configuration → GenericDirectories → FixedAssets → LocationofUse)
Custodian – employee responsible for a given fixed asset, who is selected from the employee list
Purchase Method – value selected from the relevant generic directory (menu Configuration → GenericDirectories → FixedAssets → Purchase Method)
Depreciation Areas – selected from among the depreciation areas that have been activated in the system configuration window. Values presented in the table with depreciation parameters depend on the selected depreciation areas. A depreciation area that is, by default, selected in fixed asset groups is Balance-sheet.
Note
In case the balance-sheet depreciation is deactivated in the system configuration window, then the other activated depreciation areas will be available as inactive in the fixed asset groups.
The table below presents possible settings of depreciation-related parameters in a fixed asset group for an asset of a specific type.
Asset Type
Depreciation Method
Depreciation Rate
Coefficient
Number of Months
Fixed asset
Intangible asset
Straight-line
0%-100%
0-99.99
Calculated automatically
Declining balance
Activity
0%-100%
0-99.99
Not applicable
One-time
100%
1
Not applicable
Not subject
0%
1
Not applicable
Equipment
One time
100%
1
Not applicable
Not subject
0%
1
Not applicable
In the case of assets of Fixed Asset and Intangible Asset type, parameter Depreciation Rate is completed automatically on the basis of FAC and is changeable at any time. Parameter Number of Depreciation Month is completed only for the straight-line method and is calculated on the basis of the tax depreciation rate and the coefficient.
Pattern → Accounting
In the tab Pattern → Accounting, the table Default Accounts presents default bookkeeping accounts that are assigned to a given fixed asset group. By selecting a checkbox in the column Create Account it is possible to create an account for a given fixed asset, if such account does not yet exist. Accounts are displayed in the context of the company to which the system operator is logged in within a specific accounting period. In the parent company, all the defined accounts are displayed.
Pattern → Analytical Description
Analytical description enhances the possibility of analyzing a company’s financial performance. In terms of fixed assets, it is possible to determine a depreciation area by which the values of analytical description can be completed in fixed assets documents. Depreciation areas can here be selected from among the areas activated in the system configuration window.
Analytical dimensions can be assigned to a fixed asset group. To do so, appropriate analytical dimensions must first be assigned to the object Fixed Assets (menu Configuration → Company Structure → Object Dimensions). After the analytical dimensions are assigned, it is possible to describe analytically a fixed asset group. A completed analytical description will next be copied onto the fixed assets being added to that group.
Pattern → Attributes
Attributes added from the level of the tab Pattern → Attributes are copied automatically onto the fixed assets being added to a given fixed asset group.
Detailed description of the functionality can be found in category Attributes.
Pattern → Availability
When adding a new fixed asset group, the center to which the operator is logged in is set as the group owner entitled to its modification. The operator can change the owner of the fixed asset group, its availability in particular centers as well as manage the permissions to its modification.
Detailed description of these tabs can be found in article <<TabsDiscount Codes, Analytical Description, Attributes, Attachments, Change History.
Generation of fixed asset barcodes
The functionality of generating barcodes for fixed assets is available from the level of menu Add-ons, under [Generate Fixed Asset Barcode]. It enables batch completion of field Barcode with value retrieved from field Inventory Number.
Button [Generate Fixed Asset Barcode] in menu Add-onsClicking on the button [Generate Fixed Asset Barcode] opens a window in which it is necessary to specify the following parameters:
Complete only empty fields − parameter checked by default. If it is checked, a barcode will be completed only if the field Barcode is empty. Whereas, if the parameter is unchecked, a barcode will be completed for all fixed assets and the values of fields, which were already completed, will be updated.
Complete for disposed assets − parameter checked by default. If it is checked, a barcode will be completed for all fixed assets, regardless of their status. Whereas, if the parameter is unchecked, a barcode will be completed only for those fixed assets, which are sold or disposed.
Generate for − a barcode is generated for a specific type of fixed asset. It is necessary to indicate at least one value for the parameter, to be able to generate barcodes.
[Confirm] − button active upon indicating at least one value for the parameter Generate for
[Cancel]
Window for generation of fixed asset barcodes
Fixed asset classification
General information
A fixed asset classification (FAC) is a systematized collection of objects of tangible assets, which is used for the purpose of keeping records, determining tax depreciation rates as well as for conducting statistical surveys.
Fixed asset classification list
The FAC list is available from the level of Configuration → Fixed Assets, under the [Fixed Asset Classification] button.
Fixed asset classification list
Columns available on the FAC list:
Symbol
Name
Rate– depreciation rate
Item
The user can define FAC names in different languages that are available in the system. A FAC name is always displayed in that language version of the system to which the user is logged in. If the name is not provided in the logon language, then it is presented in the system language (database language).
Adding a fixed asset classification
manually with the button [Add]
by importing it from Comarch’s servers with the button [Import FAC] – this option is available only in Polish language version of the system
Note
The FAC import option is available only to users holding a valid license key.
Selecting the button [Import FAC] opens a window where it is possible to set the following parameters:
Do not import if the source is older than that for the recently performed import – (this parameter is available when reattempting the import operation; it is not available while importing the FAC for the first time) is selected by default. If the file with the FAC data on the server had not been updated since the last time it was imported, then the import operation will not be performed. If the parameter is deselected, the data will be retrieved regardless of the FAC file creation date.
Update existing and add new ones – the system imports new FAC records and updates the existing ones. FAC records are identified with a symbol.
Note
In case there is more than one record with the same symbol on the FAC list, the system will not update those records. A relevant information will be displayed in the log window after the import operation is finished.
Only new – the system imports only new FAC records without updating the existing ones.
Parameters for importing fixed asset classification
Configuration of parameters
General information
Before getting started with the Fixed Assets module, it is necessary to define an <<accounting period>> (if depreciation areas are associated with it), a fixed asset classification and fixed asset groups according to a company structure and its requirements as well as to configure the key parameters that are available in the main system configuration window and on the form of the center of Company type.
Parameters specified in the system configuration window
The depreciation area-related parameters are configured in the system configuration window from the level of System → Configuration → Fixed Assets.
In the system, there are three predefined depreciation areas available in the system:
Balance-sheet
Tax
IAS/IFRS
The names of depreciation areas can be modified for the available language versions of the system. By default, they are displayed in the application language version to which the use is logged in.
The depreciation areas that are activated by default are balance-sheet and tax. Values of a fixed asset are copied automatically from the balance-sheet area to the tax area. In case it is necessary in a company to depreciate fixed assets in compliance with the IAS/IFRS regulations, then in the system configuration window (menu System → Configuration → Fixed Assets), it is possible to activate the IAS/IFRS area and to specify its base area in the column Copy From. In this column it is necessary to decide whether the values of fixed asset parameters must for the IAS/IFRS area be completed on the basis of the balance-sheet area, the tax area or whether they must not be copied at all. The base area for the balance-sheet and tax areas is set by default to non-editable Balance-sheet.
Each depreciation area can be associated with a calendar year or accounting period. Such option is important in the case of companies with customized <<accounting period>> necessary for generating <<depreciation plan>>, <<calculation of write-offs>> and presentation of amounts on lists.
Note
Upon applying changes in the fixed assets configuration it is necessary to restart the system.
Parameters specified on the company form
In the side panel of the form of a center of Company type, in Fixed Assets section, there are the following parameters:
360 days in a year for straight-line method
This parameter is selected by default in the French and Spanish language version of the system. In case depreciation starts in the course of a month while the parameter is activated, write-offs will be generated proportionally to the number of depreciation days in the month for which a write-off is being calculated. If the parameter is deactivated, write-offs will be calculated for the entire month.
Deselected parameter 360 days in a year for straight-line method
Write-offs for January will be amounting to 33.33 USD.
Selected parameter 360 days in a year for straight-line method
Write-offs in January will be amounting to 17.78 USD and the depreciation period will be extended by one month. In the last month, the system will generate a write-off for the amount of 15.55 USD.
Round-off amount added last month
This parameter is selected by default in the French and Spanish language version of the system. If selected, write-offs are then calculated for particular months in the same amount, whereas the remaining decimal part of the amount is added up to the write-off for the last month of the accounting/calendar period. If deselected, then the decimal part of the amount is included in the write-off for the month for which write-offs were calculated mathematically.
Deselected parameter Round-off amount added last month
Write-offs will be calculated as follows:
Month
Write-off
January
83.33
February
83.34
March
83.33
April
83.33
May
83.34
June
83.33
July
83.33
August
83.34
September
83.33
October
83.33
November
83.34
December
83.33
Selected parameter Round-off amount added last month
Write-offs will be calculated as follows:
Month
Write-off
January
83.33
February
83.33
March
83.33
April
83.33
May
83.33
June
83.33
July
83.33
August
83.33
September
83.33
October
83.33
November
83.33
December
83.37
List of customers/vendors
List of customers/vendors contains information about particular customers/vendors cooperating with the company, that is purchasers or suppliers. Saved customers/vendors can be used in different places of the system, e.g., on invoices or other trade documents.
To open the list of customers/vendors, it is necessary to go to the Main menu and then, from Directories list of buttons, select [Customers] or [Vendors] button.
In the English version of the system, customers and vendors are presented on separated list. However, it can be changed by unchecking parameter Show separated customers and vendors, available in the system configuration (System → Configuration → Trade). Upon unchecking the parameter, in the main menu, instead of the buttons [Customers] and [Vendors], one button will be available: [Customers/Vendors]
Note
The parameter Show separated customers and vendors is active only if no operations have been performed yet in a database.
List of customers
On the left side of the window, there is the tree with groups of customers/vendors. The function of customer/vendor groups and their defining are described in article Defining customer/vendor groups.
Menu of the list of customers
The menu of the list of customers/vendors contains standard buttons allowing for adding, editing and deleting groups of customers/vendors and customers/vendors, previewing change history of a customer/vendor, as well as printouts menu. For each item on the list, there are also available buttons related to <<generating questionnaires>> and a button opening customer’s/vendor’s payment estimate, CRM group of buttons ([Opportunities], [Activities]) appears after attaching an employee to an operator (Configuration → Company Structure → Operators → operator’s edition form).
The list of customers/vendors is composed of the following columns:
Code
Country Prefix
Name
Status − value from generic directory Customer/Vendor Status. The following values are defined in the system by default: Entity and Retail Customer
TIN
Columns hidden by default:
City
E-mail
First Name
Phone
Second Name
Street
Title − value from generic directory Titles from General categorythe following values are defined in the system by default: , Ms.
Zip Code
Columns hidden by default corresponding to fields from tab CRM available on customer/vendor form:
CRM Activity Status
Currency
Employment
Industry
Legal Form
Level of Finances
Revenues
Source
Supervisors
Type
Filter of the list of customers
The list of customers/vendors is provided with a default filter, containing, among others, fields:
Classification − allows for searching customer/vendor by type, drop-down list containing default values: All, Customers and
Supervisor − allows for searching customer/vendor by supervisor who can be selected from among customers/vendors or employees defined in the system
Type − allows for searching customer/vendor by type specified in the tab CRM on customer/vendor form. The drop-down list contains predefined values retrieved from generic directory Type: Customer, Lead, Partner, Prospect.
Verification of entity’s TIN number
When defining a customer/vendor with Entity status, a user can verify its TIN number in Central Statistical Office of Poland (GUS) service and VIES service. It can be done with the use of a list placed next to the TIN field, in the header of a customer/vendor form, which contains the following options: GUS, VIES and VAT
Field TIN in the header of a customer/vendor form
Verification of TIN number in GUS and VIES database
Upon entering an appropriate value in the TIN field in the header of a customer/vendor form, it is necessary to select from the drop-down list the service from which the data is to be retrieved. For Polish customers/vendors, verification in GUS and VIES databases is available, whereas for UE customers/vendors only verification in VIES database is available. The option of verification is not available for non-EU customers/vendors or in case of entering an invalid TIN number format.
Note
For the function of downloading data from GUS and VIES to operate correctly, it is necessary to unblock ports: 443 and 80 as well as addresses: www.erp.comarch.pl, http://ec.europa.eu/ (for GUS) and https://wyszukiwarkaregon.stat.gov.pl (for VIES).
Note
Verification in VIES and GUS is only possible in online mode. The service is only available for users having valid license key.
After a correct verification of a TIN number, the system displays a window confirming the verification.
Confirmation from GUS for a TIN number – correct verification
Checking the parameter Edit data before update allows for editing data on the form.
In case of a negative verification, the system displays the following window:
Confirmation from GUS for a TIN number – negative verification
Verification of entity’s VAT status
For Polish entities, besides the TIN number verification, it is also possible to perform verification of VAT status. It can be done with the use of VAT option, available on the drop-down list placed next to the TIN field.
Note
Verification of VAT status of a customer/vendor is only possible in online mode. To ensure proper operation of this feature, it is necessary to unblock the port: 443 as well as the address: https://ppuslugi.mf.gov.pl/.
VAT status for an entity – correct verification
In case of a negative verification, the system displays an appropriate information in Verification Result field.
Customer/vendor history
General information
Customer/vendor history allows for previewing transactions registered with selected customer/vendor. To open the customer/vendor history, it is necessary to click on [History] button, available in the main menu or in the ergonomic panel above the list of items.
The form of customer/vendor history is divided into the following tabs: Collectively, By Item Groups, By Item Codes
Tab Collectively
Tab Collectively
The tab Collectively contains a list of all filtered documents issued on the selected customer/vendor presented chronologically. The list is composed of the following columns:
Date − document date
Type − document type
Document Number
Contact − number of customer’s/vendor’s contact person
Subtotal − subtotal document value expressed in the system currency
VAT − VAT tax value expressed in the system currency
Total − total document value expressed in the system currency
Overdue Amount − customer’s/vendor’s overdue amount due to open payables resulting from the document, expressed in the system currency
Currency
Tab By Item Groups
Tab By Item Groups
The tab By Item Groups contains information about total number and value of transactions in which a given item was involved, ordered by groups to which customers/vendors, for whom the transaction documents were issued, are assigned. The list is composed of the following columns:
Item Group
Quantity
Value
Price (Average) – average price of an item from a given group
Currency − if items were added in documents in companies operating on various currencies, then a given item group will be displayed in as many rows as the number of system currencies in which documents were registered for a given customer/vendor and for items included in that group.
Tab By ItemCodes
Tab By Item Codes
The tab By Item Codes contains information about total number and value of transactions, sorted by codes and names of items included in these transactions. The list is composed of the following columns:
Item Code
Item Name
Quantity
Value
Price (Average) – average price of each item
Currency
Recent Price (hidden by default) − unit subtotal price of item from the recently issued document in which a given item is included
Manufacturer (hidden by default)
Filtering
Each list contains a default filter, where the following fields are available:
Date From/To − searching transactions by date of issue
Warehouse − searching transactions by warehouse
Item Classification Category − drop-down list, available for the tab By Item Groups only
Item − field available for the tab Collectively only, allows for searching transactions by an item involved in it (selected from among items registered in the system)
Document Status − drop-down list containing default values: Unconfirmed, Confirmed
Document Type
Vendor history filter
Detailed description of functioning of the filters can be found in category <<Searching and filtering data>>>
Defining customer/vendor groups
General information
Classification into customer/vendor groups facilitates managing of customers/vendors defined in the system. The tree of customer/vendor groups can be found in Groups panel, in the window of <<the list of customers/vendors>>.
Tree of customer groups
Classification drop-down list, placed below the tree of groups, allows the user for selecting classification category according to which the tree of customer/vendor groups should be presented. The following values are defined in the system by default:
Elementary – Basic classification
Comarch B2B − classification defined in <<generic directory>> Customers/Vendors Classification Categories. For the classification to be available, it is necessary to chceck Active parameter in the directory.
The user can define his/her classification categories groups, form the level of <<generic directory>> General → Customers/Vendors Classification Categories. Then, it is possible to assign customer/vendor groups to appropriate categories, in Object Availability window (Configuration → Company Structure → Object Availability).
A new customer/vendor group can be added by clicking on [Add] button placed in the main menu or ergonomic panel above <<the list of customer/vendors>>. The button opens a new customer/vendor group form divided into the following tabs: General, Questionnaires, Attributes, Attachments
Customer/vendor group form
Tab General
The tab General contains the following fields and parameters:
Code − mandatory field
Name − mandatory field
Update patterns − parameter described below
Update elements − parameter described below
and subtabs:
General
Trade
Description
Analytical Description
Attributes
Attachments
Availability
Subtab General
Fields from the General subtab tab represent pattern for fields available on the form of customer/vendor belonging to a given group or its secondary group. When defining a customer/vendor or secondary group, the values of pattern fields are automatically transferred to the forms of that item or secondary group. The exception is <<Code Format/Configuration Tool>> which enable verification of the correctness or automatic assignment of customers/vendors’ codes on the basis of created definition.
When the user modifies a pattern which was previously saved, in the main General tab are activated parameters allowing for updating data on the forms of secondary groups and customers/vendors belonging to the group:
Update patterns − applies to secondary groups
Update elements − applies to customers/vendors
Next to each parameter, there is a drop-down list with the following options:
Changed fields – conditional − updates fields in accordance with changes on the pattern. Only these fields are updated on the form of a group/customer/vendor, which before the change had the same value as on the pattern.
Example
Main Group (TIN: US)
Customer A3 (TIN: US) – assigned directly to Main Group
Group 1 (TIN: DE) – subsidiary to Main Group
Customer A1 (TIN: FR) – assigned to Group 1
Customer A2 (TIN: US) – assigned to Group 1
On the main group, the TIN is being changed from US to DE. The user checks the parameter
Update patterns (groups) and Update elements (customer forms) and selects the option
Changed fields – conditional. Only the TIN fields on Main Group, Customer A3 and Customer A2
will be updated.
Changed fields – unconditional − updates fields in accordance with changes on the pattern. All changed fields are updated, regardless of their value before the update.
Example
Main Group (TIN: US)
Customer A3 (TIN: US) – assigned directly to Main Group
Group 1 (TIN: DE) – subsidiary to Main Group
Customer A1 (TIN: FR) – assigned to Group 1
Customer A2 (TIN: US) – assigned to Group 1
On the main group, the TIN is being changed from US to DE. The user checks the parameter
Update patterns (groups) and Update elements (customer forms) and selects the option
Changed fields – unconditional. The TIN fields on all groups and customer forms in DE group
will be updated.
All fields – unconditional − updates all fields in accordance with the settings on the pattern, except for fields which would have effect on their uniqueness (e.g., code, name)
Example
Main Group (TIN: US)
Customer A3 (TIN: US) – assigned directly to Main Group
Group 1 (TIN: DE) – subsidiary to Main Group
Customer A1 (TIN: FR) – assigned to Group 1
Customer A2 (TIN: US) – assigned to Group 1
On the main group, the TIN is being changed from US to DE. The user checks the parameter
Update patterns (groups) and Update elements (customer forms) and selects the option All
fields – unconditional. All the fields will be updated in compliance with the settings in the
patterns, apart from those that would affect their uniqueness.
The functions of substabs Trade, Analytical Description and Availability are the same as of those on the customer/vendor form.
Tab General on customer group form
Other tabs
Tab Questionnaires presents questionnaires related to a given customer/vendor group, whose definition is described in article <<Defining questionnaires>>.
The tabs Attributes and Attachments, which are also available in the tab General, contain lists of attachments and attributes related to a given customer/vendor grroup. Functions of attributes and attachments are described in articles: <<Attributes and Attachments>>
The tab Changes History is available, if in the window Configuration (Configuration → History → Configuration), parameter History Incrementally is checked.The tab contains preview of operations involving object, including information such user name and date of change.
Code formats (customer/vendor groups)
Field Code Format on the form of customer/vendor groups (tab General) allows for specifying rules according to which the code of customer/vendor added to a given group should be defined. If a customer/vendor group has a code format defined, then, on the basis of that code format, when adding a customer/vendor to the group, the system verifies the correctness of the code assigned to that customer/vendor by the user.
The code format is created according to the following rules of RegEx syntax:
First, is necessary to enter a special character which defines type and interval of characters uded in the code, e.g.
[] − indicating an element from a list
() − remembering the content in brackets as an item,
$ – meaning the end of a row
^ – adjusting to the field beginning (a character following ^ must be the beginning of an expression)
Then, if the code is supposed to contain numbers, quantity quantifiers are used, e.g.:
\d − any number of digits
\d? − zero or one digit
\d − one digit
In order to use a white space (e.g., a space), it is necessary to add \s between expressions
The remaining characters are entered permanently into a code format (i.e., aa\d indicates that these codes can only be in the following forms: aa1, aa2, aa3, etc.)
Basic RegEx expressions:
Expressions Defining Possible Character Types
Expression
Meaning
Negation
[abcs23]
Character from a list
[^abcs]
[a-f]
Character from a range
[^a-f]
\d
Figure
\D
\w
Letter of figure
\W
\s
White space character (space
character, enter, tab)
\S
.
Any character
Expressions defining a number of repetitions of a given expression
Expression
Number of repetitions
*
Zero or more
+
One or more
?
Zero or one
{n}
Precisely n
{n,m}
From n to m
{n,}
At least n
Exemplary use of RegEx Code Format:
Code format
Exemplary Codes
\d{3}-\d{2}-\d{4}
215-84-6377
\d*[a-z]{5}
552345dress, lemon
\d{5}(-\d{4})?
33064, 33064-3597
\d{1,2} [A-Z]{3} \d{2}
10 AUG 59, 5 JUL 99
\(\d{3}\)[A-Za-z]{3}-
\d{2}@\d{2}
(305)abc-45@55
\d{3}/\d{3}-\d{4}
000/785-4555
((\d)|([1][0,1])):[0-5]\d[A,P]M
5:30PM, 10:05AM
\d{1,2}’ \d{1,2}’’
5' 6", 12’ 11’’
4\d\w{3}-\d
41G1A-2, 42222-2, 41aaa-2
aaa[1-4]?\d
aaa1, aaa21, aaa49, aaa40
A code format can be also a part of a configuration tool, however, in such case, the following expressions are not handled:
expressions containing special characters:
\d
\w
\s
*
+
{n,}
List of warehouses
List of warehouses contains information about places where merchandise is stocked.
To open the list of warehouses, it is necessary to go to the Main menu and then, from Directories list of buttons, select [Warehouses] button. It is also available in menu Warehouses, in Resources group of buttons.
The menu of the list of warehouses contains <<Standard buttons>> allowing for adding/modifying/deleting of institutions and buttons relating to printouts.
Menu of the list of warehouses
The list of warehouses is composed of the following columns:
Symbol
Name
Company − name of the company to which a given warehouse belongs
Handling of WMS − parameter deciding whether a warehouse will be handled in WMS
Active − parameter informing whether a given warehouse can be used in other places of the system
Columns hidden by default:
Address
Customer/Vendor − column regarding consignment warehouse for which it is possible to indicate a customer vendor (secondary vendor or secondary customer, depending on the type of a consignment warehouse)
Sort − column related do consignment warehouses for which it is possible to select one of the following sorts: Own or Customer’s
Type − the following types of warehouses are available Local, Distant, Consignment
Note
Symbols of warehouses must be unique; however, their names can repeat within a database.
List of warehouses
Code formats (item groups)
Field Code Format on the form of item group (tab General) allows for specifying rules according to which the code of an item added to a given group should be defined. If an item group has a code format defined, then, on the basis of that code format, when adding an item to the group, the system verifies the correctness of the code assigned to that item by the user.
The code format is created according to the following rules of RegEx syntax:
First, is necessary to enter a special character which defines type and interval of characters uded in the code, e.g.
[] − indicating an element from a list
() − remembering the content in brackets as an item,
$ – meaning the end of a row
^ – adjusting to the field beginning (a character following ^ must be the beginning of an expression)
Then, if the code is supposed to contain numbers, quantity quantifiers are used, e.g.:
\d − any number of digits
\d? − zero or one digit
\d − one digit
In order to use a white space (e.g., a space), it is necessary to add \s between expressions
The remaining characters are entered permanently into a code format (i.e., aa\d indicates that these codes can only be in the following forms: aa1, aa2, aa3, etc.)
Basic RegEx expressions:
Expressions Defining Possible Character Types
Expression
Meaning
Negation
[abcs23]
Character from a list
[^abcs]
[a-f]
Character from a range
[^a-f]
\d
Figure
\D
\w
Letter of figure
\W
\s
White space character (space
character, enter, tab)
\S
.
Any character
Expressions defining a number of repetitions of a given expression
Expression
Number of repetitions
*
Zero or more
+
One or more
?
Zero or one
{n}
Precisely n
{n,m}
From n to m
{n,}
At least n
Exemplary use of RegEx Code Format:
Code format
Exemplary Codes
\d{3}-\d{2}-\d{4}
215-84-6377
\d*[a-z]{5}
552345dress, lemon
\d{5}(-\d{4})?
33064, 33064-3597
\d{1,2} [A-Z]{3} \d{2}
10 AUG 59, 5 JUL 99
\(\d{3}\)[A-Za-z]{3}-
\d{2}@\d{2}
(305)abc-45@55
\d{3}/\d{3}-\d{4}
000/785-4555
((\d)|([1][0,1])):[0-5]\d[A,P]M
5:30PM, 10:05AM
\d{1,2}’ \d{1,2}’’
5' 6", 12’ 11’’
4\d\w{3}-\d
41G1A-2, 42222-2, 41aaa-2
aaa[1-4]?\d
aaa1, aaa21, aaa49, aaa40
A code format can be also a part of a configuration tool, however, in such case, the following expressions are not handled:
expressions containing special characters:
\d
\w
\s
*
+
{n,}
Item history
General information
The functionality of item history enables the preview of all transactions made with a given item. To open the item history, it is necessary to click on [History] button available in the main menu or in the ergonomic panel above the list of items.
Note
For items of Set type with checked parameter Retrieve elements onto document the button [History] is inactive.
The form of item history is divided into the following tabs: Chronologically, By customer/Vendor Groups and By Customer/Vendor Codes.
In the history, only those documents are displayed to which the operator currently logged-in to the center has access.
Tab Chronologically
Tab Chronologically contains chronologically presented list of transactions including a given item and Item Quantity in Warehouse (By Date of Receipt/Release) list.
The first list is composed of the following columns:
Customer/Vendor Code − code of customer/vendor to which a transaction document was issued
Customer/vendor Name − name of customer/vendor to which a transaction document was issued
Type − transaction document type
Quantity − item quantity expressed in the basic unit
Value − total value of an item on a document
Price − unit price of an item on a document
Date − date on which transaction document was issued
Document Number
Acquisition Value/Cost
Currency
Status (hidden by default) − transaction document status
In French databases for AVCO method of queuing resources, canceled documents are displayed twice in the list, one time with date “stocked”/date of issue and the other time with the date of cancellation. The values of canceled documents in columns Quantity, Value, Acquisition Value/Cost are presented with opposite sign.
The list Stock Level presents the quantity of item available in a given warehouse calculated on the basis of the data from the list of transactions. The list contains two rows and is composed of the following columns:
Status − initial or ending stock balance of an item
Data − date of initial or ending stock balance of an item
Quantity − quantity of selected item available in warehouse on a given day
Purchase Value
Acquisition Value − purchase value increased by additional costs (e.g., costs of transport)
Currency
Tab Chronologically
Tab Resources Chronologically
The tab Resources Chronologically is available for databases with AVCO queuing method only. It contains a list of transactions in which a given item was involved and which affected its stock levels. Besides columns which are also available in the tab Resources Chronologically, the list contains additional columns:
AVCO Unit Acquisition Price
AVCO Acquisition Value
Columns hidden by default:
Unit Purchase Price
Purchase Value
Tab By Customer/Vendor Groups
The tab By Customer/Vendor Groups contains information about total number and value of transactions in which a given item was involved, ordered by groups to which customers/vendors, for whom the transaction documents were issued, are assigned. The list is composed of the following columns:
Group Code
Group Name
Quantity
Value
Price (Average)
Currency
Tab By Customer/Vendor Groups
Tab By Customer/Vendor Codes
The tab By Customer/Vendor Groups contains information about total number and value of transactions in which a given item was involved, ordered by codes of customers/vendors, for whom the transaction documents were issued. The list is composed of the following columns:
Customer/Vendor Code
Customer/Vendor Name
Quantity
Value
Price (Average)
Currency
Tab By Customer/Vendor Codes
Note
If a document is issued to an employee, then the field in column Customer/Vendor Code on tabs Chronologically and By Customer/Vendor Codes remains empty. Such a document is not visible on By Customer/Vendor Groups tab.
Filtering
Below each list, there is a filter which allows for searching transactions by:
Date of Receipt/Release
Warehouse
Customer/Vendor
Document Status − available values are Confirmed and Unconfirmed
Document Type
Item chronology filter
Detailed description of functioning of the filters can be found in category <<Searching and filtering data>>>
Item batch addition
In the system, it is possible to add items in a single batch. To be able to add items in a single batch from the level of the main menu, permission Batch addition of items must be granted to the operator. The permission can be activated from the level of the menu Configuration → Company Structure → operator group edition form → tab Other Permissions. Moreover, a configuration tool must be assigned to the item group to which items are to be added in single batch.
Item batch addition options
Adding items in single batch through the list
On the basis of created configuration tool, a user can add items through a defined list (Add in single batch → Through List). The list of items is composed of columns defined on the basis of the configuration tool assigned to the item group. With the use of button [Add] it is possible to add new items to the list. After filling in all fields and selecting button [Save] the system generates items defined on the list.
Items on a list of item batch addition
Item batch addition window
Adding items in single batch through matrix
Also, on the basis of a configuration tool assigned to an item group it is possible to add items through a matrix of functions. In the context menu, the following options are available:
Add value − allows for entering manually a value for functions without values defined in configuration tool
Attach value − allows for selecting a value from a drop-down list for functions with values defined in a configuration tool
Item batch addition matrix
Item of set type
In the system, it is possible to define items of Set type, that is sets of two or more items. To do so, in the header of an item form, in the field Type, it is necessary to select Set value.
Field Type in item form header
Parameter Retrieve elements onto document
Item form with checked parameter Retrieve elements onto document
Sets can be used during purchase and sale transactions, if the parameter Retrieve elements onto document is checked on item form.If the parameter is unchecked, the set can be subject to sale transactions only.
Checking the parameter Retrieve elements onto document causes that:
The following fields and parameters in the form header are hidden: Purchase Vat Rate, Sales VAT Rate, CN Code, Minimum Margin, Discount on price, Subject to discounts, Edit item name, Country of Origin
It is not possible to define additional units. Such set can have only one basic unit with precision equal to 0 defined.
It is not possible to define <<related items>> (the tab Related Items on item form is hidden)
It is not possible to define <<discounts>> − discounts can be defined for particular set elements (the tab Discounts on item form and the parameter Discount on price in the header of item form are hidden)
It is not possible to define price for a whole set − the price can be defined for particular set elements only (section Prices in the tab General is hidden)
The tab Change History on item form is hidden and the button [Change History], available in the main menu over the list of items, is deactivated.
Moreover, upon checking the parameter in the header of item form, section Modification of a single item in documents along with the following parameters appear:
Block − if the parameter is checked, it is not possible to change the quantity of a single item on the list of items. Deleting an element of a set with checked Block parameter will delete all elements of that set.
Allow − if the parameter is checked, it is possible to change the quantity of a single element. Additionally, deleting of one element will divide a set and delete the checked element.
Note
The parameter Retrieve elements onto document is active only until the firs operation involving a set is carried out.
Tab Items
On the form of an item of set type, there is tab Items which contains a list of items composing a given set and allows for adding and deleting them. The list contains the following columns:
Code
Name
Quantity
Unit of Measure
Precision (hidden column) − number of decimal places with which a given unit of measure is calculated in the system.
List of set items
Defining item
General information
A new item can be added by clicking on [Add] button placed in the main menu or ergonomic panel above the list of items. A form of new item opens. On the left side of the form (item header form), the following fields and parameters are available:
ID − item identification number in the database, non-editable field, filled-in automatically by the system
Active − if the parameter is checked, an item can be used in other places of the system, e.g., on trade or warehouse documents
Code − mandatory field, contains code used for a fast and easy identification of an item (e.g., name abbreviation)
Name − mandatory field
Language − drop-down list allowing for adding translation of entered values to languages available in the system. The list contains the following predefined values: Polish, English, German, French, Spanish and Italian. The user can define new languages in generic directory General → Languages.
Sales VAT Rate − drop-down list allowing for selecting item sales VAT rate. The list contains predefined values appropriate for database language version, for the English version of database the following values are available: A 20%, B 5%, C 0%, D TE, E NS. The user can define new VAT rates in generic directory General → VAT Rates.
Purchase VAT Rate − drop-down list allowing for selecting item purchase VAT rate. The list contains value from the same generic directory as the list Sales VAT Rate.
Type − drop-down list allowing for selecting the type of added item. Available values:
Merchandise − trade transactions with merchandise are always connected with warehouse documents. In the system, it is possible to control resources of merchandises and their quantities.
Service − is subject to all trade transactions, but is not subject to warehouse operations and does not have resources.
Set − set of two or more items. More information regarding sets can be found in articleItem of set type.
Note
If an item has already been used in the system, e.g., on a trade document, its type cannot be changed.
Category − drop down list containing values defined in General → Item categories generic directory.A user has a possibility to add his/her own values to the directory. Categories are assigned to item types; therefore, the user can select only a category which in its definition has the same type assigned as the type defined on the header form of an item.
The value of the field Category depends on parameter Handle category instead of type on item form, available in the system configuration (System → Configuration → Trade → Items section). If the parameter is checked, in the header of an item form, only the field Category is available instead of the fields Type and Category.
Manufacturer − field allowing for assigning manufacturer to an item. Button […] opens list of vendors from which it is possible to select a manufacturer. Information regarding the manufacturer can be sent to e-Shop.
Brand − drop-down list containing values defined by the user in General → Item Brands generic directory.
SKU − this field can contain up to 100 characters (letters or digits)
CN Code − allows for assigning CN code to an item. Button […] opens list of CN codes defined by the user in the system. The list of CN codes is available in the menu Configuration, in the General group of buttons.
SAF-T Item Group − non-mandatory field, contains value from the SAF-T Item Group generic directory (with a possibility of changing it)
SAF-T Procedure − non-mandatory field, contains value from the SAF-T Procedure generic directory (with a possibility of changing it)
Country of Origin − field allowing for selection item’s field of origin. Button […] opens list of countries defined in the Countries (menu Configuration → Countries) generic directory. Is not available for items of Set type with checked parameter Retrieve elements onto document and for items of Service
Minimum Margin − field for determining margin percentage value which must be obtained on the sale of a given item. The method of calculating margin depends on the setting of parameter Margin Calculation Method (System → Configuration → Trade). More information regarding margins can be found in article Margin Control.
Basic Unit − unit in which merchandise stock level is registered. More information regarding item units can be found in description of the tab General of item form.
Resource’s collection queue − drop-down list allowing for selecting method of collecting resources from warehouse. Depending on the settings in the system configuration (System → Configuration → Trade), the following values are available: FIFO, LIFO, <undefined> or AVCO
Note
In a database in which operations have already been performed, it is only possible to change default method of collecting resources from FIFO to LIFO and vice versa. It is not possible to change from FIFO/LIFO to AVCO and vice versa.
Subject to discounts − if the parameter is checked, discounts can be applied when a given item is sold. More information regarding functioning of the discounts can be found in category Discounts.
Discount on price − this parameter appears after checking the Subject to discounts Defines method of calculating item discounts. If checked, first the unit price is calculated upon including item discounts and then the value after discount is calculated. If unchecked, first the value before discount is calculated, then the value after discount and finally the unit price after discount
Include in terms − parameter checked by default. After unchecking it, conditions relating to terms are not included for the item in a document.
Edit item name − checking the parameter enables editing of the item name on unconfirmed documents. Changing item name on an unconfirmed document does not affect the name on the item form.
Voucher − parameter allowing for marking an item as voucher, available only for items of merchandise More information regarding adding item as voucher can be found in article <<Defining item of voucher type>>.
Buy-back − parameter available after checking parameter Handle buy-back in the system configuration (System → Configuration → Trade).
Weighed item − checking the parameter allows for weighing item when issuing trade/warehouse documents. Parameter is available for items of merchandise
Reverse charge − parameter used for marking items entitled to use reverse charge. The functionality of reverse charge is described in article Reverse charge.
Collect VAT on ASI/API – parameter available in French version of the database. Checking the parameter enables calculating of VAT on advance invoice for a given item.
Item header form
Moreover, the item form is divided into the following tabs: General, Parameters, Resources, Price Lists, Discounts, Sets, Related Items, Accounting, Analytical Description, Availability, Attributes, Attachments, Applications and Change History.
Tab General
The tab is composed of two sections:
Prices − contains the list of the most recent price lists for released items for a given price type. In case if price list for lots is also defined, additional tab Prices by Features is available on the form of such item, which displays only price lists defined for lots by features.
More information regarding functioning of the price lists can be found in category Price lists.
Units − contains the list of units assigned to an item. In the system, there are two unit types − basic and additional units. Each item must have a basic unit assigned and, in that unit, it is registered in a warehouse. An additional unit can be used during a commercial transaction. Each item can have any number of additional units assigned but it is necessary do define conversion calculator for each of them. The list of units of measure defined in the system is available in the menu Configuration → Trade/Warehouse. A user has a possibility to add his/her own units of measure to the system.
The list is composed of the following columns:
Basic unit − parameter allowing for marking a unit as basic unit
Number of Additional Units, Number of Basic Units − allows for defining conversion calculator from basic unit to additional unit.
Unit − drop-down list for selecting unit of measure from among those defined in the system.
Decimal Form − if the parameter is checked, the conversion calculator is displayed in the form of decimal fraction
Precision − number of decimal places with which a given unit of measure is calculated in the system. Precision of items of Set type is always 0 and it is not possible to change it.
Conversion Calculator − relation of basic unit quantity to additional unit quantity. Conversion calculators are defined when adding/editing a given unit in the system.
Volume − volume value
Volume – UOM − volume unit of measure
Net Weight − net weight value
Gross Weight − gross weight value
Weight – UOM − weight unit of measure
Active − if the parameter is checked, a given unit of measure is active for a given item
Divide Delivery − parameter active for basic units with precision set to. If selected, the number of subitems of a given item in documents of receipt type will always equal to quantity of that item. This parameter can be activated at any moment during work with the system.
Note
The basic unit of a given item can be changed only until the first operation involving it is performed in the system.
Note
It is not possible to define additional units for items of Set type with checked parameter Retrieve items onto document.
List of item units
Section Block Unit Change For (basic unit) and Default For (additional unit) allow for blocking changing of unit on selected documents.
Window Block Unit Change For
Note
Blockade of unit change can be activated only for those units of measure which are default for a given document type.
Window Default For
Note
The option of setting a default unit of measure for documents and the option of blocking unit of measure change are not available for an item of Set type.
The tab Parameters is available for items of Merchandise and Service type.It is divided into two subtabs: Codes and Features.
Note
For items of Merchandise type only the Codes subtab is available.
The subtab Codes allows for assigning barcodes to items and for handling them. The list of codes is composed of the following columns:
Sort of Code − drop-down list for selecting one of available values: Company or reference
Code Type − drop-down list for selecting one of available values: UPC-8, UPC-13, UPC-13 Weighed (GS1 Poland), ISBN13, Other, UPC-A, Weighed or <empty>
Barcode − field in which it is necessary to enter the barcode in accordance with selected type
Unit
Lot − allows for selecting item lot for which the code is valid
Default − parameter determining whether a given code should be default for a given item.
Item on the list of item codes
The subtab Features allows for defining item’s features. In the system, there are directory and non-directory features. Feature categories are defined in Transactions → Features generic directory.To each feature category in generic directory values deriving from other directories can be assigned. Non-directory features can be defined in the tab Features at the moment of creating lot. However, it is necessary to remember that at the moment of issuing a document and adding an item through form, the values of a non-directory feature will not be available for selection.
The list of features is composed of the following columns:
Feature Name
Affects Lot − if the parameter is checked, the feature affects the process of dividing a lot into different resources, but at the same time it can aggregate different resources to the lot. After checking the parameter for a dictionary feature, in the section Value of that feature, button [Attach] becomes active, which allows for assigning specific values from a generic directory. Whereas, if the parameter is checked for a non-directory feature, in the section Values, button [Add] becomes active, which allows for assigning features to an item.
Purchase – Required – if this parameter is selected, it is not possible to confirm a purchase document in which no value of this feature has been specified from the level of subitem.
Value Directory – allows for indicating a generic directory the feature values will be selected from.
Value Type − allows for determining a format (type) of values of a given feature. If a feature is retrieved from a generic directory, the field is completed automatically in accordance with the type of value assigned to it in generic directory, however it can be edited. In the case of non-directory features, the user can select type from a drop-down list. Available values: Text, Real Number, Integer, Logic Value, Natural Number, Date
Price List − this parameter is active only if parameter Affects Lot is checked.Checking the parameter allows for diversifying prices of the same item, depending on feature combination.
Directory feature assigned to an item
Generating lot
Checking the parameter Affects Lot activated [Generate Lots] button, placed above the list of features. Thanks to it, it is possible to add new lot and assign UPC code to particular item features. Upon generating a lot, section Lots appears in the tab Features, which contains matrix of features of a given item.
Matrix of item features combinations
Tab Groups
The tab Groups contains information about groups to which a given item belongs. Detailed information regarding item groups ca n be found in article Defining item group.
Tab Resources
The tab Resources is available for items of Merchandise type only.It is composed of two subtabs: Resources and Lots and Planned Stock.
The subitem Resources and Lots is non-editable. It contains a list of resources and lots of a given item generated on the basis of trade/warehouse transactions carried out in the system and on the basis of registered documents. Resources define stock levels of items, along with their purchase prices. Whereas lots define quantity levels of a given item within defined features.
In case the user is logged-in to a center different than Company, on the list, there is also parameter Resources in other warehouses, which enables presenting of resources of a given item in warehouses of other companies.
Thanks to buttons available in the main menu, the user has a possibility of reserving and releasing resources and generating cost corrections.
Parameter Receipt taken by is available for FIFO and LIFO methods of resource queuing.Checking the parameter causes that only resources with date earlier or the same as selected date are displayed on the list.
Subtab Items and Lots
Subtab Planned Stock allows for specifying minimum and optimal quantities of a given item and lot, in determined unit, for a specific warehouse. These values can be added or deleted at any moment during work with the system. Such data is used in BPM and BST processes.
More information regarding item stocks and resources in the system can be found in articleResources management.
Tab Price Lists
The tab Price Lists is composed of two subtabs: All and For Vendors. In these tabs, a list of all prices and a list of vendor price lists are presented respectively. They are provided for information purposes only. More information regarding functioning of the price lists can be found in category Price lists.
Exemplary item in the subtab All
Tab Discounts
In this tab a user can find information about active discounts associated with the given item, that is, the discounts which are or will be effective. More information regarding functioning of the discounts can be found in category Discounts.
Item on the list of discounts
Other tabs
Tab Elements is available for items of set type and is described in article Item of set type.
The tab is available for items of merchandise or service type only.It contains a list of all sets for which one of the elements is the given item. More information regarding sets can be found in article Item of set type.
Tab Related Items contains list of items associated with a given item. The tab is not available for items of set type.Detailed description of the functionality of related items can be found in article Related Items..
The tab Accounting presents default bookkeeping accounts assigned to a given item.
Detailed description of the tabs Analytical Description and Change History be found in article <<Tab Discount Codes, Analytical Description, Attributes, Attachments and Change History>>.
Note
The tab Change History is not available for items of set type with checked parameter Retrieve elements onto document.
List of items
The list of items contains information about all items traded in the company. To open the list of items, it is necessary to go to the Main menu and then, from Directories list of buttons, select [Items] button.
List of items
On the left side of the window, there is the tree with groups of items. The function of item groups and their defining are described in article Defining item groups.
Menu of the list of items
The menu of the list of items contains <<standard buttons>> allowing for adding, editing, deleting of item groups or items, as well as buttons related to generating trade documents, creating associations between particular items, programming scale and menu of printouts.
The list of items is composed of the following columns:
Code
Name
Active
Quantity − quantity of items available in warehouses, defined on the basis of confirmed warehouse documents
Blocking Reservations − quantity blocked for sale or movements to another warehouse, resulting from reservations created in documents for released items (unconfirmed or confirmed R, SI – not associated with warehouse documents, non-processed and non-closed SO, confirmed IO (both a resource and quantity reservations are taken into account) and unconfirmed SOR, IR-, WLM-) or returned to a vendor (unconfirmed or confirmed PIQC and unconfirmed PORQC and IR+QC); besides, the quantity displayed in Blocking Reservations column is decreased by quantity from SIQC, RQC documents, provided that no warehouse documents have been generated to SI and R documents associated with them. Detailed description of the programming functionality of item reservations can be found in article <<Reservation types>>.
Available Quantity − quantity resulting from the difference between Quantity column and Blocking ReservationsBoth resource reservations and reservations without resources are included in the column only if Include non-blocking reservations parameter is checked in the filter below. If this parameter is checked, Quantity column will include reservations without resources (non-blocking reservations). In the case of a non-blocking reservation (reservation without resources) when item quantity equals to 0, value 0 will be displayed in Available Quantity column
Quantity Ordered − quantity of ordered merchandise defined on the basis of documents for received items. Orders on documents for received items are described in <<Trade documents>>
Shortage in Quantity − quantity of merchandise registered in a document that is not available in stock. The function of sale below stock levels is described in <<Sale below stock levels>> article.
Unit − item unit of measure, e.g., item, kg, cm
Subtotal − subtotal price of sale defined in <<price list for released items>>
Total − total price of sale defined in <<price list for released items>>
Currency– item price currency
Columns hidden by default:
Category − column containing values defined in General -> Item categories generic directory.
UPC − UPC code defined on item form
Non-Blocking Reservations – quantity resulting from reservations for which there are no resources and it is not included in quantity reservation
Resource Reservations – quantity resulting from reservations for which there are resources (quantity from specific delivery blocked for sales)
SENT − parameter informing whether an item is subject to SENT transport monitoring. Handling of SENT can be activated from the level of company header (Configuration -> Company Structure -> Rights Structure -> company edition form).
Type − type of defined item, the following values are available: Merchandise, Service and Set
Attachment − column containing information about a file attached to an item e.g., photo
Filtering
Filter of the list of items
The list of items contains a default filter, containing, among others, fields:
Price Type − drop-down list containing values retrieved from price lists created in the system. By default, the following values are available on the list: Purchase, Retail, Wholesale. The functions of price types are described in Price typescategory.
Customer/Vendor
UPC
Item Type − list containing default values: Merchandise, Service, Set
Warehouse − allows for filtering the list by resources available in a given warehouse. If an item is not available in a warehouse, it is displayed on the list with a quantity equal to 0.
Quantity − allows for filtering the list by available item quantity
Reservations − allows for filtering the list by reserved item quantity
Ordered − allows for filtering the list by ordered item quantity
Features − section allowing for filtering the list by item features defined by the user
Defining item group
General information
The user has a possibility of defining item groups in order to be able manage items easily. The tree of item groups can be found in Groups panel, in the window of <<the list of items>>.
Tree of item groups
Classification drop-down list, placed below the tree of groups, allows the user for selecting classification category according to which the tree of groups should be presented. The following values are defined in the system by default:
Assortment − Classification on account of item type
Assortment − Classification on account of item manufacturer
Without Classification − Items not classified into categories
The user can define his/her classification categories groups, form the level of <<generic directory>> General → Item Classification Categories. Each item classification contains default Main Group. The user can define new secondary groups for each classification and then assign them to the classifications in the window Objects Availability (Configuration → Company Structure → Objects Availability).
Moreover, in each generic Item Classification Categories, for each category parameter Multiple Assignment To Item Groups is available.If the parameter is checked, it is possible to attach and detach many groups within a given classification category. After deselecting the parameter the user can only transfer an item to other groups within the same classification category. The value of the parameter is presented below the tree of the groups and on the definition form of an item group.
Checking the parameter Multiple Assignment to Item Groups activates also [Attach Group] button, available in List group of buttons. The buttons allows for attaching many items to many groups at the same time. After marking selected items on the list of items and selecting the button, a window with the tree of groups appears. In the window, the user can select group/groups to which selected items are to be assigned.
Item group form
A new item group can be added by clicking on [Add] button placed in the main menu or ergonomic panel above <<the list of item groups>>. The button opens a new item group form divided into the following tabs: General, Description, Attributes, Attachments and Positioning
Tab General
Tab General on item group form
The tab General contains the following fields and parameters:
Assign items multiple times to item groups − parameter inactive, its value is retrieved from the definition of classification category definition in the generic directory. If the parameter was checked there, the user can attach many items to many groups.
Block addition of new items − checking the parameter will make it impossible to attach new items to the group. The value of the parameter can be changed at any moment during work with the system.
Code − mandatory field
Name − mandatory field
Language − drop-down list allowing for selection of the language of entered values. The following values are defined in the system by default: Polish, English, German, French, Spanish and The user can define new languages in generic directory General → Languages.
Update patterns − parameter described in further part of the article.
Update elements − parameter described in further part of the article.
The tab General contains secondary tabs:
General
Features
Related Items
Accounting
Analytical Description
Attributes
e-Shop
Availability
Subtab General
Fields from the General secondary tab represent pattern for fields available on the form of item belonging to a given group or its secondary group. When defining an item or secondary group, the values of pattern fields are automatically transferred to the forms of that item or secondary group. The exception is <<Code Format/Configuration Tool>> which enable verification of the correctness or automatic assignment of item codes on the basis of created definition.
When the user modifies a pattern which was previously saved, in the main General tab are activated parameters allowing for updating data on the forms of secondary groups and items belonging to the group:
Update patterns − applies to secondary groups
Update elements − applies to items
Next to each parameter, there is a drop-down list with the following options:
Changed fields − conditional − updates fields in accordance with changes on the pattern. Only these fields are updated on the form of a group/item, which before the change had the same value as on the pattern.
Changed fields − unconditional − updates fields in accordance with changes on the pattern. All changed fields are updated, regardless of their value before the update.
All fields – unconditional − updates all fields in accordance with the settings on the pattern, except for fields which would have effect on their uniqueness (e.g., code, name)
The mechanism of functioning of the patterns of item groups is analogical to the mechanism of functioning of the patterns of cusomer/vendor groups, which was described in article <<Defining customer/vendor group>>.
Functions of the secondary tabs Features,
On the secondary tab e-Shop, it is possible to set parameters regarding synchronization with Comarch ERP e-Shop.
Other tabs
Tab Desctiption allows for entering
Detailed description of the tabs Attributes and Attachmentscan be found in article <<Tab Discount Codes, Analytical Description, Attributes, Attachments and Change History>>.
The tab Changes History is available, if in the window Configuration (Configuration → History → Configuration), parameter History Incrementally is checked.The tab contains preview of operations involving object, including information such user name and date of change.
The tab Positioning contanes fields related to positioning of a group of items in e-Shop.
Defining contact person
General information
A new contact person can be added by clicking on [Add] button placed in the main menu or ergonomic panel above <<the list of contact persons>>. It opens a form of newly created contact person divided into the following tabs: General, CRM DATA, Attributes and Attachments.
Tab General
The tab General contains the following fields and parameters completed by the user:
Code − mandatory field. This is the only field which must be completed to be able to save a contact person in the system.
Title − drop-down list, contains predefined values and Mrs. The user can define new titles in generic directory General → Titles.
Title − drop-down list, contains predefined Dr. and Prof. The user can define new academic titles in generic directory General → Academic Titles.
Date of Birth
WWW
Active
In the section Addresses, it is possible to add contact person’s addresses. The following types of addresses are available:
Main
Delivery
Subsidiary
Mailing
Billing
Residence
The list of addresses contains default address of Main type generated by the system and it can be freely modified by the user, however it cannot be deleted. The user can add any number of contact person’s addresses but only one of them can be marked as default. If the parameter Active placed next to an address is checked, it means that such address can be used in other places of the system. Addresses can be deactivated (archived) manually by unchecking the parameter Active. An address marked as default for the main type cannot be deactivated or deleted. Also, the addresses which have already been used in the system (e.g., on a document) cannot be deleted.
Note
Deactivation of an address is irreversible.
Subtab Contact Details contains contact data of a contact person (e.g., phone number, e-mail, messenger) and allows for adding it for each address.
Subtab Consent To Personal Data Processing contains the list of consents to processing of contact person’s personal data and allows for adding them. Consents to personal data processing are described in <<article>>.
Tab General on contact person form
Tab CRM Data
The tab CRM Data contains the following fields:
Type − drop-down list containing predefined values: Customer, Lead, Partner, Prospect. The user can also define new types in generic directory CRM → Type.
Supervisor − field allowing for selecting a commercial supervisor for a contact person from among customers/vendors or employees available in the system
Industry − drop-down list allowing for indicating the industry in which contact person operates. The user can also define new industries in generic directory CRM → Industries.
SIC (Polish Classification of Activities) − inserting an appropriate number of SIC causes that the system selects an industry corresponding to it in the field
Source − drop down list allowing for selecting contact person acquisition source. The user can also define new sources in generic directory CRM → Source of Origin.
Status − drop-down list allowing for selecting the status of opportunities of a contact person. The user can also define new statuses in generic directory CRM → Opportunity Status.
In section Customers/Vendors it is possible to indicate customers/vendors with which a given contact person is associate and to select type of such association, depending on customer’s/vendor’s status.
Tab CRM Data on contact person form
Other tabs
Detailed description of the tabs Attributes and Attachments can and History be found in article <<Tab Discount Codes, Analytical Description, Attributes, Attachments and Change History>>.
List of contact persons
The list of contact persons contains information about contact persons in a company. Each contact person can be assigned to particular customers. To open the list of contact persons, it is necessary to go to the Main menu and then, from Directories list of buttons, select [Contact Persons] button.
The menu of the list of contact persons cotains <<standard buttons>> allowing for adding new items and editing them, as well as menu of printouts. Upon marking an item on the list, options related to <<generating questionnaries>> appear in the menu.
Menu of the list of contact persons
The list of contact persons is composed of the following comlumns:
Code
First Name
Second Name
Association with Customer/Vendor − position/family relationship, depending on the customer’s/vendor’s status
Supervisor − customer/vendor or employee associated with a given contact person
Assigned Customers/Vendors − parameter informing whether there are customers/vendors assigned to a given contact person
Active − if the parameter is checked, a contact person can be used in the system
WWW (hidden by default) − contact person’s website
List of contact persons
Defining employee
General information
A new employee can be added by clicking on [Add] button placed in the main menu or ergonomic panel above the list of employees. A form of new employee opens. General, Contacts, Accounting, E-mail Accouint, Bank Accounts, Attributes, Attachments
Tab General
Tab General
The tab General contains the following fields and parameters:
Code − mandatory field
First Name − mandatory field
Last Name − mandatory field
Create operator − checking the parameter automatically creates an <<operator’s account>> associated with defined employee. Next to the parameter, there is a drop-down list allowing for selecting operator type. Values available on the list:Internal, External, General.
Active − if the parameter is checked, an employee can be used in other places of the system
SSN
WWW
Card Number − number of employee’s electronic card Numbers of cards used by employees must be unique. If card number is provided, then, when logging-in to the system, it will be possible to scan its barcode and the system will automatically suggest the user’s login. In order to be able to use that function, it is necessary to uncheck parameter Use integrated security in the login window
In the section Addresses, it is possbile to add employee’s addresses. The following types of addresses are available:
Main
Delivery
Subsidiary
Mailing
Billing
Residence
The list of addresses contains default address of Main type generated by the system and it can be freely modified by the user, however it cannot be deleted. The user can add any number of employee’s addresses but only one of them can be marked as default. If the parameter Active placed next to an address is checked, it means that such address can be used in other places of the system. Addesses can be deactivated (archived) manually by unchecking the parameter Active. If an address, which has already been used in the system, gets modified on the form of an employee or on a document, it is automatically archived by the system.
Note
An address marked as default for the main type cannot be deactivated or deleted. Also, the addresses which have already been used in the system (e.g., on a document) cannot be deleted.
Note
Deactivation of an address is irreversible.
Subtab Contacts contains contact data of an employee (e.g., phone number, e-mail, messenger) and allows for adding it for each address.
Subtab Consent To Personal Data Processing contains the list of consents to processing of employee’s personal data and allows for adding them. Consents to personal data processing are described in <<article>>.
Tab Contracts
Tab Contracts
In the tab Contracts, the user can add, delete and edit the following information related to employee’s contracts:
Contract From − contract start date
Contract To − contract end date
Organization Unit − organization unit the employee is assigned to. The organization unit is selected from the list of available organization units which is opened upon clicking the […] button. Organization units are added from the level of Configuration → Company Structure → Subordination Structure.
Tab E-mail Account
Tab E-mail Account
The tab E-mail Accounts allows for defining employee’s e-mail account. It contains the following fields:
Host − e-mail server to which an employee logs
Port − outgoing e-mail server number. Most of e-mail servers has port No. 25, thus, this number is entered by the system by default. However, it can be changed freely.
Login
Password
Signature − in this field, it is possible do specify employee’s default signature for sent e-mails.
Other tabs
The tab Accounting presents default bookkeeping accounts assigned to a given employee.
The subtab Description allows for entering additional information regarding an employee.
The tab Bank Accounts presents a list of bank accounts assigned to an employee and allows for adding/editing/deleting them.
Detailed description of the tabs Attributes and Attachments can be found in article <<Tab Discount Codes, Analytical Description, Attributes, Attachments and Change History>>.
List of employees
The list of employees contains information regarding individual employees of the company. The data of registered employees is used for the establishment of <<permissions>> to particular functions and in particular elements in the system, e.g. an employee can be set as a person responsible for a given customer (tab CRM on customer/vendor form).
In order to open the list of employees, it is necessary to go to the Main menu and then, from Directory List group of buttons, select [Employees] button.
List of employees
Menu of the list of employees contains <<standard buttons>> allowing for adding/editing/deleting of employees, menu of printouts and buttons for <<generating questionnaries>>. External Operators button group contains button [Generate] thanks to which it is possible to automatically create external <<operators>> associated with selected employees.
Menu of the list of employees
The list of employees is composed of the following columns:
Code
Name
Surname
SSN
NIN
Active − parameter informing whether a given employee can be used in other places of the system
Defining institution
A new institution can be added by clicking on [Add] button placed in the main menu or ergonomic panel above the list of institutions. The button opens a new institution form.
On the left side of the form, there is institution form header containing the following fields and parameters:
ID − institution identification number in the database, non-editable field, filled-in automatically by the system
Active − if the parameter is checked, an institution can be used in the system
Code − mandatory field, contains code used for a fast and easy identification of an institution (e.g., name abbreviation), can be composed of 50 characters maximum (letters and/or digits). Codes of institutions must be unique.
Name − mandatory field, can be composed of 500 characters maximum (letters and/or digits).
Identification Code − institution id number assigned by authorities
Category − drop down list containing values defined in General → Institution Types generic
URL − institution’s website
Fields Address, Phone, E-mail are completed automatically on the basis of the data entered in the fields of Address tab, available on the form of institution definition.
Institution form header
Moreover, the institution form is divided into the following tabs: Address, Bank Accounts, Accounting, Attributes, Attachments.
The tab Address allows for entering address and contact information (e.g., phone number or e-mail address) of an institution.
Tab Address
The tab Bank Accounts presents a list of bank accounts assigned to an institution and allows for adding/editing/deleting them.
The tab Accounting presents default bookkeeping accounts assigned to a given institution.
Detailed description of the tabs Attributes and Attachments can be found in article <<Tab Discount Codes, Analytical Description, Attributes, Attachments and Change History>>.
List of institutions
The list of institutions contains information about institutions defined in the system which are sometimes necessary when:
making payments
making <<cash/bank transactions>>
filling-in <<VAT tax-return declaration>>
To open the list of institutions, it is necessary to go to the Main menu and then, from Directories list of buttons, select [Institutions] button.
List of institutions
In the left panel, there is a tree of institution groups to which defined institutions can be assigned. The following types are defined in the system by default: Customs Office and Tax Office. The user can define his/her own institution groups, form the level of <<generic directory>> General → Institution Types.
Institution groups tree
The menu of the list of pickup points contains <<Standard buttons>> allowing for adding/modifying/deleting of institutions and buttons relating to printouts.
Menu of the list of institutions
The list is composed of the following columns:
Code − institution code defined by the user
Institution Code − institution id number assigned by authorities
Name
City
Type − value retrieved from the Types of Institutions generic directory
Importing banks from KIR
Note
The functionality is available in the Polish version of database only.
Option Import from KIR allows for automatic downloading and updating of information regarding banks from Polish National Clearing House (KIR). Selecting button [Import from KIR], available in the main menu, opens window Parameters for importing bank directory from KIR database, in which the following fields and parameters are available:
Do not import if the source is older than that for the recently performed import ─ the parameter is available only if importing of banks from KIR was previously performed in the database. In case the parameter remains checked, the import will not be carried out, if the file with data of banks present on the server has not been updated since the last import. Unchecking the parameter causes that the data will be retrieved regardless of the date of creation of the file with banks data.
Import Method – drop-down list containing the following options:
Update existing banks and add new ones – imports new banks and updates the data of banks already existing on the list
Only new banks – imports only those banks, which are not present on the list yet. The data of banks already existing on the list is not updated.
Parameters for importing bank directory from KIR database
Note
In order to import banks from KIR it is necessary to have Microsoft Database Engine 2010 program installed.
Defining bank
A new bank can be added by clicking on [Add] button placed in the main menu or ergonomic panel above the list of banks. The button opens a new bank form.
On the left side of the form, there is bank form header containing the following fields and parameters:
Active − if the parameter is checked, a bank can be used in the system
Code − mandatory field, contains code used for a fast and easy identification of a bank (e.g., name abbreviation), can be composed of 10 characters maximum (letters and/or digits). Codes of banks must be unique.
Payment Number − mandatory field, number identifying a given bank. The number of digits to be enter in the field may differ depending on selected account type (NRB_PL − 8 digits, IBAN, Other − 12 digits).
Account Number Type − drop-down list, the following values can be selected:
Other
IBAN − international bank account number used for international transactions
NRB_PL − national bank account number used for national transactions
URL − bank’s website
Fields Address, Phone, E-mail are completed automatically on the basis of the data entered in the fields of Address tab, available on the form of bank definition.
Exchange data via Web Service − parameter available only for the bank ING. For the system to be able to recognize the bank, 4 digits of the payment number are relevant (ING − 1050).
Moreover, the form of a bank is divided into the following tabs: Addresses, Accounting, Web Service, Attributes, Attachments.
Bank form header
Tab Addresses
The tab allows for entering bank’s address and contact data (e.g., phone number or e-mail address).
Tab Addresses
Addresses of banks can be also defined with the use of buttons available in the main menu, in Addresses button group.
Options for defining addresses available in the main menu
Tab Accounting
Tab Accounting presents default bank accounts assigned to a given bank.
Tab Web Service
The tab is available only after checking the parameter Exchange Data via Web Service in the bank form header. In the tab, there are parameters regarding currency transfers and lists of certificates to register in the system of transport certificate, which is necessary for connection with a given bank.
Tab Web Service
In Currency Transfer section, the following parameters are available:
Paid by – the following options are available for selection:
Sender
Recipient
Evenly – default option
Contact Person
Contact
The following columns are presented in section Communication Certificates:
User
Certificate Name
In this section, it is possible to add a transport certificate associated with a currently logged-in operator. Such certificate can by deleted only by the operator to which it is assigned or by the system administrator.
The list of banks contains information about financial institutions in which the company, customers/vendors, employees and institutions have their bank accounts and which provide the cash flow. In order to open the list of banks, it is necessary to go to the Main menu and then, from Directories list of buttons, select [Banks] button.
List of banks
The menu of the list of pickup points contains <<Standard buttons>> allowing for adding/modifying/deleting of banks and buttons relating to printouts. Moreover, in the Polish version of database, in the menu, there is [Import From KIR] (National Clearing House) button.
Menu of the list of banks
The list is composed of the following columns:
Code
Name
Payment Number ─ number identifying a given bank
SWIFT
Account Number Type ─ available values IBAN, NRB, other
Active ─ parameter informing whether a given bank can be used in the system
History
The functionality of History allows for remembering information regarding changes of data made by the user, e.g., confirmation or posting of documents, adding or editing objects etc.
History configuration
History configuration
History configuration is available from the level of Configuration → History → Configuration. History Configuration list is composed of the following columns:
Object Name − type of object for which it is possible to handle changes history
Active − parameter deciding whether changes for a given object should be remembered
History Incrementally − if the parameter is checked, changes regarding an object are remembered incrementally. Unchecking that parameter in the column causes that only simple history is remembered by the system, e.g., addition, confirmation or deletion of a document.
Information remembered after checking the parameter History Incrementally:
Addition
Saving of changes
Automatic recording of modifications
Confirmation
Quantity confirmation
Deletion
Cancelation
Payment
Single-sided entries
Posting with scheme
Manual posting
Printing
Adding/Import (e.g., bookkeeping account)
Opening
Closing
Submitting of a document
EDI export
Printing on receipt printer
Addition/modification and deletion of attribute
Addition/modification and confirmation of analytical description
Addition/modification and deletion of attachment
Addition/modification and deletion of additional cost
Activation/deactivation of a price list
Addition/modification and deletion of the prices of specific items from the price list
Changes history
Window of changes history of object Receipt
To open changes history of a given object, it is necessary to mark appropriate item in the History Configuration and double click on it or select button [Changes History] available in the main menu. A list of all changes applied on the object is opened and each of them is marked with an appropriate text identifier. Double clicking on an item or clicking on the arrow placed next to it displays the following details regarding introuced change:
Identifier– change numeric identifier
Text Identifier − text identifier of the object to which the change applies
Operation Name − sort of entered change
User Name − user who entered the change
Operation Date − date of entering the change
Object Name − type of object affected by the change
Description − additional information regarding entered change
Additionally, on the form of each object (e.g., document, item, customer/vendor etc.) there is tab Change History, where the history of operations in which a given object was involved, is available.
Filtering
History filter
The history of changes is provided with a filter allowing for filtering the list by specific interval of time and user name. Parameter Only existing is checked by default and its unchecking causes that also changes regarding objects deleted from the system are displayed on the list.
The functionality Text Identifier available above the changes history allows for adapting of the filter by the user.
Detailed description of functioning of the filters can be found in category <<Searching and filtering data>>>
Defining pickup point
A new pickup point can be added by clicking on [Add] button placed in the main menu or ergonomic panel above the list of pickup points and selecting one of the following options:
Customer
Warehouse
Center
A list of customers/warehouses/centers registered in the system is opened, from among which it is necessary to select the one which will be a pickup point. After selecting in, pickup point address form is opened, which is composed of section Addresses and subtabs Contacts, Description and Pickup point
Pickup point address form
Section Addresses
The Addresses section contains the list of addresses of pickup point. The user can define and add different types of pickup point addresses. The following types are available:
Main
Delivery
Subsidiary
Mailing
Billing
Residence
To add new address, it is necessary to click on [Add] button placed in the ergonomic panel above the list of addresses and
The list of addresses contains default address of Main type generated by the system and it can be freely modified by the user, however it cannot be deleted. The user can add any number of pickup point addresses but only one of them can be marked as default. If the parameter Active placed next to an address is checked, it means that such address can be used in other places of the system. Addresses can be deactivated (archived) manually by unchecking the parameter Active. If an address, which has already been used in the system, gets modified on the form of a pickup point or on a document, it is automatically archived by the system. An address marked as default for the main type cannot be deactivated or deleted. Also, the addresses which have already been used in the system (e.g., on a document) cannot be deleted.
Subtabs
The subtab Contacts contains a list of contact data (telephone number, e-mail, fax, etc.) for each address, and allows for defining new ones.
The subtab Description allows for entering additional information regarding a pickup point.
The subtab Pickup point contains information about pickup point opening days and hours and allows for editing it.
List of pickup points
Pickup points are objects which are points of delivery of ordered items and place of their collection by a customer. Pickup points are related to the process of handling of sales orders which begins in the system and is completed along with releasing of items in Comarch Retail POS system. A pickup point can be defined with the use of the data of a customer, warehouse or center.
In order to open the list of pickup points, it is necessary to go to the Main menu and then, from Directory List group of buttons, select [Pickup Points] button.
List of pickup points
The menu of the list of pickup points contains Standard buttons allowing for adding/modifying/deleting of pickup points.
Menu of the list of pickup points
The list of pickup points is composed of the following columns:
Code
Pickup Point Name
Address
Phone
E-mail
TIN
Object Name
Object Type − object type selected during the deifnition of a pickup point, possible values: Customer/Vendor, Waroeuse and Center
Confirmations − checking the parameter causes that in case of presenting an order with delivery to a pickup point, a confirmation is sent to e-mail address
Active − if the parameter is checked, a pickup point can be used in other places of the system
SO processing – the setting of this parameter can be changed at any moment of the work with the system for pick up points of warehouse and center For a pickup point of customer type, the parameter is unchecked and it cannot be changed.
By default, the parameter remains unchecked for:
pickup points in databases converted from previous versions
for newly added pickup points
Sales of items of voucher type
General information
Items of voucher sort can be sold through the following documents:
It is also possible to issue a sales order for vouchers.
Sales of vouchers through receipt/sales invoice
With the use of a receipt or sales invoice it is possible to sell items of voucher type for which parameter Sell though debit memos is unchecked.An item marked as voucher is added to a document in the same way as an item of Merchanidise type, that is by entering voucher number or selecting an item corresponding to the voucher sort and completing voucher number property.
After confirming a receitp/sales invoice with vouchers:
it is verified whether a voucher with a given number exists in the system
the statuses of the vouchers added to the document are verified in order to avoid confirming of documents with vouchers whose statuses changed in the meantime
the vouchers are activated
date of sale, date of activation, values of vouchers, due date and location are updated
the document is associated with vouchers added to it (the document will be displayed in tab Associated documents on voucher forms)
a warehouse document SOR and associations between the R/SI and that document are created
It is possible to cancel or correct receipts and sales invoices including items of voucher type, provided that that item:
is not selected as mean of payment on the document
its status is Active
it is not associated with a customer/vendor
it is not expired
After canceling a document the status of an item of voucher type changes to Received in stock and in Changes History the following information appears: Back in Stock Due To Sales Document Cancellation. In the system, it is not possible to generate a value correction for documents containing items marked as vouchers.
Sales of vouchers through debit memo
With the use of a debit memo it is possible to sell items of voucher type for which parameter Sell though debit memo is checked and they have one of the following statuses:
Received in stock (both with activated and deactivated sale below stock levels)
To be able to sell through debit memos, it is necessary to open tab System → Configuration → Trade and activate parameter Handle debit/credit memos. /alert]
The list of debit memos is available in menu Sales, in Documents section, under [Debit Memos] button. In order to create new debit memo, open the list of debit memos from the level of the main menu and select [Add] button.
List of debit memos
Debit memo form
To add a voucher to a debit memo, select [Add] button, available above the list of vouchers and enter voucher’s code or, with the use of […] button, select in from the list of items of voucher type. Then, it is necessary to complete document details available in a panel on the left side. Value field is completed automatically on the basis of voucher’s value. If the value is equal to 0, the user can define it manually and it will be transferred onto the voucher. After confirming a debit memo containing vouchers:
the statuses of the vouchers added to the document are verified in order to avoid confirming of documents with vouchers whose statuses changed in the meantime
the vouchers are activated
date of sale, date of activation, values of vouchers are updated
aprropriate IR- warehouse documents are generated
the document is associated with vouchers added to it (the document will be displayed in tab Associated documents on voucher forms)
information about voucher activation will be saved in Change History.
Note
A debit memo registering sales of vouchers cannot be canceled and the voucher whose sale was registered through that memo cannot be returned.
Sales order
Sales orders can be issued for items of voucher type with unchecked parameter ….Issuing of SO documents for items of voucher type is performed in the same way as in the case of sales orders for other items.
Transfer to voucher
In the main menu, over the list of vouchers, button [Transfer to Voucher] is available, which allows the user to transfer information from one voucher (e.g., in case of losing or breaking a voucher) to a new voucher and associate the two vouchers. The operation is available for vouchers with Blockedor Active status only. Both vouchers must be of the same sort. If the source voucher has Active status, then, upon transferring information to a new voucher, it becomes deactivated. The operation of transferring information to a voucher is analogical to the operation of adding new voucher to the system. Information from the form of voucher sort is transferred to the form of a newly added target voucher, however, the user can edit the following fields:
Regular Amount
Validity Date since
Location
Handled By
Note
In the case of converted databases, it is possible that the system contains vouchers of the same numbers. In this case, such vouchers will be assigned with the status Blocked, and the system will assign the directory value Duplicated voucher number to the field Reason of Blockade. It is possible to transfer a voucher value to a new voucher in order to process a voucher payment.
Voucher blockade
In the system, it is possible to block existing vouchers. Vouchers with the following statuses can be blocked:
Active
Received in Stock
Confirmed
To open the window of voucher blockade, it is necessary to open <<the list of vouchers>> and then, after marking a voucher, select [Block] button which is available in the main menu.
In the blockade window, there is a drop-down list with reasons of blockade defined in the system:
Promotion to higher program level
Unsubscription from the loyalty program
Transfer to another card on customer’s request
Lost card
Expiry
Duplicated voucher number
Voucher blockade window
Hint
The user can also define new voucher blockade reasons in generic directory CRM → Reason of Blocked Voucher.
Note
Voucher blockade is irreversible.
Associating voucher with a customer
In the system, it is possible to associate voucher with a customer The associated voucher will be used as customer’s ID in loyalty programme. However, the operation is possible only for voucher sorts with the parameter Loyalty program checked on vouvher sort form and their status is Confirmed, Received in stock or Active.
To make such association, it is necesary to open the form of a voucher available on the<<list of vouchers>> and then, in the field Customer/Vendor, with the use of […] button, select customer not associated with any voucher.
Hint
The option of associating voucher with a customer is also available in the tab CRM of the customer form.
Parameter Loyalty program on the form of a voucher sort
Note
Upon using a given voucher sort in the system, it is not possible to edit the setting of the parameter Loyalty program.
Field Customer/Vendor on the voucher form
Adding vouchers to the system
In the system, it is possible to add single vouchers, as well as series of vouchers.
The option of adding vouchers is available in the menu of the list of vouchers. To open the list of vouchers, it is necessary to go to the Main menu and then, from Directories list of buttons, select [Vouchers] button.
Note
This way, only adding of vouchers of Own type is handled, since external vouchers appear on the list automatically after they are used as <payment form>> for a document and the payment is registered in the system.
List of vouchers
In order to add new voucher to the system, it is necessary to select [Add] button, placed in the main menu, over the list of vouchers, and select one of previously defined vouchers from a drop-down list.
Button for adding voucher to the system
After selecting voucher sort a form of newly created voucher is opened.
Form of newly created voucher
On the left side, there is the header of the voucher form with information regardin current voucher status, that is:
Initiated − a voucher is being created and it has not been saved yet
Saved − status assigned to a voucher upon selecting the button [Save] from the main menu. The user can still change its regular amount, date of validity delete it.
Confirmed − status assigned to a voucher upon selecting the button [Confirm] from the main menu. It can be issued as a loyalty card, used to process a refund or blocked.
Received in Stock − a voucher has not been sold and is available in stock
Active − status assigned to a voicher at the moment of its sale, issue or association with a customer/vendor.
Used − voucher entirely used, it cannot be used again in the system.
Blocked − status assigned to a voucher after selecting the option Block described in article <<blocking vouchers>>
And following fields and parameters:
Regular Amount, Validity Date − fields completed automatically on the basis of voucher sort, they can be modified by the user
Date of Issue, Type, Sort, Number − fields completed automatically on the basis of voucher sort, they cannodt be modified
Amount Paid, To be Paid, Activation Date, Date of Issue, Date Used − fields updated automatically on the basis of information retrieved from payment made with a voucher and registered in the system
Location, Handled By − fields allowing for selecting center and employee issuing a voucher
Hint
The system generates automatically the number of voucher on the basis of the confiugration tool assigned to it.
The form of a voucher contains also the following tabs:
Associated Documents which completed automatically by the system. In the tab, documents paid with the use of a voucher are available.
Detailed description of tabs can be found in article <<Tab Discount Codes, Analytical Description, Attributes, Attachments and Change History>>.
Adding vouchers in batch
To add a batch of voucher to the system, it is necessary to select button [Generate] located in the main menu, over the list of vouchers. In the window of batch addition of vouchers, the user specifies values for the following fields:
Voucher Sort − drop-down list from which it is necessary to select one of available sorts of own vouchers.
Number of Vouchers − option interchangeable with option Import from file which allows for importing from a csv file vouchers with specific numbers which are compliant with defined numbering scheme.
Regular Amount − fields completed automatically on the basis of voucher sort, it can be modified by the user
Valid From − field filled in automatically on the basis of the system date. If during the definition of the voucher sort, the paramerter from activation was checked, the field is not visibile.
Generate As − drop-down list from which it is necessary to select status of generated vouchers
Location − allows for selecting a center which will be the owner of vouchers
Moreover, in the window of batch additions of vouchers, the following parameters are available:
Print vouchers − if the parameter is checked, newly generated vouchers are automatically printed out
Register delivery − allows for registering deliveries in a warehouse with POR/IR+ documents. The parameter is active only if paramerter Create a purhcase order is unchecked and the voucher sort is associated with an item (in the system there is <<an item of vouchr type>> with a given sort). Additional fields appear after checking the parameter:
Document − drop-down list from which it is necessary to select document type through which the receipt of voucher will be processed.
Vendor− field allowing for selecting vendor who will be transferred onto voucher reception document
Create a purchase order − allows for issuing purchase order for vouchers generated during the process of batch addition. The parameter is active only of the parameter Register delivery is unchecked.Upon selecting this parameter, the field Vendor appears in which it is necessary to select vendor which will be retrieved onto purchase order.
Window of batch addition of vouchers
Defining voucher sort
General information
To start working with vouchers in the system, first the user needs to define a voucher of a specific type (own/external). The option of adding vouchers is available in the menu of the list of voucher sorts. To open the list, it is necessary to open the menu Configuration → Trade/Warehouse → Voucher Sorts.
On the right side of the list, there is Details form containing detailed information regarding selected voucher sort.
Voucher sorts
In order to define new voucher sort, it is necessary to select [Add] button placed over the list of vouchers and select voucher type (own/external) from a drop-down list.
Button for adding new voucher sort
After adding new item to the list, the user has to fill in the header of the form of voucher sort which is available on the right side of the window. Fields and parameters of the form of voucher sort will differ depending on voucher type.
External voucher
To define a voucher sort of External type, it is mandatory to enter its name.
Moreover, in the header of the form of external voucher, the following parameters are available:
Active ─ parameter deciding whether a given voucher is active
One-off─ parameter deciding whether a voucher has to be used entirely within a single transaction. In the case of an external voucher, the parameter is checked by default and it is impossible to uncheck it.
Return of Unused Value ─ parameter deciding whether funds unused during the payment for a purchase for an amount lower than the value of the voucher are given as change
Header of external voucher type form
Own voucher
To define a voucher of Own type, except for the name, it is also necessary to specify Numbering Scheme (Configuration Tool). The user can select it from among numbering schemes previously defined in the system or create a new one.
For an own voucher it is also possible to define:
Series ─ initial number identifying voucher sort
Regular Amount
Validity Date
Hint
Parameter from activation is related to the field Validity Date. If the parameter is checked, voucher validity date is calculated from the date of its activation. If the parameter remains unchecked, voucher validity date is calculated from the date of its generation.
The other parameters available in Details of own voucher are:
Loyalty Program ─ parameter deciding whether defined voucher sort can be indicated as customer’s identifier in a loyalty program. Detailed information regarding associating vouchers with customers can be found in <<article>>.
One-off ─ the parameter can be checked/unchecked by the user at any time, its function is the same as in the case of external voucher
Return of Unused Value ─ the parameter appears on the form after checking One-off parameter and its function is the same as in the case of external voucher.
Rechargeable ─ this parameter is available on the form only if the parameter One-off is not checked.Checking the parameter makes it possible to recharge voucher repeatedly with any value.
Item ─ inactive field, completed automatically upon adding association between voucher and item.
Note
After voucher sort is defined it can be added to the system as item only once.
Header of own voucher type form
General information
The Comarch ERP Standard system offers the possibility of handling multi-purpose vouchers and allows for selling single-purpose vouchers.
A first step for starting work with vouchers consists in <<defining voucher sort>> of a specific type and indicating its properties.
Two voucher sorts are available in the system:
own − issued and distributed by a company within its own shop or chain, or else accepted by its partner companies. Own vouchers are registrated before initiating the process of their distribution.
external − issued by one company and accepted by other shops. External vouchers are added to the system only after a payment with such voucher is registered.
On the basis of defined voucher sorts the user can create and add
new vouchers.
Items of voucher type can be <<sold>> through the following documents:
Sales order
Debit memo
Receipt
Sales invoices
Moreover, they can be used as <<payment form>>. It is also possible to make a refund to voucher when correcting trade documents.
Handling of intercompany transactions with selected operator’s permissions
Thanks to the possibility of creating documents of opposite type during intercompany transactions regardless of permissions of the operator issuing a source document, the system allows to handle the following business scenarios between centers, with the use of permissions of an additional operator:
Generating: SOR → POR and SI → PI
Generating corrections: PORQC → SORQC and SIQC → PIQC
Intercompany warehouse movements: WM-/+ → POR → WM-
Operations within more than two companies, e.g. intercompany return and sales to another company
Cancelling: PI, POR, corrections and intercompany WM-/WM+
Assigning of an appropriate secondary operator can be performed from the level of tab Computer, in general system configuration. If no secondary operator is selected, operations are performed normally, with permissions of initiating operator.
Batch change of tax point date
In order to perform batch change of tax point date, mark VAT invoices on the list and then select [Change] → [Tax Point Date in Single Batch] in the List button group.
In the opened window enter a new date of tax point.
Window for changing tax point date
Note
The function [Change] → [Tax Point Date in Single Batch] is available only for VAT invoices registered on account of Suggested type. In case of account of Obligatory type, it is not possible to perform a batch change.
Change of date results in update of tax point date on VAT invoice items.
Changing of VAT account
Due to specific nature of enterprise operation, users usually introduce divisions within VAT purchase and sales accounts. It may happen that users register documents in improper VAT accounts by mistake. Such situation refers not only to a single document, but to the whole group of documents.
A VAT account can be changed directly in a specific document or in a form of batch change of VAT account, which allows for changing of VAT account in a single invoice or a batch change in selected group of documents. Analogical situation applies to tax point date change. In this case, it is possible to change date of tax point in selected VAT invoices collectively, so that the user does not have to change the date on every single document.
In the system, it is also possible to change VAT parameters and tax point date in VAT invoice which is already posted and in invoices generated from trade documents. Invoices are often posted and only then VAT parameters are updated and tax point date is specified.
Both batch changes in VAT accounts and changes in posted VAT invoices can be performed after appropriate permissions are granted to the operator. These permissions are described in detail in article Permissions concerning VAT accounts.
Change of VAT account on a single document
In order to change VAT account on a confirmed/posted VAT invoice, the invoice must be reedited and new VAT account, in which the document will be registered, must be selected in the field Account.
Change of VAT account in an invoice
Upon selecting the account, the system asks the user which parameters regarding the account should be changed. In a new window it is possible to select them. If none option is checked, then VAT parameters are not changed during change of the account. In this case, the change applies only to the account/subaccount. If any of the options is checked, then only the selected data is updated in a document, on the basis of VAT account/subaccount pattern definition
Note
Changing VAT account changes all the parameters, selected by a user, in the header and items of a VAT invoice, according to the settings specified on the form of account to which the invoice is being transferred.
In case of accounts of Suggested type, the use can select which parameters should be changed. Such option is unavailable for accounts of Obligatory type. When changing account to obligatory account, all options are checked and greyed out. In such case the document inherits all settings from the account definition.
Note
If when changing an account, option VAT Parameters is checked and items of a transferred document have different values of VAT Deductions parameter than specified in the target account settings, the system displays appropriate message and disables changing account of such document.
The system operates the same way in case of changing account to an obligatory account, when all the options are automatically checked.
Change of VAT account in a single batch
In order to change VAT account in a single batch, mark VAT invoices on the list and then select [Change] → Account in Single Batch in the List button group.
Batch change of VAT account
Then, a window with VAT accounts opens, in which the user selects account to which the marked documents must be transferred and checks which VAT parameters should be changed
VAT account selection window
If a company introduced additional division of accounts into subaccounts, it is also possible to change the subaccount. In such case, an additional section with list of subaccounts appears in the window
AT account and subaccount selection window
Upon clicking [Confirm], the system makes changes in parameters selected by the user.
Note
Changing VAT account changes all the parameters, selected by a user, in the header and items of a VAT invoice, according to the settings specified on the form of account to which the invoice is being transferred.
In case of accounts of Suggested type, the use can select which parameters should be changed. Such option is unavailable for accounts of Obligatory type. When changing account to obligatory account, all options are checked and greyed out. In such case the document inherits all settings from the account definition.
Note
If when changing an account, option VAT Parameters is checked and items of a transferred document have different values of VAT Deductions parameter than specified in the target account settings, the system displays appropriate message and disables changing account of such document.
The system operates the same way in case of changing account to an obligatory account, when all the options are automatically checked.
Company structure – Company
General information
In menu Configuration → Company Structure, there is information about a company to which a user is currently logged-in.
The data is presented:
on the main company form ─ if the user is logged-in to the main company or its child center
on the form of a center of Company type ─ if the user is logged-in to a center of company type or its child center
Form
In the left panel of the form, there is basic information about the company, whereas on the right side, there is information included in a currently selected tab, and a field allowing the user to enter an additional description of the company.
Form of center of Company type
Basic information referring to a company:
Type – type of structure center
Active ─ parameter indicating activity status of a given canter (it cannot be deactivated for the main company)
Name
Created On ─ Non editable field
Currency – field for selecting system currency. Button […], which opens the list of currencies defined in the system, is active for the main company and for centers of Company type until changes on the form are saved. For child centers, system currency of the parent company is set, by default. For newly created databases, system currency is consistent with language of a database is set for the parent company.
Note
In French version of the system during creation of a database, chart of accounts is created by default. Owing to that, button […] in Currency field is inactive for the parent company. It will be possible to change system currency of the parent company once the chart of accounts is deleted.
VAT Rate Group ─ default VAT rate group assigned to a company. The field is active for the parent company and for centers of Company type, until the first document is issued. The system allows for assigning of different VAT rate groups to centers of Company type, owing to which it is possible to determine various VAT rates for an item or item group in dependence of a company. The list of VAT rate groups is available from the level of generic directories.
Company Name ─ field for selecting a customer/vendor the company can be associated with. Upon clicking on the ellipsis button […], the following message is displayed: “The company data will be filled in with information (Code, Name, Tin, EIN, URL, Legal Form, Industry, SIC) of the selected customer/vendor. Do you want to continue?”. Upon accepting the message, the system automatically fills in the mentioned fields according to data defined on selected customer/vendor form and marking that customer/vendor as internal (tab Trade of a customer/vendor form). One customer/vendor can be associated with one center of Company type only. An internal customer/vendor can be changed until he/she is used in the system or a center with which he/she is associated is used, e.g., by means of issuing a document for that customer/vendor.
TIN – TIN of a company or of the associated internal customer/vendor. This field is composed of a drop-down list of prefixes for individual countries and a field for entering the number. It must be specified in case of multi-company structure enterprises. When logging in to the system, the entered TIN is verified with the TIN registered in user’s license key.
EIN – EIN of a company or of the associated internal customer/vendor
Legal Form – field with a drop-down list for selecting legal form of a company
CID – creditor identification number applied for entities without TIN number
SIC Industry – field for selecting a standard industrial classification number and a relevant industry branch
Address ─ main address presented as company seal on document printouts. In order to change the main address, it is necessary to click on […] button which opens a list of defined addresses. From this level it is necessary to add end edit contacts which will be presented on the form, in fields Phone and E-mail.
Telephone
Email
URL ─ website address
Below, the user can expand an additional section and complete the form with data regarding a relevant authority which registered the company upon its creation:
Registering Authority
Registry Name
Number in Registry
Registration Date
Share Capital
Paid-in Capita
Shop Area ─ additional field for specifying the area of a shop (building) in square meters
The parameters available below are divided into three areas:
section Trade
Sell below stock levels – parameter allowing for selling items which are currently not available (no resources in warehouse). The function of sale below stock levels is described in Sales below stock levels article. The value of the parameter can be changed at any moment during work with the system. The possibility to uncheck it depends on shortages registered in the system. Until they are deleted, the parameter is greyed out.
Monitor SENT transport – this parameter makes possible monitoring the carriage of goods by road. It is available only for centers of Company type.
Handle reverse charge – parameter activating reverse charge handling. It can be edited until the first document handling reverse charge is registered in the system.
Compliance with French VAT law – parameter available if the VAT rate selected is: FR. Selecting the parameter brings a number of functional changes in the system, resulting from the adaptation of the system to the requirements of the French VAT law:
Retail sales blockade – it blocks, among others, the handling of receipts and their corrections, printing invoices on a receipt printer, or the handling of sales and advance invoices and their corrections if no customer TIN is given in a document. Detailed description of the functionality can be found in article Receipts.
Keeping a record of special events – the system logs events specified by the law in order to track the operational consistency of the system and data integrity.
Digital signature verification – the functionality is available for invoices, receipts, duplicate receipts, special events, Grand Total Period reports, and archives is available from the level of Configuration → Tools -> Digital Signature Verification.
Printout history – handling of the functionality of identifying duplicates of receipts printed on POS workstations.
Grand Total Reports – handling of the list of reports generated on POS workstation available in menu Sales → Grand Totals (Tax Files). In the field Archive Folder located under the parameter Compliance with French VAT law, it is possible to choose a drive location where tax files will be saved.
Print Receipts – parameter available in the French version of the database with checked parameter Compliance with French VAT law. It allows for omitting printing of a receipt with a value below a defined value. After selecting option Above the value, additional field is presented, where it is possible do define a value of EUR above which the receipt will be printed.
section Accounting
Split payment under Polish law – parameter activating handling of the split payment functionality for company It is available if the PLN currency is selected.
Register compensations – allows the registration of compensation documents in the company. More information …
Compliance with French VAT Law ─ parameter available if the VAT rate selected is: Selecting the parameter brings a number of functional changes in the system, resulting from the adaptation of the system to the requirements of the French VAT law:
Retail sales blockade – it blocks, among others, the handling of receipts and their corrections, printing invoices on a receipt printer, or the handling of sales and advance invoices and their corrections if no customer TIN is given in a document. Detailed description:
Keeping a record of special events – the system logs events specified by the law in order to track the operational consistency of the system and data integrity.
Digital signature verification – the functionality is available for invoices, receipts, duplicate receipts, special events, Grand Total Period reports, and archives is available from the level of Configuration → Tools → Digital Signature Verification.
Printout history ─ handling of the functionality of identifying duplicates of receipts printed on POS workstations.
Grand Total Reports – handling of the list of reports generated on POS workstation available in menu Sales → Grand Totals (Tax Files). In the field Archive Folder located under the parameter Compliance with French VAT Law, t is possible to choose a drive location where tax files will be saved.
section Fixed Assets
360 days in a year for straight-line method – if the parameter is active and depreciation begins in the course of a month, write-offs will be generated proportionally to the number of depreciation days during the given month. If the parameter is not selected, depreciation write-offs will be calculated for the entire month.
Round-off amount added last month – if this parameter is selected, write-offs for particular months are calculated in such a way that they are equal, while the remaining pennies are included in the write-off for the last month of the accounting/calendar period. If the parameter is not selected, pennies are kept as part of the write-off for a month, for which they have been calculated.
In the menu, there are standard buttons allowing for saving and closing the form, as well as [Objects Availability] button which allows for managing objects within a given company. More information regarding the functionality can be found in article Objects availability.
The other buttons available in the menu differ in dependence of selected form tab.
Tab Addresses
Tab Addresses contains information referring to addresses defined for a given company. A user can add, delete and edit addresses as well as contacts assigned to them.
Note
The tab is available for centers of Company type only. In centers of Center type, there is a tab Address which presents the address of a center being edited, and another tab Company, which presents address details of a company a given center is attached to.
Company form – tab Addresses
In the upper section of the window, there is a list of defined addresses and in the columns, data referring to its address and parameters determining whether a given address is active or default, are presented. For a newly added address, the parameter Active is checked by default. Unchecking it makes a given address an archival address, e.g., it cannot be selected in a document.
Example
In the system, a document including a specific center address was issued. Then, the user has updated the postal code of the center. In such case, an archival copy of the previous address is created and the address is replaced with the current address. After unchecking the filtering parameter in Active column on the list, in the column Archiving Date the
In the middle section of the window, there is a list of contacts assigned to an address selected in the upper part and Description tab. A user can add the following contact types: Phone No., Private Phone No., Office Phone No., E-mail, Fax, Messenger: GG, Messenger: Skype. For each contact type it is possible to define only one default contact. It is not possible to deactivate a default contact type. A date since when the contact is no longer active appears in column Archiving Date.
Tab Documents
Tab Documents allows for editing the document types and its layout is the same as window available upon selecting Configuration → Documents → Types. However, from the level of the structure center edit form, the user has more possibilities referring to document configuration. With the use of [Attach to Group] button it is possible to assign particular types of documents to selected group of documents.
Tab Documents on the form of the main company
In addition to the possibility of assigning document types do groups created by the user, it is also possible to determine the visibility of document groups in a given structure cent. When editing a document group, upon clicking [Attach] in panel Visibility, it is possible to indicate structure centers in which all documents included in that group are to be visible. Button [Detach] allows for performing the opposite operation.
Because the document types are described in this manual in chapter Document types, here you will find the description of the additional tabs and fields which are available when editing a given document type
Below, are described additional tabs and fields in addition of a given document type, which are not available in the document configuration performed from the level of Configuration → Documents → Types.
Tab General
In General tab of edited document type, there are basic information about a document type provided as well as additional parameters referring to configuration of the type within a given center, which concerns, among other, control of credit limit, retrieving of exchange rates, price precision, generating of warehouse documents or VAT calculation method.
SI document form on company edition form
Tab Series
After adding a series do edited document type, it is contained in a document numerator (provided that the numerator includes element Document Series).
Tab series on the form of document type
In order to attach a series to a document type, click on the button [Attach] and select proper series available within a given center from the opened list. For a series to be available on the list, it must first be added to the center from the level of Object Availability panel. To detach a series, mark it on the list and click on the button [Detach]. When creating a new document, there will be series available which are included in this tab and have parameter Active checked. The series with parameter Default checked will be selected, by default.
From the level of this tab, it is possible to associate a document numeration series with selected VAT account.
Tab Warehouses
For some types of trade/warehouse documents it is possible to attach warehouses defined in the system. Owing to that, when issuing a new document, a user can decide, e.g., from which warehouse items added onto a document are to be collected.
Tab Warehouses on the form of company type
In order to attach a warehouse to a document type, click on the button [Attach] and select proper warehouse available within a given center from the opened list. For a warehouse to be available on the list, it must first be added to a center from the level of Object Availability panel. To detach a warehouse, mark it on the list and click on the button [Detach]. When creating a new document, there will be warehouses available which are included in this tab and have parameter Active checked. The warehouse with parameter Default checked will be selected, by default.
Note
Only warehouses of Local and Consignment type can be attached to document types. However, IQC and IO documents constitute an exception, because for them it is possible to attach also a warehouse of Distant type. Owing to that, it is possible to create an item quantity calculation or an internal order for subsidiaries (distant centers) attached to a company. Moreover, for IQC document it is possible to check several warehouses as Default. This way, these warehouses will be automatically added onto item quantity calculation.
In Warehouses tab, the following parameters are also available:
Operations on one warehouse – if checked, then when issuing trade documents, it will be possible to add an item only from one warehouse (checked as Default).
Prefer default warehouse – if checked, then when adding items to documents, items from the default warehouse are collected first, according to the selected queue method (FIFO, LIFO) and only then items from the other warehouses, also according to the selected queue method, are collected. The parameter affects only trade documents, because operations made on warehouse documents always concern only one warehouse. This parameter is checked automatically if parameter Operations on one warehouse is checked
Tab Visibility
List of documents in particular centers of company structure may differ and not all documents are visible in all centers. The visibility of documents in particular centers is determined by the user, however, the following rules must be observed:
A document issued by a given center is visible for all the parent centers in a given branch of the structure
A document issued by a given center is invisible for all the child centers in a given branch which are equal to one another
Example
Exemplary company structure
The center Company sees all the documents issued in that center and all those which were issued by all its child centers.
The local center Accounting sees those documents which were issued in that center. However, it does not see documents issued in the center Shoes4UOU and Main Company. Moreover, it does not see documents issued in other local centers, that is Management and Warehouse because they are equal to each other.
The center of Company type Shoes4You_DE only those documents issued in that center of this structure. However, it does not see documents issued in the center Main Company and other companies, that is Shoes4You and Shoes4You Accessories (equal to each other) and in their child centers.
For each document type, it is possible to specify the centers of the same level, child centers and those assigned to another branch of the structure for which the documents must be visible (even though the above-specified rights do not say so). The rule, stating that if a document is visible for a given center, it is also visible for all the parent centers, still applies.
Tab Visibility on the form of company type
With the use of the button [Attach]it is possible to select from the list of company structure a center in which a given document should be visible. In order to remove the visibility of the document from a given center, it is necessary to mark it on the list and click on the button [Detach].
Example
The user logged in to the center Main Company attaches the local center Management in the tab Visibility. This means that a user logged in to the center Management will be able to preview all the documents (of a given type) issued in the center Main Company.
VAT Accounts tab
From the level of this tab, it is possible to assign many VAT accounts and select the default VAT account for a given type of document.
Tab Vat Accounts on the form of SI document type
In order to attach VAT accounts, click on the button [Attach] and select an account from the opened list of VAT accounts. To detach an account, mark it on the list and click [Detach]. It is also possible to determine which account should be default for a given document type by checking the parameter Default. More information can be found here.
This tab Tax Returns allows entering information necessary to submit a tax return.
Note
The tab Tax Returns is available only in the case of editing the parent company or a center of the Company type.
The layout of this tab changes depending on type of payer selected in field Taxpayer Type.
Tab Tax returns for a taxpayer not being a natural person
Available fields:
Tax Office ─ name of the tax office which will be assigned to a company. Button […] opens the list of offices defined in the system.
Tax Office Code ─ field completed automatically upon selecting an appropriate office or can be filled in manually.
Taxpayer Type ─ drop-down list with the following options:
Natural person ─ opens additional fields which should be completed: First Name, Last Name, Date of Birth and Nin
Taxpayer who Is not a natural person
Full Name ─ field filled in automatically with the company name retrieved from the company header. Upon selecting Edit manually option, it is possible to change data.
Abbreviated name ─ abbreviation of company’s name
In Payer’s Representative section, it is possible to specify the following data referring to a person representing a company, such as: First Name, Last Name, Phone, and E-mail.
SAF-T e-mail ─ indicated e-mail address will be automatically added to SAF-T file form
Data regarding taxpayer’s address, in the middle section of the tab, is retrieved with the use of the button […] available in the Payer’s Address ─ Type field, which opens a window with the list of addresses defined in the system.
Tab POS Workstations
In this tab it is possible to add points of sale attached to the center in which the user is currently working. From the level of this tab, it is also possible to define a new POS workstation. Detailed information about parameters available in this tab as well as instruction on how to add points of sale can be found here.
Tab Attributes
This tab allows for attaching an attribute to a structure center according to the rules described here.
Tab Attachments
This tab allows for attaching an attachment to a structure center according to the rules described here.
Positions
The list of positions is available from the level Configuration → Company Structure → Positions.
Positions defined by the user can be assigned to employees in the company subordination structure.
List of positions
In the menu, there are standard buttons for adding/deleting an object (position), saving changes, as well as refreshing and closing the list.
Button [Add] adds another row on the list, where it is possible to define a new position. Upon entering the name of the position and saving changes, the list of position becomes available in the window Selecting Employee which appears during the process of adding an employee to the <<subordination structure>>.
List of positions available when adding an employee to the subordination structure
Rights structure
In menu Configuration → Company Structure → Rights Structure there is a list of all centers defined in the system. From this level it is possible to add new centers to the company structure.
Exemplary rights structure tree
The list is presented in from of a tree, which clearly shows relations between centers (inferiority, superiority and the parallelism) and the operator groups assigned to the centers.
Column Type displays type of a structure center, whereas column Active indicates centers to which it is possible to log in.
For newly created databases, the rights structure contains only one center ─ Main Company. This is the main center of the company structure (root) to which other centers can be attached.
During conversion of database from Comarch ERP Standard system versions previous to version 2015.0, an appropriate window referring to configuration of the rights structure conversion is displayed.
Selecting the option Leave the main node unchanged means that a given company will become the parent company. Whereas selecting the option Convert the main node to centerof Company type adds a new main node – Parent Company – one level up in the rights structure.
The multi-company models make it possible to handle many companies in one database. In this case, Parent Company node can act as:
an administration center from the level of which it is possible to access all the data, objects and documents used in child centers
a company running operating activity and being add the same time superior to all the other companies (centers of Company type)
Center of Company type can be treated as an equivalent to one of enterprises in a holding, while other centers of the structure correspond to an organizational unit within a given company.
Standard buttons for editing/deleting a given object (center) from the structure tree and for refreshing it are available in the menu bar. Editing of a given company from the rights structure level enables accessing the same functionalities as when editing a company (to which a user is currently logged-in to) from the level of Configuration → Company Structure → Company.
Moreover, it is possible to create a shortcut to editing of a given center on the system desktop by selecting option [Add shortcut to system desktop], available in the context menu (opened upon clicking the right mouse button).
Buttons [Up] and [Down] allow for managing location of a selected center in the structure. Button [Attach Group] opens the list of operator groups defined in the system. Here the user can select a group which will be attached to a center. Button [Detach Group] detaches a group from the structure center. Operators not included in any of the groups attached to a given center are not able to login to that center.
Note
The group B2_admin cannot be detached from the main structure center.
Buttons for defining new rights structure center:
[Add Local Center] – opens form for defining a new local center of the rights structure, depending on selected type:
Company
Center
Comarch e-Shop
[Add Subsidiary] – opens a form for defining a new distant center of the rights structure of the Mobile type
Adding a center of the Company type
In order to add a new center of Company type, click [Add Local Center] and then [Company].
Note
A center of Company type can only be added to the parent company.
In opened company form, it is necessary to fill in relevant details in the side panel and the respective tabs of the company form and determine permissions which are available upon clicking on [Object Availability] button. Detailed information can be found here.
Note
For a center of the Company type, there must be a default price type (for released and received items) assigned as well as an exchange rate type (for which base currency is consistent with system currency of a company). Otherwise, it will not be possible to save the company form.
Adding a local center
In order to add a new local center, click [Add Local Center] and then [Center]. Subsequent steps of defining a center are the same as those described above.
Additionally, in the lateral panel, there is parameter Create a Stamp for Center, which allows for displaying different address details than those of a company in document printouts.
Form of new local center
Adding a center of the Comarch e-Shop type
In order to add a new center of Comarch e-Shop type, click [Add Local Center] and then [Comarch e-Shop]. A center of Comarch e-Shop type is defined in the same way as a local center, but in case of a center of Comarch e-Shop type, data in Synchronization tab and permissions to additional objects: Customer/Vendor Groups, Item Groups, Generic Directory Value, Additional Units of Measure, and Consents must be specified from the level of Object Availability panel.
Form of new center of e-Shop type
Adding a subsidiary of the Mobile type
In order to add a subsidiary of Mobile type, click [Add Subsidiary] and then [Mobile]. A subsidiary of Mobile type is defined in the same way as a local center, but in case of a subsidiary of Mobile type, data in Synchronization tab and permissions to objects: Customer/Vendor Groups and Item Groups must be specified from the level of Object Availability panel.
Subordination structure
Subordination structure tree
Subordination structure is a set of organizational units of a company and employees assigned to them. Owing to hierarchical presentation of the structure, based on the list of employees defined in the system, a user is provided with information about relations between employees, irrespective of the company rights structure.
The company structure window is available from the level of Configuration → Company Structure → Subordination Structure.
Tree of the subordination structure
Subordination structure is presented in form of a tree. The main tree group is Root group to which all the other organizational units and employees are attached. Root group can be edited in any way but it cannot be deleted. A user can define own organizational structure of a company and establish any relations between employees.
Section Structure on day allows user to preview history of company structure on a given day. The date can be entered manually or selected from a built-in calendar.
Section Searching is particularly useful in case the structure is very complex. In order to search a given object in the structure, it is necessary to specify the searched object (Employee or Organizational Unit) in Searched Object field, type the first and last name of employee or name of organizational unit in Searched Code/Name field. Then click [Search] in the Structure button group or click on the magnifying glass icon available next to the field Searched Code/Name to start searching. The searched objects will be highlighted in the tree structure.
In the menu, there are standard buttons for adding/deleting/saving a given object (organizational unit or employee) in the tree structure and for refreshing it.
Moreover, an employee selected on the structure tree can be marked as manager in a given organizational unit by clicking [Manager] → [Promote To Manager]. An opposite process can be performed with the use of button [Manager] →[Downgrade From Manager].
Button [Show Subordinates] displays a list of all employees subordinate to a given manager in the structure.
List of employees subject to the manager in the subordination structure
Defining organizational units
Organizational unit is any unit operating within company structure e.g. center, location, department, etc.
In order to add an organizational unit, mark the Root group (or a unit subordinate to it) on the structure tree and then click on the [Add] button and then [Add Unit].
Form of organizational unit definition
Name – name of an organizational structure must be a unique value
Type – drop-down list to which it is possible to add own types of organizational unit with the use of button [Add Type] in the menu
Adding of organizational unit type
Editing of a given unit type is performed in Edit in place mode, so directly on the list. Upon saving the changes and closing the list, click on [Refresh Types] for the data to be updated in field Type.
Created On – allows user to define date of organizational unit creation. Date of creation of a subordinate unit cannot be earlier than its parent unit creation date. It can be entered manually or selected from a built-in calendar.
Deleted On – allows user to define date on which unit will stop existing in company structure. Unit date of deletion cannot be later than its parent unit deletion date. It can be entered manually or selected from a built-in calendar.
Description – in this field it is possible to enter additional notes to the added organizational unit
Cost Account – this section allows user to determine organizational unit as a cost unit in the company subordination structure. Button [Assign] opens the list of cost accounts, from which it is necessary to select the account which is to be assigned to the unit. Clicking on the button with eraser icon erases the selected account. More information can be found in article <<Chart of accounts>>.
After filling in the form and saving changes, a unit is added to the subordination structure tree.
The subordination structure must be defined in order to be able to activate <<CRM module>> in the system.
Adding an employee to organizational unit
In order to add an employee to an organizational unit, mark ta given organizational unit on the structure tree and then click on the [Add] button and then [Add Employee]. A list of employees will be displayed, from which a specific employee must be selected.
Employee selection window
From the level of employee selection window, it is possible to specify duration of employee contract validity range, that is the date of assigning that employee to an organizational unit (in field From) and the date from which the employee no longer belongs to the company subordination structure (in field To).
Field Position Held allows for assigning appropriate position from among <<positions defined>> in the system to an employee.
List of defined positions.
After filling in the data and clicking [Select], an employee will be added to the subordination structure tree.
Objects availability – General information
Object Availability panel is used to manage availability of objects dedicated for particular centers of the company rights structure. This functionality is available for users included in operator groups with granted permission Management of object availability in the rights structure. Permissions can be assigned to operator groups from the level of Configuration → Rights Structure → Operator Groups → tab Other Permissions.
Managing of object availability can be performed:
globally for all the centers, in menu Configuration → Rights Structure → Object Availability
locally, within a specific center, in menu Configuration → Rights Structure → center form → [Object Availability] button. The window of rights structure is not available from that level.
The panel of object availability is composed of the following sections:
Rights structure ─ company structure tree with the possibility of adding columns, hidden by default, providing information about type and activity status of a center (the window is available from the level of Configuration → Rights Structure → Object Availability only).
Objects ─ objects available for assigning to a given center. The list contains a column with object name and, in case of selecting a child center, parameter Get From Parent Center. If the parameter is checked, a child center “inherits” the values of objects from the parent center. Deactivating the parameter allows user for assigning manually values of objects to a child center. A column Area,
List of values assigned to a selected type of object ─ in case of a parent company, centers of Company type and child centers with unchecked parameter Get From Parent Center, there are buttons [Attach]/[Detach] available in the menu, which allow for attaching or detaching a specific object from the list of values. Upon clicking [Attach], a list of objects defined in Comarch ERP Standard system opens, from which a given object should be selected with the use of [Select] button. Additionally, in case of some objects, there is button [Edit] available, which enables additional configuration of objects being attached. Button [Save] saves the entered changes for an object, whereas [Export To Spreadsheet] button allows for exporting data from the list to a spreadsheet.
Panel Objects Availaibility along with the list of objects of the main company
Note
In case of centers of Comarch e-Shop and Mobile type, it is not possible to check the parameter for objects which cannot be inherited from a parent center.
Objects added to the system from the level of any structure center are automatically added to the parent company (root) and to the company (center of Company type) parent to the given center. Availability of those objects in other child centers (within the company) depends on setting of the parameter Get From Parent Center.
All objects defined in the system are displayed only in the parent company (root). From the level of a child center (while being logged-in to that center), a given list of objects, e.g., warehouses, contains objects attached to a company (center of Company type) which is parent to that center. Since the list includes also objects which are not attached directly to the center in which the list is displayed, their edition is limited, e.g., tab Stock Level Management is not provided for a warehouse not available in that center