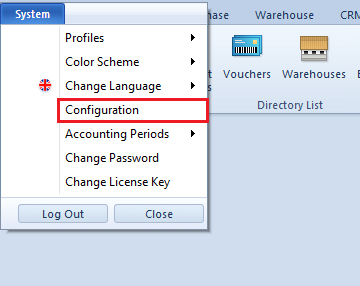
In menu Configuration → Company Structure, Operator Sessions functionality is available, which is used for handling sessions of operators and previewing the history of logging of all operators to the system. Only an operator assigned to group B2_admin has access to the functionality.
List of operator sessions
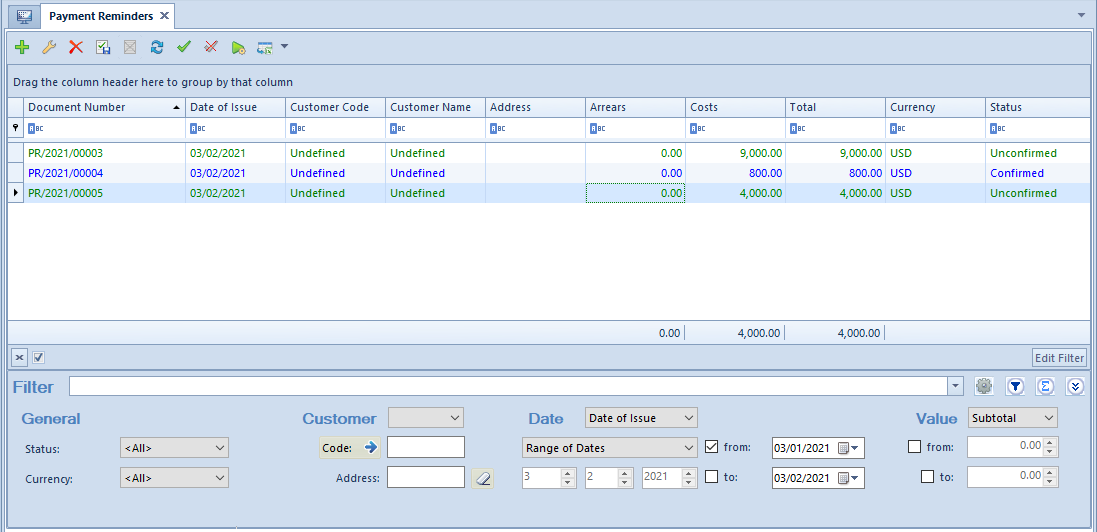
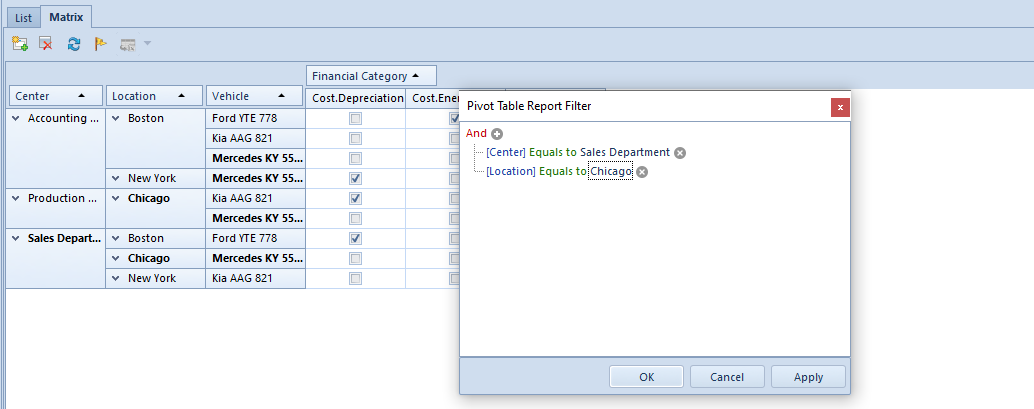
Current operator session is marked in red. In the upper right corner of the window, there is a filter for the list of sessions, containing the following options: All, Terminated, Open.
The list of operator sessions presents the following data:
ID ─ session ID
Operator ─ operator who started a session
Center ─ unit of the company structure where a session was started
Created On ─ date in which a session was started
Closing date ─ date on which a session was closed
Last Operation Date ─ date of the last action initiated in a given session
Terminated by ─ operator who terminated a session
Service ─ parameter indicating whether a session originates from an external service, e.g., Mobile
Session name ─ name of a system or application on which a session was started
Company database version
Program version
Next to the standard buttons for updating, importing and exporting list to an excel sheet, there is a button with scissors symbol which allows for interrupting an active session of a specific operator, e.g., in order to unblock the documents which were blocked after the system had been closed abnormally.
Note
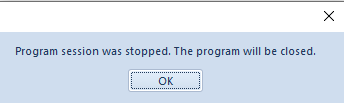
An operator cannot terminate his or her current session.
The operator whose session was terminated will receive the following message:
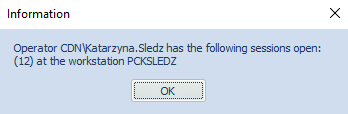
Whereas, if an open session of a given operator already exists, the following message is displayed after that operator logs in to the system:
Operator groups – General information
The list of operator groups is available in the menu Configuration → Company Structure → Operator Groups.
There, the user can also add or edit groups and assign new operators to them. Also, all permissions to objects in the company structure are defined from the level of operator groups.
Note
Each modification of permissions for an operator group requires logging out and then logging in to the system again.
To be able to manage Operator groups the user must belong to the group B2_admin, otherwise buttons [Operator Groups] and [Operators] are grayed-out.
The window of operator groups is composed of tabs Groups and Operators.
Tab Groups
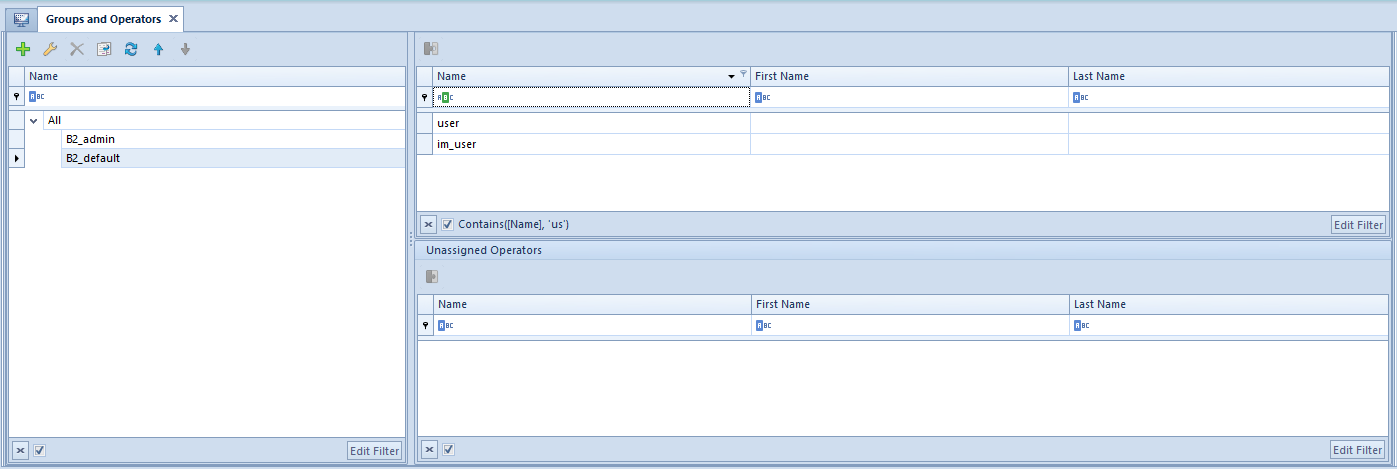
Tab Groups is divided into two sections. On the right side, in the section Groups, the tree of operator groups defined in the system is presented. By default, there are two groups available in the system: B2_admin and B2_default. The user can add new groups. Section Operators contains the list of all operators added to a given groups. On the list, there are columns Name, First Name and Last Name, which presents information about employee, provided that an employee is associated with an operator account.
List of operator groups
The group B2_admin is created by the system when generating a database. It cannot be deleted from the system, but it is possible to attach or detach operators’ accounts from it. Operators assigned to the group by default – admin, CDNwww, SearchAdmin and the operator creating the database have rights do manage all the permissions, to apply changes in the centers of the company structure and to assign operators to the groups.
Group B2_default includes all the operators defined in the system. Each new operator is assigned automatically to that group; therefore, it is important that the group has the least permissions to objects in the system.
Upon marking a given operator group in the section Groups, in the lower part, on the right side, additional section Unassigned Operators appears. An operator can be assigned to the selected group upon indicating an operator and then selecting the button [Attach To Group] which is available directly above the list or in the button group Assignments. To
To remove an operator from a group, it is necessary to indicate the operator attached to a group in the Assigned Operators group and select the button [Detach From Group].
For the tab Groups, standard buttons allowing for adding/editing/deleting object from the list and for refreshing the list, are available. Button [Copy] creates analogical group with the name of the copied group and a subsequent number in brackets, for example, if an operator copies group called Sales Representatives, group Sales Representatives (1) is created.
Tab Operators
Tab Operators is divided into three sections:
Operators – list of all operators available in the system
Groups – presents a group/groups to which an indicated operator is assigned
Other groups – list of other groups defined in the system
In the tab Operators, it is possible to <<add new operators>> to the system and to assign them to existing groups.
Additionally, in the ribbon menu, there are buttons for exporting and importing interface settings for indicated operator group:
[Export] – this button is active upon selecting one operator group and it enables saving interface setting to file for the selected group. The file takes on default name in form la with possibility to change it
[Import] – this button is active upon selecting one or several operator groups and it enables importing interface settings from file for the selected group(s). The import is carried out upon confirming the following message: “Interface settings for all selected operator groups will be overwritten with settings from the file. Do you want to import?”. If a file in improper format is selected, relevant message is displayed: “Invalid file format or the file is damaged. Cannot import the settings.”
Hint
It is possible to import any file in appropriate format, both one created in result of export of settings for operator groups as well as for an operator.
Examples of using configuration tools
Below, exemplary situations in which it is possible to use configuration tools in order to maintain nomenclature cohesion of objects present in the system, are described.
Example
In CA Clothes&Beauty company customer/vendor must have information about country prefix and subsequent number on the list included in its code.
First, it is necessary to determine country prefix as a value of attribute assigned to center in which a given customer/vendor is added to the system. In order to do so, the following data is entered by a user. To do so, the user adds attributePrefix of List type with the following values: FRA, POL and GER. Then, assigns the attribute to the objectCompany Structure Center and assigns appropriate attribute values to particular company structure centers.
Then, the user adds a new configuration tool for Customer/Vendor object with attached field Code and the following functions selected:
Center – this function must retrieve 3 characters of country prefix and therefore, in the function arguments, the following options are defined for it:
Field – Attribute
Attribute Name – Prefix
Number of characters – 3
From Character – 0
Subsequent Number – this function must provide subsequent number of a customer/vendor and therefore, in the function arguments, the following options are defined for it:
No Separator
Number of Digit –10
Start Number – 1
Numbering of Unique Codes – selected
Next, the saved item configuration tool must be attached to customer/vendor group pattern. In order to do so, option Configuration Tool must be selected instead of Code Format next to Code field and appropriate configuration tool must be selected from the list.
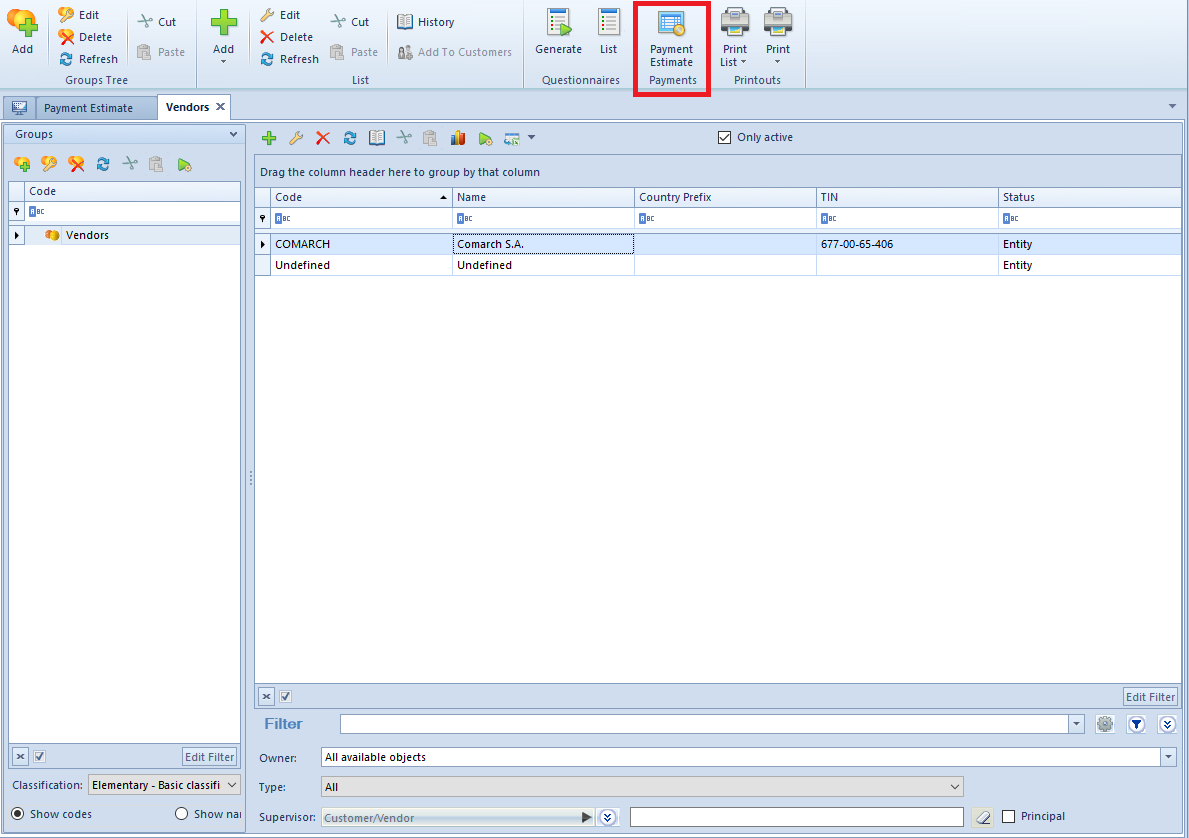
When adding a new customer/vendor from the level of center Trade Department (POL), the customer/vendor code will be automatically filled in with default values according to the defined configuration tool functions: POL0000000001.
Adding a subsequent customer/vendor from the level of center Trade Department (FRA) will automatically fill in its code with values: FRA0000000001.
Example
In CA Clothes&Beauty company code of each item included in item group Clothing must include information about item manufacturer, its brand, CN code and year of manufacturing, as well as have an image assigned.
Before adding a configuration tool, the user has to:
Add attribute Year of Manufacturing of List type with values, g., 2014, 2015, 2016 and attach it to object Item
Manufacturer – this function must retrieve only first four characters from manufacturer code and therefore, the following options are defined for it:
Default value – COMARCH
Number of characters – 4
From Character – 0
CN Code – this function must retrieve two characters of CN code, starting from 6. sign of a code and therefore, the following options are defined for it:
Field – CN Code
Default value – 85299092
Number of Characters –2
From Character – 6
Brand – this function must retrieve four characters from brand values, whereas in case of a shorter expression, it must replace the first character with an underline “_” and therefore, the following options are defined for the function:
Field – Value
Default value – ABC
Number of Characters – 4
From Character – 0
Completion Sign – “_”
Completion of Missing Characters – Prefix
Attribute – this function must retrieve Year of Manufacturing attribute and therefore, the following options are defined for it:
Attribute Name – Year of Manufacturing
Default Value – 2016
Number of Characters – 4
From character – 0
Attachment – this is an additional function which must automatically add a specific image to a new item and therefore, the following options are defined for it:
Default value – any attachment added in Comarch ERP Standard system
Next, the saved item configuration tool must be attached to Clothing item group. In order to do so, option Configuration Tool must be selected instead of Code Format next to Code field and appropriate configuration tool must be selected from the list.
When adding a new item to Clothing item group, code/name of the item will be automatically filled in with default values according to the defined configuration tool functions: COMA92_ABC2016. Moreover, that item will have attribute Year of Manufacturing with value 2016 attached in tab Attributes as well as a selected image added in tab Attachments.
Changing manufacturer, CN code, brand or attribute values on the form will update relevant value in item code/name.
Defining new attachment
A new attachment can be added by selecting [Add] button from the List button group
New attachment form
In the menu, standard buttons allowing for saving and closing form, are available. The Attachments group of buttons contains the following options:
[LoadFromFile] – loads an attachment file to from a selected location on a computer. Upon selecting a file, part of the information on the attachment form will be completed automatically
[Scan] – loads the scanned file directly to an attachment
[PreviewFile] – previews an attachment in an external program which is responsible for reading a file of a given type in the operating system
[Save To File] – saves attachment to a file in the selected location on a computer, for instance, in case attachment was added through scanning
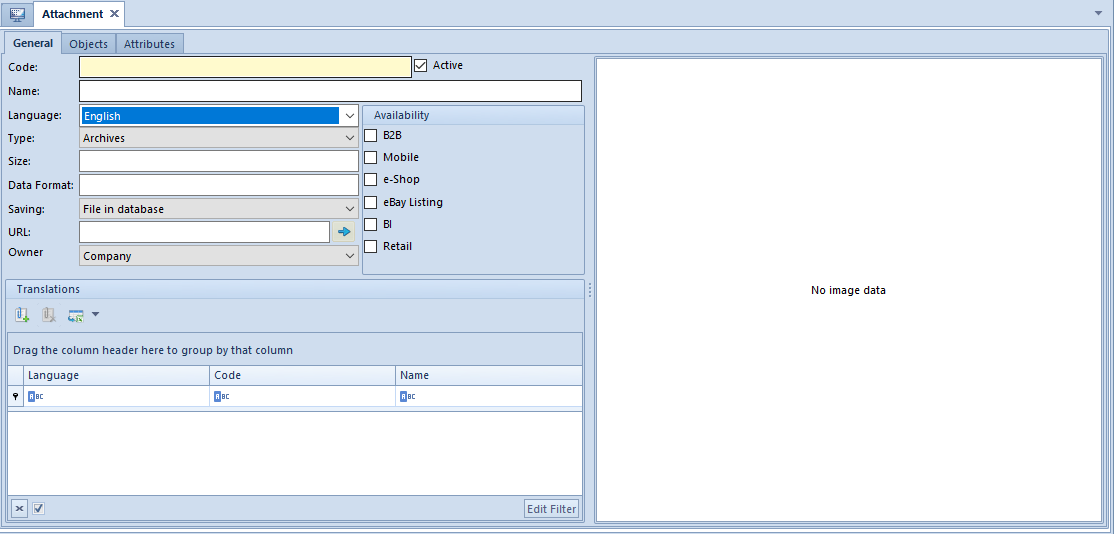
An attachment form is composed of tabs: General, Objects and Attributes
Tab General
The tab contains the following elements defining an attachment:
Code – mandatory field, unique value. If this field is not completed, it will receive an attachment name without extension after loading the file.
Name – mandatory field, the value does not have to be unique. If this field is not completed, it will receive an attachment name without extension after loading the file.
Active – parameter checked by default. If the parameter is unchecked, it is not possible to attach a file to an object.
Language – drop-down list allowing for selection of the language in which the name of an attachment is being defined. The list of language versions handled in the system is retrieved from the generic directory
Owner – field for determining the owner of an attachment
From the parent company level, a parent company will be set as owner. A parent company can, however, be changed to a center of Company type with the option All. Depending on the selected values, attachment availability is specified in the company structure. After selecting a particular company, attachment will be available in its other child centers.
From another center level, a company, to which operator is logged in, will be set in the field Owner. Owner in this case can be changed only to the option All.
If the above data is not specified, it will be completed automatically upon loading an attachment with the help of the button [Load From File]:
Type – drop-down list allowing for selection of one of file types defines in the generic directory called Attachment Types
Size – indicates attachment size expressed in bytes
Data Format – indicates data extension, e.g., *.bmp for a bit map
Location – indicates a place where attachment is saved. The value is by default retrieved from the attachment type definition (generic directory Attachment Types).
File in database – if the size of the loaded file exceeds the value specified in bytes for that attachment, the system will block saving the attachment and will display a relevant message.
File in attachment folder
URL
URL – field indicating a path to a file on a disk
In Availability section, it is possible to share an attachment in particular modules/applications cooperating with Comarch ERP Standard system:
B2B
Mobile
e-Shop
eBay Listing
BI
Retail
WMS Management and WMS Warehouseman – visible only after the installation of Comarch WMS Management and Comarch WMS Warehouseman
In Translations panel, it is possible to add an attachment in a different language than the currently defined one.
Example
To an exemplary attachment entitled User manual.pdf, defined in English, it is possible to attach a file Manuel d’utilisateur.pdf defined, in turn, in French. Owing to that, association with the file in English is presented from the level of the file in French. Such association between objects allows adding easily and quickly a subsequent attachment translation. Associated attachments in different languages are visible from the level of any attachment in given language.
To add a new translation, click on [Add] button in the Translations button group, mark an appropriate attachment on the list and confirm your selection by clicking [Select].
Removing a translation removes it from also other attachments it was added to.
Tab Objects
In Objects tab, there is a list of objects a given attachment was assigned to. An object can be edited by selecting [Edit] button. Assigning of attachment to objects is described in article Assigning attachment to an object.
Only an operator assigned to group B2_admin can manage accounts of operators. For other users, option Operators, available from the level of the menu Configuration → Company Structure, is inactive.
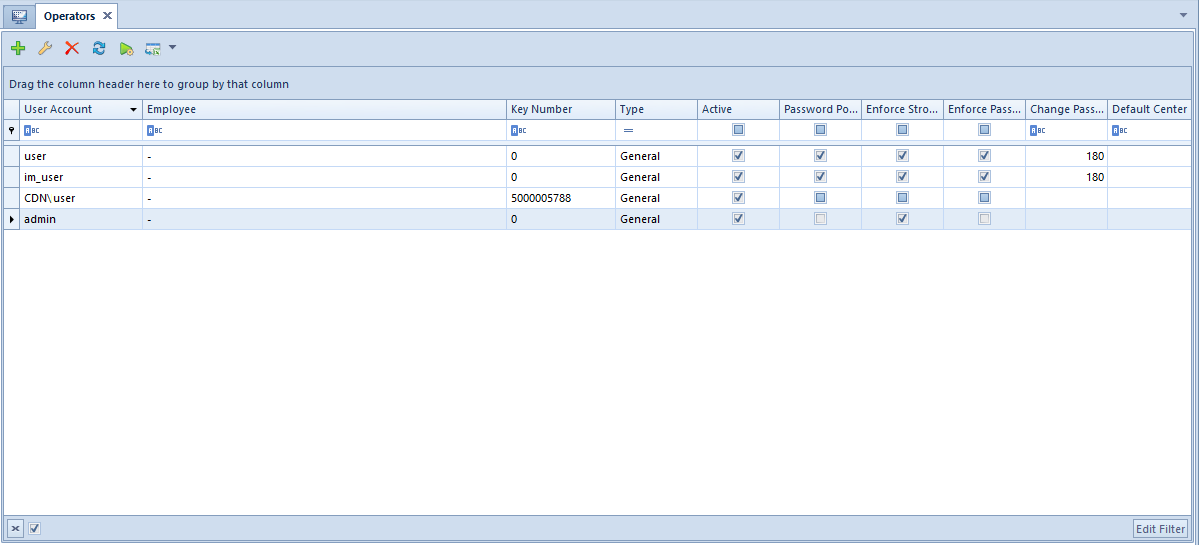
List of operators
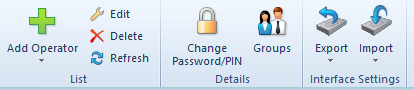
In the menu of the list of operators defined in the system, the following button groups are available:
List – standard buttons allowing for managing the list
Details – buttons used for defining passwords and managing associations with the group
Change Password/PIN – change of operator’s password
Groups
Interface Settings – allows for managing interface settings for a highlighted operator
Export – button active upon marking one operator, it allows for saving the settings of forms and lists to a file. It is possible to select one of the following options: Export Forms Only or Export Lists Only
Import – button active upon marking one or more operators, it allows for importing interface settings of forms and lists from file for the marked operator(s). It is possible to select one of the following options: Export Forms Only or Export Lists Only The import is carried out upon confirming message: “Interface settings for all selected operator groups will be overwritten with settings from the file. Do you want to import?”. In case of selecting file with invalid format, an appropriate message is displayed.
Menu of the list of operators
In the system, the following operator types are available:
Internal – operator who has login on SQL server and can log on to Comarch ERP Standard system
External – operator who is not associated with login on SQL server and cannot log on to Comarch ERP Standard system. Such operator can log on to other applications, e.g., Comarch POS.
General – operator with two login passwords: SQL and internal password, who can log on to both Comarch ERP Standard and other applications.
Note
In case of converting a database from previous system versions, the following types will be assigned to operators:
General – if operator’s account has not been associated with an employee or has been associated with one employee only
Internal – if operator’s account has been associated with an employee who has also been associated with other operators
Adding a new operator
In menu List, it is necessary to select button [Add] and select an appropriate operator type – Internal, External or General. Depending on selected type, a form for adding a new operator oopens.
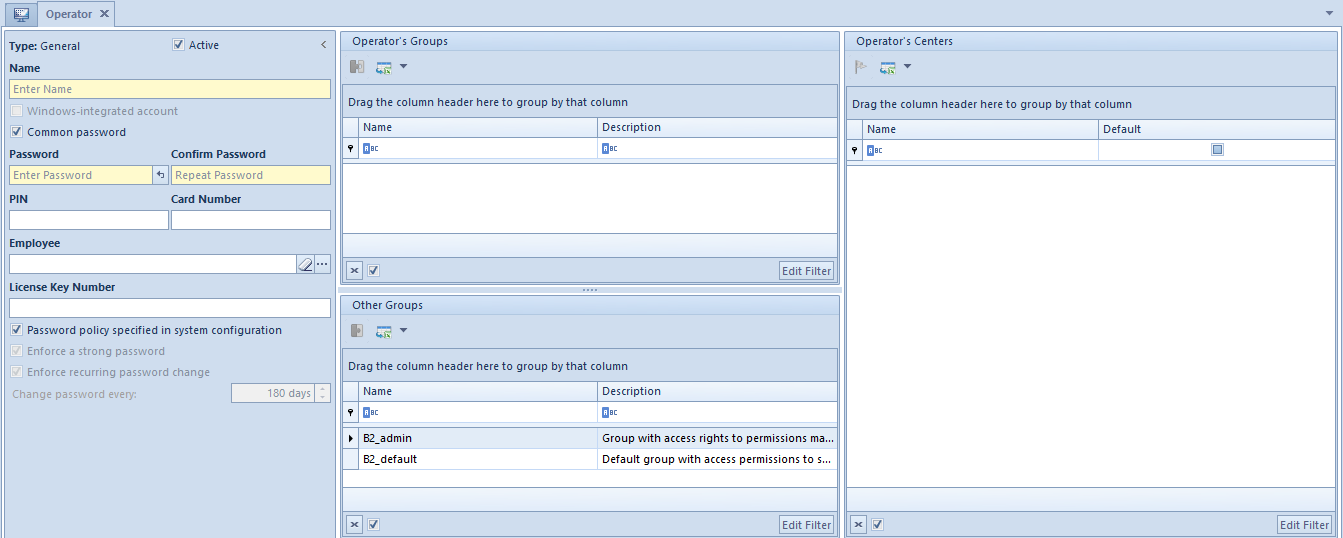
Form of new operator of General type
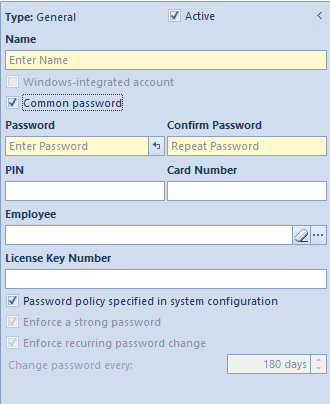
Fields and parameters common for all operator types:
Type – not editable field, indicates type of operator being defined
Active – parameter selected by default. Unchecking the parameter makes it impossible for an operator to log on to the system.
Name – field used to insert a unique operator name
Receipt Printer Symbol – allows for entering the name of the operator which will be printed on documents printed on receipt printer. By default, the option of copying operator’s name is checked and it can be changed or remain empty.
Password – the user can insert a login password manually or use [Generate Random Password] button
Confirm Password – field for verification of the password entered in the field above
PIN – number composed of 6 digits maximum for the purpose of logging in to external applications
Card Number – electronic card number (up to 50 characters) used for the purpose of logging in to external applications
Employee – this field allows for selecting an employee in order to associate it with operator’s account. The field contains […] button, clicking on which opens the list of employees defined in the system. In the system, it is possible to associate the same employee with many internal operators but only with one external or general operator. When attempting to attach such employee to an operator, an appropriate message is displayed.
License Key Number – number of license key, used while registering Comarch ERP Standard system
Password policy determined in system configuration – once this parameter is deselected, the user can separately define the following parameters for a specific operator:
Enforce a strong password – if this parameter is selected, the operator’s password should be composed of minimum 8 characters, and contain at least one upper- and one lower-case letter, at least one digit, and at least one of the following special characters: (!@#$%^&*(){}[]\|:”;'<>?,./).
Enforce recurring password change – checking the parameter allows for specifying password expiration date.
Note
The operator WMSadmin is not subject to password policy. It is not possible to edit the abovementioned parameters on the form of such an operator.
For Internal and General operators, the following option is available:
Windows-integrated account – if name is specified in domain/user scheme for an operator, this parameter is automatically checked and the operator’s account will be tantamount to his Windows-integrated account. Additionally, option <password from Windows> will be available. in fields with password
The following option is available for General operator only:
Common Password – this parameter is checked, by default, which means that password specified for an operator is the same both for login to Comarch ERP Standard system and other external applications, e.g., Comarch POS. If the parameter is unchecked, field External Password is displayed along with password confirmation option.
Operator form – parameter Common Password
In the middle part of the form, in sections Operator Groups and Other Groups, the user can assign an operator to appropriate groups, with the use of [Add To Group]/[Remove From Group] buttons. In this place, it is also possible to define a new operator group – menu Groups.
On the right side of the form, in an information window, operator’s Centers of Structure are presented in accordance with the group to which the operator is assigned.
After entering all necessary data and confirming them with the [Save] button, the newly added operator appears on the list.
Changing operator’s password
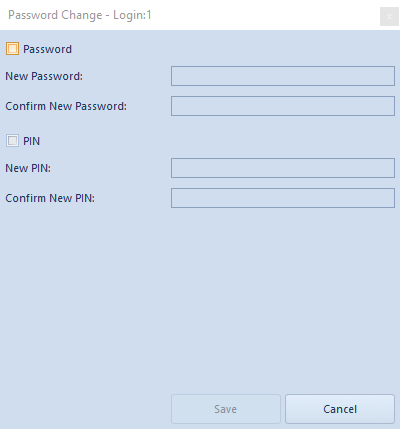
Operator’s password/PIN can be changed both from the level of operator list as well as operator form, in menu Details. Upon clicking on the button [Change Password/PIN] a windows for changing credentials opens. After selecting an appropriate option it is possible to edit relevant fields.
To change a password/PIN, it is necessary to enter current password/pin, new password/PIN and confirm it.
Window for changing password for Internal operator
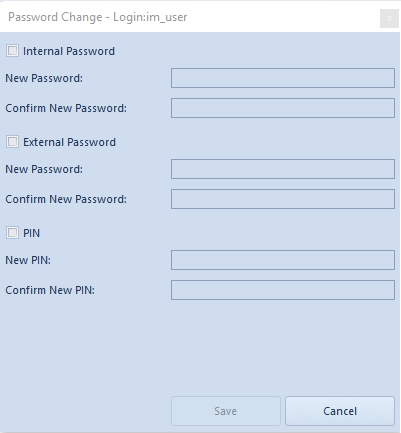
For a General operator, instead of the possibility of changing one password, the following options are available: Internal Password and External Password
Window for changing password for General operator
An operator with administrator permissions is able to change passwords of other operators without necessity to enter their current data.
Note
It is not possible to change password for currently logged-in operator whose account is defined as Windows-integrated account. The button [Change Password/PIN] opens the window for changing internal password and PIN. A Windows-integrated account password must be changed in Windows.
Defining new operator group
To create a new operator group, it is necessary to select the button [Add] from Groups button group, placed in ergonomic panel above the list of operators. A newly opened form of an operator group contains the menu with standard buttons of saving changes and closing without saving changes.
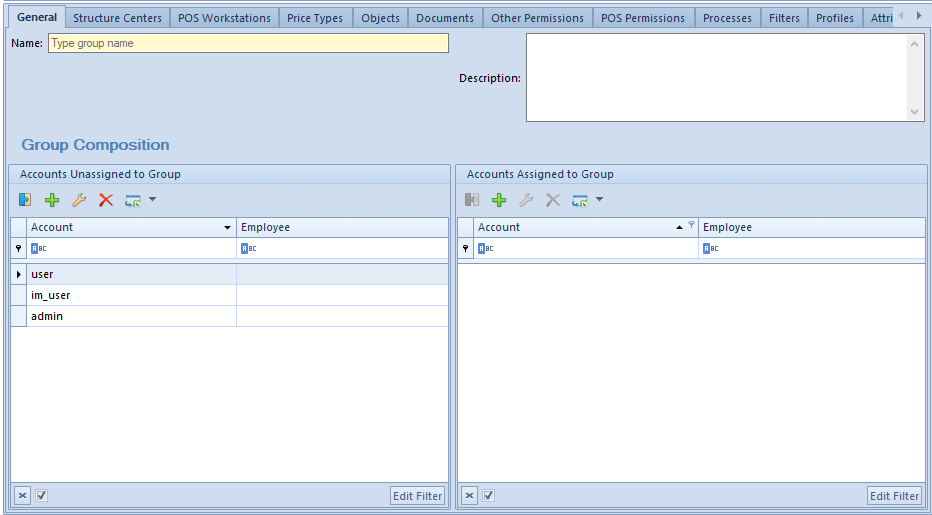
New group form ─ tab General
Tab General
In the upper part of the tab General, there is a mandatory field Name, where it is necessary to specify the name of the newly created operator group. In Description field it is also possible to provide additional information which will be presented on operator form, in section Operator Groups/Other Groups.
Group Composition section is divided into two windows:
Accounts Unassigned to Group ─ list of all operators defined in the system
Accounts Assigned to Group ─ list to which selected operators, making part of a defined group, are added
By selecting the buttons [Add To Group] and [Remove From Group], it is possible to decide which operators will be assigned to the newly created group.
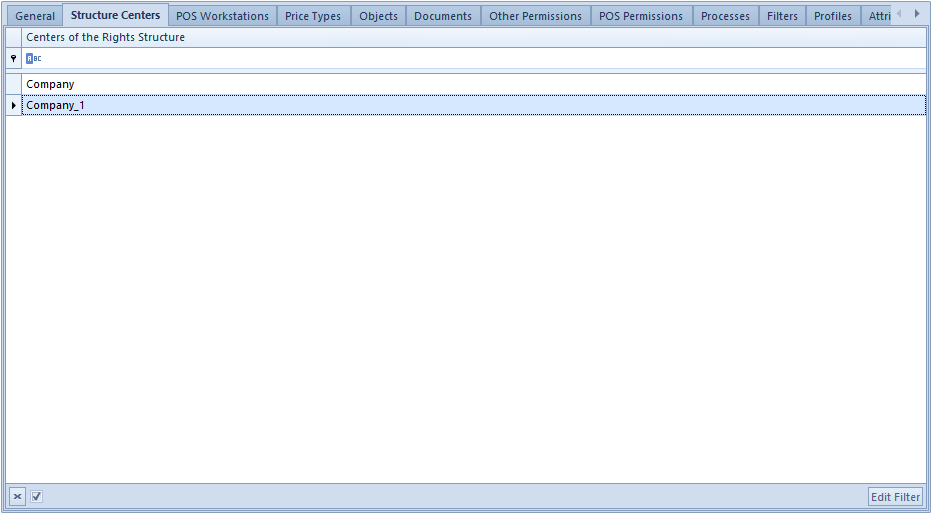
Tab Structure Centers
Here it is necessary to add centers of the company structure the newly added operator group will be attached to. Owing to that, operators from that group will be able to login to the attached center.
New group form ─ tab Structure Centers
Tab POS Workstations
To the newly created group can be added POS Workstations to which operators of that group will be able to log in. To do so, it is necessary to click on [Attach] button and select from the list of workstations the workstations to be attached to the group. To detach workstations from the group, it is necessary to highlight it and select [Detach] button.
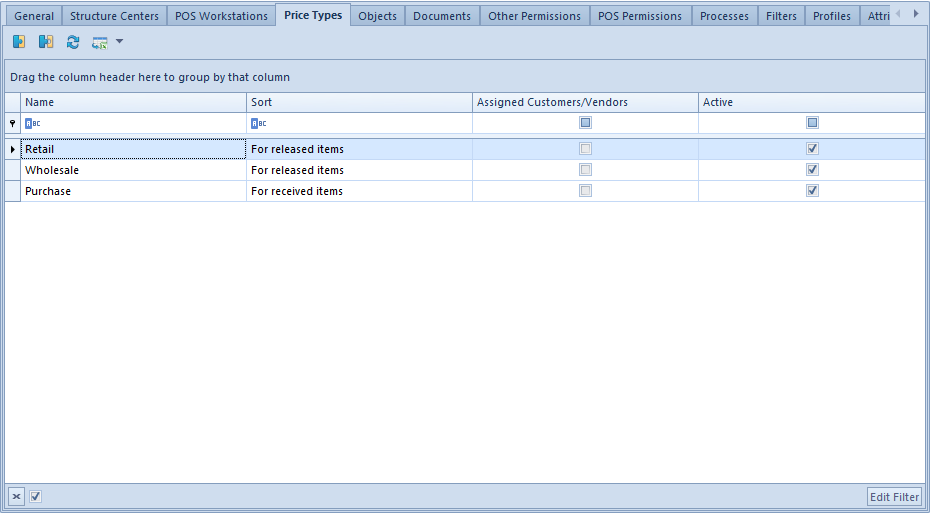
Tab Price Types
Thanks to the possibility of assigning a price type to an operator group, operators from that group can have access to price lists defined on the basis of the attached price type.
New group form ─ tab Price Types
The list of attached price types displays information about name and sort of price type, assigned customers/vendors and activity status of a given type.
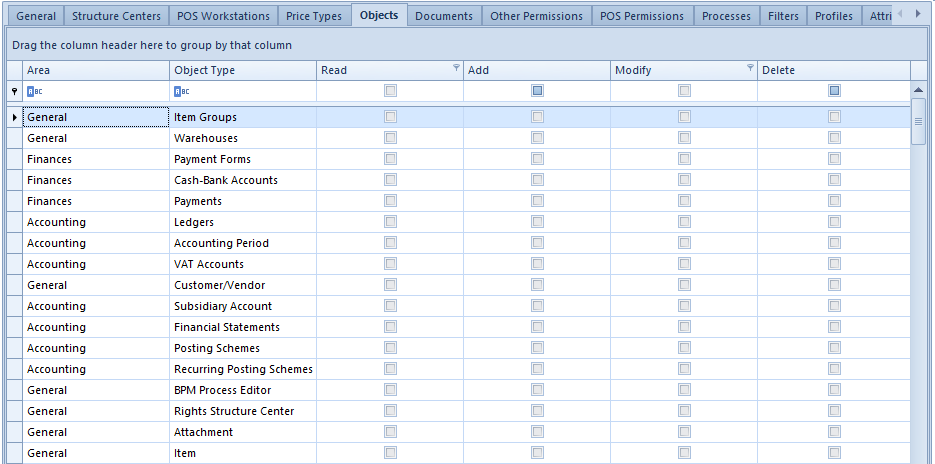
Tab Objects
Here the operator assigned to group B2_admin may manage permissions of an operator group to objects defined in the system.
New group form ─ tab Objects
The list of objects provides information referring to Area in which a given object is included as well as its Type (name). To each object the following rights can be granted:
Read – the right to accessing the basic list of objects of a given type and previewing its details
Add – the right to adding a given object type in the system
Modify – the right to editing (modifying) saved documents (objects) of given type
Delete – the right to removing objects of given type
In the menu there are buttons used for managing permissions. A user can select option All Permissions or select particular permissions to any object from the list.
Buttons of managing permissions
With the use of the key combination Ctrl + A, it is possible to highlight all rows of the list and select/deselect a given permission for all the objects at the same time.
It is also possible to select/deselect permissions directly from the list level by checking/unchecking parameter in a column with given permission.
Example
A user has all permissions to a given object granted, but cannot edit it. This can be connected with the fact that this object may be using other objects to which the logged in operator is not entitled to.
For instance, if the user does not have the right to read payments and is attempting to edit a registered sales invoice, he will not be able to preview that invoice (despite having all the rights to the object of sales invoice type).
Note
During database conversion to the recent version of Comarch ERP Standard, permissions to Report object, that is Cash-Bank Report, will be granted automatically to all operators in all groups.
Tab Documents
Detailed description of the tab can be found in article Document types.
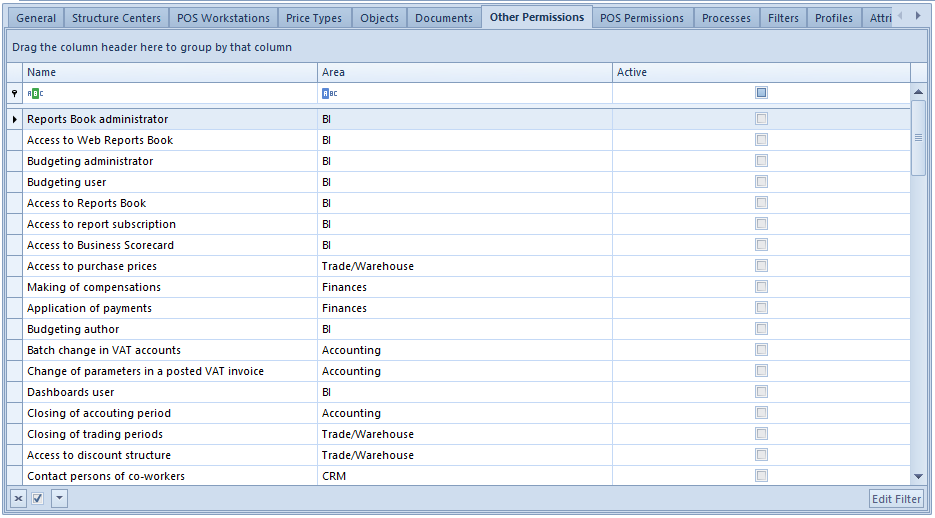
Tab Other Permissions
From the level of this tab, it is possible to assign permissions to operator groups, which concern performing of specific actions in particular areas of the system.
New group form ─ tab Other Permissions
Assigning of permissions is performed with the use of [Select]/[Deselect] buttons in the menu or directly on the list, in Active column.
List of permissions from General area:
Batch addition of items
Update of item codes/names – defines the right to updating codes/names of items in Batch Operations section
Creation of many sessions – possibility of logging in many times to the system
Batch operations on attachments
Management of object availability in the rights structure
Access to the system configuration – permissions to the system configuration available from the level of System → Configuration
Using of free document number ─ possibility of using free numbers from a pool of numbers available in the numerator on accounting and trade documents
Creation of SAF-T files
Creation of SAF-T files
Modification of interface – if this parameter is checked, for an operator there will be option Customize Layout available under the right mouse button
Configuration of object change history ─ provides permissions to configure the history of object change available from the level of History → Configuration
Access to the history of personal data modifications – permission to previewing detailed history of changes applied on a customer, contact person or employee form
Descriptions of the other permissions can be found in articles dedicated to corresponding functional areas of the system. [Trade/Warehouse, Finances, Accounting, CRM, BI]
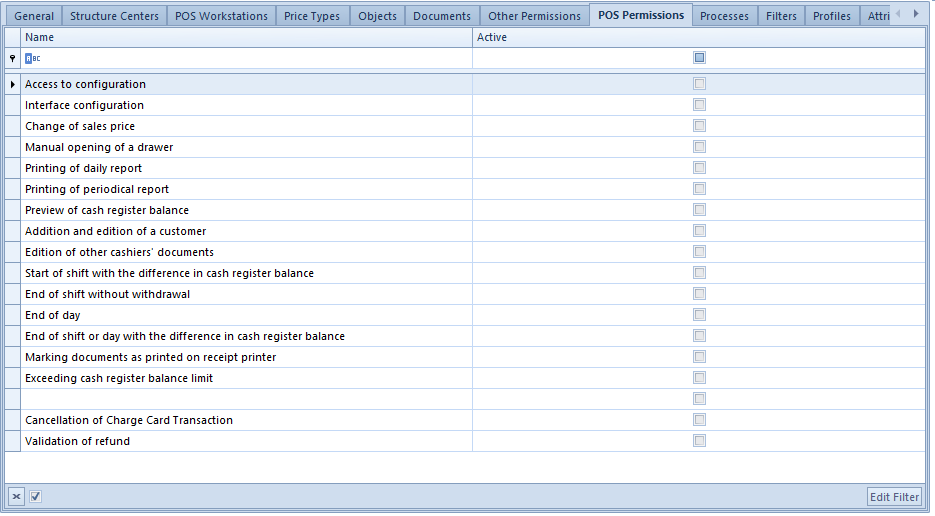
Tab POS Permissions
In this tab, permissions to POS workstations are granted for a given group of operators.
New group form ─ tab POS Permissions
Detailed description of permissions can be found in article Operator permissions.
Tab Processes
In this tab, it is possible to add and remove selected BPM processes by clicking on the buttons [Attach] and [Detach].
Tab Filters
This tab includes all filters created with the use of filter builder and attached to an operator group.
By means of clicking on [List] button, which redirects an operator to the list of filters, it is possible to define a new filter and attach an operator group to it. Owing to that, operators from that group can use the attached filters.
Tab Profiles
In this tab, by means of clicking on the buttons [Attach] and [Detach] it is possible to associate profiles created with the use of Profile Editor with operator groups. Owing to that, operators from a given group, upon logging in to the system, will have access to functionalities shared within the attached profile.
Tab Attributes
In this tab, it is possible to attach attributes to an operator group.
Configuration tools
General information
The functionality of configuration tools allows for automatic generation of the following data:
Codes and/or names for newly added items
Codes for newly added customers/vendors
Numbers for newly added vouchers
Codes for newly added coupons
Thanks to configuration tools, a user can maintain nomenclature cohesion and coding present in the system.
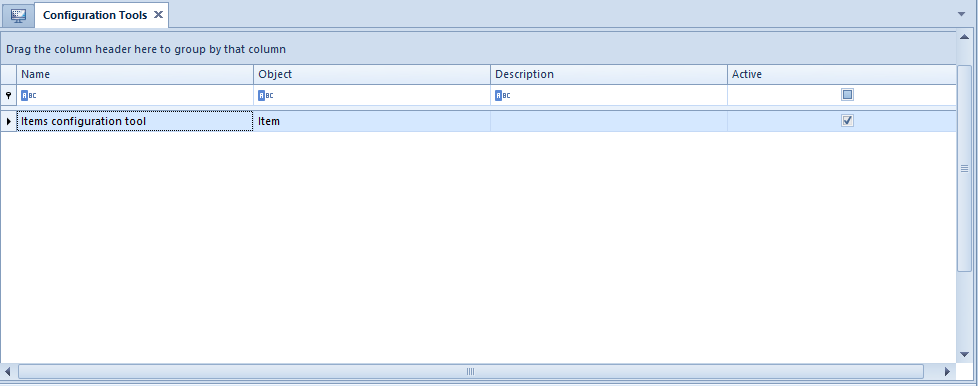
The list of configuration tools is available from the level of Configuration → General → Configuration Tools.
List of configuration tools
Defining a configuration tool
To add a new configuration tool, it is necessary to select [Add] button, which is available in the list of configuration tools.
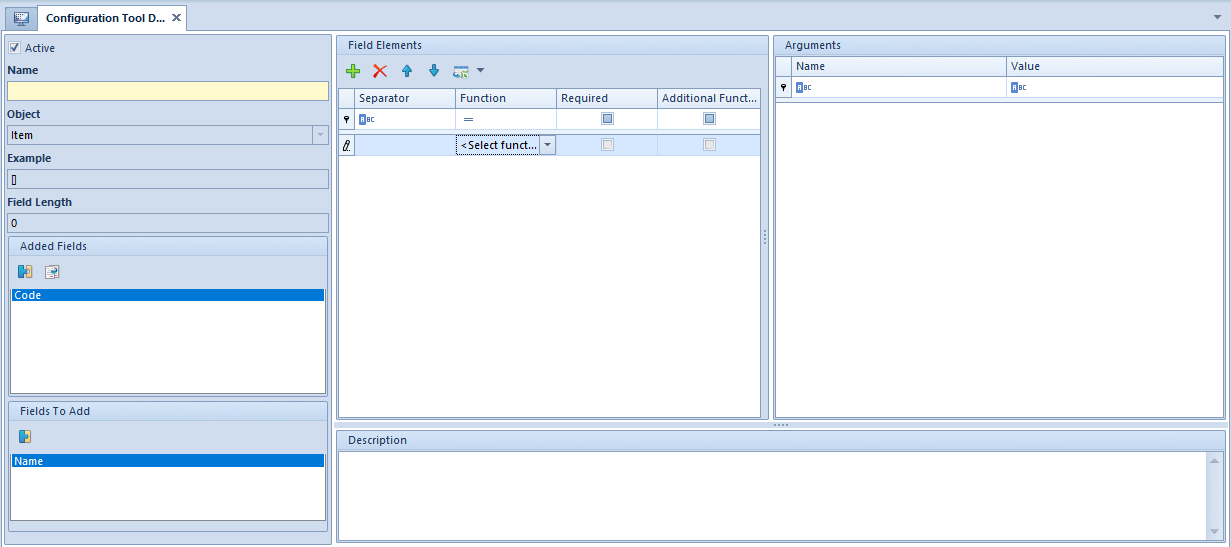
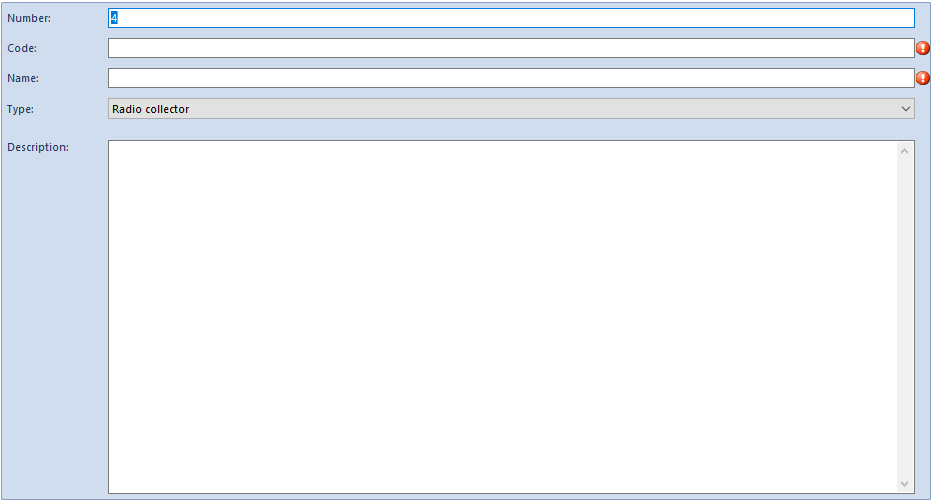
New configuration tool form
Configuration tool header
The header of a configuration tool form contains the following fields and sections:
Parameter Active – checked by default. Its deselection will make it impossible to use the configuration tool for generating object codes/names.
Name – mandatory field
Object – drop-down list of objects for which it will be possible to use the configuration tool:
Item
Customer/Vendor
Voucher
Discount Coupon
If the user selects the object Discount Coupon, the field will automatically be grayed out, regardless of the fact that the configuration tool has not been saved. In this case, a function Document SeriesCode is added. Only after this function is deleted can the user modify the field Object again.
Example – presents the structure of a configuration tool, composed of subsequent elements composted in section Field Elements
Field Length – presents total of characters presented for the argument Number of Characters in Arguments section, for each field element
Added Fields –fields to be defined with the use of the configuration tool, transferred from Fields To Add With the use of the [Detach] button, it is possible to move a given field back to the section Fields To Add.
Hint
The button [Copy], available in the Added Fields section, can be used during the creation of a configuration tool for Item object. It copies elements of an already added field and moves them to a field which is not added yet. This way, the user can move elements of the Code field to the Name field (such field will be added to the section Added Fields) and vice versa.
Fields To Add – fields which can be defined with the use of a configuration too. With the use of the [Attach] button, it is possible to move a given field back to the section Added Fields.
Section Field Elements
In Field Elements section, the user can define components of a field selected in the Added Fields section. Depending on configuration tool object, it is possible to use different functions to define field elements.
A subsequent element of configuration tool can be added/deleted with the use of the buttons [Add]/[Delete], whereas the order of elements in the configuration tool are set with the help of the [Up]/[Down] arrows.
Section Field Elements contains the following columns:
Separator – allows for entering a character which separates subsequent segments of defined code, name or number. In the case of empty character, the next element specified with given function is added to the previous one.
Function – allows for selecting from a drop-down list an expression which must be included in defined code, name or number. Codes, names and numbers of an object which are created with the use of a configuration tool, can be created by using various functions that refer to fields existing in the system. Depending on a configuration tool object and field type, the following functions are available:
Attachment
Attribute
Brand
Center
CN Code
Customer
Discount coupon
Document series code
Group
Manufacturer
Mask
Name
Price
SKU
Subsequent Number
Voucher Sort Series
Warehouse
Each function must be described with a set of arguments available in section Arguments. Depending on the selected function, there will be miscellaneous data displayed, which must be defined. Detailed description can be found in chapter <<Arguments>>
Required – column displayed for Item and Customer/Vendor Selecting this parameter means that it will not be possible to save customer/vendor or item form if no value is provided for this field element
Additional Function – column displayed for Item and Customer/Vendor If the parameter is selected, it means that a function will not be included in the code or name of a customer/vendor or item. For instance, the function Price is an additional function which purpose is to add an item to a price list during new item generation. Another example is the function Attachment which purpose is to add an attachment during new item generation
Section Arguments
The content of Arguments section depends on the function selected in section Field Elements. Below are the following arguments which can be defined:
Field – this argument is used for functions that refer to other objects than customer/vendor or item form. The argument indicates from which field of the associated object a value should be taken to create a code/name.
Example
The user wants a part of a code/name to depend on a manufacturer indicated on an item form. To do so, it is necessary to add the field element Manufacturer to the item form and defines Field argument, which allows to specify whether the name of a manufacturer should be retrieved from field Code, Name, Description or Attribute.
Attribute Name – this argument enables to indicate which attribute would be considered in the configuration tool
Level – this argument is connected with the function Group. It enables to mark an item group from which values will be included in the configuration tool
Number of Characters – this argument enables to indicate the length of a given customer/vendor/item code segment
From Character – this character enables to indicate from which character a value should be taken to a code segment. Values are very often entered in given fields in accordance with a certain pattern, in which part of the value is common for many objects and only its further part differentiates a given object
Completion of Missing Characters – parts of a code can be supplemented with additional characters in order to maintain a uniform code structure. The argument can be used when a value on the field indicated in the configuration tool has smaller number of characters than an argument value Number of Characters and a code length should be maintained
Completion Sign – this argument enables to indicate with which value a code part should be entered in the case when completion of missing characters was set for this function
Price List – argument used for Price Allows for indicating a price list from which the price making part of the code should be retrieved/
Currency – argument used for Price Allows for indicating a currency whose sign will make part of the code
Price Type – argument used for Price Allows for indicating the type of price (subtotal or total) whose sign will make part of the code
Available at Batch Addition – this argument indicates whether given function must be available in the matrix for batch addition
Values Attached at Batch Addition – this argument is dedicated for these functions which refer to objects that have a list of values and which are available at batch addition. This argument will decide if only default value or the full list of values will be displayed after activating the option of batch addition in the filter of a given function. An example of the function for which this argument can be applied is Brand
Default Value – this argument allows for specifying default value for selected function. It is mandatory for the function with checked parameter Available at Batch Addition
Number of Characters – this argument enables to define the number of digits that the Subsequent number function should contain
Start Number – allows for indicating the value with which numbering of records should start. This argument is important This argument is very important when combined with the argument Numbering Unique Codes.
Numbering Unique Records – allows for determining whether in case of using Subsequent Number function only duplicated values should be numbered or unique values too
Example
The user does not want to number unique records, but wants the first duplicated record to be marked with number 2, so checks the parameter Numbering Unique Records and defines Start Number as 2. With a configuration tool defined this way, the records can look in the following ways:
BD-12345678-1134-370 – first record
BD-12345678-1134-370-002 – duplicated record
Code Format – this argument enables defining of a regular expression. The function id constructed according to RegEx syntax, similarly as <<code format in definition of item group or customer/vendor group>>. In case of random characters, the following sets can be used:
[A-Z]
[a-z]
[0-9]
Example
Code format in the following form: [a-e]{3}[0-1] will generate string of characters composed of 4 elements. The first three of them will be selected from set {a, b, c, d, e}, while the last one will be selected from set {0, 1}.
Note
The following expressions are not supported:
Expressions containing special characters
\d
\w
\s
*
+
{n,}
Language – argument used for functions whose values can be saved in different languages
Assigning attachments to an object
Attachments are assigned to objects when adding or modifying a given object, for example, a new item. In the tab Attachments, it is necessary to click on the button [Add], which opens the list of available attachments. Here, the user can select files which will be assigned to an object or load them from a file saved on a computer or scan them.
When assigning more attachments t to an object, it is possible to specify which of the added attachments is default by selecting a checkbox in the column Default.
Note
For an image thumbnail to appear on the list of items or in a document item in column Attachment, an attachment must be assigned to an object and marked as default.
Table for assigning attachment to an object
Moreover, attachment can also be shared and marked as default for particular modules/applications cooperating with Comarch ERP Standard system. WMS Management and WMS Warehouseman are visible only after the installation of WMS. Availability of attachment is set by selecting a checkbox in particular columns (double clicking in the checkbox), whereas default attachment is set by clicking in the checkbox three times – the checkbox will then be selected and bordered.
Attachments – General information
In the system, it is possible to define attachment, that is to add different files, e.g., images or text files, to particular objects. This way, the user can attach a product image to item form, personal documents to employee form, scanned documents to invoice etc.
Types of attachments which can be added to objects:
archives (.zip, .rar)
log (.log)
spreadsheet (.xls, .xlsx)
text document (.doc, .docx)
image (.bmp, .png, .jpg, .dib, .gif)
other (without a specified extension)
Objects to which an attachment can be added are the following
customer/vendor group
customer/vendor form
item group
item form
employee form
institution form
bank form
warehouse form
selected documents
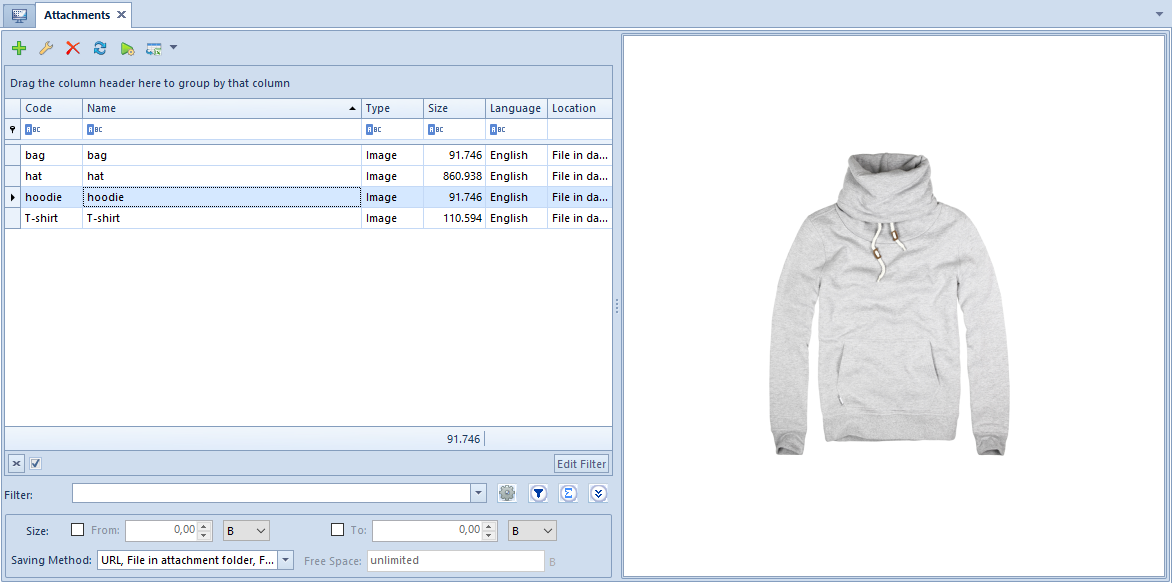
List of all attachments is available from the level of Configuration → General → Attachments.
List of attachments with preview of attached image
List of attachments is composed of the following columns:
Code
Name
Type
Size – dimensions expressed in bytes
Language – language in which an attachment was defined
Location – file path
Owner – company in the system for which the attachment will be available (column hidden by default)
Below the list of attachments, there is the filter panel used for displaying only desired attachments. Attachments can be filtered by size, saving method and the amount of free space. The size of attachments saved in the database can be reduced by checking the parameter Limit the size for attachments in a database to, available from the level of System -> Configuration -> Computer. Field Free Space is provided for information purposes and indicates the amount of free space used for storing saved attachment.
In the panel on the right side of the attachment list, attachment preview is displayed. The system is equipped with built-in editors for attachments in PDF, Word and Excel formats. Owing to that, it is possible to display a file directly in the attachment preview window in the system, without the need to install external programs for previewing, e.g., a user can display Word and Excel files without having Microsoft Office package installed and PDF files without PDF Viewer program.
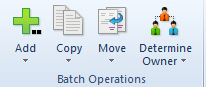
In the menu, there are standard buttons for adding/editing/deleting given object from the list as well as refreshing the list. Moreover, there are also buttons allowing for performing operations on attachments in a single batch. To be able to perform batch operations on attachments, a user must be assigned to an operator group with the permission Batch operations on attachments, which is available from the level of operator group (menu Configuration → Company Structure→ Operator Group), in tab Other Permissions.
Group of buttons for handling batch operations
[Add] – allows for adding one or more attachments
to a database
to an attachment folder
as URL
[Copy] – allows for copying one or more attachment
to a database
to an attachment folder
[Move] – allows for moving one or more attachments
to a database
to an attachment folder
[Determine Owner] – a user logged-in to the main company can select one of the following options:
All – selected attachment will be available in all the companies defined in the system
Selected – an attachment will be available in a particular company indicated by the user and in its child centers
From the level of the other center, only the option All is available.
Determining of the owner affects the visibility of attachments on the list. On the list of attachments in the parent company, all attachments will be displayed. On the list of attachments in other centers, on the other hand, only those attachments will be displayed, whose owner is the company to which a user is logged in as well as those whose owner is set to All.
Note
During conversion of database from Comarch ERP Standard system versions previous to version 2015.0, by leaving the parent node unchanged, the owner of all attachments will be parent company. By converting the parent node to center of Company type, on the other hand, the owner of all attachments will be the newly created center of Company type, attached to the parent company.
Assinging attribute value to an object
After an attribute is <<assigned to an object>>, it is possible to specify a value of that attribute for object instance. It means that if attribute, for example, Color is attached to object Item, then it is possible to specify a different value (color) of that attribute for each item.
To do so, on the object instance form, for example, item form, go to tab Attributes and click on the button [Add] in the Attributes button group. A list of attributes assigned to that object will open. Select attributes which must be assigned to that object instance and specify their values.
Depending on the type of the attached attribute, its values can be specified by:
selecting them from a drop-down list (List, Directory)
selecting a parameter (Logic Value)
selecting from a built-in calendar (Date)
selecting a number with the help of arrows (Number)
Note
If an item was assigned with an attribute that has the parameter Edition in the section e-Shop selected, once the attribute definition is saved, the following message will be displayed: “Attributes set as editable in e-Shop have been defined for these items. Would you like to assign the definition of those attributes to the Sales Order Item?”. Selecting the option [Yes] will automatically assign a given attribute to the Sales Order Item (SO) object.
Multi-company attributes
In the case of multi-company attributes, presentation of attribute value, that is assigned to an object, depends on the level of company structure from the level of which the object is being edited.
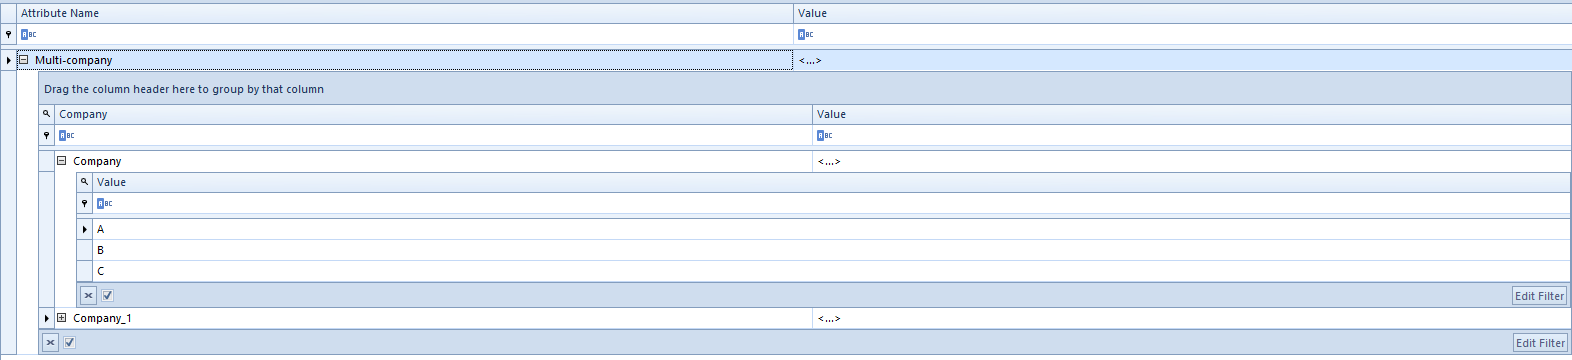
In the parent company, on an object, by a multi-company attribute, there is an active option of expanding the nested list. Value presented in the column Value is assigned to parent company. Values defined for child companies are listed upon clicking on the button [+] located next to attribute name.
Multi-company attribute on an object from the level of the main company
In the case of multi-company and polyvalent attributes, a drop-down list of attribute values includes all the values defined for each company.
Multi-company polyvalent attribute on an object from the level of the main company
When detaching an attribute from an object which has values specified in other companies, an appropriate message will be displayed. If deletion is attribute is confirmed, it will be removed from object in the parent company and in all the child companies.
From the level of other centers of company structure, it is not possible to expand the list of attribute values of other companies. Presented attribute value is assigned to a company to which a user is logged in. In the case of multi-company and polyvalent attributes, those attribute values will be displayed, which are defined for a center to which a user is logged in.
If an attribute has a value which is attached also to another center of Company type, then such attribute cannot be deleted from object.
Multi-company attribute on an object from the level of a center
Periodic attributes
In the case of periodic attributes that are assigned to an object, it is possible to add values and to specify their validity periods. These values can be defined on the form opened upon clicking on the suspension points button […] in the column Value.
Value of a periodic attribute on an object
[hint] For periodic attributes it is not required to maintain continuity between defined periods. [/hint]
Assigning attribute to an object
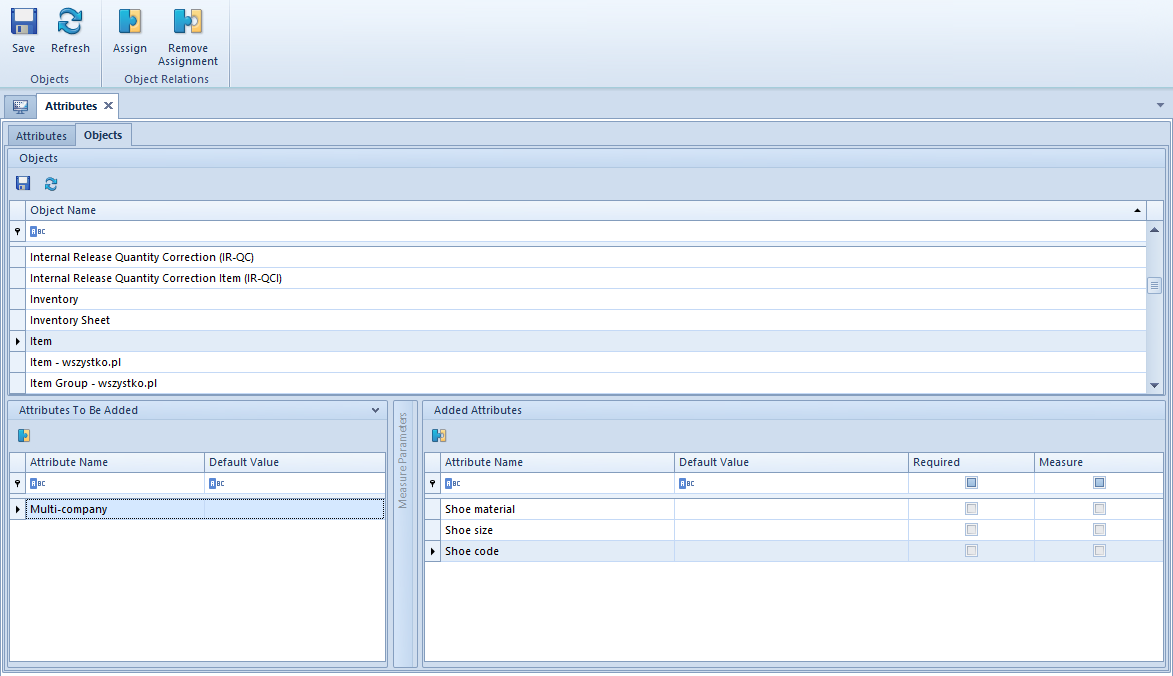
To assign a given attribute to an object, it is necessary to mark it from the level of Configuration → (General) → Attributes, in the tab Objects, in the section Attributes To Be Added and select [Associate] button from the list Object Relations in the main menu. Such attribute will be moved to the section Added attributes which means that it is assigned to the object.
To remove an association between an attribute an and an object, it is necessary to select an appropriate attribute in Added attributes section and click on [Assign] button. The attribute will be moved back to the section Added Attributes.
In the menu, there are standard buttons for adding/deleting/saving a given object from the list as well as buttons for refreshing and closing the list.
Note
Changes in the tab Objects are saved separately for each object from the list. It means that if a user makes changes for one object and does not save them then, when passing to another object from the list, the system will ask whether the user wants to save the changes.
Window for assigning attributes to objects
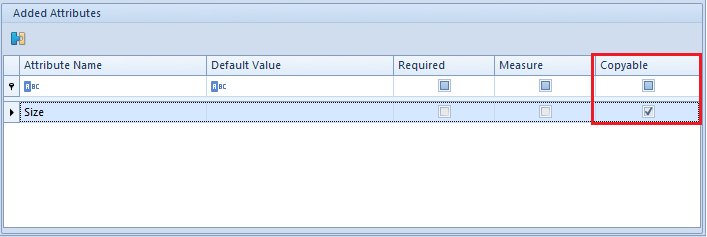
For the object Item, an additional parameter Copyable is available in the section Added Attributes. If the parameter is checked for a given attribute assigned to the object Item, when copying an item, the attribute derived from the source item along with its value (values) is copied.
Parameter Copyable in section Added Attributes
Defining an attribute
Defining an attribute
A new attribute can be added by clicking on [Add] button on the list of attributes.
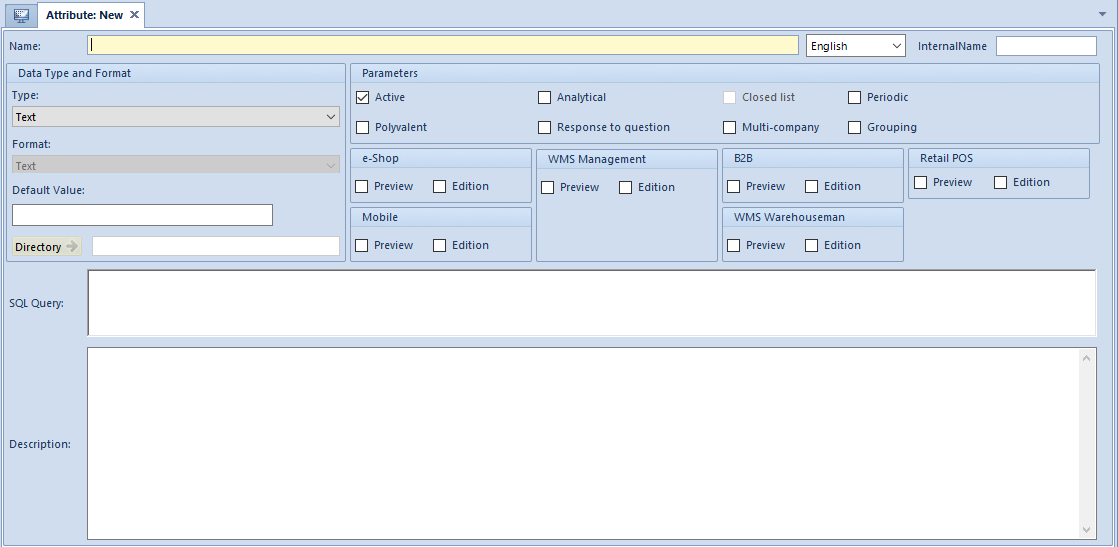
New attribute form
Name is a mandatory field whose value must be unique and can be composed of up to 50 characters (letters and digits). A user can also define translations of names into languages available in the system. Name field is a context field – the entered name is given in language selected from the drop-down list located on the right side of the field. The field InternalName may be used to identify an attribute class and it also must be unique for each attribute. By default, the value of this field is retrieved from the field Name, not including special characters.
Other data regarding attribute must be defined in section Data Type and Format.
Type – type of attribute value:
Text – any sequence of characters
Number – positive or negative number
Directory – an existing generic directory is assigned to the attribute a one of its values will constitute the value of the attribute
Hint
In the system, it is possible to materialize a directory assigned to an attribute of Directory type. If a directory is not materialized, attribute values are then updated each time changes are made to the directory values. If this being the case, it is not possible to add other values to the same attribute. However, after a directory is materialized, its values will be assigned to an attribute, but all changes made to directory values will have no effect on the attribute values. Similarly, values added to an attribute will also have no effect on directory values.
In order to materialize a directory assigned to an attribute of Directory type, on the edited attribute form, click the button [Materialize] from the Directories button group.
Logic Value – selection button
List – selected item from the list of values defined by the user. New values cannot be added to the list if the parameter Closed list has been checked
Date –in format: yyyy-mm-dd
Customer/Vendor – if selected, attribute value will be a customer/vendor selected from the list of customers/vendors defined in the system
Employee – if selected, attribute value will be an employee selected from the list of employees defined in the system
Binary Data – if selected, attribute value will be a graphic file from the object form, to which the user assigned an attribute of that type
Item – if selected, attribute value will be an item selected from the list of items defined in the system
Purchase Invoice – value of attribute will be purchase invoice selected from the list of purchase invoices defined in the system
Purchase Quote – value of attribute will be purchase quote selected from the list of purchase invokes defined in the system
Fixed Asset – value of attribute will be fixed asset selected from the list of fixed assets defined in the system
Hint
The possibility of defining attribute values is available for attributes of List or Directory type only (after materializing a directory).
Format – field active only if one of the following values is selected in Type field:
Number – available formats: integer, decimal number with two decimal places, decimal number with four decimal places
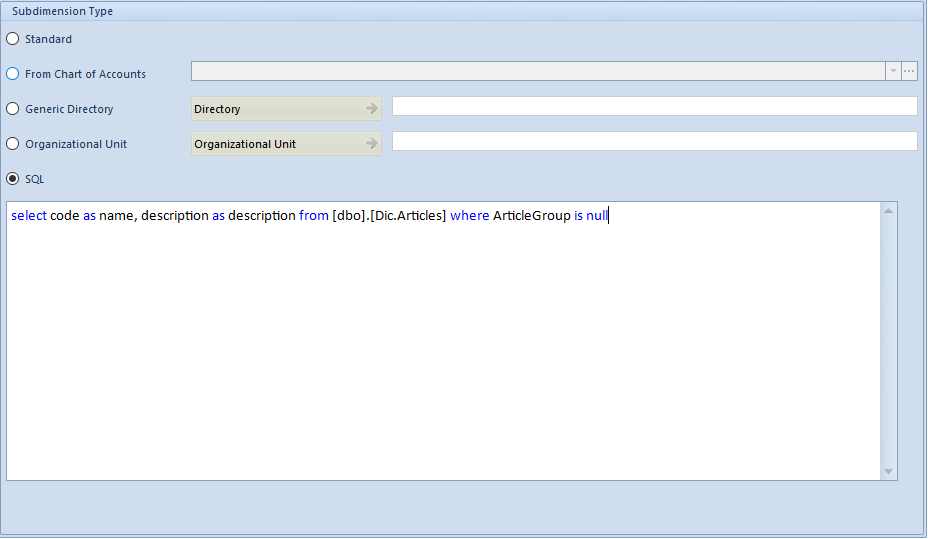
List – available formats: text, integer, decimal number with two decimal places, decimal number with four decimal places, SQL query (values of the list will result from an executed SQL query). Upon selecting the last format, the field SQL Query becomes active and then an appropriate query text can be entered.
In order to materialize data for SQL Query, it is necessary to select [Execute Query] button from the main menu and then [Materialize] button from Directories For not materialized attribute of List type with SQL Query format it is not possible to check parameter Multi-company
Note
Attribute type and format can be changes only until the first value is assigned to it or until it is attached to an object. .
Default Value –value which is by default assigned to an attribute after it is assigned to an object. The field will be greyed-out if parameter Multi-company is selected. For Purchase Invoice and Sales Quote types, an additional button [Select] appears, which opens the list of documents of one of those types defined in the system.
Directory – allows for assigning a value from selected generic directory to an attribute. =
On the attribute form, it is also necessary to determine attribute parameters:
Active – parameter checked by default. If unchecked, selected attribute cannot be used by the objects in the system
Analytical – if checked, a given attribute will be transferred to BI data warehouse and then used in the controlling analyses. The parameter is not available for the type Binary Data
Closed list – if checked, it means that it is no longer possible to add new values to an attribute
Periodic – if checked, it is possible to define attribute values which will be valid within specified periods
Note
After an attribute is defined as periodic, an additional parameter Separate periods is displayed. That parameter is by default selected, but its setting can be changed any time. If selected, then when specifying validity periods of particular attribute values, the system verifies whether the periods being added do not coincide.
Polyvalent – parameter available for attributes of Text, Dictionary or List type, if checked, it becomes possible to add more than one value to an attribute
Response to question – if checked, an attribute can be assigned to an object Questionnaire. The parameter is available for the following types: Text, Number, Logic Value, List or Date
Multi-company – if checked, different attribute values can be assigned for centers of Company type
Grouping – if checked, it is possible to specify attributes which will be displayed in eShop for grouped items – base products. The parameter is not available for the following types: Number, Date and Binary Data.
With the use of selection buttons available under the Parameters section, it is possible to decide whether other modules and applications cooperating with Comarch ERP Standard should have possibility of modifying attributes or displaying them only.
In field Description, additional notes regarding defined attribute can be provided.
Defining attribute value
To add a new attribute value, first mark an attribute on the list of attributes and then click on the button [Add] available in section Attribute Values on the right in the Value button group.
Attribute value form
An attribute value must be typed in a selected language in the column Transaction Values. Here it is possible to add subsequent translations of the attribute value in various languages.
List of attributes
Attributes represent additional information which can be defined and assigned to objects available in the system (e.g., items, customers/vendors/invoices etc.). Each attribute has specific type. Depending on selected attribute type, a user can define its format, predefined value and/or directory value..
The list of attributes is available from the level of the menu Configuration → General → Attributes
List of attributes
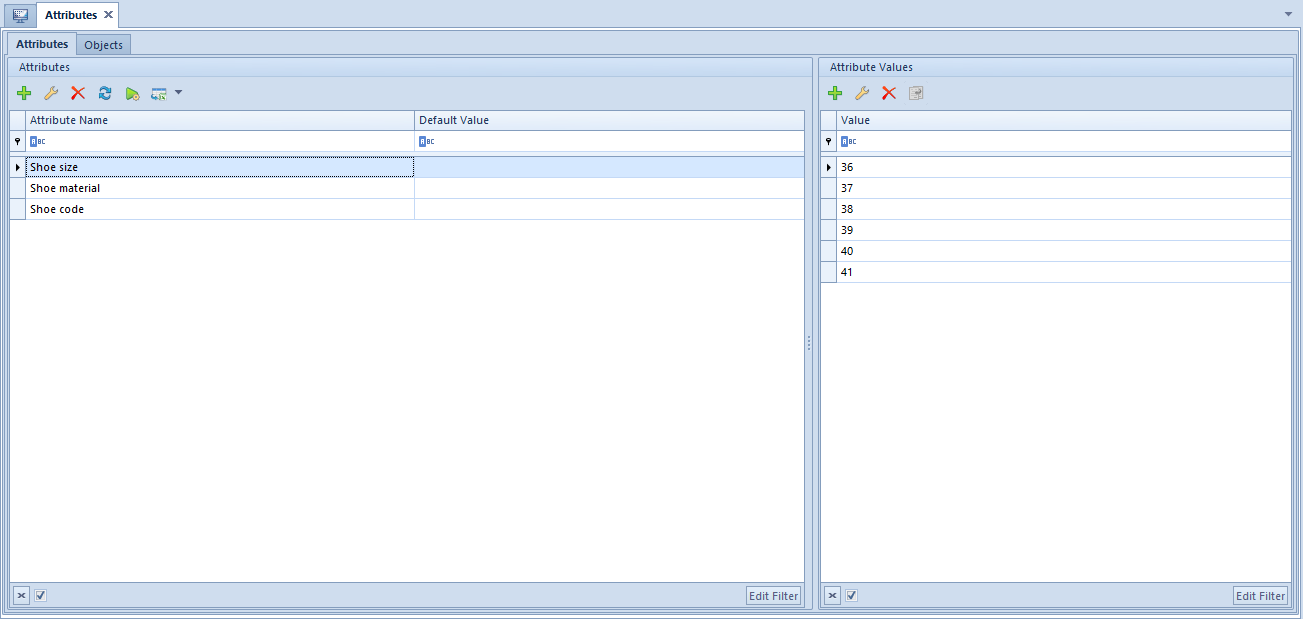
The list of attributes is divided into two tabs: Attributes and Objects llists
Tab Attributes
The tab Atrributes is divided into two sections:
List of attributes ─ contains all attributes defined in the system along with their basic data: name and predefined value
List of attribute values ─ contains values defined for attributes of List or Directory type
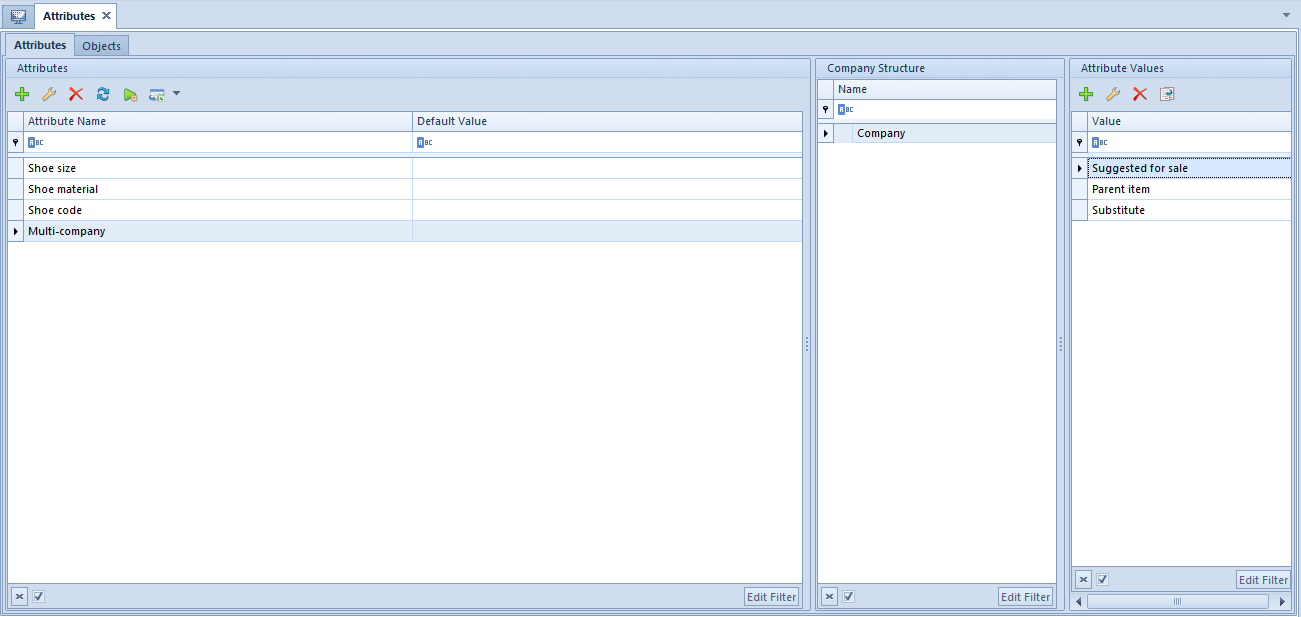
If the list of attributes contains multi-company attributes, an additional section, Comapny Structure, is displayed, which allows for previewing all attribute values assigned within a given company.
Multi-company attribute on the list of attributes
The section Company Structure presents all company structure units defined in the system.
After marking with the cursor a given company, all values assigned to attributes within that company appear along with predefined value, provided that it was defined.
If there are several companies marked in the window, all values of attributes common for the selected companies are displayed on the list of attribute values. A default value is however displayed only if it is the same for all the highlighted companies. In case of entering/removing an attribute value, it will be added/deleted for all of the marked companies.
Values of a not materialized multi-company attribute of Directory type can only be added and removed with the use of the buttons [Attach] and [Detach]. Dateiled information regarding materialization of an attribute can be found here.
Values of a multi-company attribute of List or Directory type can be copied between companies. To copy an attribute value, highlight given attribute value on the list of attribute values (from the level of indicated company) and then click on the button [Copy].
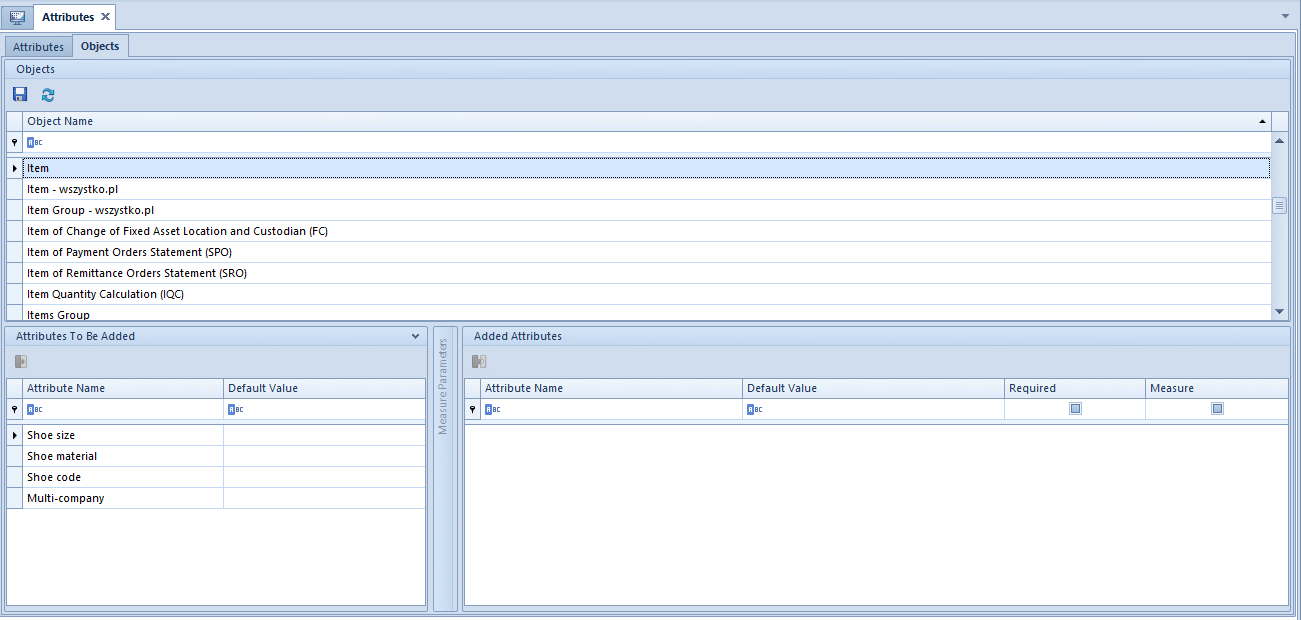
Objects tab
The tab contains all system objects to which it is possible to assign attributes.
The list of objects is divided into three sections:
List of objects with names of particular objects
Attributes To Be Added with attributes which can be added to an object
Added Attributes with attributes assigned to a given object
The list of attributes associated with a given object is composed of the following columns:
Attribute Name ─ value retrieved from the attribute definition
Measure ─ parameter available for analytical attributes, allows for parametrizing a measure to ensure that attributes are properly uploaded to BI (Business Intelligence) module
Required ─ if the parameter is checked, field in the column Default Value will be mandatory
Default Value ─ value retrieved from the attribute definition with a possibility of changing
Note
Depending on a selected object, the columns on the attribute list may differ. For instance, if parameter Cooperate with Comarch ERP Standard HR (available only in Polish version of database) is checked from the level of System → Configuration → Computer, then an additional column Synchronized with Comarch ERP Altum HR appears for Employee object. Checking the parameter allows for synchronization of a given attribute values from Comarch ERP Altum HR system.
Numerators
General information
Each one of document types can have its own numeration scheme (i.e., numerator) defined, according to which a number is assigned automatically to a document at the moment of its issuance. A numerator can be freely modified by the user. Handling of numerators can be performed from the level of Configuration → Documents → Numerators.
Note
Numerator can be modified until the first document of a given type with that numeration scheme is issued.
List of numerators
On the left side of the window, the list of numerators is displayed, whereas on the right side, edition form of selected numerator is presented. Next to the list of numerators, there is Active column. The column is provided for information purposes only. An operator with permission Change of numerator granted can change numerator. After applying changes to an existing numerator and clicking on [Save Current] button, the edited numerator is deactivated by the system and replaced by a new numerator with the same name.
Configuration of Change of numerator permission
Before carrying out the operation the operator must confirm selection in the window with message regarding changing of numerator.
Menu of the list of numerators
The menu of the list of the list of numerators contains <<standard buttons>> allowing for adding, deleting and saving numerators along with their elements.
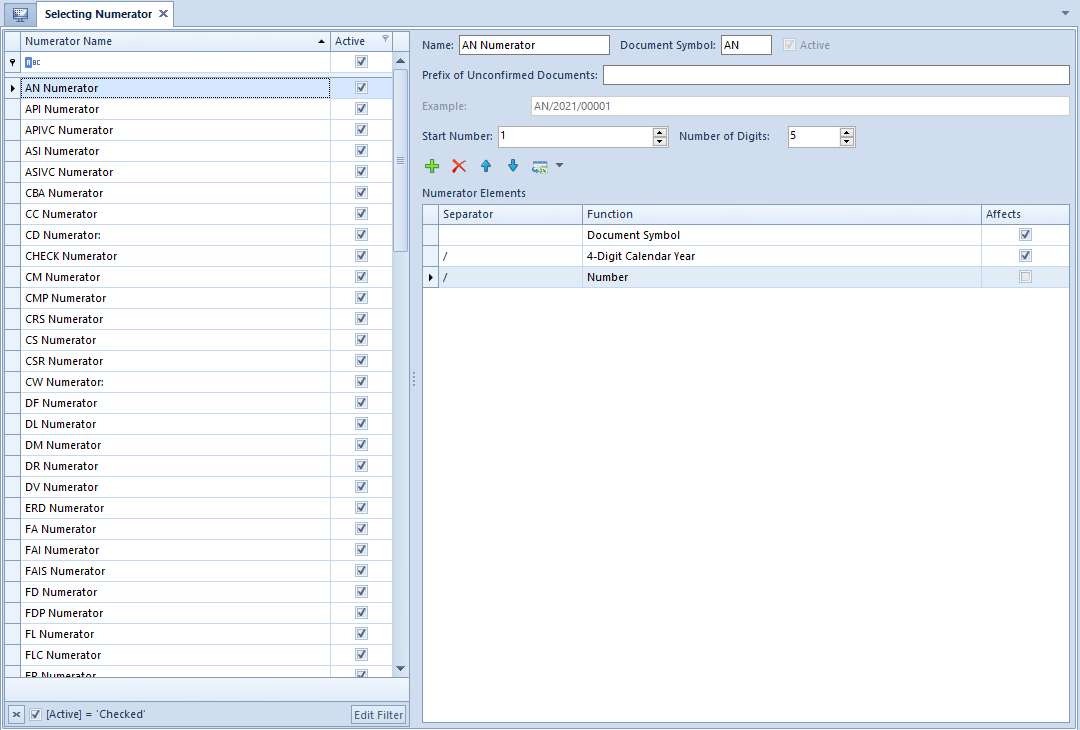
Numerator form
Numerator form is composed of the following elements:
Name ─ numerator’s name
Document Symbol ─ document’s code which will be presented in the numerator, value retrieved automatically from a <<document type>> definition, but it can be modified by the user. A document symbol can be composed of letters or digits only.
Unconfirmed Documents Prefix ─ prefix differentiating unconfirmed documents. It serves to assign the next available number to unconfirmed documents during their generation (when confirmed, the prefix is not included in a given number).
Example ─ example of a numerator including values defined by the user
Start Number ─ Numeric value with which document numbering in a numerator will begin
Number of Digits ─ number of digits of which document number in a numerator will be composed, e.g., if the number of digits in the number is 4 and document number is 1, the number will be 0001
Numerator Elements list contains a list of elements which form document numerator. The list is composed of the following columns:
Separator ─ symbol separating particular elements of a numerator, symbol / is defined by default in the system
Function ─ function performed by a given element in a numerator, drop-down list containing the following values possible to select:
Document Symbol ─ value from the field Document Symbol, mandatory element, must be unique within the system
Month – numeric value defining the month in which a document a document was issued. After selecting this function, parameter Two-digit month appears on the edition form. If it’s checked, month is displayed in a two-digit form, e.g., May – 05.
4 or 2- Digit Calendar Year – four- or two-digit calendar year retrieved from the system date of a computer
Financial Year ─ sign of <<accounting year>>. An accounting year can differ from calendar year.
Number ─ changeable part of document numeration. For each issued document of a given type, the system will increase section with number at rate of 1. Number can consist of unlimited number of digits and it will be displayed with leading zeros, e.g., number of digits in number equals 4, number of document will be: 0001 Number start digit and its length are set with parameters Start Number and Number of Digits
Document Series ─ series associated with a document type. Detailed information regarding document series can be found in article <<Series>>.
Warehouse ─ code of warehouse in which documents are issued
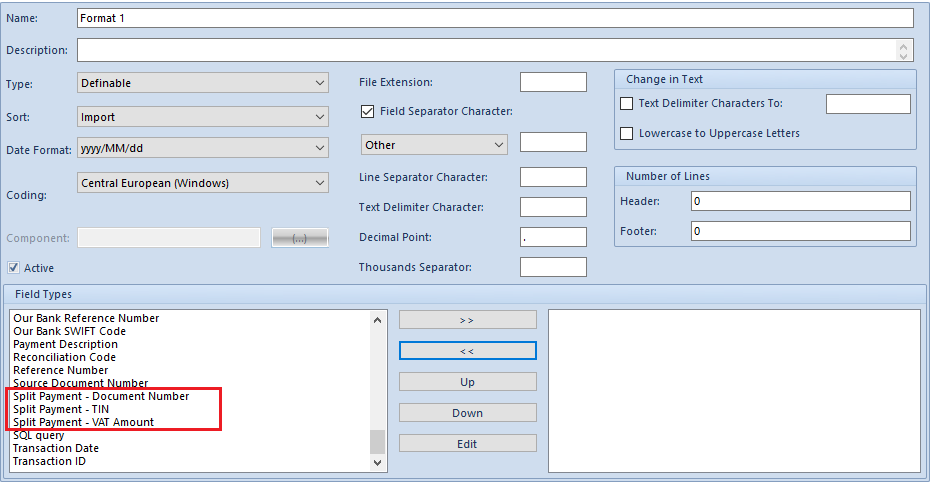
Account – name of <<VAT account>>
Unconfirmed Documents Prefix ─ value retrieved from the field Unconfirmed Documents Prefix. Using of the element is recommended for numerators of reports and cash/bank transactions. If a database is generated in the Polish language this parameter is not mandatory, whereas in the French language version this parameter is mandatory and is set as “B”.
Affects ─ if the parameter is checked, a given element affects document numeration. It means that ever time that element of the numerator is changed, the document numeration will start from the beginning, that is from number 1.
Numbering chronology control
Section Control the numbering chronology during document confirmation is available only for databases created in French language. This functionality can be used in documents covered by the mechanism of prefix numeration: JE, OB, IR+, IR-, PI, SI, SIVC, PIVC, PIQC, SIQC, SO, PO, WM+, WM-, VSI, VPI, VSIC, VPIC, AN, ERD, R, RVC, RQC, SOR, SORVC, SORQC, POR, PORVC, PORQC, OBC, RE, CHECK, VPIUA, VSIUA, VPICUA, VSICUA, PQ, SQ, SRS, CRS, ASI, API, ASIQC, ASIVC, APIQC, APIVC. It contains the following parameters:
Don’t control
Warn – the following message will be displayed while confirming a document with the following warning: “In the system, there are already documents with later date of issue (respectively a date of receipt or a posting date). The numbering chronology will be disturbed. Would you like to save the document? [Yes]/[No]”
Write lock – when a document with the write lock is to be confirmed (even if there is another document in the system with the earlier date than the last confirmed document of a given type, which has already been cancelled), the following message will be displayed: “Cannot save the document. In the system, there are already documents with later date of issue. Change the document date of issue [date] and save the document.” This parameter can only be changed when all documents of the same numeration scheme have been confirmed.
Defining new numerator
To add a new numerator, click on [Add] in the main menu, in the Numerators button group. A form of newly created numerator will be open, where it is necessary to complete Name and Document Symbol fields. The user can freely fill in the other fields and add selected numerator’s elements. During definition of numeration scheme, the following rules must be observed:
A numerator does not have to be composed of all available elements. It must contain at least two of them, that is: Document Symbol and
Each numerator must have unique name
Elements of a numerator must be unique
Values of numerator’s elements cannot be empty
Each element must be separated with separator
Order of elements is unrestricted
Numerator can contain maximum 9 sections
Numerator cannot contain both of the following elements at the same time: 4 – Digit Calendar Year and 4– Digit Calendar Year
Calendar Year and Financial Year cannot be present in one document number at the same time
Account is not obligatory but it should appear in numeration of documents from Cash/Bank module, because it allows to obtain separate numeration of reports and entries within particular accounts
Note
Numerator can be deleted until it is used in the system for the first time.
Assigning numerators to document types
For a defined numerator to be available for a given document type, it is necessary to add it to the list of numerators available in the tab Numbering Schemes on the <<edition form of a document type>> (Configuration → Documents → Types → document type edition form).
In case there are many numerators assigned to one document type, when issuing a document, the system uses the numerator for which Default parameter is checked on the list of numerators.
Numeration of confirmed documents will be continuous in the following order:
date of issue of a document
date of receipt/issue ─ for PI, PIQC, PIVC, PIAC, API, APIC, POR, PORQC, PORVC, PORAC documents if value in Numbering by Date column is appropriately specified in tab Numeration Schemes of a given document type definition
date of registration/issue ─ for accounting documents
Using of free document number
When a saved document is deleted, its number is released and it can be reassigned to an issued document.
To enable the functionality, it is necessary to activate permission Using of free document number in tab Other Permissions for a given operator group (Configuration → Company Structure → Operator Groups → operator group edition form).
If date of issue on the deleted document is the same as system date, the released number is assigned to a subsequent newly created document whose date of issue is the same as on the deleted document. If the date of issue on the deleted document is different from system date, a gap occurs in the document numeration and the system automatically assigns a subsequent number.
Series
General information
Numeration series can make part of a document <<numerator>> and allows for maintaining the appropriate numeration of documents. This is particularly essential when there are more points of sale attached in the <<rights structure>>. In such case, each workstation should have its own series to be able to check where a given document was issued. In order to open the list of series, from the menu Configuration and the Documents list of buttons, select the button [Series].
Menu of the list of series
The menu of the list of series contains <<standard buttons>> allowing for adding/deleting/saving and refreshing items on the list.
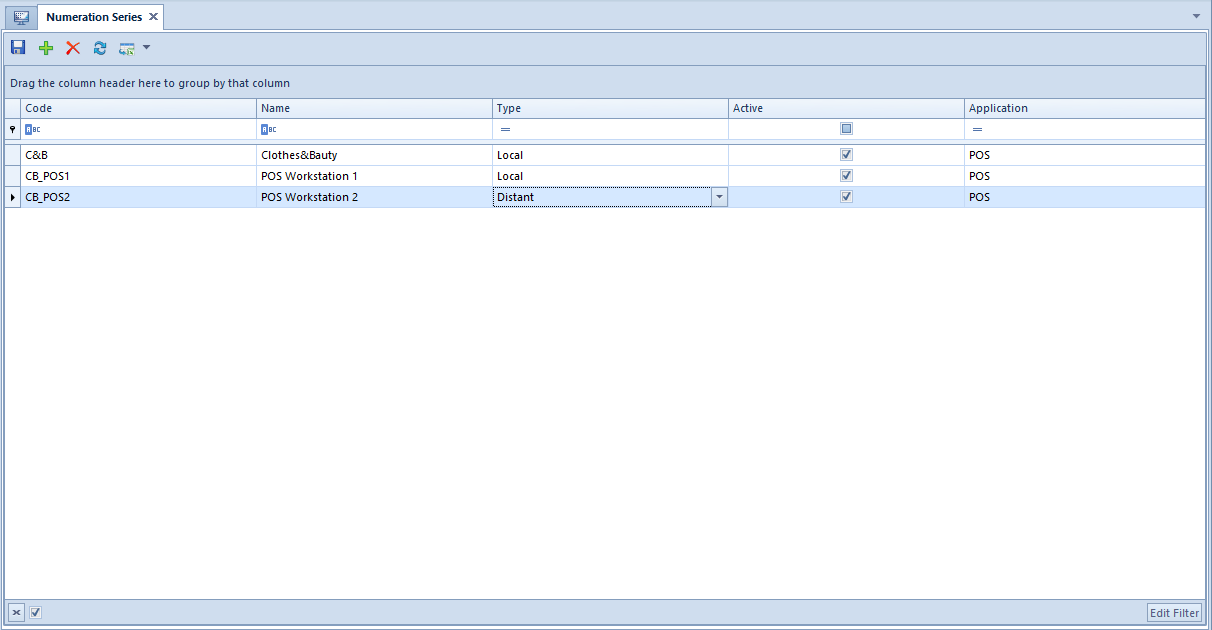
List of numeration series
The list is composed of the following columns:
Code ─ numeration series code, visible in the numerator containing the series
Name ─ numeration series name
Type ─ drop-down list allowing for selecting the type of numeration series, available values: Local and Distant
Active ─ if the parameter is checked, it is possible to use a series on a document
Application ─ drop-down list allowing for determining whether a given series is to be used in the system or as a series identifying a POS workstation. Available values: Comarch ERP Standard and POS
Defining a numeration series
In order to define a numeration series, click on the button [Add], placed in the main menu or directly above the list of numerations. After that, a new, empty row will appear on the list of series. Fields Code and Name are mandatory. The value of the code must be unique. The parameter Active is checked by default and can be unchecked at any moment during the work with the system. Field Application can be edited until a series is saved.
Attaching series to the centers of company strucutre
List of numeration series attached to a center
In order to attach a series to many <<document types>> within a given center, it is necessary to open the menu Configuration → Company Structure → Objects Availability. Then, on the list Rights Structure, mark a given center and on the List of objects, Series item. Then, on the right side, a list of numerations series is presented. With the use of buttons available in the main menu or above the list, it is possible to attach/detach selected series. On the form of series edition (button [Edit] in the main menu or in the panel above the list of series), it is possible to select documents for which a given series is to be applied.
Series can be also assigned to particular document types within a given center. In order to do so, it is necessary to open the menu Configuration → Company Structure → Rights Structure → edition form of selected center.
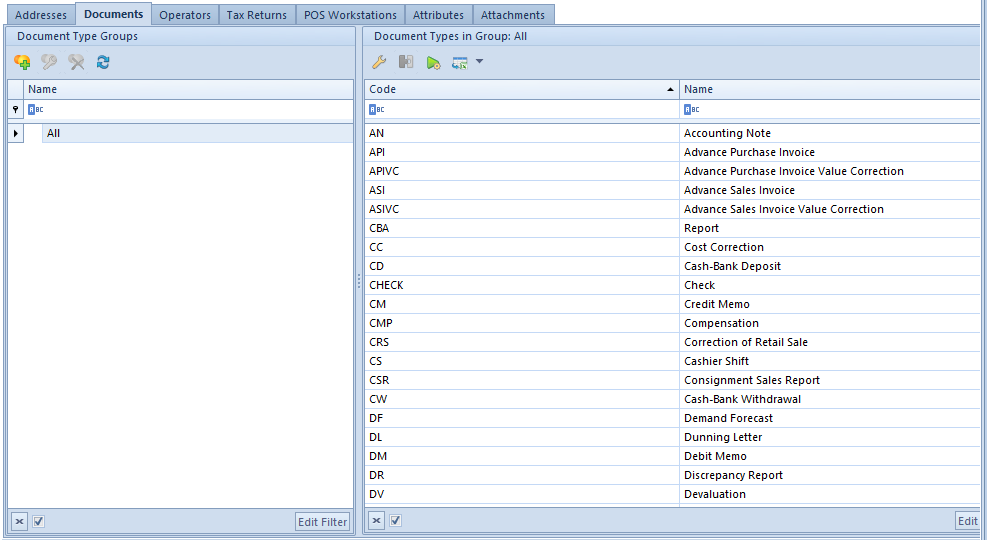
Tab Documents on the form of center edition
To attach a series to selected document type, it is necessary to open the tab Documents, and then the edition form of selected document type, where tab Series is available. In the tab, with the use of [Attach] and [Detach] buttons available in the main menu or above the list of series, it is possible to attach and detach series of document numerations defined in the system.
Tab Series of a document type
Configuration of document types
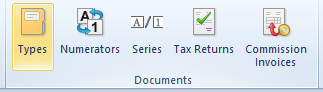
An appropriate configuration of document types available in the system allows for using them in a correct way. Buttons [Types], [Numerators] and [Series] related to the configuration of document types are placed in menu Configuration, in Documents button group.
Documents menu
In the group, there are also <<[Comission Invoices]>> and <<[Tac Returns]>> buttons.
Document types
Managing of documents of a given type can be performed from the level of the list of documents (Configuration → Documents → Types). The list is predefined in the system and the user cannot add new items to it.
Hint
The tab Document types is similar to tab Documents which can be found on the company or center configuration form (menu Configuration → Company Structure → Comapny) and which offers wider possibilities for configuring documents (additional parameters, possibility of specifying the visibility of document groups in a given structure center).
List of document types
On the left side of the window, there is the tree with <<groups of document types>>. On the right side, there is the list of document types belonging to a given group along with their codes and names.
Menu of the list of document types
The menu of the list of document types contains <<standard buttons>> allowing for adding/editing/deleting groups of document types and for editing items of the list of document types.
It is possible to define own groups of document types and and to assign them to selected document types defined in the system. Such operation can be performed with the use of [Add Group] button which is placed in the main menu or above the tree of document groups.
Edition of document types
In order to edit a document type, it is necessary to highlight a given item on the list and then, from the level of the main menu or of the panel placed above the list of documents, select the button [Edit] (this option is available also in the context menu). A form of document type opens.
Tab General
Tab General of Sales invoice document
The tab General contains basic information regarding document type. Section Parameters is composed of the following elements:
Code – document code, defined by the system (non-editable field)
Name – document name, defined by the system
Group – drop-down list allowing for assigning a document to a group, contains predefined values:
Non-grouped
Trade Release
Trade Receipt
Warehouse Receipt
Warehouse Receipt
Accounting
Cash-Bank
Complaint
Debit Collection
Fixed Assets
Include in the trading period – if the parameter is checked, a given document type is included in <<trading periods>>. The parameter is available for trade and warehouse documents only.
Include invoices whose 150/90 of days passed in the month for which a tax return is calculated – parameter available for <<VAT-ZD document>>.
Section Item Parameters contains Price Precision drop-down list which allows for determining a maximum <<price precision>>, that is a number of decimal places with which it will be possible to enter price in a given type of document. It is available only for those documents in which it is possible to enter price/value (e.g. sales invoice, purchase invoice, PO receipt, fixed asset acquisition document etc.).
Tab Diagram
Tab Diagram of Sales Invoice document type
The tab Diagram presents a graphic scheme of possible statuses a document can adopt. Possible statuses:
Initiated – document form has been opened but it has not been saved
Unconfirmed – document saved as unconfirmed, editable
<<Confirmed Quantity Total>>
Confirmed – document confirmed or saved permanently, not editable
Posted
Printed – document printed on a receipt printer
Posted/Printed – document posted and printed on a fiscal printer
Closed – document closed
Pending – a document is being processed (regards e.g., complaints or orders)
Processed – document processed (regards e.g., complaints or orders)
Deleted – a document has been deleted and is not visible in the system
Canceled
Reversing Entry – regards journal entries, a confirmed journal entry has been deleted (reversed)
Reconciled – regards <<CD>> document, a document has been reconciled, which means that data from the bank statement is compliant with journal entries
Edition of document status
Edition of Initiated status of Sales Invoice document type
Double-clicking on the field with status name of a document type or checking the field and selecting the button [Edit] from the main menu opens a side panel, which allows the user to edit status name and change the color in which a document in a given status is displayed on the list.
Edition of permissions
Edition of permissions to pass through Initiated and Unconfirmed statuses of Sales Invoice document type
Double-clicking on an arrow placed between fields with statuses of a document type or marking the arrow and selecting the button [Edit] from the main menu opens a side panel, which allows the user to edit permissions to passing through statuses, that is, e.g. confirming a document with Initiated status. Checking/unchecking the parameter placed next to the name of a given operator group grants or withdraws these permissions.
To pass to the definition of another status/permission it is necessary to save or cancel entered modifications with the use of buttons [Save]/[Cancel] placed in the main menu.
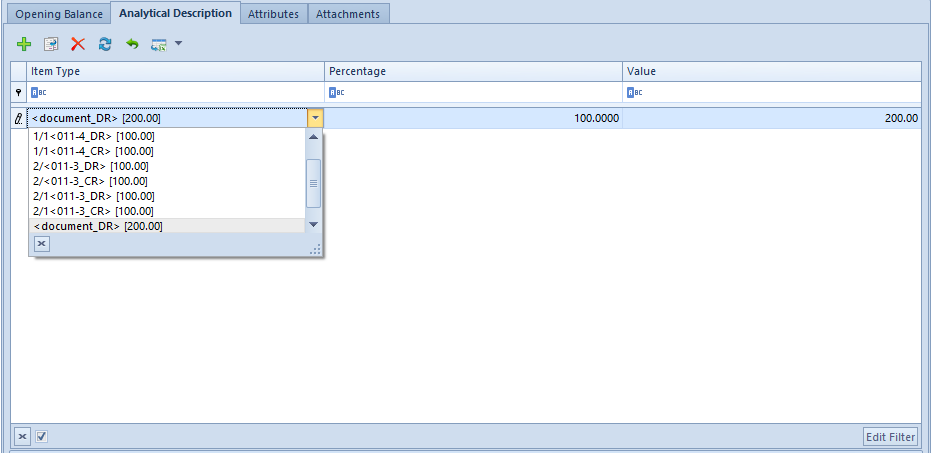
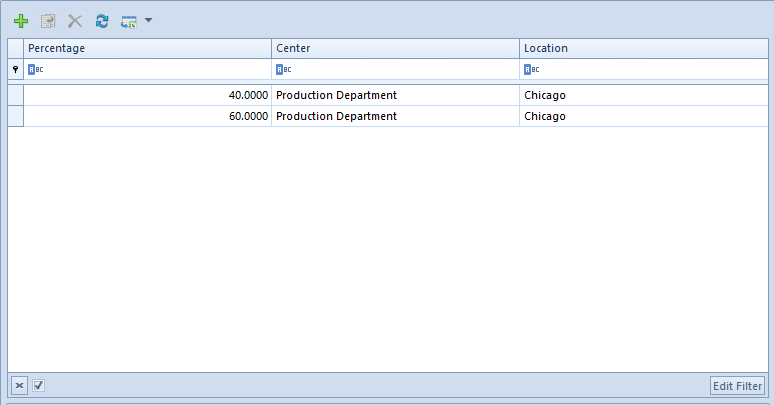
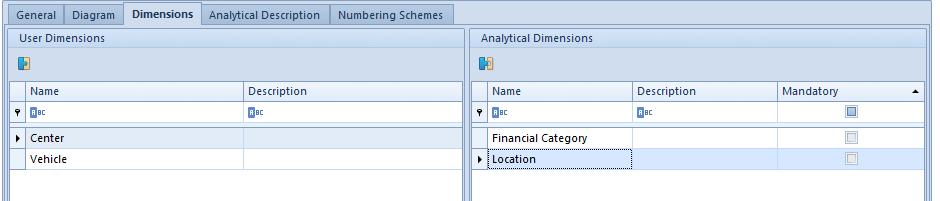
Detailed description of the tab Dimensions can be found in article <<>>.
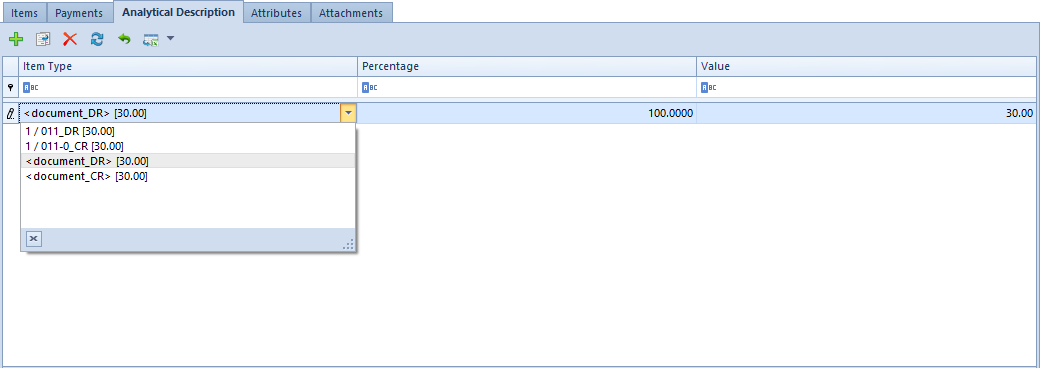
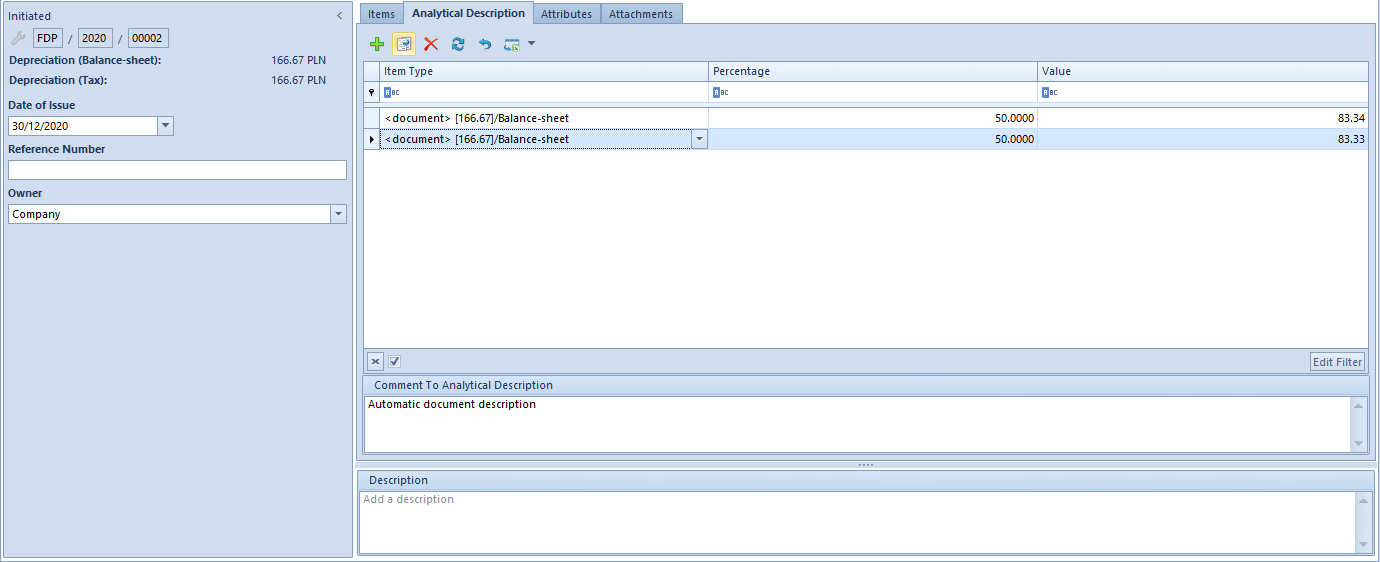
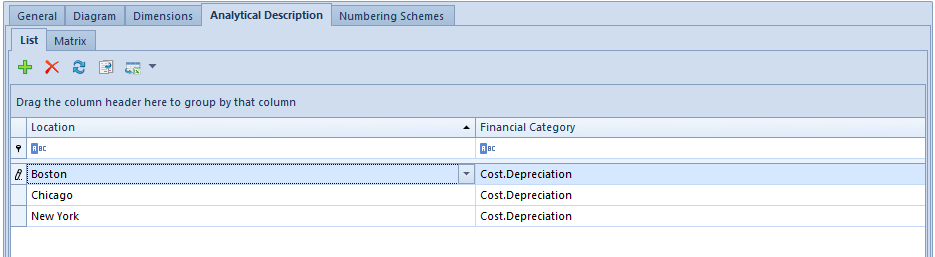
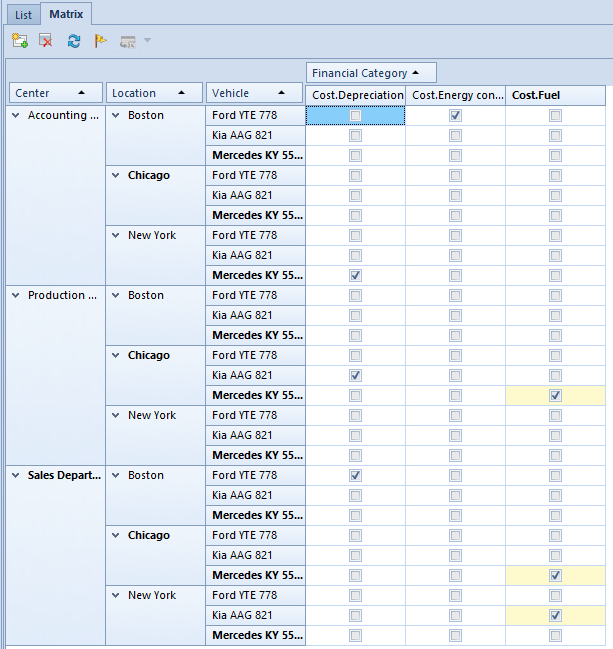
Detailed description of the tab Analytical Description can be found in article <<>>.
Tab Numeration Schemes allows for assigning many numerators to a given document tape and for indication which of them will be default. More information regarding numerators of documents can be found in article <<Numerators>>.
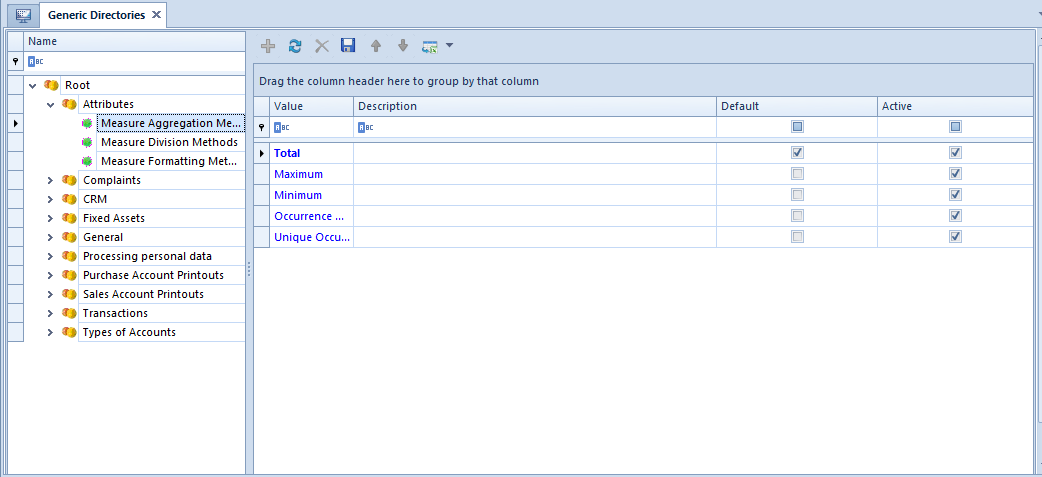
To add a new generic directory, it is necessary to highlight a directory group on the tree and select the button [Add] from the Directories button group.
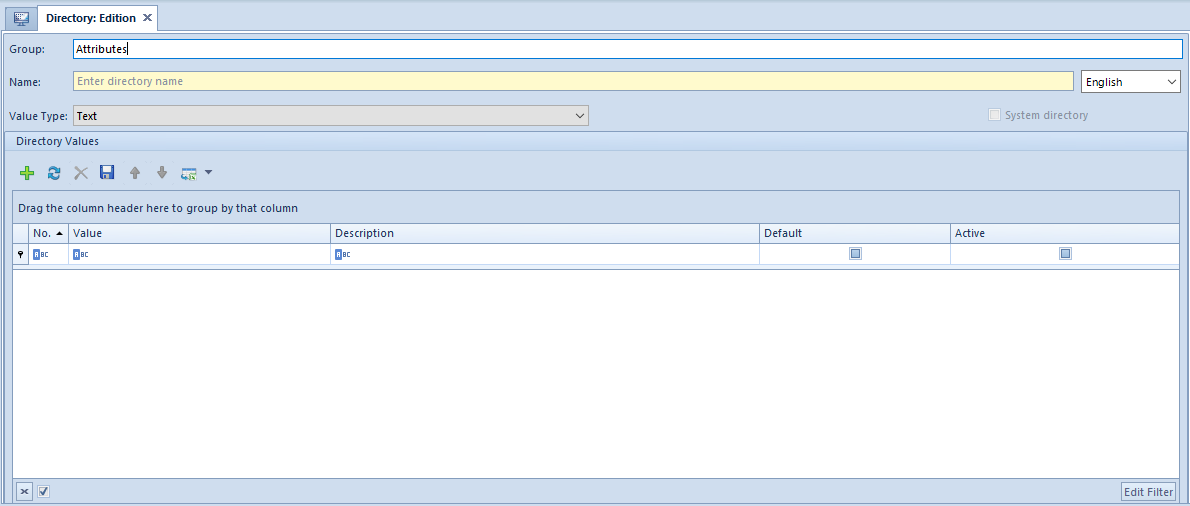
Generic directory form
On a new generic directory form, the following data must be defined:
Group – non-editable field indicating a group to which the directory is being added
Name – mandatory field, can contain up to 50 characters
Field for changing translation language – function of selecting language of translation of the directory name and its value
After entering the name in the system language, the user selects another language ind the list and inserts appropriate value in the field Name. Translations of the names of predefined directories are available in supported languages, that is in English, German, French and Spanish. An entered translation can be deleted by removing the value entered in the field Name.
The names of the values of directories are translated in the same way. After changing the language in the selection window, the field for values subject to translation in the section Directory Values are highlighted in yellow. The option of translating is available for the values of Text type only.
Translations can be added in languages which are available in Languages generic directory.
Note
It is not possible to delete translation in the system language, that is in the predefined database language.
System – non-editable parameter, checked only in case of editing a predefined generic directory
Value Type – indicates the format of entered value A user can select one of predefined types:
Text
Real Number
Integer
Logic Value ─ checked/unchecked parameter
Natural Number
Date – in the form of mm-dd-yyyy. This field is active as long as the first directory value is added. Value type can be changed not until all its values are deleted.
Directory Values – list of values of defined directory. Values are added in the same way as they are added from the level of the list of generic directories. In the case of editing an existing system directory, this section is completed with predefined
Note
Values of given directory must be unique. It is not possible to add two the same values to one directory.
Note
It is not possible to add several generic directories with the same name.
Predefined list
Predefined generic directories are grouped by the functional areas in which they are used. Detailed descriptions of each generic directory can be found in articles dedicated to particular functional areas.
General
A part of this group is described in articles from <<Trade and Warehouse>> category. Other directories from this group:
Messenger Types – directory values used in customer’s contact data definition
Position Types – values used when defining a contact person and specifying his/her association with a customer (Administrator, Director, Employee etc.)
Title Types – titles used when defining a contact person, predefined values: Mr., Ms.
Academic Title Types – values used when defining a contact person
Attachment Types – values used when adding an attachment to an object. For an attachment type, the place of saving a file and maximum size, available extensions and the possibility of compression (Yes, No or option Test which allows for checking whether the result of file compression is satisfying) are defined
Cost Types – values used in one of the BPM processes which specify types of cost related to business activity
VAT Rate Groups – depending on the language of a database, parameters Active and Default are automatically checked for a given VAT rate group:PL – for database generated in Polish language UK – for database generated in English language DE – for database generated in German language AT – for database generated in German (AT) language FR – for database generated in French language
ES – for database generated in Spanish language
Only one group of VAT rates can be set as default. It is possible to activate selected groups at any moment and to change a default group setting. This directory is used for defining of VAT rates in a multi-company structure with regard to a company. Active directory values can be selected when defining a new center of Company type.
SAF-T Item Group (General directiories group) – values used on the form of CN code, retirieved from document item to JPK_V7M
SAF-T Procedure Code (Transactions directories group) – values used on the form of CN code, retrieved from document item to JPK_V7M
Languages – values used for objects for which it is possible to add translations, that is: attributes, items and directories. By default, the following languages are available in the directory: Polish, English, German, French, German and Spanish. A user can also add/delete new languages as well as modify names and activity status of the default ones. A deactivated language is not displayed on drop-down lists.
Institution Types – used for defining new types of institutions in the system, e.g., City Hall or Customs Chamber. <<CRM>>.
List of generic directories – CRM group
Hint
In French language version of the system, there is also a dedicated directory Marking on Printouts, which refers to documents for released items only.
Generic directories – general information
Generic directories are registers of values defined for particular system objects. Such values can be reused in many system places and for many objects without being defined each time it is necessary.
The list of generic directories is available from the level of Configuration → General → Generic Directories.
List of generic directories
Directories are grouped into categories which are presented on a two-level list in the form of a tree structure. The names of categories indicate main functional areas of the system, within which particular directories are used. The categories are presented in alphabetical order.
The values defined for a directory highlighted on the tree are displayed on the list on the right side. Predefined values, which cannot be deleted, are marked in blue. Values added by the user are presented in black. Default values are presented in bold.
For the most of generic directories, the list of values is composed of the following columns:
No. – ordinal number
Value – defined directory values
Description – additional information
Default – parameter indicating whether a given value is default or not
Active – parameter indicating whether a given value is active in the system
Values are added to a directory directly on the list, wit the use of the button [Add], placed in Values group of buttons.
Note
Values of given directory must be unique. It is not possible to add two the same values to one directory.
The type of value depends on the type of given directory, which is defined during its creation or edition. Detailed description of a directory definition can be found in article <<Defining a generic directory>>.
Receipt printer
The Comarch ERP Standard system cooperates with the following fiscal printer models:
Elzab Mera
Elzab Omega
Emar Printo 57T
Epson TM-T801 FV
Innova Market
Novitus
Posnet Thermal
Parameters presented in the tab Scales, available in the menu System → Configuration, allow for configuring the receipt printer with which Comarch ERP Standard must cooperate. Owing to that, documents can be printed in the system on a receipt printer.
Tab Receipt printer
The following fields of the tab are mandatory:
Driver File – Comarch.B2.Printer2.dll containing drivers for receipt printers
Hint
For test purposes, it is possible to use file Comarch.B2.DummyPrinter.dll which imitates a correct connection to a receipt printer.
Printer Model – in this field, a printer model is selected from the list of printer models available for driver file
Printer Port – name of the port a printer is connected to
Type, Name, Version – in this field, general information about the specification of a driver supporting the available printer models is included
Mapping – this field contains a list of VAT rate mappings available in the system. The values of printer’s VAT rates corresponding to given system VAT rates must be set for the selected mapping in the table below. It is possible to create many VAT rate mappings for printers. To do so, in the fields New Mapping and VAT Rate Group below the table, it is necessary to specify a mapping name and to select a group for which VAT rates will be mapped (the VAT rate group that is set for the parent company is suggested by default). Upon clicking on the button [Create], a new value will be added to the mapping list and an empty field for specifying symbols will be added in the table.
Moreover, the user has a possibility to specify the parameters such as:
Print document number – this parameter enables printing system number of a receipt/invoice on a receipt printer
Print item discount – this parameter enables printing the amount of discount assigned to a given item of a receipt
Log the cashier in during startup – this parameter enables printing information about workstation number and operator’s number, when starting a printer
Print invoices on receipt printer – this parameter enables printing invoices on a receipt printer, if the receipt printer supports printing of invoices. Additionally, in the menu System → Configuration, in tab Trade, function Print invoices on a receipt printer must be checked. If the receipt printer does not support printing of invoices, a receipt will be printed instead.
Print customer’s TIN – this parameter enables printing the TIN number of a customer selected in a receipt.
In customer’s TIN line (new printers) – provided that a given printer model supports such functionality
In cashier line (old printers) – if a printer does not handle printing of TIN number.
The tin number is retrieved from customer’s form – customer indicated in a document and in the case of Undefined customer, directly from the printed document, from TIN field presented in section Customer in Customers tab.
Print cashier and workstation symbols – cashier symbol is retrieved from Receipt Printer Sumbol field, which is available on the form of the logged-on operator. After selecting the option In cashier line (old printers) for the parameter Print customer’s TIN, the parameter is checked and it is not possible to uncheck it.
Item Identifier – depending on a selected parameter value: Name or Code and if the handling of print names is deactivated or if an item has no print name, the name or code of an item will be sent to a receipt printer upon printing documents on that receipt printer.
Workstation Symbol – this parameter enables printing on a document a symbol entered in this field (specifying the workstation on which sales with printing on receipt printer is processed)
Button [Test Connection] allows for testing connection with a receipt printer.
Forms
In tab Forms, available in the menuSystem → Configuration, it is possible to import and export changes made by operators in the layouts of forms (with the use of <<Interface Editor>>). The changes (for operator groups) are exported to a file which later can be imported on another workstation so that the settings of form layouts for workstations are the same.
Tab Forms
Computer
General informartion
Tab Computer, available in the menu System → Configuration, allows for configuring parameters related to particular functionalities of the system and parameters enabling cooperation of the system with other applications.
The parameters are divided into the following sections:
General Parameters
Printouts
Attachments
Export to Spreadsheet
Password Policy
General Parameters
Section General Parameters
Section General Parameters contains the following parameters:
Cooperate with Comarch ERP Altum HR – allows the exchange of basic data of employees between Comarch ERP Standard and Comarch ERP Altum HR.
Note
The collaboration with the system Comarch ERP Altum HR is available only in Polish version of database.
Cooperate with WMS − this parameter is not available for editing and is checked automatically upon installing application Comarch WMS.
Automatically attach newly added center to objects available in the parent center − parameter checked by default
Data Formatting When Copied To Clipboard − Available options:
Keep source formatting − parameter checked by default
Keep text only
Timeout − Available options:
Global − default timeout value after which an operation is aborted, valid for all users. By default, the parameter is checked with value 60 seconds. This value can be changed only by a user belonging to the group
Operator’s − transaction time timeout for a logged-in user.
Message Timestamp − possibility of determining how long information messages will be displayed in Comarch ERP Standard system. Available options:
Global − allows for specifying default message timestamp for all operators. By default, the parameter is checked with value 10 seconds. Default timeout value for displaying messages can be changed only by a user that belongs to B2_admin
Operator’s – allows for specifying default message timestamp for a logged-in operator
Autofilter Delay Time − allows to specify a period of time since the modification of a filter field after which the system will start to search for new results. Available options:
Global − allows for specifying autofilter delay time for all operators. By default, the parameter is checked with value 750 ms. This value can be changed only by a user belonging to the group
Operator’s − allows for specifying autofilter delay time for the logged-in user.
Autofilter Default Setting − parameter responsible for the filtering condition for all columns and lists. Available options:
Begins with – this parameter is checked by default. Lists in the system present search results beginning with a given expression entered by the user.
Contains – lists in the system present search results containing an entered expression
Additionally, if the option Allow modification is checked, it is possible to change the filtering condition for all columns and lists in the autofilter control. This option is available after selecting the autofilter control.
Example of a change of the autofilter on the list of generic directories
[Alert]If the Allow modification parameter is deselected, the icon of the filtering condition for columns and lists will not be displayed. [/alert]
Incremental Search Default Mode − parameter responsible for the condition of searching in columns of all lists. Available options:
Begins with − this parameter is checked by default. Lists in the system present search results beginning with a given expression entered by the user.
Contains – lists in the system present search results containing an entered expression
Example of incremental searching on the list of sales invoices
<<Column Autofit>>
Printouts
Section Printouts
In the group Printouts, the following parameters are available:
Default Editor for Crystal Reports − allows for selecting the program allowing for edition of Crystal Reports. The program is selected by clicking on the button located next to this field and indicating a file with .exe extension. That the file will be running the editor of Crystal reports.
Register printout execution in the system − upon checking this option, each time a printout is made, this operation will be logged in the system and will be available on the list of printouts.
Attachments
Section Attachments
The system makes it possible to store attachments in the database or in an external folder. In section Attachments, there are the following parameters for attachment configuration:
Attachment Folder − target location of attachments saved on a computer.
Limit the size for attachments in a database to: – possibility of specifying a maximum size in MB, GB or TB
Image thumbnail size on lists (in pixels) – enables defining the size of thumbnails for items on the list of items and document item lists
Export to Spreadsheet
Detailed description of fields presented in the section can be found in article <<Exporting data to a spreadsheet>>.
Password Policy
Section Password Policy
The section Password Policy enables managing passwords of non-domain users whose account is not integrated with Windows. Particular settings from this section are transferred to operator forms; in the case of administrative operator db owner, only the Enforce a strong password for non-domain user parameter is transferred.
Note
The parameters are deselected by default for databases which have been converted from previous versions of the system, while for newly created databases they are selected.
Note
Parameters Enforce recurring password change for non-domain user and Enforce a strong password for non-domain user are not taken into account for operators with the parameter Password policy specified in system configuration deselected – this parameter is available on the operator form. In this case, parameters must be changed directly on the form of a given operator; the user is informed about this upon an attempt to save changes made in configuration.
Data exchange
Tab Data Exchange, available in the menu System → Configuration, allows for specifying parameters necessary for sending information from Comarch ERP Standard to other platforms. Its area is divided into the following sections:
EDI
E-Tax return
SAF-T files
Transfers
POS
SENT
Data exchange tab
EDI
The section contains a mechanism for importing and exporting data to EDI platform.
Section EDI
The following fields are available in the section:
Exported Files Directory − in this field, it is necessary to select a location in which files exported from the system will be saved
File Organizing Method − in this field, it is necessary to select a structure of directories within which files will be saved. The following options are available:
DocumentType − organizes files by document types, by creating subfolders Orders and Invoices
CustomerCode − organizes files by customer/vendor codes, by creating subfolders dedicated to particular customers/vendors
DoicumentType_CustomerCode − creates subdirectories divided into document types and with the created name of directory assigned according to the key document type_customer code
DoicumentType_CustomerCode − creates subdirectories divided into customer code and with the created name of directory assigned according to the key customer code_document type
DocumentType\CustomerCode − creates subdirectories in a two-level structure, where parent directories group files by document types and then subdirectories divide grouped files by customer codes
CustomerCode\DocumentType − creates subdirectories in a two-level structure, where parent directories group files by customer codes and then subdirectories divide grouped files by document types
Imported Files Directory − in this field, it is necessary to indicate location of the folder of files imported to the system
Transger the loaded files to a subdirectory − if this option is checked, a subfolder Done is created in a given path to which EDI files imported by the user are automatically transferred.
Note
The above-mentioned options are available only for operators owing a license to use EDI platform. Otherwise, the section is not visible.
E-Tax Return
Section E-Tax Return
The following fields are available in the section:
Web Service Address − address to which e-tax returns are sent, the address set by default is https://bramka.e-deklaracje.mf.gov.pl/
Exchange File Directory – field allowing for specyifying a directory in which exported e-tax returns will be saved
SAF-T Files
Section SAF-T Files
Transfers
Section Transfers
The section Transfers enables the user to select an exchange file directory for the documents Statement of Remittance Orders and Statement of Payment Orders. In the field Exchange Data Directory, the user can choose a directory in which relevant files will be saved. Thanks to that, it is not necessary to enter a specific path for file export on each SRO or SPO document form.
Sent
The SENT section allows the user to configure Web Service for the needs of registering .xml carriage notifications performed via Electronic Services Portal of the Customs Service (PUESC). Such notifications are compliant with technical specifications shared on the portal.
SENT section
Note
The above-mentioned options are available only after selecting the parameter Monitor SENT transport on the company form. Otherwise, the SENT section will not be visible.
Payment terminal
A payment terminal is a mobile device used to accept payment cards when registering transactions at points of sale-service. A payment terminal which must cooperate with Comarch ERP Standard can be configured from the level of the tab Payment Terminal, available in the menu System → Configuration. Owing to that, transactions can be registered in the system with the use of charge card as payment form.
The payment terminals with which the system cooperates are the following:
Hypercom T4220 – Elavon (RS232)
Verifone VX 520 – Eservice (RS232)
Polcard (TCP/IP).
Tab Payment terminal
Fields requiring completion to configure the payment terminal are the following:
Driver file – indicates a path to a file with .dll extension, responsible for payment terminal control. In the system setup folder, there are the following files available by default:
B2.Terminal.Elavon.dll for Hypercom T4220
B2.Terminal.Eservice.dll for Verifone VX 520
Hint
It is possible to implement own assemblies supporting other payment terminals.
Connection Type – in this field, it is necessary to indicate a type of connection with payment terminal, that is Serial port orTCP/IP
In the case of the TCP/IP connection type, for the field:
IP address – it is necessary to insert IP address of the payment terminal
Whereas for the Serial port connection type, for the field:
Serial Port – it is necessary to insert COM port to which the payment terminal s connected.
Note
For test purposes, it is possible to use file Comarch.B2.DummyTerminal.dllwhich imitates a correct connection to a payment terminal.
Label printing scale
A label printing scales is a device allowing for weighing a product and printing a label with the product’s barcode. A label printing scale which must cooperate with Comarch ERP Standard can be configured from the level of the tab Label Printing Scale, available in the menu System → Configuration.
Tab Label printing scale
Fields requiring completion to configure the label printing scale are the following:
Driver file – indicates a path to the file B2.LabellingScale.dll, responsible for connection with the scale/
Hint
It is possible to implement own assemblies supporting other scales.
Available Scales – in this field, a scale model is selected from the list of scale models available for driver file. The label printing scale with which Comarch ERP Standard cooperates is Novitus Dibal L860DB.
Version, Description, Category– these fields are completed automatically after selecting a driver file
Price Type – field for selecting a price type, from among the price types available in the system, that will be applied when using a label printing scale
Below the scale configuration parameters, there is a table for mapping of VAT rates. It is used for determining the system rates and their corresponding values of scale rates.
Note
Because label printing scales are used for weighing products in a store individually by consumers and printing labels with product barcodes, there is no need to configure such scale to cooperate with Comarch ERP Standard system. Such scale does not need to be physically connected to the system. It is, however, necessary to provide weighed UPC codes, defined in the system for items, into the scale device. A UPC code, printed on a scale, can be read with a barcode reader into the system. The item will be recognized by the system based on its defined code and its price will be recalculated on the basis of item weight.
Scales
Scales or a scales–scanner is a device dedicated to weighing products of varying weight and hence the price. Parameters presented in the tab Scales, available in the menu System → Configuration, allow for configuring the scales with which Comarch ERP Standard must cooperate. Owing to that, it is possible to weigh a product (marked as weighed item) when adding it into a document.
The system cooperates with Taurus TP150/1 and Elzab Neptun 2 scales.
Hint
It is possible to implement own assemblies supporting other scales.
Tab Scales
Fields requiring completion to configure the scales are the following:
Driver file – indicates a path to a file with .dll extension, responsible for connection with the scales
Available Scales – in this field, a scale model is selected from the list of scale models available for driver file
Type, Name, Version – these fields are completed automatically after selecting a driver file
Port Parameters – in this field, it is necessary to specify the parameters of port to which scales is connected. After selecting a driver file, an information on how to specify the parameters will appear below. These parameters should be set in a similar way as they are set in Windows system from the level of Device Manager → Communication Port → Properties.
Here it is possible to test connection with the scales by clicking on the button [Test Scales]
Note
Because scales/scales-scanners are most often installed in a cash register counter and are used mainly at points of sale, they must be configured exactly on those workstations.
Collector
A data collector is a portable batch terminal equipped with a barcode reader. It is mainly dedicated to taking stock of a warehouse or a store Parameters presented in the tab Collector, available in the menu System → Configuration, allow for configuring a data collector with which Comarch ERP Standard must cooperate. Owing to that, data can be retrieved from the collector to an <<inventory sheet (IS)>> with the help of the button [Read from Collector]. The system cooperates with Zebez PDL20 and CipherLab 8300 data collectors.
Tab Collector
Fields in this tab are the following:
Driver file – indicates a path to a file with .dll extension, responsible for connection with a data collector. In the system setup folder, there are the following files available by default:
B2.Collector.dll for Zebex PDL20 data collector
B2.Collector.CipherLab.dll for CipherLab 8300 data collector
Hint
It is possible to implement own assemblies supporting other data collectors.
Collector Model – in this field, it is necessary to indicate the name of collector model, depending on the selected driver file
Note
For test purposes, it is possible to use file Comarch.B2.DummyCollector.dll, which imitates a correct connection to a data collector.
Collector Code – enables the selection of a collector code from among the batch collectors defined in the system from the level of Configuration → General → External Devices
Collector Port – enables the selection of a port to which a collector is connected
Button [Test Collector] allows for testing the connection with the collector.
System configuration
Option Configuration, available in the tab System, allows for determining of global parameters of Comarch ERP Standard.
Note
Permissions to the system configuration available from the level of System → Configuration are assigned with the use of the parameter Access to system configuration, which is available in the tab Other Permissions of the form of operator groups accessible from the level of Configuration → Company Structure → Operator Groups.
Access to the system configuration
The system configuration window is divided into tabs dedicated to different areas of system parameterization.
Configuration window
The configuration window is composed of the tabs:
<<BI Module>>
<<General>>
<<Computer>>
<<Computer>>
<<Accounting>>
<<Fixed Assets>>
<<Trade>>
<<Receipt Printer>>
<<Collector>>
<<Scales>>
<<Label printing scale>>
<<Payment terminal>>
<<Search engine>>
<<Data exchange>>
About Program − information regarding Comarch ERP Standard system, e.g. program version, configuration and company database version, compilation number, date of production.
External devices
With the use of this function, the user defines and configures devices used for registration of external data, such as collector, label printing scale or cash register drawer.
List of external devices
The list is composed of columns corresponding to data inserted by the user during the definition of a new device:
Number
Code
Name
Type
Description
Device ID (column hidden by default)
In the menu, there are standard buttons for adding/deleting/saving a given object from the list as well as buttons for refreshing and closing the list.
Defining external device
The button [Add], placed in the List group of buttons, opens the form of a new external device:
Number is a subsequent ordinal number from the list. The fields Code and Name are mandatory. In the field Type, it is necessary to indicate the type of the newly added device. Types of external devices:
Radio collector
Batch collector
Label printing scale
Drawer
Depending on the selected type of device, additional parameters defining the device are displayed.
For a batch collector, a communication protocol must additionally be selected and the parameters of a serial port must be specified: Protocol, Transmission Rate, Parity, Data Bits, Stop Bits
For a label printing scale, a connection type and a COM port a device is connected to must be specified and a scale number must be provided.
For a drawer, in turn, it is necessary to specify the parameters specifying the operations during which a drawer must open when registering a transaction at a point of sale.
Detailed information regarding integration of external devices with pos can be found in Comarch POS Knowledge Base.
Note
Drawers can only be configured with a Comarch POS workstation.
A drawer can be opened during the following operations:
Payments for documents printable on receipt printer – with possibility to specify whether the drawer should open before or after printing
Payments for documents unprintable on receipt printer – with possibility to specify whether the drawer should open before or after payment is applied
For payment forms – with possibility to specify a payment form.
CD/CW
Starting a shift
Counting cash register balance
Ending a shift
Ending a day
VAT rates
List of VAT rates
Configuration of VAT rates in the system allows defining tax rates according to which items or services are purchased and sold as well as payments are made.
List of VAT rates
The field VAT Rate Group presents a default VAT rate group assigned to a company in which a user is logged in. Only the user logged in to the parent company can select groups available in the system from a drop-down list. Depending on indicated group, the list is completed with appropriate VAT rate values. Values presented on the list are retrieved from the generic directory VAT Rate Groups (<<Generic Directories Predefined list>>). Inactive groups are displayed in italics and it is not possible to edit values of VAT rates assigned to them.
The list of VAT rates contains the following columns:
Symbol – VAT rate symbol
Value – value assigned to a VAT rate
Name
Status– VAT rate characteristics. The following options are available for selection:
Taxed
Tax-exempt
Not subject to taxation
Active – parameter indicating whether a given rate can be used in the system.
Default – parameter indicating whether a given VAT rate is a default rate. Only one rate can be defined as default.
For newly created databases, depending of a rate group, the following predefined VAT rates are available:
Polish database – group PL
Symbol
Value
Name
Status
Active
Default
A
23,00%
A 23%
Taxed
Yes
Yes
B
8,00%
B 8%
Taxed
Yes
No
C
0,00%
C 0%
Taxed
Yes
No
D
0,00%
D ZW
Tax-exemp
Yes
No
E
0,00%
E NP
Not subject to taxation
Yes
No
F
5,00%
F 5%
Taxed
Yes
No
G
7,00%
G 7%
Taxed
Yes
No
English database – group UK
Symbol
Value
Name
Status
Active
Default
A
20.00%
A 20%
Taxed
Yes
Yes
B
5.00%
B 5%
Taxed
Yes
No
C
0.00%
C 0%
Taxed
Yes
No
D
0.00%
D TE
Tax-exempt
Yes
No
E
0.00%
E NS
Not subject to taxation
Yes
No
German database – group DE
Symbol
Value
Name
Status
Active
Default
A
19,00%
A 19%
Taxed
Yes
Yes
B
7,00%
B 7%
Taxed
Yes
No
C
0,00%
C 0%
Taxed
Yes
No
D
0,00%
D SF
Tax-exempt
Yes
No
E
0,00%
E NS
Not subject to taxation
Yes
No
German database (AT) – group AT
Symbol
Value
Name
Status
Active
Default
A
20,00%
A 20%
Taxed
Yes
Yes
B
10,00%
B 10%
Taxed
Yes
C
0,00%
C 0%
Taxed
Yes
D
0,00%
D SF
Tax-exempt
Yes
E
0,00%
E NS
Not subject to taxation
Yes
F
12,00%
F 12%
Taxed
Yes
French database – group FR
Symbol
Value
Name
Status
Active
Default
A
20,00%
Taux normal 20%
Taxed
Yes
Yes
B
10,00%
Taux ntermédiaire 10%
Taxed
Yes
No
C
5,50%
Taux réduit 5,5%
Taxed
Yes
No
D
2,10%
Tax super réduit 2,1%
Taxed
Yes
No
E
0,00%
Taux exonéré 0%
Tax-exempt
Yes
No
NS
0,00%
Non soumis
Not subject to taxation
Yes
No
Spanish database – group ES
Symbol
Value
Name
Status
Active
Default
A
21,00%
A 21%
Taxed
Yes
Yes
B
10,00%
B 10%
Taxed
Yes
No
C
4%
C 4%
Taxed
Yes
No
D
0,00%
D ZW
Not subject to taxation
Yes
No
E
0,00%
E NP
Tax-exempt
Yes
No
F
0,00%
F 0%
Taxed
Yes
No
Below the VAT rates list, in the panel VAT rates for export documents it is possible to select appropriate VAT rates for export documents, separately for items and services.
In field VAT rate for reverse charge, it is possible to determine VAT rate applicable for documents subject to reverse charge.
Default settings:
Group PL:
Export documents (items) – C 0%
Export documents (services) – E NP
Reverse charge – E NP
Group UK:
Export documents (items) – C 0%
Export documents (services) – C 0%
Reverse charge – E NS
Group DE:
Export documents (items) – C 0%
Export documents (services) – C 0%
Reverse charge – E NS
Group AT:
Export documents (items) – C 0%
Export documents (services) – C 0%
Reverse charge – E NS
Group FR:
Export documents (items) – Taux exonéré 0%
Export documents (services) – Taux exonéré 0%
Reverse charge – Non soumis
Group ES:
Export documents (items) – F 0%
Export documents (services) – F 0%
Reverse charge – E NP
Defining VAT rate
In the system, there are two methods for defining a new VAT rate:
[Add] – a new row appears on the list, where it is necessary to enter appropriate data. The values Name and Value must be unique. In the tab Value, the user must specify the value of the tax in a percentage form, e.g. 23%. In the column Status, the user selects one of the available options: Taxed, Tax-exempt, Not subject to taxation
[Add Through Form] – opens a form composed of two tabs: General and Accounting
General – contains basic data, that is Symbol, Name, Status, Value and parameter Active
Accounting – allows for assigning bookkeeping accounts to a given VAT rate. Default account types: Input VAT and Output VAT. The list of predefined account types are available in the generic directory VAT Rates under Types of Accounts group. Current Accounting Period – field provided for information purposes, cannot be edited.
Form of a newly defined VAT rate – tab General
Form of a newly defined VAT rate – tab Accounting
Note
The system does not control the uniqueness of a VAT rate symbol. This is appropriable in case new regulations determine the same symbols for new VAT rates, that were applied for previous VAT rates.
Note
Edition of VAT rate is blocked in case it has been used in one of the documents: SI, SIVC, SIQC, ASI, ASIC, R, RVC, RQC, SO, SQ, SRS, CRS, PI, PIVC, PIQC, API, APIC, PO, PQ, SOR, SORVC, SORQC, POR, PORVC, PORQC.
Defining VAT rate in a multi-company structure
To be able to assign different groups of VAT rates to a given center of Company type, it is necessary to activate them in Generic Directories.
List of VAT rate groups in Generic Directories
Depending on VAT rate groups attached to a company, the user can define different VAT rates for an item or item group.
Example
In a database, there is VAT rate group PL set for the parent company and group FR for
Company1. Upon logging in to the parent company, on an item form in field Purchase TAX and Sales TAX there is value A 23% displayed. Upon logging in to Company1, value Taux normal 20% is displayed for the same item in fields Purchase TAX and Sales TAX.
When adding an item in a document, VAT rate assigned to the item within VAT rate group attached to a company (or its center) being the document owner is retrieved.
When printing a document on a receipt printer, it is verified whether VAT rates used in the document have rates mapped for a fiscal printer, within the group in which they are included. If a rate mapping is missing, appropriate message is displayed.
CN codes
CN codes (Combined Nomenclature) are used for classifying items in international trade and are important for Intrastat declarations. CN codes defined by the user can be used on the forms of items and in document items.
List of CN codes
The list of CN codes contains the following columns:
Code ─ unique 8-digits number
Description ─ description of classified item
Additional Unit ─ item unit of measure
Net Weight ─ parameter specifying the use of net weight for particular CN codes
In the menu, there are standard buttons for adding/adding through form/modifying/deleting/saving a given object from the list as well as button for refreshing the list. Moreover, the user can handle printouts and reports and use option Import from file to quickly import many CN codes from an Excel file.
[Generate Import Sheet] ─ this button generates an empty Excel Sheet in a selected location. There are two options possible:
Import CN Codes ─ sheet composed of the the following columns:
CN Code
Additional Unit
Net Weight
Description
Upload to SENT
UOM for SENT
Assign CN Codes ─ sheet composed of the following columns:
CN Code
Item Code
Generating CN codes import sheet
[Import] ─ button for importing data from an Excel File to Comarch ERP Standard system. Available import options:
[Import CN Codes] ─ import in one of the following modes:
Add New
Modify Existing
Modify Existing and Add New
Importing CN codes from a file
[Assign CN Codes]─ assigns CN codes to items from a generated Excel file
Assigning CN codes
In order to define a CN code, it is necessary to select button [Add] from menu List and fill in data directly on the list or enter it through the form available upon clicking on button [Add Through Form].
CN code definition form
CN Code is a mandatory field. From a drop-down list, available in field Additional Unit, the user can select a unit of measure. Some CN codes require information about item’s net weight in Intrastat declaration. In such case it is necessary to check parameter Enter net weight in code definition.
VAT Rate allows for assigning to a given code one of active VAT rates from the group of VAT rates attached to the company to which the center of the logged-on user belongs.
If a VAT rate is specified from the level of a CN code form, then, when changing/adding such CN code to an item form, the user has a possibility to update automatically the VAT rate (both sales and purchase VAT rate).
SAF-T Item Group and SAF-T Procedure Code allow for selecting one of predefined values from one of generic directories with the same names, which are used during the generation of JPK_V7M file.
For companies with checked parameter Upload to SENT fields Upload to SENT and UOM for SENT are available. Those parameters should be checked for items whose data can be sent to the PUESC (Platforma Usług Elektronicznych Skarbowo-Celnych) portal. Assigning such a CN code to an item or item group results in the automatic selection of the SENT parameter on the item form.
Exchange rates
The register of currency exchange rates contains data about exchange rate values defined within exchange rate types. Exchange rate types are used to classify the exchange rates, for example, depending on the bank or exchange office from which the data about exchange rate values derives. Exchange rates are used when conducting currency transactions, for instance, to quickly recalculate values in trade documents. Comarch ERP Standard allows for defining several system currencies within a multi-company structure.
Therefore, in definitions of exchange rate types, it is necessary to specify a Base currency of exchange rate. It is a currency in relation to which recalculations of other currencies are provided.
List of exchange rates
The Exchange Rates window is composed of two sections: Exchange Rate Types and Exchange Rates
In the Exchange Rate Types section, a user can define new exchange rate, modify or delete an existing exchange rate type. In the menu, there is also an option allowing for updating and saving changes applied on the list. It is not possible to delete a default exchange rate type. On exchange rate type definition, it is necessary to define Base currency of an exchange rate.
The right section presents exchange rates specified within a given type. These are exchange rates for all currencies defined in the system, except from the base currency – from the day indicated in the field Date, placed in the right corner of the Exchange Rates section.
The Exchange Rates list is composed of the following colums:
In the column Value, it is possible, within given type of exchange rate, to enter manually the values of exchange rates for foreign currencies in relation to base currency. The other columns of the list contain the following data:
Quantity – number of currency units converted to the base currency
Currency – symbol of a foreign currency for which exchange rate value will be entered
Value ─ exchange rate for foreign currencies in relation to base currency, within a given type of exchange rate
Base Currency – symbol of a base currency in relation to which recalculations of other currencies are provided
Defining new exchange rate type
The button [Add] opens a form for defining a new exchange rate type.
Name ─ mandatory field.
WWW ─ website address where exchange rates are published
nbp.pl ─ for system currency PLN
ecb.eu ─ for system currency EUR
Assembly ─ by clicking on the suspension points button […] in this field, it is possible to select the path to a file with .dll extension. Selected file runs the service with the help of which the currency exchange rates will be imported. In the system setup files, there are the following two files available by default:
B2.NBPExchangeRateProvider.dll ─ for system currency PLN
B2.EcbExchangeRateProvider.dll ─ for system currency EUR
It is possible to implement own assemblies supporting Web sites.
Base Currency – this parameter allows the user to define base currency for exchange rate type being defined. By default, the system sets system currency of a company in which the user is logged-in.
Ask about exchange rates during system startup – this parameter allows the user to specify the types of exchange rates that the system must ask about during startup. That question pops up during the system startup only if any other operator, who is logged on to the company, has entered a currency exchange rate for that day. Upon selecting [No], the value from a previous day will be set as default value of exchange rate for the currency. If the message is accepted by selecting [Yes], a window for specifying the values of exchange rates applicable on given day will open.
In section Exchange Rate Values, it is necessary to enter the values for currencies defined in the system, depending on the selected base currency and the specified date. Those values will next be displayed on the list of exchange rates.
Updating exchange rates
Currency exchange rates are updated in Comarch ERP Standard system in two ways:
Manually – with the help of the button [Update]
Automatically – with the use of the BPM process named Update Exchange Rates
In both cases it is necessary to provide in the exchange rate type window the address of a Web site and to select an assembly referring to exchange rates published in WWW services
Manual update of exchange rates is performed from the level of the list of currencies.
Manual update of exchange rates
Upon selecting an exchange rate type to be updated and clicking the button [Update], a window Exchange Rates Update is opened. Here, it is necessary to indicate a period for which information about exchange rates must be retrieved and the type of updated exchange rate.
Checking the parameter Update all updates all types of exchange rates available in a company to which a user is logged-in.
To be able to update exchange rates automatically, it is necessary to attach a BPM process named Update Exchange Rates and assign it to a company and to operator group, to which the user belongs.
More information can be found in documentation Comarch ERP STANDARD – BPM.
States
Button [States] opens a list of default states/administrative units which can be used for entering information regarding addresses.
The list contains information about the name of a unit, its country and its activity status in the system.
List of administrative units
In the menu, there are standard buttons for adding/deleting/saving a given object from the list, and buttons for refreshing and closing the list. There is also a [Refresh Lists] button which enables the update of the state selection list from the level of other objects, for example, on company form or customer form.
Buttons for handling the list
In order to define a new administrative unit, it is necessary to select button [Add] and enter a unique name of the state and the country to which it will be assigned. The value of column Country is retrieved from the list of countries defined in available directories (Configuration → General → Countries). Parameter in Active column is checked by default.
Currencies
List of currencies
The list of currencies presents all the currencies in which transactions can be registered in the system. By default, the following currencies are defined: PLN, EUR and USD.
System currency is a currency in which operations related to amount are registered within a company. A user can define a different system currency for each company which allows for keeping logistic-accounting registry in different currencies, separately for each company of the companies included in a multi-company structure.
Note
System currency can be changed until the first document associated with a currency (e.g., trade document) is issued or a currency account is created.
List of currencies
In a form of adding/editing of a given currency, the user enters data which is presented in the following columns of the list:
Symbol ─ currency symbol defined in the system
Active ─ parameter indicating whether a given currency can be used in the system. It is not possible to change the activity status of system currency.
System ─ parameter indicating whether a given currency is default for a company in which a user is logged-in.
It is not possible to set a currency as system currency from the level of the list of currencies. It can be defined only on a company form. Detailed information can be found in article <<Company structure ─ company>>.
Next to the symbol of each non-system currency, there is an active [+] button which allows for expanding the list of exchange rate types for which base currency is consistent with the system currency of a given company. Base currency is the currency of given exchange rate type against which recalculations of other currencies are provided.
The list of exchange rate types is composed of the following columns:
Exchange Rate Name ─ name of a defined exchange rate type
Exchange Rate ─ the last (most up-to-date) exchange rate date
Exchange Rate ─ the recent known (updated) exchange rate registered in the system
Currency ─ symbol of the currency whose exchange rate is being presented
In the menu Updated, the [Update] button is available which enables manual update of exchange rates. More information can be found in article Exchange rates.
Defining currency
The button [Add] opens a form for defining a new currency.
New currency form
In the header of a new currency form, there are mandatory fields Symbol and Name. The values of these fields must me unique. For a newly defined currency, the parameter Active is checked by default.
Note
When a company makes trade transactions with a customer from a country using the currency USD and in one moment it terminates its cooperation with this customer, then such currency can be set as inactive and it will not be visible on currency selection lists. All objects already saved with inactive currency remain unchanged.
Note
It is not possible to change the activity status of system currency.
In tab Exchange Rates for System Currency there are exchange rate types displayed, for which base currency is consistent with the system currency of a company. The button [Add Exchange Rate] allows for selecting an exchange rate and assigning an appropriate value (conversion rate) to it. Available columns:
Exchange Rate Type ─ drop-down list presenting exchange rate types defined in the system. With the use of the button [Add Exchange Rate Type], it is possible to create a new type (for example, purchase, ales and average exchange rate).
Exchange Rate ─ conversion rate of foreign (not system) currency into system currency. Values may be manually typed with a keyboard or selected with arrows (up, down) placed next to the default value of 1000 in the column. Entered values of exchange rate will be visible on documents issued in a foreign currency after selecting proper exchange rate type, for which exchange rate was established on a proper date.
Date ─ effective date of a given exchange rate. It may be manually typed with a keyboard or selected from the built-in calendar. By default, the field is filled with the present date.
Currency ─ field filled in automatically
Note
For historicity reasons, exchange rates should be entered on each day. The system does not allow the registration of several exchange rates on one day. The values of exchange rates are saved with a precision to four decimal places.
Tab Available Exchange Rates displays all types of exchange rates available in a company in which a user is logged-in. Additionally, information about base currency of a given exchange rate is provided.
New currency form ─ tab Available Exchange Rates
In Denominations tab it is possible to define values of denominations for a given currency. During database creation, this tab is filled in with denominations for predefined currencies: PLN, EUR and USD.
New currency form ─ tab Denominations
The list of dominations of a defined currency contains the following columns:
Symbol ─ abbreviation of denomination name, the field can contain 20 characters maximally
Conversion Calculator ─ denomination exchange rate in reference to the base currency unit
Description ─ additional information regarding denomination
Active ─ parameter indicating whether a given denomination is active in the system
Available directories – general information
In the General button group of the Configuration menu, there are buttons used for defining objects which are common for many areas in Comarch ERP Standard system.
General button group
Each button opens a window with an object list, where a user can register and configure a new object. Defined objects will be used during the work with the system.
The General button group contains the following buttons opening object list:
[Currencies]
[Exchange Rates]
[States]
[Countries]
[CN Codes]
[Generic Directories]
[Attributes]
[Attachments]
[VAT Rates]
[External Devices]
[Configuration Tools]
[Schedules]
Granting terms
A granted terms is registered in the system as terms transaction. The form of this kind of transaction is the same as the form of a cash/bank transaction. Terms transactions can be previewed only and it is not possible to modify them.
Terms transaction form
Characteristics of terms transaction:
it is created as a result of a payment completion (cannot be added manually) and it is associated with it
depending on the settings of the Parameter payment in the definition of Terms document, it can have status Paid ord Not subject
it is subject to posting, which allows for a proper balancing of the tax and revenue values which are subject to taxation on bookkeeping accounts
it is automatically deleted along with deletion of a completed payment
[Alert] If payment is made with the use of the [Pay} button, then the value of the payment reduced by the value of granted terms is suggested as an amount to be paid.
As part of the creation of a terms transaction, the system creates an association between documents related to that transaction.
Example
On 08/19/2019 a sales invoice amounting to 350.00 USD and with due date 09/18/2019 was issued.
A terms with conditions: 10% and 15 days was assigned to the invoice payment. Terms expiration date: 09/03/2019.
The invoice was paid on 08/25/2019 – terms condition fulfilled
The following documents are generated during the payment completion:
terms transaction amounting to 35.00 USD (350.00 USD * 10%)
SIVC amounting to -35.00 USD
KFSV na kwotę -35,00 PLN (dokument techniczny na potrzeby podatku VAT)
VSIC amounting to -35.00 USD (technical document for tax purposes)
Example
Terms_3 with conditions: 30%, 2 days was added. The value of the parameter Payment on the terms document definition is set to Is not subject. On the form of the customer ABC, the due date is set to 30 days and Terms_3 is assigned.
A purchase invoice is issued for the customer ABC:
date of issue: 5.27.2019
amount 100.00 EUR, exchange rate: 1 EUR = 4 PLN
due date: 6.26.2019
On the PI payment, in the tab Terms, the values which will be calculated once terms conditions are fulfilled, are presented:
Terms on the payment form of purchase invoice in EUR
The payment is completed with a CW transaction with exchange rate 1 EUR = 4.50 PLN on 5.28.2019. The conditions of the terms are fulfilled. During the completion the following documents are automatically generated:
From the level of the lists of debt collection documents and from the level of the debt collection documents, it is possible to send e-mails to customers selected as payers on those documents. It can be done with the use of the [Send] button, which is available in the Printouts group of buttons.
Sending of documents is performed on the basis of the following rules:
There is a possibility of sending marked documents in a single batch
The e-mail address is retrieved from the form of the customer selected as payer in a payment reminder/ dunning letter/late fee
The description retrieved from the value of E-mail Subject directory assigned to the definition of a given document type is set as the message subject
Message subject is set on the basis of the settings on the defition of a given document type
E-mail content contains:
Description retrieved on the basis of the settings on the defition of a given document type
Default printout of the document saved in PDF format, enclosed as an attachment
Send form of a selected payment reminder
Registration of unapplied exchange rate differences
As a rule, financial reports are prepared in Poland in Polish PLN. Because of that, all the assets and payables of an entity, which are denominated in foreign currencies (both international and national), must be recalculated to Polish PLN. On a balance sheet day, this calculation is made according to an effective average exchange rate published for a given currency by the National Bank of Poland (Narodowy Bank Polski – NBP). In the case of clearings, clearings subject to recalculation on a balance sheet day are those which have not been settled.
The obligation of recalculating the values of assets and liabilities results from the Article 30.1.1 of the Accounting Act.
Positive exchange rate differences arise if:
Negative exchange rate differences arise if:
the exchange rate on the day of arising (posting) a receivable is lower than the average exchange rate of the NBP on the balance sheet day
the exchange rate on the day of arising (posting) a receivable is greater than the average exchange rate of the NBP on the balance sheet
the exchange rate on the day of arising (posting) a payable is greater than the average exchange rate of the NBP on the balance sheet
the exchange rate on the day of arising (posting) a payable is lower than the average exchange rate of the NBP on the balance sheet
The regulations relating to balance sheet calculations determine neither the date nor the method of registration of the exchange rate differences fixed at the end of a financial year. In practice, there are three methods of registering those exchange rate differences applied, that is:
generating a contra entry to the exchange rate differences, fixed at the end of a financial year, on 1st January of the following year
generating a contra entry to the exchange rate differences, fixed at the end of a financial year, on the day of payment
registering only paid exchange rate differences fixed between the exchange rate from the balance sheet calculation and the exchange rate from the date of payment
Once selected registration method should be included in the accounting policy and applied continuously.
In connection with the above, it is possible to register unpaid exchange rate differences, calculated on a balance sheet date (so-called statistical exchange rate difference), in the form of a journal entry of an opening balance document and an accounting note (an OB document is used the moment at which we start working with the system, whereas an accounting note document is used in subsequent accounting periods). When registering an exchange rate difference to an opening balance document and an accounting note, the value is registered on a currency account and most often on financial revenues/costs account only in the system currency (the value in a foreign currency equals to zero). In addition, the beginning balance of a journal entry in the opening balance document can be composed of the values of many documents which can have different currency exchange rates. The user knows the value of such entry in foreign and system currency but does not know the average exchange rate (it results from many exchange rates).
In the documents:
Opening balance
Accounting note
Journal entry
it is possible to choose an exchange rate of <none> type for a currency account. Upon selecting this type of exchange rate, the section, in the currency panel, relating to the value of exchange rate is hidden. Thanks to that it is possible any value into the fields with foreign currency and in the system currency. The system does not multiply the value in a foreign currency by an exchange rate in order to obtain a value in the system currency. On a currency account it is also possible to register only the values in the system currency (the value in a foreign currency equals to zero).
Registration of unapplied exchange rate differences on BO document
In the Polish version of database, from the level of the list Clearings, an auxiliary printout Currency Revaluation, which presents historical data, i.e., data including the balance on the day specified by the user. It is generated for clearing accounts. It presents the value of uncleared single-sided entries expressed in the currency after they are recalculated by the exchange rate on the day of their entry in the books as well as the value of those single-sided entries recalculated by the exchange rate effective on the balance sheet day, including calculation of positive or negative exchange rate differences. Exchange rate differences should be included in books manually, by the user.
Note
To make sure that the data presented in the printout is correct, it is necessary to post all currency exchange rate differences which are the result of cleared single-sided entries registered on the account being analyzed.
In order to prepare a correct Currency Revaluation printout, it is necessary to specify the following parameters:
Currency – drop-down list of currencies different than system currency
Value in Foreign Currency – denominator of currency exchange rate in foreign currency
Exchange Rate Value in System Currency – denominator of currency exchange rate in system currency
Balance On – date on which printout is being prepared
Show Single-sided Entries – if option Yes is selected, particular single-sided entries of a given account will be presented in printout along with detailed calculations. Otherwise, only a collective balance for a given account will be presented.
Print System Number – if option Yes is checked, on the printout, besides the number in the general ledger and the number of the document from the single-sided entry, also the source document number is presented. Otherwise, such number is not presented.
Account From/Account To – parameters for selecting account(s) for which printout is being prepared. Accounts which will be presented in the printout from among the selected accounts will only be those whose currency is the same as the currency selected in the printout parameter: Values of those parameters can be empty – if this is the case, all accounts associated with the currency selected in the parameter: Currency will be included in the printout.
Example
Single-sided entry of 8/14/2019 relating to a SI amounting to 1000 EUR, posted on account 201-COMARCH-EUR, cleared with a single-sided entry of the payment for that SI – CD amounting to 600 EUR registered on 9/30/2019. The exchange rate difference resulting from clearing of those single-sided entries at different exchange rates was posted with the date of issue, that is with 9/30/2019.
System date: 12/31/2019
Currency revaluation printout – balance on: 8/31/2019
The single-sided entry relating to the SI document will be included in printout as uncleared.
Currency revaluation printout – balance on: 9/30/2019
The single-sided entry relating to the SI document will be included in printout as partially cleared. The amount to be revalued will be the amount remaining to clear: 400 EUR.
The SI document was paid in full on October 22, hence, the related single-sided entry was cleared in full. Exchange rate differences were posted at the document date of issue.
Currency revaluation printout – balance on: 10/31/2019
The single-sided entry relating to SI will not be included in the printout.
Exchange rate differences documents
An exchange rate difference document is created as a result of completing documents in foreign currency at different exchange rates on the transaction. Such document is created also automatically at the moment of clearing (including payment completion) two journal entries which were generated at different exchange rates.
Characteristics of an exchange rate difference document:
exhange rate difference is calculated automatically when combining documents issued at different exchange rates
exchange rate difference is calculated automatically by the system and is not editable
the date of the later of completed documents is set as the date of issue, with a possibility to change it
once the combination of the associated documents is removed, the exchange rate difference document is automatically deleted
Positive exchange rate differences arise if:
the value of receivable resulting from an invoice is lower than the payment actually received from a customer
the value of expense is higher than the payment actually made
Negative exchange rate differences arise if:
the value of receivable resulting from an invoice is higher than the payment actually received from a customer
the value of expense is lower than the payment actually made
[eample] A sales invoice, amounting to 100 USD, which must be paid by bank transfer, is issued. On the day the SI is issued, the valid exchange rate is 1 USD = 4 PLN A payment of receivable type amounting to 100 USD = 400 PLN is created
On the 27th of February 2019 a deposit of 100 USD is received for that invoice. On the day the deposit is received, the valid exchange rate 1 USD = 4.05 PLN. A CD document is created with the date 27.02.2019, amouting to 100 USD = 405 PLN
The receivable and the transaction of revenue type have been fully paid. The completed amount is the same and is equal to 100 100 USD, however the value in PLN is different for each document.
The system automatically creates an exchange rate difference document amounting to 5 PLN and of Positive type, with the date of issue 27th February 2019. [/example]
Example
A purchase invoice for 200 USD paid in cash has been issued. On the day the PI is received the valid exchange rate is 1 USD = 4,20 PLN. After entering the invoice to the system, a payment of payable type, amounting to 400 USD = 820 PLN is generated.
Part of the amount equal to 100 USD is paid. On the day the PI is received the valid exchange rate is 1 USD = 4,30 PLN.
The system automatically creates an exchange rate difference of Negative type, amounting to 10 PLN (100 x 4,30 – 100 x 4,20 = 10). [/examle]
List of exchange rate documents
The list of exchange rate documents is available from the level of Finances, under the button [Compensations].
List of exchange rate documents
The list contains standard buttons which have been described in article <<Standard buttons>>.
The list is composed of the following columns:
Number – system number of an exchange rate document, assigned by the system according to the numerator
Revenue – value of an exchange rate of the Positive type
Expense – value of an exchange rate of the Negative type
Document Being Paid – system number of the document being paid
Payment Document – system number of the payment document
Currency – system currency of a company in which the document has been issued
and columns hidden by default:
Date of Issue
Status – status of exchange rate difference, possible values are: Revenues, Costs, Compensations, Other
Status – status of exchange rate difference, possible values are: Negative, Positive
Owner – center of the company structure which is the issuer of a document
Detailed description of functioning of the filters can be found in category <<Searching and filtering data>>>
Exchange rate difference document form
To modify or view the details of a document, mark one of the documents on the list and then click [Edit].
Exchange rate difference document form
Modification of an exchange rate document is possible only for documents issued in the same company. Documents issued in different companies can be previewed only.
The form of exchange rate document is composed of the following elements:
Tab General
Section General
Number – system number of an exchange rate document, assigned by the system according to the numerator
Difference Type – type of exchange rate difference: Positive, Negative. The field cannot by edited.
Status – status of exchange rate difference, possible values are:
Revenues (association type: receivable and transaction)
Costs (association type: payable and transactions)
Compensations (association type: receivable and payable or deposit and withdrawal transactions)
Other
A user can add own values from the level of Configuration → Generic Dictionaries → General → Exchange Rate Difference Status.
Date of Issue – document date of issue retrieved from the most recently generated paid document. It can be changed.
Exchange Rate Difference Value – value of the created exchange rate difference
Owner – center of the company structure which is the issuer of a document. Owner can be changed in an exchange rate difference document only if the document is not posted.
Section Paid Documents:
Entity Code – entity’s code indicated on payment/tranaction
Document – system document number
Paid – payment amount in the system currency and in the foreign currency
Exchange Rate – exchange rate of the source document
Type – type of transaction (Revenue/Expense) or payment (Receivable/Payable)
Tab Analytical Description, Attributes, Change History
Detailed description of the tabs can be found in <<Article>>. Change History
Late fees
A late fee is a document in which interest associated with a late payment for receivables are charged.
Configuration of parameters on Late Fee document type
On Late Fee document type, in the tab General, a user can set:
Exchange Rate Type – for late fees issued in foreign currency. It is possible to select one of the <<exchange rates defined in the system configuration>>.
Exchange Rate Type – for late fees issued in foreign currency.
Number of Days Before the Date – for late fees issued in foreign currency.
Number of Days After Due Date – number of days after which a late fee will be sent.
Obligatory minimum retention period
Subject – e-mail message subject. The values defined in <<generic directories>> are available.
Message – e-mail message content. The values defined in <<generic directories>> are available.
Tab General on Late Fee document type
List of late fees
The list of late fees is available from the level of Finances → Late Fees The list contains <<standard buttons>.
List of late fees
The following columns are presented for particular documents on the list:
Document Number
Date of Issue
Customer Code
Customer Name
Address – customer’s address
Arrears – total of amounts to be paid for receivables indicated in the late fee
Interest – total of interest calculated for payments added to the late fee
Costs
Total – total of arrears and costs and interests
Currency
Status
Detailed description of functioning of the filters can be found in category <<Searching and filtering data>>>
Adding a late fee
Late fee form
Tab General
Number – number consistent with the numerator
Payer – selection of a customer from the list of customers
Content – e-mail message content
Delay – number of days after due date, specified in the Late Fee document definition. Default values is 1 day and it can be changed at any moment. For example, if in the field Delay, number of days 3 is indicated, it means that a late fee document can include payments which were made at least 3 days after the due date.
Payment Form – retrieved from the form of a customer indicated as a payer
Due Date – retrieved from the form of a customer indicated as a payer
Owner – center of the company structure which is the issuer of a document
Date of Issue – the current date is set by default, without a possibility of changing it
Overdue – a total of remaining amounts from receivables list
Interest – total of interest calculated for payments added to the late fee
Costs – it is possible to define a numeric value of costs associated with
maintenance of a specific late fee document
Total – a total of values Overdue, Costs and Interest
General → Receivables
The list is composed of the following columns:
No. – ordinal number of added payments
Document Number – system number of a receivable’s source document
Reference Number – number of the receivable’s source document, provided by a user
Due Date – payment due date
Days of Delay – number of days between due date and late fee date of issue
Receivable – receivable amount
Amount Remaining – receivable amount to be paid
Rate [%] – applicable <<interest rate>> retrieved from the form of a customer indicated as a payer
Interest – interest amount charged for payment
In order to add a receivable, click on [Add] from the Receivables button group. A list with receivables which fulfill the following conditions is opened:
were issued for the customer indicated as a payer on the late fee
were entirely or partially paid after their due date
the number of days of delay is bigger or equal to the value in the column Delay of the late fee document
List of receivables paid after due date
Days of delay for particular receivables are calculated as a difference between the date of payment and the due date. Column Debt Collection indicates whether a debt collection document has been already issued for a given payment. Above the list of receivables, there is Payments associated with late fees parameter which decides whether on the list there are also displayed receivables which were already included in another late fee.
Only payments of confirmed documents can be added to a late fee. The exception is an opening balance document.
Tab Customer
In this tab, there is data of a customer selected as the payer in the tab General displayed.
Tab Currency
In this tab, there is information regarding exchange rate and date of the currency of a late fee.
Tab Payments
In this tab there are displayed payments of receivables type for the amount of late fee costs. Their currency and exchange rate are consistent with values in the document.
Tabs Attributes, Attachments, Associated Documents, Change History
Detailed description of the tabs can be found in <<Article>>.
Note
In the system, payment reminders can also be generated in a single batch with the help of a BPM process named Notify About Arrears – Payment Reminders (PR). This process generates for each customer appropriate interest rate documents in which interest charges for delayed payment are calculated. These documents can next be sent to a customer by e-mail.
Dunning letters
A dunning letter is the subsequent reminder sent to a payer notifying him about receivables not paid within their due date and it may also include interest charged due to lack of payment within specified time.
Configuration of parameters on Dunning Letter document type
On Dunning Letter document type, in tab General, it is possible to specify the following:
Exchange Rate Type – for dunning letters issued in foreign currency. It is possible to select one of the <<exchange rates defined in the system configuration>>.
Date Type – for dunning letters issued in foreign currency.
<<Number of Days Before the Date>> – also for dunning letters issued in foreign currency
Calculate To – possible dates are:
Due Date – calculates interest for the number of days from an invoice payment date until the date of issue of a dunning letter
Dunning Letter Due Date – calculates interest for the number of days from an invoice payment date until the payment date of a dunning letter
Include interest for late payment – the parameters indicates whether the value of interest for a payment should include interest on overdue payment or interest on arrears only
Include interest in amount due – the parameter indicates whether the interest value should be included in the amount Total on dunning letter
Number of Days After Due Date – number of days after which a payment reminder will be sent. An integer number from the range (-99:99) should be entered in this field. When a negative value is entered, it is possible to start debt collection actions yet before the due date.
Obligatory minimum retention period
Subject – e-mail message subject. The values defined in <<generic directories>> are available.
Message – e-mail message content. The values defined in <<generic directories>> are available.
Tab General on Dunning Letter document type
Example
In the table below, the rules of calculating interest for each configuration of parameters: Calculate to, Include interest for late payment, Include interest in amount due:
No.
Parameter Settings
Action
1.
Calculate To: Due Date
Include interest for late payment: No
Include interest in amount due: No
Interest is calculated only for the default against each payment
In case of changing the interest rate in the interest calculation period, a separate record is displayed for each payment
A Total amount does not include interest values
Payment is created on the basis of costs.
2.
Calculate To: Dunning Letter Due Date
Include interest for late payment: No
Include interest in amount due: No
Interest is calculated only for the default against each payment
In case of changing the interest rate in the interest calculation period, a separate record is displayed for each payment
A Total amount does not include interest values
Payment is created on the basis of costs
3.
Calculate To: Due Date
Include interest for late payment: No
Include interest in amount due: Yes
Interest is calculated only for the default against each payment
In case of changing the interest rate in the interest calculation period, a separate record is displayed for each payment
A Total amount includes interest values
Payment is created on the basis of costs and interest values
4.
Calculate To: Dunning Letter Due Date
Include interest for late payment: No
Include interest in amount due: Yes
Interest is calculated only for the default against each payment
In case of changing the interest rate in the interest calculation period, a separate record is displayed for each payment
A Total amount includes interest values
Payment is created on the basis of costs and interest values
5.
Calculate To: Due Date
Include interest for late payment: Yes
Include interest in amount due: No
Interest is calculated for the default and for late payment against each payment and its associated payment document
In case of changing the interest rate in the interest calculation period, a separate record is displayed for each payment and each payment document
A Total amount does not include interest values
Payment is created on the basis of costs and interest values
On the payments list of a dunning letter, there is an additional column Date of Payment presenting the date of c/b transaction completing a given payment
List of dunning letters
The list of dunning letters is available from the level of Finances → Payment Reminders. The list contains <<standard buttons>.
List of Dunning Letters
The list is composed of the following columns:
Document Number
Date of Issue
Customer Code
Customer Name
Address – customer’s address
Arrears – total of amounts to be paid for receivables indicated in the dunning letter
Interest – total of interest calculated for payments added to the dunning letter
Costs
Total – depending on the setting of the parameter Include interest in amount due in the <<dunning letter definition>>, this is a total of values Arrears and Costs or total of values of Arrears, Costs and Interest
Currency
Status
Detailed description of functioning of the filters can be found in category <<Searching and filtering data>>>
Adding a dunning letter
In order to add a dunning letter, click on [Add] from the List button group.
Dunning letter form
Tab General
Number – number of subsequent dunning letter, consistent with the numerator
Payer – selection of a customer from the list of customers
Content – e-mail message content
Zwłoka – liczba dni po terminie płatności określona na definicji dokumentu Wezwanie do zapłaty. Domyślnie jest to 28 dni, z możliwością zmiany. Przykładowo, jeżeli w polu Zwłoka zostanie wskazana liczba 10 to na dokument monitu mogą zostać dodane wyłącznie płatności, których termin płatności minął co najmniej 10 dni temu.
Delay – number of days after due date, specified in the Payment Reminder document definition. Default value is 28 days and it can be changed at any moment. For example, if in the field Delay, number of days 10 is indicated, it means that a payment reminder document can include payments whose due date is expired for at least 10 days.
Payment Form – retrieved from the form of a customer indicated as a payer
Due Date – retrieved from the form of a customer indicated as a payer
Owner – center of the company structure which is the issuer of a document
Document status
Date of Issue – the current date is set by default, without a possibility of changing it
Overdue – a total of remaining amounts from receivables list
Costs – it is possible to define a numeric value of costs associated with
maintenance of a specific payment reminder document
Total – depending on the setting of the parameter Include interest in amount due in the <<dunning letter definition>>, this is a total of values Arrears and Costs or total of values of Arrears, Costs and Interest
General → Receivables
The list is composed of the following columns:
– ordinal number of added payments
DocumentNumber – system number of a receivable source document
Reference Number – number of the receivable’s source document, provided by a user
Due Date – payment due date
Days of Delay – number of days between due date and payment reminder date of issue
Receivable – receivable amount
AmountRemaining – receivable amount to be paid
Rate [%] – applicable <<interest rate>> retrieved from the form of a customer indicated as a payer
Interest – interest amount charged for payment
In order to add a receivable, click on [Add] from the Receivables button group. The button opens the list of receivables of a customer selected in the dunning letter, with number of days of delay bigger or equal to the value indicated in the payment reminder. Only payments of confirmed documents can be added to a payment reminder. the exception is an opening balance document.
List of uncompleted payments
Tab Customer
In this tab, there is data of a customer selected as the payer in the tab General displayed.
Tab Currency
In this tab, there is information regarding exchange rate and date of the currency of a dunning letter.
Tab Payments
Upon completing dunning letter costs, in this tab, payments of receivable type equal to the amount of costs appears. Their currency and exchange rate are consistent with values in the document.
Tabs Attributes, Attachments, Associated Documents, Change History
Detailed description of the tabs can be found in <<Article>>.
Note
In Comarch ERP Standard, it is also possible to generate dunning letters in a single batch with the help of a BPM process named Notify About Arrears – Dunning Letters (DL). This process generates appropriate debt collection documents (dunning letters) for each customer and sends the documents to the customer’s main e-mail address.
Example
An invoice SI 1/2019 amounting to 10 000, with due date of 5.10.2019, for customer ABC was issued. Contractual interest defined on the customer form: 10%. A deposit for the amount of 2 000 was registered on 5.20.209 (completed with invoice payment).
On 6.10.2019 a dunning letter with the payment for SI 1/2019 was issued. The amount remaining to be completed for this payment is 8 000.00. On the day of issue of a dunning letter: 6.10.2017, the payment remains open. In dunning letter definition, the parameters of calculating to due date and including interest for late payment have been checked.
Receivables value: 10 000 USD
Late payment value: 2 000 USD
Number of days after due date: 10
Interest for late payment: 2000 USD *10*0,1/365 = 5.48 USD
Default payment value: 8 000 USD.
Number of days which passed since due date (from 5.10 to 6.10): 32 days
Interest for default payment: 8 000 PLN*32*0,1/365 = 70.14 PLN
Receivables in a dunning letter document will be presented as follow:
Receivables in a dunning letter document will be presented as follow:
Document
Due Date
Date of Payment
Days of Delay
Receivable/Payment
Amount Remaining
Rate [%]
Interest
SI 1/2019
5.10.2019
5.20.2019
10
2 000
-
10
5.48
SI 1/2019
5.10.2019
-
32
10 000
8 000
10
70.14
Batch generation of debt collection documents
In the system, it is possible to generate debt collection documents serially, that is for many payments of different customers.
Such serial operations can be performed from the level of Finances → Receivables.
Note
Generating of debt collection documents is possible only if in the filters of receivables, the following filters are properly set:
Option Payment Reminders/Dunning leters is available only if open payments are selected on the list
Option Late Fees is available both for open and completed payments
The abovementioned options are active only if a specific customer or the option All customers is set as entity.
In case an entity different than a customer is selected, the following message is displayed: Debt collection documents can be generated only for customers. Change the settings in the list filter.
Active Generation group of buttons on the list of receivables
Batch generation of payment reminders
In order to perform batch generation of <<payment reminders>>, it is necessary to select appropiate payments on the list and select [Payment Reminders] button. A window for generating payment reminders is opened.
Window for batch generation of payment reminders
The window for generating payment reminders is composted of the following fields:
Payment Reminder Content − e-mail message content
Payment Reminder Costs
Days of Delay:
By document definition – settings from document definition are retrieved
By filter settings – by filter settings regarding days of delay which are set on the list
Indicated range – upon selecting this option, two addition columns are displayed: From/To. If there are values in the columns, then, when generating payment reminders, only payments meeting the criteria are taken into account.
After completing the fields and selecting the [Generate] button, payment reminders are created separately for each customer and payment currency. Generated payment reminders have Unconfirmed status, so it is possible modify them.
Batch generation of dunning letters
In order to perform batch generation of <<dunning letters>>, it is necessary to select appropriate payments on the list and select [Dunning Letters] button. A window for generating dunning letters is opened.
The window for generating dunning letters is composted of the following fields:
Dunning Letter Content − e-mail message content
Dunning Letter Costs
By document definition – settings from document definition are retrieved
By filter settings – by filter settings regarding days of delay which are set on the list
Indicated range – upon selecting this option, two addition columns are displayed: From/To. If there are values in the columns, then, when generating dunning letters, only payments meeting the criteria are taken into account.
Interests:
From customer form – interest is calculated the same way as when adding a dunning letter from the level off Finances → Dunning Letters
Individual – an additional column for entering a value appears
Minimum Interest Amount – dunning letters are generated only for those receivables, for which the value of calculated interest is greater or equal to the entered value.
After completing the fields and selecting the [Generate] button, dunning letters are created separately for each customer and payment currency. Generated dunning letters have Unconfirmed status, so it is possible to modify them.
Batch generation of late fees
In order to perform batch generation of <<late fees>>, it is necessary to select appropriate payments on the list and select [Late Fees] button. A window for generating late fees is opened.
Window for generating late fees from the list of receivables
Window for generating late fees from the list of receivables contains the following fields:
Late Fee Content − e-mail message content
Late Fee Costs
Days of Delay:
By document definition – settings from document definition are retrieved
By filter settings – by filter settings regarding days of delay which are set on the list
Indicated range – upon selecting this option, two addition columns are displayed: From/To. If there are values in the columns, then, when generating late fees, only payments meeting the criteria are taken into account.
Interests:
From customer form – interest is calculated the same way as when adding a dunning letter from the level off Finances → Dunning Letters
Individual – an additional column for entering a value appears
Minimum Interest Amount – late fees are generated only for those receivables, for which the value of calculated interest is greater or equal to the entered value.
After completing the fields and selecting the [Generate] button, late fees are created separately for each customer and payment currency. Generated late fees have Unconfirmed status, so it is possible modify them.
Payment reminder
A payment reminder reminds the payer of receivables not paid within their due date.
Configuration of parameters on Payment Reminder document type
Payment reminder document definition is available from the level of the menu Configuration → Company → Documents → Payment Reminder.
On Payment Reminder document type, in the tab General, a user can set:
Exchange Rate Type – for payment reminders issued in foreign currency. It is possible to select one of the <<exchange rates defined in the system configuration>>.
Date Type – for payment reminders issued in foreign currency.
Number of Days Before the Date – for payment reminders issued in foreign currency.
Number of Days After Due Date – number of days after which a payment reminder will be sent. An integer number from the range (-99:99) should be entered in this field. When a negative value is entered, it is possible to start debt collection actions yet before the due date.
Obligatory minimum retention period
Subject – e-mail message subject. The values defined in <<generic directories>> are available.
Message – e-mail message content. The values defined in <<generic directories>> are available.
Tab General on payment reminder document type
List of payment reminders
The list of payment remidners is available from the level of Finances → Payment Reminders. The list contains <<standard buttons>.
List of payment reminders
The list is composed of the following columns:
Document Number
Date of Issue
Customer Code
Customer Name
Address – customer’s address
Arrears – total of amounts to be paid for receivables indicated in the payment reminder
Costs
Total – total of arrears and costs
Currency
Status
Detailed description of functioning of the filters can be found in category <<Searching and filtering data>>>
Adding payment reminder
In order to add a payment reminder, click on [Add] from the List button group.
Payment reminder form
Tab General
Number – number consistent with the numerator
Payer – selection of a customer from the list of customers
Content – e-mail message content
Delay – number of days after due date, specified in the Payment Reminder document definition. Default values is 14 days and it can be changed at any moment. For example, if in the field Delay, number of days 10 is indicated, it means that a payment reminder document can include payments whose due date is expired for at least 10 days.
Payment Form – retrieved from the form of a customer indicated as a payer
Due Date – retrieved from the form of a customer indicated as a payer
Owner – center of the company structure which is the issuer of a document
Document status
Date of Issue – the current date is set by default, without a possibility of changing it
Overdue – a total of remaining amounts from receivables list
Costs – it is possible to define a numeric value of costs associated with
maintenance of a specific payment reminder document
Total – a total of values Overdue and Costs
Note
When saving/confirming the document, field Due Date is set on the basis of the due date determined in payment reminder header.
General → Receivables
The list is composed of the following columns:
No. – ordinal number of added payments
Document Number – system number of a receivable’s source document
Reference Number – number of the receivable’s source document, provided by a user
Due Date – payment due date
Days of Delay – number of days between due date and payment reminder date of issue
Receivable – receivable amount
Amount Remaining – receivable amount to be paid
In order to add a receivable, click on [Add] from the Receivables button group. The button opens the list of receivables of a customer selected in the payment reminder with number of days of delay bigger or equal to the value indicated in the payment reminder. Only payments of confirmed documents can be added to a payment reminder. Exception is opening balance document.
List of uncompleted payments
Tab Customer
In this tab, there is data of a customer selected as the payer in the tab General displayed.
Tab Currency
In this tab, there is information regarding exchange rate and date of the currency of a payment reminder.
Tab Payments
Upon completing payment reminder costs, in this tab, payments of receivable type equal to the amount of costs appears. Their currency and exchange rate are consistent with values in the document.
Tabs Attributes, Attachments, Associated Documents, Change History
Detailed description of the tabs can be found in <<Article>>.
[Alert]In the system, payment reminders can also be generated in a single batch with the help of a BPM process named Notify About Arrears – Payment Reminders (PR). A debt collection document is generated for each customer based on the carried-out analysis.
Charging interest
In case if a payment is not paid within its due date, an additional fee is charged for each day of delay – so-called interest on arrears. The amount of such additional fee results from the interest rate outlined in statutory regulations and trade agreements. The interest rate can change in time since each interest rate has its validation dates determined. Defined interest rates are common for a whole company structure. An arrear amount is calculated on the basis of given document’s payment value.
In the system, there are three statutory interest rates available, effective in particular periods. These rates can bee freely edited. The list of interest rates is available from the level of the menu Configuration → Finances, under the button [Interests].
Window Interest in Configuration
To define new interest rate, it is necessary to select the button [Add] from the List group of buttons and complete the following data:
Value [%] – interest rate with two decimal places precision. The system controls the uniqueness of values in case of the same date and type.
From – interest effective date
Type – indicates type of interest rate. It is possible to select values entered in <<generic directories>>.
Interest on customer form
In the system, it is possible to assign statutory interest type or define new contractual interest for a customer. It can be done on customer form, in the tab Accounting, in the Interest panel.
To do so, it the field Interests, it is necessary to select one of the following values: Contractual or Statutory. If the option Statutory is selected, the Type field is automatically filled in with default value form Interest Rate Type directory, with a possibility to change it.
Statutory interest on customer form
If the option Contractual is selected, the Type field is not available, however, the user can define own interest values. To do so, it is necessary to select [Add] button and complete the following columns: Value [%] and From.
Contractual interests on customer form
Making payments with the use of Payment Confirmation window
Payment confirmation – general information
With the use of the window Payment Confirmation, it is possible to entirely or partially compete a payment thanks to an automatic creation of a cash/bank transaction completed by a given payment. The Payment Confirmation window can be opened:
automatically, when confirming a document or when confirming and posting a document at the same time
manually, by clicking on the button [Pay]
The possibility of completing a payment through the Payment Confirmation window during the confirmation of a payment is available only if in the <<definition of a given document>>, the parameter Payment confirmation has been checked. The parameter is checked by default for the following documents:
PI, PIVC, CQFA, API, APIVC, VPI, VPIC
SI, SIVC, SIQC, ASI, ASIVC, VSI, VSIC
R, RQC, RVC
Parameter Payment confirmation in the SI document definition
Completion of a payment in the window Payment Confirmation with the use of the button [Pay] can be performed from the level of:
payment estimate
list of receivables/payables
customer and vendor payments
list of trade documents (purchase invoices, sales invoices, receipts)
details of a sales invoice
The option is available only for documents issued in a company to which the user is logged-in. If the payment regards several documents, an inconsistency on at least one of them will make it impossible to register the payment.
Note
Completion of payments with the use of the Payment Confirmation window can be made also by operators who do not have any rights to <<make payments>>.
Elements of the Payment Confirmation window
Payment Confirmation window
In the upper part of the Payment Confirmation window, there is a list of planned payments defined on a document. The list is composed of the following columns:
Pay – the parameter determines whether a given payment has to be made
DocumentNumber – number of the document from which the payment comes
Amount – payment amount
Currency
Payment Form – form in which a payment will be applied
Amount Remaining – amount remaining to be applied
Entity Code – entity’s code indicated on payment
And columns hidden by default:
Terms Expiration Date – the date by which payment must be made to be able to grant terms.
Amount to Be Paid – remaining amount after the payment is corrected by the terms value
Number of Days – number of days within which payment must be made for terms to be granted
Entity Name
Terms Base – payment amount calculated on the basis of document items determined as subject to terms
Terms [%] – percentage value of terms
Value Not Subject To Terms – difference between payment amount and terms base
Terms Value – value of granted terms
The values of columns hidden by default regarding terms are retrieved, by default, from the tab Terms which is available on the payment of a given document. Detailed description of the columns can be found in article <<Defining terms on payment>>.
An operator can decide whether in the Payment Confirmation window displayed after confirming a trade document, all open payments of a given document should be shown or only these of a given type. To do so, from the level of Configuration → Company Structure → Company → Object Availability → Payment Forms object, it is necessary to select the parameter Payment confirmation for a given payment form. If the Payment Confirmation window is opened after selecting the [Pay] button after confirming a document, it will contain all not applied payment, regardless of the value of the parameter Payment confirmation for payment form.
The lower part of the Payment Confirmation window is composed of the following elements:
Customer/Vendor – by default, a customer/vendor indicated on document’s payment is suggested, with the possibility of changing it
Payment Form – the form selected on the document’s payment is indicated by default, with the possibility of changing it
Account – by default, an account associated with a given payment method is suggested, with the possibility of changing it
[Add Report] – allows for adding a report to a selected account. The button is active if a report with a time interval including th date of payment confirmation has not yet been defined in the system.
To Be Paid – payment amount remaining to be paid. For a payment expressed in a currency different than system currency, the amount to be paid is presented in two different currencies – payment currency and system currency. The field cannot by edited.
Paid – the amount to be paid is suggested by default, with the possibility of changing it. For a payment expressed in a currency different than system currency, the amount to be paid is presented in two different currencies – payment currency and system currency.
Change – a difference between the amount taken from the payee and the amount do be paid. For a payment expressed in a currency different than system currency, the amount of change is presented in two currencies – payment currency and system currency and in the lower part of the window, a section with a conversion calculator is displayed. A user can select exchange rate for such payment. In case the payment is made for several documents, the system allows for introducing separated exchange rate for each document.
Document Date – date and time of transaction registration in the system. By default, the system date is suggested, with the possibility of changing it.
For – text field with Automatically The default setting of this parameter depends on the setting of the parameter Fill in field “For” in c/b transaction automatically and it can be changed by the user. If the parameter Automatically is:
checked, the text field is hidden. In a transaction resulting from completing a given receivable, the system number of the payment is retrieved onto the field In a transaction resulting from completing a given payable, the reference number of the payment is retrieved onto the field For.
unchecked, it is possible to insert any text to the field
Description – text field allowing for entering an additional information which will be saved in a transaction generated as a result of completing a given payment. If such description is provided in a payment being completed, it will be copied to this field.
Making payments including existing transaction
In the system, it is possible to make payments for a document with the use of the payment confirmation window including already existing cash/bank transactions. To do so, in the definition of a given document, it is necessary to check the parameter Open transactions. When making payment for a given document, the list of open transactions associated with a given customer/vendor is opened.
Window with documents to be paid for a given customer/vendor.
The list presents cash/bank transactions which have status Open and fulfill predefined requirements specified in the filter placed under the list. Above the list, the amount To Be Applied is presented. This is the amount of the currently paid document.
To combine the completed payment from a document with selected transaction, it is necessary to select that transaction and click on the [Combine] button. It is possible to combine more than one transaction with a document. The system also allows for editing transactions presented on the list.
Moreover, an operator entitled to <<make compensations>> can also compensate a payment from the level of the window Documents To Be Paid. To do so, it is necessary to check the parameter Compensations, which is available in the filter under the list. A payment of the type opposite to the type of the payment currently being settled, will appear. Additionally, the name of the column Document Date will be automatically changed to Date/Due Date and either document date from a cash-bank transaction or a due date from a payment of the opposite type will be displayed there. In order to add a compensation, it is necessary to select an appropriate payment from the list and select the button [Combine]. Detailed information regarding the functionality can be found in article <<?>>.
After combining the payments, the user must click on the button [Save] or [Close]. The button [Close] interrupts the operation of payment completion, however, all completed payments are remembered. Clicking on the button [Save] closes the window (if the payment is already entirely completed) or opens the window Payment Confirmation (if there is still an amount of the payment which should be settled).
Making payments with the use of Pay all option
After selecting more than one payment on the payment estimate or on the list of receivables/payables and then clicking on the button [Pay], the payment confirmation window with active parameter Pay all is opened. If the parameter is:
checked – the system creates one collective payment, amounting to the total of all payments, where payer, payment form and account are retrieved from the firs payment
unchecked – data regarding payer, amounts, account, document date and payment form are displayed separately for particular payments after highlighting each of them
Parameter Pay all in Payment Confirmation window
Note
If several payments are marked and they are of the same type, then the button [Pay] will be active.
Terms in the payment confirmation window
If there are several terms specified for a given payment, the system will retrieve those which were specified on the basis of a document date indicated in the payment confirmation window. Changing a document date will update the terms value.
Example
In section with payments in an invoice amounting to 4 0000.00 USD and which due date is 4.30.2019, there are the following terms defined:
10% if payment is made within 2 days, expiration date is 4.10.2019, amount due is 3 600.00 USD
5% if payment is made within 7 days, expiration date is 9.15.2016, amount due is 3 800.00 USD
The table below presents the amounts due, depending on the document date specified in the payment confirmation window:
Document Date
Trems Value
Amount Due
4.9.2019
10%
3 600 USD
4.9.2019
5%
3 800 USD
4.15.2019
5%
3 800 USD
4.17.2019
=
4 000 USD
Registering change in the payment confirmation window
In the system, it is possible to register change also in the currency of a payment from the level of the Payment Confirmation window. In Configuration → Company Structure → Company → Object Availability → Payment Forms, it is possible to specify whether change should be registered for a given payment form in a given center. By default, the parameter Registering of Change is activated for the payment forms Own Voucher and External Voucher, with no possibility to modify it. The parameter is deactivated for other payment forms, and the user may activate it anytime.
If the parameter Registering of Change is deactivated for a given payment form in a center, upon paying for a payable with change in the same currency, the system will only create a transaction for an amount from the field:
Amount Remaining – if the field Amount Paid contains an amount which is greater than or equal to an amount from the field To Be Paid
Amount Paid – if the field Amount Paid contains an amount which is lower than an amount from the field To Be Paid
If the parameter Registering of Change is activated for a given payment form in a center, a cash/bank transaction is also created for a payment with change in the currency of the payment. Transactions associated with change are automatically compensated with a payment transaction created with the use of the Payment Confirmation window. Additionally, the tabs Associated Documents of those transactions display information about the association between a payment transaction and a transaction related to the registration of change.
Example
Payment form is set as Cash, and the parameter Registering of Change is active:
The user adds SI1 for $70, paid with cash
A customer pays $100, so this amount is set in the Amount Paid field of the Payment Confirmation window
The system creates two cash transactions: CD1 for $100 associated with SI1 and CW1, and CW1 for $30 associated with CD1
Example
Payment form is set as Cash, and the parameter Registering of Change is unchecked:
The user adds SI1 for $70, paid with cash
A customer pays $100, so this amount is set in the Amount Paid field of the Payment Confirmation window
The system creates one cash transaction: CD1 for $70 settled with SI1.
Customer and vendor payments
List of payments for customers/vendors is available from the level of the menu Finances, under the button [Customers]/[Vendors].
The visibility of data in a payment estimate depends on the center to which an operator is logged-in. The document is presented in the list, if:
it was added by a current center (center to which an operator is logged-in)
it was added by a center which is subordinate to the current center
it was added by a center which makes it available (by specifying its visibility for document types) for the current center or its child center
Note
All payments are displayed in the list, regardless of whether accounts indicated on those payments are available in a current center. If an account which is not available in a given center, is indicated on a payment, such a payment can be edited only in the preview mode.
Only transactions entered to accounts available in a current center are displayed in the list.
The list contains standard buttons which have been described in article <<Standard buttons>> and, additionally:
[Complete] − allows for completing a given payment
[Compensate] − allows for compensating a given payment
[Pay]>> − opens the Payment Confirmation form, by means of which it is possible to make a payment by automatic creation of a cash/bank transaction
Customer Payments list
The list of payments for customers/vendors is composed of the following columns:
Document Number
Reference Number − number entered by a user for providing an additional identification
Entity Code − payer’s code on payment and entity’s code on transaction
Receivable − amount of a payment of Receivable type or expense transaction
Payable − amount of a payment of Payable type or of a revenue transaction
Receivable – To Be Applied – receivable amount to be applied
Payable – To Be Applied – payable amount to be applied
Due Date/Date − payment due date or date of document for c/b transaction
Currency − document currency, depends on the settings in the filter
Payment Form
Status
C − Completed
U − Uncompleted
NS − Not Subject
And columns hidden by default:
Document/Transaction Date − document date for payment or transaction date presented in transaction form for transaction
Days of Delay − number of days passed from the due date of payment. After selecting parameter Show days of delay the column appears automatically in the list
Cash Register/Bank − number of account indicated in the document
VAT Amount − displayed only for payments and bank transactions with checked parameter Split Payment
Entity Code − payer’s name indicated on payment and entity’s name indicated on transaction
Voucher Number − number of voucher indicated on payment or transaction
Description − payment description for payment and value of the field For for a cash/bank transaction
Document Description – description entered in the source document of a payment and transaction description for a cash/bank transaction
Voucher Sort − sort of voucher indicated on payment or transaction
Applied − amount cleared by now
System currency − currency of the company in which the document was issued
Value − value of payment or c/b transactions from the payment’s point of view (a receivable with plus sign and a payable with minus sign)
Owner − center of the company structure which is the issuer of a document.
Affects Balance − indicates whether a given payment affects the balance of the account
Detailed description of functioning of the filters can be found in category <<Searching and filtering data>>> and in article <<Payment Estimate tab>>.
Note
For it is possible to sum up under the list of payments, it is necessary to indicate specific currency or the option <All in system currency> in the filter. If system currency of displayed payments is different, value 0 is displayed in the summary.
Generating advance invoice on the list of customer and vendor payments
On the list of customer and vendor payments, it is possible to generate an advance invoice on the basis of open cash/bank transactions. This function is available only if the transaction currency is the same as the currency of the order to which the invoice is being generated.
To issue an advance invoice, it is necessary to:
select a specific cash/bank transaction
select the button [API]/[ASI] from the Generation group of buttons. The buttons are available, if in the filter Transactions, value Deposits or Withdrawals is selected. Selecting one of the buttons opens the list of sales/purchase orders for the customer/vendor indicated in a given transaction.
check an order and click on the button [Select] This action opens a new advance sales/purchase invoice.
Detailed information regarding advance invoices can be found in article <<Advance invoices>>.
Cash/bank account of terms transaction
In the system, it is possible to indicate cash/bank account to which a terms transaction will be registered. Such an account is selected from a drop-down list, in the definition of Terms document type in a given center. The list contains all accounts available in a given center of the structure and the option <None>. After completing a payment with terms assigned, a transaction of terms type will be created in the selected account – in the report specified on the basis of the date of of the payment transaction.
Note
If the option <None> is selected and the parameter By received payment is unchecked, then, when trying to complete a payment for which a terms transaction should be generated, the system displays the following message: There is no account defined for terms. It must be specified in terms document definition. It will not be possible to complete the payment until a register is selected.
Additionally, next to the cash/bank account, the parameter By received payment is available. By selecting it, a cash-bank transaction of terms type will be added to the same account in which a received payment is registered.
Note
A cash/bank account can be changed at any time.
Cash/bank account in Terms document definition
Assigning terms to customer
A <<type of terms>> defined in the configuration can be assigned to a given customer. To do so, in the customer form, in the tab Trade, in Terms field, it is necessary to select an appropriate type of terms
Assigning default type of terms to a customer
If a customer with assigned terms is selected in a document, then, the same type of terms is assigned to the payment of this document, by default.
Defining terms
Terms is a percentage reduction of the total amount of receivable that is granted to a customer by a vendor for having mad an earlier payment.
List of terms types
The list of terms types is available from the level of the menu Configuration → Finances → Types of Terms It is composed of the following elements
Types of Terms window
Name
Active – parameter conditioning whether it is possible to use terms in the system
Items window – presents information regarding selected terms
[%] – percentage value of granted terms
Number of Days – period in which the terms is valid, counted from the date of document issue
Types of Terms
Defining types of terms
In order to define terms types, it is necessary to select the button [Add], which is placed in the Types group of buttons and, next, insert a unique terms name. The parameter Active is checked by default, with a possibility to change it at any moment.
To define a terms type item, it is necessary to click on the button [Add], which is placed in the Terms group of buttons and, next, define the percentage value of granted terms and its period. In the system, it is possible to add one than more terms type with the same items.
[Alert] A terms type which has been already used in the system, cannot be deleted. [/alert]
[Alert] Modification of a terms type will not change terms values in payments for which it has been already used. [/alert]
Assigning terms to a document payment
Methods of assigning terms to a document payment
selecting terms type defined in the configuration in the column Terms, in the tab Amounts of a document
adding new terms type in the tab Terms of a document payment
Selecting terms type in the tab Terms of a document
To assign terms to a payment, from the level of document details it is necessary to open the tab Amounts and then, in the column Terms, select an appropriate terms type.
Selecting type of terms in the tab Amounts of a document
Adding terms from the level of the tab Terms of a document payment
To add terms, from the level of a document payment is necessary to open the tab Terms and them, from the Terms group of buttons, select the [Add] button. The following fields must be filled in for an item:
Terms [%] – percentage value of terms (number from the 0-100 range)
Number of Days – number of days within which payment must be made for terms to be granted. The number of days is counted from the date of issue. After selecting the terms expiration date, the number of days is completed automatically.
Terms Expiration Date – the date by which payment must be made to be able to grant terms. This date cannot be later than the due date. After specifying the number of days, terms expiration date is completed automatically.
Terms Base – payment amount calculated on the basis of document items determined as subject to terms. Detailed description of including/non including an item in terms can be found in article <<>>>
Value Not Subject To Terms – difference between payment amount and terms base
Terms Value – value of granted terms. This is a product of terms percentage value and payment value.
Amount to Be Paid – remaining amount after the payment is corrected by the terms value.
Currency – symbol of terms transaction currency
Tab Terms in document payment
Note
Terms can be granted only to open payments and payments not subject to completion which are not included in a statement of remittance orders.
Note
Terms discounts defined in an order are transferred onto payment of an invoice generated from that order.
Excluding items from terms
In order to calculate terms value in a document, while simultaneously ignoring particular items, it is necessary to uncheck the parameter Include in terms on forms of these items.
Parameter Include in terms on item form
Note
The parameter Include in terms is unchecked and deactivated if an item is associated with a voucher (parameter Voucher is checked).
Example
In the system, there are defined:
Terms1 with conditions: 10% and 15 days
Item_1 with checked parameter Include in terms
Item_2 with unchecked parameter Include in terms
Customer_1 for whom due date is set to 30 days
A sales invoice with two items has been added:
Item_1 – subject to terms, 10 items, price 1.00 EUR/item
Item_2 – not subject to terms, 20 items, price: 2.00/item
Terms1 has been assigned to the invoice payment. As a result, in the tab Terms, the following values are displayed:
Terms [%]: 10,0000
Number of Days: 15
Terms Expiration Date: 6.12.2019 – invoice date of issue plus the number of days determined in terms conditions (11+15)
Terms Base: 30 EUR – total value of item Item_1 (subtotal value + VAT)
Value Not Subject To Terms: 49.20 EUR – total value of Item_2 (subtotal value + VAT)
Terms Value: 1.23 EUR (10% of 12.30 EUR)
Amounts To Be Paid: 60.27 EUR – total value of the whole invoice reduced by terms value
Currency: EUR
If the payment for the invoice is made until 6.12.2019, the terms will be granted.
[/exmaple]
Statements of transactions
Note
Statement of transactions functionality is only available in the French and Spanish versions of the system.
Statement of transactions are used to pass over bills to a bank in order to execute them. They contain uncompleted revenue transactions.
The list of statements of transactions is available from the level of menu Finances, under the [Transactions] button.
Statements of transactions
The list contains standard buttons which have been described in article Standard buttons and, additionally:
[File] − used for generating an ST file to the exchange file directory indicated in the system configuration
The list of statements is composed of the following columns:
Document − ST document system number in accordance with the numerator definition
Date of Issue
Number of Transactions − number of statement items
Value − total of values of all items
Status − ST document status The column can take on one of the following values: Initiated, Unconfirmed, Confirmed, Canceled, Sent
File − name and access path to the generated file
Description
Currency − system currency of a company in which the document has been issued
Statement of transactions is added in the same way as statement of remittance orders. Detailed description of the process can be found in article Statements of remittance orders.
Note
When saving an ST/whole ST document or confirming an ST it is not mandatory to complete fields From Bank Account and To Bank Account. This validation is performed while attempting to send the statement of transactions to a file.
Exporting statements to a file
Export of a statement of transactions to a file is performed the same way as in the case of the statement of remittance orders which is described in Statements of remittance orders.
Statement of payment orders
Payment order is a non-cash bank reconciliation form, in Europe known as direct-debit. This form of payment is basically used in recurring transactions. Payment order regarding a payment of Receivable type – a part initiating payment is creditor.
Configuration settings
From the level of System → Configuration → Data Exchange → in section Transfers it is possible to select exchange file directory for the Statement of Payment Orders document. Then, the path is set as default on the SPO document form.
List of statements of payment orders
The list of statements of payment orders is available from the level of the menu Finances, under the [Statements] button.
List of statements of payment orders
The list contains standard buttons and, additionally:
[File] – used for generating an SPO file to the exchange file directory indicated in the system configuration
The list Statements of payment orders is composed of the following columns:
Document – system number of the SPO document, in accordance with the numerator definition
Date of Issue
Number of Transfer Orders – number of statement items
Value – total of values of all items
Status – SPO document status The column can take on one of the following values: Initiated, Unconfirmed, Confirmed, Canceled, Sent
File – name and access path to the generated file
Description
Currency – system currency of a company in which the document has been issued
Statement of payment orders is added in the same way as statement of remittance orders. Detailed description of the process can be found in article Statements of remittance orders.
Exporting statements to a file
Export of a statement of payment orders to a file is performed the same way as in the case of the statement of remittance orders which is described in Statements of remittance orders.
Statement of remittance orders
Remittance order is a basic and common form of non-cash settlement where a bank account owner orders bank to transfer a specific amount from their bank account to a bank account indicated by him/her in any bank. The remittance order is used to settle payables.
Configuration settings
From the level of System → Configuration → Data Exchange → in section Transfers it is possible to select exchange file directory for the Statement of remittance orders document. Then, the path is set as default on the SRO document form.
Exchange file directory for SRO documents
List of statements of remittance orders
The list of statements of remittance orders is available from the level of the menu Finances, under the [Statements] button.
The list contains standard buttons.
[File] − used for generating an SRO file to the exchange file directory
Statement of Remittance Orders list
The of statements of remittance orders is composed of the following columns:
Document − SRO document system number in accordance with the numerator definition
Date of Issue
Number of Transfer Orders − number of statement items
Value − total of values of all items
Status − SRO document status The column takes on the following values: Initiated, Unconfirmed, Confirmed, Canceled, Sent
File − name and access path to the generated file
Description
Currency − system currency of a company in which the document has been issued
In order to add a statement of remittance orders, click on [Add] button from the List button group.
The form of an SRO document is composed of the following elements:
Tab General
Statement of Remittance Orders form
Number − document number assigned automatically by the system in accordance with the numerator definition
Document Status − determined automatically by the system, cannot be edited
Reference Number − allows for entering an additional document number by the user
Date of Issue − the current date is set by default, can be changed by the user
Date of Transfer − until adding an item to a statement, it is possible to select one of the three options from a drop−down list:
Current Date − system date
Due Date − it is not possible to specify the date in a document header. For particular SRO items, due date from the first payment added to the document is retrieved.
Specified Date − after selecting this option, a field allowing user for entering any transfer date becomes active
Value − total of item values converted to the system currency
File format − drop−down list allowing for selecting a format for exporting from
formats defined in the configuration. It is possible to change format only until the file is generated.
File − name and access path to the generated file. Document number and path specified in System −> Configuration −> Data Exchange −> section Transfer are set by default, with the possibility of change. In case of providing only a file name, without indicating its location, the file will be saved in Comarch ERP Standard setup folder
Owner − center of the company structure which is the issuer of a document
Group transfer orders by entity accounts – this parameter is checked by default and is editable as long as the document has no items. If checked, it is possible to add to an SRO document both payments and items and the payables against the same entity (bank account number) are grouped into one transfer order when generating the file. If the parameter is unchecked, only payments can be added to a document. For payments of the split payment type, it is not possible to group transfers − each payment is a separate order exported to a bank.
For − title of transfer
Account − dop−down list allowing for selecting a bank account. Selected account is automatically set on subsequent items and it cannot be changed. If an account is not selected, it will be filled in automatically on the basis of the first SRO item added. Changing of a register in an SRO document which contains items will automatically update the account on all items.
Tab General → Items
Tab Items of an SRO documents
The list of SRO items is composed of the following columns:
Date of Transfer
Entity Code
Entity Name
Amount
Currency
From Bank Account − number of a bank account for the account indicated on a given SRO item
To Bank Account − number of a bank account of a customer/vendor indicated on a given SRO item
and columns hidden by default:
Split Payment − information whether a given payment is subject to the split payment mechanism
VAT Amount − VAT amount for a payment of the split payment type
In order to add new item, it is necessary to click on button [Add].
SRO document item form
The form is composed of the following tabs:
Tab General
Tab General is composed of the following sections:
Transfer:
Date of Transfer – date of transfer indicated in a header
Amount − total of amounts of a transfer for payments of a given item in the currency of those payments
Account − account indicated in a header, cannot be changed. If no account has been indicated in a header, it is possible to select it from a drop−down list.
From Bank Account − number of a bank account assigned to the selected account. The field cannot by edited.
Bank − name of a bank assigned to the selected account. The field cannot by edited.
Payer:
Vendor − allows for selecting entity type (Vendor, Employee, Institution) and indicating a specific entity of a given type.
Bank Account − allows for selecting from a drop−down list a bank account from all active bank accounts of selected entity.
Bank − field filled in automatically with the code and the name of a bank appropriate for selected bank account.
Payments:
Document − system document number
Date − payment due date
To Send − amount remaining to be sent
Transfer Amount − the amount from the column To Send is set by default, with the possibility of changing it
Currency – currency in which document was entered
Source − reference number from a source document
Split Payment − information whether a given payment is subject to the split payment mechanism
VAT Amount − VAT amount for a payment of the split payment type
Adding a payment to an SRO item is possible only if:
an SRO document is confirmed
the parameter Group Transfer Orders by Entity Accounts is checked
an entity is indicated on an item
To add a payment to an SRO item, it is necessary to click on the [Add] button.
It opens a list of payables with checked parameter To Send and filtered by entity and register selected on the item. In the upper right corner of the list, parameter Terms Date is available, where the following information is displayed:
transfer date from SRO header ─ for Date of Transfer options indicated in the SRO header: Current or Date of Transfer Specified Date
value Due Date ─ for Date of Transfer option indicated in the SRO header: Due Date
Terms date is presented for information purposes and it cannot be edited. Additionally, among columns hidden by default, column Terms Value is available, which contains the value of terms for a given payment. Terms date and terms value have effect on calculation of the amount presented in column To Send. Terms on a statement of remittance orders is calculated on the basis of the full payment amount only.
Example
PI/2020/00001 amounting to 1230 USD gross was issued on 02/09/2020
Invoice due date: 03/09/2020
Terms: 10%, 10 days
Amount remaining to be cleared, terms included: 1 107 USD
On 02/12, the user added SRO/1 and included PI/10/2019 in it. The amount to be sent, terms included, equals 1107 USD. The user changed transfer amount for the payment to 1000 USD.
Then, the user added SRO/2 and included PI/10/2019 in it. The amount to be sent for that payment equals 107 USD (amount remaining to be cleared, terms included – total of amounts without transfers for that payment =1107-1000=107)
List Account Payables opened from the level of payment of an SRO item
Note
On a payment associated with a given item, it is not necessary to indicate the same account as in the item header.
It is possible to add a payment:
that is subject to completion
that is not entirely completed
whose amount To Send is different than zero
that is compatible with an item as to entity, currency, and bank account number – if such number is specified on item form
that is compatible with an item as to date of transfer, if the date of transfer selected in document header is: Due Date. This condition does not apply when adding the first payment to item.
that comes from a confirmed document (exception is an opening balance document whose payment can be added also when the OB is still unconfirmed)
If no entity’s bank account is specified for the SRO item, but it is specified for the added payment, it is assigned to the item. In case of payments added to a SRO document, it is possible to edit the amount of transfer in this column until the document is confirmed. The amount can be modified from range 0 to the amount of To Send value.
In the details of a SRO item, apart from standard buttons, there is also Customer/Vendor button group containing the following buttons:
[Form] − displays the form of a customer/vendor indicated in the SRO document. Modifications to the customer/vendor data made from this level and saving the changes updates that data also in the edited SRO item.
[History] − displays all the transactions registered for the customer selected in an SRO document.
[Payment Estimate] − redirects to the payment estimate window, where it is possible to complete/compensate a payment.
Tab General → Payments
In this tab, there is a list of all payments attached to the given SRO.
Tab Payments in SRO document
The list contains standard buttons.
The list of payments is composed of the following columns:
Document − system document number
Entity Code
Entity Name
Date − payment due date
To Send − amount remaining to be sent
Transfer Amount − the amount from the column To Send is set by default, with the possibility of changing it
Currency – currency of the document payments
Source − reference number from a source document
Split Payment − information whether a given payment is subject to the split payment mechanism
VAT Amount − VAT amount for a payment of the split payment type
Date of Receipt − date of receipt from the source document and in case it is missing
To add new payment, click on the button [Add] which opens the list of payables with checked parameter To Send and filtered by the account indicated in the document header. The payment is taken into account if it has a non−zero amount, is subject to completion and is not entirely completed.
Note
When adding a payment to the statement of remittance orders the compliance between the bank account indicated in the payment and the customer’s bank account indicated on the white list of taxpayers, is checked. Such verification is performed on the same terms as the verification performed when adding payment to an item of a statement remittance order.
Note
In the case where a given payable is to be paid partially (e.g. a purchase invoice paid by several bank transfers – included in several SRO documents), all previously added SRO documents must be paid; only then will the system be able to calculate a correct amount to be transferred in the next SRO document.
It is only possible to confirm SRO documents in which:
a bank account with account number is assigned to each customer/vendor
a bank account with account number is assigned to each bank account
payments value is other than zero
Note
It is only possible to confirm SRO documents containing payments of the split payment type if those payments have VAT amount, customer’s/vendor’s TIN and document number filled in.
This tab is used for providing additional information regarding a Statement of Remittance Orders.
Tab Attributes
Detailed description of the tab Attributes can be found in here.
Tab Attachments
Detailed description of the tab Attachments can be found in here.
Exporting of transfer orders to a file
Generating a transfer file from an SRO document is possible only if the document is confirmed and has a specified file format and the directory it must be saved in. The file can be generated from the level of the list of SRO documents and from the level of a SRO document form, after selecting the button [File] available in the Generation button group. Upon generating the file from SRO document, the document status changes to Sent.
Note
When adding a payment to the statement of remittance orders, the compliance between the bank account indicated in the payment and the customer’s bank account indicated on the, so-called, white list of taxpayers, is checked. Such verification is performed only if on the payment, as entity, a domestic customer of Business entity type, is selected and the document value is higher or equal to the control limit set in the company configuration. If the account number selected in the payment is different than the number on the white list, the following message is displayed: The selected bank account number of this customer/vendor is not listed in the VAT-registered taxpayer register. Are you sure you want to send the bank transfer with such a bank account number? Yes/No. If the user selects the option Yes, the payment will be added to the statement. In case of selecting the option No, the payment will be not added to the statement.
Note
If in the statement, transfer format of Web Service type is indicated, after selecting [File] button, window Transfer Order Signing is opened, where it is possible to sign the order with the use of a selected certificate and to export it to the bank or to export it without any sign. If the order is sent without a sign, it will be necessary to confirm its execution from the level of the bank system.
In particular cases (e.g., when a payment which should not be included in the statement was added or the file format was not inserted), it is possible to change its status back to the previous one. From the level of the context menu of a SRO document, there are two options available, which allow for changing its status:
[Undo Sending] – the option is active only for a document with Sent status and changes its status back to
[Undo Confirmation] – the option is active only for a document with Confirmed status and changes its status back to
Upon providing appropriate data, the file can be generated again.
Option of restoring SRO document status
Compensations in different currencies
In the system, it is possible to compensate transactions denominated in different currencies, that is to compensate transaction denominated in system currency with a transaction denominated in a foreign currency. When compensating documents denominated in different currencies, an exchange rate difference is not calculated.
Compensation of transaction in different currencies is available from the level of:
cash/bank transaction form (button [Compensate] in the tab Payments)
list of customer and vendor payments
payment estimate
Example
A CD transaction amounting to 1 000.00 USD at the exchange rate of 1USD = 4.30 PLN was registered and and a CW transaction amounting to 700,00 PLN. The transactions have been compensated, as a result of which:
The CW transaction is entirely completed
The CD transaction is partially completed
Compensation amount in the system currency 700, 00 PLN (the amount of the transaction amounting to a lowe value)
Compensation amount in the foreign currency (USD): 700 PLN/4.30 PLN = 162.79 USD
Amount to be paid in the system currency: 4,300 PLN – 700 PLN = 3,600 PLN
Amount to be paid in the foreign currency (USD) 700 3,600.00/4.30 PLN = 837.21 USD
Registration of deduction from the level of cash/bank transaction
During application of a cash/bank transaction, it is possible to include a deduction for uncompleted payments of the opposite type and for correcting invoices. A deduction can be registered by associating documents directly or through a compensation document. A cash/bank transaction can be associated with already existing compensation or with a document that is generated directly from the level of the transaction during its application.
Deductions can be applied only by operators who are assigned to an operator group that is entitled to this operation (menu <<Configuration → Company Structure → Operator Group → edited operator group → tab Other Permissions, selected permission Taking account of deductions during payments>>).
During creation and conversion, that parameter is:
activated and editable by default at any time for the operator group that is entitled to making compensations (menu Configuration → Company Structure → Operator Group → edited operator group → tab Other Permissions, selected permission Making of compensations)
deactivated and not editable by default for the operator group that is not entitled to making compensations
A deduction can be registered after selecting the button [Complete] or [Compensate] during registration or edition of a cash/bank transaction. In order to register a deduction via the button [Complete], it is necessary to:
select the button [Complete] from the Payments button group on the form of cash/bank transaction to invoke the list of open payments
select the parameter Show payments of the opposite type – then the open payables will additionally be displayed on the list of receivables, whereas open receivables will be displayed on the list of payables
indicate on the list the payments whose deduction must be registered
select one of the options: [Compensate Selected] or [Generate Compensation] from the button group Deductions
Selecting the option Compensate Selected completes a payment of the opposite type directly. This function is analogical to the function <<Making payment with the use of [Combine Selected] button>>.
Option Generate Compensation is used to complete a payment through an automatically generated compensation document. Before a compensation is generated, a window is opened, in which it is possible to specify a compensation date and whether to apply a current transaction to the compensation. The process of compensation generation is the same as the one described in chapter <<Generation of a compensation document in the payment estimate>>.
A deduction registration mechanism using the option [Compensate] is the same.
Note
Payments of the opposite type are on the list opened with the button [Complete] or [Compensate] presented with an opposite sign in columns: Amount, Amount Remaining, Completed with an opposite sign. Value presented in the column To Be Paid is always an absolute value.
Example
The following transactions were registered for the customer/vendor ABS:
SI/1/2019 for the amount of 11 070 (amount remaining is 9 000)
SI/2/2019 for the amount of 123 000
PI/1/2019 for the amount of 36 900
SIVC/1/2019 for the amount of -123
SIVC/2/2019 for the amount of -492
PIVC/1/2019 for the amount of -246
A user, entitled to taking account of deductions during payments, registered a deposit transaction for the customer ABC and then selected the option [Complete]. The following open receivables were displayed on the list:
Number
Amount
Amount Paid
To Be Paid
Amount Remaining
1
SI/1/2019
11 070.00
2 070.00
9 000.00
9 000.00
2
SI/2/2019
123 000.00
0.00
123 000.00
123 000.00
3
PIVC/1/2019
246.00
0.00
246.00
246.00
Next, the user selected the parameter Show payments of the opposite type after which currently open payables were additionally displayed on the list. The user selected, additionally, the amount of 28 000.00 as amount to be paid for SI/2/2019.
Number
Amount
Amount Paid
To Be Paid
Amount Remaining
1
SI/1/2019
123 000.00
28 000.00
95 000.00
95 000.00
2
SIVC/1/2019
-123.00
0.00
123.00
-123.00
3
SIVC/2/2019
-492.00
-100.00
392.00
-392.00
4
PIVC/1/2019
246.00
0.00
246.00
246.00
The user highlighted the records: 1, 2, 3, 5 and selected the button [Compensate Selected].
The following documents were associated in the effect:
SI/1/2019 and PI/1/2019 for the amount of 9 000
PI/1/2019 and SI/2/2019 for the amount of 27 900
SIVC/2/2019 and SI/2/2019 for the amount of 100
After the document associations, the list of open receivables/payables was updated as follows:
Number
Amount
Amount Paid
To Be Paid
Amount Remaining
1
SI/1/2019
123 000.00
28 000.00
95 000.00
95 000.00
2
SIVC/1/2019
-123.00
0.00
123.00
-123.00
3
SIVC/2/2019
-492.00
-100.00
392.00
-392.00
4
PIVC/1/2019
246.00
0.00
246.00
246.00
The user highlighted the records: 2, 4, and selected the button [GenerateCompensation]. In the window with parameters, the user accepted the date and deselected the parameter: Include current transaction. A compensation was generated with the following data:
Value: 123.00
Receivables: 246.00
Payables: 123.000
Amount Remaining: 123.00
After the compensation is saved, the list of open receivables/payables was updated as follows:
Number
Amount
Amount Paid
To Be Paid
Amount Remaining
1
SI/2/2019
123 000.00
28 000.00
95 000.00
95 000.00
2
SIVC/2/2019
-492.00
-100.00
392.00
-392.00
3
PIVC/1/2019
-246.00
123.00
123.00
-123.00
Example
A deposit transaction CD/3/2019 was registered for the customer/vendor ABS and a date 01.12.2019, the system date is: 01.05.2019. After selecting the button [Compensate], open withdrawal transactions were displayed.
Number
Amount
Amount Paid
To Be Paid
Amount Remaining
1
CW/1/2019
20 000.00
0.00
20 000.00
20 000.00
After selecting next the parameter Show payments of the opposite type, the following open deposit transactions were additionally displayed on the list.
Number
Amount
Amount Paid
To Be Paid
Amount Remaining
1
CW/1/2019
20 000.00
0.00
20 000.00
20 000.00
2
CD/1/2019
-2 000.00
0.00
2 000.00
-2 000.00
3
CD/2/2019
-3 000.00
0.00
3 000.00
-3 000.00
The user highlighted the records: 1 and 3 and selected the button [GenerateCompensation]. In the window with parameters, the date of compensation was changed from 01.06.2019 to 01.02.2019 and the parameter Include current transaction was selected. A compensation was generated with the following data:
Date of Issue: 01.05.2019
Date of Compensation: 01.02.2019
Compensation Value: 20 000
Receivables: 20 000
Payables: 21 000
Amount Remaining: -1 000
Document
Receivable
Payable
Compensation
Amount Remaining
1
CW/1/2019
20 000.00
0.00
20 000.00
0.00
2
CD/2/2019
0.00
3 000.00
3 000.00
0.00
3
CD/3/2019
0.00
18 000.00
17 000.00
-1 000.00
Generation of a compensation document in the payment estimate
The user may generate a compensation document directly in the payment estimate. In order to do so, it is necessary to select from the list all payments/transactions which are to be compensated and select the option [Compensate] available in the Generation section. The system will open a window in which the user may select a date of compensation (by default, the system prompts the current date) and one of the following options:
Collective compensation document − generates and opens a collective compensation document with Initiated Such document can be created only if selected payments are expressed in the same currency and were issued in the company to which the user is logged-in. In case payments regarding only one entity are selected for compensation, on the side panel of generated document, this entity will be indicated and in the tab Payer, its data will be displayed. If payments for many different entities are, compensation document will be created without entity on it.
Individual compensation documents for entity − individual and unconfirmed compensation documents will be generated for each entity and currency. Such documents will be created only for payments issued in the company to which the user is logged-in.
Window for generating compensation
After indicating the date and selecting the option [Confirm], a compensation document is generated and opened. The following fields can be edited:
Reference Number
Content
Owner
Description
Date of Issue
Confirmation Date
Compensate Documents parameter
Compensation document form
To add a compensation document, it is necessary to, from the level of Finances -> Compensations, select the button [Add]. It opens compensation document form.
Note
It is possible to add a compensation document if Compensation payment form exists in the system.
Compensation document form
The compensation form contains standard buttons which have been described in article <<standard buttons>> and, additionally:
[Compensate Documents] – selecting this button creates payments for a compensation document and associates them with the payments of the documents indicated on the list of compensation items. Additionally, in the side panel of the compensation form, the parameter Compensate Documents is checked by default.
<<[Payment Estimate]>> – button available only if in the side panel of the document a customer/vendor has been selected as entity. Clicking on the button opens the list of payment estimate filtered by a given customer/vendor.
[Preview] – button available only if in the side panel of the document, a customer/vendor has been selected as entity. Clicking on the button opens the form of a given customer/vendor.
[History] – button available only if in the side panel of the document, a customer/vendor has been selected as entity. Clicking on the button opens all transactions executed with participation of a given customer/vendor.
The form of compensation document is composed of the following elements:
Side panel
Document status – status of a currently opened document
Number – entered automatically by the system according to numerator definition
Value – compensation amount
Receivables – total of document receivables
Payables – total of document payables
Amount Remaining – total of Remaining amounts from document items
Reference Number – number entered by a user for providing an additional identification of a document
Entity – selected from the list of: customers/vendors, employees, banks or institutions. It is not obligatory to fill in this field on the compensation form but it facilitates the registration of compensations with a single entity.
Date of Issue – the current date is set by default, can be changed by the user
Date of Compensation – the system date is set by default, can be changed by the user This field is updated automatically in case of changing the date of issue, on condition that a document does not contain items
Confirmation Date – set as the system date, by default; it can be changed until compensation document is posted
Compensate Documents – selecting this button creates payments for a compensation document and associates them with the payments of the documents indicated on the list of compensation items. More information regarding functioning of the parameter can be found in description of the tab
Content – predefined value defined in document definition with a possibility to change it. A user can add new message content level of Configuration -> Generic Dictionaries -> General -> E-mail Content.
Currencies – a document currency is retrieved by default on the basis of a currency assigned to an entity selected by the user, with a possibility to change it. If a currency assigned to that entity is inactive, currency in the compensation document is set as the system one. It is only possible to change currencies if a given compensation document does not contain items.
An exchange rate is retrieved on the basis of settings specified in the definition of a given document type (Configuration → Company Structure → Rights Structure → Relevant company form → Documents tab).
In the case where the user selects the option none as the exchange rate type, created payments will use an exchange rate from the compensation document items.
Owner – center of the company structure which is the issuer of a document. Owner can be changed in a compensation document only if the document is unconfirmed. Documents issued in the same company but different centers can be edited. Documents issued in different companies can be previewed only.
Reference Number – number entered by a user for providing an additional identification of a document
Tab Items
The tab contains lists of receivables and payables added to a compensation document. The lists are composed of the following columns:
No. – item ordinal number
Document – system document number
Reference Number
Due Date – due date for payment or document date for transaction
Receivable/Payable – payment/transaction amount remaining to be completed without the current compensation. Amounts of receivables and expense transactions are indicated in the column Receivable, whereas amounts of payables and revenue transactions are indicated in column
Compensation – amount subject to compensation
Amount Remaining – payment/transaction amount remaining to be completed, including the compensation. Amounts of receivables are presented with positive sign, whereas amounts of payables are presented with negative sign.
And columns hidden by default:
Entity Code – entity’s code indicated on payment or cash-bank transaction
Entity Name – entity’s name indicated on payment or cash-bank transaction
Selecting the button [Add] on the list of items opens the list of payment estimate with a possibility of checking selected items. The list contains only uncompleted payments for the entity and currency indicated on the compensation document. If no entity is indicated, the payment estimate is displayed with the parameter All customers and vendors checked automatically in the filter section regarding the entity, which allows for adding payment compensation of different entities to the document.
Note
It is not possible to add items from the level of the Calendar tab.
List of uncompleted payments and transactions.
The payment estimate opened while adding compensation document items contains a parameter Partial compensation. If this parameter is selected, the list will display an additional column To Compensate, presenting an amount to be compensated in the case of a given payment/transaction. By default, an amount to be compensated equals an amount to be paid. However, the user may change this amount in a range [0; Remaining]. In the column To Compensate, amounts are presented in absolute terms. However, when summing up the column, the data is presented with a plus or minus sing, depending on the payment/transaction type (receivables and expense transactions with plus sign and payables and revenue transactions with minus sign).
Compensate column on the payment estimate list with the Partial compensations parameter active
The system controls whether a given payment has already been selected in this particular document and displays a summary of marked records in a given section.
Note
Compensation items can only be documents subject to completion, that is: transactions, payments from confirmed documents and payments of the following documents: VAT invoice, accounting memo and opening balance.
Upon selecting elements from the payment estimate, a window with information about items added and not added to compensation is displayed:
Compensate column on the payment estimate list with the Partial compensations parameter active
Example
The following items have been added to a compensation document:
Receivables:
SI 1/2017 amounting to 4 000, amount remaining: 1 000, due date: 10.12.2017
SI 2/2017 amounting to 12 000, amount remaining: 2 000, due date: 04.04.2017
SI 3/2017 amounting to 6 000, amount remaining: 4 000, due date: 03.09.2017
Payables:
SIC 1/2017 amounting to 40 000, amount remaining: 20 000, due date: 10.12.2017
PI 2/2017 amounting to 12 000, amount remaining: 2 000, due date: 04.04.2017
Deposits:
CD 1/2017 amounting to 4 000, amount remaining: 4 000, document date: 12.03.2017
Withdrawals:
CD 1/2017 amounting to 5 000, amount remaining: 1 000, document date: 12.03.2017
Total of amounts to be paid:
Receivables: 1,000 + 2,000 + 4,000 +1,000 = 8,000
Payables: 20,000 + 2,000 + 4,000 +1,000 = 26,000
Compensation value (amount): 8 000.00
The values of the document are presented in the table below:
No.
Document
Due Date
Receivable
Payable
Compensation
Amount Remaining
Receivables
1.
CD 1/2017
12.3.2017
1 000.00
0.00
1 000.00
0.00
2.
SI 2/2017
4.4.2017
2 000.00
0.00
2 000.00
0.00
3.
SI 3/2017
3.9.2017
4 000.00
0.00
4 000.00
0.00
4.
SI 1/2017
10.12.2017
1 000.00
0.00
1 000.00
0.00
Payables
5.
CD 1/2017
12.3.2018
0.00
4 000.00
4 000.00
0.00
6.
PI 1/2017
4.4.2017
0.00
2 000.00
2 000.00
0.00
7.
SIC 1/2017
10.12.2017
0.00
20 000.00
2 000.00
-18 000.00
Total
8 000.00
26 000.00
8 000.00
-18 000.00
Compensation amount: 8 000.00
Receivable amounting to 8 000 should be associated with items: 5,6, and 7.
Payable amounting to 8 000 should be associated with items: 1,2, 3, and 4.
Example
The following items have been selected in a compensation document with the Compensate Documents parameter active:
Receivables:
SI 1/2018 amounting to 2 000, amount 1 000 has been indicated in the payment estimate, in the column To Compensate
SI 2/2018 amounting to 400, amount 100 has been indicated in the payment estimate, in the column To Compensate
Payables:
PI 1/2018 amounting to 3 000, amount 2 000 has been indicated in the payment estimate, in the column To Compensate
Compensation amount: 1 100.00
The values of the document are presented in the table below:
Receivable
Payable
Compesnation/Value
Amount Remaining
SI 1/2018
1 000.00
0.00
1 000.00
1 000.00
SI 2/2018
100.00
0.00
100.00
300.00
PI 1/2018
0.00
2 000.00
1 100.00
-1 900.00
CMP document header
1 100.00
2 000.00
1 100.00
-600
A payment of the Receivable type amounting to 1 100 has been created
The payment has been compensated with the payable for PI/2018
A payment of the Payable type amounting to 1 100 has been created
The payment has been compensated with receivables for SI 1/2018 and SI 2/2018
Note
When deleting compensation items, it is necessary to pay attention, whether documents on appropriate list have been checked, because after clicking on the [Delete] button all checked items will be deleted – both from the list of receivables and payables. To avoid errors, before checking items to deleted, it is recommended to click on the [Deselect All] button.
Tab Payer
This tab presents the data of an entity selected as a payer in the document side panel. The system imports the main, default address of an entity which is next copied into a printout of the compensation document. If the document side panel does not contain any payer, the address section of the printout will present the data of all payers selected in payments.
Tab Payments
This tab displays the payments of a compensation document associated with payments indicated as items. The creation of payments and their association with the payments of documents selected as document items depends on the value of the Compensate Documents parameter:
If the parameter is checked, the compensation amount is calculated and then compensation payments are generated and calculated with the payments indicated as compensation items. On the lists of receivables and payables and in payments indicated as compensation items, the amount remaining to be applied is updated, as the compensation amount is taken into consideration.
If the parameter is unchecked, the compensation payments are not created and the amount remaining to be completed is updated only on the list of payables and receivables of the compensation document.
The parameter Compensate Documents is checked by default. The user can uncheck it until the compensation document is confirmed. If the parameter is unchecked in a document containing items, the system will display a notification informing the user about the deletion of compensation document payments: Document status will be changed and existing payments will be deleted. Would you like to continue? Yes/No. The status of the Compensate Documents parameter (active/inactive) is remembered for a given session.
Creating and completing compensation payments is performed on the basis of the following rules:
A payment of the Payable type is created on the basis of the sum of receivables and release transactions subject to compensation and related to a given entity. Afterwards, it is automatically associated with these receivables and transactions
A payment of the Receivable type is created on the basis of the sum of payables and receipt transactions subject to compensation and related to a given entity. Afterwards, it is automatically associated with these payables and transactions
The user may not create a new association or delete an existing one manually. Additionally, it is not possible to merge or divide compensation payments.
Example
The following items have been selected in a compensation document with the Compensate Documents parameter active:
Receivables:
SI 1/2018 with customer A and amount 1000
SI 2/2018 with customer A and amount 2000
SI 3/2018 with customer B and amount 1200
Payables:
PI 1/2018 with customer C and amount 4000
PI 2/2018 with customer C and amount 300
The sums of amounts to be paid:
Receivables: 1000 + 2000 + 1200 = 4200
Payables: 4000 + 300 = 4300
The compensation has been completed for the amount of 4200.
The system has created a payment of the Payable type with customer A and amount 3000. The payment has been compensated with the receivables for SI 1/2018 and SI 2/2018
The system has created a payment of the Payable type with customer B and amount 1200. The payment has been compensated with the receivable for SI 3/2018
The system has created a payment of the Receivable type with customer C and amount 4200. The payment has been compensated with the payable for PI 1/2018 and partly compensated with the payable for PI 2/2018 with the amount of 200
Note
It is not possible to confirm a compensation document in which the Compensate Documents parameter is inactive.
If a payment/transaction has been selected as an item in a compensation document with the Compensate Document parameter inactive, the system blocks the possibility to:
select this payment as a document item in SRO, SPO, and ST documents
complete or compensate this payment/transaction
delete the payment association or compensation of this payment/transaction
select this payment/transaction as a document item of another compensation document
The user will be informed about the blockade with a notification: Unable to perform the action. The document has been selected in (compensation document number).
Note
Canceling of a compensation deletes the document payment.
Tab Associated Documents
Information about the association is displayed both from the level of the compensation document and source document of the payment.
Tabs Attributes, Attachments, Change History
Detailed description of the tabs can be found in <<Article>>.
List of compensation documents
Compensation documents allow for registering mutual deduction of receivables/due payments, that is for creating associations between receivables and payables of a given entity or their group.
The functionality of registering compensation documents is available only if on the definition of the company the parameter Register compensations is checked. The parameter is:
unchecked on databases in Polish language version, with a possibility to check it at any moment
unchecked on databases in English and German language version, with a possibility to check it at any moment
unchecked on databases in French and Spanish language version, without a possibility to check it
Parameter Register compensations on a company form
The list of compensation documents is available from the level of Finances, under the button [Compensations].
A compensation document is visible on the list, if:
was issued by the center to which the user is currently logged−in
it was issued by a center which is subordinate to the current center
it was added by a center which makes it available (by specifying its visibility for document types) for the current center or a center which is subordinated to the current center
The list contains standard buttons which have been described in article <<Standard buttons>>.
List of compensation documents
The list is composed of the following columns:
Document Number
Date of Issue
Date of Compensation
Entity Code
Entity Name
Address − address of the entity indicated on the compensation
Value – compensation amount
Currency
Status − compensation document status (Initiated, Unconfirmed, Confirmed, Posted, Canceled)
And columns hidden by default:
Reference Number − number entered by a user for providing an additional identification of a document
Compensate Documents − allows for filtering compensation documents by the value of the parameter Compensate documents
Owner − center of the company structure which is the issuer of a document
Detailed description of functioning of the filters can be found in category <<Searching and filtering data>>>
Completing payments partially
In the system, it is possible to make payments for documents in an amount lower than the amount for which they were issued.
Example
A deposit transaction from customer ABC was registered for the amount of 10 000 USD. After selecting the button [Complete] two payments appear on the list of uncompleted payments of that customer:
first payment for the amount of 10 000 USD (amount to be paid: 6 000 USD)
second payment for the amount of 3 000 USD (amount to be paid: 3000.00 USD)
The parameter Partial payment has been checked and then, directly in the column To Be Paid, the amount to be paid for the first payment has been changed to 4 000 USD. The payment has been checked and the button [Combine] has been selected. As a result of those operations:
the first payment has been partially completed (amount paid: 4 000 USD, amount to be paid: 2 000 USD)
the second payment has been entirely completed
the transaction has been partially completed (amount paid: 7 000 USD, amount to be paid: 3 000 USD)
Parameter Partial payments on the list of of uncompleted receivables after selecting the [Complete] button.
Example
An SI for the amount of 1 000 USD has been registered A payment amounting to 200 USD has been indicated in the window Payment Confirmation. After completing the payment of the purchase invoice, the amount of 800 USD remains to be paid. An automatically created transaction has been entirely completed.
Compensations with the use of the buttons [Combine]/[Compensate]
Compensation allows for registering mutual deduction of receivables/due payments, that is for creating associations between receivables and payables of a given entity or their group.
Compensations can be made by registering a compensation document with the use of the button [Combine] or [Compensate].
To be able to make compensations in all available places of the system, it is necessary to, from the level of Configuration → Operator Groups → edition of specific operator group → Other Permissions, check parameter Making of compensations. The possibility of reading, modifying or deleting compensation depends on checking parameters available from the level of Configuration → Operator Groups → edition of specific operator group → Other Permissions → Compensation. To be able to compensate all objects (transactions/payments), the user must be entitled to read payments and cash/bank transactions.
Compensation with the use of the button [Combine]
It is possible to compensate a payment with the use of button [Combine] from the level of:
cash/bank transaction details
payment details
The mechanism of making compensation is the same both from the level of transaction details as from the level of payment details. In order to make a compensation from the level of transaction details, it is necessary to:
edit the form of a given transaction
check Compensation parameters which is available over the list of documents to complete. After checking the parameter, transactions of the opposite type will be displayed on tle list Documents to Be Paid. It means that in case of completing a transaction of revenue type, additionally, all uncompleted transactions of expense type will be displayed on the list and in case of completing a transaction of expense type, all uncompleted transactions of revenue type will be displayed on the list.
on the list of documents to be paid, check toe transaction with which the edited document has to be compensated
click on the button [Combine] placed in the Payments group of buttons. The same effect can be obtained by double-clicking on a given transaction/payment.
After making a compensation, a document completing a given transaction appears on the list Documents to Be Paid. Additionally, if such document has been paid in full, it will not be displayed on the list Documents to Be Paid anymore.
Note
Payments and cash/bank transactions which values equal to zero are not displayed in this panel.
Note
On the list Documents to be paid, there are only payments/transactions relating to the entity whose payment is currently being compensated.
Parameter Compensations and button [Combine] on transaction
Compensation with the use of the button [Compensate]
It is possible to compensate a payment with the use of button [Compensate] from the level of:
payment estimate
cash/bank transaction details
payment details
list of customer and vendor payments
list of receivables/payables
The mechanism of making compensation is the same for all the levels.
In order to compensate a payment from the level of the payment estimate, it is necessary to mark it on the payment list and select the button [Compensate]. It opens the list of all open payments of opposite type associated with the same customer/vendor from which it is necessary to select documents to be compensated. After selecting a payment, it is necessary to click on the [Combine] button.
The list of open payments is displayed after clicking on the [Compensate] button.
Example
In the system there are invoices issued for the customer ABC: SI/2019/001 amounting to 200 USD and PI/2019/KR/002 amounted to 320 USD. Under an agreement with the customer, it was set that payments from those invoices will be compensated. Therefore, the following actions must be performed:
Highlight the invoice SI/2019/001 on the list
Click on the button [Compensate] placed in the Payments group of buttons
On the created list of open transactions of the entity, find and highlight the invoice PI/2019/KR/002
Select the button [Combine] from the Transactions group of buttons
As a result of these actions:
Payment for the invoice SI/2019/001 is completed entirely
Payment for the invoice PI/2019/KR/002 is completed entirely
The completed amount is 200 USD
The amount to be applied is 120 USD
Completing payments in different currencies
In the system, it is possible to complete payments in the system currency with cash/bank transactions in foreign currency. When making payments to such documents, an exchange rate difference is not calculated.
Example
A CD transaction amounting to 1 000.00 USD at the exchange rate of 1 USD = 4.30 PLN was registered and an SI amounting to 700 USD. The documents have been completed and as a result of this operation:
The SI is paid in full
The transaction is paid partially:
Amount paid in the system currency: 700 USD
Amount paid in the foreign currency: 162.79 PLN
Amount to be paid in the system currency: 3 600 USD
Amount to be paid in the system currency: 837.21 PLN
A deposit in a foreign currency is completed from a payment denominated in the system currency in the same way as the completion of documents in different currencies. In such case, in the payment confirmation window it is possible to select the payment currency and the change currency.
Note
In case of selecting voucher as payment form in a document, it will not be possible to make payment and give change in the currency different than system currency.
Adding opening balance
General information
In the system, it is possible to add an opening balance:
Automatic – the functionality allows for adding an opening balance document on the basis the the previous accounting period.
Manual – the functionality allows not only for entering beginning balances, but also enables to generate payments for entries registered on directory clearing accounts associated with a particular entity. Entries on accounts can correspond to unpaid invoices from previous years.
Note
An opening balance can be saved (it will be still possible to edit or delete it) or confirmed (it will not be possible to edit or delete it, but it will be possible to generate a correction to it).
Adding automatic opening balance
To add an automatic OB document, in menu Accounting → Opening Balance, it is necessary to click on [Transfer Previous Period Balances] button. A form with the following parameters is opened:
Transfer Entries:
Confirmed – during the import, only balances resulting from confirmed entries from the previous accounting period are transferred
Confirmed + unconfirmed – during the import, balances resulting from all entries (confirmed, unconfirmed, reversing) are transferred and the following information is added to the opening balance document description: The balance import included unconfirmed entries.
Transfer Accounts:
All – transfers balances for all accounts with checked parameter Transfer the opening balances, in period from which the balance is being transferred
Selected – the user is transferred to the chart of accounts where it is possible to select these accounts whose balances must be transferred
Display in Log:
Errors and warnings
All
The opening balance is transferred for accounts with parameter Transfer the opening balances in period from which the balance is being transferred.
An automatic opening balance can be saved or confirmed.
In order to create an automatic opening balance correction (AOBC), it is necessary to click again on the button [Transfer Previous Period Blances]. An AOBC document can be added, when all automatic opening balance documents (AOB) and automatic opening balance corrections (AOBC) are confirmed. If at least one document is not confirmed, it will not be possible to transfer the opening balance. In such case, the following error message is displayed: “Unable to transfer the OB because there are unconfirmed AOB: [OB document number]”.
Adding manual opening balance
To add an OB document manually, it is necessary to select the button [Add] from menu Accounting → Opening balance. An opening balance form appears.
Opening balance form
The form is composed of the following elements:
Tab Opening balance
Number – assigned in accordance with the settings of the numeration scheme
Date of Issue – by default, the system suggests the first date of a current accounting period with the possibility of changing it. Changing date of issue of an opening balance does not change dates (of posting, of operation and of issue) on a journal entry generated to the opening balance.
Amount DR – field provided for information purposes, displays the number of items registered on accounts on the DR side
Amount CR – field provided for information purposes, displays the number of items registered on accounts on the CR side
Unbalanced amount – field provided for informational purposes, displays the difference between the values on DR and CR accounts. It is calculated automatically by the system. The system allows for saving a document whose amount is unbalanced, but informs about it with an appropriate message.
Owner – by default, it is the center to which the user issuing the OB document is logged-in
Description – in this field it is possible to enter additional notes to the added document
Table of opening balance document items – contains all the items of an opening balance
The table of opening balance items is composed of the following columns:
Account
Account Name
Amount DR
Amount CR
Currency – set on the basis of the currency of the bookkeeping account
Amount in Currency DR (hidden by default) – the column appears on the list, if a currency account is selected on an OB document item
Amount in Currency DR (hidden by default) – the column appears on the list, if a currency account is selected on an OB document item.
An item can be added to an opening balance document in two ways:
directly in table
through form
Adding an item directly in table
To add an item, it is necessary to select the button [Add in Table] from the Items group of buttons. A row in which it is possible to enter data, appears in the table. A user must fill in the following columns: Account, Amount Dr i Amount Cr. Columns: Account Name and Currency are filled in automatically after an account is selected. Additionally, after selecting an account in a currency different than the system currency, additional columns appear in the table: Amount in Currency DR and Amount in Currency CR.
Adding an item through form
To add an item to cost allocation in table, it is necessary to click on [Add Through Form] button placed in Items group of buttons. A form with data to complete is opened.
Opening balance item form
Tab Opening Balance Item
Account – mandatory field used to insert the account number
Account DR – mandatory field. Debit side of an account, contains entries which debit the account. In case an account in foreign currency is selected on OB item, an additional field where it is necessary to enter the amount in the foreign currency, is available.
Account CR – mandatory field. Credit side of an account, contains positive entires. In case an account in foreign currency is selected on OB item, an additional field where it is necessary to enter the amount in the foreign currency, is available.
Note
The system does not allow for saving an item without account or amounts. The button [Save] remains inactive.
Create account – checking this parameter allows for creating a directory account for an entity
[Customer/Vendor], [Employee], [Institutions], [Banks] – with the use of this button, it is possible to assign an entity to a given opening balance item. After selecting the button, it is possible to select one of the following entity types: Customer/Vendor, Employee, Institutions and Bank. After selecting the button [Customer/Vendor], [Employee]/ [Institutions], [Banks], the user is transferred to the list of selection of a given entity.
Section Currencies
This section is available, when on a OB document item an account in foreign currency is selected. It allows for selecting an exchange rate according to which a document item is to be recalculated.
In order to select an exchange rate by which the system will recalculate the opening balance amount into the system currency, it is necessary to specify the Exchange Rate Type and the Date Type. If in the system, there is a default exchange rate for the OB document registration date, it is suggested automatically/
Section Currencies on opening balance form
Tab Amounts on opening balance item
The tab allows for defining amounts composing an opening balance item. Successively added items, associated, e.g., with a given clearing account, reflect unpaid documents from the previous accounting period being the opening balance of the account.
The amounts can be added directly in table or through form.
Adding of amount directly in table – in order to do so, click [Add]. Then, a row for entering of amounts appears. It is necessary to specify Cr amount or/and Dr amount. Other columns are not mandatory.
Adding of amount through form – in order to do so, click [Add Through Form]. Then, a form for entering of data appears.
Form of opening balance item for an account in foreign currency
The form of the Amounts tab is composed of the following elements:
Amount – mandatory field. The account is transferred from an opening balance item to which particular amounts reflecting unpaid invoices are added. The field cannot by edited.
Customer/Vendor – entity with which an account is associated The field cannot by edited.
Amount DR – mandatory field, in the case of an account in foreign currency, an additional account for entering the amount in foreign currency is available
Amount CR – mandatory field, in the case of an account in foreign currency, an additional account for entering the amount in foreign currency is available
Date of Transaction – allows for entering the date of a transaction associated with a given amount. By default, this is the date of issue selected in the OB header.
Document Date – allows entering of date of the document interrelated with a given amount. By default, this is the date of issue selected in the OB header.
Payment Form – payment form from invoice associated with a given amount. In case of items registered in a customer/vendor directory account, the payment form is determined on the basis of data specified in customer/vendor form.
Payment Form – payment form from invoice associated with a given amount.
Document Number – number of an invoice associated with a given amount In case of items registered in a customer/vendor directory account, the payment form is determined on the basis of data specified in customer/vendor form.
Section Currencies
Allows for entering exchange rate on the same principle as to an opening balance item.
Tab Payments on opening balance item
It contains the list of payments generated for individual amounts of opening balance, entered to a directory cleating account associated with the entity.
Note
The AOB and AOBC documents (automatic) do not generate payments or clearings. Only OB and OBC documents registered on directory accounts of clearing type associated with an entity generate payments and clearings.
A user is able to edit a given payment and complete it. Payment from an accounting note document is subject to the same rights as payments generated for trade documents. The possibility of completing a payment from an unconfirmed opening balance document constitutes an exception.
Detailed information regarding payments for documents can be found in category Payments.
Tab Attributes
The tab contains a list of attributes assigned to an opening balance item. Detailed description of the tab Attributes can be found in article Attributes
Tab Analytical Description
The system allows for entering analytical description on the level of an opening balance. Detailed description of the functionality can be found in article Analytical description on opening balance document.
Tabs Attributes and Change History and Attachments
Detailed description of tabs can be found in article Tab Discount Codes, Analytical Description, Attributes, Attachments and Change History.
Undoing confirmation of a confirmed opening balance
On the list of opening balance documents, in the context menu, option Undo Confirmation is available. With the use of the option, it is possible to change the status of a given opening balance document from Confirmed to Unconfirmed. It is possible if:
In the status diagram, on Opening balance/Opening balance correction document type, for at least one group to which the user belongs, it is possible to go from the Confirmed to the Unconfirmed status (by default, the option is activated for B2_admin and B2_default operator groups)
on the operator group, in Other Permissions tab, for at least one group to which the user belongs, the parameter Change of OB status to Unconfirmed is checked. The parameter is unchecked by default and can be checked if on the status diagram for OB and OBC documents, for at least one group to which the user belongs, it is possible to change status from Confirmed to
Note
The option Undo Confirmation is not available for the French version of the database.
Undoing confirmation of an opening balance or its correction changes the status of the opening balance and of the entries generated on the basis of the opening balance. [/alert]
Note
It is not possible to undo opening balance confirmation for a closed accounting period.
Currency clearings
General information
Currency clearings are connected with registration of and making payment to currency documents which are posted onto accounts kept in currencies different than system currency. All the rules and mechanisms of clearing single-sided entries denominated in foreign currencies (with the help of options [Clear], [Associate Only Single-sided Entries], [Automatic Clearing]) are the same as those of clearing single-sided entries denominated in foreign currencies. Moreover, when clearing single-sided entries registered with different exchange rates, an Exchange Rate Difference document is generated. The level from which single-sided entries are cleared, that is the Clearings list or single-sided entry, is of no importance – the effect of clearing single-sided entries is always the same. A single-sided entry originating from a posted Exchange Rate Difference document is always assigned to a single-sided entry with higher exchange rate.
Note
Only properly built posting schemes, which are used for posting documents, ensure properly completed payments of documents and properly cleared single-sided entries. A very important element is the structure of a posting scheme which posts the payment amount to entity’s clearing account. Such element should be built on the basis of table Payments, that is, the option Payments should be selected in the field Element Calculated For, and the option Payment or Receivable or Payable should be selected in the Amount field.
Parameter Currency posting, available on a posting scheme element, is also very important in the case of currency clearings. If it is checked, it means that the element of a posting scheme is defined for posting of documents in a foreign currency on accounts kept in a foreign currency. Only if it is checked, values on the account will be expressed both in the currency of a payment/cash-bank transaction and in the system currency. This enables generation of exchange rate difference documents resulting from clearing of single-sided entries as well as correct clearing of single-sided entries.
Note
Leaving the parameter Currency posting not selected may cause errors related with the lack of cleared single-sided entries, blocked clearing option (blocked option of making payments to documents), miscalculation of exchange rate differences in incorrect amounts.
Note that in case of clearing single-sided entries denominated in a foreign currency (with different exchange rate values), the clearing is accompanied by generation and posting of an Exchange Rate Difference document with the use of default posting scheme. The single-sided entry of the exchange rate difference is an integral part of the clearing and it “completes” the clearing of both single-sided entries.
In case clearing of single-sided entries is a consequence of making payments to posted documents denominated in a foreign currency with different exchange rates, an Exchange Rate Difference document is created. But in this case, the Exchange Rate Difference document is not posted automatically with the default posting scheme. It must be posted manually from the level of Exchange Rate Documents list. Single-sided entries are cleared entirely not until the last document, participating in the completion of document payments, is posted, which is exactly the Exchange Rate Difference document. A common situation within currency clearings is in Comarch ERP Standard system having a clearing of single-sided entries without a ERD document posted. If this is the case, one of the single-sided entries remains uncleared for the amount of that ERD document. By posting the Exchange Rate Difference document, single-sided entries will be cleared entirely.
It is possible to clear single-sided entries and make payments to their documents (with the help of the option [Clear]) only if both cleared single-sided entries fulfill an additional condition (except for the general clearing rules), meaning that the exchange rate in the single-sided entry is the same as that in the source document.
Clearing of single-sided entries denominated in a foreign currency
Single-sided entries denominated in a foreign currency and associated with a source document can be cleared with the help of the option [Clear] from the level of:
Clearings list
Tab Clearings DR/Clearings CR of a single-sided entry
The process of generating a clearing determined in foreign currencies is performed the same way as when generating a clearing in the system currency, but in this case an Exchange Rate Document is also generated. The Exchange Rate Difference document is posted automatically with the use of the default posting scheme. A single-sided clearing created as a result of the posting also participates in the clearing and is an integral part of the clearing.
Example
A Sales Invoice (SI) document denominated in EUR at the exchange rate 1EUR = 4PLN and a Cash Deposit transaction denominated in EUR at the exchange rate 1EUR = 5PLN have been added.
Both documents have been posted with correct schemes.
On the list of clearings, it is necessary to indicate the clearing account on which both documents were posted and filter the list.
List Clearings – single-sided entries to be cleared.
From the level of the first single-sided entry, it is necessary to select option [Add]. List of journal entries on account is opened, where the user selects the second single-sided entry and confirms the selection by clicking [Select].
The system clears the single-sided entries. Because they are expressed in a foreign currency at different exchange rates, an Exchange Rate Difference document is also generated and posted. A single-sided entry resulting from posting of the Exchange Rate Difference document is an integral part of the clearing and participates in it.
List Clearings – single-sided entries after clearing
In accordance with the basic rule of clearing operations, completion of the associated source documents is carried out automatically by the system as well. An exchange rate difference document has also been generated.
Clearing of single-sided entries denominated in different currencies.
In the system, it is possible to clear (and complete) single-sided entries in different currencies. This functionality refers only to single-sided entries which source documents derive from posting of:
Cash-bank transaction denominated in a foreign currency and payment denominated in the system currency
Cash-bank transaction denominated in a foreign currency from cash-bank transaction denominated in the system currency
An Exchange Rate Difference document is not created as a result of the clearing.
Example
The option of clearing single-sided entries denominated in different currencies does not refer to option [Associate Only Single-sided Entries] and function [Automatic Clearing].
Deleting clearings of single-sided entries denominated in different currencies
In the case of clearing an unconfirmed single-sided entry generated as a result of posting an Exchange Rate Difference document, it will be removed automatically along with deleting the clearing. If deleting a clearing deletes also a completed payment/compensation of a document, whereas the completed payment/compensation is associated with an Exchange Rate Difference document, the document will be deleted automatically along with removing associations between the documents.
In the case of clearing an unconfirmed single-sided entry generated as a result of posting an Exchange Rate Difference document, it will be removed automatically along with deleting the clearing. Clearing of the associated single-sided entries can be deleted only after the contra entry has been confirmed.
Making payments with the use of the buttons: [Combine] [Combine Selected], [Complete], [Pay]
Payments can be made with the use of the following buttons:
Button graphic symbol
The button is available from the level of:
• cash/bank transaction details
• payment details
• payment estimate
• customer and vendor payments
• payment estimate
• customer and vendor payments
• list of receivables/payables
• cash/bank transaction details
• payment details
• payment estimate
• customer and vendor payments
• lists of payables/receivables
• trade documents (invoices and receipts)
• details of a sales invoice
Making payments with the use of [Combine] button
The button [Combine] is available from the level of <<payment details>> and <<cash/bank transaction details>>, i the tab Payments.
Button [Combine] in the Payments tabDetailed description of the tab Payments can be found in article <<Adding receivable/payable>>.
In order to complete a given payment, it is necessary to select an appropriate document On the list Documents to Be Paid and select the [Combine] or double-click on the selected document. After making a payment, in the section Paid Documents, the document completing the payment will appear. Additionally, if such document has been paid in full, it will not be displayed on the list Documents to Be Paid anymore.
Note
On the list Documents to Be Paid, there are only transactions and payments of the opposite type associated with the entity whose payment is currently being applied.
In order to delete a payment, on the list Paid Documents, it is necessary to select an appropriate document and select the button [Remove Combination] or double-click on that document. After deleting such payment, the document disappears from the list Paid Documents and it appears again on the list Documents To Be Paid.
Making payments with the use of [Combine Selected] button
To complete a payment, on the list of payment estimate or on the list of customer/vendor payments, it is necessary to select at least two documents which are to be associated one with another and select the button [Combine Selected].
Button [Combine Selected] on the list Customer payments
Making payments with the use of [Complete] button
Payments can be completed with the use of the button [Complete] from the level of:
payment estimate
customer and vendor payments
list of receivables/payables
cash/bank transaction details
payment details
Selecting the button [Complete] opens a list of all open transactions for a given customer/vendor (in case of completing payments) or payments (in case of completing transactions). After selecting appropriate documents, it is necessary to click on the [Combine] button. The system also allows for editing documents presented on the list.
The documents are presented on the list of open transactions/open payments only if the user is authorized to <<read payment or transaction>>. Additionally, on the list of open transactions/open payments, there are all objects available in the center to which the user is currently logged-in.
Window Open Cash/Bank Transaction during a payment completion
Making payments with the use of [Pay] button
Making payments with the use of the button [Pay] is described in article <<Making payments with the use of Payment Confirmation window>>.
Configuration settings relating to the functionality of settlements
The functionality of settlements allows for:
associating received or executed payments (cash/bank transactions) with receivables or payables
compensating documents whose cash flow is opposite e.g., revenue transaction with expense transaction or receivable with payable
Note
Only payments of confirmed documents are subject to document association. The exception are payments of opening balance which are subject to completion also if the balance opening document is unconfirmed.
In the system, it is possible to complete only the documents within one company to which the operator is logged in. Documents issued within the same company but in different centers can be completed both from the level of that company and from the level of its centers, however, to do so, several configuration settings are required. Documents, which are to be visible in center and to which payments can be made, must be made available in the center which is the owner/issuer of such documents. Additionally, from the level of Configuration → Company Structure → Company → Documents → Visibility, it is necessary to attach cash/bank accounts to centers. If a document is available in a given center, its payment is visible too. In case a shared document was completed from a cash/bank transaction which is not available in given center or company, values of that transaction are masked.
Completions can be made from the level of:
Payment details of a given document
Cash/bank transaction details
List of payments (receivables, payables)
Customer and vendor payments
Payment estimate
Lists of documents and document details
To be able to make payments in all available places of the system, it is necessary to, from the level of <<Configuration → Operator Groups → edition of specific operator group → Other Permissions>>, check parameter Application of payments
Note
Canceling trade documents, VAT invoices, corrections of VAT invoices, debt collection documents and deleting VAT invoices and corrections of VAT invoices automatically deletes clearing/compensation of canceled/deleted document. The following message will be displayed: Are you sure you want to delete the selected invoice? The associated payments will be deleted.
Tab Calendar
Information provided in the Calendar tab refer to a financial situation of a company by time ranges. The Calendar tab presents information in accordance with the criteria selected in tab Payment Estimate.
Note
If the option <All in system currency> is selected in filter pane of a payment estimate, then when proceeding to tab Calendar, the system controls whether all the objects are expressed in the same system currency. In case of various currencies, the message: “Impossible to display the calendar for all currencies. Select different value in the filter.” will be displayed when attempting to open the tab Calendar.
Tab Calendar in the payment estimate window
The tab Calendar has a tree structure and its layout is the following:
Level 1 − Analysis Period
Level 2 − receipts and expenses structure elements:
Resources – cash/bank transactions value
Payments – payments associated with documents
Planned – entered directly from the level of payment estimate or the list of payables/receivables
Level 2 is displayed only if the parameter By receipts and expenses structure has been checked in the filter.
Level 3 − Document
The list Calendar is composed of the following columns:
Period/Document Number − for the level 1 it presents the period, for the level 2 it presents the names of the elements of elements of receipts and expenses structure and for the level 3 it presents the system number of a document. The period depends of the value of the parameter Group which is available in the filter.
Reference Number − presented for the level 3
Entity Code − presented for the level 3
Receipts − on the third level the amount of receivable or receipt for a given document is presented, whereas on the first and the second level the total value of all the amounts from the third level is presented.
Expenses − on the third level the amount of receivable or expense for a given document is presented, whereas on the first and the second level the total value of all the amounts from the third level is presented.
Balance − presented on the first and second level. It is calculated as a difference between receipts and expenses.
Current Balance − current balance of the account at the end of a given period, presented on the first level
and columns hidden by default:
Cash Register/Bank
Description
Document Description
Amount Remaining
Applied
Value
Owner
Affects Balance
Detailed description of hidden columns can be found in article <<Tab Payment Estimate>>.
Filtering on Payment Estimate tab
The Calendar list has general filter which allows for filtering by the following parameters:
By inflows and outflows structure – parameter unchecked by default; if the parameter is checked, the level 2 is displayed
Group – parameter determines the method of presenting values on the list:
Daily − default value
Weekly
Monthly
Quarterly
Yearly
Skip periods without sales – parameter checked by default
Detailed description of functioning of the filters can be found in category <<Searching and filtering data>>>
Tab Payment Estimate
Tab Payment Estimate allows for analyzing status of payments and cash/bank transactions, as well as for making payments.
Tab Payment Estimate
[Add] − opens a drop-down list with payment types: Credit, Debit Payments added from the level of a payment estimate are not subject to completion.
[Source Document] − allows for previewing the source document of a payament selected in the list
[Combine Selected] − completes selected payments
[Complete] − allows for completing a given payment
[Compensate] − allows for compensating a given payment
[Pay] − opens a form Payment Confirmation, by means of which it is possible to make a payment by automatic creation of a cash/bank transaction
[Compensations] − generates a compensation document for selected payments
[Payments] − allows for making batch changes for selected payments. The button is active only if the operator belongs to a group with granted permission Batch changes to payments, which is available in the tab Other permissions. The user can decide about details contained in log displayed during the change. The same rules apply for batch changes as in the case of payment edition. The following elements can be changed:
Payment form
Due date
Account
Payer
Payer’s bank account
Deleting of settlements and compensations (permissions Application of payments/Making compensations are required)
Window with batch change to payments parameters
[Transactions] − allows for making batch changes for selected operations. The button is active only if the operator belongs to a group with granted permission Batch changes to transactions, which is available in the tab Other permissions. The user can decide about details contained in log displayed during the change. The same rules apply for batch changes as in the case of payment edition. The following elements can be changed:
Payment form
Due date
Account
Payer
Payer’s bank account
Deleting of settlements and compensations (permissions Application of payments/Making compensations are required)
In the upper right corner of the list, parameter Show days of delay is available. Checking it results in showing an additional column Days of Delay in the list of payments. The column presents number of days passed since the due date of an unpaid credit/debit.
[Attributes] – allows for batch update of attributes for selected payments. After clicking on this button, a window where it is possible to specify batch change parameters, is displayed.
The list Payment Estimate is composed of the following columns:
Document number
Reference Number − number entered by a user for providing an additional identification
Entity Code − payer’s code and code of entity for transaction
Receipts − amount of credit or revenue
Expenses − amount of debit or expense
Due Date/Date − payment due date or date of document for c/b transaction
Currency − document currency, depends on the settings in the filter
Payment Form
Status
C − Completed
U − Uncompleted
NS − Not Subject
and columns hidden by default:
Document/Transaction Date − in the case of payment, it is the date of document from the form of registered payment and in the case of transaction, it is the date from a transaction from
Days of Delay − number of days passed from the due date of an uncompleted credit/debit. After selecting parameter Show days of delay the column appears automatically in the list.
Cash Register/Bank − number of account indicated in the document
VAT Amount − displayed only for payments and bank transactions with checked parameter Split Payment
Receivable − amount of a payment of Receivable type or of an expense transaction
Receivable – To Be Applied – receivable amount to be applied
Entity Code − payer’s name indicated on payment and entity’s name indicated on transaction
Entity’s TIN
Voucher Number − number of voucher indicated on payment or transaction
Description – description of payment for payment and value of the field For for cash/bank transaction
Document Description – description of payment source document and description of transaction for cash/bank transaction
Transfer Orders − number of the SRO document in which a given payment has been included
To Be Applied − transaction/payment amount remaining to be applied. Receivables are presented with plus signs and payables with minus sings, according to the data presented in the following table:
Object Type
Amount Type
Sign
Planned payment (of a source document
Receivable > 0
Receivable, plus sign
Planned payment (of a source document)
Payable > 0
Payable, minus sign
Cash/bank transaction
Revenue > 0
Payable, minus sign
Cash/bank transaction
Expense > 0
Receivable, plus sign
Voucher Sort − sort of voucher indicated on payment or transaction
Applied − amount cleared by now
System currency − currency of the company in which the document was issued
Value − value of payment or c/b transactions from the payment’s point of view (a receivable with plus sign and a payable with minus sign)
Debt Collection – number of debt collection document in which a given payment is included
Owner − center of the company structure which is the issuer of a document
Affects Balance − indicates whether a given payment affects the balance of the account
Arrears – if a given payment (days of delay > 0), an exclamation mark will be displayed in this column
Payable − amount of a payment of Payable type or of a revenue transaction
Receivable – To Be Applied – receivable amount to be applied
Note
In columns Revenues and Expenses, for payments, there are amounts remaining do be applied and for cash/bank transactions, there is document value.
Filtering on Payment Estimate tab
The tab Payment Estimate contains the following filtering areas:
General − allows filtering by:
Entity indicated on payment/transaction − All, Customer, All customers, Employee, All employees, Institution, All institutions, Bank, All banks, None
Currencies − <All>, <All in system currency> and active currencies defined from the level of Configuration →
Payment forms − active payment forms
Tax correction − VAT, Income tax, None. After selecting VAT value and filtering the list, only payments will be displayed and the following additional columns will appear: VAT Due Date and VAT Days of Delay (value with minus sign indicates the number of days remaining to apply payment, and with plus sign, indicating the number of days after due date, respectively). It allows to obtain information about payments which should be completed in order to avoid the adjustment of input tax or about those payments, which have not been completed by customers/vendors and, hence, grant the right to decrease the output tax. After selecting in selecting the value Income Tax, only payments of Payable type will be displayed and the following two additional columns will appear: Income Tax Due Date and Income Tax Days of Delay (values with minus sing indicates the number of days remaining to apply payment, and with plus sign, indicating the number of days after due date, respectively).
Range of Dates − allows for filtering by due date for payments and by document date for c/b transactions. The following values are available within the filter: Any, Day, Month, Range of Dates, Previous Month, Current Month. The range of dates allows for selecting a specific time interval.
Payments − allows for filtering by:
Payment type – <All>, Account Receivable, Account Payable, None
Payment settlement status − uncompleted, completed, not subject
Document status − <All>, Posted, Unposted
Split payment parameter on payment − filter visible only if in the definition of a relevent center of the Company type, for the parameter Split payment according to Polish regulations, value In accounting module or In accounting and trade modules is specified.
Timeliness − <All>, Not overdue, Overdue, Today’s
Transactions − allows for filtering by:
Transaction type − <All>, Deposits, Withdrawals, None
Transaction settlement status − uncompleted, completed, not subject
Document status − <All>, Posted, Unposted
Split payment parameter on transaction − filter visible only if in the definition of a relevent center of the Company type, for the parameter Split payment according to Polish regulations, value In accounting module or In accounting and trade modules is specified. Values available within the filter: <All>, No, No + Payments, Payments, VAT Transactions, Payments + VAT Transactions.
Account Type − all accounts available in a given center are displayed. The value All indicates all accounts available in the current center, whereas the values <Cash>, <Bank> indicate all accounts of a given type in the current center.
Note
Totaling on the payment estimate list is possible only after selecting a specific currency in the filter or the option All in system currency. If system currency of displayed payments is different, value 0 is displayed in the summary.
Detailed description of functioning of the filters can be found in category Searching and filtering data>
Reference to the payment estimate from the level of the list of customers/customer form
From the level of the list of customers or of the form of a given customer, by means of the [Payment Estimate] button, it is possible to open the payment estimate window, where payments and transactions are displayed for a given customer. A user can freely modify the list of payments and make settlements and compensations.
Reference to the payment estimate from the level of the list of customers/customer form
Payment estimate – general information
Payment estimate provides information regarding statuses of patyments and available financial resources.
The list of payment estimate is available from the level of menu Finances, upon clicking [Payment Estimate] button. It is composed of two tabs – Payment Estimate and Calendar
Payment Estimate list
The visibility of data in the payment estimate depends on the center to which an operator is logged-in. Payments are displayed basing on the owner of the source document. The document is presented in the list, if:
it was added by a current center (center to which the operator is logged-in)
it was added by a center which is subordinate to the current center
it was added by a center which makes it available (by specifiying its visibility for document types) for the current center or its child center
Note
All payments are displayed in a payment estimate, regardless of whether accounts indicated on those payments are available in a current center. If an account which is not available in a given center, is indicated on a payment, such a payment can be edited only in the preview mode.
Note
Only transactions entered to accounts available in a current center are displayed in a payment estimate.
Note
In a document, the system currency of the company in which the document has been issued, is always presented.
Split payment mechanism in the export of statements of remittance orders and import of bank statements
Split payment mechanism in the export of statements of remittance orders and import of bank statements Split payment
In the system, it is possible to export statements of remittance orders containing payments marked as Split payment and import bank transactions relating to split payment mechanism – payment transaction or transactions of posting VAT amounts.
Exporting statements of remittance orders
Payments of split payment type may be exported with the use of the same format as the other payment or with the use of a separately defined transfer format.
To properly handle a split payment transaction code, the user needs to modify a variable responsible for that transaction. For that purpose, it is possible to use the field Constant Value. Upon selecting this field in the format definition, it is necessary to edit it and fill in the field Split payment value with a relevant string of characters according to the requirements of a given bank.
Split payment value field on the form of the Constant Value variable in a defined transfer format
The user may handle bank transfers connected with the split payment mechanism in one of the two ways:
With the use of fields dedicated to split payment available in the transfer format definition
With the use of the parameter Support split payment available for the field For
Handling transfers by means of dedicated fields
Fields contained in the transfer format definition which can be used to handle the split payment mechanism include:
Split Payment – VAT Amount – a VAT amount to be sent from a payment
Split Payment – TIN – a subject’s TIN transferred from a payment without hyphens and prefixes
Split payment – document number – reference number from a payment
Fields for the handling of split payment included in the transfer format definition
Parameter Support split payment
Another method of handling bank transfers related to the split payment mechanism uses the Support split payment parameter available in the transfer format definition for export in the case of the following fields:
For
For – Document Numbers
For – Document Numbers and Amounts
For – System Numbers and Amounts of Documents
For – Document Numbers and Amounts
After selecting an appropriate field in the format definition, it is necessary to edit it and activate the parameter Support split payment. As a result, the system will automatically add the following string of characters before a transfer title in payments marked as split payments: /VAT/VAT Amount /IDC/Customer TIN /INV/Document number /TXT/Payment description
In a <<statement of remittance orders>>, in the Elements and Payments tabs, besides the standard columns, there are two columns available: Split Payment and VAT Amount. They inform whether a given payment is of the split payment type and present the value of a VAT amount to be sent for a given payment. The value of the column Split Payment is retrieved in accordance with the setting of the parameter Split payment in a given payment. The value of the column VAT Amount of a given SRO document is transferred from the payment. In case of changing of the transfer amount in an SRO document, the amount is updated automatically (proportionally to the transfer amount).
Example
The user has added a transfer for a payment of the split payment type associated with a PI document (subtotal 1000 PLN, VAT 230 PLN, total 1230 PLN). The amount to be sent equals 1230 PLN. The amount of the transfer has been changed to 500 PLN.
VAT Amount = 500 / 1230 * 230 = 93.50 PLN
Split Payment and VAT Amount columns on SRO form
To enable the export of a payment of the split payment type, the following information must be provided in it:
VAT Amount
Customer’s/venord’s TIN
Document number
Note
In the case of payments of the split payment type, it is not possible to group transfers. Each payment constitutes a separate order in the export to a bank.
Importing bank statements
When importing a bank statement, the user will receive two entries for transactions of the split payment type:
entry relating to the main operation for the entire total amount
entry regarding split payment operation which posts a VAT amount between a current account and a VAT account
While importing most bank statements with the use of the MT940 format and importing flat files, the column for will display the same content for both the main transaction and the technical posting of VAT between accounts. After a bank statement import, the system will automatically select the following parameters in the transactions:
Split Payment: Payment – in main transactions
Split Payment: VAT Transaction – in technical (VAT) posting transactions.
In transactions recognized as Split payment: VAT Transaction will be automatically assigned with the parameter Payment: Is not subject with a possibility to change it by the user.
Split payment in bank transactions
In the system, it is possible to define a bank account that would keep record of transactions made only on a special VAT account associated with a current account. Ti do so, it is necessary to select the parameter VAT account for split payment on the form of a Bank account.
VAT account for split payment parameter on the form of a bank account
Note
The parameter VAT account for split payment is only visible if the Split payment under Polish law parameter has been activated in the definition of a relevant center of the Company type.
To make the parameter VAT account for split payment available for selection, the following requirements need to be met:
Account currency – PLN
Account type set as Bank
Account sort set as Local
If the user selects the parameter, the system will block the possibility to change the account’s currency and types.
The list of cash/bank accounts contains VAT Account column (hidden by default) which indicates whether on the definition of a given register the parameter VAT account for split payment is checked.
Note
An account with checked parameter VAT account for split payment cannot be selected on a payment and on the header as well as on an item of SRO. Also, it cannot be assigned to a payment form.
Each split payment transaction consists of two entries:
main operation for the entire total amount
additional operation which posts a VAT amount between a current account and a VAT account
On the side panel of a bank transaction, there is a Split Payment control which, depending on the type of transaction, may assume one of the following values:
No – it specifies that the split payment mechanism will not be used to pay for a given receivable/payable
Payment – it specifies that the split payment mechanism will be used to pay for a given receivable/payable
VAT Transaction – it tags marks the technical transaction of posting into a VAT account
Note
The Split Payment control on the form of a bank transaction is only visible in the case of transactions entered to a bank account in PLN.
Split Payment control on the form of a bank transaction
In a transaction added to an account tagged as VAT account for split payment, the parameter is set automatically as Split payment: VAT Transaction without a possibility to change it and the value Is Not Subject is set in the column Payment with a possibility to change it.
On the lists Payment Estimate and Customer/Vendor Payments, the user may filter bank transactions related to split payment. For that purpose, the filter Split payment with the following values is available:
<All>
No
No + Payments
Payments
VAT Transactions
Payments + VAT Transactions
It is also possible to display the column VAT Amount (hidden by default) which presents VAT amount for bank transaction tagged as Split payment: VAT Transaction.
Split payment filter and column VAT Amount on payment estimate
Handling split payment on payments
A payment for purchased goods or services with the use of the split payment mechanism is made in a total amount. Next, a relevant VAT amount is transferred by a bank to a separate account. As a result, the payment is divided into:
a subtotal amount on an account selected by the vendor
a VAT amount on the dedicated VAT account
In the side panel of a payment, Split payment parameter is available. Selecting it displays additional fields:
VAT Amount
Vendor’s/Customer’s TIN
The values of these fields are completed automatically on the basis of the source document.
Split payment parameter on the payment’s side panel
Note
The parameter Split payment is only visible if the Split payment under Polish law parameter has been activated in the definition of a relevant center of the Company type.
The Split payment parameter is active in a payment window only if the payment is in the PLN currency. If a payment has the Split payment parameter selected, and the user wants to change the PLN currency, the system will display the message: “The payment is tagged to be made in the form of Split Payment. By changing the currency, the Split payment option will be blocked. Payments will be fixed as regular payments. Would you like to change the currency? Yes/No”. Selecting option Yes will change the currency into a different one, deactivate the Split payment parameter. Selecting the option No does not make any changes in the payment document.
The parameter Split payment is checked by default on a payment, if on its source document a payment form of Bank type is selected and on the form of the customer/vendor indicated on the source document, the parameter Split payment is checked. In addition, checking the parameter Split payment in an invoice header automatically checks the parameter Split payment in all payments of the document, if:
Payment currency = PLN
Payment form is of the Bank type
The payment is not included in a SRO
The payment is not completed
This rule regards payments of the documents:
PI, PIQC, PIVC
SI, SIQC, SIVC
R, RQC, RVC
API, APIVC, ASI, ASIVC
VSI, VSIC, VPI, VPIC
SO, PO
SQ, PQ
In the case of payments for AN and OB documents, the parameter is always deactivated by default, with a possibility to activate it by the user.
In case of splitting payment marked as Split payment, the parameter Split payment will be automatically checked on newly created payments, with a possibility to change it. The system completes customer’s/vendor’s TIN number and VAT amount on new payments (proportionally to the payment amount) and updates VAT amount on the split payment.
Example
A payment of the split payment type for the amount of 1230 PLN associated with a PI document (subtotal 1000 PLN, VAT 230 PLN, total 1230 PLN) has been divided into two payments:
Payment 1: 700 PLN
VAT Amount = 700 / 1230 * 230 = 130.89 PLN
The system automatically completes the VAT amount in the payment as 130,89 PLN
Payment 2: 530,00 PLN
VAT Amount = 530 / 1230 * 230 = 99.11 PLN
The system automatically completes the VAT amount in the payment as 99,11 PLN
If the user changes the VAT amount on a split payment into an amount lower than the VAT amount resulting from the source document and, then, divides the payment, the VAT amount on newly created payments will be completed automatically, whereas, it will not be updated on the split payment.
Example
In a payment of the split payment type for the amount of 1230 PLN associated with a PI document (subtotal 1000 PLN, VAT 230 PLN, total 1230 PLN), the user has changed the VAT amount into 23 PLN Then the payment has been divided.
Divided payment:
Value = 730 PLN
VAT Amount = 23 PLN
New payment:
Value = 500 PLN
VAT Amount = 500 / 1230 * 230 = 93.50 PLN
The user may change a VAT amount in a split payment. The threshold value is the difference between the VAT amount of the entire document and the sum of the VAT amounts of all other split payments in that document.
Example
A payment of the split payment type for the amount of 1230 PLN associated with a PI document (subtotal 1000 PLN, VAT 230 PLN, total 1230 PLN) has been divided into three payments of the split payment type and with the amount of 410 PLN each. The system automatically completes the VAT amount in those payments:
VAT amount in the first payment 76,67 PLN
VAT amount in the second payment 76,67 PLN
VAT amount in the third payment: 76,66 PLN
The user may change the VAT amount’s value within the range: 0,00 PLN – 76,66 PLN
Example
A payment of the split payment type for the amount of 1230 PLN associated with a PI document (subtotal 1000 PLN, VAT 230 PLN, total 1230 PLN) has been divided into three payments:
The first payment with the amount of 410 PLN has been tagged as split payment. The system automatically completes its VAT amount as 76,67 PLN
The second payment with the amount of 410 PLN has not been tagged as split payment.
The third payment with the amount of 410 PLN has been tagged as split payment.
The system automatically completes its VAT amount as 76,67 PLN. The user may change the VAT amount’s value within the range: 0,00 PLN – 153,33 PLN.
On the lists <<Payment Estimate>> and <<Customer/Vendor Payments>>, the user may filter payments of the split payment type and display columns presenting VAT amounts in such payments.
Split payment filter and VAT Amount column in the payment estimate
Split payment configuration
The possibility of applying the mechanism of split payment according to Polish law results from the act from 15 December 2017 amending the Goods and Services Tax Act. A payment for purchased goods or services with the use of the split payment mechanism is made in a total amount. Next, a relevant VAT amount is transferred by a bank to a separate account. As a result, the payment is divided into:
sales subtotal amount which is transferred into vendor’s or service provider’s bank account
tax amount which is transferred into vendor’s or service provider’s VAT account
The split payment mechanism may be used only in reference to transactions paid on account of other taxpayers. It can be used only for payments made by bank transfers in PLN.
The split payment mechanism is only available in the system if the parameter Split payment under Polish law has been selected from the level of Configuration → Company Structure → Rights Structure in the definition of a center of the Company type. The parameter is unchecked by default and it can be activated at any moment.
Split payment under Polish law parameter in the definition of a center of Company type
Note
The parameter Split payment under Polish law is only visible if a company has PLN assigned as the system currency.
The system makes it possible to specify that by default payments with a given customer/vendor should be made in the split payment mode. A parameter enabling such configuration can be found on the <<customer group>> and the <<customer form>>.
It can be checked only if the following requirements are met:
Customer status set as Entity
Customer type set as Active taxpayer
Payment currency set as PLN
Split payment parameter on the customer form
Note
The parameter Split payment is only visible on the customer form if the Split payment under Polish law parameter has been activated in the definition of a relevant center of the Company type.
Dividing and combining payments
Dividing payments
A payment can be divided with the use of [Divide] button from the level of:
tab Amounts of a document with payment
list of receivables/payables
Button [Divide] on the Receivables list
Note
It is not possible to divide a payment which is completed, partially competed, payment of an accounting note, payment of an opening balance and payment of a posted document.
Clicking on the [Divide] button opens a window composed of two tabs – New Payment and Divided Payment
Dividing payment window
In the tab New Payment, it is necessary to indicate the amount a if a newly created payment which should be bigger than 0 and lower than the value of the divided payment. The other data is transferred automatically from the divided payment. In the tab New Payment, it is possible to change the currency and the values of the following fields: Reference Number, Payment, Due Date, Days of Delay, Expected Due Date, Account, Completion, Payer, Bank Account, VAT-ZD.
In the tab, it is not possible to edit any data. The system updates the amount of the divided payment automatically as a difference between the amount of the original payment and the amount of the new payment.
Example
The user has entered SI/1/2019 amounting to 300 USD with a payment completed by bank transfer. However, it was decided that the payment would be competed in two installments – 250 USD by bank transfer and 5 USD in cash. To divide the payment, it is necessary to:
check the given payment on the list of receivables
select the [Divide] button
in the window of dividing of planned payment insert 50 USD as the amount of the new payment
change the payment form of the new payment to cash
The system has changed the amount of the divided payment automatically to 25 USD. After saving the payment, on the list of receivables/payables there are two independent payments.
Note
When dividing payment in a foreign currency, the default exchange rate for of the currency of the payment is retrieved automatically and it cannot be changed.
Combining payments
In the system, it is possible to combine payments relating to the same document. To do so, it is necessary to:
check given payments from the level of document details (tab Amounts) or on the list of receivables/payables.
select the [Combine] button
It opens a window of a newly created payment whose value is tantamount to the total of all selected payments. The value and the currency of the new payment are not subject to edition. The other data is retrieved from associated payments with the possibility of changing it. If associated payments have different payment forms, account or payer, the newly created payment will not hae any payment form, account or payer selected and the user will be able to select such values manually.
Rules of combining payments:
it is not possible to combine completed payments
it is not possible to combine payments of different types, e.g., receivable and payable
it is not possible to combine payments with different currencies
it is not possible to combine payments in external currencies with different exchange rates
it is not possible to combine payments associated with different documents, e.g., two payments one of which refers to SI/2013/00001 and the other to SI/2013/00002
it is not possible to combine payments associated with trade documents and payments added manually
it is not possible to combine payment subject to completion with payments not subject to completion
it is possible to combine payments for different payers – no payer is transferred onto newly created payment
it is possible to combine payments with different payment forms/accounts – newly created payment will not have any payment form/account selected
Adding receivable/payable
Receivables/payables can be created manually from the level of the list Receivables/Payables/Payment Estimate or can be generated automatically from a document with a payment.
Note
Manually added receivables and payables are not subject to completion
To add a payment from the level of receivables/payables list, from the level of the menu Finances → Receivables/Payables, click on the [Add] button.
Receivable form
The receivable form is composed of the following elements:
Side panel
Type – payment type The field cannot by edited and can take on one of the following values: Receivable, Payable
Value – amount and payment currency. The field is mandatory.
Paid – the amount of a document which has been paid. The field cannot by edited.
To Be Paid – amount calculated as a difference between the value of the receivable/payable and the paid amount. The field cannot by edited.
Number – for payments added manually this field is mandatory and it is completed by the user. For payments created automatically, the field is filled in with the system number from the source document, without the possibility of changing it.
Reference Number – for payments entered manually, this is a number entered by a user for providing an additional identification. For payments created automatically, the field is filled in with the system number from the source document, with the possibility of changing it.
Document Date – for payments added manually, this is the date of entering the payment to the system which can be freely modified. For payments created automatically, this is the date of issue of the source document and it cannot be modified.
Payment – payment form which should be selected from a drop-down list.
Due Date – date by which the payment should be completed
Days of Delay – number of days by which the realization of payment can be postponed against due date
Expected Date – due date corrected by the number of days of delay
Account – cash/bank account which should be selected from a drop-down list. In case of assigning an account to selected payment form (Configuration → Company Structure → Objects Availability), it will be filled in automatically
Completion – for payments entered manually, the field takes on value Not subject to completion (?) which cannot be changed. For payments created automatically, it is possible to select two values: Subject and Not subject
Payer – field for entering the name of entity the payment is assigned to. For a receivable the entity of Customer type is suggested automatically, whereas for a payable it is Vendor, with the possibility of changing the value.
Currencies – type, date and value of the exchange rate for the payment currency
Bank Account – the number of the bank account of the payer indicated on a receivable/payable is set by default. A user can change it selecting from among all active bank accounts of a given payer.
Bank – field filled in automatically with the code and the name of a bank appropriate for selected bank account. Every time the bank account is changed on payment, the field is updated.
Split Payment – parameter available only, if in the definition of a center of Company type, for the parameter Handle split payment according to Polish regulations, the value In accounting module or In accounting and trade modules has been selected. Detailed description of the parameter can be found in article Handling split payment in payments
Owner – center of the company structure which is the issuer of a document. For payments created automatically, the owner of a document to which the whole payment is assigned is set by default, without the possibility of changing it.
SEPA – parameter available for payments of Payable type only, if on the definition of a center of Company type, parameter Exchange data via ING Bank Śląski Web Service. The parameter can be changed for payables in the EUR currency only.
Note
If in the document to which a payment was generated, a business entity is indicated as customer/vendor and the value of the document exceeds the limit control set in the company configuration, then, before saving the document, the system verifies payment form in the document payment. If a payment form of Cash type is selected, the following message is displayed: The limit of cash payments between the entrepreneurs has been exceeded. Cash payment cannot be classified as deductible expenses. Would you like to save the document? Yes/No. More information can be found in article Tab Amounts.
In the Polish version of the database, in the side panel of payments of the following documents: SI, VSI, PI, VPI, R, TF, there are additional parameters:
VAT-ZD
Yes– the payment will be included in the ZD notification
No – the payment will not be included in the ZD notification
Beyond the system – the invoice will be included in the ZD notification after the payment was made
ZD Notification – number of the notification in which the payment has been included.
Tab Payments
This tab is available only for payments created automatically when adding a document with payment. It is composed of three sections: Documents To Be Paid, Paid Documents, Statements of Remittance Orders and field Description.
For receivables, the list Documents To Be Paid contains all uncompleted documents and cash/bank transactions of revenue type and positive value and those of expense type with negative value, associated with the same customer as a given receivable. For payables, the list Documents To Be Paid contains all uncompleted documents and cash/bank transactions of expense type and positive value and those of revenue type with negative value, associated with the same customer as a given receivable.
Check Compensation parameters which is available over the list Documents To Be Paid. Checking it displays the payments of the opposite type associated with the same payer on the Documents to Be Paid list (for receivables, uncompleted payables are displayed and for payables, the list presnts uncompleted receivables). Detailed description of compensating payments can be found in article Compensations with the use of [Associate], [Compensate] buttons.
Next to the parameter Compensations, there is the field Owner which allows for reducing documents displayed on the list only to the documents issued in a selected center. The default value of the field is All available documents. If a user is not entitled to read a given payment, it will not be visible on the list.
The list Documents To Be Paid is composed of the following columns:
Document Number
Reference Number
Entity Code
Amount – transaction/payment value
Amount Remaining – amount remaining to be cleared
Due Date – document date for a cash/bank transaction and payment due date
Currency
Owner – center of the company structure which is the issuer of a document
and columns hidden by default:
Amount in system currency:
Entity Name
To Be Paid In System Currency – amount remaining to be cleared, expressed in system currency
Paid – the amount which has been paid.
Paid In System Currency – cleared amount, expressed in system currency
For
The Paid Documents list presents a list of documents from which the payment was completed of compensated. Documents which user cannot access are displayed with masked data. The list Paid Documents is composed of the following columns:
Document Number
Reference Number
Entity Code
Paid – the amount which has been paid.
Amount Remaining – amount remaining to be cleared
Due Date – document date for a cash/bank transaction and payment due date
Currency
and columns hidden by default:
To Be Paid In System Currency – amount remaining to be cleared, expressed in system currency
Amount – transaction/payment value
Settlement Amount – amount settled with a given payment
Settlement Amount in System Currency – amount settled with a given payment, expressed in system currency
Amount In System Currency – value of a transaction/payment in system currency
Paid In System Currency – cleared amount, expressed in system currency
For
Owner – center of the company structure which is the issuer of a document
The list Statement of Remittance Orders presents SRO documents containing a given payment. The list is composed of the following columns:
Number – SRO document number
Date of Transfer – date of transfer from the SRO document
Amount – transfer amount indicated in the SRO for a given payment
Status – SRO document status
Tab Entity
The tab contains payer’s data, that is code, name, TIN, EIN, NIN, address, contact person’s data. Information is completed automatically, upon selecting a payer in the side panel of a payment.
Tab Terms
This tab is available only for payments created automatically when adding a document. It contains information regarding terms defined in a given payment. Detailed description of the tab can be found in articleDefining terms.
Lists of Receivables/Payables is available from the level of Finances, under the [Receivables]/[Payables] button.
List of receivables
The visibility of data in a payment estimate depends on the center to which an operator is logged-in. The document is presented in the list, if:
it was added by a current center (center to which an operator is logged-in)
it was added by a center which is subordinate to the current center
it was added by a center which makes it available (by specifiying its visibility for document types) for the current center or its child center
Note
All payments are displayed in a payment estimate, regardless of whether cash/bank accounts indicated on those payments are available in a current center. If an account which is not available in a given center, is indicated on a payment, such payment cannot be edited but previewed only.
The list contains standard buttons and, additionally:
[Import Transfer Statuses] – button available on the list Payables only. It is used for updating the status of a payment sent with the use of the web service. After clicking on the button, a window, in which the following parameters are defined, is displayed:
Import Format – transfer formats of Web Service type can be selected
Account – accounts associated with ING bank with checked parameter Exchange data via Web Service can be selected
[Combine] − allows for combining several payments in one payment
[Source Document] − this button is active only form payment created automatically when adding a document. Allows for displaying the source document of a payment.
[Complete] − allows for completing a given payment
[Compensate] − allows for compensating a given payment
[Pay] − opens a form Payment Confirmation by means of which it is possible to make a payment by automatic creation of a cash/bank transaction
[Payment Reminders] − button available on the list of receivables only. Allows for generating payment reminders for selected payments.
[Dunning Letters] − button available on the list of receivables only. Allows for generating dunning letters for selected payments.
[Late Fees] − button available on the list of receivables only. Allows for generating late fees for selected payments.
The list Receivables/Payables is composed of the following columns:
Reference Number − number entered by a user for providing an additional identification
Entity Code − payer’s code indicated on payment
Value − payment value
Amount Remaining − amount remaining to be cleared
To Send − transfer amount remaining to be sent
Date − date of payment
Currency − document currency, depends on the settings in the filter
Payment Form
Debt Collection − column available on the list of receivables only. It displays the number of a debt collection document containing a given payment.
and columns hidden by default:
Document Date – date of the document from the form of registered payment
Date of Receipt − date of receipt from the source document and if case there is no source document, document date from the payments
Cash Register/Bank – name of account selected on payment
VAT Amount – displayed only for payments with checked parameter Split Payment
Entity Code − payer’s code indicated on payment
Voucher Number – number of voucher indicated on payment
Description – description entered in payment
Document Description – description of payment source document
Voucher Sort – sort of voucher indicated on payment
Applied − amount cleared by now
Split Payment − informs whether the parameter Split Payment has been checked on a given payment
Expected Date − expected payment date
Status
C − Completed
U − Uncompleted
NS − Not Subject
SEPA – column available on the Payables list only. Informs whether the payment is made via SEPA transfer.
Currency − system currency of a company in which the document has been issued
Owner − center of the company structure which is the issuer of a document
Affects Balance − indicates whether a given payment affects the balance of the account
Web Service Send Date – column available on the Payables list. It displays the date of sending the transfer with a given payment to the bank.
Web Service Message – column available on the Payables list only.
Web Service Message Date – column available on the Payables list only. Displays the date of reception of the last message from the bank.
[Alert] The status of partially completed receivables/payables is U − Uncompleted. [/alert]
In the upper right corner of the list, two parameters are available:
Show days of delay − after checking the parameter, additional colum Days of Delay appears on the list, where the number of days after the due date is presented
Terms Date − by default, the current date is suggested, without the possibility of changing it. The terms date affects calculation of To send amount on the statemen of remittance orders. More information can be found in article Statement of remittance orders.
The list of Receivables/Payables contains the following filtering areas:
General − allows filtering by:
Payment status − uncompleted, completed, not subject to completion, to send
Entity indicated on payment − All, Customer, All customers, Employee, All employees, Institution, All institutions, Bank, All banks
Currencies − <All>, <All in system currency> and active currencies defined from the level of Configuration →Currencies.
Payment forms – <All> and acrive payment forms defined from the level of Configuration →Finances →Payment Forms
Document status − <All>, Posted, Unposted
Due Date − allows for filtering by the following values:
By due date − payment date. Available options: Any, Day, Month, Range of Dates, Previous Month, Current Month. The range of dates allows for selecting a specific time interval.
By expected due date − expected payment date. Available options: Any, Day, Month, Range of Dates, Previous Month, Current Month. The range of dates allows for selecting a specific time interval.
Timeliness − <All>, Not overdue, Overdue, Today’s
Days of Delay − available upon checking the parameter Show days of delay. The range of days allows for selecting a specific time interval.
Amount − the following options are available within this filter:
Amount – total payment amount. Range of amounts allows for selecting a specific amount interval.
Amount Remaining − amount remaining to be cleared. Range of amounts allows for selecting a specific amount interval.
[Alert] Totaling on the list Receivables/Payables is possible only after selecting a specific amount in the filter or the option All in system currency. If system currency of displayed payments, value 0 is displayed in the summary. [/alert]
The functionality of checks is available in the English and German versions of databases.
A check is a document that orders a bank to pay a specific amount of money to the person in whose name the check has been issued. The money is paid from the check drawer’s account. An order to pay money is unconditional. An order to pay money is unconditional.
List of checks
The list of checks is available from the level of menu Finances, upon clicking on [Checks] button.
List of checks
The list of checks is composed of the following columns:
Date − check issuance date
Number − introduced manually by a user or automatically by the system in accordance with numbering tool definition, depending on the method of adding a check
Payee − person a check is made out to
Revenue − value of a check of Deposit type
Expense − value of a check of Withdrawal type
Currency – currency in which check was issued
Paid − check amount already paid
Account − cash register or bank account in which a given check will be registered
Note
Status
Owner − center of the company structure which is the issuer of a document
The list contains standard buttons which have been described in article <<Standard buttons>>.
Note
A given check can be printed only once.
Detailed description of functioning of the filters can be found in category <<Searching and filtering data>>>
Adding check
A check can be added to the system by means of the following buttons:
[Add Deposit] or [Add Withdrawal] – check number is introduced by the system automatically, according to the definition of numbering tool and it is not editable
[Add Manual Deposit] or [Add Manual Withdrawal] − check number is completed by a user
The method of filling in check forms is the same both for deposits and withdrawals.
In order to add a withdrawal check, it is necessary to select button [Add Deposit] from List group. A form for entering data appears.
Check form
Number − number completed automatically in the case of checks added by means of buttons [Add Deposit] or [Add Withdrawal] or completed by a user in the case of checks added by means of buttons [Add Manual Deposit] or [Add Manual Withdrawal]. The field is mandatory.
Date − the system date is suggested automatically, with the possibility of changing it
Value − check amount and currency The field is mandatory.
Paid − check amount already paid The field is not subject to edition.
To Be Paid − amount calculated as a difference between the value of the check and the paid amount. The field is not subject to edition.
Note – field for providing description of a check. When printing a check, the value of the field is transferred onto the printout.
Tab General
Balance
Affects − when the parameter is checked, the check amount will affect the report ending balance
Does not affect − when the parameter is checked, the check amount will not affect the report ending balance
Payment – refers to the status of payments associated with a given check.
Combination with payments − if checked, the amount of a check is subject to payments
No combination with payments − if checked, the amount of a check is not subject to payments
Paid From/Paid To – field for entering Customer, Secondary Vendor or Employee the check is assigned to.
Payment Form – only payment forms of Check type can be selected. The field is mandatory.
Cash Register/Bank Account – account in which a report will be registered. The field is mandatory.
Report – the field is completed automatically with the number of the report assigned to a selected account and compliant with an indicated date. If such a report does not exist, the field remains empty. Additionally, button Add Report becomes active, by means of which a user can add a report in which a given check will be registered. The field is mandatory.
Owner − center of the company structure which is the issuer of a document
Currencies − this section is visible only if the check currency is different than the system currency. The following parameters are available in the section:
Exchange rate type
Date type
Date
Bank Transfer Data − information regarding bank and bank account. This field refers only to checks for which an account of Bank type has been selected.
Bank − name of the payer’s bank which is to be selected from a list of banks defined in the system.
Bank Account − number of payer’s bank account.
Tab Customer
This tab contains address and identification data of the Customer for whom a check is issued.
Tab Analytical Description
Detailed description of the tab Analytical Description can be found in <<Article>>. Change History
Generation of VAT invoices to invoices issued from receipts
Note
The functionality is available in the Polish version of the system only.
In order to generate a VAT invoice to invoices issued from receipts, it is necessary to select, from the level of menu Add-ons, button [VAT Invoice Generation To Invoices From Receipts] which is placed in Special Features button group. The button is available after selecting the parameter Generate VAT invoices in VAT account to invoices issued from receipts (System → Configuration → Accounting → General Parameters section) and re-logging in to the system.
Special Features
Clicking on the button opens Generate VAT invoices in VAT account to invoices issued from receipts window which is composed of fields Receipts Issued From (1st of January 2017 is set by default) and Receipts Issued To (the current date is set by default) which allow for indicating the range of dates within which the verification of receipts should be executed.
VAT Invoices are generated when a VAT invoice has not yet been generated to an invoice created from a receipt.
When using the system, it is sometimes necessary to verify the correctness of data in a given area and to carry out operations reconstructing or updating the existing structures.
Note
Before using such a feature, it is necessary to confirm that a backup copy has been made. Confirming that a backup copy has been made is not tantamount to making a physical copy. The user should make such copy before starting reconstruction operations.
In order to carry out the reconstruction of posting scheme variables, it is necessary to select, from the level of menu Add-ons, button [Posting Scheme Variable Update] which is placed in Special Features button group.
Special Features
It opens Update of Posting Schemes Variables window which is composed of the following elements:
Accounting Period − allows for selecting from a drop-down list an accounting period or partial period for which the feature is to be carried out.
Backup copy has been made − parameter unchecked by default. Checking the parameter is not tantamount to making a physical copy. Unchecking the parameter deactivates [Update] button and makes it impossible to carry out the feature.
Update of posting scheme variables
Due to changes in VAT rates or changes in the database structure, collective update of variables concerning posting schemes has been provided.
During the update, variables existing in already defined posting schemes are appropriately modified.
Clearings reconstruction
When using the system, it is sometimes necessary to verify the correctness of data in a given area and to carry out operations reconstructing or updating the existing structures.
Note
Before using such a feature, it is necessary to confirm that a backup copy has been made. Confirming that a backup copy has been made is not tantamount to making a physical copy. The user should make such copy before starting reconstruction operations.
In order to carry out the reconstruction of clearings, it is necessary to select, from the level of menu Add-ons, button [Clearings Reconstruction] which is placed in Special Features button group.
Special Features
It opens Clearings Reconstruction window which is composed of the following elements:
Posting Date From/Posting Date To – range of dates within which are included journal entries registered on clearing accounts when carrying out the feature
Repair automatically– parameter unchecked by default. After checking the parameter, the system will verify the correctness of amount to be cleared on the single-sided entries and in case of any discrepancies – it will repair them and the parameter Backup copy has been made will appear.
Backup copy has been made– parameter unchecked by default. Checking the parameter is not tantamount to making a physical copy. Checking the parameter activates [Confirm] button and allows for carrying out the feature.
Function of clearings reconstruction
Reconstruction of clearings consists in, among others, making clearings, checking and repairing the status of current clearings.
For which of the single-sided entries the system verifies whether it the entry has a source document and if it was created on the basis of:
a payment (payment identifier)
transaction (transaction identifier)
opening balance/payment amount
an accounting note item associated with payment
Then, it is verified whether a given object has been completed (entirely or partially).
If the source document is completed, it is checked whether associated object has been posted in the manner enabling to identify the association and whether the single-sided entries fulfill the conditions of clearing operation.
Single-sided entries fulfilling the criteria of compensation, that is, entered on different accounts, are excluded from this procedure – in case of this operation, compensating single-sided entries are not generated.
If all the above-mentioned criteria are met, clearing amount is specified for each pair and the data (amounts, identifiers) are updated in appropriate tables containing the associations.
Example
There is SI 1/2019 in the database with payment for the amount of 4 000.00 partially completed with cash-bank transaction for the amount of 1 000.00.
SI was posted to clearing account 201-A on Dr side with date 02.03.2019 (Single-sided entry A was created on the basis of payment), amount remaining [Dr] on the single-sided entry: 1 000.00.
Transaction was posted to clearing account 201-A on CR side with date 12.20.2019 (single-sided entry B is associated with the transaction), amount remaining [Cr] on single-sided entry: 1 000.00.
Range of dates: 01.01. – 31.12.2019 was selected in the reconstruction procedure.
Result: Single-sided entry A has an association with Single-sided entry B and the other way around. Amount remaining [Dr] on Single-sided entry A = 3 000.00 and amount remaining [Cr] on single-sided entry B = 0.
Account Reconstruction
When using the system, it is sometimes necessary to verify the correctness of data in a given area and to carry out operations reconstructing or updating the existing structures.
Note
Before using such a feature, it is necessary to confirm that a backup copy has been made. Confirming that a backup copy has been made is not tantamount to making a physical copy. The user should make such copy before starting reconstruction operations.
In order to carry out the reconstruction of accounts, it is necessary to select, from the level of menu Add-ons, button [Account Reconstruction] which is placed in Special Features button group.
Special Features
It opens Account Reconstruction window which is composed of the following elements:
Accounting Period– allows for selecting from a drop-down list an accounting period or partial period for which the feature is to be carried out.
Backup copy has been made – parameter unchecked by default. Checking the parameter is not tantamount to making a physical copy. If the parameter is unchecked, button [Select] is inactive and it is not possible to carry out the operation of account reconstruction.
Trial balance aggregates values for accounts within given accounting/partial period. While adding a journal entry, appropriate values are summed up in aggregations. If trial balance is calculated for an accounting period/partial period, values are read directly from these aggregations, without any recalculations. During the reconstruction, all single-sided entries are analyzed and appropriate recalculations are made. The calculated values replace the current aggregations.
Duration of the reconstruction depends on number of accounts and journal entries.
Bank reconciliation on the basis of imported bank statement
In order to reconcile the account balance with a bank statement, it is necessary to import the bank statement to the system. To do so, click on the button [Import] available in the Parameters button group
Note
It is possible to import again the same data into the selected account and period.
After the form of bank statement item import opens, in the field File Format it is necessary to select an import format appropriate for the loaded statement and in Encoding field – an appropriate coding method. Then, the user can load a statement, mark its items and import data to the system with the use of [Import Selected] button. The system does not generate the loaded transactions, but only retrieves them from the statement to facilitate the comparison process.
Detailed description of formats and statement importing can be found in category <<Bank Transfers>>.
Form of bank statement import
After the import, it is possible to get back to making payments in a manual manner by clicking on the button [Manually].
After importing the bank statement, the bank reconciliation window is divided into two panels:
Journal Entries – a list displayed in the left panel, contains information regarding posted bank transactions
Bank Statement – a list displayed in the right panel, contains bank transaction imported from the statement
Below each list, there is a table providing a summary of reconciled and unreconciled values.
Bank reconciliation with an imported bank statement
To facilitate the process of reconciling, the following parameters have been provided in the section Operations:
Mark Manually – if the parameter is unchecked, after selecting an item in one of the lists, the system automatically searches and marks corresponding items on the other list. If the parameter is checked, the user needs to mark them in the other list manually.
Unreconciled – if the parameter is checked, the system displays unreconciled journal entries. If unchecked, the unreconciled journal entries are hidden.
Reconciled – if the parameter is checked, the system displays reconciled journal entries. If unchecked, the unreconciled journal entries are hidden.
Hint
In Bank Statement panel, among the columns available for selection, there is the column Reconciled thanks to which it is very easy to filter reconciled transactions.
Between the section Journal Entries and Bank Statement, the following buttons are available:
[Reconcile] – enables to reconcile the marked journal entry with a selected transaction from the bank statement
[Undo] – cancels reconciliation between the marked journal entry and the selected transaction from the bank statement
[Delete] – deletes items which have been imported and are not reconciled
[Search] – allows for searching a journal entry which is not included in defined period. After clicking on the button, the list of c/b transaction is displayed and the user can select a journal entry which will be added to the list of journal entries in the bank reconciliation window
[Reconcile All] – allows for reconciling all journal entries corresponding to the transaction at the same time.
Note
It is impossible to unpost a cash-bank transaction which was reconciled. To unpost it, the reconciliation must be undone first.
In the section Additional, it is possible to post a difference between the beginning and the ending balance, bank service charges and earned interests.
Bank reconciliation on the basis of a paper bank statement
To reconcile the bank statement received in form of a paper printout with journal entries registered in the system, in the menu Accounting, it is necessary to click on the button [Bank Reconciliation] and then, in section General of the bank reconciliation form, select a bank register and a period for which the reconciliation is supposed to be made. In section Balances, it is necessary to complete the Ending field and in case it is the first reconciliation in a given account, also the field Beginning.
A list of journal entries registered in a given period in the account associated with the selected bank register will be displayed.
Bank reconciliation form
If data from a bank statement is consistent with journal entries displayed in Journal Entries panel, the user can select an entry and click [Reconcile]. In the result, color of journal entries on the list changes.
In case of mistake, it is possible to undo the reconciliation. To do so, it is necessary to mark a reconciled entry and click on the [Undo] button.
Note
It is impossible to unpost a cash-bank transaction which was reconciled. To unpost it, the reconciliation must be undone first.
List of reconciled journal entries
To facilitate the process of reconciling journal entries, the following parameters have been provided in the section Options:
Unreconciled – if the parameter is checked, the system displays unreconciled journal entries. If unchecked, the reconciled journal entries are hidden.
Reconciled – if the parameter is checked, the system displays reconciled journal entries. If unchecked, the reconciled journal entries are hidden.
In the section Additional, it is possible to post a difference between the beginning and the ending balance, bank service charges and earned interests.
Bank Reconciliation
Note
The functionality is available in the French, German and English version of the system.
There are two distinct models of work in regard to handling of bank accounts of a business entity:
Registration on the basis of a received bank statement – registration of operations related with transactions made on a bank account only after receiving a bank statement (in form of a file or paper printout). Then, transactions are registered and later posted. It is in force, for example, in Poland.
Registration of transactions on a regular basis and using so-called Bank Reconciliation – registration of operations related with transactions made on a bank account on a regular basis that is, a bank transaction is registered when a bank transfer order is issued to a bank. Upon receiving a bank statement, completeness of transactions is verified on both sides – in company’s registry and in a bank. It is in force, for example, in France.
The form Bank Reconciliation is available from the level of the menu Accounting, under the [Bank Reconciliation] button. It is created within a company and refers to its system currency.
Bank reconciliation form
In the menu of the reconciliation form, there are standard buttons and, additionally:
[A/P Reconciliation] – button active until it is selected. Upon its selection, it becomes deactivated and in the Type field, the value A/P Reconciliation is set.
[A/R Reconciliation] – button active until it is selected. Upon its selection, it becomes deactivated and in the Type field, the value A/R Reconciliation is set.
[Bank Reconciliation] – button active until it is selected. Upon its selection, it becomes deactivated and in the Type field, the value Bank Reconciliation is set. This operation is default after opening the Bank Reconciliation form.
[Import] – button available after selecting account and period. It allows for loading a bank statement item.
[Manually] – button available after selecting account and period. It becomes active after loading a bank statement item. It allows for getting back to making payments for a given month in a manual manner. After selecting the button, the message “If you return to a Manual Reconciliation you will lose all of your progress for this month. Are you sure you would like to return to a Manual Reconciliation?” is displayed and the user can decide whether to continue or not.
The bank reconciliation form is divided into three sections:
Section General
The following parameters are available in the section:
Type – value set on the basis of the buttons [A/P Reconciliation], [A/R Reconciliation] and [Bank Reconciliation]. Depending on the option selected in sections Journal Entries and Bank Statements, CP operations, CW operations or both types are presented.
Account – allows for selecting an account of Bank type
Period – allows for defining a month of accounting period to which the user is logged-in
Section Options
The following parameters are available in the section:
Mark Manually – parameter available after importing a bank statement. If the parameter is unchecked, after selecting an item in one of the lists, the system automatically searches and marks corresponding items on the other list. If the parameter is checked, the user needs to mark them in the other list manually.
Unreconciled – if the parameter is checked, the system displays unreconciled journal entries. If unchecked, the unreconciled journal entries are hidden.
Reconciled – if the parameter is checked, the system displays reconciled journal entries. If unchecked, the reconciled journal entries are hidden.
Section Balances
The following fields are available in the section:
Beginning – this field can be completed during the first reconciliation with bank account. In successive months the beginning balance is completed on the basis of the ending balance of the previous month, without a possibility of editing it.
Ending – mandatory field, completed manually. In case it is necessary to edit an entered value, it is possible to use the [Edit] button.
Section Additional
The following fields are available in the section:
Discrepancy – non-editable field, calculated automatically as a difference between the beginning and the ending balance
Bank Service Charge – field completed manually
Bank Service Charge – field completed manually
In order to post the values of those field, it is necessary to select the [Post] button which is available next to the amount field. To be able to post those amounts, first it is necessary to define posting schemes for each type of discrepancy in the system configuration (System → Configuration → Accounting → General Parameters section). Assigned schemes should be added within the Cash-Bank Transaction document type. Detailed description of the functionality of posting schemes can be found in category Document posting.
Section with options for assigning posting schemes for bank reconciliation
Section Summary
Section is composed of non-editable fields which are provided for information purposes:
Ending Bank Balance – value from the field Ending of the Balances section
Cleared Balance – value calculated on the basis of the beginning balance and the value of reconciled transactions
Discrepancy – value calculated as a difference between the beginning balance and the cleared balance
Section Journal Entries
This section is divided into a list containing journal entries and a table with a summary of reconciled and unreconciled values.
Buttons related with journal entries reconciliation:
[Reconcile] – allows for reconciling selected journal entry
[Undo] – cancels reconciliation of a selected journal entry
[Delete] – in the case of an imported transaction, allows for deleting items which have been imported and remain unreconciled
[Search] – allows for searching a journal entry which is not included in defined period. After clicking on the button, the list of c/b transaction is displayed and the user can select a journal entry which will be added to the list of journal entries in the bank reconciliation window
[Reconcile All] – allows for reconciling all journal entries corresponding to the transaction at the same time. The button is visible in case of importing a transaction.
Section Bank Statement
Section available after importing a bank statement with the use of the [Import] button.
It contains information regarding loaded items of the bank statement which are supposed to be reconciled with the journal entries.
Sections Journal Entries and Bank Statement contain summaries of reconciled and unreconciled transaction with divided into the following columns:
Name – reconciliation status: Unreconciled, Reconciled, Total
Expenses #, Revenues #, Total # – number of items of a specific type and in total, divided into statuses
Expenses, Revenues, Total – value of items of a specific type and in total, by status
Analytical description in opening balance document
The system provides also the option of completing analytical description in opening balance documents and their corrections. This applies both to an opening balance being added with the help of the button [Add] as well as to that being generated based on opening balance from a previous accounting period.
Analytical description can be provided directly in a document either “manually” or on the basis of analytical description specified on book account, similarly as in the case of journal entries.
Note
Values subject to analytical description are amounts provided on all book accounts, including off-balance sheet accounts.
Analytical description in opening balance document can be completed from the level of document header, its item or particular amount.
Note
[Alert]One of opening balance items can be described analytically on the level of item, while another item can be described on the level of its amount. Analytical description cannot, however, be completed for opening balance item if such description has been provided for at least one of its amounts.
Analytical description in opening balance document
In case a relation pattern is assigned to the definition of opening balance document, the list of elements of particular dimensions will be limited to elements acceptable for a given combination of the values of analytical dimensions. The element list is limited only when selecting a dimension element. During edition or saving of the document, the system does not control the list for the already existing records.
In order to complete analytical description in opening balance document on the basis of analytical description specified on book account, select the button [Fill In By Account]. The rules of creating analytical description are in this case the same as those applied in journal entries.
Upon clicking on the button [Fill In By Account], the information “Automatic document description” will be displayed on opening balance form in the field Comment to analytical description”.
Similarly as in the case of journal entry, correctness of analytical description is in opening balance documents controlled depending on the selection of the parameter: Control analytical description correctness in document definition.
If the mentioned parameter is selected, the system will be controlling the correctness of analytical description as follows:
If analytical description of an item or a document is being made only on one side – the description’s amount will be controlled within a given side (Dr/Cr).
If analytical description of an item or a document is being made only on one side – the description’s amount will be controlled within a given side (Dr/Cr).
If the parameter Control analytical description correctness is deactivated, correctness of analytical description will not be controlled.
Completed analytical description in opening balance document is automatically copied to journal entries associated with the document according to the following rules:
Analytical description completed on the level of OB header is saved on the level of JE header
Analytical description completed on the level of OB item is saved on the level of JE item
Analytical description completed on the level of OB amount is saved on the level of JE item
After filling in analytical description in opening balance document automatically, information “Automatic document description” is displayed in the field Description.
During modification of OB items/amounts or its analytical description, the system informs about automatic update of analytical description in its associated journal entry.
Analytical description generated automatically in a journal entry on the basis of analytical description completed in OB document can be modified by the user.
Analytical description in accounting note
Similarly, as in the case of journal entries, analytical description can in accounting note be specified both for the entire document and for its particular items.
Such description can be provided directly in a document either manually or on the basis of analytical description specified on book account.
Analytical description in accounting note
Note
Values subject to analytical description are amounts provided on all book accounts, including off-balance sheet accounts.
In case a relation pattern is assigned to the definition of accounting note, the list of elements of particular dimensions will be limited to elements acceptable for a given combination of the values of analytical dimensions. The element list is limited only when selecting a dimension element. During edition or saving of the document, the system does not control the list for the already existing records.
In order to complete analytical description on the basis of analytical description specified on book account, select the button [Fill In By Account]. The rules of creating analytical description are in this case the same as those applied in journal entries.
Upon clicking on the button [Fill In By Account], the information “Automatic document description” will be displayed on accounting note form in the field Comment to analytical description.
Similarly, as in the case of journal entry, correctness of analytical description is in accounting notes controlled depending on the selection of the parameter: Control analytical description correctness in document definition.
If the mentioned parameter is selected, the system will be controlling the correctness of analytical description as follows:
If analytical description of an item or a document is being made only on one side – the description’s amount will be controlled within a given side (Dr/Cr).
If analytical description of an item or a document is being made only on one side – the description’s amount will be controlled within a given side (Dr/Cr).
If the parameter Control analytical description correctness is deactivated, correctness of analytical description will not be controlled.
Analytical description in fixed asset documents
On a fixed asset item, it is necessary to specify a depreciation are for which an analytical description is to be created. By default, the depreciation areas are completed on the basis of the fixed asset form. In fixed asset documents, apart from the option of providing “manually” an analytical description directly in a document, the document can also be described analytically on the basis of the analytical description of the fixed asset selected in the document with the help of the option [Fill In].
Selecting the option [Fill In] generates automatically analytical description lines according to the following rules:
If analytical description is completed on a fixed asset form, then the system retrieves the description from that form
Information about an automatic document description is saved in section Comment To Analytical Description
An existing analytical description is updated in a document each time the option [Fill In] is used. The operation of replacing existing values with new ones is preceded with the following message: “Existing elements will be replaced with new values. Do you want to continue? Yes/No”
Analytical description in depreciation document
Analytical description in trade and warehouse documents
In trade and warehouse documents, apart from describing a document manually, analytical description can be completed with the help of the button [Fill In] based on the analytical description of the item and the customer/vendor selected in a document.
After selecting the option [Fill In], analytical description line swill be generated according to the following rules:
If analytical description is filled in on item form, the system gets analytical description from item form
If analytical description is filled in also on customer/vendor form, apart from that on item form, the system divides additionally the line of analytical description according to the data registered on the customer/vendor form
In case the same dimensions are used both on item form and customer/vendor form, only those dimensions are included in the divided analytical description based on customer/vendor data, which are missing on item form
If analytical description is filled in only on customer/vendor form, the system completes analytical description in a document according to analytical description provided on customer/vendor form
The lines with particular dimension values are created on item level even if no analytical description has been specified on item form
Entries are created regardless of whether given dimensions are assigned to a document in which analytical description is being specified. In case dimensions are not assigned to a given document type, only particular items along with percentage value and amount are copied to analytical description. To be able to view all the dimensions used on item and customer/vendor forms, they must also be assigned to the type of document in which analytical description is being specified
Information about automatic document description is saved in the field Comment to analytical description
Using the option [Fill In] updates each time existing analytical description in a document. Before replacing existing values with new values, the following message is displayed: “Existing elements will be replaced with new values. Do you want to continue? Yes\No”.
Example
Analytical description specified on item form is the following:
Analytical description on item form
Whereas analytical description specified on vendor form is the following:
Analytical description on customer form
A purchase invoice, documenting a transaction related with the item and the vendor, on the forms of whose the above presented analytical descriptions were specified, was then registered in the system.
After selecting the option [Fill In] in the PI, the lines of analytical descriptions will be completed automatically according to analytical descriptions specified on the item form and on the vendor form.
Analytical description in the trade document
Analytical description can also be added in documents automatically with the use of a BPM process named Completed Analytical Description in Documents Automatically.
Analytical description on fixed asset form
After assigning analytical dimensions to the object Fixed Assets in the menu Configuration → Company Structure → Object Dimensions, it is possible to describe analytically either a fixed asset group or a fixed asset, itself. Based on the analytical description defined on the form of fixed asset, it is then possible to create automatically analytical description lines in the documents relating to a given fixed asset.
It is possible to specify a depreciation area by which analytical description values must possibly be completed in the fixed asset documents. Depreciation areas can be selected from among those made available in the system configuration window.
Analytical description on fixed asset form
The way in which an analytical description is defined on the form of fixed asset group is similar to that in which it is defined in documents. But unlike in documents, only the amount in percentage terms is specified in this case.
Because it is possible to determine an owner on the form of analytical dimension’s elements, only elements, for which the company, to which an operator is logged on, or the value All is selected as owner, are displayed on the list of analytical dimension values.
In case a relation pattern is assigned to the Fixed Assets object, the list of elements of particular dimensions will be limited to elements acceptable for a given combination of analytical dimension values. The list is limited only when selecting a dimension element. In the case of already existing records, the acceptable combination of values is not controlled when editing or saving an object.
In case there are subgroups defined to a given fixed asset group and an analytical description is changed in that fixed asset group, then it is possible to update that description also on its subgroups by selecting the parameter Update patterns. Upon activating this parameter, it is possible to select one of the following values:
Changed fields – conditional: analytical description will be updated according to the change made in the pattern. The change will, however, apply only to subgroups which analytical description was compatible with the source definition of analytical description in the pattern.
Changed fields – unconditional: analytical description will be updated according to the change made in the pattern. The change will apply to all subgroups, regardless of whether their analytical description is or is not compatible with the source definition of analytical description in the pattern.
All fields – unconditional: all fields in the subgroups will be updated according to the settings in the pattern, except for those which would infringe their uniqueness (e.g., the field Code, Name).
In the newly added item subgroups, analytical description is completed automatically based on analytical description definition of the parent group.
The parameter Update elements works similarly as the parameter Update pattern. The difference is that it applies to the update of analytical description on fixed asset forms.
In multi-company structure, analytical description specified on fixed asset form is saved on the level of given company. Analytical description displayed during edition of item form is the one specified in the company to which an operator is currently logged in. Similarly, changes made to fixed asset’s analytical description are also saved for the current company.
Analytical description defined on fixed asset form can next be copied to trade or warehouse documents containing a given fixed asset, which was described in <<Article>>.
Analytical description on book account
Similarly, as in the case of item or customer/vendor form, analytical description can also be specified on book account. That description can next be copied to analytical description of journal entry’s item accounting note’s item, in which a given account was selected.
Analytical description on book account
The way in which analytical description is defined on book account is similar to that applied in documents. The difference is that in the case of book account, only percentage value of amount is determined.
Because it is possible to determine an owner on the form of analytical dimension’s elements, only elements, for which the company, to which an operator is logged on, or the value All is selected as owner, are displayed on the list of analytical dimension values.
In case a relation pattern is assigned to the object Accounts, the list of elements of particular dimensions will be limited to elements available for a given combination of the values of analytical dimensions. The list is limited only when selecting a dimension element. During edition or saving of the object, the system does not control the list for the already existing records.
Analytical description can be defined on each level of book account. If a parent account has accounts on lower levels, its analytical description is automatically copied to child accounts. When saving changes made to analytical description on a parent account, it is possible to decide whether to update simultaneously the description of child accounts by selecting appropriate option in the popped-up question. A user may change analytical description on each level of book account.
Moreover, on book account definition it is possible to select the parameter: Analytical description required (this parameter is deselected, by default) which determines the necessity of providing analytical description in case a given account is selected in an accounting document.
The Analytical description required parameter can be specified individually on each level of book account Child accounts inherit, by default, the setting of this parameter from their parent account. When saving changes made to the setting of this parameter on a parent account, a user may decide whether to change its settings also on child accounts by selecting appropriate option in the popped-up question.
When describing analytically a journal entry/contra entry or an accounting note, in item of which a book account with checked Analytical description required parameter was selected, when attempting to save the document, the system will be controlling:
whether item selected in the analytical description is associated with the given account,
whether value of at least one analytical dimension was selected on the item associated with the given account.
If the document does not fulfill the above-mentioned conditions, a relevant message, stating that no values have been specified for the required account, will be displayed. The system will allow for saving such a document or it will deny saving it, depending on the document status. The way in which the system controls saving of document depending on its status has been described in article Control of analytical description correctness.
Analytical description on customer/vendor form
Similarly, as in the case of analytical description on item form, after assigning analytical dimensions to Customers/Vendors object in the menu Configuration → Company Structure → Object Dimensions, it is possible to describe analytically a customer/vendor group or on customer/vendor form, itself. Based on description specified on customer/vendor form, it is possible to automatically create analytical description lines in a document in which given customer/vendor has been selected
Analytical description on customer/vendor group form
A method of defining analytical description on customer/vendor group is similar to that on item group.
Owing to the option of specifying an owner on the form of analytical description elements, elements displayed on the list of analytical dimension values are only those whose owner is the company to which operator is logged in or those for which the value All has been selected.
In case a relation pattern is assigned to the object Customers/Vendors, the list of elements of particular dimensions will be limited to elements acceptable for given combination of analytical dimension values. The list is limited only when selecting a dimension element. During edition or saving of the object, the system does not control the list for the already existing records.
In case given customer/vendor group is composed of subgroups, then analytical description changed on the customer/vendor group can be updated also on its subgroups by selecting the parameter Update patterns. Upon activating this parameter, it is possible to select one of the following values:
Changed fields – conditional: analytical description will be updated according to the change made in the pattern. The change will, however, apply only to subgroups which analytical description was compatible with the source definition of analytical description in the pattern.
Changed fields – unconditional: analytical description will be updated according to the change made in the pattern. The change will apply to all subgroups, regardless of whether their analytical description is or is not compatible with the source definition of analytical description in the pattern.
All fields – unconditional: all fields in the subgroups will be updated according to the settings in the pattern, except for those which would infringe their uniqueness (e.g., the field Code, Name).
In the newly added item subgroups, analytical description is completed automatically based on analytical description definition of the parent group.
The parameter Update elements works similarly as the parameter Update pattern. The difference is that it applies to the update of analytical description on customer/vendor forms.
In multi-company structure, analytical description specified on customer/vendor form is saved on the level of given company. Analytical description displayed during edition of item form is the one specified in the company to which an operator is currently logged in. Similarly, changes made to customer’s/vendor’s analytical description are also saved for the current company.
Analytical description defined on a customer/vendor form can next be copied to a sales or purchase invoice issued for that customer/vendor, which has been described in <<Article>>.
Analytical description on item form
Upon assigning analytical dimensions to an object Item in the menu Configuration → Company Structure → Object Dimensions, it is possible to describe analytically an item group or item form, itself. Based on analytical description defined on item form it is possible to create automatically analytical description lines in a sales invoice or purchase invoice registering transactions related to a given item.
Analytical description on item group form
The way in which analytical description is defined on the form of item group is similar to that applied in documents. The difference is that in the case of item form, only percentage value of amount is determined.
Because it is possible to determine an owner on the form of analytical dimension’s elements, only elements, for which the company, to which an operator is logged on, or the value All is selected as owner, are displayed on the list of analytical dimension values.
In case a relation pattern is assigned to the object Items, the list of elements of particular dimensions will be limited to elements acceptable for a given combination of the values of analytical dimensions. The list is limited only when selecting a dimension element. During edition or saving of the object, the system does not control the list for the already existing records.
If there are item subgroups defined to a given item group, after changing analytical description on item group, that description can also be updated on its subgroups by checking the parameter Update patterns. After checking this parameter, it is possible to select one of the following three values:
Changed fields – conditional: analytical description will be updated according to the change made in the pattern. The change will, however, apply only to subgroups which analytical description was compatible with the source definition of analytical description in the pattern.
Changed fields – unconditional: analytical description will be updated according to the change made in the pattern. The change will apply to all subgroups, regardless of whether their analytical description is or is not compatible with the source definition of analytical description in the pattern.
All fields – unconditional: all fields in the subgroups will be updated according to the settings in the pattern, except for those which would infringe their uniqueness (e.g., the field Code, Name).
In the newly added item subgroups, analytical description is completed automatically based on analytical description definition of the parent item group.
The parameter Update elements works similarly as the parameter Update pattern. The difference is that it applies to the update of analytical description on item forms.
In multi-company structure, analytical description specified on item form is saved on the level of given company. Analytical description displayed during edition of item form is the one specified in the company to which an operator is currently logged in. Similarly, changes made to item’s analytical description are also saved for the current company.
In the case of database converted to version 2016.5 or later, analytical description is saved for a current company.
Analytical description defined on item form can next be copied to trade or warehouse documents containing a given item, which was described in <<Article>>.
Analytical description on object forms
In the system, it is possible to assign analytical dimensions to book accounts, to item forms, to customer/vendor forms and to fixed assets. In addition, based on the assigned analytical dimensions a user may determine available combinations of dimension values or assign previously defined relation patterns to given objects. The functionality is available from the level of Configuration → Company Structure → Object Dimensions.
Object Dimensions window
The Object Dimensions window is composed of the following panels:
Rights Structure – this panel presents the main company and child companies. Analytical dimensions as well as relation patterns can be assigned to book accounts and to items only on the main company level. The parameter Get from Parent Center is selected for child companies; therefore, they inherit analytical dimensions assigned in the parent company. Assigned analytical dimensions and relation patterns will be applicable to the above-mentioned objects in the entire company structure.
Objects – objects to which a user may assign the defined analytical dimensions.
Dimensions – this panel is composed of two sections: User Dimensions and Analytical Dimensions.
In User Dimensions section, there are dimensions which are available for assigning. In order to assign a dimension to a given object, it is necessary to select it on the list and then click on the button [Add Assignment] or double click on a given dimension.
Analytical Dimensions section presents dimensions assigned to a given object. In order to remove an assigned dimension, it is necessary to select it on the list and then click on the button [Remove Assignment] or double click on a given dimension.
Analytical Description – in this panel, it is possible to define analytical dimension values for given objects of relation pattern, similarly as in the case of defining a relation pattern from the level of the menu Main → Relation Pattern, which has been described in article Defining of relation pattern or to assign a previously defined relation pattern by selecting the option [Select Pattern] in the main menu.
A relation pattern is assigned in accordance with the rules below:
Only one relation pattern can be assigned to a given object
In case available combinations of analytical dimension values are already specified for an object, the following message will be displayed: “The document definition already contains defined associations. Existing elements will be deleted. Would you like to continue?”. A user may decide whether to assign a new pattern to a given object or whether to leave the data unchanged.
When assigning a pattern to a given object, the system controls whether dimensions assigned to the object are the same as those assigned to the selected pattern. If they are different, the following message will be displayed: “The document definition contains different dimensions than those selected in the pattern. Would you like to continue?”. If the operation is continued, appropriate records of analytical description will be added, whereas the names of dimensions will be displayed after the missing dimensions have been assigned to the given object.
Filtering journal entries on book account based on analytical description
Due to the option of describing analytically of journal entries, journal entries can be filtered on book account on the basis of analytical description. This filter option is available from all the levels from which the list of journal entries on book account can be displayed, i.e., menu Accounting → Account Filter, Clearings/Add/Associate Single-sided Entries, Trial Balance/Journal Entries.
Filtering journal entries on book account based on analytical description
Clicking on the button [Analytical Description] in the filter pane on the list of journal entries opens a window Analytical Description Conditions in which it is possible to define a filter including single-sided entries with specified values of analytical description.
Analytical Description Conditions window
Detailed description of functioning of the filters can be found in category <<Searching and filtering data>>>
Example
A journal entry is being described on the basis of two dimensions: Center, Location
A user wants to search for single-sided entries for which the dimension: Center has a value: Sales or Production and the dimension: Location has a value: Chicago
The filter can be defined in two ways:
Filtering of single-sided entries based on analytical description – method 1
Filtering of single-sided entries based on analytical description – method 2
Control of analytical description correctness
The system enables controlling the correctness of analytical description, which is made dependent on document status. This option is available for the following documents: Journal Entry, Reversing Entry, Accounting Note, Opening Balance and its correction. In order to use this option, go to the menu Configuration → Document Types, edit a given document definition, proceed to tab: Dimensions and select the parameter: Consider document status. This parameter is deselected, by default. If the control of analytical description correctness is disabled, it will not be possible to select the parameter: Consider document status.
Dependencies between the parameters: Control analytical description correctness and Consider document status are the following:
If the parameter: Control analytical description correctness is disabled – the system does not verify correctness of description
If the parameter: Control analytical description correctness is enabled and the parameter: Consider document status is disabled – the system will be verifying correctness of description according to the general rules of system operation with the selected parameter Control analytical description correctness
If both the parameters: Control analytical description correctness and Consider document status are enabled, correctness of description is controlled as follows:
For accounting note:
the rules for controlling of analytical description correctness remain unchanged
if description is being completed in an unposted document, the system will inform about incorrectly completed description in the form of a warning and will allow for saving the values not fulfilling the conditions of description correctness
the system controls the correctness of analytical description filling also while posting a document – if description was not entered properly, the system will inform about an error and will not allow for posting a document
For journal entry (journal entry and reversing entry documents) and opening balance documents
the rules for controlling of analytical description correctness remain unchanged
if description is being completed in an unconfirmed document, the system will inform about incorrectly completed description in the form of a warning and will allow for saving the values not fulfilling the conditions of description correctness
if description is being completed in a confirmed document, the system will inform about incorrectly completed description in the form of a blockade and will not allow for saving the values not fulfilling the conditions of description correctness
the system controls the correctness of analytical description filling also while confirming a journal entry – if description was not entered properly, the system will inform about an error and will not allow for confirming a journal entry.
Assigning of dimensions and relation pattern to document type
In order to describe a document with the use of analytical dimensions, the dimensions must be first assigned to the document type. The assigned dimensions will then be available in tab Analytical Description of documents of a given type. Apart from assigning of dimensions, in document definition it is also possible to determine available combinations of dimension values which can be used when describing analytically a given document type.
In order to assign analytical dimensions and a relation pattern to given document type, in the menu Configuration select Types under Documents button group.
Option Types in the menu Configuration
Upon selecting the button, a list of document types is displayed. On the list of document types, it is necessary to select a document type and then click on [Edit] in the List button group.
Analytical dimensions can be assigned to a given document type in tab Dimensions.
Tab Dimensions in document definition
The tab is composed of two sections: User Dimensions and Analytical Dimensions.
In User Dimensions section, there are dimensions which are available for assigning. In order to assign a dimension to a given object, it is necessary to select it on the list and then click on the button [Add Assignment] or double click on a given dimension.
Analytical Dimensions section presents dimensions assigned to a given object. In order to remove an assigned dimension, it is necessary to select it on the list and then click on the button [Remove Assignment] or double click on a given dimension.
Note
Assignment of dimensions with document type is saved while saving the document type.
From the level of document type definition, it is also possible to determine whether a given dimension is mandatory If analytical dimension is marked as mandatory and a user did not select its value when describing a document type analytically, then the following message will be displayed: “No value has been specified for the mandatory dimension: [Dimension name].”.
The fields in the columns dedicated for mandatory dimensions are presented in tab Analytical Description of a document in yellow.
A relation pattern is, on the other hand, specified for a given document type in tab Analytical Description.
Tab Analytical Description in document definition
In this tab, it is possible to define a relation pattern of analytical dimensions’ values in a similar way as the way in which a relation pattern is defined from the level of the menu Main → Relation Pattern, which has been described in <<ARTICLE>> or to assign a previously defined relation pattern by selecting the option [Select Pattern] in the main menu.
A relation pattern is assigned in accordance with the rules below:
Only one relation pattern can be assigned to a given document type
In case available combinations of analytical dimension values are already specified for a given document type, the following message will be displayed: “The document definition already contains defined associations. Existing elements will be deleted. Would you like to continue?”. A user may decide whether to assign a new pattern to a given object or whether to leave the data unchanged.
When assigning a pattern to a document type, the system controls whether dimensions assigned to document definition are the same as those assigned to the selected pattern. If they are different, the following message will be displayed: “The document definition contains different dimensions than those selected in the pattern. Would you like to continue?”. If the operation is continued, appropriate records of analytical description will be added, whereas the names of dimensions will be displayed after the missing dimensions have been assigned to the given document type.
Defining of relation pattern
General information
In business practice, there are very often logical relations between defined values of analytical dimensions, e.g. there is only one sort of business activity conducted in a given location or only a specific group of cost center related to a given expense.
A user can define a pattern of relations between particular elements of analytical dimensions. Defined relation patterns are common for the entire company structure.
A relation pattern can be defined upon selecting the option [Relation Patterns] which is available in the Main menu under the button group Analytical Description.
The relation patterns being defined from the level of the menu Main → Relation Patterns are common for all types of documents and objects. A user may assign the same pattern for various document types and objects.
List of relation patterns
On the list of relation patterns, it is possible to perform such operations as: addition, edition, deletion, refreshing of relation pattern list and export to a spreadsheet.
To add a new relation pattern, click on the button [Add].
Relation pattern form
Tab General
The form of relation pattern is composed of a header section and a section related to pattern elements. Values which are defined in the relation pattern header are pattern code, name and activity status.
Elements of a pattern can be displayed in the form of a list or matrix. The data presented is the same, regardless of the selected form, but in a different manner. A user may, therefore, determine available combinations of analytical dimension values from the level of the tab List or Matrix.
In tab List, it is possible to add, delete, copy, refresh or export to a spreadsheet the defined elements of relation patterns. In order to activate the buttons [Add], [Delete], [Copy], it is necessary in the tab Dimensions to assign analytical dimensions to a given relation pattern.
The system controls the uniqueness of pattern elements. Upon clicking the button [Copy], the value All is set in the cell of a copied record, that was highlighted during copying. That value can be changed to any of the available values. This mechanism prevents doubling of records with the same values. Moreover, the system does not allow for saving of a relation pattern with duplicated items by displaying the following message: “Error, each line must contain different values of dimensions.”.
Relations are defined through list in a similar way as analytical description is defined in a document.
Similarly as in tab Analytical Description in a document, there is locator above the pattern element list, which enables filtering of defined pattern elements based on the specified values.
In tab Matrix, there are all possible combinations of values assigned to a given pattern of analytical dimensions displayed. A user may determine the relations of dimension values without adding of particular lines.
Tab Matrix on the relation pattern form
In tab Matrix, there are the following options available:
[Add Through Matrix] – enables generating of matrixes of possible relations based on the dimensions assigned in the Matrix tab and their elements. In case a pattern contains already defined elements, the following message will be displayed: “The pattern already contains defined associations. Existing items will be deleted. Would you like to continue?”. If the operation is continued, a new matrix will be displayed
[HideBlanks] – enables hiding of rows or columns, for which none possible combination has been specified
The matrix of relations of analytical dimension values after using the [Hide Blanks] option[Refresh] – allows for displaying of the rows or columns which earlier were hidden with the use of the option [Hide Blanks]. Moreover, in the relation pattern presented in the form of a matrix, it is possible to use an additional filter. In order to define such a filter, in the relation matrix window, right-click the mouse button and then select the option [Show Report Filter].
Prefilter in the relation pattern matrix
Detailed description…can be found in article <<Searching and filtering data>>
Moreover, the system enables sorting of the elements of relation matrix by specified columns.
[Set Default Value] – enables determining of default values within a given combination
Default values set in the relation pattern matrix
The names of values that are set as default are presented in the matrix in bold. Moreover, the fields with default values are distinguished in yellow for the last dimensions assigned to a matrix. The settings of default values within a given dimension are copied also to the relation matrix from the list of analytical dimensions (Main → Analytical Dimensions).
The above figure presents an exemplary setting of default values in the relation pattern matrix, i.e. Chicago is a default location in the Production Department. In addition, there are different vehicles set as default, depending on the location of the accounting department, i.e. a default vehicle for Chicago is Mercedes KY5509. Moreover, a default financial category for all the combinations in which a given value is included is Cost.Fuel.
When describing a document analytically, the names of default values are bold and suggested as first on the list of given dimension’s elements.
[Export to Spreadsheet] – allows exporting a matrix to a spreadsheet
In case the number of records of potential relations in the matrix is greater than 100 000, only available combinations (with selected checkboxes) are displayed, where their maximum number is also limited to 100 000 records. If this is the case, relations can be defined only in tab List, of which a user will be informed with a relevant message.
Permissions of operator groups to read, modify and delete the relation patterns depend on whether they have been granted the relevant permissions to the object Relations Patterns of Analytical Dimensions (menu Configuration → Company Structure → Operator Groups → edited operator group → tab Objects → area General).
All the permissions are selected for the groups B2_admin and B2_default as well as for other groups in databases converted from previous application versions, whereas they are deselected for the newly added groups.
Tab Dimensions
In Dimensions tab, it is possible to select dimensions for which a relation pattern must be created. The way in which dimensions are assigned is the same as the way in which dimensions are specified for a given document type.
Tab Attributes, Attachments, Change History
Description of these tabs can be found in <<article>>
Adding of an element
In order to add a new element, first mark a dimension or subdimension on the dimensions tree and then click on [Add Element] in the List button group. In a newly opened element form, complete appropriate information and save it by clicking on [Save] in the Actions button group. The added element is assigned to the marked dimension or subdimension.
On the form of element, there is only one mandatory field – Name, which is filled in in the same way as in the case of dimension.
The other fields on element form are: Level, Account, Description, Validity Period, and Owner.
Element form
Account – allows assigning a book account to an element of analytical dimension. Clicking on that button opens the chart of accounts from a current accounting period of the company to which a user is logged on. The operator may select an account on any level or type any sequence of characters in the corresponding field, which allows for defining flexibly of accounting schemes.
Note
In multi-company structure, each of the companies keeps the books of accounts separately. Thus, book accounts are assigned in a subdimension separately for each company.
Owner – in this field it is possible to determine the owner of an element in accordance to the rules below:
When adding an element, a center of Company type, to which the operator is logged on, is set in the field Owner, by default
When adding an element from the level of the parent company, the parent company and all the centers of Company type are displayed on the list of values. The value All can also be selected, which makes given element available in the entire company structure
When adding an element from the level of the center different than parent company, the value All and the center of Company type, to which an operator is logged on, are displayed on the list of values
In case an element is added to a subdimension, in which either of the values below is selected in the field Owner, that is:
All – the value All or a particular company can be selected as element’s owner
Particular company – only the company that is the owner of a subdimension can be selected as element’s owner
In a database converted from earlier versions than 2016.1, the value All will be set in the field Owner in all the elements of a subdimension
After materializing a subdimension of SQL, Generic Directory or Organizational Unit type, value of the field Owner in the elements of subdimension is specified on the basis of the subdimension’s owner
After materializing a subdimension of From Chart of Accounts type, value of the field Owner in the elements of subdimension is specified on the basis of the owner of account selected in a given company in the subdimension definition.
Adding of a subdimension
In order to add a new subdimension, first mark a dimension or subdimension on the dimensions tree and then click [Add Subdimension] in the List button group. In a newly opened subdimension form, complete appropriate information and save it by clicking on [Save] in the same menu. The added subdimension is assigned to the marked dimension or subdimension.
Subdimension form
On the form of subdimension, there is only one mandatory field Name, which is filled in as in the case of dimension.
Other fields:
Level – name of level defined in the list of levels on dimension form. This field is not editable, it only provides appropriate information
Owner – in this field it is possible to determine the owner of a subdimension in accordance to the rules below:
When adding a subdimension, a center of Company type, to which the operator is logged on, is set in the field Owner, by default
When adding a subdimension from the level of the parent company, the parent company and all the centers of Company type are displayed on the list of values. The value All can also be selected, which makes given subdimension available in the entire company structure
When adding a subdimension from the level of the center different than parent company, the value All and the center of Company type, to which an operator is logged on, are displayed on the list of values
In case the owner was changed, in the subdimension which has child elements, to:
All – the following question will be displayed: “Would you like to change the owner in the child elements? Yes\No”. Depending on the decision of a user, the value All will be set also in the child elements in the field Owner or their values will remain unchanged
Particular company – the following message will be displayed: “The owner will be changed also in the child elements.” and then the owner will be updated in the child elements of a given subdimension
In a database converted from earlier versions than 2016.1, the value All will be set in the field Owner in all subdimensions
Subdimension Type – each subdimension is maintained by the system depending on its type. There are four types of subdimensions available:
Standard – if selected, it is possible to assign other subdimensions and elements to the marked subdimension
From Chart of Accounts – if selected, it is possible to assign to a subdimension a selected fragment of the chart of accounts in the form of its elements. The button [Account] then becomes active. Clicking on that button opens the chart of accounts from a current accounting period of the company to which a user is logged on. The operator may select an account on any level or type any sequence of characters in the corresponding field, which allows for defining flexibly of accounting schemes.
Note
In multi-company structure, each of the companies keeps the books of accounts separately. Thus, book accounts are assigned in a subdimension separately for each company.
Upon selecting the account, [Materialize] button in the Subdimension button group becomes active. By clicking on that button, selected account together with all its sub-accounts are assigned to the subdimension as its elements. Accounts, assigned to a subdimension, are treated as standard elements, which means that all changes that will be made on the chart of accounts will not be included in the subdimension’s elements forms. It is, however, possible to materialize again the subdimension, which will add the elements that currently are not on the list. Subdimensions of Chart of Accounts type are materialized within a current accounting period. It means that upon materialization, the new accounts that were added by the user in the current accounting period will be added to the list of elements. After materializing a subdimension of From Chart of Accounts type, an account name is displayed in the Description field of dimension element. After a subdimension of From Chart of Accounts type is materialized, an account name is displayed in subdimension’s element in the field Description.
Note
If account numbers changed in the new accounting period, then upon materializing again the accounts, both the previous elements and the ones added in the new period will be displayed on the list. In order to include only the current structure of the chart of accounts in analytical dimensions, it is necessary to indicate a parent account in particular subdimensions of FromChart of Accounts type.
If subdimension is not materialized, then all its elements become dynamic. It means that each time this subdimension is used for analytical description of a document, its elements will be generated on the basis of the chart of accounts and the account selected by the user. Just like in case of a materialized subdimension, these elements are: selected account and its sub-accounts registered on the chart of accounts
Generic Directory – if selected, it is possible to assign to a subdimension the values of a generic directory in the form of its elements. If this type is selected, the button [Directory] becomes active. By clicking on that button, a list of generic directories is opened. Upon selecting a directory, [Materialize] button in the Subdimension button group becomes active. By clicking on that button, all values of selected directory are assigned to the subdimension as its elements. Values, assigned to a subdimension, are treated as standard elements which means that all changes that will be made in the directory, will not be included in the subdimension’s elements forms. The functionality of [Materialize] button in case of this subdimension type is the same as in case of the From Chart of Accounts type. Thus, if subdimension is not materialized, then all its elements become dynamic. It means that each time this subdimension is used for analytical description of a document, its elements will be generated on the basis of selected generic directory.
Note
Neither subdimension nor element can be added to a non-materialized subdimension of Generic Directory and From Chart of Accounts types. The only items of such subdimension are the dynamically retrieved values of a directory.
Organizational Unit – if selected, it is possible to assign to a subdimension a fragment of the company structure. Elements of this subdimension type are dynamic, i.e. each time this subdimension is used for analytical description of a document, its elements will be generated on the basis of selected unit of the company structure
Note
Neither subdimension nor element can be added to a subdimension of Organizational Unit type. The only elements of such subdimension are the dynamically retrieved items of the fragment of the company structure.
SQL – this option allows for using SQL query in dimension element definition. It is possible to refer to existing lists/directories without the need of reproducing them again in the dimension structure. Selecting of this subdimension type will activate a text field allowing for typing SQL query
Subdimension of SQL type form
Note
It is not possible to add child elements to subdimensions of SQL type (the options are insensitive). Subdimensions defined through SQL query must be materialized. Therefore, while saving or reediting of such subdimension, the following question is popped up: “A subdimension of SQL type requires materialization. Would you like to materialize it now?”.
Subdimension of SQL type is marked on the list of dimensions with different icon than other subdimensions. Upon saving a subdimension of SQL type, its type can no longer be changed.
Adding of a dimension
To define new dimension, it is necessary to fill in a form which is opened upon selecting the button [Add Dimension] from the menu List.
Analytical dimension form
On the form of dimension, there is only one mandatory field Name and additional fields: Description, Validity Period, and Level Names.
Level Names – names of levels within dimension hierarchy. The levels are defined from the highest to the lowest. Defined names are then displayed in the forms of subdimensions and elements added on proper levels. This allows the easy completion of information within a given dimension