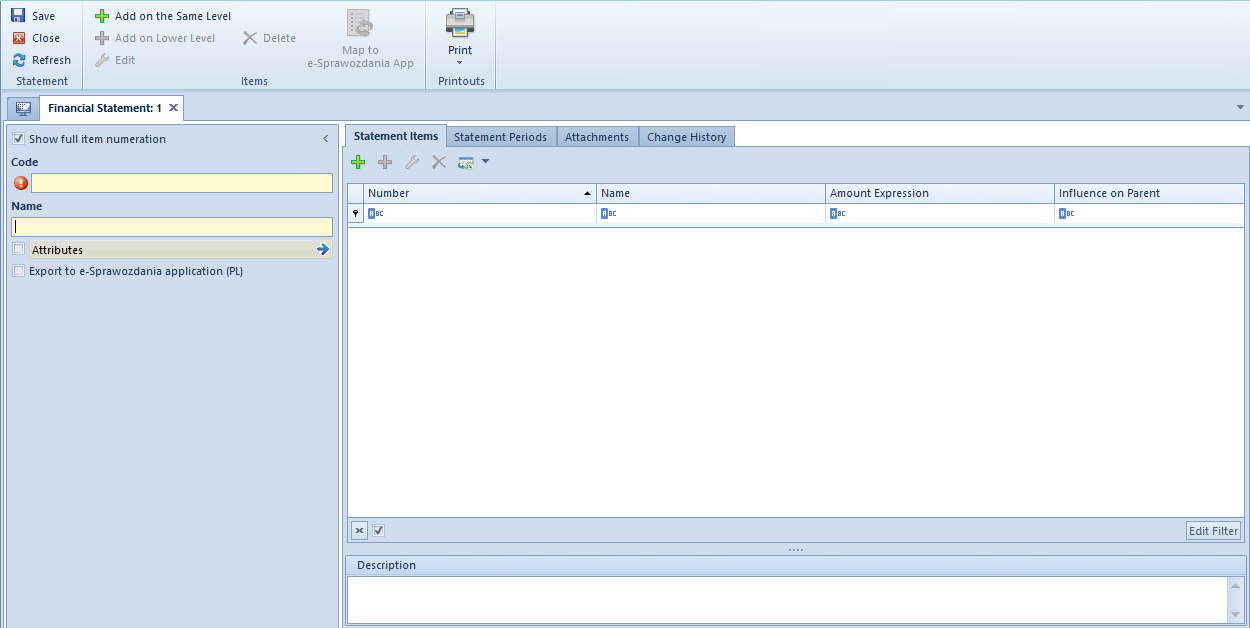
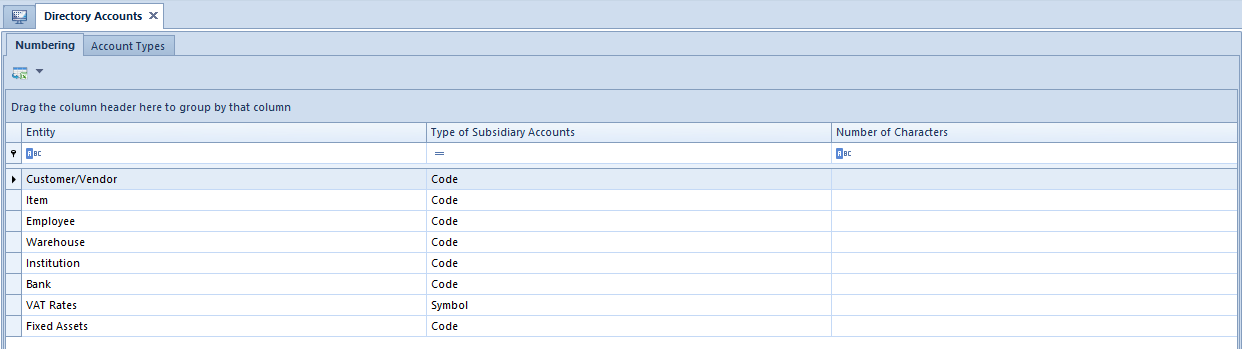
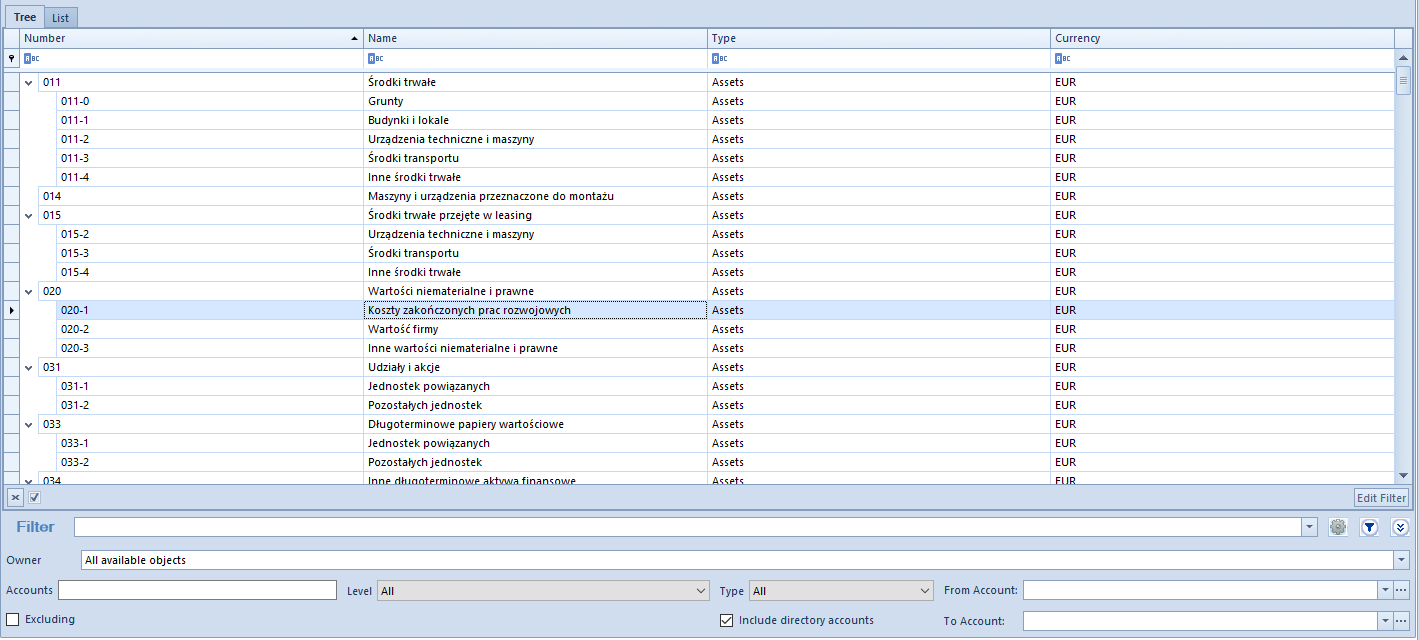
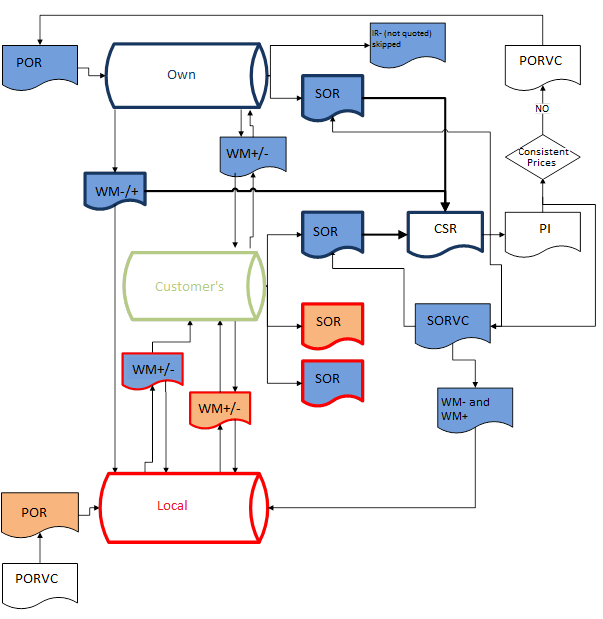
Analytical dimensions are used in the area related to Business Intelligence. They are used in the Reports Book in preparing the analyses. Data, analyzed in the reports, is based on information retrieved from different types of documents. The amounts, registered in documents, are described with many dimensions according to which they can be analyzed.
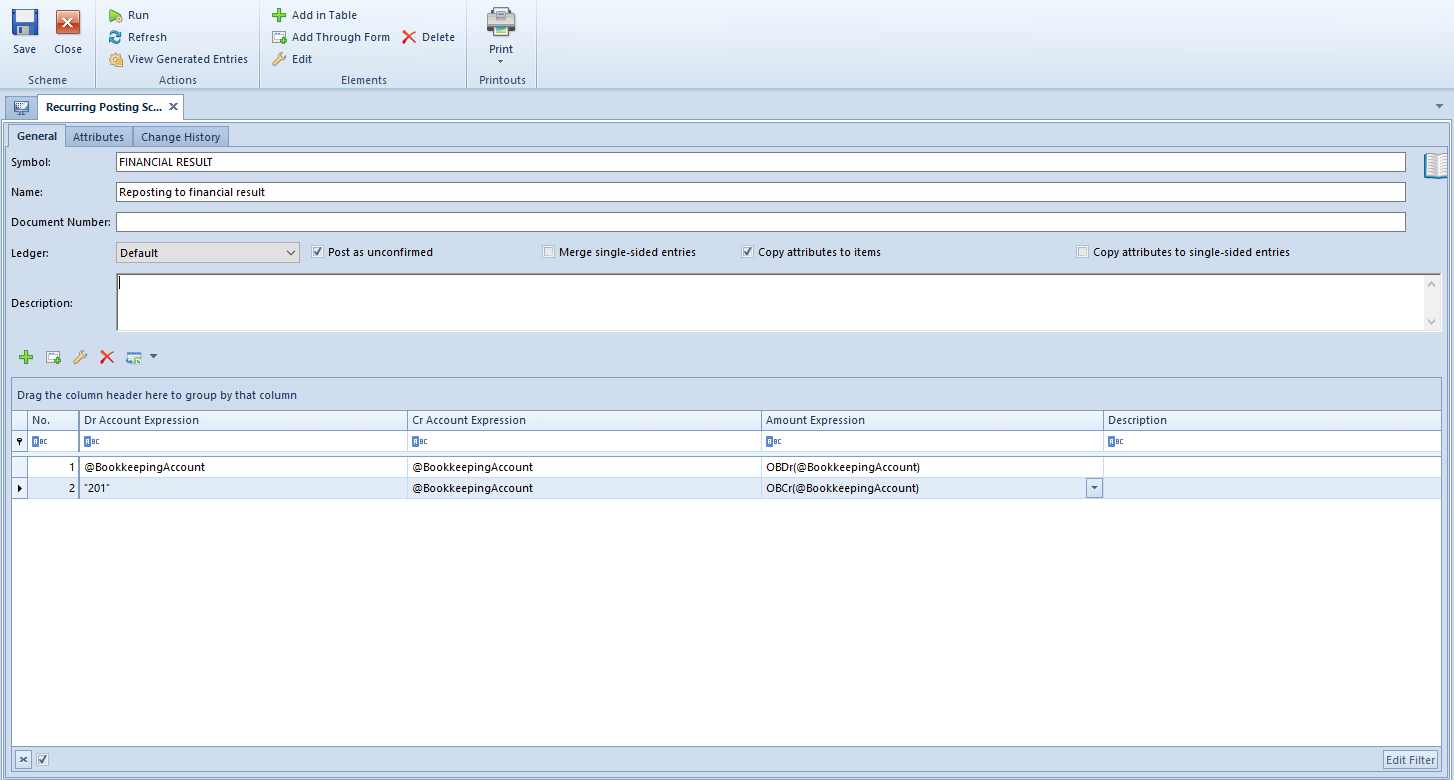
Moreover, using of analytical description in accounting module of Comarch ERP Standard enables quick and easy posting of documents on different cost accounts by type and function as well as on income accounts.
In the system, there are two types of analytical dimensions in the system:
Predefined dimensions – during creation of a database, Financial Category dimension is added, by default, along with four subdimensions – Cost, Revenue, Non-Cost, Non-Expense. It is mostly used in BI processes. It cannot be deleted, but it is possible to edit it and add new subdimensions and elements
Dimensions defined by the user – these are the additional dimensions defined by the user on the dimensions tree. They can be used for describing of documents
Objects maintaining analytical dimensions are available in the system from several levels. The dimensions tree is available in the Main menu under Analytical Dimensions icon.
On the form of analytical dimension, there are the following fields:
Name – dimension name can be composed of any sequence of characters. It allows for the easy and quick identification of particular dimension. Dimension name must be unique. It means that it is not possible to add two or more dimensions with the same name. If attempted, an appropriate message will be displayed. Dimension names can be translated into languages available in the system. The Name field is a context field – an entered name is defined in a language selected from a drop-down list located on the right side of the field
Description – field for additional information about dimension. Dimension description can be composed of any sequence of characters
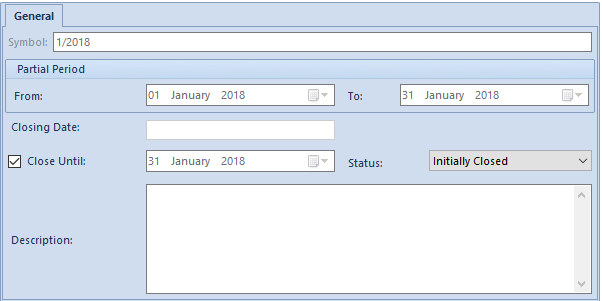
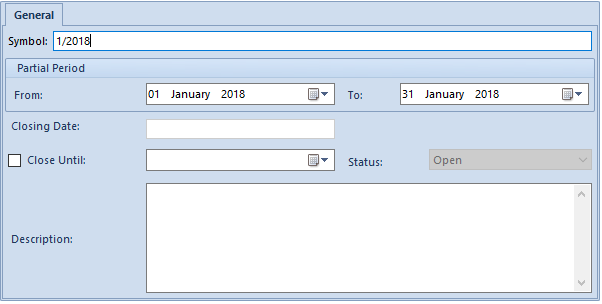
Validity Period – range of dates within which a given dimension will be active. It is possible to set only one of the dates, e.g., it can be specified that a given dimension is active till 12-28-2016
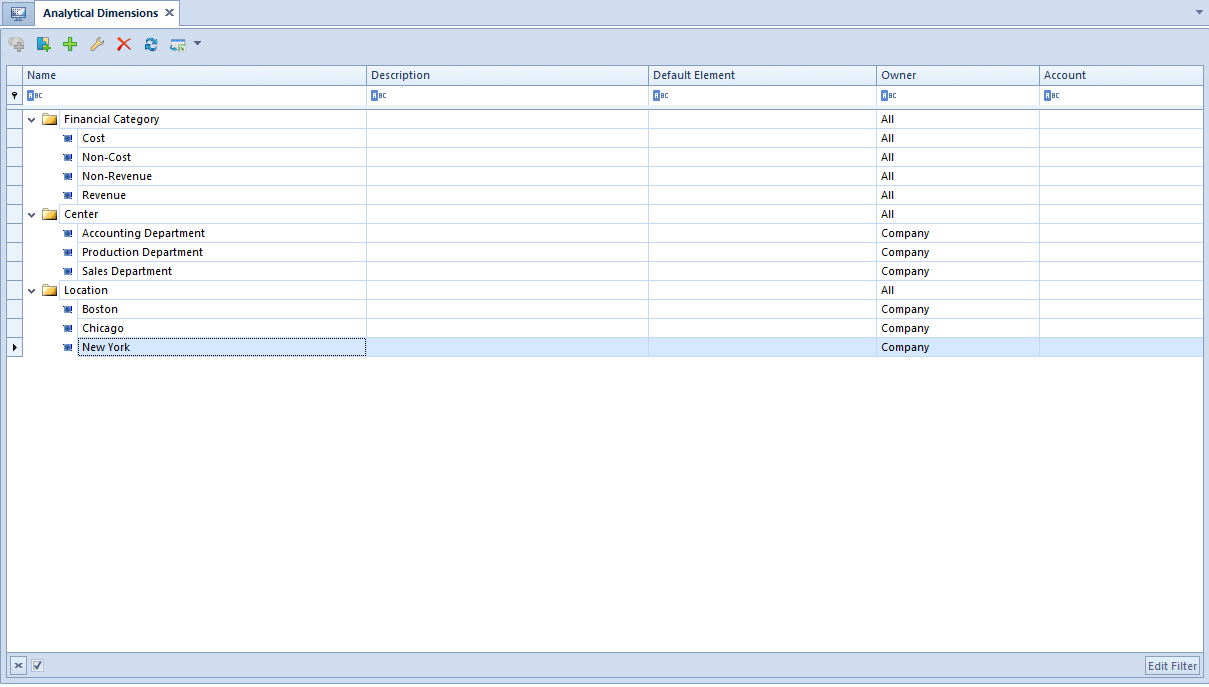
Analytical dimensions tree
Analytical dimensions tree presents a hierarchical structure of dimensions defined by the user.
Because it is possible to determine an owner on the form of analytical dimension’s subdimensions and elements, only subdimensions and elements, for which the company, to which an operator is logged on, or the value All is selected as owner, are displayed in centers different than parent company. In the parent company, on the other hand, there are all the subdimensions and elements of analytical dimensions displayed.
Note
Analytical dimensions are common for the entire company structure.
The list of analytical dimensions is composed of three columns: Name, Description, and Default Element.
The names of dimensions, subdimensions and elements are displayed in the Name column. Each of these items is distinguished with a different icon which allows the easy identification of item type.
The column Description presents description of dimension/subdimension/element.
In the column Default Element, it is possible to set a given dimension element as default. The name of element that is set as default will be displayed in bold both in the dimension structure, in the relation pattern as well as when describing analytically a document or an object. Moreover, when defining a relation pattern in tab List and analytical description of documents, the default elements will be suggested as first element on the list of given dimension’s values.
On the list of hidden columns, there are also two additional columns which can be used, i.e., Owner and Account.
In the column Owner, there is the name of the company being the owner of an element/a subdimension/an analytical dimension.
Note
Analytical dimensions are common for the entire company structure. A user cannot manage their availability in particular child companies, therefore, the value All is always displayed in the column Owner.
The column Account presents an account selected on element\subdimension form. The account is always displayed in red, regardless of whether it exists or does not exist on the chart of accounts.
Dimension is always on the highest level of the tree. Subdimensions and elements can be defined and assigned to each dimension. The elements are on the lowest level of the dimensions hierarchy and are displayed in analytical description.
Analytical dimensions tree with default columns
Note
Dimension is always added on the highest level of the tree. Subdimensions or elements are assigned both to dimensions and to parent subdimensions. Item is a leaf of the tree and no other object can be assigned to it.
Analytical dimensions tree with Financial Category dimension added by default
Unconfirmed and Canceled statuses of a VAT invoice
General information
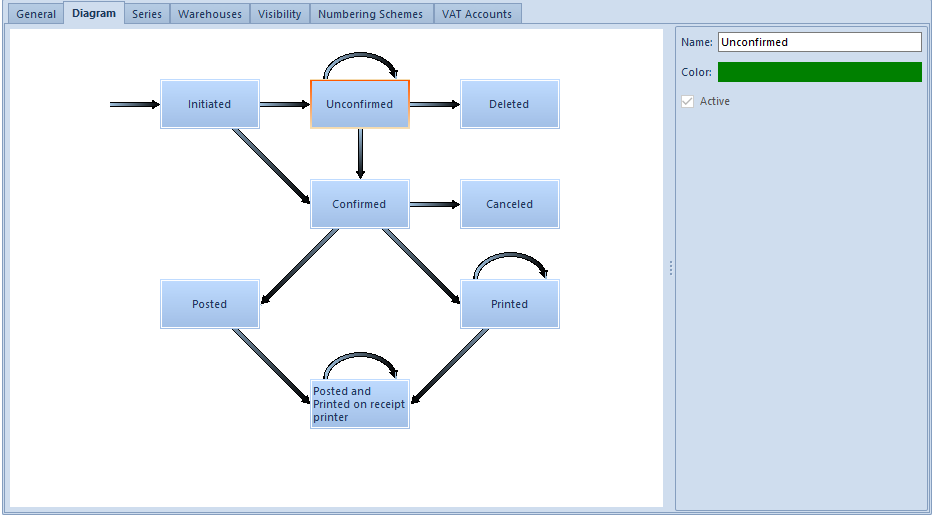
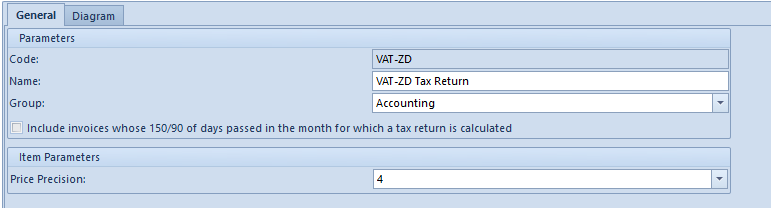
In Comarch ERP Standard system, it is possible to design a diagram of statuses in VSI, VPI, VSIC, and VPIC document definitions.
In tab Diagram of a document definition, it is possible to define which of the statuses will be activated. This option is only available until the first document of a given type is issued.
VAT invoice statuses diagram
When editing status Unconfirmed/Canceled, parameter Active is available. Checking it results in activation of status being edited. Moreover, activation/deactivation of Unconfirmed (Canceled) status automatically checks/unchecks Canceled (Unconfirmed) status.
In databases created in French, Unconfirmed and Canceled statues are checked as active, by default. In databases created in other language versions, both statuses are deactivated, by default.
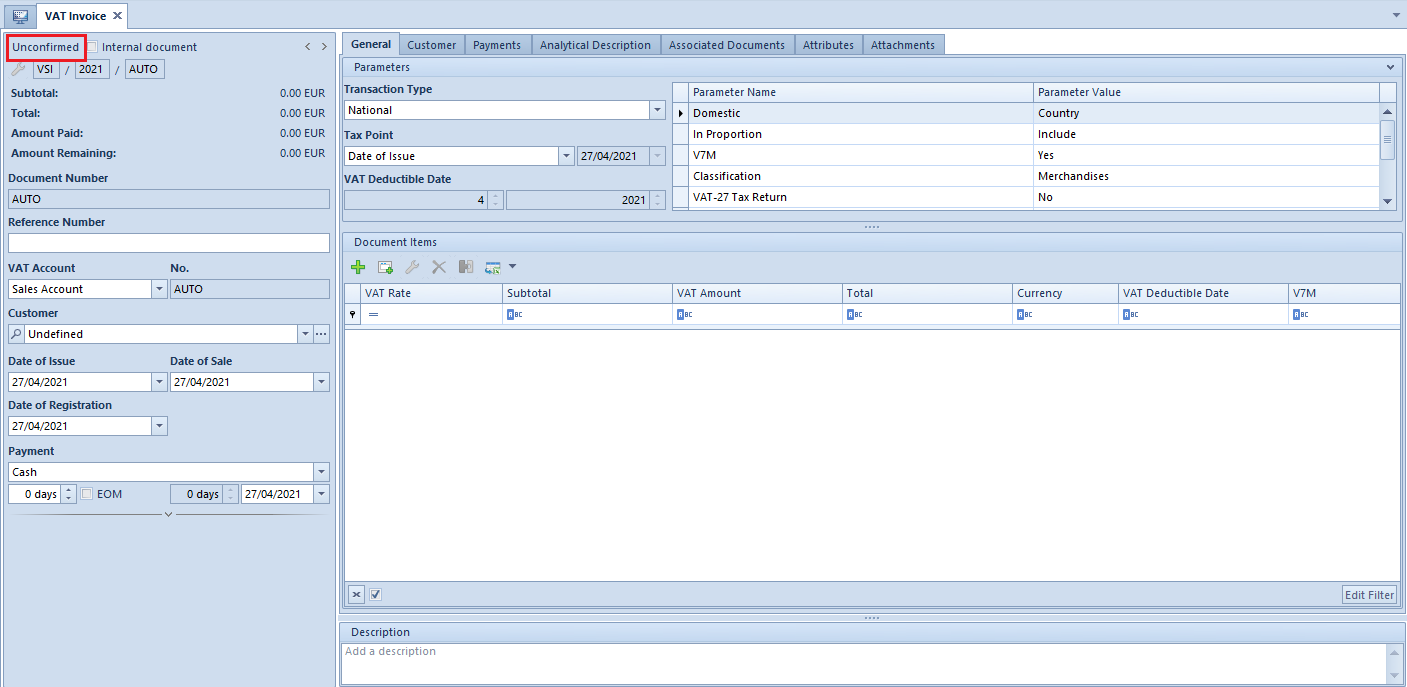
Adding VAT invoice with active status Unconfirmed and Canceled
A VAT invoice which can adopt each status available in the diagram is added the same way as an invoice on which Unconfirmed and Canceled statuses have not been activated (see article Adding VAT invoice in system currency).
However, there are additional fields available on the form of such invoice, which indicate status of document.
Document status in a VAT invoice
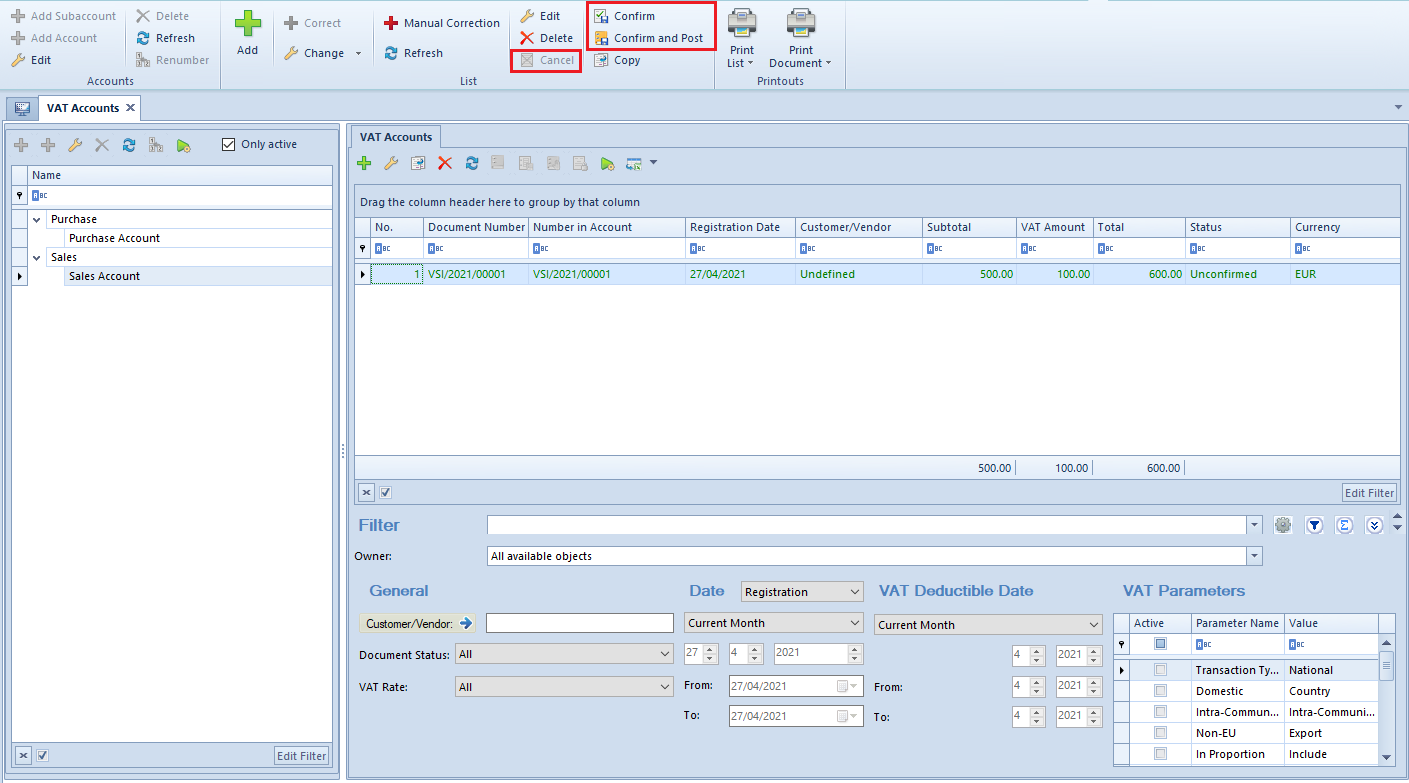
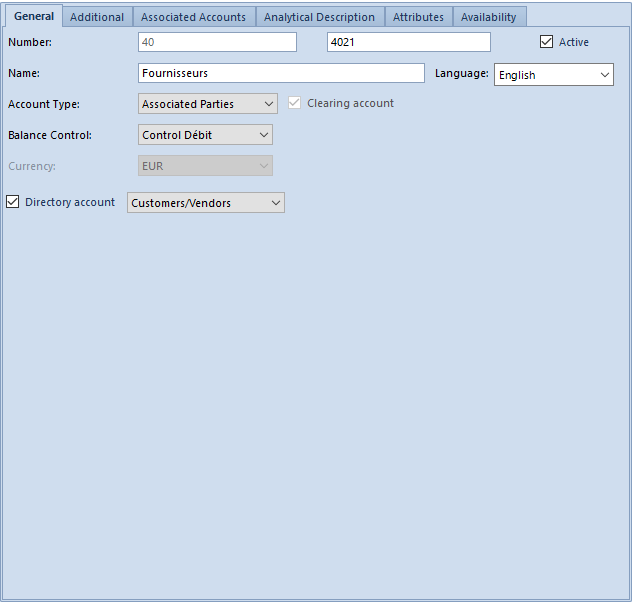
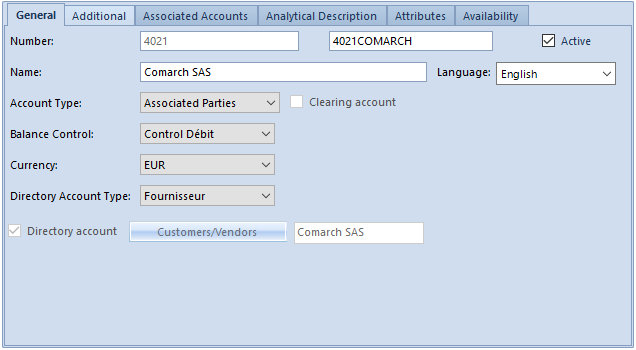
Additionally, both in the Ribbon menu of the invoice list and in the VAT invoice form, the following additional options are available: Confirm, Confirm and Post and Cancel.
List of VAT invoices with activated options: [Confirm], [Confirm and Post], and [Cancel] Characteristics of VAT invoices having full diagram of statuses activated:
Unconfirmed VAT invoices are subject to completion until they are confirmed. In this regard, the system operates the same way as in case of trade documents
VAT invoices generated from trade documents can be canceled only by canceling trade documents
Only unposted documents can be canceled
If the parameter Require a reason for document cancellation is selected in the definition of SIT or SITC document, then when canceling a SIT or SITC document added from the level of a VAT account, a window for specifying the reason for document cancellation is displayed. The specified reason is then presented on the form of SIT or SITC in the field Reason for Document Cancellation. If SIT or SITC was generated from a trade document, then the reason for cancellation in the VAT document is completed on the basis of the reason selected during cancellation of the trade document.
Canceled VAT invoices are not included in tax returns
Tax returns include both confirmed and unconfirmed documents
A trade document to which an unconfirmed VAT invoice was generated cannot be posted until the VAT invoice is confirmed
Generating VAT invoices on the basis of trade documents
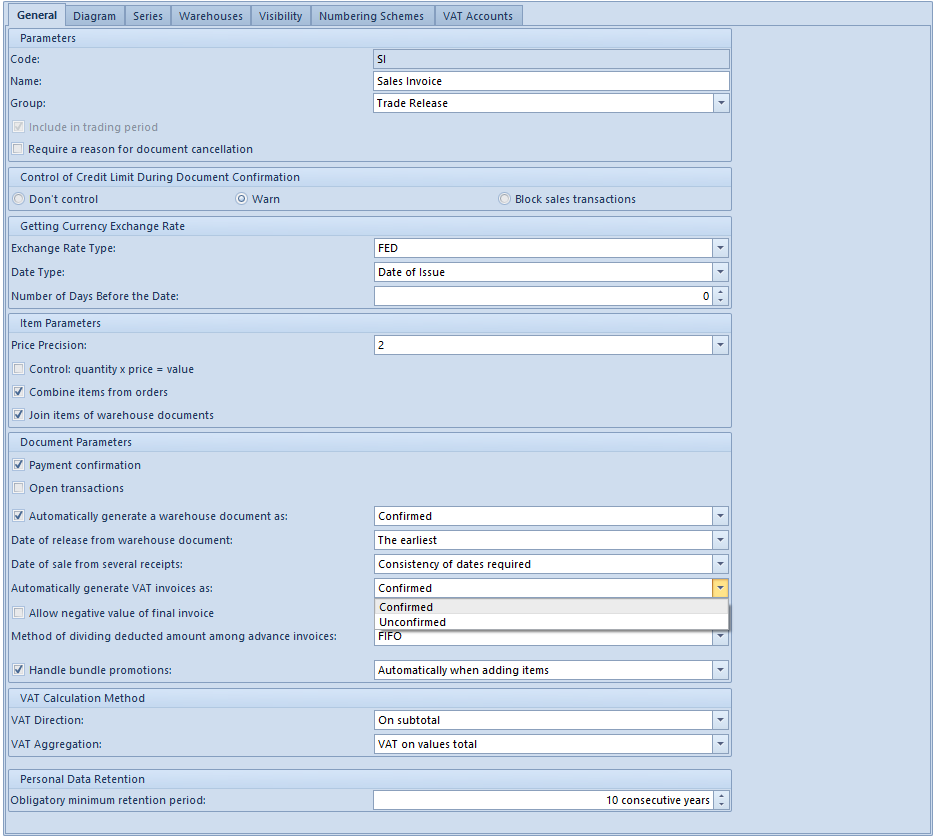
After status Unconfirmed/Canceled is activated for VAT documents, additional parameter Automatically generate VAT invoices with status: Unconfirmed/Confirmed becomes available in definitions of trade documents (Configuration → Company Structure → Company → Documents) on the basis of which a document is generated in VAT account. Appropriate setting of this parameter determines what status an automatically generated VAT invoice adopts.
In databases created in French, a VAT invoice is added the same way as in databases created in other language versions of the system. Detailed description can be found in article Adding VAT invoices in system currency.
However, in case of newly created databases, all of the operators have the permission for adding manual VAT sales invoices and their corrections unchecked, by default. This rule applies also to newly added operators.
VAT sales invoices which are generated automatically from trade documents will still be generated, regardless of lack of permissions for adding of VAT invoices.
Tax Free document in VAT sales account
Upon confirming a CRS document which includes a tax-free document, appropriate VAT document will be automatically generated in VAT sales account.
VAT sales invoice correction generated on the basis of CRS document
For items of a VAT invoice, which refer to the tax-free document, value of parameter Domestic will be set to Tax Free, on the basis of which a given amount will be included in corresponding field in VAT-7 declaration concerning return of VAT for tourists. On the other hand, amounts from the receipt with original VAT rate (e.g., 23%) will be appropriately corrected in VAT-7 declaration.
Reverse charge in VAT invoices
On VAT sales invoices and VAT sales invoice corrections generated automatically to a trade document on which parameter Reverse charge was checked, information parameter Reverse charge is displayed (provided for information purposes). It is grayed out and cannot be edited.
Additionally, for VAT invoice items included in reverse charge value of parameter Domestic is set as Customer is a taxpayer.
Note
Sales invoice items included in reverse charge and invoice items for which in field VAT Rate is set value: E ENS, are included separately on a VAT sales invoice.
VAT sales invoice with reverse charge
In case of VAT purchase invoice regarding reverse charge, it is possible to issue internal documents: VSI and VPI which do not generate payments and are only used for calculating and deducting VAT.
Internal documents
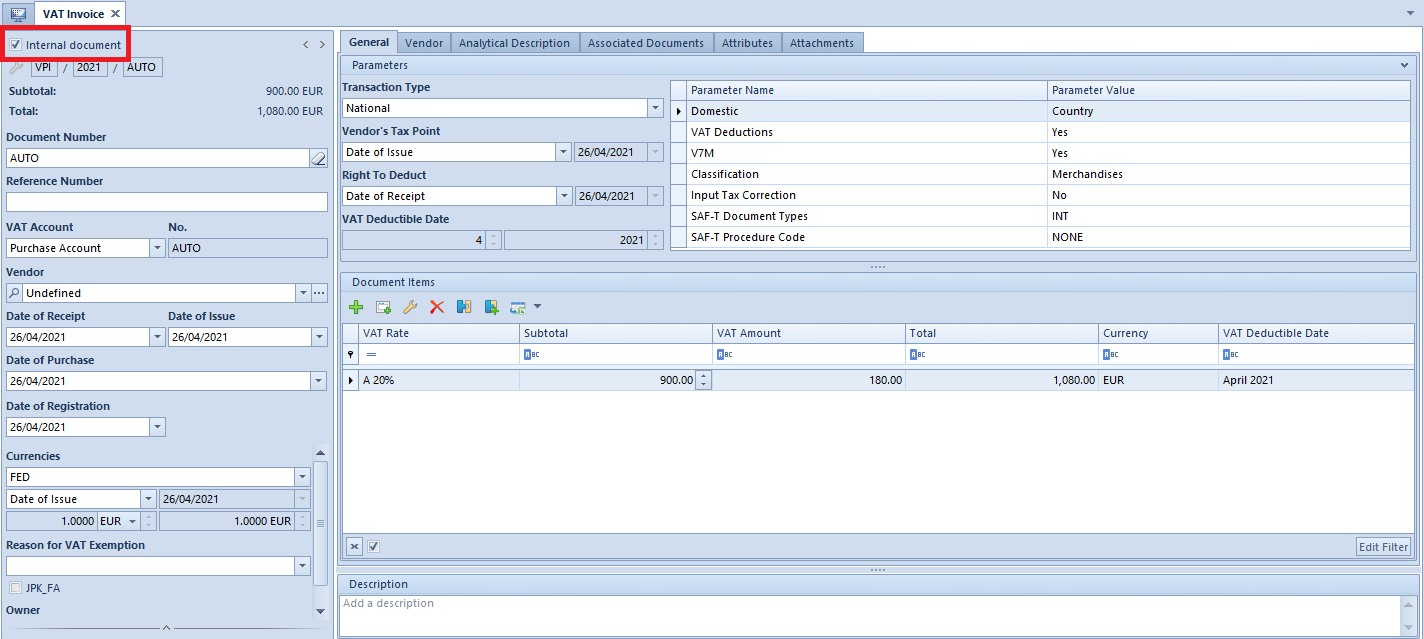
On both a VAT sales invoice and VAT purchase invoice, there is parameter Internal document available. If it is checked, payments are not generated to given invoices. If the parameter is checked while editing an issued invoice, the payments already generated are deleted.
Parameter Internal document on VAT invoice form
The following rules have been adopted referring to possibility of checking Internal document parameter:
Parameter is available and editable only on manually added VAT invoices and their corrections
Parameter is greyed out on a posted document
Parameter is greyed out on a confirmed document if full diagram of VAT invoice statuses is enabled
Parameter is greyed out if a document includes completed or partially completed payments
Parameter is greyed our if payments of a document have been included in an SRO
Parameter is greyed out if payments of a document have been included in debt collection documents
Generating VAT invoices to invoices generated from receipts
For sales transactions to be included in VAT accounts, in VAT-7 tax returns and in SAF-T file, it is currently necessary to include a receipt or receipt correction in a statement of retail sale (SRS) or in its correction (CRS). The same rules apply also in the case of receipts and receipt corrections to which a VAT sales invoice or VAT sales invoice correction has been issued. Such sales invoice generated from a receipt is no longer presented in VAT accounts so as not to duplicate the sales value.
Due to changed regulations of Article 109.3 of the Act of May 13th, 2016 regarding the changed act – Tax Law as well as some other acts (Journal of Laws of 2016, item 846), as of 2017.1 version of the system, in a database generated in Polish language version, it is possible to include in VAT accounts also sales invoices generated to receipts. To enable such an option, from the level of System -> Configuration -> Accounting, it is necessary to check parameter Generate VAT invoices in VAT account to invoices issued from receipts which is unchecked by default. It determines whether at the moment of confirming an invoice (or its corrections) generated to a receipt, a VAT invoice (or VAT invoice correction) should be created in a VAT sales account.
Note
Due to numerous doubts as regards interpretation of the regulations, receipts and receipt corrections can still be included manually or automatically in a statement of retail sale and its correction (SRS/CRS). They will also be included automatically in VAT sales account and in SAF-T file.
After selecting the parameter Generate VAT invoices in VAT account to invoices issued from receipts in definition of documents: SI/SIQC/SIVC, a user can specify a VAT account in which VAT invoice must be registered. A suggested option is Default, which can be changed to other VAT accounts available in a given center. If given VAT account is detached from a given center, then a default VAT account will be set in document definition.
Note
VAT invoices are generated only to invoices issued as of 1.01.2017 and they do not generate payments.
In VAT invoices generated to invoices issued from receipts, setting of VAT-7 parameter depends on the pattern type of VAT account. In the case of Suggested pattern type, VAT-7 parameter is set to NO (such invoice will be included neither in VAT tax return nor in SAF-T file) and in the case of Obligatory pattern type, VAT-7 parameter is set according to VAT account parameters.
If a user wants to include an invoice and not a statement of retail sale in VAT-7 tax return and in SAF-T file, VAT7 parameter must be set to YES.
Note
In the case receipt or receipt correction, to which a VAT invoice has been issued, is included in SRS or in CRS, then in order not to duplicate a sales value, the value must be corrected manually in VAT sales account by the value of invoices included in tax returns by registering an additional document directly in VAT account.
When posting a receipt or an invoice generated to that receipt or a generated VAT invoice, the other documents are also marked as posted.
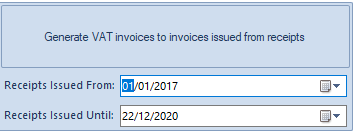
Selecting the parameter Generate VAT invoices in VAT account to invoices issued from receipts and relogging to the program activates a function Generate VAT Invoices To Invoices From Receipts in tab Add-Ons. Using this functionality, it is possible to generate VAT invoices for a selected period from 1st of January, 2017. VAT invoices are generated only if none VAT invoice has yet been generated to a given invoice issued from a receipt.
Window of Generate VAT Invoices To Invoices From Receipts function
VAT invoice generated to a trade document
VAT invoices are generated automatically through confirmation of a sales or purchase trade document, as well as value or quantity correction generated to such document. Such VAT invoices are created automatically on the basis of a source document and are registered in appropriate sales or purchase account (default for a given document type or assigned to the series), inheriting settings from definition of that account.
If for parameter Type in account definition one of the following options is selected: Merchandises, Services, Costs, Fixed Assets, Means of Transport, Real Estate, Services payable to customer, then VAT invoice inherits this setting regardless of what type of items (merchandise, service) are registered in a trade document to which this invoice was generated.
If for parameter Type in account definition the option Merchandises/Services is selected, then on the automatically generated VAT invoice, standard division of items into those related to the merchandise and those associated with the service is made. This division is made according to item form type (merchandise, service) used in a trade document. In the VAT invoice, items are grouped according to type and therefore, the invoice will include one item of Merchandise type and one of Service type, regarding a given tax rate.
Example
In a Sales Invoice trade document, there are two items with the same VAT rate – 23%, one of Merchandise type, the other of Service type
Variant A
ParameterType in default account definition is set to Merchandise
After the sales invoice is confirmed, VSI contains one item of Merchandise type
Variant B
Parameter Type in default account definition is set to Merchandises/Services
After the sales invoice is confirmed, VSI contains two items: one of Merchandise type, the other of Service type.
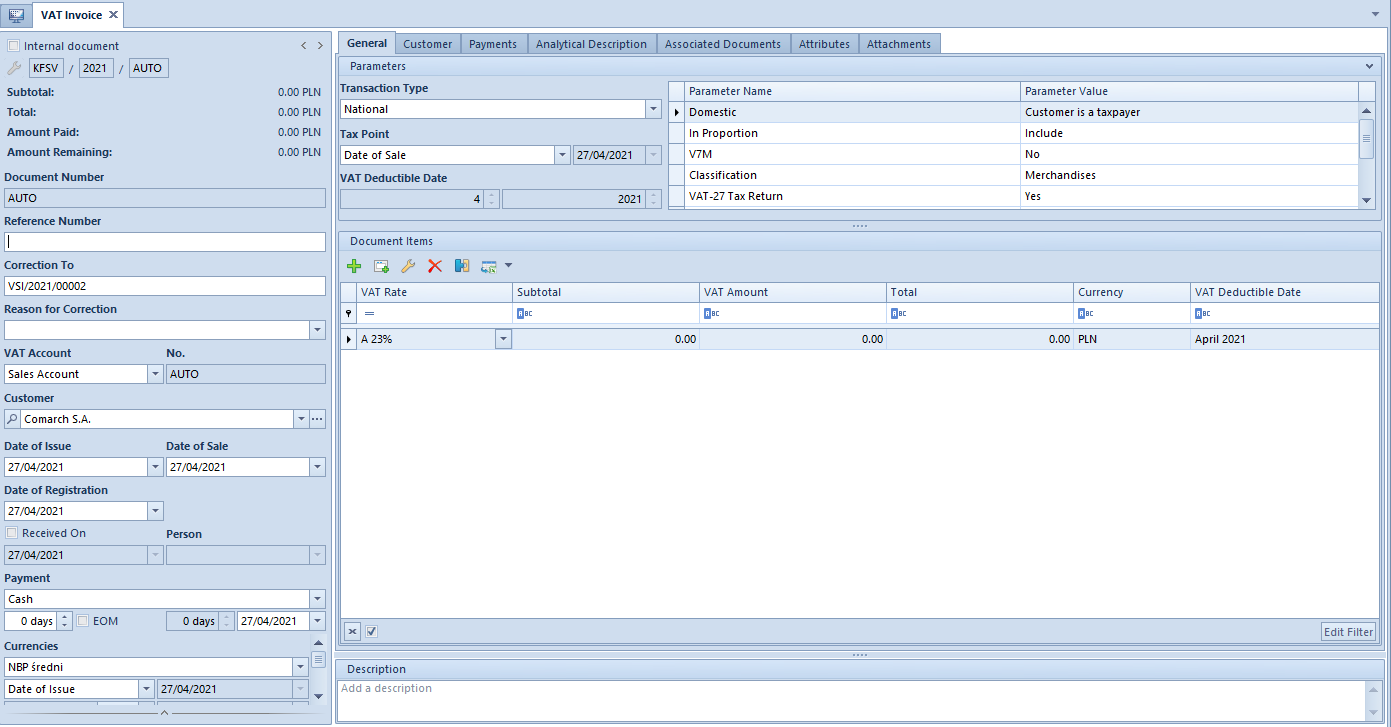
Adding VAT invoice correction
In the system, it is possible to add a correction that is not associated with any document or add a correction to a VAT invoice.
To add a correction not associated with a VAT invoice, select [Manual Correction] in the List button group.
To add a correction to a document registered in the system, mark appropriate VAT invoice in the list and then select [Correct] in the List button group.
Except for the additional field Correction To, in which number of a document being corrected must be entered, the form of VAT invoice correction does not differ from that of a regular VAT invoice. The other fields are the same as on the invoice form.
In case of correction issued to a VAT invoice, the data on the correcting document is filled in automatically on the basis of document being corrected. The rules for setting dates on such document are as follows:
Registration date is retrieved from account settings
Date of purchase/sale is retrieved from date of purchase/sale on a corrected document
Other dates are set according to the current date
VAT invoice correction form
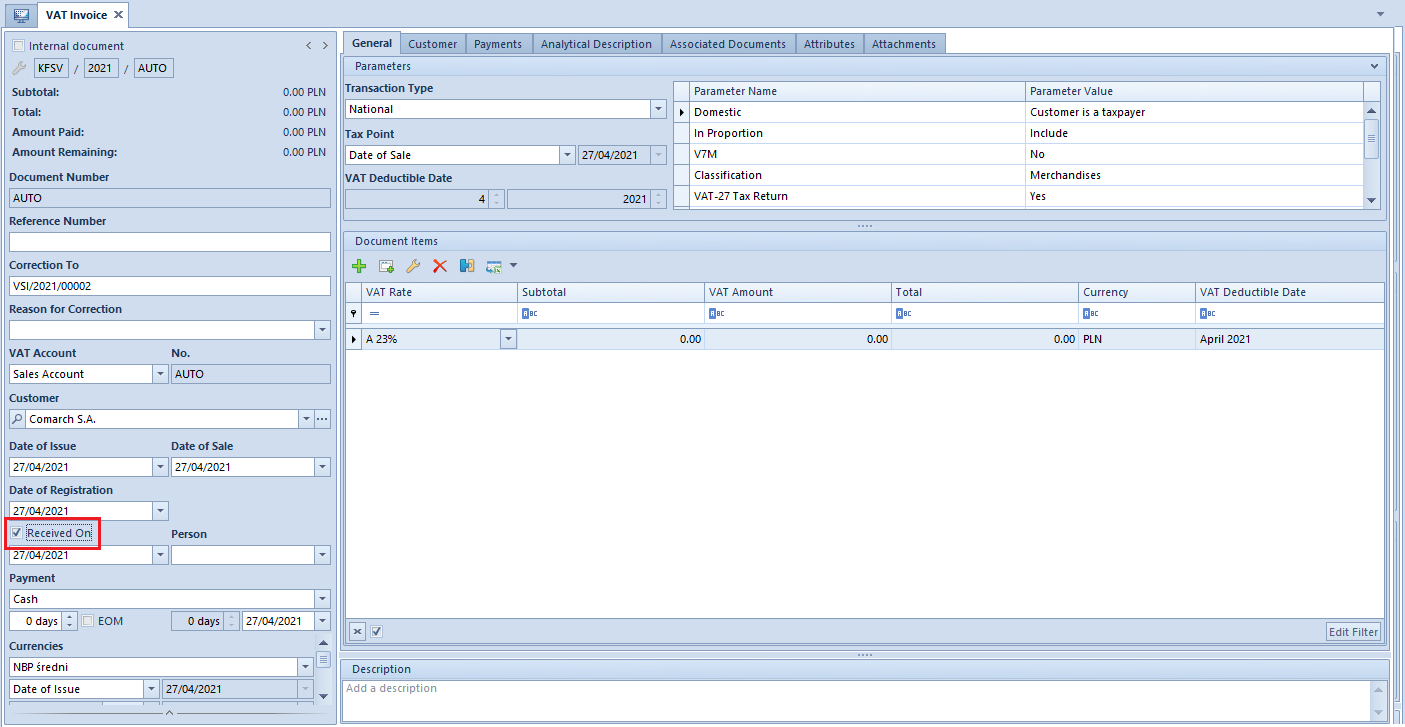
On a VAT invoice correction form (in Polish version of the system) it is possible to specify whether a given correction has been received by a customer or not and define a person confirming that receipt. In field By it is possible to select one of the contact persons of a customer (tab Contact Persons on customer form).
Moreover, the correction date of receipt can be specified. In this case, upon selecting option Date of Sale/Receipt Conf. Date in Tax Point field, the system automatically indicates receipt confirmation date as a date of including a VAT invoice correction in tax return, whereas the sales invoice itself will be included in the tax return
according to the date of sale.
VAT invoice correction form with checked Received On parameter
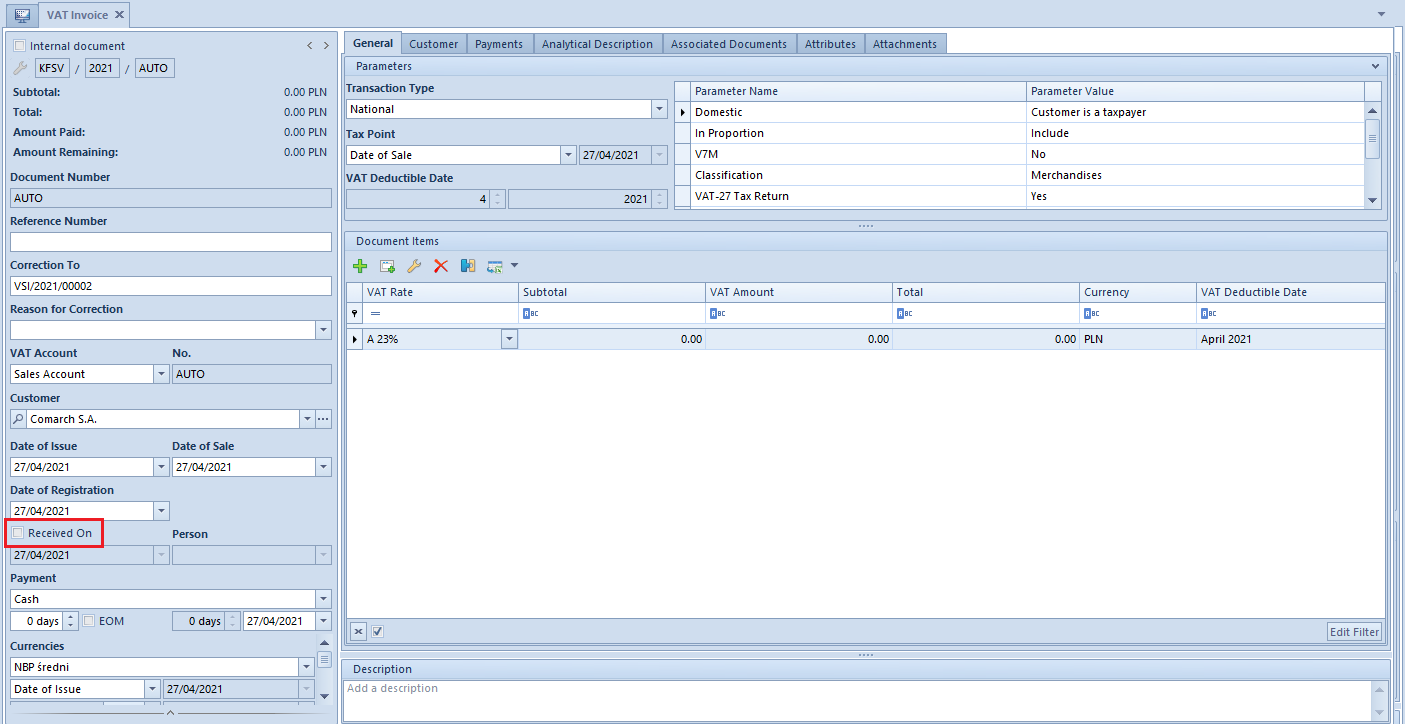
If parameter Received On is unchecked, VAT sales invoice correction will not be included in a tax return.
VAT invoice correction form with unchecked Received On parameter
Example
Possibilities of using Received On parameter in business practice
Variant A
In case of including corrections in a tax return according to corrected document date of issue, in definition of an account in which corrections are registered, tax point date should be set as Date of Issue. Upon analyzing the correcting invoices, they can be transferred (for instance, with the use of batch change of account option) to an account where Receipt Confirmation was defined as the tax point date. A given tax point definition must be previously specified in Configuration → Accounting → Tax Point with condition set as From the date of receipt confirmation. Upon transferring the corrections to the given account, receipt confirmation will be unchecked, that is, documents will not be included in the tax return until the parameter confirming receipt of correction is checked (for instance, with the use of batch confirmation of receipt option).
Variant B
In case if a tax return includes only corrections whose receipt has been confirmed, in definition of an account the tax point date should be set as Date of Sale/Receipt Conf. Date (if the account contains invoices and their corrections) or Receipt Confirmation (if the account contains only invoice corrections). In such case, correcting documents (in the first case also invoices) will be included in a tax return only after Received On parameter is selected.
VAT invoices corrections and corrections of trade documents are closely associated, that is, changing data on a VSIC results in update of relevant data on the associated SIQC/SIVC.
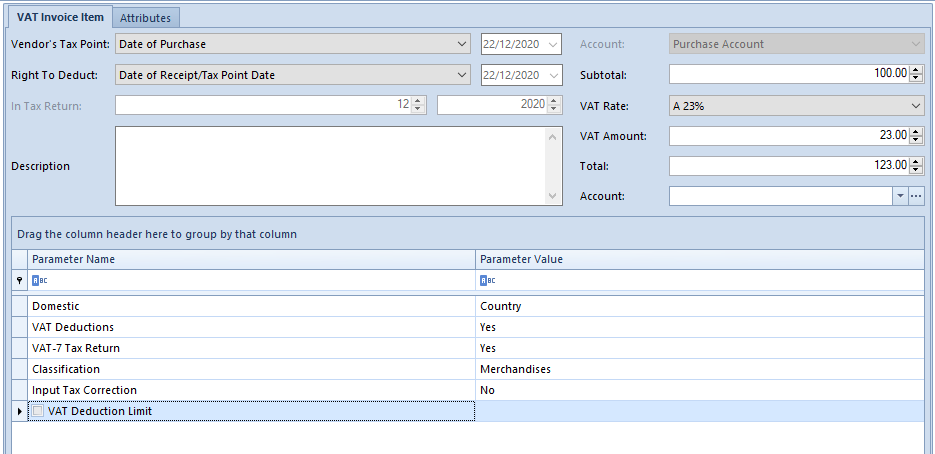
VAT deduction limit
According to regulations concerning value added tax, in some cases an entrepreneur running business activity is entitled to deduct the input tax amount from the output tax only up to the value determined by appropriate amount or percentage limit. Because of that, in Polish language version of the system, it is possible to control VAT deduction limit.
A user may select predefined value of deduction limit, that is 50 % Limit, or define own percentage and amount limits, which can be later selected in item of a VAT purchase invoice and its corrections.
Amount and percentage limit can both be specified in a limit definition added by a user. If in VAT deduction limit there is percentage as well as amount value specified, the system calculates value of the limit on the basis of percentage limitation, compares it with value of the amount limit and selects the smaller of the compared values.
Note
Parameter VAT Deduction Limit can be specified only at the level of VAT invoice item. It is not displayed in a document header.
VAT Deduction Limit parameter on VAT purchase invoice item
Note
Parameter VAT Deduction Limit can be checked only if VAT amount of a given invoice item is subject to deduction, that is, parameter VAT Deductions is set to YES.
It is impossible to edit the parameter on a posted or confirmed (if full diagram of statuses is enabled) document, regardless of operator permissions to change parameters in a confirmed/posted VAT invoice.
Note
It is possible to modify parameter VAT Deduction Limit on a document issued in foreign currency only when adding a given item. Upon checking the parameter, fields referring to change of currency exchange rate will be non-editable.
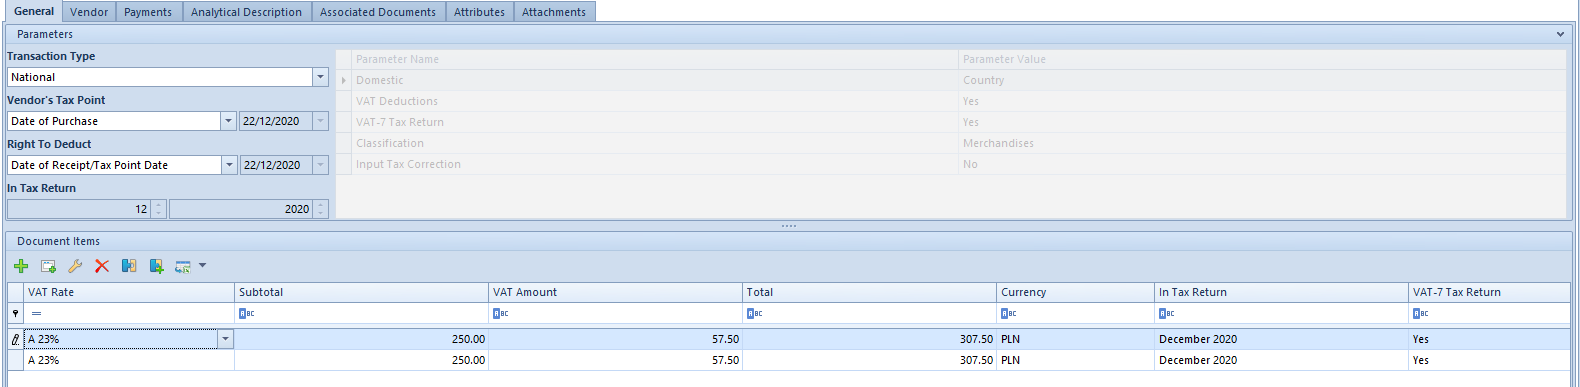
When saving an item with VAT Deduction Limit parameter, control of VAT amount value with selected VAT deduction limit value is performed. If the value is exceeded, the system automatically updates VAT amount to amount of the selected limit and generates a difference item
with parameter VAT Deductions set to No.
Divided VAT amount of VAT purchase invoice item
It is possible to divide VAT amount of a VAT purchase invoice item or its correction with the use of button [Divide VAT] provided that the parameter VAT Deduction Limit has first been selected and the parameter VAT Deductions has been set to Yes. As a result, the system performs the same operation as in case of checking parameter VAT Deduction Limit in a document item.
VAT amount not subject to deduction will be included in analytical description of a document.
On the list of VAT accounts, it is possible to filter documents with VAT deduction limit by checking parameter VAT Deduction Limit in the filter panel. A user may decide whether all documents with VAT deduction limit will be displayed or only those with specific value of the limit, e.g., 50 %.
Parameter VAT Deduction Limit in the filter on the list of VAT accounts
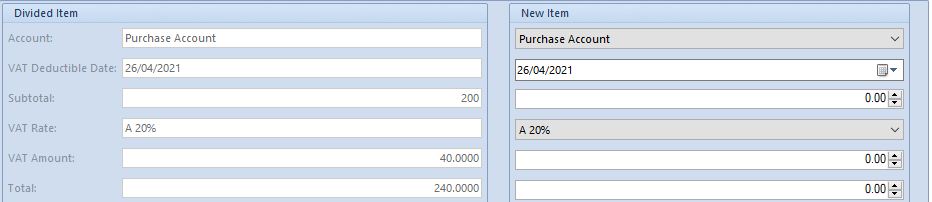
Dividing VAT invoice items
In order to divide VAT invoice item, click on the button [Divide Entry] in the Items button group. After selecting it, a form for entering data appears.
Form for dividing VAT invoice item
In the opened form, in section Divided Item, original data of VAT invoice item is displayed. These fields are not editable.
In section New Item, the user enters data for a newly created item:
Account – allows selecting VAT account
VAT Deductible Date – allows for the selection of JPK_V7M file/declaration period in which newly created item must be included
Subtotal – new subtotal value
VAT Rate – new VAT rate
VAT Amount – new value of VAT amount
Total – new total value
Description – allows for entering an additional description
Note
In order to facilitate the calculation task, after entering subtotal value, VAT amount and total value are calculated automatically. After entering total value, the system automatically calculates also VAT amount and subtotal value.
After completing new item data, click [Save] in the Actions button group.
The new item will appear on the list of items.
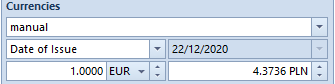
Adding VAT invoice in foreign currency
Adding of a VAT invoice in a foreign currency is performed the same way as in case of adding such invoice in the system currency. In this case, it is also necessary to select appropriate currency and specify its exchange rate in the Currencies section in the side panel of VAT invoice form.
Hint
By default, document currency is determined on the basis of currency assigned to a given customer/vendor.
Currencies panel in VAT invoice
In case the currency assigned to a given entity is inactive, the system currency is set in a document. Upon changing a customer/vendor, data in a document is recalculated according to the new currency and a user is notified about it in an appropriate message.
It is possible to select a different currency than the one assigned to a customer/vendor specified in a document.
A currency exchange rate is retrieved on the basis of the settings specified in the definition of given document type (menu Configuration → Company Structure → Rights Structure → edited company form → Documents tab)
Currency exchange rates can be updated in the menu Configuration → Currencies
After selecting a document a foreign currency, an additional section – Items in System Currency is displayed on VAT document form in tab General. Values in the foreign currency, which are presented in this section, are recalculated by a specified exchange rate into amounts denominated in system currency.
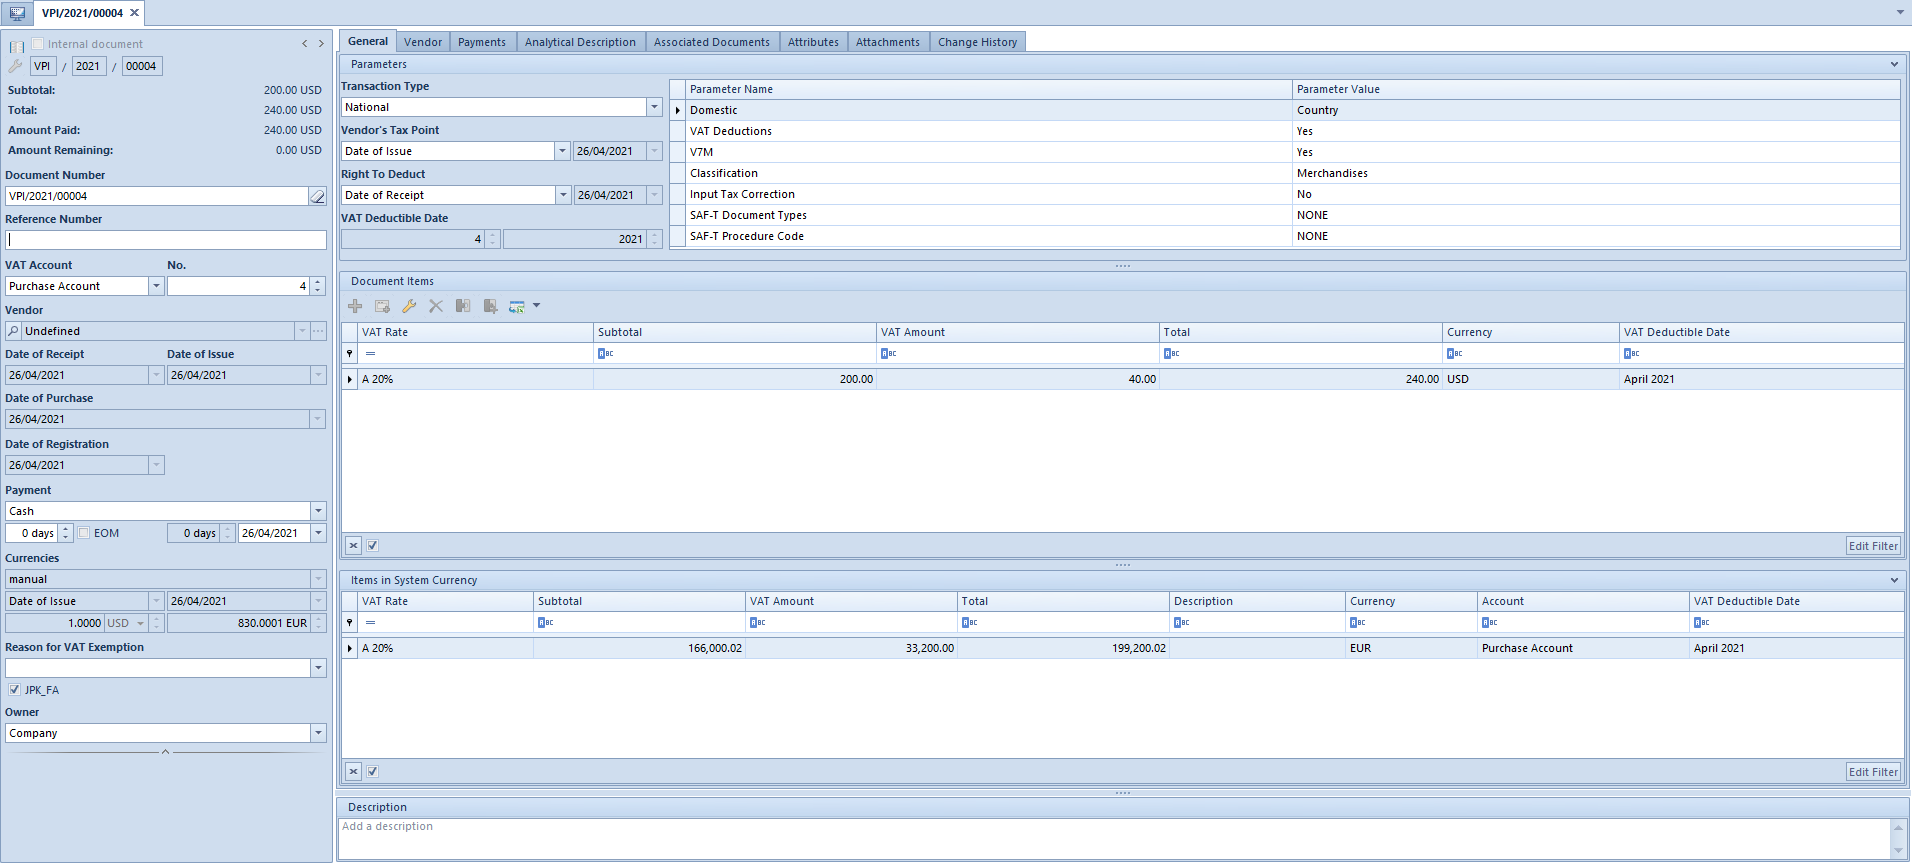
Form of VAT invoice in foreign currency
Editing VAT purchase invoice in a foreign currency
Documents: VPI and VPIC are specific documents for which edited values denominated in a given currency do not recalculate the values denominated in the currency different than the “edited” currency.
The abovementioned rule results from the necessity of ensuring flexibility of calculations in the face of ambiguous regulations relating to VAT calculation method on documents denominated in a foreign currency. The application of a more rigorous calculation principle would disable registration of purchase invoice with values consistent with a document received from a vendor.
Example
Data from the invoice received from a Vendor is the following:
Currency EUR, exchange rate 3.9757
VAT 23% on all items
Invoice items
Thus, the total amount of the invoice is:
Subtotal
VAT
Total
EUR
11 946.84
2747.77
14 694.61
PLN
10 924.31
Depending on VAT calculation method, VAT amounts in Comarch ERP Standard system are the following:
Total of VAT items:
Total of VAT items
VAT on values total:
VAT on values total
In order to ensure consistency between the registered document and the one from the vendor, it will be possible to edit the following:
For EUR: the values agree, no need to be edited
For USD: VAT amount changed to 1,564.04, the system will then recalculate only the total value and the subtotal value can be changed independently.
The change of values on a VAT invoice denominated in a foreign currency does not recalculate the values denominated in a different currency. Thus, changing the value denominated in the currency USD does not affect the value denominated in the currency PLN. When making such change, appropriate information is displayed – that information appears only when the value is edited in a document for the first time, the information no longer appears during edition of values in the following columns. It will be displayed again not until the document is re-edited and changes in values are made. Such information concerns only VPI and VPIC documents having currency other than the system currency defined in the header.
Example
A user opens a VPI denominated in the currency USD and edits VAT USD in the General tab – the information is displayed; the user goes to the column Total USD and changes value in this column – the information is not displayed; the user saves VPI, opens it again and edits VAT PLN in the Currency tab – the information is displayed.
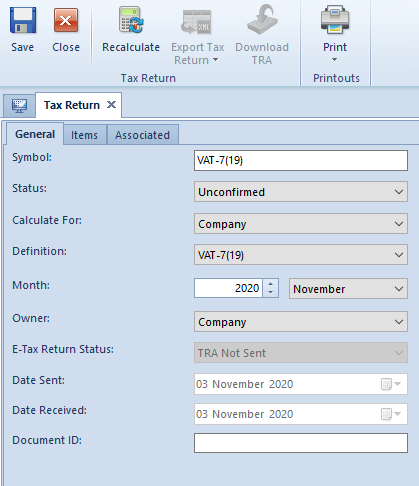
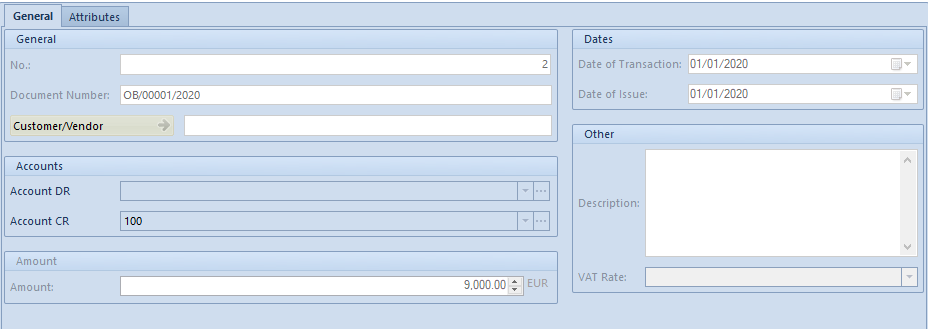
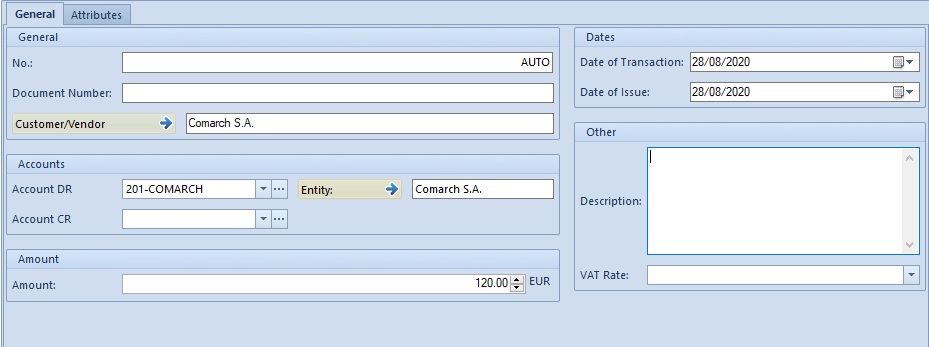
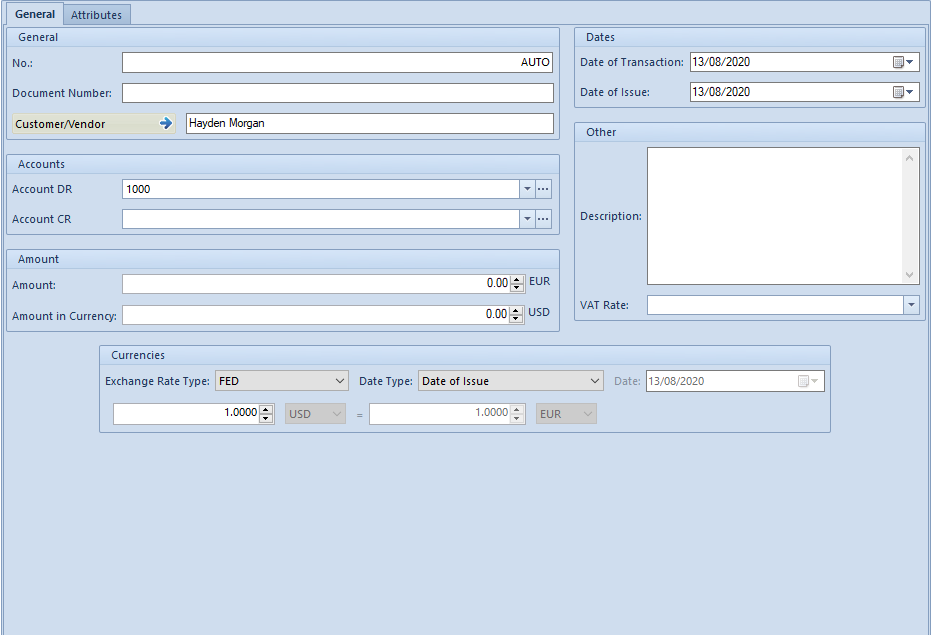
Adding VAT invoice in system currency
General information
VAT sales and purchase invoices are added the same way. Thus, this mechanism is described only once on the basis of a purchase invoice.
To add a VAT purchase invoice, select an account/subaccount in which the invoice will be registered and click [Add] in the List button group. The form of the VAT invoice will then be displayed.
General tab
VAT invoice form
OCR – symbol of the status of a document added with the use of the OCR service. The symbol is not displayed for documents not added by OCR.
Internal Document – marking of a document as internal document
Number in Account – number granted automatically by the system according to the numerator definition
Netto – wartość netto faktury
Brutto – wartość brutto faktury
Subtotal – invoice subtotal value
Total – invoice total value
Paid – value of the invoice that has been paid
Amount Remaining – value of the invoice that still needs to be paid
Document Number – in documents being registered directly in a VAT account, the option AUTO is displayed by default. A document receives a specific number not until it is saved manually or automatically (for instance, after proceeding to tab Payments).
That number is consistent with number in the account. In VAT purchase documents, it is possible to enter any value into this field by clearing its content with the eraser button. In VAT documents generated automatically to trade documents, field Document Number is filled in with the number of a trade document.
In a database created in French language version, this field is not available in VSI and VPI documents.
Reference Number – in this field it is possible to provide the invoice number under which it was registered in other system
Account – VAT account in which a VAT invoice will be registered
No. – ordinal number assigned automatically by the system
Customer or Vendor – name of an entity the VAT invoice is assigned to
A user may update customer/vendor data, that is: name, TIN, EIN and NIN on a confirmed document (if full diagram of statuses is enabled) by selecting a customer/vendor again, whereas that user must have the permission to update data of a customer/vendor in confirmed documents assigned (Configuration → Company Structure → Operator Groups → tab Other Permissions).
Date of Receipt – document date of receipt; field available only in VAT purchase invoices
Date of Issue – VAT invoice date of issue
Date of Purchase – date of purchase; field available only in VAT purchase invoices
Date of Sale – date of sale; field available only on VAT sales invoices
Registration Date – invoice date of registration in VAT account
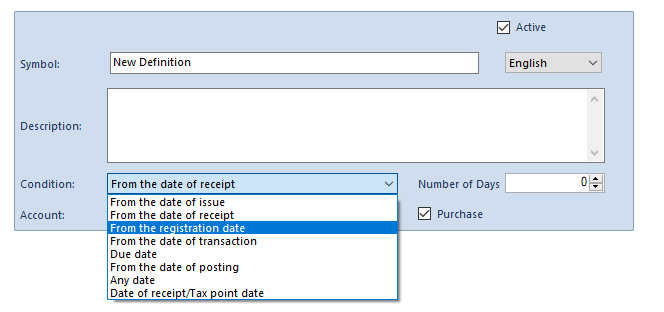
The above dates can be used to specify a tax point date, whereby, when fixing a tax point date in reference to registration date, first it is necessary to specify a proper tax point definition in the menu Configuration → Accounting → Tax Point by selecting a value From the registration date in the field Condition. A new tax point definition can be assigned to the definition of selected VAT account and its validity date can be specified. Selected tax point date will automatically be filled in VAT invoices being added to given VAT account. A specified tax point date can also be selected directly in a document.
Payment Form – allows for the selection of payment form for a given document
Due Date – number of days from the date of registration on the basis of which the planned payment date is determined
EOM – due date of End of Month type. Upon checking this parameter, a section for specifying number of days by which a due date will be postponed on the basis of the end of month becomes active
Split Payment – this parameter is available only if in the definition of a center of Company type, for the parameter Handle split payment according to Polish regulations, the value In accounting and trade modules is selected. Checking the parameter Split payment in the VAT invoice header automatically checks the parameter Split payment in all document payments where PLN currency and Bank payment form are selected.
Currencies – a document currency is by default determined on the basis of the currency assigned to a given customer/vendor. In case the currency assigned to a given entity is inactive, the system currency is set in a document. Upon changing a customer/vendor, data in a document is recalculated according to the new currency and a user is notified about it in an appropriate message.
It is possible to select a different currency than the one assigned to a customer/vendor specified in a document.
A currency exchange rate is retrieved on the basis of the settings specified in the definition of given document type (menu Configuration → Company Structure → Rights Structure → edited company form → Documents tab).
Reason for VAT Exemption – if VAT rate of tax-exempt type (D TE) is applied in an invoice, it is then possible to select the reason for VAT exception. Apart from selecting the predefined values, a user may define new values in the dedicated generic directory (menu Configuration → Generic Directories → group General → Reason for VAT Exemption). This field is editable in the invoices registered directly in a VAT account. In VAT invoiced generated from a trade document, value in this field is copied from the trade document. Detailed description of this field can be found in the manual Comarch ERP Standard – Standard audit file.
SAF-T_INV – this parameter is by default selected. It informs to include a VAT invoice being registered directly in a VAT account in a SAF-T_INV file. Detailed description of this parameter can be found in the manual Comarch ERP Standard – Standard audit file.
Owner – a default center to which the user adding a VAT invoice is logged-in
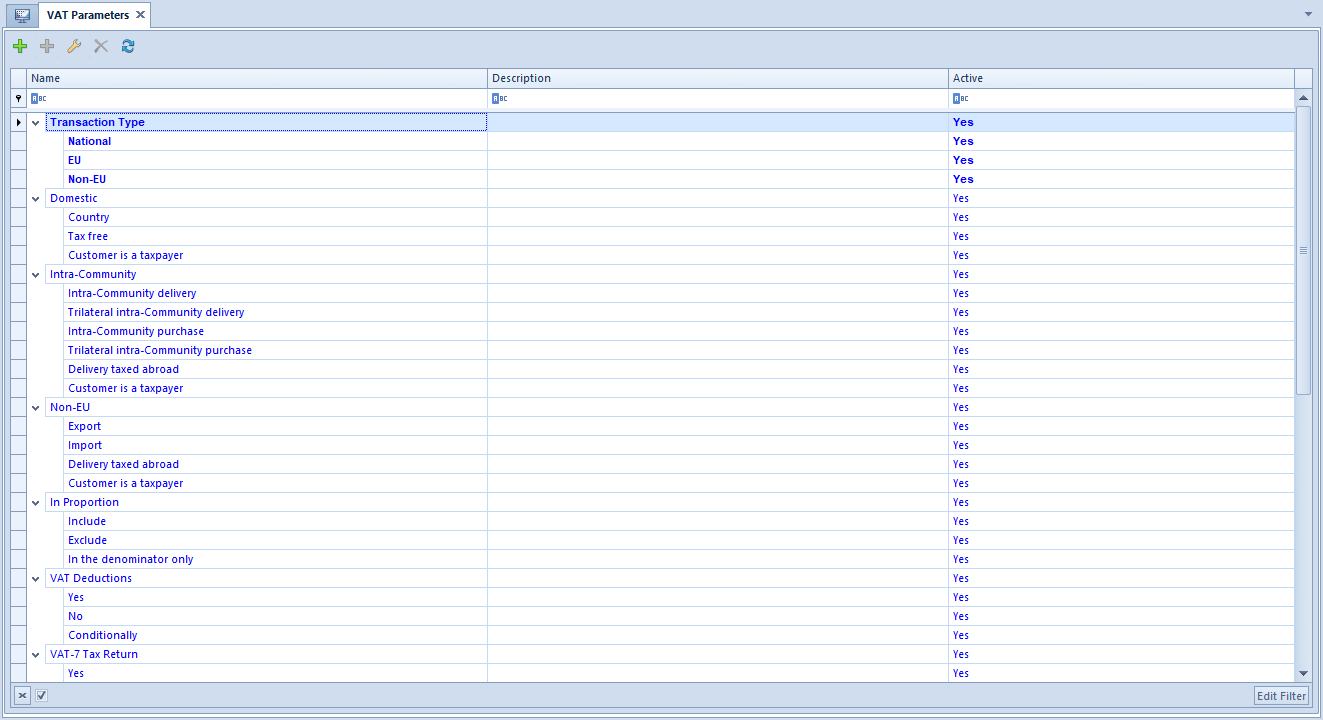
Transaction Type – the type of transaction can be selected from among the following options: National, IntraCommunity, Non-EU. Transaction type filters the list of VAT parameters to those which were previously assigned to it.
Note
A user can change document Owner to a center in which at least one of the defined VAT accounts is also available in the company the user is currently logged-in to.
VAT Parameters – the parameters panel is divided into two columns:
Parameter Name – contains the name of VAT parameter
Parameter Value – contains value assigned to given parameter
VAT parameters are defined from the level of Configuration → Accounting → VAT Parameters Available parameters:
National – transaction type selected in General tab
Parameter values: Country, TaxFree (available on sales documents), Customer is a taxpayer (available on sales documents)
Intra-Community – transaction type selected in General tab
Parameter values: Intra-community delivery/purchase, Trilateral Intra-community Delivery/Purchase, Delivery Taxed Abroad (available on sales documents), Customer is a taxpayer (available on sales documents)
Non-EU – transaction type selected in General tab
Parameter values: Import, Export (available on sales documents), Delivery Taxed Abroad (available on sales documents), Customer is a taxpayer (available on sales documents)
VAT Deductions – parameter available on purchase documents
Parameter values: Yes, No, Conditionally
V7M – value of the parameter indicated if an item is to be included in the JPK_V7M file
Parameter values: Yes, No
VAT-27 – parameter available on sales documents with National transaction type. Its value determines whether a document item must or must not be included in a VAT-27 tax return. If a value Customer is a taxpayer is set in the field Domestic, value of the VAT-27 parameter will automatically be set to
Parameter values: Yes, No
VAT-EU – parameter available for Intra-community transaction type. Its value determines whether a document item must or must not be included in a VAT- EU tax return.
Parameter values: Yes, No
Type – parameter available for sales and purchase documents,
Parameter values: Merchandises, Services, Costs, Fixed Assets, Means of Transport, Real Estate, Service payable to customer, Purchase of cash registers, Physical inventory
Input Tax Correction – parameter available on purchase documents
Parameter values: Yes, No,Article 89b. 1 of the Act, Article 89b. 4 of the Act
Type – parameter available for sales and purchase documents. Parameter values:
CRT – internal collective document containing information about sales from cash registers. The value is available on sales documents only and it is set by default for invoices generated during the confirmation of CRS and SRS documents.
INT – internal document. By default, the value is set for VAT invoices with checked parameter Internal document.
RI – invoice referred to in art. 109 sec. 3d of the Act. The value is available on sales documents only and it is set by default for invoices with checked parameter Invoice to Receipt.
CB – invoice issued by a taxpayer being vendor or service provider, who has selected liquidation cash method defined in art. 21 of the Act. The value is available on purchase documents only.
VAT_FRF – VAT FRF invoice referred to in art. 116 of the Act. The value is available on purchase documents only.
NONE – document different than CRT, INT, RI, CB, VAT_FRF. By default, the value is set for the other types of documents.
SAF-T Item Group – parameter available in the header of sales and purchase documents only. It can assume several values. When generating VAT invoice from a trade document, the value of the parameter is transferred from the generic directory SAF-T ProcedureCode value indicated on trade document items.
Parameter values: NONE, GSG_01 Alcoholic beverages, GSG_02 Goods mentioned in art. 103 sec. 5a of the Act, GSG_03 Heating oil, GSG_04 Tobacco products, GSG_05 Waste specified in items 79-91 of Appendix no. 15 to the Act, GSG_06 Electronic devices, GSG_07 Vehicles and automotive parts, GSG_08 Noble and non-noble metals, GSG_09 Medicines and medical devices, GSG_10 Buildings, structures and lands, GSG_11 Services for the transfer of permits for greenhouse gas emissions, GSG_12 Intangible services (consulting, accounting, etc.), GSG_13 Transport and warehouse management services.
SAF-T Procedure Code – parameter available in the header of sales and purchase documents only. It can assume several values. The value of the parameter is transferred from the generic directory SAF-T ProcedureCode value indicated on customer form. Additionally, when generating VAT invoice from a trade document, the value of the parameter is transferred from the generic directory SAF-T ProcedureCode value indicated on trade document items.
Parameter values: NONE, MOS Mail order sales, EE Telecommunications, broadcasting, and electronic services, AF Affiliations between a customer vendor, TT_IC Second taxpayer, TT_S Second taxpayer, MR_T Tourism margin, MR_SH Second-hand goods, works of art, antiques, I_42 ICS Custom procedure 42 (import), I_63 ICS Custom procedure 63 (import), V_SPV Transfer of a single-purpose voucher art. 8a.1, V_SPV_SUPPLY Supplies related to a single-purpose voucher, V_MPV_Supply Supplies related to the transfer of a multi-purpose voucher, SPM Split payment mechanism, IMP Tax calculated for import of goods art. 33a.
In Proportion – parameter available on sales documents. It is used for classifying a given sale as taxed or tax-exempt, which allows for calculating a sale structure indicator for completing a purchase related with tax-exempt and taxed sale.
Parameter value: Include, Exclude, In the denominator only
Output tax correction on intra-Community purchase of fuels – parameter available on sales document for EU transaction type. It is used for classifying an invoice to the field of JPK_V7M file relating to intra-community acquisition of motor fuels
Parameter values: Yes, No
Note
If values of VAT parameters on invoice items are different from those set in the document header, they are marked in red.
[/alert] If pattern type is set to Obligatory in an account definition, it will not be possible to edit the VAT parameters. [/alert]
Vendor’s Tax Point – date according to which the vendor’s tax point will be determined. It is possible to select a tax point definition specified in the menu Configuration → Accounting →Tax Point. A date can be selected from the calendar manually only in case of option Any Date. This field is unavailable for databases created in French. In a VAT sales invoice, the corresponding field is called Tax Point
Right To Deduct – date according to which the right to deduct VAT tax will be determined. It is possible to select from among Tax Point Definitions available in tab Configuration → Accounting → Tax Point. A date can be selected from the calendar manually only in case of option Any Date. This field is unavailable in VAT sales invoices
VAT Deductible Date – month and year of including a document in JPK_V7M file/VAT-7 tax return. This field is non-editable – it is specified on the basis of
right to deduct date – in a VAT purchase invoice
tax point date – in a VAT sales invoice
After completing the mandatory field, the invoice item must be added. It can be added:
in table
through form
Description – field for providing additional description of a document. This field is available in each tab of VAT invoice
Adding VAT invoice item in table
In order to add a VAT invoice item in table, click [Add] in the List button group. Then, a new line of VAT invoice item appears and it is divided into columns selected by a user; by default, these columns are: VAT Rate, Subtotal, VAT Amount, Total, Currency, VAT Deductible Date, V7M, VAT-EU Declaration (for transactions of intra-community type for on documents for received and released items), VAT Deductions, Type, Input Tax Correction. Individual fields must be filled in with appropriate values.
Additionally, on documents for received items, columns VAT%, Vendor’s Tax Point Date, Date of Deduction, Account, National/Intra-Community/Non-EU (depending on transaction type), Vendor’s Tax Point, Description, Right To Deduct, Account, VAT%. On documents for released items additional columns are: Account, VAT%, Tax Point Date, Tax Point, National/Intra-Community/Non-EU (depending on transaction type), Description, Account, In Proportion.
In databases created in French, column Account is only available on invoices and their corrections added in an account manually. It is thus not available on documents generated automatically from trade documents.
Adding an invoice item in table is a faster and more convenient method for entering of accounting data into the system. Thus, entered item need not to be saved. The entire document must be saved only.
Note
When adding VAT invoice items, settings of individual parameters are transferred from definition of VAT subaccount, whereas settings in a VAT invoice header are retrieved from definition of VAT account. Hence, it may happen that settings of VAT parameters in the header and on items of a VAT invoice will be different. Consistency must only be provided in reference to type of transaction set in the header and on items.
Note
If values of VAT parameters on document items are different from those set in the document header, they are marked in red. In such case it is also not possible to change values of VAT parameters in the document header.
VAT invoice items
Adding VAT invoice item through form
In order to add a VAT invoice item through form, click [Add Through Form] in the List button group. Then, a form of VAT invoice item is displayed.
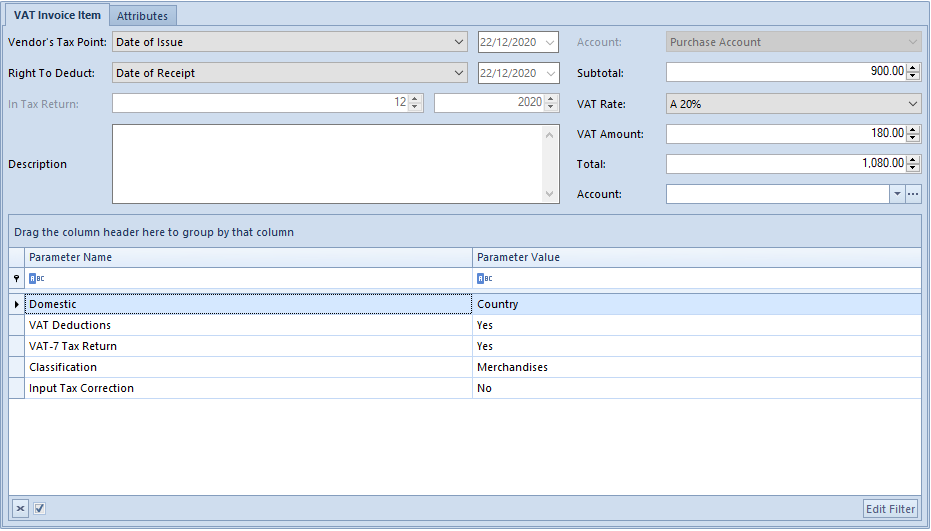
VAT Invoice Item tab
VAT invoice item form
Vendor’s Tax Point – date according to which the vendor’s tax point will be determined. It is possible to select from among Tax Point Definitions available in tab Configuration → Accounting →Tax Point. A date can be selected from the calendar manually only in case of option Any Date. This field is unavailable for databases created in French. In a VAT sales invoice, the corresponding field is called Tax Point
Right To Deduct – date according to which the right to deduct VAT tax will be determined. It is possible to select from among Tax Point Definitions available in tab Configuration → Accounting → Tax Point. A date can be selected from the calendar manually only in case of option Any Date. This field is unavailable in VAT sales invoices
Account – by default, it is an account in which an invoice was registered. If the account contains subaccounts, it is possible to select appropriate subaccount
VAT Deductible Date – month and year of including an item in JPK_V7M file/VAT-7 declaration
Description – additional description of an item
Subtotal – item subtotal amount
VAT Rate – VAT rate included in VAT rate group assigned to a company to which a user is logged-in
VAT Amount – VAT amount
Total – item total amount
Account – allows for assigning an account to the item. In databases created in French, column Account is only available on invoices and their corrections added in an account manually. It is thus not available on documents generated automatically from trade documents
VAT Parameters – allows for assigning of values to individual VAT parameters
Attributes tab
This tab is described in article <<Attributes Tab>>
Upon all the fields are filled in, save the item by clicking [Save].
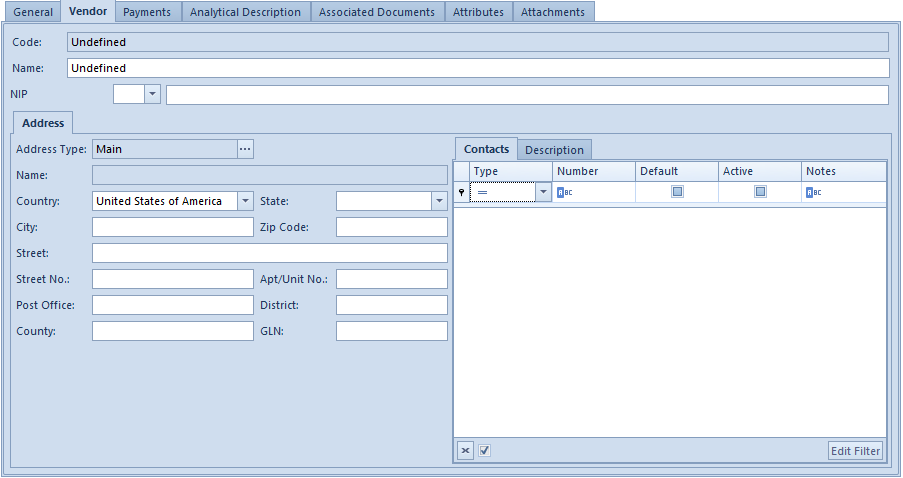
Customer/Vendor tab
This tab contains customer’s/vendor’s address details. This data is filled in automatically upon selecting the customer/vendor in tab General. Until a document is posted (if full diagram of statuses is disabled), all the information displayed in this tab can be modified or completed, if missing. By changing it, the data will be updated in the customer/vendor form.
If full diagram of statuses is enabled, it is possible to update customer/vendor address in a confirmed document by clicking on button [Change Address], whereas that user must have the permission to update data of a customer/vendor in confirmed documents assigned (Configuration→ Company Structure → Operator Groups → tab Other Permissions).
Tab Vendor on the form of VAT invoice
Payments tab
This tab is available only for documents added directly to a VAT account. It contains a list of payments assigned to a given invoice.
From the level of customer and vendor payments (subtab Finances) it is possible to complete/compensate a document.
If the invoice, being issued, is to be paid in several installments (e.g., part of it is paid in cash while issuing the document and the other part will be paid by bank transfer within 7 days period) – it is possible to divide the due payment.
The list can be modified with the use of standard buttons available in the Payments button group.
Note
While dividing a payment, the system suggests the following deposits amounted to the missing invoice value. If the payment value exceeds the invoice amount – the system does not allow saving such payment.
Note
Only an invoice entered manually to VAT accounts generates payment. An invoice generated from a trade document does not generate payments. The payment is included on the source document.
Analytical Description tab
Description of this tab can be found in category <<Analytical Description>>
Associated Documents tab
In case of invoices entered to VAT account manually, this tab remains empty.
In case of invoices with the source document in the form of a trade document, this tab contains a list of documents associated with the VAT invoice.
Attributes,Attachments, Chronology tabs
Description of these tabs can be found in <<Article>>.
Saving a VAT invoice
Upon filling in all the fields, save the document by clicking [Save] in the VAT Invoice button group. The document will then appear on the list of VAT invoices.
Adding VAT account
General information
In order to add a VAT account, it is necessary to click on appropriate branch of the accounts tree (Sales or Purchase) and then click [Add Account] button in the Accounts button group. A form for entering of data appears.
VAT purchase account form
VAT sales account form
Mandatory fields:
Account Name – VAT account unique name
Other fields:
Dedicated for the parent company – this parameter decides whether a given account is available only in the Parent Company and its child centers. The parameter is editable if an operator is logged-in to the parent company.
Accounts with selected parameter Dedicated for the parent company cannot be used in centers of Company type and in their child centers.
Default parameter setting during addition of new VAT account:
From the level of VAT account list for a user logged in to the parent company or to a center right below the parent company on the structure tree – it is selected, but it is possible to deselect it
From the level of VAT account list for a user logged in to a center of Company type or to its child center – it is deselected and its selection is blocked
From the level of the rights structure in the parent company – it is selected, but it is possible to deselect it
From the level of the rights structure in a center of Company type – it is deselected and its selection is blocked
Note
If a VAT account is attached to any center of Company type, selection of the parameter is blocked.
Rules regarding addition and availability of VAT accounts are described in article <<Object availability – Objects>>>.
Type – the type of account is entered, by default, depending on the branch the account is being added to (Purchase type or Sales type). The field cannot by edited.
Pattern Type – there are two pattern types possible to select:
Suggested – when adding a VAT invoice, it is possible to modify the VAT parameters and the tax point. If parameters of a VAT invoice item are different from those set in the header, they are marked in red.
Obligatory – when adding a VAT invoice to an account, it is possible to edit the VAT parameters and the tax point. These values are not editable.
Transaction Type – allows the assignment of the default type of transaction to a given account. The type is selected from the list that is defined in the system along with the assigned VAT parameters. By default, there are three types of transactions available: National, Intra-Community, and Non-EU. Additional types of transactions are specified on the list of VAT parameters available in tab Configuration → Accounting → VAT Parameters.
Registration Date – it allows for defining according to which date documents will be registered in a VAT account. This parameter determines also which date will affect the way invoices are numbered within a VAT account (No.). However, it does not affect the numerator of VAT invoices.
Parameters panel – displays all the VAT parameters associated with a given type of transaction. The panel is divided into two columns: Parameter Name and Parameter Value. Appropriate values for a given parameter are specified from the level of Configuration → Accounting → VAT Parameters.
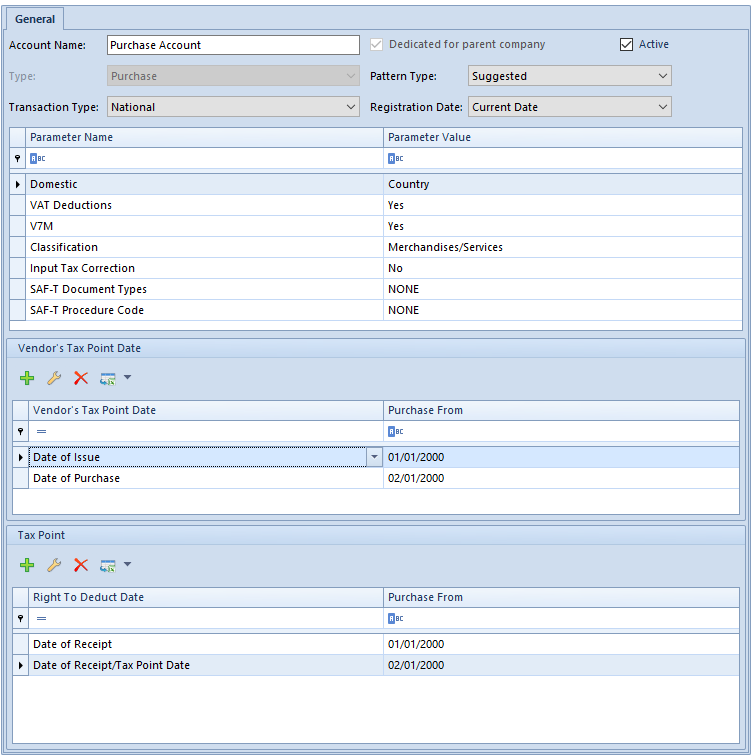
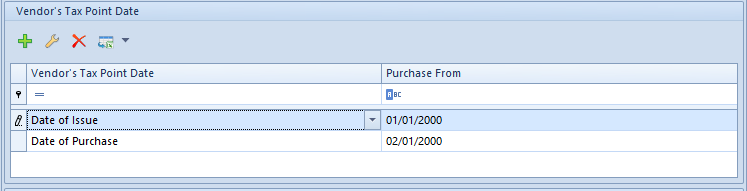
Vendor’s Tax Point Date – panel available in definition of an account of Purchase type
Vendor’s tax point date
A user can specify according to which the vendor’s tax point will be determined. Moreover, it is possible to set a range of dates for this setting (column Purchase From). A tax point can be edited or added from the level of Tax Point Definitions list available in tab Configuration → Accounting → Tax Point.
Proper definition of a tax point is set by date of sale in VSI and VSIC documents and by date of purchase in VPI and VPIC documents.
This section is unavailable in French version of a database.
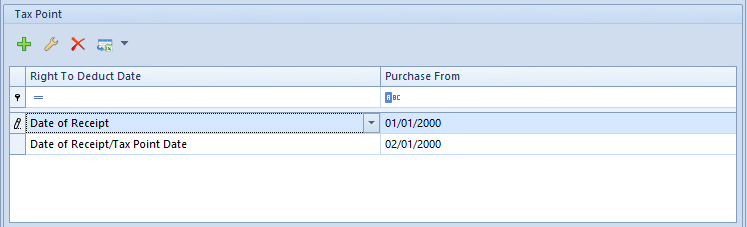
Tax Point Date – panel available in definition of an account of Sales type
Tax Point Date
Allows for specifying a definition according to which the right to deduct VAT tax will be determined. Moreover, it is possible to set a range of dates for this setting (column Purchase From). A tax point definition can be edited or added from the level of Tax Point Definitions list available in tab Configuration → Accounting → Tax Point.
Example
Vendor’s tax point date (from 01.01.2014) is determined according to condition From the date of transaction (Definition symbol: Date of Purchase).
The date of the right to deduct VAT tax (from 01.01.2014) is determined on the basis of the following condition: If the date of receipt is earlier than the date of vendor’s tax point, then the vendor’s tax point date (Definition symbol: Date of Receipt/Tax Point Date)
Variant A
A VSI was issued with date of purchase: 01.15.2014, the date of issue: 01.01.2014 and the date of receipt 01.02.2014,
Vendor’s tax point Date of purchase – 01.15.2014
Tax point Vendor’s Tax Point Date – 01.15.2014 (Date of receipt earlier than the vendor’s tax point date)
Variant B
A VSI was issued with date of purchase: 01.15.2014, the date of issue: 01.01.2014 and the date of receipt 01.17.2014,
Vendor’s tax point Date of purchase – 01.15.2014
Tax point Vendor’s Tax Point Date – 01.17.2014 (Date of receipt later than the vendor’s tax point date)
Example
Vendor’s tax point date
from 05.01.2013 to 12.31.2013 is determined according to condition From the date of issue (definition symbol: Date of Issue)
from 01.01.2014 is determined according to condition From the date of transaction (definition symbol: Date of Purchase)
Right to deduct date:
from 05.01.2013 to 12.31.2013 is determined according to condition From the date of receipt (definition symbol: Date of Receipt)
from 01.01.2014 is determined according to condition: If the date of receipt is earlier than the vendor’s tax point date, then the vendor’s tax point date (definition symbol: Date of Receipt/Tax Point Date)
Variant A
A VPI was issued with date of purchase: 12.31.2013, date of issue: 01.01.2014, and date of receipt: 01.15.2014
Vendor’s tax point: Date of issue – 01.01.2014
Tax Point Date of Receipt – 01.15.2014 (date of receipt is later than the vendor’s tax point date)
Variant B
A VPI was issued with date of purchase: 01.15.2014, date of issue: 01.01.2014, and date of receipt: 01.02.2014
Vendor’s tax point Date of Purchase – 01.15.2014
Tax point Vendor’s Tax Point Date – 01.15.2014 (date of receipt is earlier than the vendor’s tax point date).
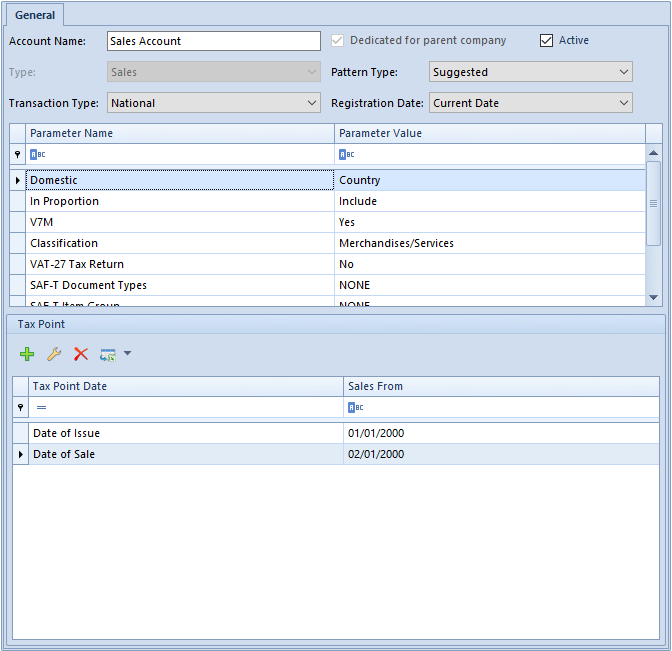
Tax Point Date – panel available in definition of an account of Sales type
Tax Point Date
A user can specify according to which the tax point date will be determined. Moreover, it is possible to set a range of dates for this setting (column Sales From). A tax point definition can be edited or added from the level of Tax Point Definitions list available in tab Configuration → Accounting → Tax Point.
Example
Tax point date:
from 05.01.2013 to 12.31.2013 is determined according to condition From the date of issue (definition symbol: Date of Issue)
from 01.01.2014 is determined according to condition From the date of transaction (definition symbol: Date of Sale)
Variant A
A VSI was issued with date of sale: 12.31.2013 and the date of issue: 01.01.2014
Tax point Date of Issue – 01.01.2014
Variant B
A VSI was issued with date of sale: 01.15.2014 and the date of issue: 01.01.2014
Tax point: Date of sale – 01.15.2014.
Note
After adding a new account, its availability and default status must be configured for individual types of documents in Configuration → Company Structure → Object Availability. More details in this matter can be found in article <<Object availability – Objects>>.
Adding VAT subaccount
To add a VAT subaccount, it is necessary to check the parameter Add subaccounts available on the parent branch (Purchase/Sales). Checking this parameter automatically generates a default subaccount.
Note
After adding a VAT invoice to a given account, it is no longer possible to change settings of parameter Add subaccounts.
The user is able to change the name of automatically generated subaccount and add new subaccounts with the use of option [Add Subaccount] in the Accounts button group. After selecting it a form for entering of data appears.
The subaccount form is the same as that of VAT account. VAT parameters and pattern are also determined according to the same rules. The only difference is the lack of parameter Date of Registration.
When being added, a new subaccount assumes the default setting Pattern Type from the parent account. If this type is Suggested, the new subaccount will also have this type set, by default and the same applies to obligatory accounts. In case of suggested accounts, it is possible to change pattern type of their subaccounts to Obligatory. All subaccounts of obligatory accounts must have obligatory pattern. All subaccounts with obbligatory pattern have obbligatory patern set by default and it is not possible to change it. If pattern type is changed for an account to Obligatory, all its subaccounts inherit this pattern, by default.
Note
After adding a new subaccount, its availability and default status must be configured for individual types of documents in Configuration → Company Structure → Object Availability. More details in this matter can be found in the manual Comarch ERP Standard – Configuration.
Associating VAT account/subaccount with document series
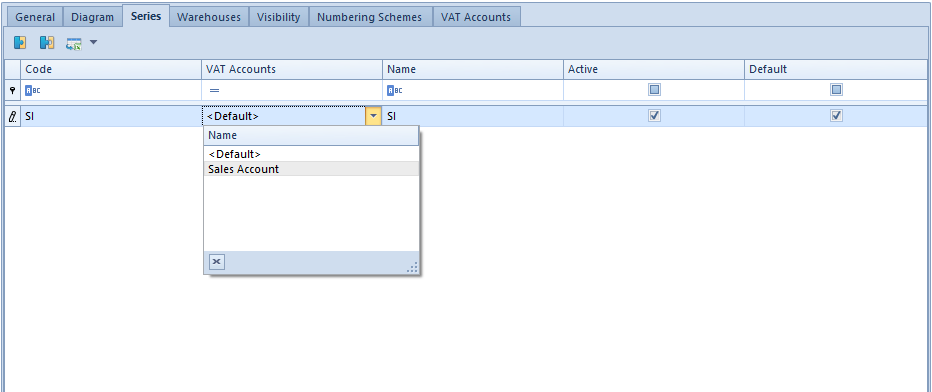
It is a common situation that numerators of individual documents include unique series. Comarch ERP Standard system allows for associating a specific series of a document with VAT account/subaccount. Owing to that, in an issued document, there is an account/subaccount assigned to the document series uploaded, and upon confirming the document, an entry is added in a proper registry.
In order to associate a specific document series with selected VAT account/subaccount, go to Series tab on a given document type definition in a company or a center and assign the account/subaccount.
Associating VAT account/subaccount with document series
In VAT Account field there are two options available for selection:
<Default> – VAT account will be uploaded onto a document with given series according to settings for a given document type in particular company/center
One of VAT accounts/subaccounts assigned to a given document type definition (added in tab VAT Accounts of the definition)
When issuing a trade document, account/subaccount default for a given document type or account/subaccount associated with series is assigned. The user can change that account/subaccount directly on a document in Amounts tab.
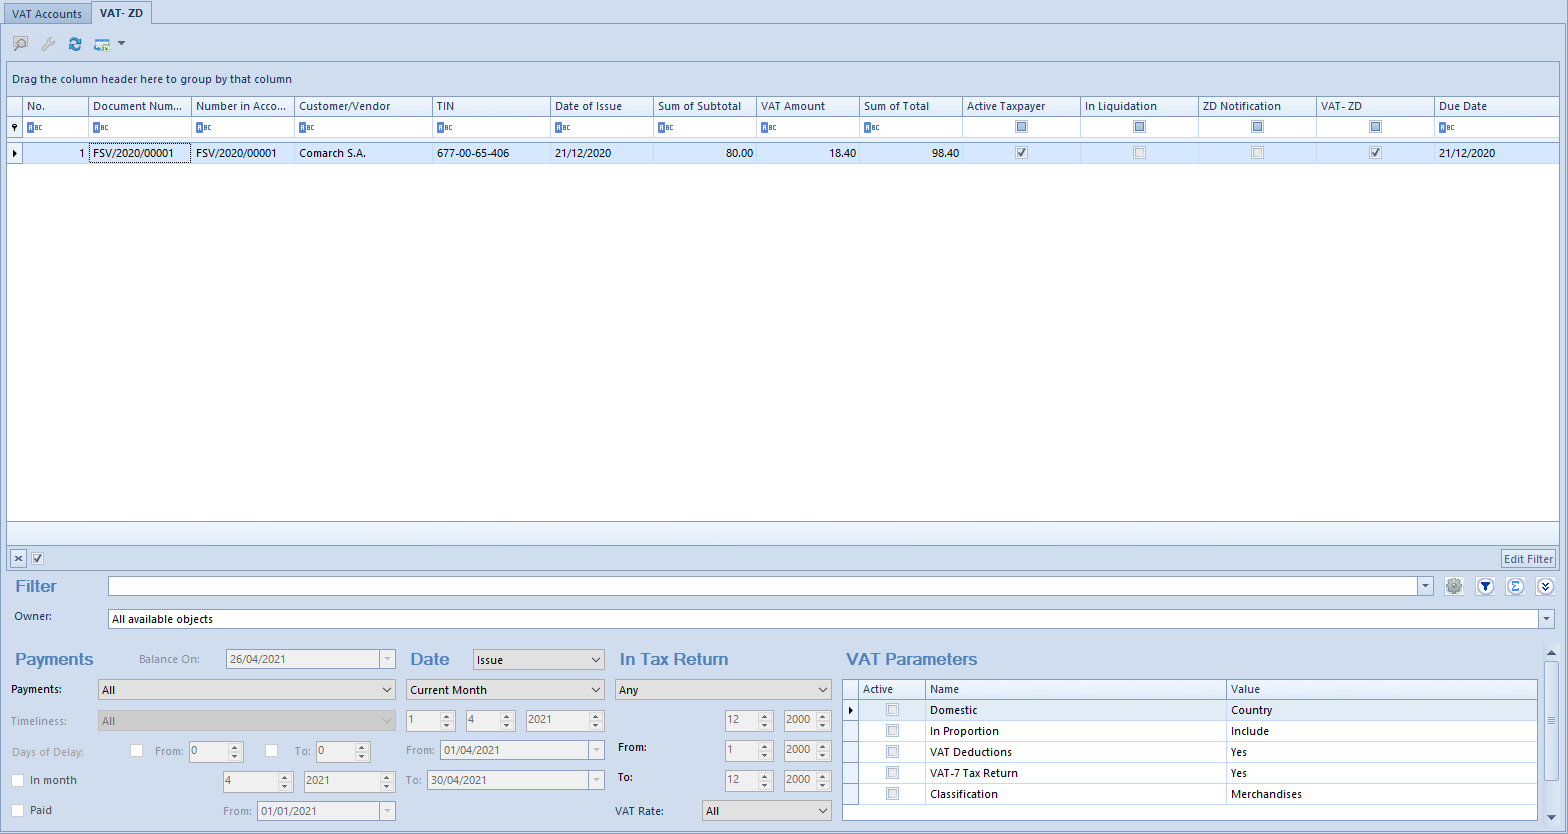
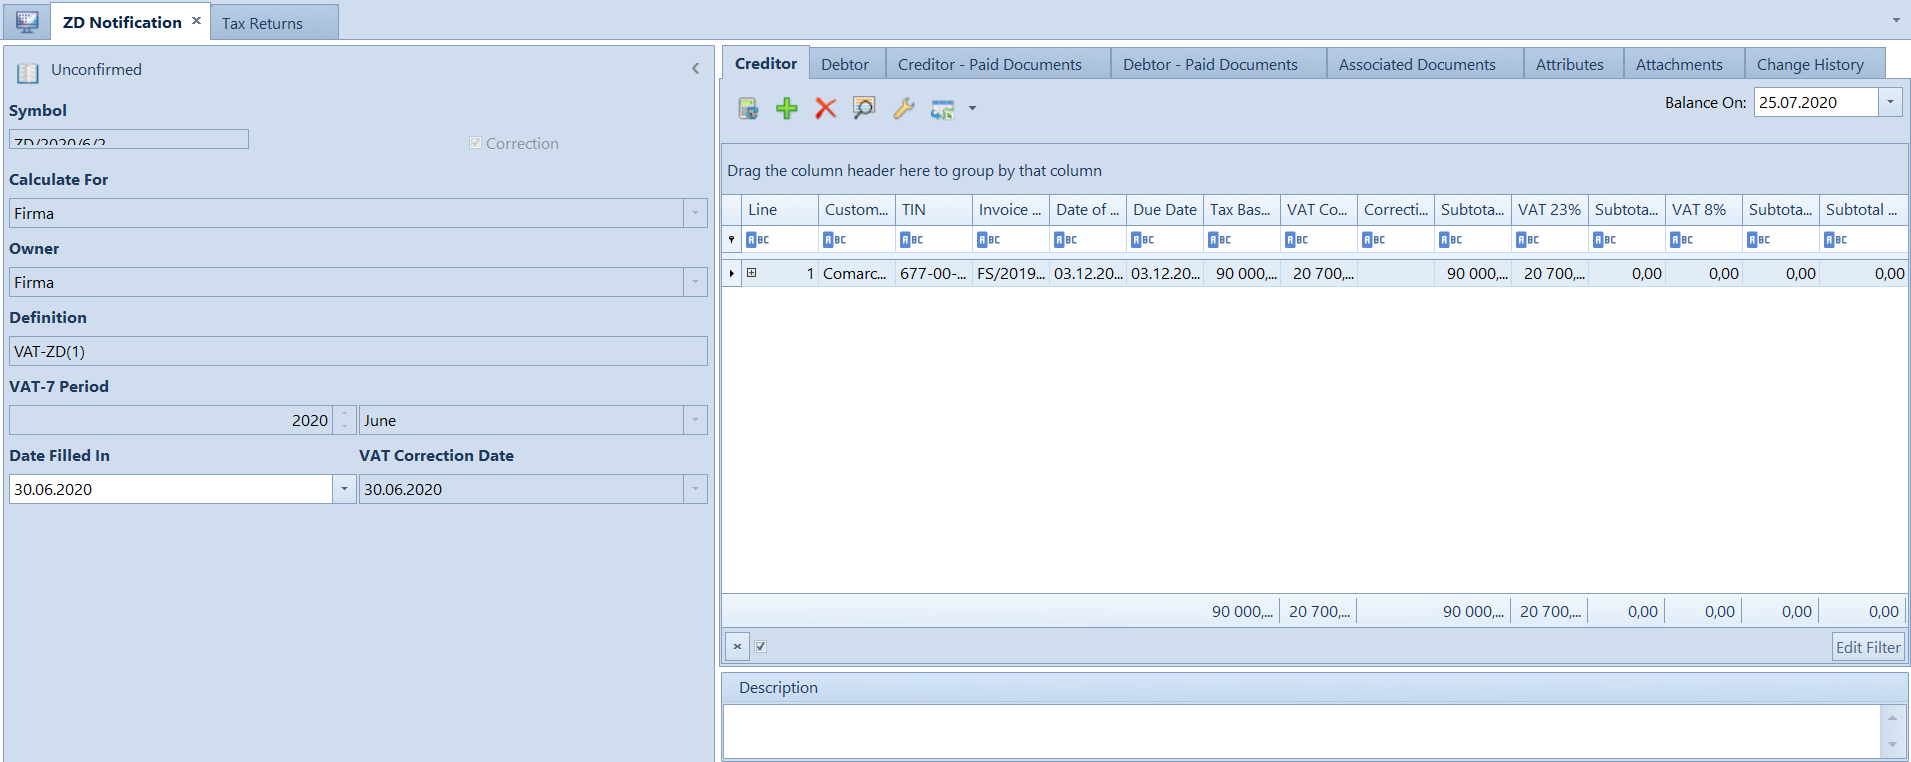
VAT-ZD tab
In VAT-ZD tab, it is possible to search for historical document payments classified as Domestic transactions and with regard to payment status: paid, open, not subject to payment in historical approach.
Operations which can be performed in the VAT -ZD tab:
Adding an account – button [Add Account]
Adding a subaccount – button [Add Subaccount]
Editing an account and subaccount – button [Edit]
Deleting an account and subaccount – button [Delete]
Editing a selected payment – button [Edit], option [Edit Payment]
The VAT-ZD tab is divided into three sections:
Accounts Tree – presents the structure of sales and purchase accounts and subaccounts
VAT Invoices – depending on marked account/subaccount, appropriate documents or document payments registered in the selected VAT account are displayed in the list
Filter panel – allows for filtering list of VAT invoices
VAT accounts tree
Description of this section can be found in article <<List of VAT accounts>>.
List of VAT invoices in the VAT-ZD tab
The list of VAT invoices displays the VAT documents or document payments classified to Domestic type of transactions and registered in the selected account available on the accounts tree.
VAT-ZD tab
The list of VAT invoices in the VAT-ZD tab is composed of the following columns: No., Document Number, Number in Account, Customer/Vendor, TIN, Date of Issue, Sum of Subtotal, VAT Amount, Sum of Total, Active Taxpayer, In Liquidation, ZD Notification, VAT-ZD, Due Date.
On the list of VAT invoices, it is possible to select additional columns, such as: Days of Delay, Reference Number, Status, Currency.
Settings of the parameters Active Taxpayer and In Liquidation are consistent with the data specified on customer/vendor form at the time of issuing an invoice.
In the Customer/Vendor column, a customer/vendor details are presented in compliance with a source document even if a payer is changed in document payment.
Selection of the check box in the column VAT-ZD depends on the value selected in field VAT-ZD in a document payment. If option Yes or Beyond the system is selected in the invoice payment – the check box is selected, if option No is selected – the check box remains deselected.
Selection of the check box in the column ZD Notification depends on inclusion of an invoice in a ZD notification. If it is included in the notification, the check box is selected. Otherwise, the check box is deselected.
Value presented in the Days of Delay column determines the number of days after due date for both applied and open payments. In the case of open payments, that value determines the difference between the date specified in the Balance On field and the due date of a given payment. In the case of applied payments, it presents the difference between the due date and the latest date of the applied payment dates until the date specified in the Balance On field.
Filter panel
Detailed description of functioning of the filters can be found in category <<Searching and filtering data>>>
Owner – allows filtering the list of VAT invoices by their owners
The filtering panel is divided into four basic sections:
Filters in VAT-ZD tab
Payments – allows filtering the list by:
Balance On – this option is activated upon selecting Open/Partially Open or Applied/Partially Applied option under the Payments filter. After specifying a date, data can be presented on the list historically.
Payments – options possible to select are: All, Open/Partially Open, Applied/Partially Applied, Not Subject To Payment. In case of selecting All or Not Subject To Payment options, the filter options Balance On and Paid in this section are inactive.
Timeliness – this filter option is active and changeable when Payment option is selected in filter and Applied/Partially Applied or Open/Partially Open is selected in the Payments filter. Available values of this filter are All, Overdue, Not overdue.
Days of Delay – this option is activated when the option Timeliness is set to Overdue; it is used to specify the number of overdue days.
In month – this option is activated when the option Timeliness is set to Overdue and the option Days of Delay is selected. If this parameter is deselected, then all open documents in the case of which it has already been 90/150 days since they due dates will be listed on the list and if it is selected, then the listed documents will be the open documents in the case of which it has already been 90/150 days since their due dates in a selected month.
Paid – this option is activated upon selecting Applied/Partially Applied option under the Payments filter. Selecting the Paid check box makes possible to specify a range of dates From and To, within payment associations/compensations made to a document payment will be verified.
Example
A VSI, issued on 2/1/2017, has tree payments defined with due date specified by 2/1/2018 for each of them. A deposit transaction for one of those payments was received on 2/5/2017
Variant A
Options Payments: Open/Partially Open, Balance ON: current date are selected
Timeliness: Overdue, Days of Delay from: 10 – the VSI will be displayed on the list twice in amounts resulting from the open payments.
Variant B
Options Payments: Applied/Partially Applied, Balance On: current date,
Timeliness: Overdue, Days of Delay from: 3 – the VSI will be displayed on the list twice in amounts resulting from the open payments
Date – allows for filtering the list according to one of the available dates.
For purchase accounts these dates are the following:
Registration
Issue
Receipt
Purchase
Vendor’s Tax Point
Right To Deduct
For sales accounts these dates are the following:
Registration
Issue
Sales
Tax Point
Time ranges available for selection are the following:
Current Month
Day
Month
Year
Range of Dates
Previous Month
Any
Other fields are used for specifying of appropriate time ranges for filtering.
InTax Return – allows for filtering the list according to a time range within which documents were registered in a tax return. Time ranges available for selection are the following:
Current Month
Month
Year
Previous Month
Range of Dates
Any
VAT Rate – (it is possible to select a rate from VAT rate group assigned to a company to which a user is logged-in)
VAT Parameters – allows for filtering the list by VAT parameters. To filter the list of VAT invoices, the checkbox available in the Active column should be checked by the parameters which must be included in the searched VAT invoices Additionally, the list can by filtered by the following options:
Domestic with options: Country, Tax free, Customer is a taxpayer, Country or Customer is a taxpayer
In Proportion with options: Include, Exclude, In the denominator only
VAT Deductions with options: Yes, No, Conditionally
VAT-7 Tax Return with options: Yes, No
Classification with options: Merchandises, Services, Costs, Fixed assets, Means of transport, Real estate, Services payable to customer, Merchandises/Services, Fuel, Purchase of cash register device, Physical inventory
Note
] The only documents presented in VAT-ZD tab are those with Domestic transaction type.
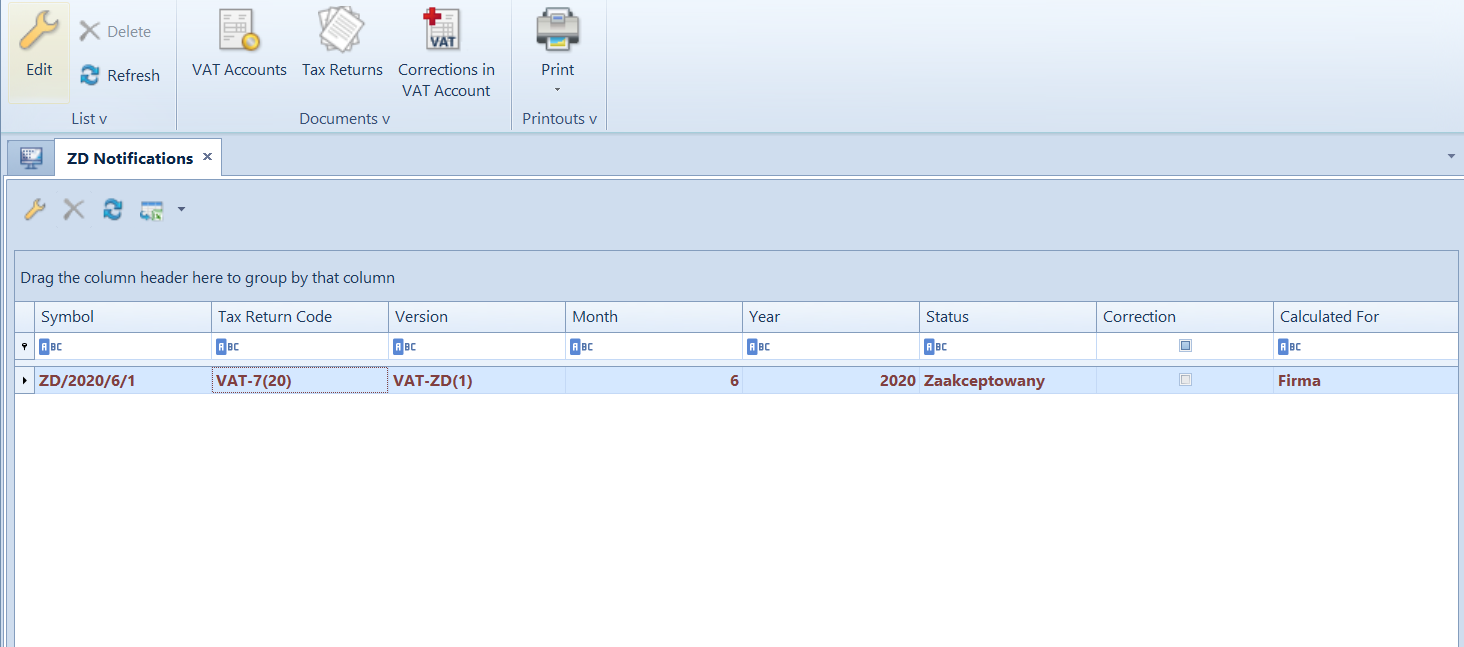
List of VAT accounts
In the Polish version of database, the list of VAT accounts is composed of two tabs: VAT Accounts and VAT-ZD. The VAT-ZD tab is not available in other language versions.
VAT accounts tab
The menu of VAT Accounts tab is composed of the following groups:
Printouts with buttons: [Print List], [Print Document]
VAT accounts tab
Documents in VAT accounts can be created in two ways:
Through confirmation of a sales or purchase trade document as well as value or quantity correction of such document – then, VAT invoices are generated automatically based on the source document and are included in the default purchase or sales account.
By adding a VAT invoice or a VAT invoice correction manually, directly from the level of VAT account.
Organization of documents in a VAT account, in terms of assigning them appropriate ordinal number, is related to parameter VAT accounts numeration available in the system configuration window in tab Accounting. An ordinal number a document receives can be granted within a month (monthly numeration) or within a year (continuous numeration).
Operations which can be performed in the VAT Accounts tab:
Adding an account – button [Add Account]
Adding a subaccount – button [Add Subaccount]
Renumbering VAT incvoices – button [Renumber] The possibility of renumbering the ordinal number (No.) depends on numeration option selected in the system configuration. If yearly numeration of VAT accounts has been selected, the renumbering option is only available in case of setting Date filter in a given VAT account to Year. Then, the renumbering applies to the entire year. If monthly numeration has been selected in the system configuration, the renumbering option is only available in case of setting Date filter to Month. Then, the renumbering applies to the entire month.Renumbering in VAT sales account within a selected accounting period sorts documents in the following order:
by registration date
within the same registration date by type of source document (in Polish version of the system: SI, ASI, VSI, SIQC, ASIC, SRS, CRS, VSIC, in other system versions: SI, ASI, R, VSI, SIVC, SIQC, RVC, RQC, VSIC)
within the same type of documents by particular numerators (according to numerator ID)
within the same numerator alphabetically by series
within one series by document number
Adding correction – button [Manual Correction]
Copying a VAT invoice – when copying documents in VAT (sales and purchase) accounts, the date of registration is retrieved from account settings, other dates are set according to the current date.
Adding a correction to an invoice – option [Correct]. Allows for adding a correction to a specific VAT invoice. The data on a correction document is filled in automatically on the basis of document being corrected. Amounts with an opposite sign to amounts of the document being corrected are generated in a correction, by default.
Editing VAT invoice
Deleting VAT invoice – option [Delete]. Only unposted/unpaid VAT invoices, added manually to an account, can be deleted.
Changing in a single batch of an account or/and date of tax point – option [Change]. It allows a batch change on marked VAT invoices – change of an account or date of tax point
Posting a VAT invoice – button [Post]
Generating an unposted entry to a VAT invoice – button [View Unposted Entries]
The VAT Accounts tab is divided into the following sections:
Accounts Tree – presents the structure of sales and purchase accounts and subaccounts
VAT Invoices – depending on marked account/subaccount, appropriate invoices registered in the selected VAT account are displayed in the list
Filter panel – allows for filtering list of VAT invoices
VAT accounts tree
VAT accounts structure has a tree layout and is divided into two predefined sections:
Purchase – contains accounts and subaccounts in which VAT invoices registering a purchase operation are included
Sales – contains accounts and subaccounts in which VAT invoices registering a sales operation are included
These sections can be neither edited nor deleted. Each account or subaccount defined in the system must be contained in one of them.
On the accounts tree, it is possible to define two types of objects:
Account – it is the firs level in Purchase or Sales
Subaccount – it is the second level in Purchase or Sales. Each subaccount must be assigned to an account. A subaccount can be added only if parameter Add subaccounts has been previously checked in the main purchase or sales account. This operation must be performed at the very beginning of work with the system, before the first VAT invoice is added
In databases created in French, there are accounts created automatically in branch Purchase (Purchase Invoices and Expenses) and one account in in branch Sales (Sales Invoices), by default.
In other language versions, there is one purchase and one sales account created, by default.
Next to the quick access buttons, there is the parameter Only active which allows the user to filter the VAT accounts with regard to their activity.
List of VAT invoices
The list of VAT invoices displays all the VAT invoices registered in the selected account available on the accounts tree.
On the list of VAT invoices, it is possible to select additional columns, such as: TIN, Country Prefix or Owner.
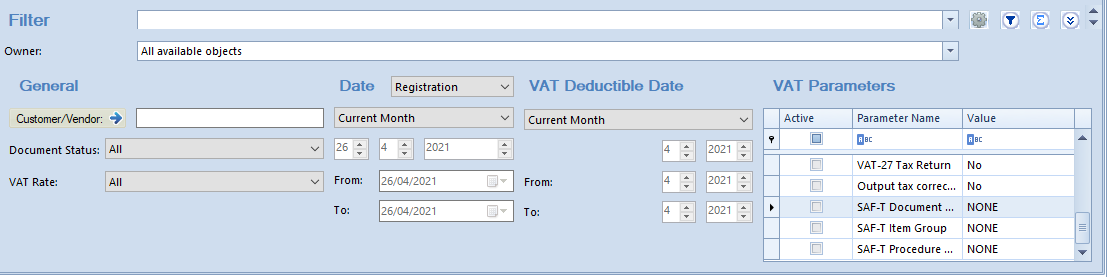
Filter panel
Detailed description of functioning of the filters can be found in category <<Searching and filtering data>>>
Owner – allows filtering the list of VAT invoices by their owners
The filtering panel is divided into four basic sections:
General – allows filtering the lis of invoices by:
Customer/Vendor
Document Status – (All, Posted/Unposted). In case if statuses Confirmed/Canceled are activated in VAT invoice definitions, there are three additional filtering options available: Canceled, Unconfirmed, Confirmed
VAT Rate – (it is possible to select a rate from VAT rate group assigned to a company to which a user is logged-in)
Note
Upon selecting option All in VAT Rate field, all groups of VAT rates assigned within the entire company structure are displayed.
Date – allows for filtering the list according to one of the available dates.
For purchase accounts these dates are the following:
Registration
Issue
Receipt
Purchase
Vendor’s Tax Point
Right To Deduct
For sales accounts these dates are the following:
Registration
Issue
Sales
Tax Point
Time ranges available for selection are the following:
Current Month
Day
Month
Year
Range of Dates
Previous Month
Any
Other fields are used for specifying of appropriate time ranges for filtering.
VAT Deductible Date – allows for filtering the list according to a time range within which documents were registered in a JPK_V7M file/tax return. Time ranges available for selection are the following:
Current Month
Month
Year
Previous Month
Range of Dates
Any
VAT Parameters – allows for filtering the list by VAT parameters. To filter the list of VAT invoices, the checkbox available in the Active column should be checked by the parameters which must be included in the searched VAT invoices
Note
Values are not summed up if the displayed VAT documents are issued in different system currencies.
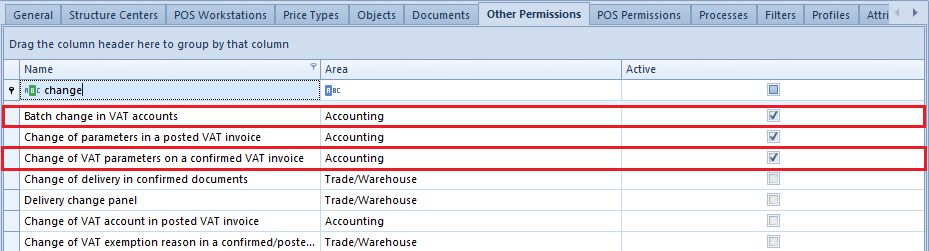
Permissions concerning VAT accounts
From the level of Configuration → Company Structure → Operator Groups → Other Permissions, it is possible to grant/withdraw permissions concerning VAT accounts to//from specific operator groups. In the system, there are four permissions referring to that area:
Change of VAT parameters on a confirmed VAT invoice – if checked, users assigned to a given operator group are permitted to change VAT parameters in a confirmed VAT invoice
Batch change in VAT accounts – for operators with this permission checked, option [Change] (in Single Batch) becomes available in the List group for VAT accounts
Change of parameters in a posted VAT invoice – for operators with this permission checked, it is possible to change VAT parameters and tax point date (date type, year and month, except for the parameter referring to VAT account) in the header and items of a posted invoice.
Change of VAT account in a posted VAT invoice – for operators with this permission checked, it is possible to change VAT account in posted VAT invoices and corrections of VAT invoices.
Permissions to change VAT parameters in a confirmed VAT invoice
This permission allows for changing VAT parameters in confirmed VAT invoices. If status Unconfirmed/Canceled has been activated and the permission to change VAT parameters has been granted to operators, a user is able to modify VAT parameters on a confirmed invoice. If this permission is unchecked, this operation will not be possible.
Permissions to change VAT parameters in a confirmed VAT invoice
Additionally, only if permission to change VAT parameters is granted, the option of batch change in VAT accounts is available.
In case of databases created in French language version, batch change of VAT accounts on a confirmed VAT invoices is blocked, even if appropriate permissions are granted and the full diagram of statuses is activated.
Permissions to batch change in VAT accounts and change of parameters or VAT account in a posted VAT invoice
Permissions regarding batch changes in VAT accounts and change of parameters in a posted VAT invoice as well as change of VAT account in a posted VAT invoice can be considered together as complementary elements.
The option [Change] in List button group in VAT Accounts menu is enabled only for operators with permission to batch change. Otherwise, this option is hidden.
Operators with permissions to change parameters in a posted VAT invoice are permitted to change VAT parameters and tax point date (type of date, year, and month, except of the parameter concerning VAT account) in invoice header and on its items. Otherwise, all controls mentioned above are greyed out.
Operators with granted permission for changing VAT account in a posted VAT invoice are only able to change VAT account in posted VAT invoices and corrections of VAT invoices. Other parameters of VAT invoice and its correction, except for the one concerning the account, are possible once permission Change of parameters in a posted VAT invoice is assigned to the operator. Additionally, only operators with permissions for changing VAT account in a posted VAT invoice and for performing batch change in VAT accounts can make batch changes in VAT accounts on a posted VAT invoice.
Operator permissions in the company structure
Configuration parameters relating to VAT accounts
General information
VAT accounts are used for registering documents subject to value added tax. On the basis of data contained in them, a tax return is generated. The number of kept VAT accounts depends on the specification and diversity of a business activity. The minimum structure of VAT accounts should contain one sales account and one purchase account for merchandises and services. In case of foreign transactions, it is possible to create an export account and an import account of merchandises and services. For example, an account for each type of purchase can be kept: purchase account of intangible assets, purchase account of fixed assets, purchase account of materials, purchase account of merchandises, purchase account of foreign services, import account of foreign services, and others.
The functionality of VAT accounts requires configuration of additional parameters available in system configuration window (System → Configuration → Accounting → Parameters) as well as configuration of the Accounting module.
System configuration
Within the system configuration, in System → Configuration → Accounting → General Parameters, there is parameter VAT accounts numeration which is related to VAT accounts. It determines how ordinal numbers are assigned to documents in VAT accounts (No.). There are two options available for selection: monthly or yearly. The value of the parameter can be changed at any moment during work with the system. Accounting module configuration
Within detailed configuration referring to the Accounting area, it is possible to define VAT parameters and define specification of Tax Point.
VAT parameters
Because Comarch ERP Standard is dedicated to international markets, it has been adjusted to observe tax regulations applied in a given country. Tax declarations differ considerably in each country in structure and requirements, therefore, the system allows the user to flexibly define and load VAT parameters, depending on the location.
VAT parameters can be defined from the level of Configuration → Accounting → VAT Parameters. The defined VAT parameters are shared by all companies and their child centers.
Menu Configuration, Accounting group
VAT parameters can be selected on trade documents and when adding documents to VAT accounts.
Parameters are divided in the system into three groups:
Main parameters (marked on the figure below in blue bold font)
Default parameters (marked on the figure below in blue font)
User parameters (marked on the figure below in black font)
The main group and default group can be edited only in terms of activity status. In addition, it is possible to add subsequent parameters (default and user parameters) to the main group.
List of VAT parameters
Defining VAT parameter
A new VAT parameter can be added by clicking [Add Parameter] in the List button group. A form with the following buttons is opened:
Name − field allowing for entering the name of a new parameter
Description − field allowing for entering the name a new parameter
Active − parameter checked by default when adding a new parameter. If unchecked, a given VAT parameter becomes archival, which means that it can no longer be used in the system, e.g., it is not possible to issue any documents related with it.
Account − two fields indicating the presence of a given parameter in sales/purchase VAT accounts.
VAT parameter form
To save changes, it is necessary to click [Save] button in the Actions button group.
To registered parameters, it is possible to add elements which are defined the same way as parameters. An element can be added after selecting a parameter it will be added to and then clicking [Add Item].
Such a defined parameter with elements assigned should then be added to one of the main parameters. To do so, on the edited form, select of one of the main parameter’s elements: National, Intra-community, or Non-EU, then click [Add] in the List gropu of buttons which will open a window with the list of available parameters. The selection of parameter must be confirmed by clicking [Select] in the Selection button group.
Attaching of VAT parameter to the main parameter
Such defined parameters are presented in definitions of accounts along with appropriate types of transactions and are available for selection in documents registered in a VAT account.
Tax point
The system allows for defining of any number of tax point definitions. Both Polish tax law (The Goods and Services Tax and Excise Duty Act) and international tax law specify many particular tax points for VAT, so a user can flexibly define their number.
Tax points defined by a user are shared by all the companies and their child centers.
The tax point is defined from the level of the tab Configuration → Accounting →Tax Point. In the system, there is a list of predefined definitions of tax point. A user may use these definitions as well as add his/her own.
Menu Configuration, Accounting group
List of tax point definitions
In order to add a new tax point definition, click on [Add] from the List button group. Then, a form of tax point opens.
Tax point definition form
Available fields:
Parameter Active − unchecking it deactivates definition
Symbol − tax point definition name
Description − additional description of definition
Condition – allows for selecting one of the available options on the basis of which a tax point date will be calculated in VAT invoice
Available options:
From the date of issue
From the date of receipt
From the date of registration
From the date of transaction
Due date
From the date of posting
Any date
Date of Receipt/Tax Point Date
From receipt confirmation date (option available only in Polish system version)
Date of Sale/Receipt Confirmation Date (option available only in Polish system version)
List of conditions
Number of Days − additional number of days from the date selected in the condition
Register − Sales or Purchase Checking this parameter by given type of account provides possibility of selecting a definition in corresponding VAT accounts and VAT invoices (of sales or purchase type).
Tax point definitions defined in the system can later be used both in definitions of VAT accounts (Sales and Purchase) and on particular VAT invoices.
Selecting tax point date in a VAT purchase account
Selecting tax point date in a VAT sales account
Examples referring to determining vendor’s tax point date and right to deduct date in a VAT purchase invoice as well as to determining tax point date in a VAT sales invoice are described in chapter <<Adding VAT account>>.
Generic directories
Within the list of predefined generic directories provided in the system, there are directories referring to printouts available from the level of VAT account (Configuration → Generic Directories):
Sales Account Printouts group:
Templates
Purchase Account Printouts group:
Templates
Templates are defined separately for sales account and purchase account printouts.
Templates relating to printouts available in VAT Account window
Owing to defining of appropriate templates, a user can select which VAT rates are included in printouts available from VAT account level. Before generating printouts in VAT accounts, a user may choose which of the defined templates should be used in a given printout. Layout of the printout is adjusted to the selected template. The data and order of printing rates are consistent with settings specified in the template.
Within each printout group, there are 5 predefined templates which cannot be deleted. It is neither possible to add new ones. In each template, it is possible to define 5 elements at most, within which VAT rates are defined, referring to a given column displayed on a printout. The list of VAT rates is retrieved from the system configuration. Apart from VAT rates from the configuration, a user may also select value <none> − then, a given column is presented as empty in the printout and its total value is displayed as: 0% TE NS.
In each of the predefined group in the generic directories, the first template on the list is defined. It has values as shown in the figure below, which can be modified.
Printout template available by default
Deleting clearings
In case journal entries were associated improperly, it is possible to undo clearing manually or automatically. To do so, it is necessary to highlight the paying entry and select the button [Delete].
A clearing can be removed manually from the level of:
Clearings list
Tab Clearings DR/Clearings CR of a single-sided entry
When removing a clearing, the relation between the source documents of the associated single-sided entries (completion or compensation) is automatically removed. This refers to single-sided entries which were generated as a result of posting document payments with the help of an appropriately designed posting scheme.
Note
The completed payments/compensations of documents, which single-sided entries have been cleared with each other, cannot be deleted. If this being the case, it is necessary to delete the clearing, which will result in deleting the completed payments.
Clearing can also be removed automatically while deleting a journal entry which single-sided entry is participating in clearing. In this case, depending on user’s decision (answering Yes or No to the displayed question), the source documents may still be paid/compensated or their association can be removed.
Clearing can be removed between both unconfirmed and confirmed single-sided entries.
Deleting clearing on a contra entry
In the case of a contra entry which has been cleared with another single-sided entry, clearings are removed only at the moment of confirming the contra entry. After the confirmation, previous associations are deleted and the correcting single-sided entry is automatically cleared with the single-sided entry being correction.
Clearings of single-sided entries not associated with a source document
Single-sided entries, which are not associated with any source document, are cleared in the same way as single-sided entries associated with a document with the use of buttons [Clear] or [Associate Only Single-Sided Entries] on the list Clearings.
Clearing of single-sided entries with the help of the option [Clear] is possible only if both single-sided entries are associated with a source document or both single-sided entries are not associated with a source document If only one of the single-sided entries is associated with a document, the following message will be displayed when attempting to clear such single-sided entries: “Impossible to complete source documents. Verify their status or select clearing without completion option.” If this is the case, the option [Associate Only Singlesided Entries] should be used.
Clearings from the level of journal entry
A clearing can be added from the level of a single-sided entry entered to the ledger.
The functionality of clearings is available on single-sided entry item associated with a clearing account, in tab Clearings (Clearings DR or Clearings CR respectively, depending on which side of single-sided entry a clearing account is specified). When clearing of single-sided entries, a user can select one of the following options:
[Clear]
[Associate Only Single-Sided Entries]
[Automatic Clearing]
These options work in the same way as those in chapter describing the clearing operation from the level of the Clearings list. With these options, single-sided entries can be cleared from journal entry level in the following relations:
One to one
One to many
When performing clearing from the level of a particular single-sided entry (after selecting the option [Add] or [Associate Only Single-sided Entries]) opens the window Journal Entries: Account. After selecting a relevant journal entry from the list of single-sided entries to clear (window Journal Entries: Account), the entries are cleared. If automatically posted documents were the sources of single-sided entries, the clearing operation is accompanied with completion of document payments. If the amount of the paying entry is greater than or equal to the amount of entry being paid, the entry is paid entirely. Value in field Amount Remaining in tab Clearings DR/Clearings CR of particular single-sided entry will equal to zero. In case the amount of the paying entry is lower than that of the entry being paid, the entry will be paid partially. Value in field Amount Remaining will be lower than the entry amount and greater than zero.
Journal entries, clearing a given single-sided entry, are presented on a cleared journal entry, in tab Clearings DR/Clearings CR.
Tab Clearings CR of a cleared single-sided entry
Clearings from the level of the list of clearings
General information
On the list of clearings, it is possible to clear single-sided entries with the help of one of the three available options: [Add], [Associated Only Single-sided Entries] and [Automatic Clearing]. This way, single-sided entries can be cleared in the following relation:
One to one
One to many
Add option
In the case of single-sided entries generated from posted documents, using the option [Add] it is possible to both clear those entries and to complete their payments, whereas in the case of single-sided entries registered directly in ledgers, it is possible to clear the entries.
Mechanism of the Add option
Selecting the option [Add] displays the list of single-sided entries possible to clear on indicated account and on appropriate side (Debit or Credit, depending on the type of payment being completed: receivable or payable). On the list, it is possible to indicate several single-sided entries which, in this way, can be cleared in one-to-many relation. The layout of the list is the same as the list of journal entries on account.
Journal Entries On Account window – list of single-sided entries possible to clear with a selected single-sided entry
The list Journal entries on account is by default opened with the following settings:
Accounting Period – current accounting period changeable also to a period Any
Posting Date – current month changeable to any value
Document Status – All, changeable to either confirmed or unconfirmed single-sided entries
Ledger – All + *OB, changeable to a particular ledger
Account Type – All, changeable to a particular account type
Status – contrary to an account side in a single-sided entry, from the level of which a clearing is made, that is, if the side of a clearing account is, in a single-sided entry, set to Dr, then single-sided entries presented on the list are uncleared and registered on Cr side, and changeable to a different status
Account From/Account To – account retrieved from a single-sided entry, from the level of which clearing is made; changeable
Excluding – empty value, possible to specify its definition
Currency – system currency set by default, changeable
After selecting an appropriate journal entry or journal entries, single-sided entries are cleared. If automatically posted documents were the sources of single-sided entries, then the source documents are automatically paid/compensated along with a clearing operation. If the amount of paying entry is greater or equal to the amount of entry being paid, it will be paid entirely. In case the amount of the paying entry is lower than that of the entry being paid, the entry will be paid partially.
Clearing entries can be displayed on the list of clearings under the entry being cleared upon clicking on the icon with a plus symbol available by single-sided entry.
Cleared journal entry along with the journal entry clearing it
From the level of the clearing list, it is also possible to preview the form of a cleared single-sided entry, on which detailed information about single-sided entries clearing it is presented (in tabs Clearings Dr/Clearings Cr respectively).
Cleared single-sided entries visible from the level of journal entry
Partial clearings
In certain scenarios it is necessary to determine an amount to be cleared. Such amount can be determined on the list of single-sided entries to be cleared (window Journal Entries: Account) by checking the option Partial clearings. Selecting this option activates a column To Clear, in which amount of partial clearing is determined.
Example
A journal entry, in which a clearing account on Dr side was selected in one single-side entry, was registered in the system. The single-sided entry is not cleared (the amount remaining to be cleared equals to the amount of the single-sided entry = 10 000 USD)
On the list of clearings, select the clearing account on which the journal entry was registered and then filter the list
List of clearings
Upon clicking [Add] from the level of the single-sided entry, the list of uncleared single-sided entries (on Cr side) will open, on which there are two single-sided entries: one of which amounts to 11 000 USD (amount remaining to be cleared = 6 000 USD) and the other amounts to 5 000 USD (amount remaining to be cleared = 5 000 USD).
List of single-sided entries to clear and parameter Partial clearings
Check the parameter Partial clearings and enter appropriate values in the column To Clear
First single-sided entry (amount to be cleared = 5 000)
Second single-sided entry (amount to be cleared = 5 000)
Single-sieded entries to clear – column To Clear
After the operation:
Single-sided entry amounting to 10 000 USD is cleared entirely
Single-sided entry amounting to 11 000 USD is cleared partially (amount remaining = 1 000)
Single-sided entry amounting to 5 000 USD is cleared entirely (amount remaining = 0)
Clearings list – single-sided entries after partial clearing
If the selected amount exceeds the amount remaining to be cleared on the form of single-sided entry being cleared and it is not possible to clear it entirely, the single-sided entry will be cleared only for the remaining amount to be cleared.
Example
A single-sided entry amounting to 12 000 USD was registered on the Dr side of a clearing account. Amount remaining to be cleared in the single-sided entry is 11 000 USD. While creating a partial clearing, single-sided entries 2, 3, and 4 were selected. Amount to be cleared, which was specified in each of the entries, equals 4 000 USD. The system clears single-sided entry 2 and 3 for the amount of 4 000 USD and single-sided entry 4 for the amount of 3 000 USD.
Clearing of single-sided entries registered on different accounts
In the system, it is possible to clear single-sided entries registered on different clearing accounts.
In order to clear such single-sided entries from the level of a journal entry, in tab Clearings of edited single-sided entry, select the button [Add]. Entries subject to clearing and associated with an account selected in the single-sided entry being cleared will, by default, be displayed in that window. Values specified in fields Account From, Account To can be modified (for instance, to values related with the same or different entity or not related with any entity). After such change, journal entries associated with the newly selected account will be displayed on the list. After selecting a journal entry, entries will be compensated through a compensating single-sided entry which, in such situation, is created automatically by the program and is part of a clearing.
Associate Only Single-Sided Entries option
Clearing of single-sided entries with the use of [Associate Only Single-sided Entries] option is not accompanied by making payments to the source documents. This option allows for clearing single-sided entries without making simultaneously payment to documents in the case of single-sided entries generated as a result of posting of documents.
The functionality of [Associate Only Single-sided Entries] option can be used for evaluating the expenditure of monetary measures expressed in foreign currencies, calculating an account used for registering of monetary means in transit or reconciling the balance of account 303 (Purchase Calculation). This option may be used wherever there is a need for clearing entries only.
Selecting this option displays a list of journal entries possible to clear on selected account and on appropriate side (Debit or Credit, depending on the type of payment being completed: receivable or payable). On the list, it is possible to indicate several single-sided entries and hence to clear them in one-to-many relation. The layout of the list is the same as that of journal entries on account.
The rules of partial clearings and clearing of single-sided entries on different accounts with the help of the option [Associate Only Single-sided Entries] are the same as those for the option [Add].
Automatic Clearing option
The purpose of automatic clearing functionality is to support the user in the process of clearing single-sided entries by searching out single-sided entries by one specified criterion and clearing them.
Selecting the option [Automatic Clearing] opens the window Automatic Clearings, in which it is possible to automatically associate single-sided entries. Clearings are generated here on the same rules as they are generated with the help of the option [Add] or [Associate Only Single-sided Entries] on the clearing list. Depending on the selected method, clearing of single-sided entries generated in the result of posting of documents is accompanied by automatic completion of source documents (option [Add]) or clearing of single-sided entries does not involve completion of source documents (option [Associate Only Single-sided Entries]).
Note
In case of clearing single-sided entries with the use of automatic clearings option, Comarch ERP Standard system controls the completion status of payments of source documents on the basis of which these single-sided entries were generated. If single-sided entries are cleared on an account associated with an entity (customer/vendor/employee/institution/bank), the system controls the completion status of payments of source documents. If a payment on a source document associated with a given single-sided entry is completed, this single-sided entry is omitted in suggested clearings. Whereas, in case single-sided entries are cleared on non-directory accounts or those related with directory other than entity, that is warehouse or item, status of payment completion is not verified. Single-sided entries registered on these accounts are suggested for clearing, regardless of the payment completion statuses of their source documents.
Automatic clearings are available from the level of the clearing list under option [Add Automatic Clearing].
Automatic Clearings window
Clearings window is composed of three sections: Associate Single-Sided Entries, Association Method, Time Interval, and the list of single-sided entries subject to automatic clearing.
Associate single-sided entries section
In this section, it is possible to select one of the following options:
Current – the only available and default option if automatic clearing operation is called from the level of tab Clearings CR/DR on single-sided entry form, and it is also available for the highlighted record on the list of clearings. In the field, number in a ledger (depending on the numeration configuration) of a current single-sided entry is displayed; if the automatic clearing option is called from the level of the list of clearings, option Current is inactive if none of the single-sided entries has been checked. Selecting this option means that only currently selected single-sided entry must be associated
On Account – the only available and default option if it is called from the level of the list of clearings, both from the level of a highlighted record and from the list. If an account is selected in a list, it is automatically uploaded in field On Account. If account is not selected, field On Account remains empty and it is possible to select account from the chart of accounts. Selecting this option means that all single-sided entries registered on the selected account must be associated
Association Method section
In this section, it is specified how a single-sided entry is to be associated with other single-sided entries. The searching is based on one given criterion:
By Number – includes single-sided entries with the same document number, i.e. values entered in the field Document Number on the single-sided entry form
By Amount – associated single-sided entries have compliant amounts
Chronologically – allows for associating single-sided entries according to their date
Time Interval section
Within this section, the user may enter conditions which narrow the list of displayed single-sided entries which will be subject to clearings, to single-sided entries added in a specific time interval.
List of single-sided entries – contains entries fulfilling the given association criterion.
Predefined columns available on the list: Number in General Ledger, Number in Ledger (depending on the selected numbering configuration method), Document Number, Account DR, Account CR, Posting Date, Amount, Amount Remaining DR, Amount Remaining CR, Currency, Description, To Clear.
Moreover, it is possible to select also columns which, by default, are hidden: Customer, Date of Issue, Date of Transaction, Document System Number, Number, Subject To Clearing, VAT Rate.
Note
In automatic clearing window it is not possible clear single-sided entries partially. Singlesided entries are always cleared for the lower amount of the entries being cleared.
The functionality of [Automatic Clearing] option can be used for evaluating the expenditure of monetary measures expressed in foreign currencies, calculating an account used for registering of monetary means in transit or reconciling the balance of account 303 (Purchase Calculation). In these cases, after searching appropriate single-sided entries, it is possible to use the option [Associate Only Single-sided Entries]. Using the functionality, it is also possible to clear single-sided entries and make payments with the help of the option [Clear], which can be used, for instance, to clear collectively an account dedicated, for example, to handling of transactions with occasional customers in a single batch.
Example
The operation of automatic clearing will be presented on the example of chronological association of single-sided entries on a book account.
From the list of clearings, select [Automatic Clearing]
In field Account, select a clearing account and in section Association Method, select the option Chronologically
Automatic Clearings window – association parameters
From the button group Actions, select [Search]. Single-sided entries suggested to clear will be displayed on the list
Automatic Clearings window – list of single-sided entries to clear
Upon selecting a check box in the column To Clear by single-sided entries which must be subject to clearing and then selecting the button [Clear] or [Associate Only Single-sided Entries], the system will clear the associated single-sided entries
Automatic Clearings window – single-sided entries after clearing
List of clearings
The list of clearings contains single-sided entries dedicated for clearing for a given clearing account. Single-sided entries are presented in compliance with their posting date selected in the filter option Posting Date. Using this option, it is possible to search for clearings for any period composed of even several reporting periods. On this list, it is possible to filter the data of a given single-sided entry in system currency or/and in the currency of the selected account.
Note
The clearing list is not a historical list. It presents single-sided entries on account of current clearing status (cleared, uncleared, not subject to clearing). This is not a status for a particularly specified historical day. Data in historical terms, calculated on a specific day, can be viewed in a Clearing Ageing Structure printout.
List of clearings in multi-company structure
Single-sided entries on the list of clearings are displayed according to generally applicable rules regarding visibility of documents in a multi-company structure. Entries are visible on the list if their owner is a company within which an operator works, a child center of the current center or if they are shared by another center.
Hint
Journal entries added in a ledger, which is not available in a given center, are not displayed, whereas entries including an account unavailable in a given center can only be previewed.
The menu of the clearings window is composed of two button groups:
Clearing with buttons: [Add], [Edit], [Delete], [Refresh], [Source Document], [Automatic Clearing], [Associate Only Single-sided Entries]
Printouts with a button: [Print]
Menu of the Clearings list
By default, the list of clearings in composed of the following columns: Number in General Ledger, Number in Ledger (the presence of this column depends on setting of the parameter Numeration only in ledger, which is available in accounting period definition), Document Number, Account, Posting Date, Amount, Amount Remaining DR, Amount Remaining CR, Currency, and Description.
From among the additional columns, which are available for selection, there are: Amount, Customer/Vendor, Date of Issue, Date of Transaction, Document System Number, Due Date, Number, Owner, Remaining Credit, Remaining Debit, Subject To Clearing, VAT Rate.
Clearings list
The list of clearings is loaded upon selecting a clearing account in the field Account, on which single-sided entries have been registered, and upon filtering the data. The list is presented in the form of a tree, that is single-sided entries cleared with a single-sided entry registered in the given account can be also presented. Those single-sided entries are displayed upon clicking on the plus icon by a specific single-sided entry. If a given single-sided entry of the account being analyzed is cleared with another single-sided entry, the icon is active (black). If a single-sided entry is not cleared, the plus icon is grey.
Presentation of journal entry clearing in the Clearings list
Options available on the Clearings list
Add – using this option it is possible to clear single-sided entries and to complete their payments in the case of single-sided entries derived from posted documents or to just clear single-sided entries in reference to single-sided entries registered directly in ledgers.
Edit – allows editing of a single-sided entry
Delete – allows deleting existing clearings of single-sided entries
Source Document – previews a source document, that is a document which posting resulted in generation of a single-sided entry
Automatic Clearing – opens the list of automatic clearings on which it is possible to associate single-sided entries
Associate Only Single-sided Entries – using this option, it is possible to clear single-sided entries without completing simultaneously the payments from documents in the case of single-sided entries generated as a result of posting the documents
Filtering on the list of clearings
Detailed descritpion of functioning of filters can be found in category <<Searching and filtering data>>.
Options available in the filter pane are the following:
Owner – allows filtering the lists of clearings by their owners specified in journal entries
Filters and parameters on the list are divided into three basic categories: General, Side, and Posting Date.
General – parameters available in this section are used to filter single-sided entries on a clearing account by
Account – filters single-sided entries by a selected clearing account. The account number can be entered manually or by referring to the chart of accounts upon clicking on appropriate button. The chart of accounts, opened by default in tab List, is filtered to accounts of Clearing type.
Clearing status – depending on the selected parameters, it filters either cleared or uncleared single-sided entries or those not subject to clearing. Statuses of displayed single-sided entries are presented for the moment the clearing list is filtered
Status – filters the list according to single-sided entry status. Available options are: All, Unconfirmed, Confirmed, Reversed
Currency – filters single-sided entries by the following currency values:
System currency – amounts presented in columns: Amount, Amount Remaining Dr, Amount Remaining Cr are expressed in the system currency. It refers to single-sided entries both in the system currency and in a foreign currency. The symbol of the system currency is presented in column Currency
Account currency – amounts presented in columns: Amount, Amount Remaining Dr, Amount Remaining Cr are expressed in the account currency, i.e., in the currency of single-sided entry. This refers to single-sided entries both in the system currency and in a foreign currency. The currency symbol of single-sided entry is presented in column Currency
System and account currency – amounts presented in columns: Amount, Amount Remaining Dr, Amount Remaining Cr are expressed in the account currency, i.e. in the currency of single-sided entry. The currency symbol of single-sided entry is presented in column Currency. There are also the following columns: Amount – [], Amount Remaining Dr [], Amount Remaining Cr []. In the brackets [], there is the symbol of the system currency. This value is used only for currency accounts
Ledger – filters the list by ledgers in which single-sided entries are registered. Using this option, it is possible to filter single-sided entries by all ledgers +*OB*, *OB*or by a particular ledger
Side – allows for filtering the list by posting sides on indicated clearing account – Debit side, Credit side. The names of the sides agree with the names specified in the accounting module configuration
Posting Date – allows for filtering single-sided entries by their registration dates. Available filter options are: day, month, year, range of dates, current month, previous month and any date. A range of dates option enables the selection of a particular time interval (also from beyond the dates of the accounting period).
Hint
After selecting any date and an account, the chart of accounts from the current accounting period is displayed.
Attributes – allows for filtering basing on attributes in single-sided entries. Selecting the button [Attributes] opens Attribute Conditions window, where it is possible to define a filter including single-sided entries with specific attribute values. In the filter, it is possible to use attributes of textual and list type only.
Attribute conditions window
Creating clearings
General information
Clearing is an association between two single-sided entries registered on a clearing account. The basis for clearing single-sided entries are payments (receivables, payables) which are generated by source documents. Based on posted payments, single-sided entries can be cleared on book accounts. Clearings provide information on unpaid journal entries affecting the balance of a clearing account.
<<Payments>> are completed on the level of document payments, whereas clearings are made on the level of single-sided entries. Payment completions and clearings are an integral whole, which is why a transaction is completed only once – either from the level of payments or single-sided entries.
Journal entries dedicated for clearing are generated as a result of:
posting of receivables or payables, originating from documents, with the use of a posting scheme in which the amount primitive – Payment – has been used to post a receivable or payable
adding single-sided entries directly in a ledger onto clearing accounts
It is possible to clear both unconfirmed and confirmed single-sided entries. Clearing amount is the lower amount of the amounts remaining to be cleared. Clearing operation can be initiated if amounts being cleared:
have the same signs and are registered on the opposite sides of an account (Debit/Credit)
have the opposite signs and are registered on the same side of account
Note
Payments and clearings are processed correctly only if the posting schemes used to post documents have been properly built. Essentially important is a posting scheme element which posts a payment amount to an entity’s clearing account. Such element should be built on the basis of the table Payments, that is, the option Payments should be selected in the field Element Calculated For, and the option Payment or Receivable or Payable should be selected in the field Amount.
Clearing operations can be performed both from the level of the Clearings list and from the tab Clearings DR/Clearings CR of a journal entry. Adding a clearing from the level of a single-sided entry has the same results as in the case of adding it from the level of the list Clearings.
Mechanisms of creating clearings
Clearings can be created automatically or manually. Automatic clearings are created without additional interference of a user. Note that using the option Automatic Clearing, which is available from the level of the Clearings list or the tab Clearings DR/Clearings CR of a single-sided entry, is also a form of creating manual clearings.
Creating clearing automatically
Automatic clearing refers to single-sided entries generated as a result of posting a document payment.
A clearing is created automatically when:
completing/compensating posting documents
posting the second of the completed/compensated documents
Creating clearing manually
Manual clearing can be created from the level of:
Clearings list
tab Clearings DR/Clearings CR of a single-sided entry
Clearing of single-sided entries, generated as a result of posting of a document, is accompanied by automatic completion/compensation of source documents.
Mechanism of adding a compensating single-sided entry
Regardless of the way in which single-sided entries are cleared (automatically or manually), a compensating single-sided entry can be generated along with a clearing operation.
A compensating single-sided entry is generated due to accountancy rules. In case of associating two entries registered on two different accounts, an appropriate amount is posted to one account and unposted from another. A compensating single-sided entry associates two clearings accounts to which payments are posted.
Configuration settings relating to compensating single-sided entries
In definition of a particular accounting period, there are configuration parameters relating to generation of compensating single-sided entries and applicable in a given accounting period. These parameters apply to the setting of such information as:
Ledger – ledger in which generated compensating single-sided entries are registered
Posting Date – date of posting a compensating single-sided entry, that is the date under which a compensating single-sided entry is registered in the books, Possible dates to select are: Date of the later single-sided entry or System date.
Accounting period form – Compensating Single-Sided Entries section
Clearing date
An important information when clearing single-sided entries is a date under which cleared single-sided entries are registered and hence considered as cleared.
Clearing date is not the same as the date of physical clearing of single-sided entries. Clearing date is a posting date of a latter (the most recent) of the cleared single-sided entries – it is determined on the basis of a posting date from the header of a journal entry. If a compensating single-sided entry is part of the clearing process, a date of that single-sided entry has also an impact on determining a clearing date.
Example
A single-sided entry PK/1/2020, amounting to 10 000 USD and registered on Dr side (posting date: 05/12/2020, date of issue: 05/10/2020, date of transaction: 05/08/2020) is cleared with a single sided entry PK/2/2020, amounting to 2 000 USD and registered on Cr side (posting date: 05/20/2020, date of issue: 05/18/2020, date of transaction: 05/12/2020).
Clearing date: 05/20/2020 (posting date of the latter single-sided entry)
In this case:
On 05/12/2020, the single-sided entry PK/1/2020 is presented as uncleared (amount remaining = 10 000 USD)
On 05/18/2020, the single-sided entry PK/2/2020 is presented as uncleared (amount remaining = 10 000 USD)
On 05/12/2020, the single-sided entry PK/1/2020 is presented as partially cleared (amount remaining = 8 000 USD)
On 05/20/2020, the single-sided entry PK/2/2020 is presented as cleared
Clearings of single-sided entries registered in different periods
In the system, it is possible to clear single-sided entries registered in different accounting periods. To be able to clear such single-sided entries, it is necessary to associate the accounts selected in particular accounting periods in the single-sided entries being cleared. Association of accounts ensures continuation of transactions in subsequent accounting periods. It is independent of the numbers of accounts at the turn of accounting periods. In case of changing an account number between accounting periods, it is necessary to ensure that these accounts are associated.
347 Information return
Note
The functionality is available in the Spanish version of the system only.
A 347 information return is sent to an appropriate institution in order to provide details about transactions executed in a previous year.
To generate a 347-information return, go to the menu Accounting and select the option [347 Information Return].
347 return form
In the menu of 347 information return, there are standard buttons and, additionally:
[Calculate] – it is used to calculate tax returns on the basis of VAT invoices.
[Import XLS] – allows for importing data from a file with .xls or .xlsx. extension. First row of the file to be imported should contain the names of columns by which the data will be imported. The system allows for importing data also when there are items already added to the list.
[Generate TXT] – button active if there are items added to the tab Accounts. Allows for saving the information return by generating a text file. The structure of a generated file is compatible with the required structure for submitting a return in an electronic form.
The form of 347 information return is composed of the following elements:
Side panel
Symbol – information and non-editable field
Year – field for selecting an accounting period for which a return must be calculated. The latest selectable accounting year is current year. A default year is always the year preceding current year. A default year is always the year preceding current year.
If a user changes the year for which to calculate an already calculated information return, the following message will be displayed: “Changing the year will recalculate the return. Would you like to continue?” with Yes or No respond options.
Sales Invoices By Date/Purchase Invoices By Date – field for determining the date by which to include sales/purchase invoices in the information return. Available options:
Date of Registration, Date of Issue, Date of Sale – for Sales Invoices By Date field
Date of Registration, Date of Issue, Date of Purchase, Date of Receipt – for Purchase Invoices By Date field
Calculate For – field for selecting a center for which a return must be calculated. A 347 return can be calculated only for the logged-on company. When a user is logged in to parent company, a return can be calculated for a selected company or parent company.
Company Name – mandatory field. A company name is by default displayed on the basis of the name of the customer/vendor associated with the company selected in field Calculate For. Company name can be changed in 347-return, but this alteration does affect the customer/vendor name on customer/vendor form.
Contact Person – mandatory field for selecting a contact person
Phone – mandatory field for providing a contact person’s phone number
Return ID – declaration number. By default, it is set to 0000000001 and it is changeable.
Correction – used for marking return as a correction. Its selection activates an additional field Previous Return ID for providing the number of the 347-return to which a correction is being submitted.
Fill in information return – used for marking return as a complementary list of transactions which were not included in a previous return. Its selection activates an additional field Previous Return ID for providing the number of the 347-return to which a complementary return is being submitted.
Previous Return ID – field presented after selecting the parameter: Correction or Fill in information return. It is intended for providing the number of the 347-return to which a correction or a complementary return is being submitted.
Accounts tab
A 347 return can be calculated upon selecting the button [Calculate].
Calculated values present total consumer dealings in a given accounting period by quarters. Sales and purchase transactions are registered as separate records with a corresponding key A or B.
Records of 347 return are created on the basis of the following rules:
if total value of VAT sales invoices and their corrections for a given customer in the year for which a return was calculated exceeds 3 005,06 EUR, a record with B key is generated
if total value of VAT sales invoices and their corrections for a given customer in the year for which a return was calculated exceeds 3 005,06 EUR, a record with B key is generated
if total cash CD transactions for a given customer in the year for which a return was calculated exceeds 6000,00 EUR, given transactions are listed in the column Amount in Cash in the record with B key, including VSI
The data on the list can be modified freely by a user (excluding Total Sales column).
The tab Accounts is composed of the following columns:
TIN – customer’s/vendor’s TIN
Name – mandatory field, customer/vendor name
Stat Code – mandatory field, for national customers/vendors it is filled in with two first digits of the postal code of the default main customer/vendor address, for the others, the value is 99
Country Code – field filled in only for customers/vendors different than national ones, on the basis of the TIN number prefix. If the prefix is not provided, then the field is filled in on the basis of the default main customer/vendor address.
EU Community Operator – field filled in only for European Union customers with their TIN numbers
Transaction Key – information whether a transaction is related to a purchase (A) or sales (B)
Total Sales – total of sales with a given customer/vendor in the year for which the return is being calculated. The column cannot by edited.
Amount in Cash – total value of CD transactions
Sales Q1, Sales Q2, Sales Q3, Sales Q4 – total value of transactions of a given type divided into quarters
Rental of Premises – information whether transactions were related to the rental of premises
Adding ZD notification
General information
A ZD notification can be:
Generated during the first recalculation of a VAT-7 tax return
During the first recalculation of a VAT-7 tax return the following message is displayed: “Would you like to generate a ZD notification?”. A user can deny the operation by selecting the option No, in which case a ZD notification will not be generated or accept the operation by selecting the option Yes, in which case a ZD notification will be generated as unconfirmed, provided that there are documents in the system, which fulfill the conditions of including them in the ZD notification. If this being the case, the value of the field Notification about corrected tax base and the amount of tax due (Zawiadomienie o skorygowaniu podstawy opodatkowania oraz kwoty podatku należnego (VAT-ZD) of the tax return VAT-7(17) be automatically set to Yes. If none of the documents fulfills the conditions of inclusion in ZD notification at the time of recalculating the tax return VAT-7 (17), a notification will not be generated and the following message will then be displayed: “There are no documents in the system that satisfy statutory criteria of inclusion in ZD notification. A ZD notification has not been generated”.
Generated after selecting value Yes in appropriate tax-return field
In case ZD notification is not generated during first recalculation of VAT-7 tax return, it is possible to generate it by selecting the option Yes in the column Value in the field Notification about corrected tax base and the amount of tax due of the VAT-7(17) tax return and then recalculating the tax return.
Note
ZD notifications being calculated for the periods from January 2019 will list the documents in the case of which it has already been 90 days since they due dates. ZD notifications being calculated for earlier periods will list the documents in the case of which it has already been 150 days since they due dates.
Only invoices are included in the notification, correcting documents are not taken into account. Each invoice is listed in as many records as there are payments.
Note
Open (not compensated) correcting invoices are not included in a ZD notification. They must be compensated with an invoice and the remaining unpaid amount of the invoice must only be reported.
If an invoice payment is included in a ZD notification, it is not possible to:
divide the invoice payment
change the invoice’s due date
change the payment’s entity
delete the invoice from the system
ZD notification form
In the menu of the window ZD Notification, there are standard buttons and, additionally:
[Recalculate All] – button active for unconfirmed notifications. It recalculates all the tabs of a ZD notification.
[Accept] – button active for unconfirmed notification
[Accept] – button active for unconfirmed and accepted notification
[Open] – button active for accepted notification It allows for restoring Unconfirmed status for a notification.
[Generate Correcting Documents] – allows for generating lacking correcting documents
[Recalculate] – button active for unconfirmed notification It recalculates currently open tab of a ZD notification.
[Add] – button active for unconfirmed notification. It opens VAT-ZD tab in VAT accounts filtered to those documents that <<can be included in ZD notification>>.
[Delete] – button active for unconfirmed notification after selecting an invoice. It deletes selected items.
[Edit] – button active after selecting an invoice. After clicking on the button, a list of the following options becomes available:
Edit Document – opens VAT invoice form for a selected item
Edit Payment – opens payment form for a selected item
Edit correction – opens VAT invoice form of a correction generated for a selected item
[Taxpayer Status] – button active for unconfirmed notification. After selecting the button, in a currently opened tab an additional column Active Taxpayer is added and the taxpayer status will be verified on the day of verification according to the settings on customer/vendor form. If the customer/vendor is no longer an active taxpayer on the day of recalculating the notification, then he/she should not be included in the notification and the records relating to such customer/vendor must be deleted.
[VAT Accounts] – opens the list of VAT accounts in the VAT-ZD tab
[Tax Returns] – opens the list of tax returns
[Corrections in VAT Accounts] – button available upon selecting accepted or confirmed ZD notification It opens the ZD Notification Corrections window, presenting correcting documents generated to a specific ZD notification with division into the following tabs Creditor, Debtor, Creditor – Paid Documents, Debtor – Paid Documents.
ZD notification form is composed of the following elements:
Side panel
Status – ZD notification can receive on the following statuses: Unconfirmed, Accepted, Confirmed
Symbol – ZD notification number, cannot be edited by the user
Correction – it is selected if ZD notification is generated to the correction of VAT-7 tax return; otherwise, the parameter is deselected
Calculate For – non-editable field, its value is completed based on the field Calculate For of VAT-7 tax return to which a ZD notification has been generated
Owner – non-editable field, its value is completed based on the field Owner of VAT-7 tax return to which a ZD notification has been generated
Definition – field for selecting the definition of VAT-ZD attachment form. By default, the definition valid in the period for which a tax return is being calculated, is set.
VAT-7 Period – non-editable field completed on the basis of the field Month in VAT-7 tax return to which a ZD notification has been generate
Date Filled In – completed on the basis of the field Date Filled In in VAT-7 tax return to which a ZD notification has been generated. It is editable until the ZD notification is accepted or confirmed.
VAT Correction Date – non-editable field completed with the last day of the month for which VAT-7 tax return was calculated, to which a ZD notification has been generated.
Tab Creditor
This tab presents the list of sales invoices which fulfill the statutory criteria of including them in a ZD notification and will be the basis for generating corrections of tax base and output tax.
This tab is visible if value in the field Notification about the corrected tax base and the amount of the output tax (VATZD)) of VAT-7 tax return, is set to Yes.
On the basis of the data from this tab, a VAT-ZD attachment is generated and then sent via the Internet to the Tax Office. If the tab Creditor is not visible or it does not contain at least one invoice, a VAT-ZD attachment is not generated.
This tab is recalculated according to the field Balance On which value is, by default, set to the 25th day of the next month for which the notification is being submitted. If date in the field Balance On is changed, it is necessary to recalculate the tab.
Tab Debtor
This tab presents the list of purchase invoices which fulfill the statutory criteria of including them in a ZD notification and will be the basis for generating corrections of tax base and input tax
This tab is recalculated according to the field Balance On which value is, by default, set to the last day of the month for which the notification is being submitted. If date in the field Balance On is changed, it is necessary to recalculate the tab.
Tab Creditor – Paid Documents
This tab presents the list of sales invoices which either were listed in a ZD notification, in the Creditor tab, as unpaid within 150 or 90 days since their due dates and correcting documents were generated to them or value Beyond the system was selected on their payments in the VAT-ZD field. Once these sales invoices are partially or entirely paid, they are qualified again in the ZD notification in the Creditor – Paid Documents tab.
This tab is recalculated according to the field Balance On which value is, by default, set to the last day of the month for which the notification is being submitted. If date in the field Balance On is changed, it is necessary to recalculate the tab.
Tab Debtor – Paid Documents
This tab presents the list of sales invoices which either were listed in a ZD notification, in the Creditor tab, as unpaid within 150 or 90 days since their due dates and correcting documents were generated to them or value Beyond the system was selected on their payments in the VAT-ZD field. Once these sales invoices are partially or entirely paid, they are qualified again in the ZD notification in the Debtor – Paid Documents tab.
This tab is recalculated according to the field Balance On which value is, by default, set to the last day of the month for which the notification is being submitted. If date in the field Balance On is changed, it is necessary to recalculate the tab.
Tab Associated Documents
This tab presents the list of tax returns and correcting documents associated with ZD notification.
Tabs: Attributes, Attachments, Change History
Detailed description of tabs can be found in article <<Tab Discount Codes, Analytical Description, Attributes, Attachments and Change History>>.
Accepting ZD notification
In order to accept a ZD notification, it is necessary to click on the [Accept] button, placed in the List group of buttons. When accepting a ZD notification, the user decides whether to generate straightaway the documents correcting the tax base and value.
Correcting documents are generated as internal documents and are tagged with an uneditable parameter VAT-ZD Correction available in the side panel of the document. The parameter is not subject to edition. Correcting documents can also be generated by selecting the button [Generate Correcting Documents]. Correcting documents are generated separately for particular invoices.
Acceptance of ZD notification can be undone with the use of [Undo Acceptance] option, which changes document status back to Unconfirmed, provided that correcting documents have not yet been generated to it and that the VAT-7 tax return, to which the notification applies, is still unconfirmed. If correcting documents are generated to the VAT-ZD, they must first be deleted. The user can find correcting documents in VAT accounts or from the level of a ZD notification, by clicking on the [Corrections in VAT Account] button. The button opens the ZD Notification Corrections list, where it is possible to delete, preview, print or post correction documents.
Hint
Suggested VAT accounts and series for documents correcting tax base and value can be changed in the menu Configuration → Company Structure → Company → Documents → ZD Notification → tab General → section Generationof Documents Correcting Tax Base and Tax Amount.
Note
Upon generation of documents correcting tax base and value, it is necessary to recalculate the VAT-7 tax return so that these documents are also included in the tax return. Documents correcting tax base and value are also listed in relevant fields of SAF-T file.
Confirming ZD notification
In order to accept a ZD notification, it is necessary to click on the [Confirm] button, placed in the List group of buttons. ZD notification can be confirmed provided that correcting documents have been generated to it. As in the case of tax-return, once a TRA document is downloaded, the status of a ZD notification will be automatically changed to Confirmed.
A confirmed ZD notification can be restored back to status Accepted with the use of option [Undo Confirmation] which is available on ZD notification list under the right mouse button. This operation can only be performed when VAT-7 tax return has not been confirmed.
Note
In case a ZD notification was not generated to a VAT-7 tax return, the notification status must first be changed to Accepted, then correcting documents must be generated and finally the tax return status must be changed. If ZD notification is not accepted, then it will not be possible to accept and confirm the VAT-7 tax return.
ZD notification correction
Along with a correction to VAT-7, a ZD notification correction is also generated, which in the document side panel is tagged with a non-editable parameter Correction. Similarly, as VAT-7 tax return correction, ZD notification correction is a holistic document. It lists all the documents qualified as to be included in a given month.
If a given document is already included in a ZD notification, it cannot be removed from ZD notification correction. The following message will be displayed: “This document is included in the ZD notification [ZD notification number] and cannot be deleted.”
ZD notification correction form
Particular records in ZD notification correction are presented as Before and Currently. The system compares the data from the source notification and the current data. When correcting a ZD notification, the system generates documents correcting tax base and value only for those documents which have not been included in the notification or have changed in reference to a previous ZD notification.
List of ZD Notifications
Note
The functionality is available in the Polish version of the system only.
According to the regulation of the Ministry of Finance, in order to recognize the bad debt relief, it is necessary to generate a VAT-ZD attachment (notification about the corrected tax base and the amount of tax due).
A ZD notification is used for listing all the invoices that fulfill all of the following conditions:
invoice unpaid or partially paid
it has already been 150 days since their due dates
it has not been 2 years since the date of issue of the invoice
transaction type: National
VAT-7 Tax Return parameter Yes
in the case of purchase in voices VAT Deductions: Yes or Conditionally
VAT-ZD parameter Yes (with the possibility of changing it from the level of the document payment)
ZD Notification parameter No
parameter Active Taxpayer (checked)
parameter In liquidation unchecked
Depending on the setting of the parameter Include invoices whose 150/90 of days passed in the month for which a tax return is calculated that is available in VAT-ZD document definition (Configuration → Types → VAT-ZD document), a ZD notification:
lists the invoices in the case of which additional 150/90 days have passed since their due dates in the month for which the notification is being calculated – if the parameter is checked
lists the invoices in the case of which additional 150/90 days have passed since their due dates in the month for which the notification is being calculated – when the parameter is checked
Parameter Include invoices whose 150/90 of days passed in the month for which a tax return is calculated
Example
An unpaid VPI issued on 11.16.2018 with due date specified to 23.11.2018. In February 2019, additional 90 days passed for the invoice to be included in a VAT-ZD notification, but it has not been added into that document.
During recalculation of VAT-7 tax return along with a VAT-ZD notification:
with deselected parameter Include invoices whose 150/90 of days passed in the month for which a tax return is calculated – the VPI will be listed in a VAT-ZD notification issued for the month of March
with selected parameter Include invoices whose 150/90 of days passed in the month for which a tax return is calculated – the VPI will not be listed in a VAT-ZD notification issued for the month of March
The list of ZD notifications is available under the button [ZD Notifications] available in the menu Accounting.
List of ZD Notifications
The list contains <<standard buttons>> and, additionally:
[VAT Accounts] – opens VAT-ZD tab in VAT accounts
[Tax Returns] – opens the list of tax returns
[Corrections in VAT Accounts] – button available upon selecting accepted or confirmed ZD notification on the list. It opens ZD Notification Corrections window, presenting correcting documents generated to a specific ZD notification with division into the following tabs: Creditor, Debtor, Creditor – Paid Documents, Debtor – Paid Documents
A ZD notification document can be deleted from the level of the list ZD Notifications, with the use of the button [Delete] or along with deleting the VAT–7 tax return to which it was generated.
The list of ZD notifications is composed of the following columns:
Symbol – ZD notification symbol
Tax Return Code – VAT-7 tax return symbol
Version – version of VAT-ZD attachment form
Month – month of recalculation of notification
Year – year of recalculation of notification
Status – notification status
Correction – information whether notification is a correction
Calculated for – center for which the notification is calculated
and columns hidden by default:
Correcting Documents – information whether correcting documents were generated to the notification
E-Tax Return status – information regarding the status of forwarding VAT tax return for which ZD notification was created
Creditor – information whether a notification contains the tab Creditor
Owner – ZD notification owner
Detailed description of functioning of the filters can be found in category <<Searching and filtering data>>>
Adding tax return and tax return correction
General information
In the menu of tax return form, there are <<standard buttons>> and, additionally:
[Recalculate] – button active for tax returns and corrections with Unconfirmed status. It is used to calculate tax returns on the basis of VAT invoices.
[Export Tax Return] – button active for tax returns with Accepted or Confirmed status. It used to export a tax return to the web portal of Polish Ministry of Finance
[Download TRA] – button active after exporting a tax return. It is used for downloading Tax Return Acknowledgement.
[ZD Notification] – button available for VAT-7 tax returns. Clicking on the button opens a ZD notification document associated with a tax return. If there is no ZD notification generated to the tax return, the following message is displayed: “No ZD notification is associated with this VAT-7 tax return”.
Calculation of tax return
To add a tax return, it is necessary, from the level of the menu Accounting → Tax Returns, select appropriate branch within which the declaration must be added (VAT-7, VAT-27, VAT-EU) and click on the [Add] button. A tax return form is opened.
Tab General of tax return
The form is composed of the following elements:
Tab General
Symbol – symbol along with tax return form number
Status – available options:
Unconfirmed:
a tax return can be deleted without leaving a trace
it is not possible to generate a correction
Accepted:
it is possible to generate a correction
its status can be changed to Unconfirmed providing that no correction was generated to it
it is possible to change the status to Confirmed
a tax return can be deleted without leaving a trace
Confirmed
it is possible to change the status to Confirmed or Unconfirmed
it is possible to generate a correction
it is possible to export such a tax return
Calculate For – allows for selecting a center of Company type for which the tax return is to be calculated. If the Parent Company is selected in this field, the tax return will be calculated on the basis of documents of all the companies
Note
If VAT invoices of child companies are issued in different system currencies, it will not be possible to recalculate a tax return for the parent company.
Definition – indicates the definition of tax return form. By default, the definition of the form valid in the period for which a tax return is being recalculated, is set.
Month – month and year for which a tax return is recalculated
Owner – company to which a user adding a tax return is logged-in. When adding a tax return in the Parent Company, it is possible to calculate a tax return including VAT invoices of all subsidiary companies or only for a selected company.
E-Tax Return Status – depending on e-Tax Return status, this field presents appropriate value:
TRA Not Sent
Sent/TRA Being Processed
Sent/TRA Not Received
Sent/TRA Received
Sending Error
Rejected
Date Sent – date of the last sending of e-Tax Return
Date Received – date of receiving Tax Return Acknowledgement (TRA)
Document ID – reference number of a tax return assigned during sending by the Ministry of Finance service
Tab Items
After a tax return is recalculated, this tab includes the items of tax return according to a selected form definition.
Information referring to payer details is retrieved from the company structure, from tab Tax Returns (Configuration → Company Structure → Company → Tax Returns). Detailed description of the tab Tax Returns can be found in article <<Tax Returns Tab>>
Additionally, in the case of VAT-7 declaration, in the field Actual Coefficient it is possible to specify a coefficient of taxable sales against total sales. This coefficient is calculated automatically on the basis of the data from the previous year however, the user may correct the value calculated by the system in appropriate item of the tax return form. After the coefficient is entered, a tax return should not be recalculated anymore.
Tab Change History
Detailed description of tabs can be found in article <<Tab Discount Codes, Analytical Description, Attributes, Attachments and Change History>>.
Tab Associated
This tab contains all the attachments or corrections added to a given tax return.
The tab is the integral part of the source tax return. The source tax return is recalculated along with all its attachments. The period of recalculating attachments is always the same as that of the source tax return.
Available attachments:
For VAT-7 tax return
VAT-ZD – generated if the taxpayer uses a bad debt relief allowing the creditor to recover part of the debt that he/she was obliged to pay to the tax office
For VAT-7 tax return correction
ORD-ZU – justification for submitting correction to VAT-7 declaration
VAT-ZD
Sending tax return
After a tax return is accepted or confirmed, a user may export it to the Polish Ministry of Finance service along with all attachments with the use of [Export Tax Return] button. When sending a tax return of Correction type, ORD-ZU attachment is enclosed if field 13 of the ORD-ZU (Justification Content) is filled in.
The exported document will be saved in exchange file directory specified in the <<system configuration>> (System → Configuration → Data Exchange → E-Tax Returns) and sent to the Ministry of Finance portal.
When exporting a tax return, it is possible to select one of the options:
Unqualified Signature – possible to select when VAT-7 or VAT-EU declaration is being sent by a natural person. If selected, the system displays form with data of the natural person specified in the configuration (Configuration → Company Structure → Company → Tax Returns). Additionally, it is necessary to provide TIN of a given person as well as the revenue amount for the last two years.
Qualified Signature – possible to select when declaration is sent by a natural person or a taxpayer who is not a natural person. After selecting this option, a list of installed certificates is displayed.
The system allows also for downloading and printing a Tax Return Acknowledgement (TRA) with the use of the [Download TRA] button.
Tax return correction
A correction can be generated to a tax return, only if such a tax return has been accepted or confirmed.
In order to generate a tax return correction, it is necessary to mark the tax return or the last tax return correction and click on the [Correction] button. A new declaration is added, which has value Correction in the field regarding the purpose of submitting the form.
VAT-7 and VAT-27 tax return corrections contain all documents qualified to be included in the tax return in a given month, for that reason the correction has an integral character against the original tax return which was corrected.
Note
When generating a correction to a VAT-27 tax return, data from the correction of VAT-27 tax return should be compared with the date from the original VAT-27 tax return and in case it is changed, a value Yes should be selected by the record Change.
In VAT-EU tax return correction, the only items which are included in VAT-EUC document are those which have changed in section Was and Is. The system compares the date from the original VAT-EU tax return and the current data.
Qualification of invoices to appropriate fields of tax return
Parameters selected on an item of a VAT invoice which determine including of the document in a specific field of VAT-7/VAT-27/VAT-EU declaration:
National – transaction type selected in General tab
Parameter values: Country, TaxFree (available on sales documents), Customer is a taxpayer (available on sales documents)
Intra-Community – transaction type selected in General tab
Parameter values: Intra-community delivery/purchase, Trilateral Intra-community Delivery/Purchase, Delivery Taxed Abroad (available on sales documents), Customer is a taxpayer (available on sales documents)
Non-EU – transaction type selected in General tab
Parameter values: Import, Export (available on sales documents), Delivery Taxed Abroad (available on sales documents), Customer is a taxpayer (available on sales documents)
VAT Deductions – parameter available on purchase documents
Parameter values: Yes, No, Conditionally
VAT-7 – value of the parameter indicated if an item is to be included in the VAT-7 declaration
Parameter values: Yes, No
VAT-27 – parameter available on sales documents with National transaction type. Its value determines whether a document item must or must not be included in a VAT-27 tax return. If a value Customer is a taxpayer is set in the field Domestic, value of the VAT-27 parameter will automatically be set to Yes.
Parameter values: Yes, No
VAT-EU – parameter available for Intra-community transaction type. Its value determines whether a document item must or must not be included in a VAT- EU tax return.
Parameter values: Yes, No
Type – parameter available for sales and purchase documents,
Parameter values: Merchandises, Services, Costs, Fixed Assets, Means of Transport, Real Estate, Service payable to customer, Purchase of cash registers, Physical inventory
Input Tax Correction – parameter available on purchase documents
Parameter values: Yes, No,Article 89b. 1 of the Act, Article 89b. 4 of the Act
In Proportion – parameter available on sales document. It is used for classifying a given sale as taxed or tax-exempt, which allows for calculating a sale structure indicator for completing a purchase related with tax-exempt and taxed sale.
Parameter values: Include, Exclude, In the denominator only
Output tax correction on intra-Community purchase of fuels – parameter available on sales document for EU transaction type. It is used for classifying an invoice to the field of VAT-7 return relating to intra-community acquisition of motor fuels
Parameter values: Yes, No
Moreover, VAT invoice items are qualified to a given tax return on the basis of the date of tax return – the field In VAT declaration on VAT invoice items. The user may select month and year of including an item in the tax return.
Settings of VAT parameters, required to include VAT invoice items into particular records of a VAT-7, VAT-27 nad VAT-EU tax return forms, are described in a document Comarch ERP Standard Technical Newsletter – Tax Returns.
List of tax returns
In the system, it is possible to calculate:
VAT-7 tax return along with a VAT-ZD attachment
VAT-7 tax return correction along with VAT-ZD and or ORD-ZU attachments
VAT-27 declaration
VAT-27 declaration correction
VAT-EU declaration
VAT-EU declaration correction VAT-EUC
A user can calculate a tax return for:
Center of Company type – VAT invoices of a given company are taken into account
The whole activity from the level of the main company – all VAT invoices added to the system are taken into account
Tax returns are calculated on the basis of documents included in the VAT account, in accordance with applicable laws. Detailed information regarding definition of parameters can be found in article <<Qualification of invoices to appropriate fields of tax return>>. Both Confirmed and Unconfirmed VAT invoices are included in tax returns.
Tax returns are calculated in the system currency of a given company. If in child companies, different system currencies are set, it will not be possible to calculate a tax return in the main company. The following message will be displayed: “Cannot calculate tax return for documents issued in different system currency.”
The list of tax returns is available from the level of menu Accounting, under the button [Tax Returns].
List of tax returns
The list contains standard buttons which have been described in article <<Standard buttons>> and, additionally:
[Add] − button active after selecting a tax return type: VAT-7, VAT-EU, VAT-27
[Correction] − button active after selecting a tax return or a correction with Accepted or Confirmed status and without correction.
[ZD Notification] − button available after selecting a VAT-7 tax return. Clicking on the button opens for editing a ZD notification document associated with a tax return. If there is no ZD notification generated to the tax return, the following message is displayed: “No ZD notification is associated with this VAT-7 tax return.” Zawiadomienie ZD.”
Description of ZD notification can be found in articles <<List of ZD Notifications>> and <<Adding ZD notification>>.
Detailed description of functioning of the filters can be found in category <<Searching and filtering data>>>
Tax return submitting configuration
The system allows for sending tax returns directly to the Ministry of Finance portal and retrieving Tax Return Acknowledgement (TRA). A user can export a tax return with the use of so-called qualified or unqualified signature.
From the level of the menu Configuration -> Company Structure -> Company, in the tab Tax Returns it is necessary to indicate a tax office to which tax returns will be submitted as well as a taxpayer type. Detailed description of the tab Tax Returns can be found in article <<Company Structure – Company>>
Tab Tax Returns on company form
Before submitting a tax return, it is necessary to complete fields in section E-Tax Return (access from the level of the menu System → Configuration → Data Exchange.
Web Service Address – address https://bramka.e-deklaracje.mf.gov.pl/ is set, by default.
Exchange File Directory – directory in which exported e-tax returns and TRA will be saved
Section E-Tax Returns in system configuration
Note
The system user should have full access to the folder in which tax returns and TRA are saved as well as to the folder in which the logs of Comarch.EDeclarations.dll assembly are saved. The location of the folder with the logs of a given assembly depends on the running Windows system version. Usually, the access path to a given folder is: C:\ProgramData\ Comarch ERP Altum\ Logs\ Version\ Profile code from Auto Update\ File name.
Information regarding ports which must be unlocked in order to enable tax return submitting can be found in document <<Comarch ERP Altum – Wykaz połączeń>>
Calculating an accounting statement
To calculate an accounting statement, it is necessary to, from the level of the menu Accounting → Statements, select a statement, click on button [Recalculate], and then, on button [Recalculate] once again.
Calculated accounting stuntmen
In the Statement calculation window, in non-editable Calculation date field, there is information regarding the date and the hour of the last statement calculation.
The following parameters are available in the statement filter:
Include unconfirmed entries − decides whether unconfirmed journal entries should be included in the value calculation. The parameter is checked by default.
Hide items with zero amounts − decides whether calculated items with zero amounts should be visible. The parameter is checked by default.
After changing the values of parameters, it is necessary to select the [Recalculate] button.
Note
In a statement calculation form it is not possible to manage visibility of the column list.
Adding a financial statement
General information
A financial statement can be:
Added manually
Generated automatically (only in the Polish language version of the system)
Adding a statement with the use of the button [Add]
Financial statement form
From the level of the financial statement form, standard buttons described in article <<Standard buttons>> are available, and, additionally:
[Add on the Same Level] − allows for adding a statement item on the same level as the cursor level.
[Add on Lower Level] − allows for adding a statement item on the lower level against the selected item. The button is active, if there is a parent item.
[Map to e-Sprawozdania App] − button available in Polish version of database. It is active, if in the side panel of a financial statement, the parameter Export to e-Sprawozdania application (PL) is checked. It allows for assigning a financial statement item to relevant items of an official financial statement according to the structure made available by the Ministry of Finance.
The form is composed of the following elements:
Side panel
Show full item numeration − if selected, an indicated numeration will fully be presented in the statement calculation and in the Statement Items tab
Code − mandatory field, allows for entering a unique statement code
Name − mandatory field, allows for entering statement name
Attributes − allows for including single-sided entries with specific attributes in calculation of accounting functions. Selecting the button [Attributes] opens Attribute conditions window, where it is possible to define appropriate conditions.
Export to e-Sprawozdania application (PL) − parameter available in the Polish version of database. If selected, it means that it will be possible to prepare an electronic version of a given financial statement in relevant logic structure and format published by the Ministry of Finance. Selecting it activates two additional fields:
Statement Type − indicates a type of unit for which the a given statement is being prepared Available values: Other unit (default value), Small unit, Micro unit.
Statement Element − mandatory field, used for specifying financial statement to which the statement refers. The list of displayed items depends on selected type of economic entity.
When attempting to change a type or an item of a financial statement, the following message is then displayed: “Changing e-statement item will clear the mappings of statement items. Would you like to change the item?”. Selecting the answer Yes deletes the value from the field e-Statement Item from the level of statement item.
Tab Statement Items
This tab contains a list of items from the level of which it is possible to manage statement elements. The items are organized as a tree.
The list is composed of the following columns:
Number
Name
Amount Expression
Influence on Parent
E-Statement Item (hidden by default, available in the Polish version of database)
After adding the first statement item, a user can specify item numeration scheme. Four predefined types are available:
1,2,3…
I,II,III…
a,b,c…
A,B,C…
And Without Numeration option
Description − section allowing for entering a statement description
To add a statement item, on the tab Statement Items, it is necessary to select the button:
[Add on the Same Level] − opens a form which allows for adding a statement item on the same level as the cursor level. It will be the following item on the same level of the hierarchy.
[Add on Lower Level] − opens a form which allows for adding an item on the next level against the cursor level.
Financial statement item form
The form is composed of the following elements:
Name − mandatory field, allows for entering statement item name
Number − automatically generated, in accordance with selected numeration scheme
[Insert an account from the chart of accounts] − the button opens the chart of accounts where it is possible to select an account.
Expression Value − allows for defining amount expression on each level of an item. The amount can be entered manually (fixed value) or calculated on the basis of a function.
Functions:
@OBDr( ) − Opening balance Dr
@OBCR( ) − Opening balance Cr
@SDT( ) − Debits
@SCT( ) – Credits
@DrBC( ) − Change in Debit Balance
@CrBC( ) − Change in Credit Balance
@DrB( ) − Debit Balance
@CrB( ) − Credit Balance
@OnB( ) − Ending Balance
After selecting the function in brackets, it is necessary to indicate an account. It can be selected manually, with the use of the button [Insert an account from the chart of accounts] or with the use of account format variables according to the same rules as when defining a recurring posting scheme. The functioning of account formats is described in article Account format in recurring posting operations.
Other:
Financial Statement − retrieves data from another branch to the same statement or other statement defined in the system. Upon selecting this option, a list of branches defined under the registered financial statements is displayed. In order to change the statement from which data should be retrieved, it is necessary to use drop-down list of the field Statements.
If − allows for using the IF function, for example: IF(CrB(“2000-100”) > DrB(“2001-100”), CrB(“2000-100”) – DrB(“2001-100”), 0). If the condition used in the function is fulfilled, then the first value is retrieved. Otherwise, the second value is retrieved.
Absolute Value − allows for using the ABS function, for example: ABS(CrB(“2000-100”)). This function is used to extract an absolute value of a number.
Round Figures − allows for using the ROUND function, for example: ROUND(SCT(“2000-400”),0), where decimal place informs how to round an amount
Integer Part − allows for using the INTEGER PART function, for example: INT(SCT(100))
SQL Query − allows for using a SQL query
Example
SQL(SELECT sum(h.NetValue)
FROM SecSales.Headers as h
INNER JOIN DT.DocumentTypes as dt ON dt.ID = h.DocumentTypesID
WHERE (dt.NamespaceEntry = N’FSV’)
AND (h.IsReverseCharge = 1)
AND (h.SellingDate between @DateFrom AND @DateTo))
where variables: @DateFrom AND @DateTo correspond to Date From and Date To specified for particular statement periods.
Influence on Parent − this parameter is used to specify whether a given branch must affect a parent branch. Available values determine how parent is influenced:
[+] – increases parent branch value
[-] – decreases parent branch value
None – does not influence the parent branch
E-Statement Item − field available in the Polish language version of database. It is activated after selecting first the parameter Export to e-Sprawozdania application (PL) available in the side panel of a financial statement. It is completed upon selecting the [Map to e-Sprawozdania App] button or manually. The list of values in the field e-Statement Item depends on the value selected in the field Item in the side panel of the statement. A given item can be selected only once within a given statement. An Item providing details is an exceptional value as it can be assigned to each statement item. Selecting the value Item providing details as a statement item means that it will be imported to the e-Sprawozdania application, but it does not have its unique symbol in the schemes of the financial statements published by the Ministry of Finance.
Select/By default – in this field, a user can select one of two available options. If the option By default is selected, then, for a given statement items, attribute conditions defined in the statement header are taken into account and the button [Attributes] is inactive. In case the option Select is selected, a user can define conditions for a given item by using the [Attributes] button.
Attributes – button active only if in the field next to it, the option Select is selected. Clicking on the button opens Attribute conditions, where it is possible to define conditions including single-sided entries with specific attributes in calculation of accounting functions.
Tab Statement Periods
A user can define any number of periods, that will be taken into account in the statement value calculation.
To add a statement item, on the tab Statement Periods, it is necessary to select the button [Add]. A calculation period form will be opened.
Financial statement calculation period form
The form is composed of the following elements:
Name – mandatory field, allowing for entering statement period name
Period − period for which the statement will be calculated. Available options:
Any − allows for determining any range of dates in fields From, To. The dates must be included within one accounting period.
Opening Balance − upon selecting this option, a calculation will include journal entries from an opening balance within the current accounting period
Current Month − for functions calculated by activity, the system will calculate values on the basis of the current month. For functions calculated by balances, the system will calculate accrual values from the beginning of the accounting period, including the OB.
Previous Month – for functions calculated by activity, the system will calculate the values only for the previous month. For functions calculated by balances, the values will be calculated on the basis of journal entries from the beginning of the accounting period to the last day of month preceding the current month, including OB.
Current Period – if selected, all journal entries of the current accounting period will be included
Previous Period – if selected, all journal entries of the previous accounting period will be included
Accounting Period – this option allows the user to select any accounting period defined in the system
Today – if selected, all journal entries from the current day will be included
Yesterday – if selected, all journal entries from the previous day will be included
Current Week – if selected, all journal entries from the current week will be included
Previous week – if selected, all journal entries from the previous week will be included
Accounting Period − field active if value Accounting Period is selected in the field Period. Allows for selecting an accounting period from among the periods defined in the system.
Partial Period − this parameter is active if value Accounting Period has been selected in field Period and if partial periods had been defined within a selected accounting period.
Show percentage column − selecting the parameter activates a column presenting percentage share of each statement item against the entire statement.
On the list of financial statement periods it is possible to manage their order by using buttons [Move Up] and [Move Down].
Note
The order of columns changed on financial statement calculation will be visible only on the current calculation of statement. During another calculation, the columns will be displayed according to order set on the list of financial statement periods.
Attributes, Attachments, Change History
The tabs have been described in article <<…>>
Generating financial statements automatically with the use of [Generate] button
Note
The functionality is available on databases generated in Polish language version.
In order to generate statements, it is necessary to click on button [Generate], placed in the Statement group of buttons. Financial Statement Template According To Accounting Act will be opened, where the user can specify which financial statement elements should be created.
Financial statement generation window
Code, Name, Statement Items and Statement Period are completed automatically with the possibility of changing it.
Financial statement created via the option [Generate].
List of financial statements
Financial statements are one of the tools for assessing company’s financial condition and analyzing of data recorded in the system. They act as internal information database for carrying out of analyses. Financial statements are of registering nature, because they are calculated on the basis of data registered on the accounts.
The system allows for defining any type of financial statements and own financial indicators.
A list of financial statements is available from the level of the menu Accounting, under the [Statements] button.
List of financial statements
The list contains financial statements available in a given center: From the level of the menu Configuration → Company Structure → Object Availability, it is possible to manage the availability of financial statements within centers of a given company. Detailed description regarding sharing of financial statements can be found in article <<Object availability>>.
The list contains standard buttons which have been described in article <<Standard buttons>> and, additionally:
[Calculate] − calculates a statement, allows for previewing the previous statement
[Wizard] − button available in Polish version of database. Allows for generating templates of financial statements.
[Import XML] − allows for importing a statement a file with .xml extension
[Export XML] − allows for exporting a statement to a file with .xml extension Each exported statement is saved in a separate file with a name indicated by a user to which the symbol of a given statement is added.
The list is composed of the following columns:
Name
Code
Description
Detailed description of functioning of the filters can be found in category <<Searching and filtering data>>>
Running a recurring posting operation
To run a recurring posting operation, it is necessary, from the level of the menu Accounting → Recurring Posting Operations, select a recurring posting scheme and click on the button [Run].
In the opened window, a user should:
Specify the posting date − date with which a journal entry will be created. The current date is set by default.
Specify the start and the end date − period for which single-sided entries should be included in calculation of functions defined in a recurring posting scheme. The current dates are set by default.
Define the value of the parameter Include unconfirmed entries − decides whether unconfirmed entries are to be included in the value calculation. The parameter is checked by default.
Window starting recurring posting operation
If account format is not used in an element of recurring posting, there will be one journal entry generated with one single-sided entry for the amount calculated and to the accounts specified in Account DR/Account CR sections.
If account format is defined, that is the Calculate For section is filled in, a loop which elements will be all the accounts from a current accounting period fulfilling the specified criterion will be executed.
The owner of created journal entry is a company structure center to which an operator who performed the posting operation is logged-in.
In order to view generated journal entry, it is necessary to select the recurring posting operation and click on the button [View Generated Entries]. The user will be transferred to the list Journal Entries: Ledger limited to the entries generated by a given scheme.
Account format in recurring posting operations
General information
Functionality of account format in recurring posting operations allows for defining of a recurring posting mechanism in such a way as to use all the accounts in posting operations.
A user has a possibility to:
Optionally define a range of accounts assigned to a group of accounts participating in posting operation – so-called account format
Refer to an account format in account definition
Refer to an account format in amount definition
Refer to an account format in the description on a posting scheme element
Defining account format
A range of accounts which is to be included in the posting is specified in field Calculate For, on the form of recurring posting scheme element. Accounts format can be composed of letters, digits, dashes, and special characters.
Calculate For field on the form of recurring posting scheme element
Rules of functioning of an account format:
Symbol
Operation
Example
? or _
Any character
5?? All accounts beginning from number 5 and containing 3 characters in their account number
* or %
Any sequence of characters
5* All accounts beginning from number 5
[AB]
Character assigned to a sequence
401-[137]-01 All subsidiary accounts of the account 401, which contain 1 or 3 or 7 in the second segment, and ‘01’ in the last segment
[A-B]
Character included in range
40[1-4]-* All accounts recording costs by function, which last character in the number of subsidiary account is a digit from range from 1 to 4
[^AB]
Character not included in sequence
401-[^137]-01 All subsidiary accounts of the account 401, which contain a digit other than 1, 3 or 7 in the second segment, and ‘01’ in a sub subsidiary account
[^A-B]
Character not included in range
40[^1-4]-* All accounts which subsidiary accounts begin with characters ‘40’, and the last character (third character in this case) is different from the digits of the range from 1 to 4
For the [Calculate For] button, the following variables responsible for account format handling are available:
? – Any character
* – Any string of characters
[] – Character included in string
[-] – Character included in range
[^] – character not included in string
[^-] – character not included in range
Example
In a chart of accounts with the following structure:
Chart of accounts structure
a record 5*401 – refers to a group of accounts beginning from number 5 and ending with number 401 i.e. 501-01-401, 501-02-401, 502-01-401, 503-02-401, 550-401
a record 501-??- 463 – refers to the accounts 501-01-463 and 501-02-463
Account format in account definition
In fields Account DR/Account CR it is possible to refer not only to a single account but also to an account group which is defined in the Calculate For field by an account format with the use of the @Account variable.
For example – if account format is defined in the Calculate For section as 4??-??-??, then using @Account in Account DR section will be responsible for posting to all the accounts fulfilling the indicated criterion.
In field Account DR/Account CR it is not possible to create an account format. However, it is possible to use the Substring syntax for creating an account number.
Example
Use of the Substring syntax
Such saved element will generate the same number of journal entries as the number of accounts compatible with the account format 401-??. Each of the journal entries will be posted to accounts 501-01-?? and 409 account (where ?? will be replaced with the end-piece of the number of the account 401. Precisely, two digits, starting from the fifth digit, will be retrieved).
Account format in amount definition
In the field Amount it is possible to refer not only to a single account but also to an account group defined with an account format. The account format can be referred to by:
Indicating an account format as an argument of an accounting function – for example, for DTT function, which is responsible for Debit turnover of an account, it is possible to type DTT (5*) responsible for Debit turnover of all the accounts from group 5
Using @AccountFormat variable which is responsible for getting values for an account group defined in Calculate For field. Value of the variable is calculated for all accounts from the group.
Example
Data in the trial balance:
DTT account 501-001: 100.00 USD
DTT account 502-001: 30.00 USD
Account format: 5??-001
In the field with accounts: @Account (and any contra account)
In the field with amount: DTT(@AccountFormat)
As a result, the following two single-sided entry lines are returned:
501-001 (and contra account), amount 130.00 USD
502-001 (and contra account), amount 130.00 USD
Using @AccountFormat variable which is responsible for getting values for an account group defined in Calculate For field. The value of the variable is calculated separately for each processed account.
Example
Data in the trial balance:
DTT account 501-001: 100.00 USD
DTT account 502-001: 30.00 USD
Account format: 5??-001
In the field with accounts: @Account (and any contra account)
In the field with amount: DTT(@Account)
As a result, the following two single-sided entry lines are returned:
501-001 (and contra account), amount 130.00 USD
502-001 (and contra account), amount 130.00 USD
Single-sided entries from opening balance documents
Opening balance documents create single-sided entries which are registered in a special predefined <<journal>> symbolized with *OB* and named Opening Balance.
Single-sided entries are created for each type of opening balance document, both when registering documents (OB, OBC) manually and while transferring the opening balance from the previous <<accounting period>> (AOB, AOBC). Single-sided entries are associated with the amounts of opening balance documents (Opening balance document → tab Amounts). Moreover, single-sided entry of manually entered documents (OB, OBC), which items were registered on a clearing account of directory type for entity, is associated with the opening balance <<document payment>>.
Opening balance single-sided entries are not included in sales registered in a given accounting period. They are included only in the beginning balances and balances of accounts.
The status of opening balance single-sided entry (Unconfirmed, Confirmed) depends on the status of the opening balance document.
From the level of the amount of opening balance document (Opening balance document item → tab Amounts), it is possible to view the associated single-sided entry with the use of buttons [View Debit Journal Entry] or [View Credit Journal Entry] available in the Journal Entry group of buttons. The group of buttons is active, when a data row is selected. To be able to display the single-sided entry for a newly selected amount, first, it is necessary to save the entire OB document.
Buttons available in the main menu, from the level of the tab Amounts of an opening balance item.
Note
Opening balance single-sided entries are registered in the ledger with a date which equals to the first day of the accounting period.
Tab General of opening balance single-sided entry
Tab General of opening balance single-sided entry
Document Number – document number entered from the level of the tab Amounts of an opening balance document If the number is not entered, the document receives the system number of opening balance.
Customer/Vendor – business entity selected from the level of the tab Amounts of an opening balance document; if not selected, the field remains empty
Account DR/Account CR – account entered from the level of the tab Amounts of an opening balance document
Amount – amount in the system currency entered from the level of the tab Amounts of an opening balance document
Amount in Currency – amount in foreign currency entered from the level of the tab Amounts of an opening balance document
Date of Transaction – date of transaction entered on the amount of an opening balance
Date of Issue – date of document entered on the amount of an opening balance
Description – empty field
VAT Rate – empty field
Section Clearings
This section is available only for manual opening balance documents (OB and OBC), for a single-sided entry added to a clearing account. Status field can take on the following values: Subject to clearing and Not subject to clearing.
Section Currency
This section is available for an opening balance single-sided entry added to a currency account. It is filled-in in accordance with the values of the opening balance amount.
Tab Clearings of opening balance single-sided entry
The opening balance single-sided entries registered on a clearing account have an additional tab Clearings. Detailed description of the functionality can be found in section Clearings.
Adding a recurring posting scheme
To add a recurring posting scheme, it is necessary, from the level of the menu Accounting → Recurring Posting Operations, click on the button [Add] placed in the List group of buttons. Then, a form for entering of data appears.
Recurring posting scheme form
Tab General
Symbol − mandatory field, recurring posting scheme symbol
Name − allows for entering the name of a recurring posting scheme
Ledger − mandatory field, allows for indicating a ledger on which journal entries generated with the use of a given posting scheme should be registered. Clicking on the button opens the list of ledgers available within a current accounting period.
Document Number − allows for entering the number which will be transferred to the Document number field on the journal entry
Description − allows for entering a description which will be transfered to the field Description on the journal entry.
Post as unconfirmed − parameter specifying whether generated journal entries will be saved as unconfirmed (parameter checked) or immediately confirmed (parameter unchecked).
Merge single-sided entries − parameter specifying whether a posting scheme should merge single-sided entries registered on the same account.
A recurring posting scheme item can be added in table or through form.
Adding a recurring posting scheme item in table
To add an item, it is necessary to select the button [Add in Table] from the Items group of buttons. A row in which it is possible to enter data, appears on the list of items.
The table contains the following columns: No., Expression of Account DR, Expression of Account CR, Amount Expression, Description. After clicking on the arrow placed on the right side of the field, a window where it is possible to type the expression, appears.
Note
The list of predefined macros is not available when adding a posting scheme item in table.
Recurring posting scheme item added in table
Adding a posting scheme item through form
To add an item, it is necessary to select the button [Add through Form]. A posting scheme item form appears.
Recurring posting scheme item form
The form is composed of the following elements:
Tab General
Calculate For − allows for defining a range of accounts fulfilling specific conditions, so-called masks. A mask can be used when defining subsequent scheme items with the use of the variable @Account. A user can define a mask by using the following options:
? − Any character
* − Any string of characters
[] − Character included in string
[-] − Character included in range
[^] − Character not included in string
[^-] − character not included in range
Account DR/Account CR − allows for manual insertion of account or for using of the option:
Select account from the chart of accounts
Account − variable referring to the accounts which fulfill the definition of the mask. An example of use can be found in article <<Mask in recurring posting>>
SQL Query
Create DR Account/Create CR Account − parameter determining whether accounts should be created automatically when posting, in accordance with the number entered in the field Account DR/Account CR
Account − allows for manual insertion of account or for using of the macros:
Opening Debit Balance
Opening Credit Balance
Debits
Credits
Change in Debit Balance
Change in Credit Balance
Debit Balance
Credit Balance
Ending Balance
Accounts Format − variable referring to all the accounts which fulfill the definition of the mask.
Account − variable referring to the accounts which fulfill the definition of the mask.
Select account from the chart of accounts
SQL Query
Description − allows for entering description manually or with the use of an SQL query in which a macro @Account can be used. For example:
SQL( SELECT tv.Value AS this FROM SecAccountingStructure.Accounts AS a
INNER JOIN Dictionaries.TranslationValues AS tv ON a.NameTranslationID = tv.TranslationID
WHERE a.Number = @Konto AND a.AccountingPeriodID = @AccountingPeriodId)
An SQL query in recurring posting schemes can be defined manually or with the use of function suggesting SQL query elements (tables, SQL functions, system elements) by pressing <CTRL>+ <Space>. In case the function of suggesting is selecte, the system displays elements which could be included in an SQL query at a given moment.
Tab Attributes
Detailed description of the tab can be found in article <<Tab Discount Codes, Analytical Description, Attributes…>>
List of recurring posting schemes
Postings can be performed with a specific regularity, e.g. every month, quarter, year etc. That practice is called a recurring posting. Most often, they are used for reposting of balances and/or turnovers of accounts to other accounts.
This functionality can also be useful in the process of settling operation costs in a given period. Once registered in the system with the use of recurring posting operations, they can be automatically posted each month, which increases the efficiency of work.
A list of posting schemes is available from the level of the menu Accounting, under the [Recurring Posting Operations] button.
List of recurring posting schemes
The list contains all the recurring posting schemes available in a given company within a specified accounting period. From the level of the menu Configuration → Company Structure → Object Availability, it is possible to manage the availability of recurring posting schemes within centers of a given company. Detailed description regarding sharing of posting schemes can be found in article <<Object availability>>.
The list contains standard buttons and, additionally:
[Import] − allows for importing a recurring posting scheme from a file with .xml extension
[Export] − allows for exporting a recurring posting scheme to a file with .xml extension Each exported scheme is saved in a separate file with a name indicated by a user to which the symbol of a given scheme is added.
[Update] − transfers recurring posting schemes from the previous accounting period. Only schemes with symbols which do not exist in a given accounting period are added, if ledger assigned to them exists in a given accounting period.
[Run] − runs a recurring posting scheme. The button is available if a recurring posting scheme is selected.
[View Generated Entries] − allows for displaying the list of entries generated by a scheme. The button is available if a recurring posting scheme is selected.
The list of recurring posting schemes is composed of the following columns:
Symbol
Name
Description − description entered in the header of a scheme
Post as Unconfirmed − information whether the parameter Post as unconfirmed is checked
Merge Single-sided entries − information whether the parameter Merge single-sided entries is checked
Document Number − number entered in the header of a scheme
Ledger − ledger indicated in the header of a scheme
Detailed description of functioning of the filters can be found in category <<Searching and filtering data>>>
Posting with the use of a posting scheme
Posting may be completed successfully or unsuccessfully. It depends on correctness of a posting scheme that is used for posting.
Note
In case of selecting a posting scheme in which an account or a journal was selected to which a given user does not have access, generating of unposted entry/posting will not be executed. The user can edit such a posting scheme.
Posting a document with a correct posting scheme
In order to post a document with a posting scheme, it is necessary to:
Mark a document on the list
Click [Post] in the Posting button group
If there is more than one posting scheme defined for a given type of document, a window in which a posting scheme and posting date can be selected will open. In that window, there are two checked parameters:
Use the scheme date – unchecking this parameter enables to select a different posting date than that specified on the scheme
Use default scheme – unchecking this parameter enables to select a different posting scheme assigned to a given document type
Upon selecting appropriate date and scheme, click on [Post] button
If the posting scheme is correct, the document will be posted and the newly created journal entry will appear with the Unconfirmed status on the list of journal entries (menu Accounting → Ledger)
Preview of successfully completed posting process
Posting a document with the use of an incorrect scheme
In order to post a document with a posting scheme, it is necessary to:
Mark a document on the list
Click [Post] in the Posting button group
If there is more than one posting scheme defined for a given type of document, a window in which a posting scheme and posting date can be selected will open.
Select the [Post] button
If the used posting scheme is incorrect, posting of the document fails. An appropriate message is displayed in the log window, e.g. “The generated journal entry does not balance. Posting of the document has failed.”
In such case, you need to change the posting scheme into a correct scheme and re-post the document.
Preview of failed posting process
Document posting with warning
When generating an unposted entry or posting with the use of a posting scheme with marked parameter Create account and specified account number which is inconsistent with numeration scheme assigned to it, the system displays appropriate message and, depending on account numeration control setting, posting of a document will be continued or canceled.
Window with warning displayed when posting with creation of an account not fulfilling conditions of numeration scheme
Unposted entries
Before posting a document, the user may preview the entries which will be created by posting the document with a particular posting scheme, that is generate an unposted entry. Unposted entry does not make any changes to the document. The proposed unposted entry can be freely changed.
In order to generate an unposted entry, it is necessary to:
Mark a document on the list
Click [View Unposted Entries] in the Posting button group
If there is more than one posting scheme defined for a given type of document, a window in which a posting scheme and posting date can be selected will open. In that window, there are two checked parameters:
Use the scheme date – unchecking this parameter enables to select a different posting date than that specified on the scheme
Use default scheme – unchecking this parameter enables to select a different posting scheme assigned to a given document type
Preview of the unposted entry process
By selecting the button [View Unposted Entries] the window Unposted Entry will open. A user can:
Save the unposted entry – [Save]
Post the document – [Save and Post]. A message about posting will appear.
Add a new unposted entry item – [Add Through Form] A single-sided entry form will open, where it is necessary to fill in the mandatory fields and then save the form.
Edit the unposted entry item – [Edit] A single-sided entry form will open, where possible to enter changes and then save the form.
Delete the unposted entry item – [Delete]
Change posting scheme – [Change Posting Scheme] A list of posting schemes will then be opened, where it is possible to select another posting scheme.
Delete the modified data – [Delete User Values] The button is active if changes have been entered to the unposted entry. The system will then restore the values generated with the scheme.
Verify whether journal entries fulfill the conditions specified in the defined cost allocations – [Check Cost Allocations]. Detailed description of the functionality can be found in article <<Cost allocations>>.
Close the unposted entry
Unposted entry preview
Hint
If an account selected in unposted entry does not exist on the chart of accounts, it is highlighted in green.
Note
The system remembers a generated unposted entry. Each following initiation of the posting scheme loads the original unposted entry. If the posting scheme or a document was modified, the option [Change Posting Scheme] must be used in order to generate a new unposted entry. Selecting this option not only changes the scheme, but refreshes the unposted entry.
Information about loading of the previous unposted entry
Note
When generating an unposted entry, the system verifies whether Dr side equals to Cr side, but only within balance sheet accounts. If the two sides are different, the system displays a warning “The document does not balance”. The unposted entry can be saved, but the system will not allow for posting the document.
Adding a posting scheme
General information
A list of posting schemes is available from the level of the menu Accounting, under the [Schemes] button.
A posting scheme is added on the list of posting schemes upon clicking the [Add for Documents] button and selecting a document type for which the scheme is to be added. A posting scheme form appears.
The menu of the window contains <<standard buttons>> and, additionally:
[Copy from…] − allows for copying data from another posting scheme. Upon clicking on the button, the list of posting schemes is opened, where it is possible to indicate the scheme whose elements must be copied to a given scheme.
Posting scheme form
The form of a posting scheme is composed of the following elements:
Tab General
Symbol − mandatory field, posting scheme symbol
Name − allows for entering the name of a posting scheme
Entry Owner − allows for specifying of the method of determining the owner of a journal entry. Available values:
Posting Operator − the current center (center of logged-in operator) becomes the owner of generated journal entry
Document Owner − owner of a posted document becomes the owner of generated journal entry
Ledger − allows for indicating a ledger on which journal entries generated with the use of a given posting scheme should be registered. Selecting the button [Ledger] opens a drop-down list with the following options: SQL Query (allows for retrieving a ledger with the use of SQL query) and Insert value from directory… -> Ledger (allows for indicating a ledger from the list of ledgers available for a company in a given accounting period).
Hint
For schemes for cash-bank documents it is also possible to select variable @AccountLedger, which retrieves a ledger from cash-bank account definition during posting.
Posting Date − allows for specifying a date with which a document will be posted. Selecting the button [Posting Date] opens the list of predefined macros. Macros included in the list depend on type of document for which a scheme is being defined
Note
@TransactionDate in a posting scheme is a date of trade transaction from the source document. In the case of trade document corrections, it is possible to use the @CorrectionDate macro.
The variable @TransactionDate retrieves the date of:
Sale − for sales documents
Purchase − for purchase documents
Release/reception − for warehouse documents
Condition − allows for entering an additional condition which must be fulfilled by a posted document. Selecting the button [Condition] opens the list of predefined macros. Macros included in the list depend on type of document for which a scheme is being defined.
Description − allows for entering a description which will be transfered to the field Description on journal entry. Selecting the button [Condition] opens the list of predefined macros. Macros included in the list depend on type of document for which a scheme is being defined.
Active − parameter allowing for blocking the possibility of posting with the use of a posting scheme. The parameter is unchecked automatically when saving a posting scheme containing errors.
Merge Single–Sided Entries − parameter specifying whether a posting scheme should merge single-sided entries registered on the same account.
Note
If parameter Save VAT rate has been checked on the scheme item, a separate single-sided entry is created for each rate, regardless whether the parameter Merge Single-Sided Entries is checked or not in the scheme definition.
Note
When posting documents on clearing accounts on the basis of payments, separated single-sided entries are created, if the payment was divided, regardless whether the parameter Merge Single-Sided Entries is checked or not.
A posting scheme item can be added in table or through form
Adding a posting scheme item in table
To add an item, it is necessary to select the button [Add in Table]. A row in which it is possible to enter data, appears on the list of items.
The table contains the following columns: No., Expression of Account DR, Expression of Account CR, Description Expression, Amount Expression, Condition Expression, Calculate For. After clicking on the arrow placed on the right side of the field, a window where it is possible to type the expression, appears.
Note
The list of predefined macros is not available when adding a posting scheme item in table.
Posting scheme item added in table
Note
Payments and clearings are processed correctly only if the posting schemes used to post documents have properly been built. Essentially important is a posting scheme element which posts a payment amount to entity’s clearing account. Such item should be built on the basis of the table Payments, that is, the option Payments should be selected in the field Element Calculated For, and the option Payment or Receivable or Payable should be selected in the Amount field. Payment or Credit or Debit
Values should not be posted on clearing accounts on the basis of the amount from the header (Total amount) or through a manual generation of unposted entries on the document, because it could cause discrepancies between clearings and payments. Errors might relate to the lack of clearing despite a registered payment and the other way round, not being able to clear journal entries (complete payments), calculation of inappropriate exchange rate differences.
Moreover, after generating unposted entries of a document with a properly defined posting scheme, an unposted journal entry must not be manually changed, e.g. by deleting the entry and adding it again manually or by modifying the amount of payment.
Note
When posting payments not subject to clearings, on a clearing single-sided entry, in the section Clearings, the status Not subject to clearings is set.
Changing payment status (Subject/Not subject to clearing) from the level of payment list, results in automatic change of single-sided entry status (Subject/Not subject to clearing).
Adding a posting scheme item through form
To add an item, it is necessary to select the button [Add through Form]. A posting scheme item form appears.
Posting scheme item form
The form is composed of the following elements:
Element Calculated For − takes the following values: Payment, Header, Element, Subelement and Analytical Description. Depending on the value selected in this field, the following variables are available on elements:
Currency posting − parameter determining whether a scheme element was defined to post documents/payments in foreign currency on accounts in kept in foreign currency. Only if the parameter is checked, the values on account are expressed both in the currency of payment/cash-bank transaction and in the system currency. When posting a payment/transaction in foreign currency with the use of a posting scheme which has an element with the parameter unchecked, the system displays a message informing about an incorrectly defined posting scheme.
If the parameter Currency posting is checked, in the field Account DR/Account CR it is possible to indicate an account number or retrieve an account with the use of SQL query.
Hint
If documents were first posted without the parameter Currency posting being checked, a customer/vendor account without detailed subsidiary accounts for USD is created (e.g. 201-COMARCH and not 201-COMARCH-USD). If later it is attempted to post to this account through a posting scheme with the parameterCurrency posting being checked and the parameter Currency accounts added as sub-subsidiary accounts also being checked in the configuration, the system will not allow for adding a subsidiary account to the account on which journal entries are already recorded.
Save VAT rate − parameter determining whether VAT rates should be transferred to the journal entry. The parameter is only active during the posting on the basis of elements.
Account DR/Account CR − mandatory field, allows for defining accounts on the DR and CR side.
Create DR Account/Create CR Account − parameter determining whether accounts should be created automatically when posting, in accordance with the number entered in the field Account DR/Account CR
Amount − mandatory field, allows for defining a variable for retrieving posted amount
Condition − allows for adding a condition which must be fulfilled by a posted document
Description − allows for entering a single-sided entry description
Upon clicking on the buttons [Account DR], [Account CR], [Amount], [Description], a user can select variables described in article <<Predefined macros of posting schemes>>.
Hint
The prime cost should be posted in Comarch ERP Standard from the level of SOR/SORQC documents. On SI/R/SIQC/RQC documents, the prime cost value is an estimated value only.
Hint
Variables referring to set, which are defined on the basis of subelement should be used only if option Retrieve elements onto document has been checked. A scheme using @Subtotal variable or condition “IfSetComponents=1” returns 0 value for a set without the parameter Retrieve elements onto document checked.
Tab Change History
Detailed description of tabs can be found in article <<Tab Discount Codes, Analytical Description, Attributes, Attachments and Change History>>.
Creating accounts with the use of a posting schemes based on types of directory accounts
From the level of a posting scheme, when referring to types of directory accounts defined in configuration (menu Configuration → Accounting → Directory Accounts → Account Types), it is possible to create a subsidiary directory account for the following objects: Customer/Vendor, Item, Employee, Warehouse, Customs Bureau, Inland Revenue, Bank, VAT Rates, Fixed Assets.
In order to do so, it is necessary to assign appropriate directory account to specific types of accounts in the types of accounts window (menu Configuration → Accounting → Directory Accounts), for which object subsidiary accounts will be created.
Types of directory accounts
Next, in the posting scheme, refer to specific type of account, for instance, to a customer/vendor account of Customer type: @Customer/VendorAccount[“Customer”] and check parameter Create account. The customer’s account will be created while posting a document and at the same time it is registered on the form of customer object (tab Accounting).
Posting scheme element, creating a subsidiary directory account
SQL queries in posting schemes
An SQL query in posting schemes can be defined manually or with the use of function suggesting SQL query elements (tables, SQL functions, system elements) by pressing <CTRL>+ <Space>. In case the function of suggesting is selecte, the system displays elements which could be included in an SQL query at a given moment.
If entered command or query is incorrect, the field being defined becomes pink.
[Alert]The returned value must be labeled with “this” alias. Without it, the query will be validated, but it will be run with an error. [/alert]
When building an SQL query, it is possible to refer to the following variables:
@DocumentId – ID of a document being posted (available for scheme header or elements calculated for header)
@ItemId – ID of an item being posted (available for scheme elements calculated for items)
@SubitemId – ID of a given subitem (available for scheme items calculated for subitems)
@PaymentId – ID of a payment being posted (available for scheme elements calculated for payments)
@LineId – ID of an analytical description line being posted (available for scheme elements calculated for analytical description)
Description of the exemplary conditions, which can be used in posting schemes, can be found in the Comarch ERP Standard Technical Newsletter – Posting schemes.
List of posting schemes
A list of posting schemes is available from the level of the menu Accounting, under the [Schemes] button.
List of posting schemes
The list contains all the posting schemes available in a company within a given accounting period. From the level of the menu Configuration → Company Structure → Object Availability, it is possible to manage the availability of posting schemes within centers of a given company. Detailed description regarding sharing of posting schemes can be found in article <<Object availability>>.
Default posting scheme for a document type can be changed from the level of the menu Configuration → Company Structure → Object Availability, by selecting the parameter in the column Default. Only one default posting scheme can be assigned to a document type.
The list contains standard buttons which have been described in article <<Standard buttons>> and, additionally:
[Add for Documents] − allows adding posting schemes for particular types of documents. After clicking on the button, a list of document types becomes available, where it is possible to build a scheme.
[Update] − allows transferring schemes from the previous accounting period. Only schemes with symbols which do not exist in a given accounting period are added.
Note
Those posting schemes are transferred which have a ledger defined in the current accounting period assigned.
[Import] − allows for importing a scheme from a file with .xml extension
[Export] − allows for exporting a scheme to a file with .xml extension Each exported scheme is saved in a separate file with a name indicated by a user to which the symbol of a given scheme is added.
The list of posting schemes is composed of the following columns:
Symbol
Name
Document Type − provides information about the type of the document for which a given scheme has been built
Active
Document Group (hidden by default) − information regarding the group of documents for which a given scheme has been built, defined on the basis of the document type. Available values: Sales and Purchase, Cash/Bank Reports, Exchange Rate Differences, Cash-Bank Transactions, Debt Collection, Compensations.
Types of documents subject to posting:
[TABLE]
Detailed description of functioning of the filters can be found in category <<Searching and filtering data>>>
Additionally, the following filters are available on the list:
Document Type − allows for limiting the list of schemes to selected document type for which schemes have been built
Only Active − parameter selected by default Allows for limiting the list of schemes to those which have the parameter Active checked
Rules of posting documents
Rules of posting documents in a multi-company structure
In a multi-company structure, posting of documents is possible only within a company a user is currently logged-in to – for its current accounting period and through posting schemes available in it.
documents issued in a company to which a user is logged-in can be posted
documents issued in other center than the one a user is logged-in to, but included within the same company, can be posted
documents issued in other company than the one a user is logged-in to cannot be posted
Available methods of posting:
When confirming a document
While confirming a document, the button [Confirm and Post] is available. The document will be posted successfully only with a properly defined default posting scheme. Otherwise, the document will be confirmed, but not posted.
From the level of the list of documents/from the level of a document
A confirmed document can be postedfrom the level of the documents list or in the document edit mode. The document is posted by clicking on the button [Post]. The document will be posted successfully only with a properly defined default posting scheme.
Clicking on the button [Post] without selecting a posting scheme (checked parameter Use default scheme) posts a document with the use of a remembered unposted entry, if such entry existed before. However, clicking on the button [Post] and selecting a posting scheme (unchecked parameter Use default scheme, it can be also a default scheme) posts the document according to the scheme definition (possible unposted journal entries are then ignored).
Posting through a contra account
The [Post Through Contra Account] button is only available for cash-bank transactions and closed cash/bank reports. If a contra account is selected in the cash-bank transaction form, and an account and a ledger is assigned to the account selected on a cash-bank transaction, posting operation will be performed successfully.
Manually from the level of journal entries
By adding a journal entry from the level of the list of journal entries. Detailed description of the functionality can be found in article <<Numbering of book accounts>>.
Through a BPM process named Post Documents Automatically
Rules for posting with the use of a posting scheme
A posting scheme should be built separately for each type of document. There can be several schemes assigned to a given document type. One of the schemes must be set as default
Posted documents are displayed in the list in blue
Trade and warehouse documents can be posted only if they are confirmed.
Warehouse documents can be posted if they have prime sales cost/delivery value is determined. If documents not having these values determined and should be posted, parameters Prime sales cost determined/Fixed delivery value must be checked.
Documents generated from other documents can be posted in the same way as the source documents
Posting VAT invoices with source documents:
when the source document is already posted, it is not possible to post the VAT invoice. It takes automatically the status: Posted.
when the VAT invoice is posted, it is not possible to post its source invoice. It takes automatically the status: Posted.
A posted document cannot be canceled.
The status of a journal entry created during the posting with a posting scheme is Unconfirmed. A user confirms such an entry manually.
If a journal entry created as a result of a document posting has status Unconfirmed, it can be deleted. After deleting the entry, it is possible to cancel the document or post it again.
If a journal entry created as a result of a document posting is confirmed, it cannot be deleted without a trace. In order to unpost a document, it is necessary to generate a correcting entry. After the correcting entry is confirmed, the document is unposted and thus can be canceled.
Opening balance document list
Opening balance documents define initial situations on accounts in a given accounting period. When starting work with the system, the opening balance should be entered manually, whereas in successive accounting periods, the opening balance can be transferred from the previous accounting period, on the basis of its ending balances.
A list of opening balance documents is available from the level of the menu Accounting, under the [Opening Balance] button.
Opening Balance Documents list
The list contains standard buttons and, additionally:
[Add] − allows for manual addition of an opening balance document. The functionality provides possibility of generating payments for items of documents registered on directory accounts of clearing type which are associated with a given entity.
[Transfer Previous Period Balances] − allows for adding an opening balance document on the basis of the previous accounting period. The document can be added, when all automatic opening balance documents (AOB) and their corrections (AOBC) are confirmed.
[Add Opening Balance Correction] − allows for adding an opening balance correction. Automatic creation of an opening balance correction is executed by selecting once again the button [Transfer Previous Period Balances].
Detailed description of adding of OB documents is available in article Adding opening balance.
In the window of opening balance documents, there is Current Accounting Period (not editable) field. The status of the accounting period is indicated in brackets – Closed or Open.
The list of opening balance documents is composed of the following columns:
Number
Date of Issue
Amount DR
Amount CR
Document Type – the column takes on value Manual (for documents added manually or imported) or Automatic (for documents created on the basis of previous accounting period).
Additionally, the list can by filtered by the following options:
Document Status − available options: All, Unconfirmed, Confirmed and Corrections.
Sorts and Types of Documents − available options:
OB − opening balance document added manually
AOB − opening balance document created automatically on the basis of previous accounting period
OBC − opening balance correction added manually
AOBC − opening balance correction created automatically on the basis of previous accounting period It contains entries which are a difference between the closing balance of the previous accounting period and the opening balance of the current accounting period.
Trial balance calculation
The system allows for calculating trial balance for all accounts and for presenting opening balances.
The statement can be calculated for:
Accounting period or partial period
To calculate trial balance, it is necessary to indicate an accounting period (by default, it is the accounting period of the company to which the user is currently logged-in) and select [Recalculate] button. Additionally, if an accounting period is divided into partial periods, then, after selecting the parameter Partial Period and selecting particular partial period from the list, it is possible to calculate statement for a given period.
Range of dates
To calculate a statement for a particular time range, it is necessary to select filter Date From, set the start and the and date and select the [Recalculate] button. Trial balance will be calculated for the selected time range.
Note
So-called expanded balance (two-sided balance) is presented if there are two conditions fulfilled:
Account type: Clearing or Current Liability
An account has subsidiary accounts (it is a general or sub-subsidiary account)
The balance is always presented one-sidedly on a general account (on its lowest level), regardless of its type. It means that, for example, a clearing subsidiary account of a given customer will have the balance presented on one side.
Rules for trial balance calculation
Opening balance
For subsidiary accounts
Opening balance is calculated as a difference between ∑OB Dr and ∑OB Cr of given account
For general and sub-subsidiary accounts
For clearing accounts or accounts of current liability type
OBDr = ∑OBCr of lower level subsidiary accounts
OBCr = ∑OBCr of lower level subsidiary accounts
For regular accounts
Opening balance is calculated as ∑OBDr – ∑OBCr for lower level subsidiary accounts
Note
A negative opening balance is always presented on Cr side as an absolute value.
Change in period
For subsidiary accounts
Change in period is calculated as a total of journal entries registered on appropriate side (Cr/Dr) of given account
For general and sub-subsidiary accounts – regardless of their type
CiPDr = ∑CiPDr of lower level subsidiary accounts
CiPCr = ∑CiPCr of lower level subsidiary accounts
Change in credit balance
For subsidiary accounts
Change in period is calculated as a total of journal entries registered on appropriate side (Cr/Dr) of given account
For general and sub-subsidiary accounts – regardless of their type
CiCBDr = ∑CiCBDr of lower level subsidiary accounts
CiCBCr = ∑CiCBCr of lower level subsidiary accounts
Balance
For subsidiary accounts
is calculated as a difference of (OBDr+CiCBDr) – (OBCr+CiCBCr)
For general and sub-subsidiary accounts
For clearing accounts or accounts of current liability type
BDr = ∑BDr of lower level subsidiary accounts
BCr = ∑BCr of lower level subsidiary accounts
For regular accounts
The balance is calculated as a difference of ∑BDr – ∑BCr for lower level subsidiary accounts
Note
A negative balance is always presented on Cr side as an absolute value. A negative opening balance is always presented on Cr side as an absolute value.
Ending Balance
Ending balance is calculate as a difference Bdr – Bcr
Filtering of trial balance
Detailed description of functioning of the filters can be found in category <<Searching and filtering data>>>
Trial balance list
Additional options of trial balance filtering:
From Account, To Account – allows for defining the interval of account for which the statement should be calculated
Levels – allows for defining levels according to which the accounts used for the statement calculation will be included. Available values: All (list without limits), 1 (accounts from level 1), 2 (accounts from level 1 and 2) etc. Only directory accounts, The lowest level.
Type – allows for filtering of accounts by their type. Available values: Balance sheet and Nominal, Balance sheet, Nominal, Off-balance, Clearing.
Currency – allows for specifying the currency of accounts included in trial balance calculation. When the following option is selected in the filter:
All – the statement is calculated in the currency of the account
All in system currency – the statement is calculated in the system currency (also for the accounts in foreign currency, the values are reported after recalculation in the system currency)
EUR, PLN etc. – the statement is calculated for account in selected currency
Include unconfirmed entries – when the parameter is checked, the statement is calculated on the basis of confirmed and unconfirmed entries. When the parameter is unchecked, the statement is calculated on the basis of the entries transferred to the general ledger (confirmed) only.
Include directory accounts – if checked, the system includes analytical directory accounts while filtering. If unchecked, the system will not include the directory accounts. Upon unchecking of the parameter, the system displays only directory accounts (subsidiary directory accounts are not displayed).
Without accounts with zero activities – allows for calculating the statement only for accounts which have activities or value in the columns Dr OB/Cr OB in analyzed period
Note
In case of selecting the option Without accounts with zero balances in the filter panel, the filtered trial balance will also include an opening balance.
Without accounts with zero balances – allows for calculating the statement only for accounts which have balance in analyzed period
Note
If the parameter Without accounts with zero activities and Without accounts with zero balances are checked, only accounts with balance different than zero are displayed on the list.
Attributes – allows for filtering statement on the basis of attributes on single-sided entries. Selecting the button [Attributes] opens the Attribute conditions window where it is possible to define a filter including single-sided entries with specific values of attributes. In the filter, it is possible to use attributes of textual or list type only.
Attribute conditions window
Trial balance
Trial balance is a source of information regarding individual components of company assets and capital. It provides information necessary to prepare elements of the financial statement, that is balance sheet, income statement, cash flow statement, etc.
Trial balance is a statement of journal entries on accounts. Turnover is the registry of all business transactions posted on an account. Balance is the registry of CR and DR sides, that is, all turnovers listed on an account in a given accounting period (including also the opening balance).
Trial balance is available from the level of menu Accounting, under [Trial Balance] button.
Trial balance can be displayed as:
Tree – hierarchical structure
List – flat structure
Trial balance
The list contains standard buttons which have been described in article <<Standard buttons>> and, additionally:
[Calculate] – allows for calculating trial balance
[Collapse All] – in case of a tree structure, it allows for reducing chart of accounts to general accounts
[Expand All] – in case of a tree structure, it allows for expanding a chart of accounts to a form including both general and subsidiary accounts
[Journal Entries] – allows for displaying journal entries for selected account
[Clearings] – allows for displaying the list of clearings for selected account in specified range of dates. The list of clearings can be displayed only for an account at the lowest level.
[Trial Balance] – allows for calculating trial balance for selected account
Trial balance is composed of the following columns:
Number
Name
OB DR, OB CR – account balances on the day of opening of accounting ledgers
Turnover DR, Turnover CR – turnover for the reporting period
Subtotal Turnover DR, Subtotal Turnover CR – turnover incrementally from the beginning
Balance DR, Balance CR, Ending Balance – balances at the end of reporting period
Currency – document currency, depends on the settings in the filter
Type (column hidden by default) – account type
Note
Totaling is possible from the level of the list of trial balance only upon selecting a specific currency in the filter of the option All in system currency. If system currency of accounts is different, value 0 is displayed in the summary.
Detailed description of filtering and calculating of can be found in article Trial balance calculation.
Chart of accounts in the German system version
In Germany, there is no need to create and preview chart of accounts in the tree form.
In Germany general and subsidiary accounts do not exist, but there are parent accounts (general ledger) and so-called auxiliary accounts associated with customers/vendors (auxiliary ledger). Auxiliary account number must be within the specified range of characters, e.g. from 10000 to 69999 – receivables, from 70000 to 99999 – payables. Auxiliary accounts are presented not below the parent account, but at the end of the chart of accounts, below all parent accounts.
Chart of accounts in German version along with auxiliary accounts
In the German version the user may:
add general ledger accounts only on the first level
add directory accounts directly associated with all types of directory accounts on the first level (System → Configuration → Accounting → parameter Add general directory accounts)
add auxiliary ledger accounts on the next level by selecting the button [Add auxiliary account]. The option is available only for accounts with parameter Directory Account checked.
Auxiliary accounts:
are always associated with parent account
many auxiliary accounts are associated with one general ledger account
auxiliary account number is always unique
Note
When adding an account through a posting scheme remember to set account number from the general ledger (customers/vendors directory account) in directory account type.
Chart of accounts in the French and Spanish system version
Chart of accounts − general information
Accounting standards in France and in Spain differentiate general accounts and subsidiary accounts, as well as directory accounts associated e.g. with customers and vendors. The difference between Polish and French (Spanish) chart of accounts is the lack of dash separating particular levels. Each account level is determined with adequate number of characters.
Structure of the French chart of accounts
For instance, account number 752: Revenues from financial transactions. The account was created on the highest level possible. The following levels are created by adding another number to given account number without dashes. The child accounts (i.e. accounts on lower level) against the account 753 are the following accounts:
7521
7522
7523
7524
7525
The account number 7521 has, in turn, the following child accounts assigned:
75211
75212
Similarly, subsidiary (child) accounts against the account 7522 are those starting from the number 7522 (which defines two upper levels). These accounts in this example are:
75221
75222
The multi-level structure of the chart of accounts in French version could be the following
Level 1: 221
Level 2: 2213
Level 3: 22135
Level 4: 221358
Level 5: 2213581
Creating a multi-level structure of the chart of accounts
A new level can be created by adding one or several characters (numbers) to the number of the parent account. The method of creating a multi-level structure of the chart of accounts will be presented on the example of creating a clearing account of directory type for customers and vendors.
Creating a parent account number 402
Creating a clearing account
Creating directory accounts on lower level
Directory account on lower level
This is an important step for providing a complete number of child account that is, the number containing the number of the parent account preceding the character which indicates a given level. In the example, the parent account number 402 is entered and the number 1 is “added” to it. The system automatically suggests number of the parent account (without possibility to change it) – the user only has to supplement it with appropriate sign of subsidiary account. This way, the account number 4021 is created and it is a child account (account on lower level) against the account 402.
Assigning a directory account to customer or vendor
In tab Accounting, on the customer or vendor form, it is possible to refer to the chart of accounts and to select a proper directory account.
Reference to a directory account on the customer form
The system suggests an account number with dash, however, upon checking the option Create Account, an account number 4011COMARCH (without dash) will be created.
Account on the chart of accounts
Directory account for a customer/vendor can also be created directly on the chart of accounts by filling in the fields with appropriate data. First, it is necessary to enter a complete account number – a sequence of characters COMARCH is added to the number of the existing directory account 4021. This way, the account number 4021COMARCH is created on the third level of the chart of accounts. Next, it is necessary to select a particular customer by clicking on the button [Customer/Vendor].
Customer’s directory account
Creating of accounts from the level of a posting scheme and recurring posting scheme
In the French/Spanish version of the system, accounts can be created through posting schemes in the same way they are created in standard version. This means, that when creating a subsidiary (child) account, its number entered from the level of posting scheme items, should contain dashes. The purpose of the dashes here is to specify the level on which the account is being created. The dashes will not be included in the number of the created account.
Example
Creation of a subsidiary account on two levels for the account 303: Purchase accounting
In order to create such structure through a posting scheme and not directly on the chart of accounts, the following should be typed into the posting scheme item:
”303”- ”1”- ”MATERIALS”
The following accounts will be created during posting operation:
303
3031
3031MATERIALS
If account number 303 or 3031 already exists, the system will properly recognize the number and will create a subsidiary account: 3031MATERIALS If e.g. the account number 3031 already exists in the system, it is possible to type the following:
”3031”- ”ITEMS”
using a dash only to specify the last level – the one the user wants to create through the posting scheme. The effect will be the same as typing:
”303”- ”1”- ”ITEMS”
The difference here is that using a posting scheme with the specified account number
”3031”- ”ITEMS”
providing that the account number 3031 does not exist (as in the structure presented in the above figure), will produce the situation shown in the figure below:
The similar rule applies when using the option of creating an account with the use of recurring posting schemes.
Creating accounts – other possibilities
In other places in the system where accounts are created, the account numbers must be accompanied with dashes (in order to specify the levels of subsidiary accounts), but without “ ” characters, e.g. 100-1-1.
Places where it is possible to create an account are as follows: journal entry, accounting note, cash-bank transactions, directory: Customer/Vendor, Employee, Institution, Item, Warehouse, Bank, VAT Rate, Fixed Assets in Accounting tab.
Assigning accounts to objects
When selecting an account, for instance, on the form of cash-bank account, it is necessary to enter the number of the existing account without dashes or other additional characters. For instance, it is possible to enter an account number in the following form: 10011. This account is secondary against the account 1001 which, in turn, is secondary against the one on the highest level, that is the account number 100.
Directory accounts
Directory accounts − general information
Each company has its own accounting periods and chart of accounts, so a user can configure directory accounts for each company separately. Configuration of directory accounts saved in a center of Company type applies to all its child centers.
Note
The system controls uniqueness of account type names within one company.
Directory accounts are the ones with an assigned directory of values.
Customers/Vendors
Items
Employees
Warehouses
Institutions
Banks
VAT Rates
Fixed Assets
Directory accounts can be defined either from the level of the tab Configuration → Accounting → Directory Accounts or from the level of Configuration → Generic Directories → group: Types of directory accounts
Directory accounts numeration
When directory accounts are configured from the level of Configuration → Accounting → Directory Accounts, it is possible to determine their numeration scheme.
Subsidiary directory accounts can be created on the basis of the following criteria:
Code
ID
Range of numbers
Name
Symbol
Value
Inventory Number
These parameters are specified for all the directories separately.
Directory accounts numeration window
Entity − specific directory of values
Type of Subsidiary Account:
ID − subsidiary account created on the basis of the unique ID of the object of the following type
Customer/Vendor
Item
Employee
Warehouse
Institution
Banks
Fixed Asset
Code – subsidiary account created on the basis of the unique code/symbol
Customer/Vendor
Item
Employee
Warehouse
Institution
Bank
Fixed Asset
Range of Numbers – subsidiary account created on the basis of the given range of numbers
In order to create an account in this way, follow these steps:
in chart of accounts create an account for which the range of number must be set
in directory accounts mark that the subsidiary accounts will be built on the basis of the range of numbers
return to the form of the account on the chart of accounts, determine the range of numbers
return to the forms of the directory accounts to determine the same range of numbers
Name – a subsidiary account for VAT rates created on the basis of name of VAT rate, e.g., A 23%
Symbol – a subsidiary account for VAT rates created on the basis of symbol of VAT rate, e.g., A
Value – a subsidiary account for VAT rates created on the basis of value of VAT rate, e.g., 23%
Inventory Number – a subsidiary account for fixed assets is created on the basis of the inventory number from the <<form of fixed asset>>
Number of Characters – field containing a numeric value. It informs about the length of an account number. It indicates the number of zeros with which the number of the subsidiary account will be completed to obtain the declared length. This field is active only in case of selecting the option ID, whose default value is 5, the minimum value is 4 and the maximum value is 50 or option Value, whose default value is 2, the minimum value is 1 and the maximum value is 5
Note
If it is set to create accounts by ID or the range of numbers, the account names are followed by entity code in order to localize the entity (because a number does not always tell about it).
Types of dictionary accounts
The list of directory account types is dynamically developed based on institution types which are defined by a user from the level of <<generic directories>> (Configuration → Generic Directories → General group).
On the level of definition of a given type of directory account, it is possible to determine a fragment of account number and to specify whether the account must be created automatically when saving the form of a given object, i.e. customer/vendor form.
Types of directory accounts window with selected type Customer
Value − name of directory account type
Active – parameter specifying whether a given type of account is used in the system
Account − account for which subsidiary accounts should be created. If the selected account is not a directory account, the system will display a proper message. It will be still possible to save such account.
Autocreation – parameter determining if the account of the object of given type must be created automatically when adding the object. If checked, the option Create account will be enabled on the form of the object for a given type of account.
Scenarios of creating directory accounts
Directory accounts can be added manually or automatically from the level of the opening balance documents, accounting notes and journal entries, as well as when posting documents with the use of posting schemes.
Note
When adding a subsidiary directory account, if the directory name contains “-“ character, it will be replaced with “_” character.
Manual creation of a general account associated with a directory
From the level of Accounting → Chart of Accounts, select the [Add Account On The Same Level] button in the List button group
In the opened account form, fill in the mandatory fields and check the parameter Directory Account
Select type of directory account which should be created. Available values: Customers/Vendors, Items, Employees, Warehouses, Institutions, Banks, VAT Rates, Fixed Assets
Save the account
Manual creation of a subsidiary directory account
On the chart of accounts mark general directory account
Click [Add Account on Lower Level] in the List button group. A subsidiary directory account form will be opened
Select directory account type (depending on the directory)
Select customer/vendor by clicking [Customers/Vendors] button (button name depends on directory selected on the subsidiary account). After selecting the button, the list of customers and vendors defined in the system will be opened, from which it is necessary to select a specific customer/vendor.
The name of the selected customer/vendor will be displayed in the account number field, if in directory account configuration the option of creating customer/vendor accounts by code is selected. If the option of creating customer/vendor accounts by ID is selected, in the field Number the customer/vendor ID in the database is displayed.
Account name will be automatically filled in with the customer/vendor name
Subsidiary account of directory type for a single customer/vendor
Save the account
Automatic creation of a subsidiary account of directory type through a journal entry document
From the level of Accounting → Ledger, add a journal entry with the use of the [Add] button placed in the List button group. A journal entry form will open, where it is necessary to fill in the mandatory fields.
To add an item to cost allocation in table, it is necessary to click on [Add Through Form] button placed in Items group of buttons. A single-sided entry form appears.
Single-sided entry form
In Customer/Vendor field, choose customer/vendor for which a subsidiary account should be created
In fields: Account DR/Account CR, select general/subsidiary account for which a customer’s subsidiary account has to be created. Newly created accounts are displayed in green.
Save the account
Automatic creation of a subsidiary account of directory type through an opening balance
From the level of Accounting → Opening Balance, add an OB document with the use of the [Add] button placed in the List button group. An opening balance form appears.
Click on [Add Through Form] button placed in Items group of buttons. An opening balance form appears.
Opening balance item form
In field Account, select general/subsidiary account a subsidiary account should be created for and check parameter Create account
In Customer/Vendor field, choose customer/vendor for which a subsidiary account should be created
Upon completing the mandatory fields and clicking [Save], a message informing that the account was created automatically will be displayed. Newly created accounts are displayed in green.
Manual creation of a general account of directory type
Hint
To be able to create a general directory account for a single Customer/Vendor, Item, Employee, Warehouse, Institution, Bank, VAT rate and Fixed Asset, parameter Add general directory accounts must be checked in the system configuration
From the level of Accounting → Chart of Accounts, select the [Add Account On The Same Level] button in the List button group
In the opened account form, fill in the mandatory fields and check the parameter Directory Account
Select type of directory account which should be created. Available values: Customers/Vendors, Items, Employees, Warehouses, Institutions, Banks, VAT Rates, Fixed Assets
After clicking [Customers/Vendors] button (button name depends on directory selected on the subsidiary account), select specific customer/vendor
Save the account
Automatic creation of a subsidiary account of directory type when saving an object, e.g. customer form
On the chart of accounts, mark general directory account for which a subsidiary account should be created (e.g. subsidiary directory account for customers/vendors)
From the level of Configuration → Accounting → Directory Accounts, in tab Account Types select specific directory account type and assign number of subsidiary account created in the chart of accounts to the predefined value displayed on the list (e.g., for Account Type:Customer/Vendor, for option Customer). If Autocreation parameter is checked, subsidiary account will be automatically created when saving a form related with a given directory (e.g., a customer form).
Add a new form related with a given directory (e.g., a customer form). If this is a vendor form, then the system suggests subsidiary account number in tab Accounting of its form
Upon selecting the [Save] button for a given form, the subsidiary account for a single customer/vendor appears in the chart of accounts, if parameter Create account was checked. Checking/unchecking of the parameter Create account transfers the user to directory account type definition form.
Hint
The account is added only in an accounting period of the company in which the user is currently logged-in. In order to add a subsidiary directory account in other company, it is necessary to log in to that company and create and account from the level of a given directory, e.g. Customer/Vendor.
The name of the selected customer/vendor will be displayed in the account number field, if in directory account configuration the option of creating customer/vendor accounts by code is selected. If the option of creating customer/vendor accounts by ID is selected, in the number the customer/vendor ID in the database is displayed.
Note
Subsidiary accounts related with directory item are created if in Account Type (Configuration → Accounting → Directory Accounts) a directory account has been selected. If a regular account has been selected in Account Type, subsidiary accounts are not created automatically from the level of a specific directory item. In this case, on a directory item the system suggests an account uploaded from specific type of directory account.
Automatic creation of a subsidiary account of directory type when posting with a posting scheme.
Creation of a subsidiary account of directory type associated with a given Customer/Vendor (Item, Employee, Warehouse, Institution, Bank, VAT Rate, Fixed Asset) with the use of a posting scheme − detailed description can be found in article <<Adding posting scheme>>
Automatic creation of a sub-subsidiary account to a directory account from the level of a cash-bank transaction
In Configuration → Accounting check the parameter Currency accounts added as sub-subsidiary accounts
Add a general directory account for customers/vendors in the chart of accounts
In Configuration → Accounting → Directory Accounts, in Account Types tab, assign the created general account to, for instance, Customer and check the parameter Autocreation
Create a subsidiary directory account for a selected customer/vendor
Add a cash-bank transaction in EUR. In field Account the system will suggest appropriate currency account. Upon checking the parameter Create account and clicking [Save], the suggested account is created in the chart of accounts
Upon creating in the chart of accounts an account 201-COMARCH-EUR and then adding a cash-bank transaction for COMARCH in system currency, account 201-COMARCH-USD is suggested in field Account.
Note
If there is account, e.g. 201-COMARCH-EUR created in the chart of accounts, it is not possible to post to 201-COMARCH account.
Automatic creation of a subsidiary currency account from the level of a cash-bank transaction
In Configuration → Accounting, the parameter Currency accounts added as sub-subsidiary accounts must be unchecked
Add a general directory account for customers/vendors in the chart of accounts
In Configuration → Accounting → Directory Accounts, in Account Types tab, assign the created general account to, for instance, Customer, and check parameter Autocreation
Create a subsidiary directory account for a selected customer/vendor
Add a cash-bank transaction in EUR. In field Account the system will suggest appropriate currency account. Upon checking the parameter Create account and clicking [Save], the account is created.
Upon creating in the chart of accounts the account 202-COMARCH_EUR and then adding a cash-bank transaction for COMARCH in the system currency, account 201-COMARCH is suggested in field Account.
Adding accounts
Adding accounts
Note
Adding accounts in French and Spanish version of the system has been described in article <<Chart of accounts in French and Spanish version>>.
The possibility of reading, modifying and deleting accounts depends on granting given operator group appropriate permissions to object General Account/Subsidiary Account (Configuration → Company Structure → Operator Groups → edition of a given operator group → tab Objects).
To add an account, from the level of Accounting → Chart of Accounts, it is necessary to select the button [Add Account On The Same Level] or, when adding a subsidiary account [Add Account On Lower Level]. A form with fields to be filled in is opened.
The form of an account is composed of the following elements:
Tab General
Tab General on account form
Number − field used to insert a unique account number. The maximum value of this field is 50 (along with “-” characters). Mandatory field. In the case of a subsidiary account, first part of the number is completed automatically by the system on the basis of the parent account and the second part is completed by a used.
Note
The system disables entering character “-“ in account number (it is added automatically by the system to numbers of subsidiary accounts). It is also recommended to avoid entering special characters: *, ?, ‘, % and spaces.
Name − mandatory field. It is possbile to define account name in different languages available in the system (Configuration → Generic Directories →General → Languages). When adding an account, its name has to be completed in the system language version in which the user is currently logged in. Account name is always displayed in the language in which the logs in to the system. If the account name has not been defined in the logged-in language, it is displayed in the system language (database language).
Account Type − parameter defining account type. Available values: Assets, Liabilities, Assets Liabilities, Costs, Revenuses, Costs Revenues, Off Balance-Sheet The list of account types depends on language version.
Balance Control − parameter used to specify whether the account must be subject to balance control. It means that the system will be checking whether the account balance is registered on the right side. In case of discrepancy, the user will receive an appropriate message.
Currency − allows for selecting account currency. The currency can be changed until the fists subsidiary account or single-sided entry is added to a given account. By default, it is system currency of a company within which an account is being added.
Example
In the system, there is an account in the system currency. For such general account, it is possible to create a subsidiary account both in the system currency and in other currencies.
Note
It is not possible to add accounts on a lower level to currency accounts.
Dictionary Account − after selecting this parameter, it is possible to determine the directory of the account (available values: Customers/Vendors, Items, Employees, Warehouses, Institutions, Banks, VAT Rates, fixed assets). If parameter Add general directory accounts is unchecked in the system configuration, the user can associate the account with particular entity on the level of its subsidiary account. If the parameter is checked, it is only possible to associate the account with particular entity on the level of general account.
Range of numbers from [] to [] − fields available for generic directory account when the numeration is created basing on rage of numbers. Detailed information regarding the functionality can be found in article <<Directory accounts>>.
Clearing Account − if the parameter is checked, the account becomes a clearing account. In case of a subsidiary account, the clearing type is marked the same way as on a general account and it is not editable. In case of a generic account, the parameter is not editable, if a subsidiary account has been added to it or the account has been already used in the system.
Active − unchecking the parameter deactivates the account and makes it impossible to add journal entries to it.
Note
If general account contains subsidiary account(s), the system does not allow the change of:
General account number
General account’s currency
Parameter Clearing Account
Parameter Directory Account
Tab Additional
Tab Additional on account form
Transfer the opening balance − parameter specifying whether the ending balance should be transferred into a new accounting period as the <<opening balance>>.
Create an account in the next period − parameter specifying whether an account along with all of its assigned accounts should be transferred to the new accounting period.
Account number to be transferred − account number which will be given to the account upon transferring the chart of accounts to subsequent accounting period.
Account No. in the Next Period – allows for associating accounts at the end of accounting periods. If a subsequent accounting period is not defined in the system, the field is not editable.
Description – in this field it is possible to enter additional notes to the added account
Numeration Scheme − numeration scheme assigned to a given account. Detailed description of the functionality can be found in article Account numeration.
Note
Numeration schemes can be determined only on a general account level. Subsidiary accounts inherit the numeration scheme from the parent account, without possibility to change it.
Tab Associated Accounts
This tab contains a list of all the accounts associated with a given account within particular accounting periods. It is particularly important in case of transferring of the chart of accounts and <<opening balance>> into the following accounting period. Association of accounts is also important in case of making clearings at the end of one accounting period and beginning of another.
Tab Analytical Description
In the system, it is possible to add an analytical description at a journal entry level, which later can be transferred to a journal entry or an accounting note. Detailed description of the functionality can be found in article <<Analytical description on accounting documents>>.
Tabs Attributes and Change History
Detailed description of tabs can be found in article <<Tab Discount Codes, Analytical Description, Attributes, Attachments and Change History>>.
Tab Availability
This tab allows for differentiating the access to individual accounts. Managing of availability takes place at general account level – subsidiary accounts inherit these settings without possibility to change them.
It is possible to specify owner of an account as well as centers in which it will be available.
Restrictions concerning availability of individual account:
Chart of accounts and trial balance is limited to accounts available in a current center
<<Trial balance>> displays only the data of accounts available in a current center
It is not possible to preview an accounting document if it includes a posting to an account which is not available in a current center; the rule applies to the following documents:
List of journal entries on account displays only those posting operations which are registered on available accounts
It is not possible to generate an unposted entry and post through a scheme containing an item with account not available in a current center
Account numeration
The system allows for defining structure of account number (number of characters) and attach the defined numeration schemes to particular general accounts.
Account numeration schemes are closely connected with an accounting period and chart of accounts defined in it. In each accounting period it is possible to define different account numeration schemes. Moreover, when transferring/updating the chart of accounts, numeration schemes are copied from previous accounting period.
The list of account numeration schemes is available in menu Configuration → Accounting → Account Numeration.
List of account numeration schemes
The list of account numeration schemes is composed of section Account Numeration Schemes, which presents a list of defined numeration schemes and Example of Account Numeration, which presents the preview of the structure of a selected numeration scheme.
To add a new numeration scheme, it is necessary to select [Add] button. A form of a new numeration will appear, where it is possible to determine number of characters on each level of account and select general accounts to which a given scheme will apply.
Account numeration scheme form
The form is composed of the following elements:
Name − field used to enter a name of a given numeration
Active − parameter used to uncheck the activity of a numeration scheme. When deactivating a numeration scheme with accounts assigned to it, a user decides whether the associations with book accounts should be deleted as well. An inactive numeration scheme will not be displayed on the list of numeration schemes selected from the level of a book account form.
Levels – table used to enter levels of accounts, composed of the following columns:
Level − the system automatically enters numbers of levels. For general account it will be digit 1, for subsidiary account – successive numbers.
Number of Characters – number of characters possible to define on individual levels of an account. The value of the column can be from 1 to 50.
Limit − available options:
Up to this number of characters − after selecting a given value, it will be possible on a given account level to add exactly as many characters as it was selected in the field with number of characters
Up to this number of characters − after selecting a given value, it will be possible on a given account level to add exactly as many characters as it was selected in the field with number of characters (neither more nor less).
Note
In number of a currency account, currency symbol and separator “-“, used for distinguishing sub-subsidiary currency accounts, are not included in the number of characters.
Number of characters specified in a numeration scheme is superior to number of characters specified in configuration of directory accounts.
Accounts − table used to indicate accounts for which a given numeration scheme should be valid.
A numeration scheme can be assigned to an <<account>> also from the level of the account form, in tab Additional. Deleting an account from a chart of accounts results in its automatic deletion from the numeration scheme form.
Numeration scheme on account form
Note
A numeration scheme assigned to a general account is automatically assigned to its subsidiary accounts.
A numeration scheme to which accounts have been assigned can be modified, but cannot be deleted. Modification of numeration scheme can be performed, if from the level of System → Configuration → Accounting, for the option Account numeration control, option Don’t control or Warn has been selected.
Numeration scheme of a given account can be modified at any moment. A new scheme applies to newly added accounts. Numeration of already existing accounts is not verified, the system only displays an information regarding inconsistency between an account number and newly selected numeration scheme, but it is possible to assign such scheme regardless of setting of account numeration control.
The functionality of numeration schemes allows for defining the form of the control of the correctness of an account number. When adding or modifying an account whose number does not fulfill conditions defined in numeration scheme assigned to it, the system displays an appropriate message depending on selected value of the parameter Account numeration control (System → Configuration → Accounting → section Chart of Accounts).
The control of the correctness of an account number is carried out when:
adding an account from different levels (e.g. from the level of a journal entry, opening balance, accounting note)
editing an account
Note
When editing an account whose number does not fulfill conditions specified in numeration scheme assigned to it and in the system configuration, in the parameter Account numeration control, value Block is checked, the system displays an appropriate message and allows for saving such an account.
Chart of accounts
Chart of accounts − general information
Chart of accounts is a set of all posting accounts used in a given entity, associations between them and operations which can be executed on them.
Characteristics of a chart of accounts:
it is separate for each center of Company type
each account’s number can be alphanumeric
it is possible to create any number of charts of accounts
documents can be posted on a general account only if such an account does not have any subsidiary accounts
a subsidiary account can have sub-subsidiary accounts
posting can be performed only on an account at the lowest level
accounts can be kept in different currencies
The chart of accounts is available from the level of Accounting, upon clicking on [Chart of Accounts] button.
A chart of accounts can be displayed as:
Tree – hierarchical structure
List – flat structure
Chart of accounts displayed in the form of a tree
The list contains standard buttons which have been described in article <<Standard buttons>> and, additionally:
[Add Account On The Same Level] − allows for adding an account on the same level as selected account
[Add Account On Lower Level] − allows for adding an account which is subordinate to selected account. The button is inactive, if posting has been initiated on selected account or that account is a currency account.
[Edit Account] − allows for displaying account parameters
[Delete Account] − allows for deleting an account A book account can be deleted if it has not yet been used in the system, e.g. on a single-sided entry, accounting note, cash/bank transaction (as a contra account).
[Collapse All] − in case of a tree structure, it allows for reducing chart of accounts to general accounts
[Expand All] − in case of a tree structure, it allows for expanding a chart of accounts to a form including both general and subsidiary accounts
[Trial Balance] − allows for calculating <<trial balance>> for selected account
[Clearings] − allows for displaying the list of clearings for selected account. The list of clearings can be displayed only for an account at the lowest level.
[Chart of Accounts Wizard] − allows for generating a model chart of accounts. The button is available until the first book account is added.
[Export] and [Import] − allow for exporting and importing a chart of accounts
[Update Chart of Accounts] − allows for updating chart of accounts basing on the previous accounting period. The system transfers only those accounts, which have parameter Create an account in the next period checked and do not exist in the current period. When updating a chart of accounts, <<account numbering schemes>> are transferred as well. The system updates associations on account form in accordance with the definition of numbering schemes.
Filtering chart of accounts
The following fields are visible in the chart of accounts window:
Enter the searched account number…, Enter the searched account name… – enables quick searching for accounts by entering its number or name. Then, the system automatically highlights the searched account on the chart of accounts.
Only Active − allows for reducing the chart to accounts marked as Active
Current Accounting Period − shows the current accounting period for which the chart of accounts is displayed. It cannot by edited.
Detailed description of functioning of the filters can be found in category <<Searching and filtering data>>>
Additional filtering options on chart of accounts:
Accounts − allows for displaying or hiding accounts (checked parameter Excluding) containing the phrase entered in the field.
Hint
A sequence of characters entered in the Accounts field is considered by the system as an entire expression and not as particular digits or letters.
Example
If nothing is selected in fields From Account and To Account and the sequence “5*” is entered in the accounts option – accounts of the group 5 will be displayed
If account number 401 is selected in the field From Account and 550 is selected in field To Account, and the number “01” is entered in the accounts option− the accounts of the group 4 and 5 with “01” sequence in their number will be displayed.
If account number 401 is selected in the field From Account and 550 is selected in the field To Account, and the number “1” is entered in the account options – an empty list will be displayed, there are no accounts fulfilling such criterion.
Level – allows for defining level by which accounts should be filtered. Available values: All (list without limits), 1 (accounts from level1), 2 (accounts from level 1 and 2) etc. Only directory accounts, The lowest level.
Type − allows for filtering of accounts by their type. Available values: All, Balance sheet and Nominal, Balance sheet, Nominal, Off-balance, Clearing.
Range of accounts – the user may strictly specify a range of accounts that must be displayed
Include directory accounts – if checked, the system includes analytical directory accounts while filtering. If unchecked, the system will not include the directory accounts. Upon unchecking of the parameter, the system displays only directory accounts (subsidiary directory accounts are not displayed).
Note
Upon checking parameter Include directory accounts and selecting option The lowest level in Level field, there are general directory accounts displayed in the chart of accounts along with their subsidiary accounts associated with specific directory value, e.g. a specific customer/vendor.
Trial balance for selected account
To calculate trial balance for selected account, it is necessary to select it on the list and click on the button [Trial Balance] placed in Statements group of buttons. A window of trial balance for selected account is opened.
Window of trial balance for selected account
Calculation can be performed for selected accounting period, partial period, specific time interval, account currency. Calculation can include unconfirmed journal entries (checked parameter Include buffer).
To recalculate the statement, it is necessary to click on [Recalculate] button.
Generating standard chart of accounts
With the use of the option of chart of accounts generation, it is possible to create a standard chart of accounts for a company.
Chart of accounts wizard form
When generating a chart of accounts, it is necessary to define parameters which affect the chart of accounts.
Ownership Form
Type of Business
Cost Registration
Import and export of chart of accounts
The system allows from importing a chart of accounts from an XML or XLS file. The file containing chart of accounts can be used for creating accounts in different accounting periods.
[Alert]The system blocks the possibility of importing the chart of accounts if the chart of accounts already exists in the system and posting of journal entries on those accounts is in progress.
The system does not import already existing accounts and their child accounts. It displays the message “Failed to import some of the accounts because they already exist on the chart of accounts.”[/alert]
The chart of accounts will be imported only if it contains a valid data. If the import fails (e.g., account currency is not registered in the system), it is notified in the import log and the account is omitted.
In the system, it is also possible to export a chart of accounts to any XML or XLS file. The exported file is not connected with any accounting period.
Adding accounting note
Accounting note is used for registration of documents other than <<VAT documents>> (VAT purchase invoices and VAT sales invoices). These documents can be the following: regular bills from VAT exempt persons, documents connected with paying for business trips. Accounting notes can also be used for entering of journal entries regarding different types of posting operations performed during an accounting period, e.g. transferring of prime cost at the end of month, paying VAT etc.
The main application of accounting notes comes down to the registration of all (non-VAT) documents which are connected with a business entity and which should be posted on the entity’s clearing account and then paid.
Hint
When saving an accounting note, the system checks whether the value of the Dr side is equal to the value of the Cr side, but only within balance-sheet accounts. If the two sides are different, the system displays a warning “The document does not balance. Unbalanced amount: […]. Are you sure you want to save the document?”.
A note, which is unbalanced within balance sheet accounts, cannot be posted.
To add an accounting note, it is necessary to click on button [Add], which is available from the level of menu Accounting → Accounting Notes. A form with data to complete is opened.
The accounting note form is composed of the following elements:
Side panel
Number – entered automatically by the system according to numerator definition
Dr Balance Amount – information field, it presents a total of items registered on a debit side of balance-sheet accounts
Cr Balance amount – information field, it presents a total of items registered on a credit side of balance-sheet accounts
Difference – information field, it presents a difference between a total amount of items registered on debit side of balance-sheet accounts and a total amount of items registered on credit side of balance-sheet accounts
Document Number – number entered by a user for the purpose of additional identification of an accounting note. After changing a document number in journal entry header, the system asks whether to update the document number on the accounting note’s items.
Posting Date – date on which an accounting note will be posted
Date of Transaction – transaction creation date
Date of Issue
Ledger – ledger in which an accounting note will be posted. A ledger defined as a default ledger on accounting period form, is suggested.
Owner – by default, it is the center to which the user registering an accounting note is logged-in
Description – section containing an additional description of a document. It will be copied to single-sided entry after posting the accounting note.
Tab Items
In this tab, it is possible to add, edit, copy, delete accounting note items as well as export them to a spreadsheet.
The system allows for adding accounting notes entries in two ways:
directly in table
through form
Adding accounting note item in table
To add an item in table, it is necessary to click on [Add] button placed in Single-Sided Entry group of buttons. A row in which it is possible to enter data, appears in the table. A user must fill in the following columns: Account DR, Account CR, Amount, Date of Transaction, and optionally VAT Rate, Description, and Customer. Among columns hidden by default, there are: Amount in Currency and Currency. When adding a subsequent item, amount presented in the Amount field is calculated as a differential value so that a document balanced within balance-sheet accounts.
Adding accounting note item through form
To add an item to an accounting note through form, it is necessary to click on [Add Through Form] button.
Adding accounting note item through form
The tab General of accounting note item is composed of the following items:
Items → General
The tab General of accounting note item is composed of the following elements:
Section General
No. – field filled in by system automatically. It cannot by edited.
Document Number – number entered by a user for the purpose of a better identification of an accounting note. By default, the number is copied from the side panel of an accounting note.
Customer/Vendor – allows for selecting a customer/vendor associated with a given accounting note.
Section Account
Account DR – mandatory field. Debit side of an account.
Account CR – mandatory field. Credit side of an account.
Entity – field displayed upon selecting a dictionary account associated with an entity. An entity associated with a given dictionary account is displayed in this field.
Section Amount
Amount – mandatory field. Single-sided entry value. When adding a subsequent single-sided entry, amount presented in the Amount field is calculated as a differential value so that a document balanced within balance-sheet accounts.
Amount in currency – field available only for single-sided entries entered to account in a currency different than the system currency.
Section Currencies
Section available only for those single-sided entries which are registered on account in a currency different than the system currency. It allows for selecting an exchange rate according to which a journal entry is to be recalculated. In case of a single-sided entry created as a result of posting of a document, the section is not editable.
Section Dates
Date of Transaction – the actual date of transaction, that is, the day on which a purchase or sales transaction was made
Date of Issue – date of issue of a document on the basis of which the posting is made
Section Other
Description – field for providing additional information regarding accounting note item
VAT Rate – allows for the selection of VAT rate included in VAT rate group assigned to a company
Items → Attributes
Detailed description of the tab Attributes can be found in article <<Attributes>>
Tab Payments
Payments for an accounting note document are created automatically, provided that the account selected on an accounting note item is a clearing and dictionary account associated with the entity (customer, employee, institution, bank). Additionally, the system allows for automatic creation of an appropriate analytical account upon selecting a dictionary general account and indicating an entity.
From the level of this tab, it is possible to edit and clear a given payment. Payment from an accounting note document is subject to the same rights as payments generated for trade documents.
Tab Analytical Description
Detailed description of the functionality can be found in article <<Analytical description on accounting documents>>.
Tabs Attributes, Attachments, Change History
Detailed description of tabs can be found in article <<Tab Discount Codes, Analytical Description, Attributes, Attachments and Change History>>.
List of accounting notes
The list of accounting notes is used for registration of documents other than <<VAT documents>> (VAT purchase invoices and VAT sales invoices). These documents can be the following: regular bills from VAT exempt persons, documents connected with paying for business trips.
It is available from the level of Accounting, upon clicking on [Accounting Notes] button.
List of accounting notes
The list contains standard buttons which have been described in article <<Standard buttons>> and, additionally:
[Import] − allows for importing accounting notes from files with .xls or .xlsx extension
[Export] − allows for exporting selected accounting notes to a file with .xls or .xlsx extension
The list of accounting notes is composed of the following columns:
Number
Document Number
Posting Date
Amount Dr
Amount Cr
Description
Currency (hidden by default)
Owner (hidden by default)
Filtering areas available on the list:
Section Accounting Period
Section allowing for filtering accounting notes by accounting period in which an accounting note has been registered. If an accounting period is divided into partial periods, it is possible to check the parameter Partial period and select an appropriate period from the list.
Section Posting date
Section allowing for filtering accounting notes by the following periods: Day, Month, Year, Range of Dates, Previous Month and Current Month. The range of dates allows for selecting a specific time interval. In case of an accounting period in which the current date is included, the value Current Month is set in the filter. For other periods it is Range of Dates with dates of the beginning and of the end of accounting period on the basis of its form.
Section General
Section allowing for filtering accounting notes by:
Status − the following values are available in this field: All, Unconfirmed, Confirmed and Reversed
Ledger – allows for indicating a ledger from the list of ledgers assigned to a given accounting period Accounting notes registered in an indicated ledger will be displayed on the list.
Detailed description of functioning of the filters can be found in category <<Searching and filtering data>>>
Journal entries: Account Filter
The list Account Filter allows for previewing all journal entries, including opening balance single-sided entries, entries for a specific account or range of accounts.
The list of journal entries on accounts is available from the level of Accounting → Account Filter.
Journal Entries list: Account Filter
Hint
In a multi-company structure, in case of journal entries on which a ledger or an account has been indicated, which is not available for a given user, the following rules apply:
If a journal entry is registered in a ledger a user does not have access to – the entry is not displayed
If a journal entry includes posting to account a user does not have access to – the entry is displayed, but it is neither possible to edit nor delete it
The list contains the <<standard buttons>> and, additionally:
[Check Cost Allocations] – used for reporting discrepancies between journal entries. The button is available, if in menu Configuration → Accounting, in section General Parameters, the parameter Control cost allocation is checked. Detailed description of the functionality is available in category <<Cost allocation control>>.
[Batch Changes] – used for adding/deleting attributes on single-sided entries in a single batch. The button is active only if an operator belongs to a group with granted permission Batch changes to single-sided entries, available in Other Permissions tab. Selecting the button opens a window with batch change parameters where it is necessary to check one of the following options: Add attribute, Delete attribute and select appropriate attributes.
Window of batch change to attributes
The list of journal entries on accounts is composed of the following columns:
Number in General Ledger
Number in Ledger − column available depending on the setting of the parameter Numeration only in ledger available on accounting period form
Document Number
Posting Date
Account
Side − side of a posting account
Contra Account − number of posting account used on the opposite side of an entry in the case of double-sided entries
Amount Dr
Amount Cr
Description – single-sided entry description
VAT Rate
Amount in Currency
Currency
and columns hidden by default:
Number
System Document Number
Status
VAT% − percentage value of a VAT rate assigned to a single-sided entry
Owner
Detailed description of functioning of the filters can be found in category <<Searching and filtering data>>>. Additionally, the following filters are available on the list:
Section Accounting Period
This section allows for selecting an accounting period for which journal entries should be displayed. If an accounting period is divided into partial periods, the list of journal entries can be reduced to indicated partial period.
Section Posting date
This section allows for filtering journal entries by periods: Day, Month, Year, Range of Dates, Previous Month and Current Month. After selecting option Day, Month or Year, it is necessary to insert specific values in appropriate fields. The range of dates allows for selecting a specific time interval.
Section General
This section allows for filtering journal entries by:
Document Status − filtering by statuses of journal entries: All, Unconfirmed, Confirmed and Reversed
Ledger − filtering journal entries by ledgers in which they are registered. Next to the option Ledger, there is a dropdown list containing all ledgers defined in a current accounting period.
Account Type − filtering journal entries by the type of account on which a journal entry is registered
Status − in case in the filter Account Type, the option Clearing is selected, it is possible to filter journal entries by status:
All − displays all single-sided entries regardless of their status
Uncleared − displays uncleared single-sided entries, regardless of the side – uncleared on one side at least
Uncleared DR, Uncleared CR
Cleared − displays cleared single-sided entries, regardless of the side – cleared on one side at least
Cleared DR, Cleared CR
Not Subject To Clearing
From Account and To Account − allows for defining the range of accounts for which journal entries will be displayed. After clicking on the button [From Account] or [To Account] a list of chart account appears, where it is possible to select an appropriate account.
Accounts − allows for displaying accounts whose number contains a specified string of characters. Checking the option Excluding results in hiding on the list those entries which have an account with a specified string of characters.
Section Amount
This section allows for filtering journal entries by the following options:
Currency − filters the list by the currency in which a single-sided entry is registered
Amount From and Amount To − allows for setting a range of amounts which should be included in displayed journal entries
Section Single-sided entry conditions
This section allows for filtering entries by the following options:
Analytical Description – detailed description can be found in article <<Filtering journal entries…>>
Attributes – allows for filtering journal entries by attributes on single-sided entries. Selecting button [Attributes] opens Attribute conditions window, where it is possible to define a filter which includes single-sided entries with specified attribute values.
Attribute conditions window
Detailed description of functioning of the filters can be found in category <<Searching and filtering data>>>.
Deleting a journal entry
Deleting a journal entry
Journal entries can be deleted:
From the level of the list of journal entries in a ledger (Accounting → Ledger)
From the level of the source document
Deleting journal entry from the level of a ledger
In order to delete a journal entry from the level of the list of journal entries (Accounting → Ledger) it is necessary to select a journal entry and click on the button [Delete], placed in List group of buttons.
Only unconfirmed journal entries, that is journal entries which are not placed in posting buffer, can be deleted without leaving a trace. If a journal entry has already been confirmed, using the option [Delete] results in generating a contra entry (correcting entry or reversing entry). Confirming of a contra single-sided entry unposts the document from which a corrected single-sided entry originates.
By default, <<contra entry type>> is set to correcting entry.
In databases created in French, correcting entry is unavailable as such entry is against the French law.
In case of generating a contra entry to a journal entry, which has been registered on a clearing account and cleared with another journal entry, <<clearings>> are deleted not until the correcting entry has been confirmed. Upon its confirmation, the original associations are removed and the correcting entry is then automatically cleared with the journal entry being corrected.
When deleting a journal entry which single-sided entry has already been cleared, the clearing is deleted along with the journal entry. A user may decide whether to keep <<payments>> of source documents by selecting appropriate option in the displayed message window: “Removing the journal entry number {0} will remove the clearing at the same time. Would you like to keep the payments of the source documents?”. Moreover, when deleting several journal entries at the same time, it is possible to check the option Apply for all.
Deleting journal entry directly in document
Hint
The possibility of deleting journal entries from the level of a document depends on the permission Deletion of journal entries from document (Configuration → Company Structure → Operator Group → Other Permissions) which is granted to a given operator group. The permission is unchecked by default.
To remove a journal entry from the level of a document, a user has to right-click on a posted document and select the option [Delete Journal Entry].
Deleting journal entry from the level of a document
Journal entries are deleted from a document level in the same way as they are deleted from the level of a ledger. The difference is that deleting journal entries from the level of a document does not generate a contra entry.
Only unconfirmed journal entries can be deleted directly in a document. A contra entry to a confirmed journal entry can be generated from the level of a ledger.
Adding a journal entry
Adding a journal entry
Journal entries can be created in three ways:
By posting a source document − e.g. with the use of a posting scheme or through a contra entry, if such option is available for a given document. The result of posting operation is generation of a journal entry (journal entry document). Detailed description of the functionality can be found in article <<Posting documents>>.
By manual addition of a journal entry in ledger − a user enters an entry into the list of journal entries and defines its parameters manually
Automatically − journal entries are generated by the system, e.g., correcting single-sided entry (when deleting a confirming journal entry), compensating single-sided entry (it assigns single-sided journal entries entered onto two different clearing accounts)
To add a journal entry manually, it is necessary to select button [Add], placed in the List group of buttons, which is available from the level of Accounting → Ledger. A form of a journal entry is opened.
Journal entry form
The form is composed of the following elements:
Side panel
Document Status − displayed after a document is saved. Depending on the document status, it takes one of the following values: Unconfirmed, Confirmed or Reversed
Number – generated automatically by the system according to settings of a document numerator
Dr Balance Amount – information field, it presents a total of items registered on a debit side of balance-sheet accounts
Cr Balance amount – information field, it presents a total of items registered on a credit side of balance-sheet accounts
Difference – information field, it presents a difference between a total amount of items registered on debit side of balance-sheet accounts and a total amount of items registered on credit side of balance-sheet accounts
Number in General Ledger – successive number of a journal entry in the general ledger. This number is entered automatically and it cannot be edited. Confirmed entries receive respectively the following numbers: 1,2,3. Draft documents receive prefix defined in the system configuration and the successive number. If parameter Numeration only in ledger has been checked in the accounting period definition, it is possible to select particular ledger within the number During a manual addition of a journal entry the field is, by default, filled in with the ledger symbol defined in field Default ledger on accounting period form.
Number in Ledger − successive number of a journal entry within a ledger. This field is available if the parameter Numeration only in ledger available in the accounting period definition, is unchecked. After expanding the list, all ledgers defined in a current accounting period are displayed. During a manual addition of a journal entry the field is, by default, filled in with the ledger symbol defined in field Default ledger on accounting period form. The second part of the field, the part after slash (/), is the ordinal number that is entered automatically by the system.
Document Number – number entered by a user. In case a journal entry was generated as a result of posting a document, this is the reference number of the document from which the journal entry originates and if a reference number is missing – it is a system number of a given document. After changing a document number in journal entry header, the system asks whether to update the document number on the journal entry’s items.
Posting Date – document date of registration in the books
Note
The system does not allow saving a journal entry which date is earlier than the date of the last document posted in the general ledger.
Date of Transaction – actual date of business event (date of sale in an invoice can be different than the date of issue indicated in invoice). In case of entry resulting from posting of a document, transaction date is set according to the date of sale/purchase selected in the posted document or the date of transaction in case of posted CD/CW.
Date of Issue − journal entry date of issue. The date is set on the basis of the date resulting from posted document or the document date in case of posted CD/CW.
Type of Proof – value in this field informs about a document on the basis of which a journal entry was generated. When registering a journal entry manually from the level of general ledger, a value JE – Journal Entry is set by default. Values of a predefined generic directory Type of Proof are the following:
Invoice
Warehouse document
JE
Bank Statement
Cash Report
Exchange Rate Difference
Debit Collection Document
Compensation
Periodical Report from Receipt Printer
Account Closing
Technical Reposting
A user can add own values from the level of Configuration → Generic Dictionaries → General → Type of Proof.
Owner − company structure center to which a user adding a journal entry is assigned. It is possible to change the entry owner to other center of a given company.
Description − section with description of a JE document. In a journal entry generated as a result of posting of a document, value presented in this field is the value selected in the header of the posting scheme with which the document was posted. In a journal entry generated as a result of posting a cash-bank transaction through a contra account, value presented in the field Description is the number of the posted cash-bank transaction.
Single-sided Entries tab
The system allows for adding single-sided entries in two ways:
directly in table
through form
Adding a single-sided entry in table
To add an item in table, it is necessary to click on [Add] button placed in Single-Sided Entry group of buttons. A row for entering data appears in the table. A user must fill in the following columns: Account DR, Account CR, Amount, Date of Transaction, and optionally VAT Rate, Description, and Customer. There are also hidden columns available: Amount in Currency, VAT %, Currency. When adding a subsequent single-sided entry, amount presented in the Amount field is calculated as a differential value so that a document balanced within balance-sheet accounts.
Journal entry form with an item added in table
Adding a single-sided entry through form
To add an item to cost allocation in table, it is necessary to click on [Add Through Form] button placed in Items group of buttons. A single-sided entry form appears.
Single-sided entry form
Single-sided Entries → General
The tab General of a single-sided entry form is composed of the following elements:
Section General
No. − field filled in by system automatically. It cannot by edited.
Posting Scheme − scheme, by means of which a document has been posted. This field is visible if a single-sided entry was created as a result of posting of a source document.
Document Number − reference number of a document from which a single-sided entry derives and if such number is missing – system number of the given document. It can be also entered manually.
Customer/Vendor − allows for selecting a customer/vendor associated with a given single-sided entry.
Section Accounts
Account DR − mandatory field. Debit side of an account.
Account CR − mandatory field. Credit side of an account.
Entity − field displayed upon selecting a dictionary account associated with an entity. The entity associated with a given dictionary account is displayed in this field.
Section Amount
Amount − mandatory field. Single-sided entry value. When adding a subsequent single-sided entry, amount presented in the Amount field is calculated as a differential value so that a document balanced within balance-sheet accounts.
Amount in Currency − field available only for single-sided entries registered on account in a currency different than the system currency.
Section Currencies
Section available only for those single-sided entries which are registered on account in a currency different than the system currency. It allows for selecting an exchange rate according to which a journal entry should be recalculated. In case a single-sided entry was created as a result of posting of a document, the section is not editable.
Section Dates
Date of Transaction – in case of single-sided entry resulting from posting of a document, transaction date is set according to the date of sale/purchase selected in the posted document or the date of transaction in case of posted <<CD/CW>>.
Date of Issue – in case of single-sided entry resulting from posting of a document, date of issued is set on the basis of the date of issue of the posted document or the document date in case of posted <<CD/CW>>.
Section Other
Description − in case of a single-sided entry generated as a result of posting a document, description in this field is copied from the element of a posting scheme through which a given document was posted. In the case of a journal entry generated as a result of a posted cash/bank transaction, description in this field is copied from the field For of a cash/bank transaction.
VAT Rate – allows for the selection of VAT rate included in VAT rate group assigned to a company to which a user is logged-in. In the case of journal entries created as a result of posting documents with a posting scheme, the system sets a relevant value posting the amount of VAT, depending on the setting of the parameter Save VAT rate which is available on posting scheme item. Detailed description can be found in article <<Adding posting scheme>>.
Section Clearings
Section available only for those single-sided entries which are added to a clearing account. It defines the status of a single-sided entries: Subject to clearing/Not subject to clearing
Note
If in the system configuration, in section Cash/bank transaction, the parameter Copy “Payment” parameter setting to single-sided entry is checked, when posting a transaction/cash-bank report not subject to clearing, in the section Clearings of the single-sided entry with clearing account, the status Not subject to clearing is set.
If the parameter is unchecked, regardless of whether a posted transaction/report is subject to clearing or not, a single-sided entry created after posting is subject to
Note
Changing payment status (Subject/Not subject to clearing) from the level of payment list, results in automatic change of single-sided entry status (Subject/Not subject to clearing).
Single-sided Entries → Clearings DR and Single-sided Entries → Clearings CR
Edition of single-sided entry/Tab Clearings CR
The tab is available, if a clearing account has been used in a single-sided entry. The name of the tab depends on the side of single-sided entry in which the clearing account was used.
The tab Clearings of a single-sided entry contains a table with information regarding a single-sided entry which clears the given single-sided entry.
The tab is composed of the following fields:
Due Date − set depending of the source of a single-sided entry:
For single-sided entries associated with a payment (created after posting a payment) − on the basis of the field Due Date of document payment
For single sided entries associated with a cash/bank transaction − on the basis of the field Document Date on the cash/bank transaction
For single-sided entries added manually − on the basis of the date of posting of the journal entry
For single-sided entries created after posting an exchange rate difference document − on the basis of the date of issue of the document
Remaining − amount remaining to be cleared
Presentation Currency − Takes one of the following values:
System currency − in columns Amount, Remaining DR, Amount Remaining CR amounts presented are expressed in the system currency. It regards both single sided-entries in system currency and in a foreign currency. The column Currency contains the symbol of the system currency.
Account currency − in columns: Amount, Remaining DR, Amount Remaining CR amounts presented are expressed in the account currency, that is in the single-sided entry’s account. It regards both single sided-entries in system currency and in a foreign currency. The column Currency contains the symbol of the single sided entry’s currency.
System and account currency − in columns Amount, Amount Remaining DR, Amount Remaining CR amounts presented are expressed in the account’s currency. The column Currency contains the symbol of the currency of a journal entry. Additionally, the following columns are presented: Currency [], Amount Remaining DR [], Amount Remaining CR [], where in [], the symbol of the system currency is presented. The value of the parameter is used for currency accounts only.
Single-sided Entries → Attributes
Detailed description can be found in article <<Attributes>>
Tab Analytical Description
The system allows for entering analytical description on the level of a journal entry. Detailed description of the functionality can be found in article <<Analytical description on accounting documents>>.
Tabs Attributes, Attachments, Change History
Detailed description of tabs can be found in article <<Tab Discount Codes, Analytical Description, Attributes, Attachments and Change History>>.
Saving/confirming journal entry
After completing all mandatory fields, it is necessary to save a document by clicking on one of the buttons:
[Save as Unconfirmed] − a document saved as unconfirmed is not binding. It can be freely edited and deleted.
[Save and Confirm] − permanent saving. Upon a journal entry is confirmed, it becomes binding, then it can be neither edited, nor deleted (it is only possible to preview the data included in such entry). It is also possible to generate a correcting or reversing entry to it. Upon doing so, the entry will still be visible on the list of journal entries in the ledger. The reversing document is displayed in red. Contra entry of journal entry can be also confirmed or saved as unconfirmed.
Hint
When transferring journal entries from ledger to General Ledger (that is when confirming the journal entries), values in the Number in General Ledger and in the Number in Ledger fields are automatically renumbered. In the case of journal entries which are already in the General Ledger, neither number changes.
Note
When saving/confirming a journal entry, the system controls the balancing of journal entries only within balance-sheet accounts.
Example
102 – off-balance sheet account
Journal entry only to an off-balance sheet account.
Dr Side
Cr Side
Amount
102-off-balance-sheet
1000
The control of balancing is not verified. The system allows for the registration of a one-sided journal entry.
Example
101 – balance sheet account
102 – off-balance sheet account
Journal entry only to an off-balance and a balance sheet account.
Dr Side
Cr Side
Amount
102-off-balance sheet
101-balance sheet
1000
The system blocks registration of the journal entry because total amounts on Dr side of the off-balance sheet accounts does not equal to 0 and on Cr side it is 1000.
Example
100 – balance sheet account
101 – balance sheet account
102 – off-balance sheet account
Journal entry only to an off-balance and a balance sheet account.
Dr Side
Cr Side
Amount
100-balance sheet
101-balance sheet
1000
102-off-balance sheet
5000
The journal entry can be registered because total amounts on Dr and Cr sides of the balance sheet accounts equals to 1000. The balance of journal entry registered on off-balance sheet account is not verified.
Numbering of journal entries
Numbering of journal entries
Before adding the first journal entry in a given accounting period, it is possible to specify the method of numbering journal entries numeration from the level of accounting period form (Configuration → Accounting → Accounting Periods).
Methods of numbering of journal entries:
Complete numeration of journal entries
Numeration only in ledger
Complete numeration of journal entries
When the parameter Numeration only in ledger, on accounting period form, is unchecked, journal entries have double numeration: Number in Ledger and Number in General Ledger
Additionally, with the use of the parameter Ledger Numeration it is possible to specify whether the numeration should be performed within an accounting period or within a month
Selection of monthly numeration results in adding new segments to a number in the general ledger and in ledger:
Calendar year
Month
Example
Situation 1:
Unchecked parameter Numeration only in ledger
Parameter Ledger Numeration set to – In accounting period
Number in general ledger, e.g.: B 1:
B – is the prefix from configuration of unconfirmed journal entries
1 – subsequent number in a given accounting period
Number in ledger, e.g.: B Sales/1:
B – is the prefix from configuration of unconfirmed journal entries
Sales – ledger symbol
1 – subsequent number in a ledger in a given accounting period
Situation 2:
Unchecked parameter Numeration only in ledger
Parameter Ledger Numeration set to – Monthly
Number in general ledger, e.g.: B/2018/01/1, where:
B – is the prefix from configuration of unconfirmed journal entries
2018 – calendar year
01 – month
1 – subsequent number in a ledger in the calendar year in a specific month
Number in ledger, e.g.: B Sales/2018/01/1, where:
B – is the prefix from configuration of unconfirmed journal entries
Sales – ledger symbol
2018 – calendar year
01 – month
1 – subsequent number in a ledger in the calendar year in a specific month
[/example]
Numbering of ledger (general ledger) and ledgers within a month provides possibility of entering journal entries in a given month even if confirming of entries in following months has already started.
Example
Unchecked parameter Numeration only in ledger
Parameter Ledger Numeration set to – Monthly
Journal entries in ledgers:
January
Status
Number in General Ledger
Number in Ledger
Posting Date
Confirmed
2018/01/01
SALES/2018/01/1
01/01/2018
Confirmed
2018/01/02
PURCHASE/2018/01/1
01/01/2018
Confirmed
2018/01/03
PURCHASE/2018/01/2
01/02/2018
Confirmed
2018/01/04
SALES/2018/01/2
01/13/2018
Unconfirmed
B 2018/01/5
B SALES/2018/01/3
01/14/2018
Unconfirmed
B 2018/01/6
B SALES/2018/01/4
01/15/2018
February
Status
Number in General Ledger
Number in Partial Ledger
Posting Date
Confirmed
2018/02/01
SALES/2018/02/01
02/01/2018
Confirmed
2018/02/02
PURCHASE/2018/02/01
02/01/2018
Confirmed
2018/02/03
PURCHASE/2018/02/2
02/02/2018
Confirmed
2018/02/04
SALES/2018/02/02
02/13/2018
Unconfirmed
B 2018/02/05
B SALES/2018/02/03
02/14/2018
Unconfirmed
B 2018/02/06
B SALES/2018/02/04
02/15/2018
If the user attempts to add an unconfirmed or confirmed journal entry with date 1.10.2018 to the ledger SALES, the following message is displayed: “This document contains single-sided entries with dates earlier than the recently confirmed journal entry document. Cannot save”. If the user tries to add a journal entry with posting date 1.20.2018 – it will be possible to add it.
Numeration only in ledger
If option Numeration only in ledger is checked in the accounting period definition, then added journal entries receive only one number: Number in Ledger. It allows for closing journal entries within particular ledgers.
Additionally, with the use of the parameter Ledger Numeration it is possible to specify whether the numeration should be performed within an accounting period or within a month.
Selection of monthly numeration results in adding new segments to a number in the general ledger and in ledger:
Calendar year
Month
Example
Situation 1:
Checked parameter Numeration only in ledger
Parameter Ledger Numeration set to – In accounting period
Number of a journal entries looks as follows, e.g.: B Sales/1, where
B – is the prefix from configuration of unconfirmed journal entries
Sales – ledger symbol
Number in Ledger – successive number of a journal entry within a given accounting period
Situation 2:
Checked parameter Numeration only in ledger
Parameter Ledger Numeration set to – Monthly
Number of a journal entries looks as follows, e.g.: B Sales/2018/01/1, where:
B – is the prefix from configuration of unconfirmed journal entries
Sales – ledger symbol
2018 – calendar year
01 – month
1 – subsequent number in a ledger in the calendar year in a specific month
In case of numeration only in ledger, the mechanism of controlling if a journal entry being saved as unconfirmed or confirmed has its posting date earlier than the last confirmed journal entry. The control regards the dates of journal entries within numeration in the ledger.
Additionally, in case of monthly numeration, correctness of posting dates within a month is also controlled.
[Example]
Checked parameter Numeration only in ledger
Parameter Ledger Numeration set to – In accounting period
Journal entries in ledgers:
Status
Number in General Ledger
Posting Date
Confirmed
SALES/1
01/01/2018
Confirmed
SALES/2
01/20/2018
Unconfirmed
B PURCHASE/1
01/25/2018
Confirmed
SALES/3
02/01/2018
Unconfirmed
B PURCHASE/3
02/10/2018
Unconfirmed
B SALES/4
02/15/2018
Unconfirmed
B PURCHASE/4
03/01/2018
After confirming the ledger SALES only, it is possible to add an unconfirmed journal entry to it until the end of January or a confirmed journal entry to the ledger PURCHASE with any date. The blockade applies only to the ledger SALES.
After confirming ledgers SALES and PURCHASE, until the end of January it is not possible to add journal entries to either of these ledgers with the date earlier than the last journal entry confirmed in those ledgers. [/example]
Example
Checked parameter Numeration only in ledger
Parameter Ledger Numeration set to – Monthly
Journal entries in ledgers:
Status
Number in General Ledger
Posting Date
Confirmed
SALES/2018/01/01
01/01/2018
Confirmed
SALES/2018/01/02
01/20/2019
Unconfirmed
B PURCHASE/2018/01/01
01/25/2018
Confirmed
SALES/2018/02/01
02/01/2018
Unconfirmed
B PURCHASE/2018/02/02
02/10/2018
Confirmed
SALES/2018/02/02
02/15/2018
Unconfirmed
B PURCHASE/2018/03/01
03/01/2018
After confirming the ledger SALES, until the end of February it is possible to add an unconfirmed journal entry or a confirmed journal entry to the ledger PURCHASE with any date. It is also possible to add a journal entry to the ledger SALES with date 01.31.2018 or 02.28.2018. Posting of journal entries with other January of February dates will be blocked.
After confirming ledgers SALES and PURCHASE, until the end of January it is possible to post journal entries with date 01.31.2018 to both ledgers. Posting with other January dates will be blocked.
Journal entires: Ledger
According to the Polish Accounting law, each event which occurred in a reporting period must be registered in accounting books of that period in from of a journal entry.
A journal entry is understood as an entry made on the basis of accounting record.
Each journal entry should include:
Business transaction date
Specified type and number of accounting record being the basis of the entry as well as the date of entry if it is different from the transaction date
Intelligible text, short description or code of transaction description
Amount and date of entry
Specified accounts to which it refers
The list of journal entries in ledgers is available from the level of Accounting, upon clicking [Ledger].
List of journal entries
The list contains <<standard buttons>> and, additionally:
[Delete] – used for deleting an unconfirmed journal entry or for generating a contra entry to a confirmed journal entry
[Confirm] – used for confirming unconfirmed journal entries and for moving them to the general ledger A user has a possibility of confirming journal entries in a single butch, but first it is necessary to sort them by posting date. Before confirming a journal entry, the system displays a question which requires confirmation of the operation. The system does not allow to confirm a journal entry, if there are journal entries with earlier date.
[Renumber] – used for getting a correct numeration of journal entries in case gaps in numeration occur, e.g. as a result of deleting an unconfirmed document
[Source Document] – used for displaying a preview of a document from which a journal entry was created
[Close Ledger] – used for collective closing of ledgers. The button is available, if on the accounting period form, the parameter Ledger closing is checked. Detailed description of the functionality can be found in article Closing ledgers.
[Check Cost Allocations] – used for reporting non conformances of journal entries. The button is available, if in menu Configuration → Accounting, in section General Parameters, the parameter Control cost allocation is checked. Detailed description of cost allocation control can be found in category Cost allocation control.
In the window of journal entries in a ledger, there is Current Accounting Period field (field cannot be edited). The status of accounting period is provided in brackets – Closed or Open
If the current accounting period or partial period is closed, the field JE Closing Date contains the date of closing (initial or final). It determines the possibility of performing operations on journal entires by operators not entitled to close accounting periods.
If a company uses the functionality of closing ledgers and, in the filter, a user indicates a particular ledger, additional fields appear on the list: Ledger Closing Date, Ledger Preliminary Closing Date, which inform until when entering and modification of entries is blocked.
Detailed description of the functionality of closing accounting periods/partial periods/ledgers can be found in articles Closing accounting period and Closing ledgers.
Journal entries in a ledger, which are not confirmed, are displayed in green and their number contains a prefix defined in system configuration (System → Configuration → Accounting → parameter Prefix of unconfirmed document symbol in section General Parameters). By default, it is letter B. Confirmed journal entries are displayed in black. They cannot be modified or deleted; it is only possible to generate contra entries for them. Reversed entries and confirmed contra entries are displayed in red.
The list of journal entries is composed of the following columns:
Number in General Ledger
Number in Ledger – column available if on the form of a ledger, the parameter Numbering only in ledger is unchecked.
Document Number – reference number of a document and if such number is missing – system number of the given document.
Posting date
Description
Amount Dr
Amount Cr
Entry – Takes one of the following values:
Scheme – journal entry created as a result of a document posting
Manual – journal entry added manually
Automatic – journal entry generated automatically, e.g. contra entry or compensating single–sided entry.
Import – journal entry imported to the system
Modification (e.g. Scheme/Modification) – additional tagging after modification of a journal entry
and columns hidden by default:
JE Number
Document System Number – number from the field Document number of a journal entry
Status
Currency – system currency of a company
Owner – owner of a journal entry
Filtering areas available on the list:
Section Accounting Period
This section allows for selecting an accounting period for which journal entries should be displayed. If an accounting period is divided into partial periods, it is possible to check the parameter Partial period and select an appropriate period from the list.
Section Posting date
This section allows for filtering journal entries by periods: Day, Month, Year, Range of Dates, Previous Month and Current Month. The range of dates allows for selecting a specific time interval.
Section General
This section allows for filtering journal entries by:
Status – the following values are available in this field: All, Unconfirmed, Confirmed and Reversed
Ledger – allows for indicating a ledger from the list of ledgers assigned to a given accounting period
Note
Opening balance documents create single–sided entries which are registered in a special predefined journal symbolized with *OB* and named Opening Balance. These single–sided entries are not included on the list of journal entries available from the level of Accounting → Ledger.
Detailed description of functioning of the filters can be found in category <<Searching and filtering data>>>
Hint
The following rule applies for journal entries on which a ledger or an account not available for a given user is indicated.
If a journal entry is registered in a ledger a user does not have access to – the entry is not displayed
If a journal entry includes posting to account a user does not have access to – the entry is displayed, but it is neither possible to edit nor delete it
Functioning of cost allocation control
Methods of controlling cost allocations
during work on a current basis – the system checks active cost allocations which in parameter Control cost allocation while posting have option Warn or Block set. When attempting to save a posting document, it is verified whether it fulfills conditions specified in cost allocation definition. If it fulfills the conditions – it will be added. If not – the system displays a warning or message informing about error, depending on set type of control. The control on a current basis includes all defined cost allocations – journal entry is considered correct if it fulfills all the defined cost allocations. The control on a current basis includes all defined cost allocations – regardless of the way in which they were created, that is whether they were entered by a user or created automatically by the system. The control is performed also during confirmation of journal entries.
on request – a user can check whether conditions of cost allocations are fulfilled, by clicking on [Check Cost Allocations] button. The control is available for documents:
journal entry
accounting note
opening balance
unposted entry view
A document fulfills a cos allocation if the following totals are equal:
total of journal entries registered on accounts defined as source accounts
total of journal entries registered on accounts defined as target accounts
total of journal entries registered on accounts defined as settlement accounts
In case a settlement account is not specified, then correctness of the totals below is controlled:
total of journal entries registered on accounts defined as source accounts
total of journal entries registered on accounts defined as target accounts
Example
1. A cost allocation [4 and 5] has been defined as follows:
Account
Account Type
Account Side
4*
Source
Any
5*
Target
Any
490
Settlement
Any
2. The following journal entry was registered:
Account
Account Side
Amount
100
CR
5000 USD
410
DR
4000 USD
420
DR
1000 USD
501/490
DR/CR
3000 USD
502/490
DR/CR
1000 USD
total of entries on source accounts: 5000 USD
total of entries on target accounts: 4000,00 PLN
total of entries on settlement account: 4000,00 PLN
The cost allocation [4 and 5] is not fulfilled, because the above totals do not equal.
Note
Posting in a single batch – in case the control of cost allocation is defined in the cost allocation definition with warning and generation of entries which do not fulfill a cost allocation, no message is displayed during posting and the system posts documents. Information about documents not fulfilling the conditions of cost allocation is registered in the posting–dedicated log.
Reporting of discrepancies among journal entries
Apart from using the option of checking cost allocations, which is available on the form of accounting documents, it is also possible to control selected journal entries in a single batch.
The option of reporting in a single batch is available from the level of the lists Accounting –> Ledger and Accounting > Account. After selecting the option [Check Cost Allocation], a window with the following parameters is opened:
Correctness condition for journal entry – this parameter can take the following values:
Fulfill all cost allocations – journal entry is considered correct if it meets all the cost allocations
Fulfill at least one cost allocation – journal entry is considered correct if it meets at least one cost allocation
Show only entries which do not fulfill cost allocations – if selected, the list of journal entries displayed after being controlled in reference to cost allocations is filtered only to entries which do not fulfill cost allocation(s)
Cost allocations – the parameter takes one of the following values:
All – correctness of entries with all the cost allocations is controlled
Selected cost allocation – correctness of entries with a selected cost allocation is controlled
Display in Log – the parameter takes one of the following values:
Only invalid entries
All entries
Note
In case:
an accounting document is confirmed (confirmed journal entry, confirmed opening balance, confirmed accounting note),
an accounting document is modified in such a way that it is possible to save the document,
it results from the cost allocation definition, that saving of accounting document should be blocked,
instead of blocked saving, a warning is displayed.
On the list of journal entries, there is a printout Journal Entries – Cost Allocations Control available. This printout presents the journal entries which do not fulfill the conditions of cost allocation.
Defining cost allocation
The functionality of cost allocation control allows for verifying whether journal entries fulfil the conditions as regards their allocation by type and function. It can also be used to control other associated posting operations. The program can verify cost allocation automatically on a current basis during posting or manually on a recurring basis.
The cost allocation control functionality is available, if in System → Configuration → Accounting, the parameter Control cost allocation is checked.
List of cost allocations
The list of cost allocations is available from the level of menu Configuration → Accounting, under [Cost Allocations] button.
The list contains standard buttons and, additionally:
[Import] − allows for uploading definition from a file
[Export] − allows for exporting selected definitions to a file
[Update] − allows for updating definition of allocation based on the data from a previous accounting period. Only new cost allocations with symbols which do not exist in a given accounting period are added.
Permissions of operator groups to read, add, modify and delete cost allocations depend on granting them appropriate permissions to the object Cost Allocation (Configuration → Company Structure → Operator Groups → edition of a given operator group → Tab Objects → Accounting area). Definitions of cost allocations are associated with particular accounting period.
Defining cost allocation
To add a new cost allocation, it is necessary to select [Add] button. A form of cost allocation definition is opened.
Cost allocation form
The form is composed of the following elements:
Symbol − mandatory field, the system controls its uniqueness within an accounting period
Active − parameter for determining activity status of cost allocation. Only active cost allocations can be used.
Name − name of cost allocation
Settlement account − account taking part in settlement, optional field
Account Side − side of settlement account, this field is activated upon completing the settlement account field. The following options are available:
Any − default value, control regards those journal entries, which are registered on both account sides (turnover on Debit side is retrieved with a minus sign and turnover on Credit side is retrieved with plus sign)
DR − only journal entries registered on Debit side are registered
CR − only journal entries registered on Credit side are included
Note
DR and CR options can be renamed if default values of the parameters Abbreviated name for debit and Abbreviated name for credit have been modified in System → Configuration → Accounting.
Control allocation while posting − parameter receives one of the following values:
Don’t control − default value, the system does not verify conditions specified in cost allocation definition
Warn − the system displays a warning if the conditions are not fulfilled
Block − the system blocks posting in case the conditions are not fulfilled
Description − field for providing additional description
Tab Items
In the system, it is possible to add cost allocation items in two ways: directly in the table or through form.
Adding cost allocation items in table
To add an item to cost allocation in table, it is necessary to click on [Add] button placed in Items group of buttons. A row in which it is possible to enter data, appears in the table. A user must fill in the following columns: ….
Adding cost allocation items through form
To add an item to cost allocation in table, it is necessary to click on [Add Through Form] button placed in Items group of buttons.
Form of cost allocation item
The form is composed of the following elements:
Source Account − account on which a journal entry will be registered
Source account side – posting side onto source account, parameter available after completing the field Source Account. Available options:
Any − default value (turnover on Debit side is retrieved with a plus sign and turnover on Credit side is retrieved with minus sign)
DR − only journal entries registered on Debit side are registered
CR − only journal entries registered on Credit side are included
Target account side − posting side onto target account, available options are:
Any − default value (turnover on Debit side is retrieved with a plus sign and turnover on Credit side is retrieved with minus sign)
DR − only journal entries registered on Debit side are registered
CR − only journal entries registered on Credit side are included
In fields: Source account, Target account, it is possible to enter particular numbers of book accounts or use an account format. Available types of account formats:
? − Any character
* − Any string of characters
[] − Character included in string
[-] − Character included in range
[^] − character not included in string
[^-] − character not included in range
(|) − or
Tabs Attributes, Attachments, Change History
Detailed description of tabs can be found in articles: <LINK>
Closing accounting peirod
The system allows for closing an entire accounting periods and for closing journal entries for a particular day. First of all, the functionality allows for fulfilling requirements foreseen in Polish accounting law, that is making possible for an accounting system to close an accounting period at any day – to ensure the credibility of maintained account books, the entries should be registered in a durable way, without possibility to change them. Additionally, the functionality if closing a month for a day blocks the possibility of deleting journal entries with date earlier than the closing date.
Note
Closing partial period of one company does not cause closing partial periods with the same time intervals of another company.
In business practice, the permission to close accounting periods and journal entries for a given day is granted e.g. to the financial director or the main accountant only. In the system, there is a possibility of granting permissions to close journal entries to particular operator groups. Additionally, the system allows for an initial closing of an accounting periods, where only a person permitted to close periods is able to add, delete and modify journal entries. However, the final closing of an accounting period blocks such a possibility for all operators.
The permission to close accounting periods can be assigned to an operator group from the level Configuration → Company Structure → Other Permissions → Closing of accounting period.
An operator with the above-mentioned parameter checked, can close:
accounting periods
partial accounting periods
If for a given operator group the parameter Closing of accounting period with status Initially Closed is:
checked − users can add, modify, delete, move to the general ledger, renumber the journal entries and generate contra entries
unchecked − adding, modifying and deleting journal entries is blocked for a given operator group. However, operators can still move to the general ledger and generate contra entries with posting date the same as the closing date.
If a user has permissions granted and the closing status of all partial periods is different than Closed, renumbering of journal entries is available. If at least one partial period has Closed status, then renumbering of journal entries is not available.
In a closed period, all operators, regardless of permissions to close periods, do not have the possibility of adding, modifying, deleting, moving to general ledgers, generating contra entries and renumbering of journal entries.
Form of partial accounting period for an operator with permission to close partial periods granted
Closing Date − this field is inactive and takes on the value of the latest closing of journal entries within a given partial accounting period, that is, it cannot be earlier or later than the date of opening and closing of the partial accounting period.
Status − the following values are available in this field:
Open
Initially Closed
Closed
Selecting the checkbox [Close Until] sets the default status Initially closed automatically and makes it possible to select only status Closed.
Note
Rules of changing status of accounting period:
Change of status is possible only after selecting [Close Until] option
Selection of the status and saving it is definitive and irreversible form the level of the program
It is not possible to change the status from Closed to Initially Closed or Open
It is not possible to change the status form Initially Closed to Open, in such case it is only possible to select status Closed.
If a user has closed entries until a given day and he is attempting to close the entries until the prior day when reediting, it will not result in change of the closing date. The entries will be closed in accordance with the date of the latest closing.
Note
Checking or changing the value in the checkbox [Close Until] followed by clicking [Save] results in displaying the message: “Closing of journal entries until {closing date} is an irreversible operation. Are you sure?”.
In case if entries in earlier partial accounting periods have not been closed yet, the following question will be also displayed: “Journal entries in earlier partial accounting periods will be closed. Do you want to continue?” Clicking Yes results in setting the closing date in all the earlier partial accounting periods as the closing date of a given partial accounting period.
Note
It is not possible to delete a partial accounting period which was closed.
Defining accounting period
Defining accounting period
Accounting period is a period for which financial statements are made in mode provided by legal rules. It can be calendar year or another period used for tax purposes. Accounting period or its changes are defined by status or agreement on which basis a unit was created. If unit had started its activity in the second half of defined accounting period, then financial statement and the books for this period can be connected with financial statement and the books of the next year.
In multi-company structures, each company has its own accounting period along with partial periods. Each accounting period has its own chart of accounts, its own set of ledgers and general ledger. As in the case of other accounting objects, an accounting period added to a center of Company type is inherited by all its child centers.
The list of accounting periods is available in the Configuration → Accounting, under button [Accounting Periods].
List of accounting periods
Methods of adding accounting period:
by clicking on [Add Accounting Period] button available directly in the table. A user must fill in field Symbol Fields Opening/Closing dates are filled in automatically with the possibility of changing them. An accounting period does not have to last 12 moths, so it does not have to coincide with calendar year. It can last longer than 12 months and can be shorter than 1 month if such need occurs. In Polish and French language version of the system, accounting period is 23 months maximum.
by clicking on [Add Through Form] button – after selecting this option, the form of a new accounting period is opened
Accounting period form
The form is composed of the following elements:
Section Basic
Symbol − mandatory field, allowing for entering up to 50 characters (letters or digits), used for identifying each period. It must be unique within a given company.
Note
It is not possible to add several accounting periods with the same symbol within a given company.
Opening Date − date of beginning of accounting period. The date cane be entered manually or
selected from a built-in calendar which is expanded by clicking on the arrow. This date is presented in the column From on the list of accounting periods.
Period (in months) – field used for defining length of accounting period exact to month, e.g. when Opening Date is set to 2019-01-01 and Period (in months) to 6 months, then in Closing Date field automatically will appear date 2019-06-30 which cannot be changed. The maximum number of months that can be entered is specified in the parameter <<Maximum length of accounting period – number of months>> which is available from the level of System → Configuration → Accounting → section Accounting Period. In Polish and French versions of the application it is 23 months, whereas in Spanish version it is 12 months and those values are not changeable. The minimum length of an accounting period is 1 month. The number of months can be entered manually or with the use of arrows up – down.
Closing Date − allows for entering precise date of closing of an accounting period. It is used in situations when user wants to enter an accounting period which does not las for a full number of months, but, e.g., for 2 months and 2 days. The date can be entered manually or selected from a built-in calendar. This date is presented in the column To on the list of accounting periods. When adding an accounting period, the system automatically sets Period (in months) to active, whereas Closing Date field cannot be edited. A user can activate them by selecting option Closing Date.
Closed − this parameter is presented only if a user has granted <<permission to close accounting periods>>. Checking it means that an accounting period is already closed. No ledgers or accounting operations can be added to it, it cannot be modified. An accounting period is not closed automatically after exceeding the closing date. It should be closed by a user.
Detailed description of closing accounting period can be found in article <<CLOSING ACCOUNTING PERIOD>>.
Section Ledgers
Note
Parameters concerning the numeration of ledgers are available only if a given accounting period has no journal entries.
Numeration Only in Ledger – the user abandons the number within the general ledger and the numeration is made only in the ledger. Thanks to that, it is possible to confirm journal entries in particular ledgers. Detailed description can be found in article <<Numeration of journal entries??>>.
Ledger closing − this parameter is available only if the parameter Numeration Only in Ledger is activated. Detailed description can be found in article Closing ledgers.
Ledger Numeration − journal entries can be numbered annually or monthly. Detailed description can be found in article <<Numeration of journal entries>>. Monthly type of numbering allows for entering journal entries in a closed month, if confirmation of entries in subsequent month has been already started. Selecting monthly type of numbering results in adding two new segments:
Calendar Year − it is necessary due to the unusual accounting period and the necessity of retaining the uniqueness of numbers. Otherwise, it may come to duplication of the same numbers in the same month of the following calendar year.
Month
Default Ledger − ledger selected by a user as default. When adding first accounting period, a predefined ledger is set as default. A user can change it after defining ledgers in the system. A ledger indicated as default is set, by default, when adding an accounting note, manual journal entry or an accounting scheme.
Section Compensating single-sided entries
Ledger − posting ledger in which compensating single-sided entries are registered
Posting Date − date with which the single-sided entry was registered in the books. Dates available for selection: Date of the later single-sided entry or System date
Description − allows for entering an additional description Description is presented in the list of accounting periods.
Current accounting period
After defining parameters on accounting period form, it is possible to save it by clicking on [Save] button placed in Period group of buttons and, at the same time, set is as current accounting period.
If a user saves newly added accounting period and does not indicate it as a current accounting period, he/she can do it later. To do so, it is necessary to select the proper period from the list of accounting periods and select button [Set As Current]. A period set as current is displayed as bold element on the list of accounting periods. In the system, only one current period can be set for a given company and it cannot be a closed accounting period.
Note
To set an accounting period as current, it is necessary to close all other tabs. Otherwise, the system displays appropriate message and allows user to close the tabs.
An accounting period is set as current for a given operator. It means that each operator can have different accounting period set as current.
Note
A user can also set current accounting period from the level of System −> Accounting Periods. In such case, accounting period is set as current only for the current session.
Updating accounting objects
When saving an accounting period, the system asks whether a user wants to transfer the chart of accounts, account, numbering schemes, cost allocations, ledgers and accounting schemes from the previous accounting period.
A user can also transfer the above-mentioned objects later, from the previous accounting period, by selecting the buttons listed below from the section Update placed on the list of accounting periods or from the level of the list of particular objects.
Chart of Accounts − chart of accounts, definitions of cost allocations and numbering schemes are transferred from the previous accounting period
Ledgers − ledgers are transferred from the previous accounting period
Ledgers − ledgers are transferred from the previous accounting period. If in a newly added accounting period, there is already a scheme with the same type and symbol as in the previous accounting period, it is not transferred.
Posting schemes − posting schemes are transferred from the previous accounting period. If in a newly added accounting period, there is already a scheme with the same type and symbol as in the previous accounting period, it is not transferred.
Partial accounting period
The system allows for dividing an accounting period into partial periods by means of the following options:
[Divide Into Months] −this button automatically divides selected accounting period into partial periods. Periods created as a result of the division are listed chronologically (month by month). On the list of accounting periods, next to the symbol of divided period, a marker appears, which an be used for expanding and collapsing the list of partial periods.
[Divide Into Quarters] − this button automatically divides selected accounting period into quarters, that is into three-month periods.
Example
Division of an accounting period which lasts e.g. from 01/01/2018 to 6/20/2018:
Division into monthly partial accounting periods
The system divides the period into six partial accounting periods, five of which will last for one month each one and the sixth period will last for twenty days.
Accounting period divided into months
Division into quarterly partial accounting periods
The system divides the period into two quarters, one of which will last for three months and the second one will last for two months and twenty days.
Accounting period divided into quarters
An accounting period can be added also manually, with the use of the following buttons:
[Add in Table] (adding accounting period directly on the list)
[Add Through Form] − these options allow for adding manually any partial period. After selecting an accounting period and clicking on [Add Through Form] button, a form of a partial accounting period opens.
Form of partial accounting period
The form of a partial accounting period is composed of the following elements:
Symbol − mandatory field, allowing for entering up to 50 characters (letters or digits), used for identifying each partial period, e.g. name abbreviation. It mus have a unique value. Symbol is visible only upon expanding the list of partial periods within a given accounting period.
[Alert]It is not possible to add several partial periods with the same symbol within a given company. [/alert]
Opening Date − allows for entering date of opening of a partial period, that is the date of the beginning of the validity of partial period. The date is visible only upon expanding the list of partial periods within a given accounting period.
Closing Date − allows for entering date of closing of a partial period, that is the date of the end of the validity of partial period. The date is visible only upon expanding the list of partial periods within a given accounting period.
The dates can be entered manually or selected from a built-in calendar. Dates of validity of partial periods cannot exceed dates of validity of accounting period. The system blocks inserting invalid dates. Date of opening and date of closing of partial periods can “overlap”.
Description − allows for entering an additional description Description is visible on the list of partial periods in a given accounting period.
Defining ledgers
Ledgers register chronologically (day after day) events occurred in a given reporting period, according to the order of accounting operations entries. The scope of such a dataset is a continuous
and reliable reflection of correctness and integrity of accounting operations reported in ledgers in a given accounting period.
The system allows for maintaining several ledgers within the same accounting period which register, for example, operations of the same type, e.g. ledger SALES containing journal entries referring to sales only. Each ledger has its own independent numeration.
Journal entries can be entered to a ledger manually or automatically as a result of posting documents or adding opening balance (entries with *OB* symbol in the predefined ledger).
All ledgers of a given accounting period compose a general ledger which contains all journal entries.
In order to define a ledger, from the level of Configuration → Accounting → Accounting Periods, it is necessary to check appropriate accounting period and select button [Add] from the button group Ledgers.
On the right side of the table, in the table Ledgers, a row appears, where it is necessary to enter a unique ledger name and symbol and select button [Save].
List of ledgers
The availability of ledgers in centers of a given company can be set from the level of Configuration → Company Structure → Objects Availability. Detailed description of handling of ledgers can be found in article <<Objects availability – objects>>.
Closing ledgers
Journal entries can be closed:
For the entire accounting period
For a partial accounting period to a specified day
Within particular ledgers
The functionality of closing ledgers becomes available upon selecting the parameter Numeration only in ledger. It is strictly connected with an accounting period.
The parameter Ledger closing is presented in an accounting period form, if an operator has the permission of closing trading periods granted (Configuration → Company Structure → Operator Groups → Other Permissions → Closing of accounting period). If at least one of ledgers is closed, it is not possible to uncheck the parameter.
Paramerter allowing for closing accounting ledgers in the definition of accounting period.
Ledgers can be closed from two levels:
Configuration → Accounting Periods→ Accounting Periods → ledger edition
Closing general ledger from the level of a ledger
Example
Status Initially Closed is set for a ledger to 02-28-2019 (ledger initially closed on 2018-28-02). When attempting to change that status to Accepted on 2019-15-01, the system blocks the operation.
Status Initially Closed is set for a ledger to 02-28-2019 (ledger initially closed on 2019-28-02). When attempting to change that status to Initially Closed on 2018-31-05, the status is changed.
Status Initially Closed is set for a ledger to 02-28-2018 (ledger initially closed on 2018-28-02). When attempting to change that status to Closed on 2018-31-03, the status is changed.
Accounting → Ledger → Close Ledger
If the parameter Ledger closing is checked, the option [Close Ledger] becomes active in the main menu of the list of journal entries.
List of journal entries with active button [Close Ledger]If the option <All> is selected for Ledgers in the filter panel, then the option [Close Ledger] allows for closing all the ledgers. If some of the ledgers cannot be closed (because they contain unconfirmed journal entries), the system will close only those ledgers which can be closed and will display the information about those which could not have been closed. A ledger which was closed cannot be deleted.
Example
If at least one ledger with status Initially Closed is closed until a given day and the operation of closing all the ledgers until the previous day is attempted on the reedited form of the ledger, the system will block that operation. The status Initially Closed can be changed to a later day than the date of the recent ledger closing or to a later day than the date of the recent initial closing of at least one of the ledgers.
If at least one ledger with status Closed is closed until a given day and the operation of closing all the ledgers until the previous day is attempted on the reedited form of the ledger, the system will block that operation. The status Initially Closed can be changed to Closed with a later date than the date of the recent ledger closing.
Closing journal entries in general ledger can result with status:
Initially Closed – allows the users with permissions to close accounting periods (?) to add, delete, modify and renumber journal entries within initially closed ledgers. Operator without appropriate permission granted are only able to renumber journal entries and transfer them to the general ledger, as well as make contra entries for them with the same date as the closing date.
Closed – this status is tantamount to the definitive closing of entries in a given ledger. All operators, regardless of their permissions to close accounting period, have blocked the possibility of adding, modifying, deleting, transferring to general ledger, making contra entries and renumbering of journal entries.
Checking the parameter Ledger closing automatically sets the default status Initially closed, with the possibility of changing to Closed status only.
Note
If a general ledger has already been closed, it is not possible to return to the status Open
Closing of an accounting period or of a partial period is superior to closing ledgers. If in a given accounting period, a user selects parameter Closing ledgers, thefunction acts as a definitive closing of all accounting ledgers until the day of closing of the partial period (status Closed of all ledgers). Closing of an accounting period closes all ledgers to the last day of the accounting period.
If there is a ledger which was closed with a date later than the date of closing of the partial period, the closing date will not be set to an earlier date. In such case closing date is not updated.
If parameter Combine trading periods with accounting periods is checked (System → Configuration → Trade), then to be able to close the ledgers, an operator must be granted the permissions to closing of trading periods (Configuration → Company Structure → Operator Groups →Other Permissions → Closing of accounting periods).
Numeration of documents in the accounting period
Principles of numbering documents in accounting module:
When adding a new document, option AUTO is displayed in the numerator, in segment Number.
Upon saving a document or saving it automatically (e.g. upon going to tab Payments in case of VAT invoices), the system assigns a specific number to the document. This is the first free number according to date used in the numerator of a specific document type (VAT documents – registration date, accounting note and journal entry – date of issue).
It is possible to use a free number by selecting it manually in the numerator, in field with number, but appropriate permissions to use free numbers must be granted to a given customer (Configuration → Company Structure → Operator Groups → Other Permissions: Using of free document number).
Note
Upon selecting a free number in the document numerator, it is necessary to save the document, otherwise, appropriate message is displayed.
In case of closing the entire system, the selected document number is saved automatically.
When editing a document, upon changing the document date or item, e.g. VAT account which directly affects the document number, the system automatically suggests a first free number for the given document date. It is possible to change it, if there are several free numbers available for the given date. A new system number is saved automatically and the previous one is released (it can be used in another document). A user cannot close a document without saving it. If attempted, the following message is displayed: “Unable to close the document. The document must be saved.”
It is possible to change document number until the document is confirmed.
Configuration of paramerters in the Accounting area
Configuration of paramerters in the Accounting area
Main accounting parameters can be defined from the level of System → Configuration → Accounting. Accounting parameters set in the system configuration refer to the entire company structure.
Parameters related to the accounting area are divided into the following sections:
General Parameters
Abbreviated name for debit − allows for defining the name of account’s debit side.
Abbreviated name for credit − allows for defining the name of account’s credit side.
Prefix of unconfirmed document symbol − allows for defining a letter which will appear by the name of an unconfirmed document.
Indicate accounts in journal entry as
Appropriate − entries can be added both with and without a contra account
Single-sided − entries can be added only on one account side
Double-sided − entries can be added only on both account sides
Negative single-sided entries − after selecting the parameter, the system allows for entering negative single-sided entries in journal entry. It is recommended to uncheck the parameter for companies active on the territory of the United States.
Reversing entry − when the parameter is checked, when deleting a confirmed journal entry, the system generates single-sided entries amounting to a positive value on opposite sides of a corrected entry. If the parameter is unchecked, the system operates on principle of correcting entry, which means that the system generates correcting single-sided entries amounting to a negative value on the same side of a corrected entry.
Collective posting − the parameter is available for French and Spanish version of the system. If the parameter is checked, when performing a collective posting, one common journal entry is generated.
VAT accounts numerations − parameter determining the way ordinal numbers are assigned to documents in VAT accounts (No.). Possible period numeration options are: yearly and monthly.
Posting scheme symbol for discrepancy − the parameter is available for French and English version of the system. It is used for specifying a posting scheme for discrepancy presented on bank reconciliation form by entering a symbol of previously defined scheme.
Posting scheme symbol for bank service charges − the parameter is available for French and English version of the system. It is used for specifying a posting scheme for bank service charges presented on bank reconciliation form by entering a symbol of previously defined scheme.
Posting scheme symbol for interest earned − the parameter is available for French and English version of the system. It is used for specifying a posting scheme for earned interest presented on bank reconciliation form by entering a symbol of previously defined scheme.
Control cost allocation − this parameter is responsible for the activation of cost allocation control functionalities. In Polish version of the database, the parameter is checked by default. Detailed description of cost allocation control can be found in category Cost allocation control.
Generate VAT invoices to invoices issued from receipts − the parameter is available for Polish version of the system. It determines whether at the moment of confirming an invoice (or its corrections) generated to a receipt, a VAT invoice (or VAT invoice correction) should be created in a VAT sales account.
Accounting Periods
Maximum length of accounting period− number of months − setting the maximum number of months composing an account period. In Polish and French versions of the application it is 23 months, whereas in Spanish version it is 12 months and those values are not changeable.
Accounting periods without time gaps − in the French system version, during the creation and conversion of a database, this parameter is checked by default, and it cannot be unchecked. If the parameter is checked:
while defining accounting periods, the system verifies the closing date of the previous accounting period, whereas the opening date is set to the day following the closing date
when editing accounting periods and attempting to change the closing date, the system verifies whether the next accounting period exists. If the next accounting period is defined, changing of closing date is blocked.
If the parameter is not checked, then when defining accounting periods, it is possible to define any opening date of the next period.
Only two open accounting periods − in the French system version, this parameter is checked by default, and it cannot be unchecked. If in a database there are more than two accounting periods or open accounting periods are not do not follow one another, it will not be possible to check the parameter. When defining an accounting period:
if this parameter is checked, then while defining the accounting periods, the system verifies the number of the open accounting periods. It will not be possible to add a third accounting period if the first period is not confirmed.
if the parameter is not checked, then while defining the accounting periods, it will be possible to specify any number of the open accounting periods.
Chart of Accounts
Currency accounts added as sub-subsidiary accounts − after selecting this option, it is possible to create currency accounts for directory accounts as separate sub-subsidiary accounts. In case a document is posted with the use of a posting scheme, it is necessary to check the parameter Currency posting. The parameter refers also to automatic creation of an account during posting with a posting scheme.
In such case the chart of accounts looks as follows:
If the parameter is unchecked, in the same situation, the chart of accounts looks as below:
Add general directory accounts − the parameter is available in the German version of the system only. If this option is checked, it is possible to add a general account of directory type.
Account numeration control
Don’t control − disabled account numeration control. During database creation and conversion numeration control is disabled by default.
Warn − when saving an account which does not fulfill conditions specified in numeration scheme assigned to it, the system displays appropriate message, but allows for saving such account.
Block − the system will not allow for saving an account which does not fulfill conditions specified in numeration scheme assigned to it.
Present account name in the tooltip as− allows for defining method of presenting the name of the account selected on objects or lists. The system allows for selecting one of the following options:
Current account − the name of the current account selected on an object or a list is displayed
Full path of account name − a full path of account name, that is the names of all parent accounts in reference to an indicated account is displayed as well as the name of the indicated account beginning from the name of the lowest−level account.
Note
The settings relating to the method of presenting the chart of accounts take effect after relogging on to the system.
Analytical Description
Modify in posted documents− activating this parameter allows for changing analytical description in posted documents. The parameter is unchecked by default. A user can check it at any moment during the work with the system.
Allow for describing items with zero values− activating this parameter allows for saving of analytical description item with zero value. The parameter is unchecked by default. A user can check it at any moment during work with the system.
Differences between intercompany transactions and BPM process Generate Opposite Documents for Operations Executed Between Companies within One Structure
Differences between intercompany transactions and BPM process <<Generate Opposite Documents for Operations Executed Between Companies within One Structure>>:
generation of SO and PO can be performed only by means of the standard BPM process
when handling of intercompany transactions is activated, the process does not generate SO/PO documents
a PO document is not executed by a POR if the following generation: SO → SOR → POR occured when handling intercompany transaction
Note
In the case of a buisness scenario in which issuing documents starts from a PO, it is recommended to use the process: Generate Opposite Documents for Operations Executed Between Companies within One Structure. For such a PO document to be executed, the whole circuit of documents must be handled by the process. [/aler]
it is not possible to create PORQC → SORQC for SOR/POR and SI/PI documents created by the process − only documents created by the functionality of intercompany tansasctions are handled.
Generating internal documents in the process of intercompany transactions
In the event of registering a return of a resource created by means of a POR issued to a customer/vendor defined as intercompany vendor and then moved with WM-/WM+ documents, it is possible to create mirrored documents IR- reflecting those returns.
Features of created IR+/IR- documents:
In the document header, there is Source Number field which is filled in with the number of a WM- document which initiates an intercompany movement
IR- document is created to the intermediate warehouse in the source company and in the field Customer/Vendor is filled in with the internal customer from the WM+ document
IR+ document is always created to the intermediate warehouse in the source company and takes on Confirmed status
features of items in IR+ are transferred directly from the IR- document (purchase/acquisition value, quantity, UOM, features, volume/net weight/gross weight)
the documents do not have associations on the level of items/subitems
it is not possible to correct them
there is no possibility of a direct cancellation of IR+/IR- documents, such a process must by initiated by canceling the WM- which initiates the intercompany transaction
Handling indirect warehouse receipt in intercompany transactions
The operation of indirect receipt is performed only in case of registering an intercompany transaction, if:
an intercompany SOR document has been issued
in the form of the secondary customer indicated in the SOR, the option of indirect replenishment in intercompany processes is selected
there is an active intermediate warehouse in the target company
Example
Below, there is an exemplary path of document circuit in an intercompany transaction with the use of indirect replenishment:
In a company being a vendor, a SOR document to a customer/vendor associated with the customer’s company has been issued.
In the form of the secondary customer indicated in the SOR, the option of indirect replenishment in intercompany processes is selected
By means of intercompany transactions, after confirming the SOR, a POR document with Confirmed status is automatically generated in the customer’s company. The document has been created to customer’s intermediate warehouse
From the POR document, a warehouse movement WM- document is created, in which:
The source warehouse is the customer’s intermediate warehouse
The target warehouse is the secondary customer’s warehouse from the SOR document
Note
Cancelling a WM- document created as a result of the path SOR → POR → WM- results in cancelling the POR document.
Use of intermediate warehouses
An intermediate warehouse can be used during:
An intermediate receipt, as:
a warehouse in the header of the POR generated from a SOR from another company
a warehouse on subitems of a PI which posts a POR generated from a SOR from another company
a warehouse in the header of a POR generated from a SOR from another company
a source warehouse in a WM- generated from a POR in the path SOR → POR → WM-
a warehouse in PI/POR corrections from an intermediate receipt
An intercompany warehouse movement, as:
an intermediate warehouse in a WM- document (to that warehouse will be moved resources, when finishing the circuit of WM documents in the source company)
a warehouse in a SOR document generated from an intercompany WM- (resources received by means of an intercompany WM+ document will be released from that warehouse)
a warehouse in an IR- document generated from an intercompany WM+ document with checked parameter Process return (resources received with an intercompany WM+ for resources created as a result of the delivery done by means of an IR+ from an internal customer will be released from that warehouse)
a warehouse in a SI document generated in the path WM+ → SOR → SI
a warehouse in a SIQC/SORQC in an intercompany movement marked as Process return (in the event of company returns, resources will be received in this warehouse)
Note
An intermediate warehouse cannot be selected in a document manually by an operator. It can be set in a document automatically by the system:
during processes of intermediate receipt
in PI/POR corrections initiated manually by an operator
Configuration of warehouses involved in intercompany transactions
Defining intermediate warehouses
An intermediate warehouse allows to make full use of the functionality of intercompany transactions in databases with activated FIFO/LIFO method of queuing resources. Such a warehouse can be used in the following documents:
SI and quantity/value corrections
SOR and quantity/value corrections
PI and quantity/value/additional cost corrections
POR and quantity/value/additional cost corrections
WM−/WM+
IR+
IR−
In order to add an intermediate warehouse, from the level of Main → Warehouses or Warehouse → Warehouse, it is necessary to select button [Add] and option Intermediate.
Use of intermediate warehouses has been described in article <LINK>.
Note
The possibility of adding an intermediate warehouse is available only for companies with activated handling of intercompany transactions.
Intermediate warehouse form
The differences between the form of an intermediate warehouse and the forms of other<< local warehouses>> are as follows:
the parameter Dedicated for parent company is grayed out. The parameter is checked only if the Main Company has been selected in field Company.
the parameter Handling of WMS is hidden
it is not possible to define address data and the forecast coefficient
there are no tabs: Stock Management, Stock Level Visibility and there are no buttons used for generating documents
Company – field allowing for associating the warehouse with a selected company. The of companies is limited to companies with activated handling of intercompany transactions. This field is available for editing after the warehouse form is saved for the first time.
Features of the intermediate warehouse:
only one intermediate warehouse can be assigned to each company
it becomes automatically available defined within the company to which it belongs (it is not visible in Object Availability)
it cannot be deactivated
Parameter Replenish in intercompany process in local warehouses
Replenish in intercompany process – field available in the headers of local warehouses in companies/centers handling intercompany transactions as Customers, in databases with FIFO/LIFO method of queuing resources. A user can select one of the following options:
Direct (default value) − in a process of intercompany transaction, a merchandise is received with the omission of the intermediate warehouse (e.g. SOR → POR)
Indirect − in a process of intercompany transaction, a merchandise is received with the use of indirect warehouses (e.g. SOR → POR → WM−/+)
Local warehouse header
Changes in WM−/+ document
In databases with FIFO/LIFO method of queuing resources, in the forms of WM−/+ issued in a company with activated intercompany transactions and with shared warehouses of other companies, additional fields are available:
Intermediate Warehouse − field completed automatically with the name of the intermediate warehouse, if a warehouse which belongs to another company was selected as the target warehouse in the document. It is a warehouse from which the resources are:
Moved during an operation within one company (WM+)
Released (SOR/PORQC/IR−)
Internal Customer − presents the name of a customer associated with the company to which the target warehouse is assigned. The field is visible only in these documents, in which the target warehouse is a warehouse which belongs to another company.
Intercompany Transaction − parameter not subject to edition, it is automatically checked if a WM− initiates an intercompany transaction. The field is visible only in these documents, in which the target warehouse is a warehouse which belongs to another company.
Process return − depending on the value of the parameter:
from the WM+ can be created PIQC/PORQC/IR− (and SIQC/SORQC/IR+ in the opposite company) − parameter checked
a SOR is generated from the WM+ − parameter unchecked
Note
The parameter is available only in databases with FIFO/LIFO method of queuing resources, only in documents whose target warehouse is a warehouse of another company.
Note
The parameter is checked by default and is not available for editing for companies which are customers only.
Target Warehouse − warehouse to which the documents in the opposite company will be issued
Vendor’s Warehouse − name of the warehouse from which resources have been released in another company:
In the path: SOR → POR → WM−/WM+ it is the warehouse from which resources have been released with the use of the SOR document
In the path: WM−1/WM+ → PORQC/SOR/IR− → SORQC/POR/IR+ → WM−/WM+ it is the source warehouse indicated in the WM−1
Canceling documents deriving from intercompany transactions
Canceling documents involved in intercompany transactions should begin from the side of opposite documents.
Note
There is no possibility of direct cancellation of documents which are source documents in the transaction path. Canceling an opposite document automatically cancels its source document.
Example
In a company which is a customer, a SI document has been issued, whose confirmation has initiated automatic generation of a SOR document
During an intercompany transaction taking place in the customer company:
to the SOR document, an oppoosite POR document is created
to the SI document, an opposite PI document is created
In the event of canceling documents:
first, it is necessary to cancel the POR document, which will result in automatic cancellation of the SOR document
then, it will be possible to cancel the PI document, which will result in automatic cancellation of the SI document.
Blockade of creating documents in intercompany transactions
In companies with activated handling of intercompany transactions, there is a blockade of:
generating POR from PI if the invoice is an opposite document to SI. In such a case, it is possible to create a PO receipt only on the basis of a realase of resources by means of the source SI document.
generating PI from POR if POR was automatically created to a SOR document. In such a case, it is possible to create an invoice for the POR document only on the basis of the trade document issued to the source SOR document.
adding a POR document, in case the vendor selected in a document is an internal customer/vendor and the comany to which they are assigned is defined as Vendor, whereas the company in which te document is being issued is defined as Customer. In such a case it possible to issue a POR only on the basis of a SOR document in the vendor’s company.
adding a PI document, in case the vendor selected in a document is an internal customer/vendor and the comany to which they are assigned is defined as Vendor, whereas the company in which te document is being issued is defined as Customer. In such a case it possible to issue a PI only on the basis of a SI document in the vendor’s company.
issuing a VAT correction to a soruce document to which an opposite document has been generated
issuing opposite documents to documents for released items containing sets with parameters Retrieve elements onto document checked
issuing opposite documents, if the source company does not have access to the objects used in the source document (customer/vendor, item, warehouse) or the operator does not have permissions to log-in to the target center.
Principles of creating documents during intercompany transactions
An opposite document is generated automatically at the moment of confirming the source document. If an error occurs during the creation of a document, its content is presented in an appropriate message and the confirmation of the source document gets withdrawn.
Vendor/Secondary Vendor in a PI/POR document is set on the basis of the center being the owner of the source document.
PI/POR documents are generated to a warehouse set as Customer’s Warehouse in the source document.
The total/subtotal value or discounts defined in the source document are mantained in documents generated during an intercompany transaction.
In documents generated during an intercompany transaction, the value in a system currency is calculated according to the exchange rate of the document currency to the system currency of the target comapny. Features of an exchange rate (type, date type, date) in PI/POR are set according to the definition of the document type in a given center, whereas in corrections – according to the settings of corrected documents.
As the price type in documents for received items created from documents for released items, the type associated with the customer/vendor for which the document is being issued, is set. If such an association is not dedined, the default purchase price types retrieved.
In case the group of VAT rates of the source company is different then the one assigned to the target company, the value of VAT Rates in the header of the source document, is verified:
For VAT Rates: National – the possibility of creating an opposite document is blocked
Export – an opposite document with VAT rates available for the target company is created. The generation will be completed with success only if total and subtotal values in both documents are compatible. Otherwise, the process will be interrupted and an appropriate message will be displayed.
In case of generating: POR from SOR and PI from SI, if on the document that initiates the intercompany transaction, a currency different than the system currency is selected, then, on the opposite document in the target company, the exchange rate (exchange rate type and its value) is transferred from the initiating document.
Example
Two companies which will be involved in intercompany transactions have been created in the system:
Company ABC with internal customer ABC Shop defined as Vendor in intercompany transactions handling
Company TWZ with internal customer Impax defined as Customer in intercompany transactions handling
The automatic generation of warehouse documents is disabled in the definition of SI document type in the company ABC.
A sales invoice is issued in the company ABC. Impax is set as the customer and IPX warehouse (defauld for documents in the company TWZ) is set as the Customer’s warehouse.
Confirming the document results in the automatic generation of an opposite PI document in the company TWX for the warehouse IPX.
Next, in the company ABC, a SO release is generated from that document and the confirmation of the document generates a POR document in the company TWZ.
The table below presents the source of completing fields in opposite documents:
Feature
PI
POR
SORQC
PIQC/PIVC/PORVC
Subtotal/Total amount
Value in document currency from SI
Value in document currency from SOR
Value in document currency from POR corrections
Reference number
SI number
SOR number
POR correction number
SI/SOR correction number
Date of issue
Date of issue from SI
Date of issue from SOR
Date of issue from POR correction
Date of issue from SI/SOR correction
Date of receipt
Current date set automatically
Current date set automatically
-
Current date set automatically
Date of purchase
Date of sale from SI
-
-
-
Date of correction
-
-
POR correction date
SI/SOR correction date
Date of receipt
-
Current date set automatically
-
-
Reason for correction
-
-
Reason for correction from POR
Reason for correction from SI/SOR
Processing priority
-
Standard behavior
Standard behavior
Standard behavior
Payment parameters (payment method, date, number of days, EOM, number of days EOM)
Payment parameters from the source SI
-
SOR corrections: From the setting on customer/vendor form
PI corrections:
Payment parameters of the source SI correction
POR corrections - not applicable
Currency
SI currency
SOR currency
POR correction currency
SI/SOR correction currency
Transaction type
Transaction type from SI
Transaction type from SOR
Transaction type from POR correction
Transaction type from SI/SOR correction
Reason for tax exemption
Reason from SI
-
-
PI corrections: reason from PI document
Delivery method
Delivery method from SI
Delivery method from SOR
Delivery method from POR correction
Delivery method from SI/SOR correction
VAT direction
VAT direction from SI document
VAT direction from SOR document
Vat direction from POR correction
VAT direction from SI/SOR correction
VAT aggregation
Parameter value from SI
Parameter value from SOR
Parameter value from POR correction
Parameter value from SI/SOR correction
Reverse charge
Parameter value from SI
Parameter value from SOR
SOR source document
PI/POR source document
VAT Account
According to the settings of the owner of the target document
Owner
Center/company selected in the definition of company/center, in the tab Intercompany transactions. In case option According to the customer’s/vendor’s center, the following centers can be set as the owner:
• customer’s center in case only the customer is an internal customer
or both the customer and the secondary customer are internal customers assigned different companies
• secondary customer’s center in case the customer and the secondary customer are internal customers assigned different companies
Handled By
Employee of the operator who initiates the transaction
Identification of intercompany transactions
The scheme below presents identification of an intercompany transaction:
Dedicated fields on documents involved in intercompany transactions (SI, SOR, PI, POR)
Customer’s Warehouse – field available in the header of SI and SOR documents It allows for selecting a local warehouse to which an opposite document will be generated.
By default, the field is filled in by the default warehouse of:
from the customer’s center, in case
only the customer selected in the document is an internal customer
both the customer and the secondary customer are internal customers and the secondary customer is assigned to a different company than the customer
from the secondary customer ‘s center, when both the customer and the secondary customer are internal customers assigned to the same company.
Note
In case of generating a SI from several SOR documents issued to different warehouses, the field Customer’s Warehouse takes on value <All>.
Note
It is possible to change the secondary customer in a SI/SOR document if it was generated from a SOR/SI document which registers an intercompany transaction.
Vendor’s Warehouse – field available in the header of PI and POR documents generated from SI/SOR. It presents the name of the warehouse to which the associated opposite document (source document) has been issued.
Configuration of intercompany transactions
By means of intercompany transactions it is possible to automate registering of business transactions taking place between companes, in case if e.g. one of them is engaged in production activities and the second one in distribution activities. Such a path begins with a sales order document which reflects the registration of a customer order.
In order to activate the functionality of intercompany transactions, from the level of Configuration → Company Structure → edition of selected center of Company type, in field Intercompany Transactions, it is necessary to define the role of a given company in the organization:
Vendor
Customer
Vendor and Customer
Parameter Intercompany Transactions
Note
To save a company as Vendor/Customer in intercompany transactions handling, it is necessary to assicate the form with a customer/vendor.
Note
After selecting one of the options and saving the company form, it is not possible to change it.
In the forms of a Company participating in international transactions, there is an additional tab Inctercompany Transactions. It contains the following columns:
Process – column presenting paths of possible generations whose quantity depends on the function hold by a given company: For a Customer these are as follows:
PO Receipt Quantity Correction – SO Release Quantity Correction
Owner – allows for indicating a center within which an opposite document will be automatically created. The following options are available for selection:
According to the customer’s/vendor’s center – deafult value, the owner of an opposite document is a center associated with the Secondary Customer indicated in the source document.
Selected company/center with activated intercompany transactions – an opposite document will be created within selected unit of company structure, regardless of the association between the center and the secondary customer in the source document.
Tab Intercompany Transactions in Company forms
[hint] An association with a customer/vendor can be also added from the level of the forms of centers subordinated to a company with activated intercompany transactions <LINK>. Thanks to that, it is possible to specify center in which an opposite document should be generated. [/hint]
Example
ABC company which functions as customer in intercompany transactions, is associated with customer Laneco. It is also the parent company for center MOB1 associated with customer Studio K.
Company ABC issues a SOR document in which:
Laneco is the Customer
Studio K is the Secondary Customer
The POR document created during the process of intercompany transactions will be generated in the secondary customer’s center – MOB1.
Returns of goods in consignment
Returns of goods in consignment
The process of consignment sale anticipates returns of goods, which failed to be sold, back to their vendors. The period in which goods can be returned as well as the quantity of goods subject to be returned depend on an agreement between the parties. Arrangements between parties can be registered on the form of a given customer/vendor, in tab Consignment.
Consignment warehouse of Customer’s type
Return from a customer’s consignment warehouse is executed by WM-/WM+ documents. If within the period of time set forth in the contract a customer has not sold the entire lot placed in the secondary customer’s consignment warehouse it can return the remaining part.
Depending from which warehouse resources in a secondary customer’s consignment warehouse originate, in WM- and WM+ documents the target warehouse will be a consignment warehouse of Own type – or a local warehouse and the source warehouse – the secondary customer’s consignment warehouse.
Note
It is not possible to move (return) resources from a secondary customer’s consignment warehouse, which originally come from a consignment warehouse of Own type to a local warehouse and adversely – coming from a local warehouse to a consignment warehouse of Own type.
Returned resources can be only moved to a warehouse from which they have been taken to a secondary customer’s consignment warehouse. In a case of returning resources to a local warehouse it is not important if it is the same
local warehouse or another local warehouse – it only needs to be a local warehouse. Original resources coming from a consignment warehouse of Own type have to be returned to the same warehouse.
Own consignment warehouse
In the situation when a customer did not sell in full the goods received at an own consignment warehouse and arranged with a vendor that the unsold goods would be returned, such operation can be registered with a PORQC or IR- document, depending on the moment of registering the return
A PORQC document can be issued only prior to making a payment to vendor for part of the goods that have already been sold.
Note
Only these resources can be returned with a PORQC which are currently available in own consignment warehouse to which the POR refer, for which the PORQC is being issued Resources available in other warehouses are not subject to return, although they have been originally received with the same POR document to which the PORQC is being issued.
If payment is made for the goods sold, return of the remaining goods can be registered with an IR- document.
The goods are not included in a CSR document when making subsequent payments to the vendor.
Local warehouse
If goods were delivered, in the process of consignment sale, to a local warehouse from an own consignment warehouse, such goods cannot be returned. This type of operation is tantamount to the purchase of goods from this vendor.
PO to own consignment warehouse
Registration of a PO document is used when a customer places an order at a vandor for a consignment item, which as a result of the execution of the order is received in its own consignment warehouse.
Note
If in at least one of three places in a PO document – in the header, in packs, or on subitems, own consignment warehouse associated with a customer is selected, it is not possible to edit vendor/secondary vendor in this document.
It is not possible to generate a PI from a purchase order which contains subitems issued to a consignment warehouse It is possible to generate a POR document which will receive a resource in a warehouse.
Note
If a POR document has been created for a purchase order, it is not possible to generate an API to it. However, if an API has been created to a PO first, then it will not be possible to issue a POR (that is, no consignment service will be possible).
Generating WM- from SO
The functionality of generating a warehouse movement from an order is used whereby a customer orders consignment items and the order is executed through a movement of the ordered item to its consignment warehouse (the customer’s consignment warehouse).
In order to generate a WM- from a SO, in the SO list a user should check the order or several orders and select button [WM-] in the main menu from the group of buttons Generation.
Note
A warehouse movement document can be generated only to orders issued to a recipient assigned to the consignment warehouse indicated in the document.
Fractures of generated WM- document:
the document is added with Unconfirmed status
If the resources in a SO document are retrieved from one warehouse, one WM- document will be generated, for which the source warehouse is the warehouse from the subitems of the SO document, and the target warehouse – the customer’s consignment warehouse to which the customer from the SO is assigned.
If the resources in a SO document are retrieved from more than one warehouse, a list of warehouses, which appear in the subitems of the SO, is displayed with the possibility of selecting one or several warehouses. After selecting a warehouse/warehouses, as many WM- documents as the number of selected warehouses are generated.
The number of items in the document is subject to edition.
After canceling or deleting a WM- document generated from a SO, the quantity of items executed in this WM- document will be made available again for execution in the SO.
Consignment with AVCO method of queuing resources
In the case of AVCO queuing method:
on a WM- document, as the target warehouse, it is possible to indicate a consignment warehouse of Own type associated with a customer/vendor.
after adding the WM- document to a CSR document it is possible to decrease the quantity. Such a WM- document can be added to another CSR document with quantity decreased by quantities already included in other CSR documents.
Purchase invoice, receipt corrections and update of purchase value for AVCO method
A purchase invoice for consignment items, received in a warehouse by means of a POR, is not generated directly from this POR but from a CSR document issued to a vendor from whom we have received the item. A vendor, after receiving the CSR, generates a SI, whose counterpart at the customer’s will be a purchase invoice.
Such an invoice contains all the items from the source SCR in the identical quantities. It is issued to the vendor/secondary vendor, whose item appeared in the CSR.
Generating a PI
A PI is generated from CSR according to standard rules valid for FIFO/LIFO methods.
Generating a POR
POR document is associated with an invoice according to the following rules:
all POR documents are searched, which are issued in the same currency with the same warehouse and include the same items/lots as PI
according to settings on warehouse form, POR documents will be sorted according to the selected settings. More information regarding the order og associating PI with POR can be found in article Configuration
the first document from the POR list filtered according to the above criteria is verified
the first item included in such POR is verified (items are selected according to number in column No. on a document)
association of a given item with PI document is verified in case if
quantity of the item is not associated with the invoice in full – association for the remaining quantity not associated with invoice is created
quantity of the item is associated with invoice in full – the item is omitted and the system verifies another item
Receipt correction – PORVC
When confirming a PI document generated from CSR for own consignment warehouse, the system checks price in items of the PI against price in items of associated POR documents:
if price in items of POR documents associated with an item of PI document is the same, no additional document is generated
if price in an item of POR document associated with item of PI is different, then when confirming the PI, PORVC document is generated to the associated POR, in which price after correction will equal price in the PI item
Cost corrections and update of resource values in a warehouse
During update of resource values in a warehouse, it is verified if the resources are available and in case if:
rsources are available – upon generating PORVC, the system corrects value of a given resource in a warehouse by values resulting from PORVC
resources are not available – upon generating PORVC, the system generates CC document to it
Consignment with FIFO/LIFO methods of queuing resources
Due to their particularities, the differences between methods of queuing resources affect the way of executing stages of the consignment process.
In the case of FIFO/LIFO queuing methods:
the system does not take into account documents which have already been added by means of another CSR (both confirmed and unconfirmed), SOR documents which have been corrected in full and WM- associated with SORQC.
Purchase invoice, receipt corrections and update of purchase value for FIFO/LIFO method
A purchase invoice for consignment items, received in a warehouse by means of a POR, is not generated directly from this POR but from a CSR document issued to a vendor from whom we have received the item. A vendor, after receiving the CSR, generates a PI, whose counterpart at the customer’s will be a purchase invoice.
Generating a PI
In order to generate a PI to a CSR, a user should check appropriate documents in the CSR list and click on button [PI] available in the main menu in the group of buttons Generation.
A purchase invoice can be generated to a confirmed CSR only. Otherwise, the generation button is grayed out.
In the generated PI, the vendor and secondary vendor will be a customer/vendor identified as the vendor in the CSR. The transaction type always takes on value National and is not editable.
Receipt correction – PORVC
When confirming a purchase invoice generated from a CSR, the comparison of prices of the items appearing in the purchase invoice with the prices in the associated POR items takes place. If quantities of individual items of the POR and PI are defined in different units, then for POR document (in consignment service, items in a PI are always defined in basic unit) the system calculates price for the basic unit according to unit conversion calculator. If the prices in the POR and PI do not agree, a value correction will be automatically generated to each POR document in which the difference in the price of items appears. Correction of value will apply to such quantity of individual items only, which is included in the CSR and thus, in the PI. In other words, a correction is generated only for such quantity of individual items which has been sold and purchase value of these very items is modified. Purchase value of the other parts of deliveries from POR documents (not included in the CSR and PI), to which a PORVC correction is generated automatically, remains unchanged.
Cost corrections and update of resource values in a warehouse
In the result of re-quoting of an item received in the consignment process which was caused by:
confirmation of a PORVC issued to a POR before payments for a consignment item have been applied
confirmation of a PI generated from a CSR in which prices of items on the PI are different from prices of associated items on POR – PORVC generated automatically
confirmation of a PORVC generated to a PI created in the consignment process – PORVC generated automatically
the system generates appropriate cost corrections to documents which released a given item before re-quoting it and modifies value of the remaining quantity of that item (which has not been released “outside” with a SOR) in consignment warehouses of Customer’s type and in local warehouses, if a re-quoted item was received in a warehouse of such type.
Corrections to SOR documents issued to consignment warehouse
During the consignment process, corrections to SOR are issued:
to a local warehouse compliant with the SOR document, if none of the items included in the SOR has been yet included in the CSR
to a default local warehouse (with the possibility of changing it to another local warehouse), if at least one SOR item is included in the CSR
The method of generating a SORQC in case there is an oscitation with a CSR, is as follows:
a SOR document is issued from own consignment warehouse
a SOR document is included in a CSR
a SORQC is created for this SOR, in which the subitems that have been included in the CSR are corrected
a default local warehouse is set in the SORQC (other than the warehouse set in the SOR)
when confirming the SORQC:
the item is returned to the warehouse which has been selected in the source SOR,
at the same time, WM-/WM+ documents are being created which relocate these resources to the warehouse from SORQC document
the source warehouse in the WM-/WM+ documents is the SOR own/customer’s consignment warehouse, and the target warehouse is the SORQC local warehouse
value of the returned item is the same on SORQC, WM-/WM+, and on SOR – if the item price has been changed in the meantime (a CC has been created to the SOR), then appropriate CC documents are also created for the SORQC and WM-/WM+ documents
While generating subsequent CSRs, a WM- document generated in that way is not taken into consideration.
Note
It is not possible to cancel WM- and WM+ documents created in the result of a SORQC confirmation. These documents are cancelled automatically when the user cancels the SORQC.
IO in consignment
On internal order it is possible to select consignment warehouses as target or source warehouses. In case on an IO document:
as the source warehouse is set a local, distant or own consignment warehouse, the user cannot select own consignment warehouse as the target warehouse.
as thetarget warehouse is set an own consignment warehouse, the user cannot select another warehouse than customer’s consignment warehouse as the source warehouse.
For internal orders, resource reservations are created upon submitting a document.
If a customer’s consignment warehouse is set as the source warehouse and an own consignment warehouse is the target warehouse, then if Reserve resources parameter is checked, during the second confirmation only those resources are collected which come from the own consignment warehouse (the target warehouse on document).
Upon confirming an IO, it is possible to generate WM- document on which the customer’s consignment warehouse is the source warehouse. On the WM- there will be only those resources collected which were received in the customer’s consignment warehouse from the own consignment warehouse.
Example
1. POR1 is issued to an own consignment warehouse, then WM-1/WM+1 document is generated, where the own consignment warehouse is the source warehouse and a customer’s consignment warehouse is the target warehouse
2. POR2 document is issued to a local warehouse and next, WM-2/WM+2 document is generated, where the local warehouse is the source warehouse and the customer’s consignment warehouse is the target warehouse.
3. IO document is issued, where the customer’s consignment warehouse is the source warehouse and the own consignment warehouse is the target warehouse. Parameter Reserve resources is checked on the IO.
4. From the IO there is WM-3 document generated, where customer’s consignment warehouse is the source warehouse and the own consignment warehouse is the target warehouse. On WM-3 there are resources collected from the customer’s consignment warehouse, but only from POR1 document, because resources in the customer’s consignment warehouse were received from the own consignment warehouse.
Document
Quantity
Warehouse
Source Warehouse
Target Warehouse
POR1
2 pcs
Own consignment
WM-1/WM+1
2 pcs
Own consignment
Customer's consignment
POR2
10 pcs
Local
WM-2/WM+2
10 pcs
Local
Customer's consignment
IO
5 pcs
Customer's consignment
Own consignment
WM-3
2 pcs
Customer's consignment
Own consignment
Only 2 pcs were transferred on the WM-3 document, because there had been only 2 pcs from POR1 available in the own consignment warehouse before the warehouse movement.
Inventory
Consignment handling also inclues taking an inventory of the resources in a consignment warehouse of Own type. The process of creating an inventory document is identical as the process for local warehouses. The only difference is the documents generated as a result of confirming the inventory.
The following documents will be created for a consignment warehouse:
POR – if a positive difference in the quantity of item has arisen in the inventory sheets
POR – if a positive difference in the quantity of item has arisen in the inventory sheets
The complete description of creating an inventory in the system can be found in category Inventory.
Consignment Sales Report
Consignment sales report is used for collecting the whole sale of the resources received from one customer/vendor in one consignment warehouse of Own type in a given period. At the same time, the CSR serves as information for the vendor which items supplied by it have been sold by the customer.
The consignment sales report includes:
sale of items from delivery from a specific customer/vendor to a consignment warehouse of Own type on the basis of SOR documents.
“sales” for the customer, whereby the item is moved from the consignment warehouse by means of WM documents to a local warehouse of the customer, thereby becoming their property
sale of consignment items made by the secondary customers from the consignment warehouse of the secondary customer (documented by a SOR issued to a customer assigned to the consignment warehouse of the secondary customer)
A list of CSR documents and the associated functionality are available in module Sales. The list displays information regarding:
document number
date of issue
code
secondary vendor name
warehouse in which an item has been received
range of dates in which SOR and WM- included in the CSR have been issued
warehouse in which the resource delivered by a given vendor has been received (it can only and exclusively be an own consignment warehouse)
center in which a document is issued
field with a space for an additional description to a report
current document status
date of issue of a document
subtotal and total values of the report
range of dates within which the dates of issue of documents including in the created CSR fall
In field Warehouse a warehouse, for which in the configuration the CSR document has been set as default, is set as default. That does not mean, however, that it cannot be replaced with another own consignment warehouse.
Note
It is not possible to issue a CSR to a consignment warehouse of a secondary customer or a local warehouse.
A list of CSR items displays the items and their quantity which has been released within the selected period of time by means of SOR and WM- documents from own consignment warehouse that is the basis of the report.
These items can only be added after selecting a vendor as well as a warehouse. From a list filtered by dates, vendor and warehouse, a user can select specific SOR or/and WM- documents. The other option involves the automatic addition of all SOR and WM- documents fulfilling the criteria set – button [Add Automatically].
Note
In databases with FIFO/LIFO methods selected, the system does not include the documents which have already been added to another CSR (confirmed and unconfirmed), SOR documents which have been completely corrected, and WM- documents associated with a SORQC.
Note
In databases with AVCO method selected, upon adding a WM- document to a CSR, it is possible to decrease the quantity. Such WM- document can be added to another CSR document with quantity decreased by quantities already included in other CSR documents.
Example
1. A WM- document is issued with an own consignment warehouse selected as source warehouse and a customer’s consignment warehouse specified as target warehouse. Item Scarf in quantity 10 pcs is added onto the document.
2. The WM- is confirmed
3. The WM- is included in a CSR document, quantity is automatically transferred from the WM-
4. Quantity of item Scarf is decreased on the CSR from 10 pcs to 8 pcs
5. Another CSR document is issued, the WM- from p. 1. is included in it with quantity 2 pcs (10 pcs from the WM- – 8 pcs included in the first CSR)
Prices of the individual items are retrieved from the current price list for received items assigned to the vendor selected in the CSR, in system currency of a company being the document owner. They are not editable and are only used for information purposes. They can differ from the prices in the POR and PI, which ultimately document the purchase.
A CSR document can also be generated from the list of SOR and WM- documents. Generation can be performed for one or many documents checked in the list. With regard to WM-, these can be documenting whose source warehouse is own consignment warehouse and whose target warehouse is a local warehouse. Documents are generated with Unconfirmed status.
After confirming the CSR document, it is sent to the vendor who in return submits a sales invoice that includes exactly the same items. After receiving such an invoice, an operator can generate a corresponding purchase invoice from the CSR list level.
Consignment in documents
This article presents a simplified example of documents circulation between vendor, customer and secondary customer.
Consignment scheme
Consignment stages presented in the diagram:
A vendor releases an item from its warehouse to the so-called consignment warehouse and issues a warehouse document for a customer, e.g. a SOR
A customer receives the item from the vendor to the consignment warehouse on the basis of the warehouse document issued by the vendor and next the customer issues a POR document to the vendor to its own consignment warehouse
The customer:
sells the item received in the consignment warehouse of Own type and documents it through sales invoices or receipts associated with the SOR documents for the item sold
acquires the item for its own needs moving it to its own local warehouse by using WM-/WM+ documents (the source warehouse will be its own consignment warehouse, the target warehouse – a local warehouse)
moves the item to a consignment warehouse of its secondary customer by means of WM-/WM+ documents (the source warehouse will be its own consignment warehouse, the target warehouse – a consignment warehouse of the secondary customer)
In the event when the customer has moved the merchandise to a consignment warehouse of its secondary customer:
the customer sells the item from the warehouse in which they have received it
after the sale the secondary customer provides the customer with a consignment sales report
on the basis of this report the customer creates SI and SOR documents to its secondary customer from the consignment warehouse of the secondary customer, thereby making the sale and settlement with their customer
The customer informs the vendor which items from the consignment warehouse of Own type have been sold, including those which have been sold by its secondary customer from the consignment warehouse of the secondary customer
On this basis, the vendor issues a sales invoice document to the customer, in which there are listed the items sold by the customer (and their secondary customers). At this moment, the actual sale of the merchandise by the vendor for the customer takes place
On the basis of the sales invoice received from the vendor, the customer records the purchase invoice document to the vendor, associating the items of the invoice with the items of the POR documents with which the merchandise was received in the consignment warehouse of Own type
If the prices in the purchase invoice and the POR document are different, the customer issues a value correction document to the POR document.
In case a company is also vendor of consignment goods, the consignment path might be extended:
the reproduction of the transfer of goods within consignment is registered with the help of WM- document from a local warehouse to a customer’s consignment warehouse
after receiving a sales report from a “customer”, payment is processed according to the standard path, described in the above process, that is by means of SI/R and SOR issued for the customer assigned to the consignment warehouse of Customer’s type and which contains the resources from that warehouse.
A diagram presenting almost full path (without ordering stage) of subsequent operations performed on a delivery received in a consignment warehouse of Customer’s type, as well as operations on a resource moved from a local warehouse to a consignment warehouse looks as follows:
Advanced consignment scheme
Fill color in the above diagram determines type of delivery:
blue – a resource from a delivery received in own consignment warehouse
orange – a resource from a delivery received in a local warehouse
Shape outline color in the above diagram determines:
red – that a resource went through a local warehouse regardless of where it was received
blue – documents which can be added to a CSR from a delivery received in own consignment warehouse
The process always starts from a POR document which registers a delivery in own consignment warehouse or local warehouse. Although the diagram presented above does not illustrate it, an item can also be received in a local warehouse by an IR+ document.
Attention should be paid to the following operations when analyzing the consignment process, and so, the update of resources in this process:
a CSR includes SOR documents issued to:
own consignment warehouse
consignment warehouse of Customer’s type, but only if a resource released by these documents was originally received to own consignment warehouse and have not been moved to any local warehouse in in the meantime
a CSR includes WM- and WM+ documents which move an item from own consignment warehouse to a local warehouse
items not included in a CSR are subject to quotation
it is necessary to distinguish WM- and WM+ documents issued manually and moving an item from own/customer’s consignment warehouse to a local warehouse from which have been generated automatically to a SORQC
WM- and WM+ documents issued manually are subject to quotation only if they have been added to a CSR, they are subject to quotation until they are not added a CSR
WM- and WM+ documents issued automatically to a CSR are subject to quotation only if a CC has been generated to a SORQC associated with those documents, on the basis of the CC generated to the SORQC, there are cost corrections generated to WM- and WM+ documents as well as to subsequent documents in the presented path; or resources included in this WM+ are updated in the warehouse
WM- and WM+ documents which move an item from own consignment warehouse to consignment warehouse of Customer’s type are quoted only after SOR documents releasing the moved resources are quoted; such WM- and WM+ documents will not be quoted until a resource they move is not added to a CSR with the use of a SOR issued in consignment warehouse of Customer’s type
other documents, that is: IR-s, although they include resources created by a delivery received in own consignment warehouse, will never be quoted (when quoting from a CSR); while updating and generating a CC, such documents are not taken into account at all
SOR documents issued in consignment warehouse of Customer’s type and using resources going through a local warehouse will not be included in a CSR, and thus, they are not subject to quoting
Note
In case of AVCO method of collecting resources, it is possible to select an own consignment warehouse associated with vendor as a target warehouse in WM- document.
Configuration
Activation of consignment
In the system, the consignment handling is deactivated by default. In order to activate it, it is necessary to check parameter Handle consignment located in menu System → Configuration → Trade tab. As a result of this operation:
button [CSR] located in menu Sales that opens a list of these documents is activated
the button used for generating a CSR from the level of a list of SOR and WM- is activated
in the customer/vendor form there appears tab Consignment which is used for defining basic parameters in the consignment process.
Tab Consignment in the customer/vendor form
Tab Consignment in the customer form
The following fields are available in the tab Consignment:
Reconciliation Cycle – indicates every how many days it is necessary to make reconciliation with a given customer (100 days is maximum)
Reconciliation Date – field with a date indicating next reconciliation with a customer/vendor. The date can be selected from the built-in calendar.
Fields in groups Returns – Consignment and Returns – Invoice are available only for vendors and customers who are also vendors. They are for information purposes only.
Below, there is a list of all consignment warehouses associated with a given customer.
Adding consignment warehouses
Warehouses are defined from the level of:
menu Main → Warehouses
warehouse module Warehouse → Warehouses
customer/vendor form, tab Consignment
Defining consignment warehouses is nearly identical to defining local or distant warehouses. The difference is that in the case of consignment warehouse:
a specific customer/vendor is assigned (necessary condition for customer’s consignment warehouses)
warehouse type is defined (own/customer’s)
The vendor defined for an own consignment type can be changed until a document has been issued to this warehouse. After defining warehouses, it is necessary to assign documents to them on which a given warehouse can be used. To do so, from the level of Configuration -> Company Structure -> Company, it is necessary to open tab Warehouses, open an appropriate warehouse for editing and define its availability and parameter Default of particular documents.
Note
In order to be able to issue a CSR document, it is necessary to set its availability and parameter Default for selected own consignment warehouse.
Consignment – general information
Consignment consists in storing items owned by a vendor in a warehouse of a customer who collects them and sells them before they have made a formal purchase and settlement with a vendor. Consignment is most commonly used in franchise networks.
In the system, there are two types of consignment warehouses:
own consignment warehouse – a warehouse physically owned by a customer, in which items owned by a vendor are stored and which are disposed of and sold by a customer
customer’s consignment warehouse – a warehouse physically owned by a secondary customer, where items of a vendor or a customer are stored, which are managed by the secondary customer; the items can be owned by a vendor who is located several levels higher; when looking from the perspective of a secondary customer, a customer becomes a vendor and a secondary customer becomes a customer. In the customer’s system it is a virtual warehouse which is used only for determining that the items have been transported to a customer’s warehouse; a customer does not record in its system each sales transaction made by a secondary customer – a customer can only issue a sales document to a secondary customer to whom the warehouse is assigned, after prior receiving a special report from it.
Items delivered by a vendor are owned by this vendor, whereas a customer is responsible for their proper storage.
Payment for the items is made after the resource has been depleted (in the case of production) or sold out (in the case of trade).
AVCO reservations
Note
Parameters described in this article are available in databases with AVCO method of queuing resources.
Reservations on sales orders and internal orders
The following parameters are available in definitions of sales order and internal order document types (Configuration → Company Structure → Company → Documents → IO/SO document type editing):
Reserve resources – if checked, when adding an item onto a document or increasing item quantity, reservation on specified item quantity is created by default, blocking sales of the item from particular delivery. If requested quantity is not available, reservation without resources is created
Above parameters are available for editing, regardless of value of parameter Handle quantity reservation in warehouse documents.
Parameters Reserve resources/Reserve quantities available in SO document definition
Moreover, it is possible to make/release a reservation with the use of buttons [Reserve]/ [Release Reservations] for the following documents:
Sales orders –with status Initiated, Unconfirmed, Confirmed, Pending
Internal orders – with status Confirmed and Pending
Verification of quantity reservation in an order document is possible from the level of document item details in section Subitems and in tab Deliveries in column In Stockof section Subitems. In case the parameter is checked, a reservation is created for a given subitem. The parameter MA DOSTAWE is blocked for editing for:
item being a service
SO document in status: Canceled, Closed, Processed
IO document in status: Initiated, Canceled, Unconfirmed, Closed, Submitted and Processed
Making/releasing a quantity reservation on an order is possible for:
documents in status Initiated (SO), Unconfirmed (SO), Confirmed (SO, IO), Pending (SO, IO)
for items of Merchandise type – refers only to making reservations
documents associated with warehouse specified in the header/subitem. In case if appropriate permissions are missing (e.g., the warehouse in given center is not associated with given document type), such document is omitted
Detailed description referring to operation of resource reservations and reservations without resources in dependence of document type can be found in articles Orders and Internal orders
Quantity reservations
To be able to reserve quantities in order documents (SO, IO) and warehouse documents (SOR, WM-, IR-), parameter Handle quantity reservation must be checked from the level of System → Configuration → Trade.
Parameter Handle quantity reservation in system configuration
Note
In case the parameter is not checked, current system operation is maintained.
Upon checking the parameter, in case if in a subitem of order or warehouse document:
a lot is indicated – resource reservation for a given lot is created
a lot is not indicated – quantity reservation for a given item is created
Note
Type of reservation in an order depends on setting of parameter Reserve resources in document header. In case the parameter is:
checked – quantity or resource reservation is created, depending if lot is indicated in a given subitem
unchecked – non-blocking reservation (reservation without resources) is created
In the ribbon for sales orders, there is also button [Reserve Resources] available, which operates in the same way
In an unconfirmed warehouse release generated from a SO, the following reservation is created:
resource reservation – if resource reservation or non-blocking reservation with indicated lot was created in SO document
quantity reservation – if quantity reservation without indicated lot or reservation without resources was created in SO document
Upon confirmation, quantity in given warehouse will be decreased by quantity resulting from trade document.
Reservations in warehouse documents FIFO and LIFO
In definitions of warehouse document types for released items – SOR, IR-, WM- (Configuration → Company Structure → Company → Documents → SOR/IR-/WM- document type editing) parameter Reserve resources in unconfirmed documents is provided.
The parameter is available for editing upon checking parameter Handle quantity reservation in warehouse documents.
Parameter Reserve resources in unconfirmed documents in definition of SOR document
In case if in definition of warehouse document type (SOR, IR-, WM-) parameter Reserve resources in unconfirmed documents is:
checked – current system operation is maintained, that is, item from particular delivery is reserved in warehouse document (SOR, IR-, WM-)
unchecked – upon adding an item onto a document, quantity reservation is created. A subitem of such a document does not have fields filled in in columns: Delivery Date, Document, Source Document and Purchase Value/Acquisition Value is equal to 0. In order to associate a given document item with delivery, click on the button [Assign Delivery]. Such action is possible for documents with Initiated/Unconfirmed status.
When confirming a warehouse document which still includes quantity reservation, that reservation type is changed into resource reservation and resources as retrieved according to queueing method.
Depending of place in which button [Assign Delivery] is used, a delivery is associated with:
document – if the button is selected from document list level
item – if the button is selected from item list level
subitem – if the button is selected from the level of item details/delivery change panel
Note
It is not possible to change resource reservation into quantity reservation in a warehouse document.
Depending on value of parameter Reserve resources in unconfirmed documents, when generating a warehouse document from an order, if the parameter is:
checked and order subitems are associated with:
a resource – the reservation is transferred onto warehouse document according to lot and delivery from order document
a quantity reservation – reservation is made in warehouse document according to queueing method
a non-blocking reservation (reservation without resources) – reservation is made in warehouse document according to queueing method; for such subitems the reservation is made at the end
unchecked and order subitems are associated with:
a resource – the reservation is transferred onto warehouse document according to lot and delivery from order document
a quantity reservation – quantity reservation on given item/item lot is transferred onto warehouse document
a non-blocking reservation (reservation without resources) – quantity reservation is made in warehouse document
Note
In case of generating a warehouse document from SI/R document, irrespective of setting of Reserve resources in unconfirmed documents, resource reservation is created according to the trade document.
Margin
In case if quantity reservation is created in a document, the margin is calculated on the basis of given quantity and last purchase price (the system analyses all confirmed PI documents including given item to determine which item date of receipt is the latest). Details regarding margin calculation can be found in article Margin control.
within the same lot – change is not made because there is no association with delivery
within different lots – it is possible to make change if the whole item quantity within a given delivery is available
In case of changing delivery in an unconfirmed document:
within the same lot – change is not made because there is no association with delivery
within different lots – change of deliveries is made for available quantity of a given lot
Canceling a document
When canceling/correcting a POR document, the system verifies whether reservations (resource and quantity reservations) of an item (including individual lots) do not exceed that item quantity in a warehouse. In such case (reservations are greater than the quantity remaining after the document is canceled) the system blocs the possibility of canceling the document.
FIFO and LIFO reservations
Note
Parameters described in this article are available in databases with FIFO/LIFO method of queuing resources.
Reservations on sales orders and internal orders
The following parameters are available in definitions of sales order and internal order document types (Configuration → Company Structure → Company → Documents → IO/SO document type editing):
Reserve resources – if checked, when adding an item onto a document or increasing item quantity, reservation on specified item quantity is created by default, blocking sales of the item from particular delivery. If requested quantity is not available, reservation without resources is created
Reserve quantities – if checked, when adding an item onto a document, reservation on specified quantity is created without blocking sales of the item from particular delivery.
Above parameters are available for editing, regardless of value of parameter <<Handle quantity reservation in warehouse documents>>
Parameters Reserve resources/Reserve quantities available in SO document definition
Note
It is not possible to check parameter Reserve resources and Reserve quantities at the same time.
Additionally, on SO/IO document, it is possible to reserve quantities/resources with the use of button [Reserve Resources]/ [Reserve Quantities] as well as release resources/quantities by using button [Release Resources]/ [Release Quantities] for the following documents:
Sales orders with status Initiated, Unconfirmed, Confirmed, Pending
Internal orders with status Confirmed and Pending
Making/releasing a quantity/resource reservation does not result in creating/releasing reservation of different type than the one for which the operation is performed. Moreover, when reserving quantity of item, upon checking document item on which resource reservation has previously been made, appropriate question is displayed, allowing the user to change reservation type to quantity reservation.
In case if option of confirming change of resource reservation into quantity reservation is selected, first, resource reservation is released and quantity reservation created and then quantity is reserved for other subitems
Example
In a warehouse, there is item AP in quantity 50 pcs, including:
10 pcs, lot: Red
15 pcs, lot: Green
25 pcs, lot: without features
The following reservations exist in the system:
Resource reservations: 5 pcs from lot Red and 5 pcs from lot without features
Quantity reservations: 15 pcs from lot without features and 5 pcs from lot Green
A user can reserve 20 pcs, because 30 pcs is already reserved with resource or quantity reservations.
The following reservations can be made:
5 pcs from lot Red – other 5 pcs from that lot is reserved in terms of resources
10 pcs from lot Green – other 5 pcs from that lot is reserved in terms of quantity
20 pcs from lot Without features – other 5 pcs from that lot is reserved in terms of resources
Quantity reservation is changed into resource reservation in the same order.
In case if reservation without resources is included in a document and a user makes quantity reservation, first the system:
makes reservation in default warehouse for given document type
then it makes reservation in warehouses associated with this document
if in warehouses associated with that document requested quantity is not available, the reservation will remain a non-blocking reservation (a reservation without resources)
Example
In a SO document there is item BR included in quantity 10 pcs. A reservation without resources is created and option <All> is selected for in field Warehouse in the order header.
In warehouse:
main (default), are available 3 pcs of item BR
outlet, are available 3 pcs of item BR
complaint, are available 3 pcs of item BR
A user clicks button [Reserve Quantities] on the SO
The following reservations are made by the system:
3 pcs from the main (default) warehouse – 7 pcs of reservation without resources is remaining
3 pcs from the outlet – 4 pcs of reservation without resources is remaining
3 pcs from the complaint warehouse – 1 pcs of reservation without resources is remaining
1 pc will be a reservation without resources
Verification of quantity reservation in an order document is possible from the level of document item details in section Subitems and in tab Deliveries in column Reservation of Quantity of section Subitems. In case the parameter is checked in that column, quantity reservation is created on given subitem (blocking sales of given item quantity without indicating a lot). Parameter in column Reservation of Quantity is blocked for editing for:
item being a service
SO document in status: Canceled, Closed, Processed
an IO document in status: Initiated, Canceled, Unconfirmed, Closed, Submitted and Processed
Making/releasing a quantity reservation on an order is possible for:
documents in status Initiated (SO), Unconfirmed (SO), Confirmed (SO, IO), Pending (SO, IO)
for items of Merchandise type – refers only to making reservations
documents associated with warehouse specified in the header/subitem. In case if appropriate permissions are missing (e.g., the warehouse in given center is not associated with given document type), such document is omitted
Detailed description referring to operation of resource reservations and reservations without resources in dependence of document type can be found in articles Sales order and Internal order.
Types of reservations
In the system, it is possible to create the following types of reservations:
without resources (non-blocking reservations) – reservations which do not block quantity in a subitem specified for sales. These reservations can be used in IO and SO documents.
resource (blocking reservations) – reservations blocking sales of quantity of given subitem from a particular delivery. These reservations can be used in IO and SO documents.
quantity (blocking reservations) – reservations blocking sales of given item quantity specified on subitem without determined delivery A quantity reservation can be created:
within an item – as a guarantee of reserving particular quantity of given item (without specifying item lot which will be reserved) – for databases with any method of queueing resources
within selected lot – as a guarantee of reserving particular quantity of given item lot (in such case, the difference in terms of resource reservation consists in lack of assigning a delivery at the same time) – for databases with FIFO/LIFO method of queueing resources
Blockade of automatic reservations
In the system, it is possible to deactivate creation of automatic reservations for sales orders in a given warehouse. To do so, it is necessary to check parameter Blockade of Automatic Reservations, which is available from the level of Configuration → Company Structure → edition of selected center → tab Documents → Sales Order → tab Warehouses.
In case option <All> has been selected in the header of a SO document, the warehouse for which the parameter Blockade of Automatic Reservations is checked is ignored during the creation of automatic reservations of quantities/resources.
In case a user, in the SO document header or on it subitem, indicates a warehouse, the value of the parameter is ignored and it is possible to make a blocking reservation maintaining current rules of creating reservations.
Margin
In case in a document there is a quantity reservation, a margin is calculated on the basis of a given quantity and the last purchase price (the system analyses all confirmed PI documents containing a given item whose date of receipt is the latest). Details regarding margin calculation can be found in article Margin control.
Delivery change FIFO/LIFO
In case of changing delivery in a confirmed document:
within the same lot – change is not made because there is no association with delivery
within different lots – it is possible to make change if the whole item quantity within a given delivery is available
In case of changing delivery in an unconfirmed document:
within the same lot – change is not made because there is no association with delivery
within different lots – change of deliveries is made for available quantity of a given lot
Canceling a document
When canceling/correcting a POR document, the system verifies whether reservations (resource and quantity reservations) of an item (including individual lots) do not exceed that item quantity in a warehouse. In such case (reservations are greater than the quantity remaining after the document is canceled) the system blocs the possibility of canceling the document.
Quantity confirmation – FIFO/LIFO
Quantity confirmation of POR and IR+ documents – FIFO/LIFO
The functionality of quantity confirmation allows for providing an item for sales begore specifying its correct value. After receiving a purchase document, a user can enter an appropriate value in a POR document and then confirm the document, upon which values of resources and purchase costs are updated in unposted documents for released items. In posted documents, the update of purchase costs will be executed by generating a CC.
In a document with confirmed quantity, the following fields can be modified:
Regular Price (POR), Discounted Price (POR, IR+), Discount (POR), Value (POR, IR+), Price Type (POR),
Modification of exchange rate and currency, unless a quantity correction is not generated to a document (POR).
Date of issue, date of receipt, reference number, delivery method
Description
Other fields are not subject to modification on a document with confirmed quantity.
From a POR/IR+ with confirmed quantity it is not possible to generate a value correction.
Parameter Prime sales cost determined and Fixed value of delivery
Parameter Prime sales cost determined is only available on warehouse documents: SOR, IR-, WM-, WM+ and on quantity corrections. It is editable on SOR, IR- and WM- documents. For other documents, the value of the parameter is transferred from the source document and it is not subject to edition. After checking the parameter in a document and saving the document, it is not possible to change the parameter value.
Note
Quantity confirmation of documents is not available for documents issued to a consignment warehouse.
If in a document, the parameter Prime sales cost determined is:
checked – costs on the document are actual A document can be posted, after changing the value in an IR+/POR document, a cost correction is generated.
unchecked – cost on the document has not been determined. It is not possible to post a document until the parameter is checked.
Note
Information about prime sales cost on SI and R trade documents is only approximate and does not always match the actual sales cost. Owing to that, posting of costs should be performed on the basis of warehouse documents.
In order to be able to modify the parameter Fixed value of delivery in a confirmed SOR, IR-, WM- document, the operator group to which the currently logged-in operator belongs must have permission Determining of prime sales cost granted, which is available from the level of Configuration → Company Structure → Operator Groups → edition of selected operator group → tab Other Permissions.
The parameter Fixed value of delivery is available in IR+, PZ and cost corrections and it is not subject to edition.
The parameter does not regard: trade documents, orders, quotes and inquiries.
When confirming a SOR, IR- or WM- document, all document subitems are verified, if value of the delivery is:
determined – the parameter is checked automatically
not determined – the parameter will not be checked
The parameter is update during the update of costs on a document upon confirmation of POR/IR+.
In case of updating price/value on a document with confirmed quantity, the change is saved only for a given item and document value. The value of an item remains unchanged until a complete confirmation of a POR/IR+ document (status Confirmed).
Changing value of subitem on POR/IR+
Example
Updating values of item and subitem on a document with confirmed quantity and confirmed entirely:
Quantity
Price
Item Value
Document Value
Subitem Value
Document Status
Comment
10 pcs
5 USD
50 USD
50 USD
50 USD
Confirmed Quantity Total
Document with confirmed quantity
10 pcs
7 USD
70 USD
70 USD
50 USD
Confirmed Quantity Total
Modification of price on document and its saving
10 pcs
8 USD
80 USD
80 USD
80 USD
Confirmed
Modification of price on document and its permanent confirmation
Updating resources and costs
Upon changing status of POR document from Confirmed Quantity Total to Confirmed, the system:
Updates purchase costs on warehouse documents for released items and their quantity corrections with status Unconfirmed, Initiated and Confirmed if Prime sales cost determined parameter is unchecked on SOR, IR-, WM-, WM+, SORQC and IR-QC documents.
Generates cost corrections to warehouse documents for released items and their quantity corrections with status Confirmed if Prime sales costdetermined parameter is checked on SOR, IR-, WM-, WM+, SORQC and IR-QC documents.
Updates PORQC document.
Changes value of resource remaining in warehouse(s).
Confirmed WM-/WM+ from W1 to W2 – 2 pcs, unchecked parameter Prime sales cost determined.
Unconfirmed SOR3 from W2 – 1 pcs
Modification of price on POR document from 10 USD to 12 USD. Confirmation of the POR.
Unconfirmed SOR3 from W2 – 1 pcs
Step
Quantity
Price/Value
Document Value
Subitem Value
Comment
1.
10 pcs
12 USD/120 USD
120 USD
120 USD
-
2.
2 pcs
12 USD/22 USD
24 USD
24 USD
Update of resource
3.
2 pcs
10 USD/20 USD
20 USD
20 USD
Cost correction for 4 USD is generated
4.
1 pcs
12 USD/12 USD
12 USD
12 USD
Update of resource
5.
1 pcs
10 USD/10 USD
10 USD
10 USD
Cost correction for 2 USD is generated
6.
1 pcs
12 USD/12 USD
12 USD
12 USD
Update of resource
7.
2 pcs
12 USD/24 USD
24 USD
24 USD
Update of resource on WM-/WM+
8.
1 pcs
12 USD/12 USD
12 USD
12 USD
Update of resource
9.
4 pcs
12 USD/48 USD
-
-
Resource value in warehouse
Generating PI from POR document with confirmed quantity
In case of generating a PI document from a POR, standard rules for generating documents described in category Generation of documentsapply, with exclusion of the following rules:
in case of selecting several POR with confirmed quantity, in which different currency exchange rates are registered, during generation of a PI, the system displays window with question referring to aggregation of exchange rates:
upon approving the aggregation, those exchange rate type and value are retrieved onto the invoice, which are determined by settings in PI document definition in a center in which the document is being generated
upon selecting the option without aggregation, as many invoices are generated as there are different currency exchange rates registered in the selected documents
Note
It is not possible to generate one invoice to a PO receipt with status Confirmed Quantity Total and Confirmed.
Upon generating a PI from a PO receipt with confirmed quantity, it is not possible to:
modify document items
confirm or confirm and post POR
generate a correction to the POR if the invoice status is Unconfirmed.
In an invoice document, the following fields can be modified:
Regular Price – the permission Modification of regular price is controlled for an operator group
Discounted Price
Discount
Value
Exchange Rate Type and Exchange Rate Value
When confirming a PI document, the POR document is also confirmed and the following elements are updated:
purchase value on subitems
regular and discounted price, discount, values on an item
VAT table
values and parameters referring to currency (exchange rate, exchange rate type, date type, date, conversion calculators) in the document header
Note
Confirming an invoice results in confirmation of PO receipt associated with it (the document status will be changed from Confirmed Quantity Total to Confirmed).
Note
In case of adding additional costs to a PI document, a PORAC document is generated after confirmation of the PI.
Once the PI is confirmed, standard mechanism of updating purchase cost is started, the same as in case of changing status of POR from Confirmed Quantity Total to Confirmed.
Canceling a document with confirmed quantity
The rules applying to the cancellation of documents with confirmed quantity are the same as in the case of cancelling a confirmed POR/IR+ document. Conditions verifying during an attempt to cancel a POR/IR+ document with Confirmed Quantity Total status:
Quantity correction – if there is a correction with a status different than Canceled, the system does not allow to cancel the document.
Item sale – verification whether the merchandise from the document which is to be canceled, has been released. If yes, the system does not allow to cancel the document.
Quantity confirmation – AVCO
Quantity confirmation of POR and IR+ documents – AVCO
The functionality of quantity confirmation allows for providing an item for sales begore specifying its correct value. After receiving a purchase document, a user can enter an appropriate value in a POR document and then confirm the document, upon which values of resources and purchase costs are updated in unposted documents for released items. In posted documents, the update of purchase costs will be executed by generating a CC.
In a document with confirmed quantity, the following fields can be modified:
Regular Price (POR), Discounted Price (POR, IR+), Discount (POR), Value (POR, IR+), Price Type (POR),
Modification of exchange rate and currency, unless a quantity correction is not generated to a document (POR).
Date of Issue, Date of Receipt, Reference Number, Delivery Method
Description
Other fields are not subject to modification on a document with confirmed quantity.
From a POR/IR+ with confirmed quantity it is not possible to generate a value correction.
Note
Quantity confirmation of documents is not available for documents issued to a consignment warehouse.
Note
Information about prime sales cost on SI and R trade documents is only approximate and does not always match the actual sales cost. Owing to that, posting of costs should be performed on the basis of warehouse documents.
Parameter Prime sales cost determined
The parameter Fixed value of delivery is available in IR+, POR and cost corrections and it is not subject to edition.
The parameter is update during the update of costs on a document upon confirmation of POR/IR+.
In case of updating price/value on a document with confirmed quantity, the change is saved only for a given item and document value. The value of an item remains unchanged until a complete confirmation of a POR/IR+ document (status Confirmed).
Changing value of subitem on POR/IR+
Example
Updating values of item and subitem on a document with confirmed quantity and confirmed entirely:
Quantity
Price
Item Value
Document Value
Subitem Value
Document Status
Comment
10 pcs
5 USD
50 USD
50 USD
50 USD
Confirmed Quantity Total
Document with confirmed quantity
10 pcs
7 USD
70 USD
70 USD
50 USD
Confirmed Quantity Total
Modification of price on document and its saving
10 pcs
8 USD
80 USD
80 USD
80 USD
Confirmed
Modification of price on document and its permanent confirmation
Updating resources and costs
After changing the status of a POR document from ZATWIERDZONY ILOŚCIOWO to Confirmed, the system:
Updates IR+QC and PORQC documents
Updates resource value
Generates cost correction
Example
Updating costs and resources for AVCO method of collecting resources:
POR with confirmed quantity – 10 pcs X 10 USD
Confirmed SOR1 – 8 pcs
Confirmed SORQC1 – 4 pcs
Confirmed PORQC1 – 1 pc
Unconfirmed PORQC2 – 2 pcs
Modification of price on POR document from 10 USD to 12 USD. Confirmation of the POR.
Step
Quantity
Price/Value
Document Value
Subitem Value
Comment
1.
10 pcs
12 USD/120 USD
120 USD
120 USD
-
2.
8 pcs
Unimportant
Unimportant
80 USD
-
3.
4 pcs
Unimportant
Unimportant
40 USD
-
4.
1 pcs
12 USD/12 USD
12 USD
12 USD
Update of resource
5.
2 pcs
12 USD/24 USD
24 USD
24 USD
Update of resource
Generating PI from POR document with confirmed quantity
In case of generating a PI document from a POR, standard rules for generaing documents described in category Generation of documentsapply, with exclusion of the following rules:
in case of selecting several POR with confirmed quantity, in which different currency exchange rates are registered, during generation of a PI, the system displays window with question referring to aggregation of exchange rates:
upon approving the aggregation, those exchange rate type and value are retrieved onto the invoice, which are determined by settings in PI document definition in a center in which the document is being generated
upon selecting the option without aggregation, as many invoices are generated as there are different currency exchange rates registered in the selected documents
Note
It is not possible to generate one invoice to a PO receipt with status Confirmed Quantity Total and Confirmed.
Upon generating a PI from a PO receipt with confirmed quantity, it is not possible to:
modify document items
confirm or confirm and post POR
generate a correction to the POR if the invoice status is Unconfirmed.
In an invoice document, the following fields can be modified:
Regular Price – the permission Modification of regular price is controlled for an operator group
Discounted Price
Discount
Value
Exchange Rate Type and Exchange Rate Value
When confirming a PI document, the POR document is also confirmed and the following elements are updated:
purchase value on subitems
regular and dicounted price, discount, values on an item
VAT table
values and parameters referring to currency (exchange rate, exchange rate type, date type, date, conversion calculators) in the document header
Note
Confirming an invoice results in confirmation of PO recepit associated with it (the document status will be changed from Confirmed Quantity Total to Confirmed).
Note
In case of adding additional costs to a PI document, a PORAC document is generated after confirmation of the PI.
Once the PI is confirmed, standard mechanism of updating purchase cost is started, the same as in case of changing status of POR from Confirmed Quantity Total to Confirmed.
Canceling a document with confirmed quantity
The rules applying to the cancellation of documents with confirmed quantiy ar etha same as in the case of cancelling a confimred POR/IR+ document.
Verification of deliveries
Permission to change deliveries
Change of deliveries on many documents can be performed from the level of the form of delivery verification whose visibility depends on the permissions available from the level of Configuration → Operator Groups → edition of selected group → tab Other Permissions:
Access to purchase prices
Change of delivery in confirmed documents
Delivery change panel
[Alert]Permission Change of delivery in confirmed documents and Delivery change panel are not available for French database version and AVCO method of queuing resources. [/alert]
The form is available from the level of menu Warehouse (Resources) → Delivery Verification
Delivery Verification form
Delivery verification form
First section Items allows for adding:
items, with the use of button [Add]
whole item group, with the use of button [Add Group]
In section Parameters, it is necessary to specify conditions which must be fulfilled by a document whose resources are to be changed:
Date – indicates the date from the document, with the possibility of indicating: Date of Issue or Date of Release. By default, the date of issue is displayed on the form.
Note
For an IR- document, regardless of selected date, date of issue is always taken into account.
Date From/Date To – it allows for specifying a range of dates from which documents will be retrieved. Current date is displayed in both fields, by default.
Document – it allows for indicating documents used for delivery change:
<All> – SO release documents and internal release documents
<Sales Order Release> – default option
<Internal Release>
Warehouse – determining of warehouses narrows down the list of documents to those which have been issued in the selected warehouses. The list for selection includes those warehouses which have been attached to a company/center to which the currently logged-in operator is assigned.
Control feature conformity – parameter checked by default When changing deliveries, the list of deliveries displays only those items whose values of features are the same as on the subitem being changed.
The control does not include:
subitems without defined values of features – such a subitem can be changed to any subitem, regardless of feature value
subitems with defined values of features – such a subitem can be changed to a subitem without defined values of features
Upon unchecking the parameter, the control is not sustained.
In section Subitems, after selecting button [Recalculate], are displayed subitems of documents for released items, according to the parameters set in section Parameters and Items.
In order to be able to perform a change of delivery, it is necessary to:
indicate a subitem for which change of delivery is to be performed. In field Quantity in section Subitems, a quantity corresponding to the currently selected item is displayed.
check parameter Show deliveries and select a delivery which should be retrieved onto the document.
click on [Change] button which will change delivery in the document.
The window in which it is possible to change deliveries is the same as the window in which it is possible to <<change delivery in a confirmed document>>.
Change of deliveries can be also performed directly in a <<confirmed SI, SOR, IR- document>>, from the level of item details.
Sales below stock levels
The system allows for selling items, that is issuing confirmed trade documents for released items, whose resources have not yet been actually registered in a warehouse Thanks to that, the resources are already in the warehouse and can be subject to sales, even though a warehouse document for received items has not yet been entered to the system.
A warehouse document for released items (SOR) can be created when resources are present in a warehouse – a warehouse document for received items should be issued first. The item registered as shortage can be retrieved from the warehouse if there exists a sufficient amount of the resources whose date of receipt in the warehouse (e.g. the date of receipt in case of a POR document) is not later than the date of generating of the SOR document.
Note
The system allows issuing only a trade document for released items below stock levels, whereas a warehouse document for released items (SOR, IR-, WM-) can only be based on the actual resources.
Configuration of sale below stock levels
The option of sale below stock levels can be enabled by checking parameter Sell below stock levels in definition of a given center company (Company Structure → Rights Structure → center/company edition), from the level of which such sales model is to be enabled.
Parameter Sell below stock levels in center definition
The option of sale below stock levels is inactive by default. The parameter can be unchecked if:
no shortages are registered in warehouses associated with a given center
no POS workstation is associated with a company/center
Example
On 1 September 2018 a customer purchases item AP whose resources have not been registered in the stock records in the warehouse. The vendor can then issue a trade document – a SI or R document, but the item can be released only when its receipt has been registered in the system. Therefore, it is not possible to issue a SOR document confirming the release of the item from the warehouse until a warehouse document for released items (e.g. POR) has been issued.
The vendor issues a SI with its date of issue of 1 September 2018 and sales date of 4 September 2018, since will definitely be registered on that date.
On 4 September 2015, a warehouse operative registers the POR document whose items include the item AP and thus records the item in the stock records.
On the same day (4 September 2018), after confirming the POR document, the customer can come to collect the item AP that was purchased 3 days before Then, a SOR document is generated to the SI document issued before, whose subitems are associated with the subitems of the POR document.
Note
The date of generating of a SOR document cannot be earlier than the date of receipt on a POR document.
Handling shortages in documents
When issuing a trade document, a user can indicate a warehouse from which the shortages are to be retrieved.
In case in a document header has been indicated:
a warehouse from the list of warehouses available for SI or R document, all added items are assigned to that warehouse
option <All>, items are associated with the <<default warehouse>> defined in company structure for a given document for released items
Note
After entering items into a document, it is not possible to change a warehouse.
Adding items to a document has been described in article: <<LINK>>.
In the there are shortages in a document:
the margin on an item is calculated on the basis of the applicable sales price list for a given item (if there are no resources) or the purchase price increased by the margin for a given item (if there exists at least one unit in the stocks and its price from the sales price list is does not meet the minimum margin requirements). While generating a warehouse document, the system does not verify whether the minimum margin is achieved – the prices on the generated SOR document will be set according to prices specified on the trade document.
subitems of item in columns: Delivery Date, Document, Source Document are empty. The columns with Purchase Value and Acquisition Value take on a value equal to 0.00, whereas the columns with features may remain empty (then, while generating a SOR document, the system retrieves resources with any features values) or may take on a specific value – however, it must be remembered that all subitems of a given item must have the same values of features.
Note
Purchase/acquisition costs on trade documents are not updated when restocking shortages.
Subitem in a sales invoice with sale below stock levels
Registered warehouse shortages of a specified resource are displayed:
in the list of stock levels, on an item form, in the tab Resources → <<Resources and lots>>, in the column Shortages
ona warehouse form, in the tab <<Stock Level>>
on the <<Archival Stock Levels>> form, in the column Shortages
Note
The system displays stock shortages with the date set in a trade document – SI/R in the field Date of Sale.
Elimination of shortages
Shortages can be eliminated in two ways:
Manually – when generating a warehouse document for released items (SOR) from a trade document (SI, R) which has subitems sold below stock levels, it is verified whether on the current day appropriate resources exist in the warehouse. If so, the released item subitems are associated with the corresponding received item subitems
With BPM process Restock Shortages Automatically – the process automates generation of warehouse documents to sales invoices and receipts in which shortages have been registered. It can be run in several ways:
confirmation of POR, IR+, WM+ – the process is started automatically upon confirming the listed documents. In this case the process adds missing warehouse documents on the on-going basis. For items included in a delivery document, the process verifies shortages registered in the system. Next, it generates warehouse documents (SOR) to sales invoices or receipts pointing to lack of resources for received items and thus it eliminates shortages in a warehouse.
from the level of POR, IR+, WM+ lists – it is also possible to start the process manually for specific deliveries by selecting given documents on the list and running the process from context menu In this case the process operates the same way as in case of confirming a delivery document.
from the level of Inbox – if shortages are to be restocked recurrently and not each time a delivery is confirmed. In this case the process verifies all sales invoices and receipts in which shortages are registered and attempts to generate missing warehouse documents (SOR) with the use of resources available in warehouses. Information about all documents pointing to shortages and about generated documents is sent to operator indicated in the startup parameter or to the process initiator.
Note
BPM process Restock Shortages Automatically concerns only permanently confirmed documents. It is not possible to run the process for documents with confirmed quantity.
Control of resource modification chronology – AVCO
Note
Parameter Control chronology of resource modifications is available only upon selecting AVCO method of queuing resources.
For AVCO method of pricing resources, there is an option available which is responsible for controlling the chronology of dates regarding receipt and release of resources.
From the level of System → Configuration → Trade, after selecting AVCO method of queuing resources, it is possible to check/uncheck the parameter Control chronology of resource modifications. By default, during the creation of databases in the system, the parameter is checked, with the possibility of unchecking it at any moment. For converted databases, the parameter is unchecked by default, with the possibility of checking it.
Blockade of confirming warehouse documents manually
If parameter Control chronology of resource modification is checked, when confirming or confirming quantity of warehouse documents
IR+/POR and their quantity and value corrections
SOR/IR – and their quantity corrections
WM-/WM+
for each document item, the following date is checked:
date of release for SOR
date of receipt for POR
date of issue for POR and its quantity/value corrections, for and its quantity corrections, WM-/WM+
correction date for PORQC/PORVC and SORQC
In case if the above dates are earlier than the last date of resource modification (in a warehouse the same as selected in a document), it is disabled to confirm a document and appropriate message is displayed.
Automatic generation of confirmed warehouse documents
When confirming:
SI/R/PI and their quantity corrections
PIAC
WM-
which automatically generate warehouse documents, the system blocks possibility to confirm them in case if the dates below, in dependence of document type, are earlier than the date of last modification of a resource (in a warehouse the operation refers to) of at least one item of a document:
date of sale for SI/R
date of purchase for PI
date of issue for WM-
correction date for PIQC/PIVC, RQC, SIQC, PIAC
Note
The system automatically generates a confirmed cost correction, regardless of last date of resource modification.
In the case of IR+/IR- documents generated from an inventory, if chronology of resource modification is not sustained, the system generates unconfirmed documents.
Batch confirmation of documents from the level of warehouse document list
When confirming warehouse documents in a batch, the system verifies among the items marked for confirmation whether there is any document to which confirmation blockade applies. All documents to which the blockade does not apply are confirmed, whereas documents subject to blockade are not be confirmed