
Contents
General information
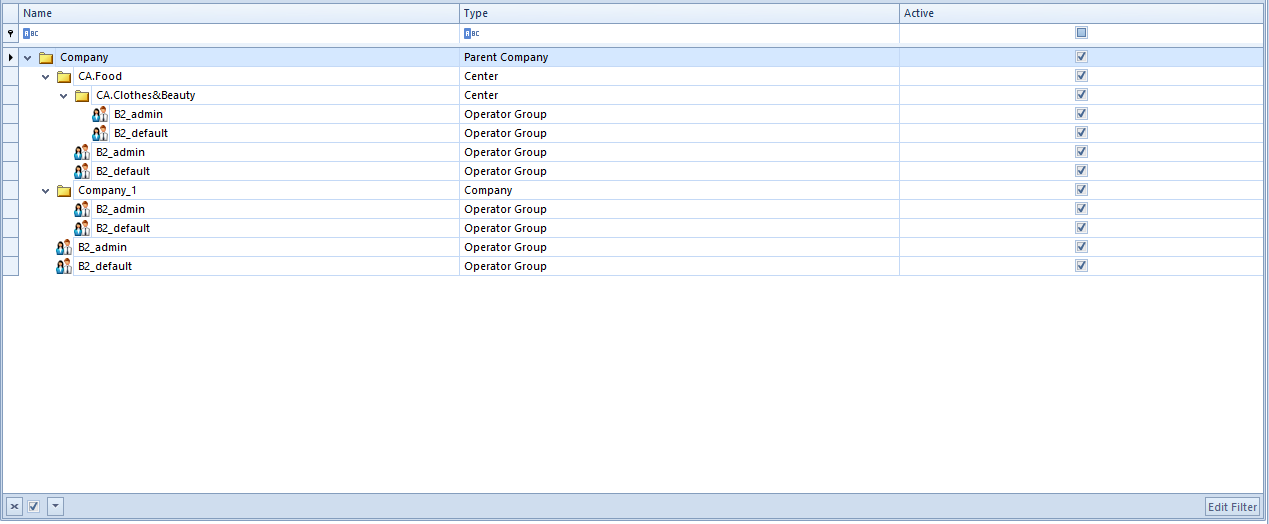
In menu Configuration → Company Structure, there is information about a company to which a user is currently logged-in.
The data is presented:
- on the main company form ─ if the user is logged-in to the main company or its child center
- on the form of a center of Company type ─ if the user is logged-in to a center of company type or its child center
Form
In the left panel of the form, there is basic information about the company, whereas on the right side, there is information included in a currently selected tab, and a field allowing the user to enter an additional description of the company.
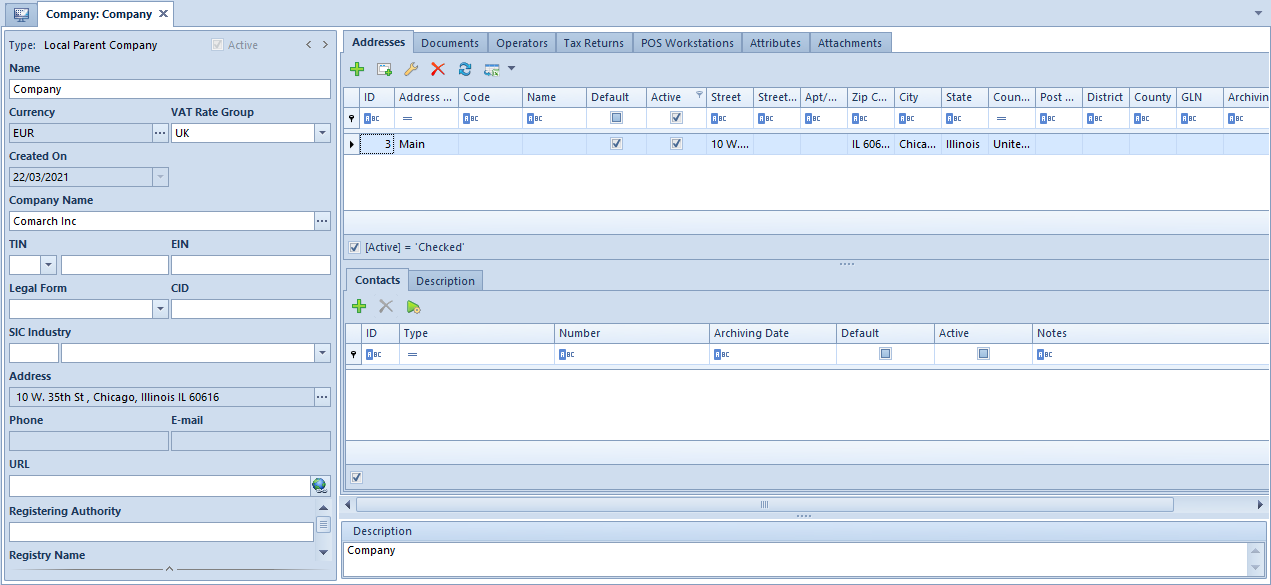
Basic information referring to a company:
- Type – type of structure center
- Active ─ parameter indicating activity status of a given canter (it cannot be deactivated for the main company)
- Name
- Created On ─ Non editable field
- Currency – field for selecting system currency. Button […], which opens the list of currencies defined in the system, is active for the main company and for centers of Company type until changes on the form are saved. For child centers, system currency of the parent company is set, by default. For newly created databases, system currency is consistent with language of a database is set for the parent company.
- VAT Rate Group ─ default VAT rate group assigned to a company. The field is active for the parent company and for centers of Company type, until the first document is issued. The system allows for assigning of different VAT rate groups to centers of Company type, owing to which it is possible to determine various VAT rates for an item or item group in dependence of a company. The list of VAT rate groups is available from the level of generic directories.
- Company Name ─ field for selecting a customer/vendor the company can be associated with. Upon clicking on the ellipsis button […], the following message is displayed: “The company data will be filled in with information (Code, Name, Tin, EIN, URL, Legal Form, Industry, SIC) of the selected customer/vendor. Do you want to continue?”. Upon accepting the message, the system automatically fills in the mentioned fields according to data defined on selected customer/vendor form and marking that customer/vendor as internal (tab Trade of a customer/vendor form). One customer/vendor can be associated with one center of Company type only. An internal customer/vendor can be changed until he/she is used in the system or a center with which he/she is associated is used, e.g., by means of issuing a document for that customer/vendor.
- TIN – TIN of a company or of the associated internal customer/vendor. This field is composed of a drop-down list of prefixes for individual countries and a field for entering the number. It must be specified in case of multi-company structure enterprises. When logging in to the system, the entered TIN is verified with the TIN registered in user’s license key.
- EIN – EIN of a company or of the associated internal customer/vendor
- Legal Form – field with a drop-down list for selecting legal form of a company
- CID – creditor identification number applied for entities without TIN number
- SIC Industry – field for selecting a standard industrial classification number and a relevant industry branch
- Address ─ main address presented as company seal on document printouts. In order to change the main address, it is necessary to click on […] button which opens a list of defined addresses. From this level it is necessary to add end edit contacts which will be presented on the form, in fields Phone and E-mail.
- Telephone
- URL ─ website address
Below, the user can expand an additional section and complete the form with data regarding a relevant authority which registered the company upon its creation:
- Registering Authority
- Registry Name
- Number in Registry
- Registration Date
- Share Capital
- Paid-in Capita
- Shop Area ─ additional field for specifying the area of a shop (building) in square meters
The parameters available below are divided into three areas:
section Trade
- Sell below stock levels – parameter allowing for selling items which are currently not available (no resources in warehouse). The function of sale below stock levels is described in Sales below stock levels article. The value of the parameter can be changed at any moment during work with the system. The possibility to uncheck it depends on shortages registered in the system. Until they are deleted, the parameter is greyed out.
- Monitor SENT transport – this parameter makes possible monitoring the carriage of goods by road. It is available only for centers of Company type.
- Handle reverse charge – parameter activating reverse charge handling. It can be edited until the first document handling reverse charge is registered in the system.
- Compliance with French VAT law – parameter available if the VAT rate selected is: FR. Selecting the parameter brings a number of functional changes in the system, resulting from the adaptation of the system to the requirements of the French VAT law:
- Retail sales blockade – it blocks, among others, the handling of receipts and their corrections, printing invoices on a receipt printer, or the handling of sales and advance invoices and their corrections if no customer TIN is given in a document. Detailed description of the functionality can be found in article Receipts.
- Keeping a record of special events – the system logs events specified by the law in order to track the operational consistency of the system and data integrity.
- Digital signature verification – the functionality is available for invoices, receipts, duplicate receipts, special events, Grand Total Period reports, and archives is available from the level of Configuration → Tools -> Digital Signature Verification.
- Printout history – handling of the functionality of identifying duplicates of receipts printed on POS workstations.
- Grand Total Reports – handling of the list of reports generated on POS workstation available in menu Sales → Grand Totals (Tax Files). In the field Archive Folder located under the parameter Compliance with French VAT law, it is possible to choose a drive location where tax files will be saved.
- Print Receipts – parameter available in the French version of the database with checked parameter Compliance with French VAT law. It allows for omitting printing of a receipt with a value below a defined value. After selecting option Above the value, additional field is presented, where it is possible do define a value of EUR above which the receipt will be printed.
section Accounting
- Split payment under Polish law – parameter activating handling of the split payment functionality for company It is available if the PLN currency is selected.
- Register compensations – allows the registration of compensation documents in the company. More information …
- Compliance with French VAT Law ─ parameter available if the VAT rate selected is: Selecting the parameter brings a number of functional changes in the system, resulting from the adaptation of the system to the requirements of the French VAT law:
- Retail sales blockade – it blocks, among others, the handling of receipts and their corrections, printing invoices on a receipt printer, or the handling of sales and advance invoices and their corrections if no customer TIN is given in a document. Detailed description:
- Keeping a record of special events – the system logs events specified by the law in order to track the operational consistency of the system and data integrity.
- Digital signature verification – the functionality is available for invoices, receipts, duplicate receipts, special events, Grand Total Period reports, and archives is available from the level of Configuration → Tools → Digital Signature Verification.
- Printout history ─ handling of the functionality of identifying duplicates of receipts printed on POS workstations.
- Grand Total Reports – handling of the list of reports generated on POS workstation available in menu Sales → Grand Totals (Tax Files). In the field Archive Folder located under the parameter Compliance with French VAT Law, t is possible to choose a drive location where tax files will be saved.
section Fixed Assets
- 360 days in a year for straight-line method – if the parameter is active and depreciation begins in the course of a month, write-offs will be generated proportionally to the number of depreciation days during the given month. If the parameter is not selected, depreciation write-offs will be calculated for the entire month.
- Round-off amount added last month – if this parameter is selected, write-offs for particular months are calculated in such a way that they are equal, while the remaining pennies are included in the write-off for the last month of the accounting/calendar period. If the parameter is not selected, pennies are kept as part of the write-off for a month, for which they have been calculated.
In the menu, there are standard buttons allowing for saving and closing the form, as well as [Objects Availability] button which allows for managing objects within a given company. More information regarding the functionality can be found in article Objects availability.
The other buttons available in the menu differ in dependence of selected form tab.
Tab Addresses
Tab Addresses contains information referring to addresses defined for a given company. A user can add, delete and edit addresses as well as contacts assigned to them.
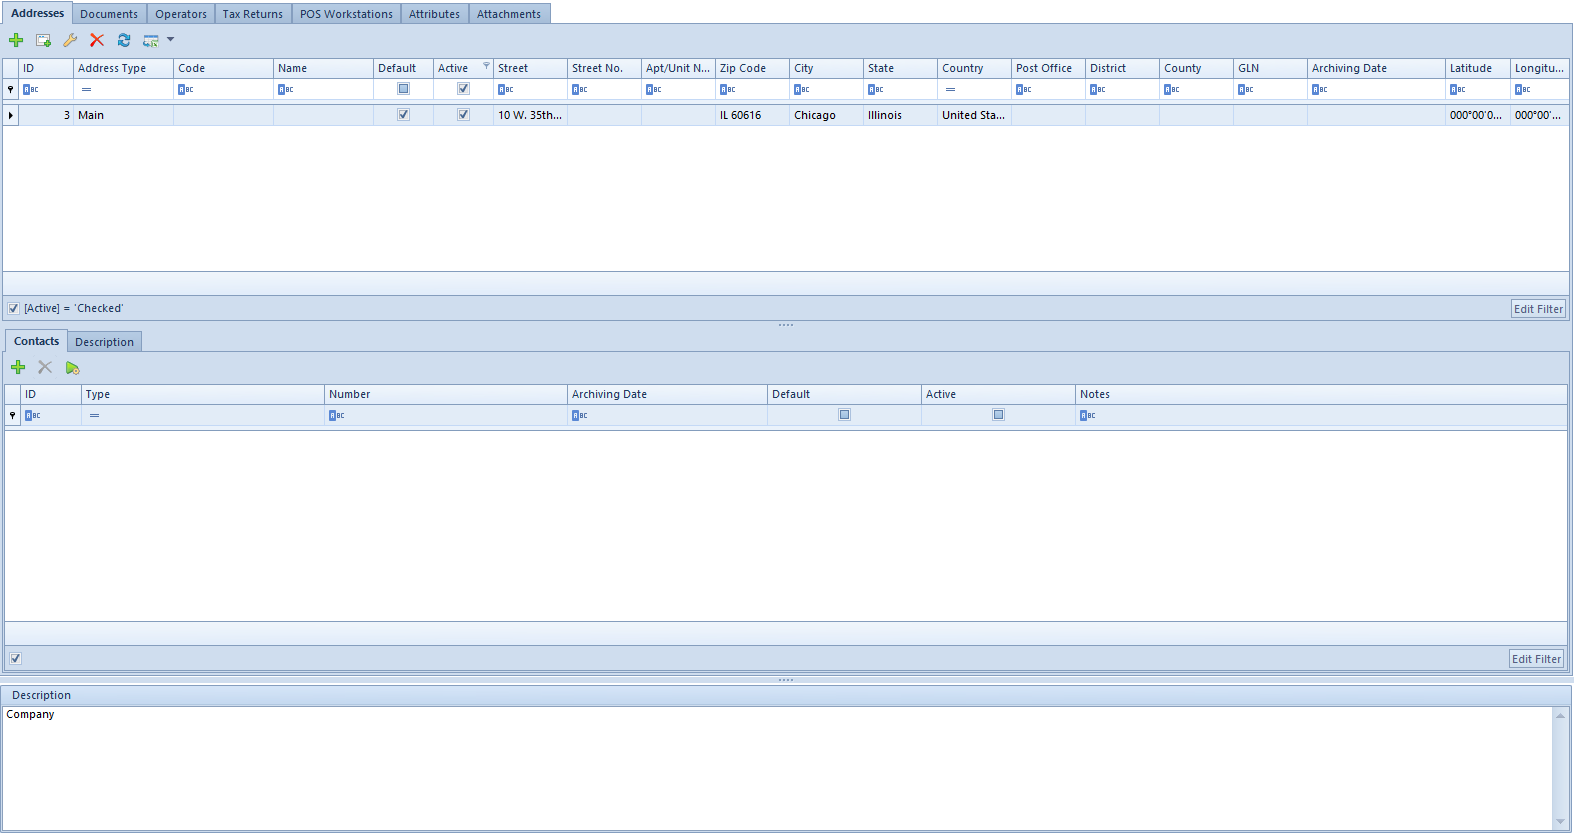
In the upper section of the window, there is a list of defined addresses and in the columns, data referring to its address and parameters determining whether a given address is active or default, are presented. For a newly added address, the parameter Active is checked by default. Unchecking it makes a given address an archival address, e.g., it cannot be selected in a document.
In the middle section of the window, there is a list of contacts assigned to an address selected in the upper part and Description tab. A user can add the following contact types: Phone No., Private Phone No., Office Phone No., E-mail, Fax, Messenger: GG, Messenger: Skype. For each contact type it is possible to define only one default contact. It is not possible to deactivate a default contact type. A date since when the contact is no longer active appears in column Archiving Date.
Tab Documents
Tab Documents allows for editing the document types and its layout is the same as window available upon selecting Configuration → Documents → Types. However, from the level of the structure center edit form, the user has more possibilities referring to document configuration. With the use of [Attach to Group] button it is possible to assign particular types of documents to selected group of documents.
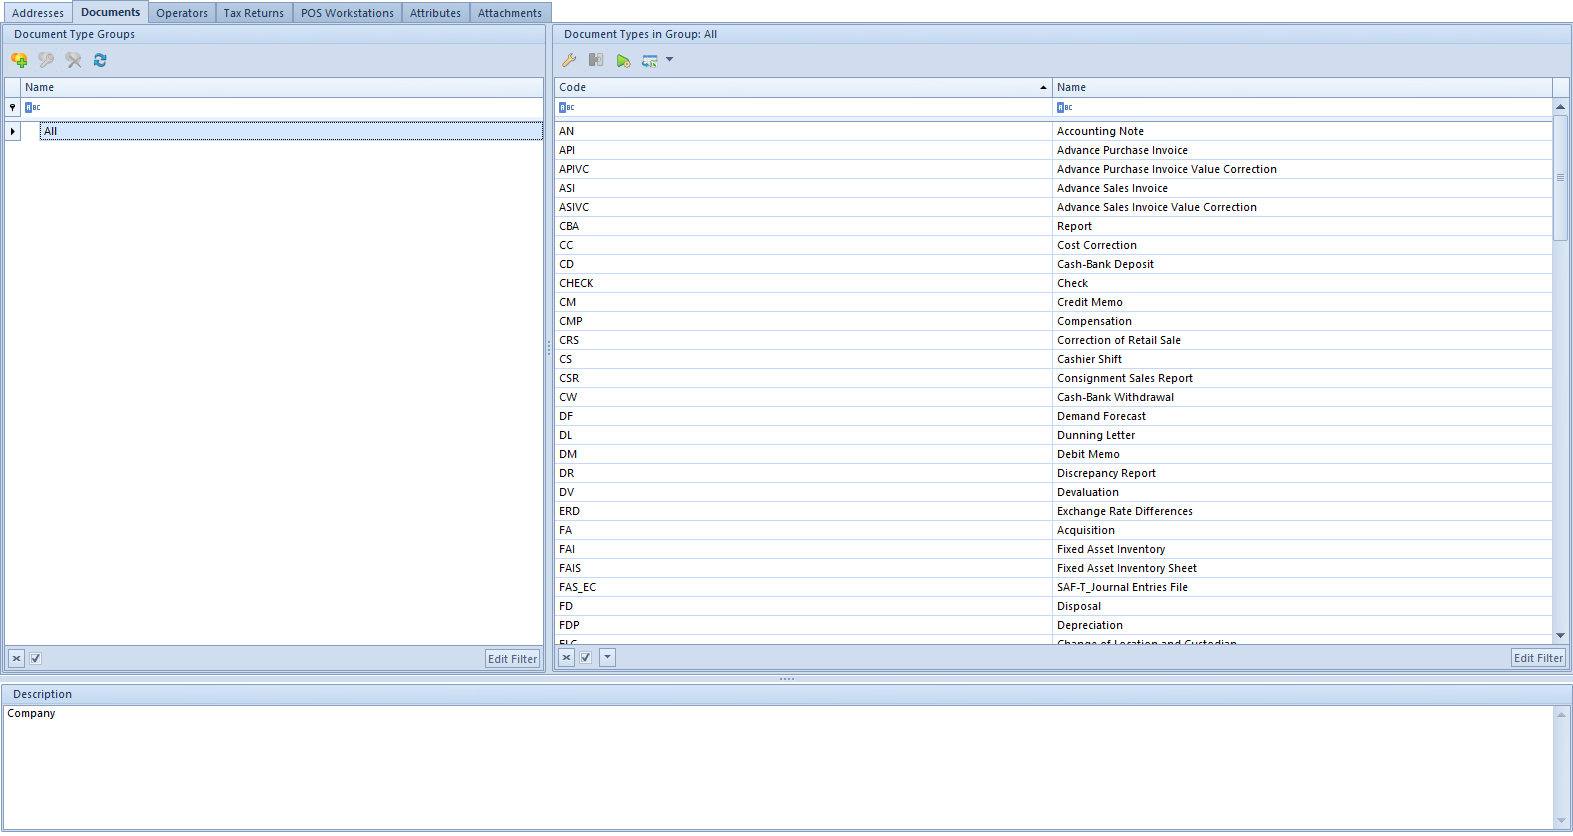
In addition to the possibility of assigning document types do groups created by the user, it is also possible to determine the visibility of document groups in a given structure cent. When editing a document group, upon clicking [Attach] in panel Visibility, it is possible to indicate structure centers in which all documents included in that group are to be visible. Button [Detach] allows for performing the opposite operation.
Because the document types are described in this manual in chapter Document types, here you will find the description of the additional tabs and fields which are available when editing a given document type
Below, are described additional tabs and fields in addition of a given document type, which are not available in the document configuration performed from the level of Configuration → Documents → Types.
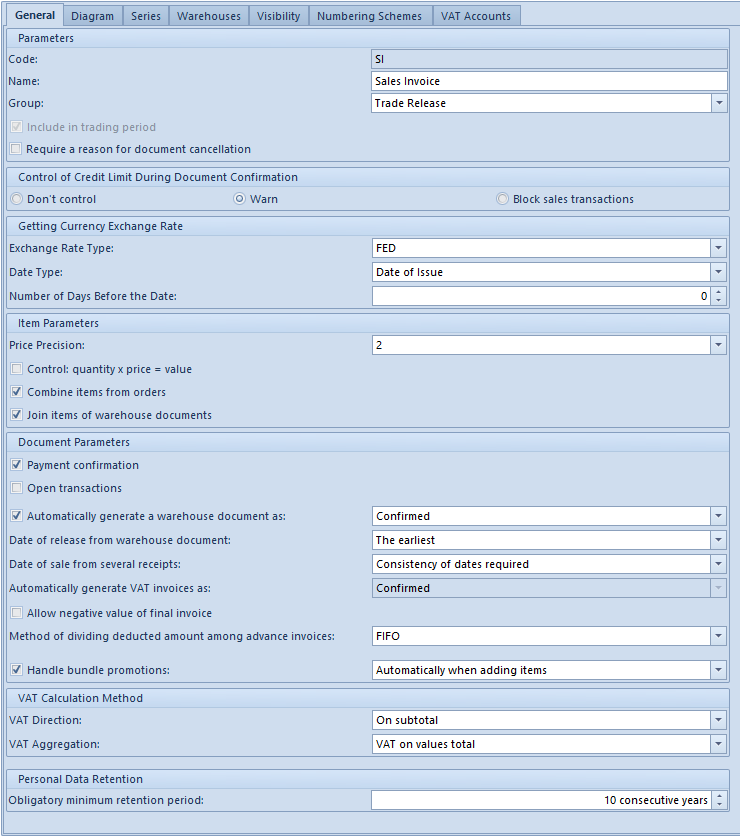
Tab General
In General tab of edited document type, there are basic information about a document type provided as well as additional parameters referring to configuration of the type within a given center, which concerns, among other, control of credit limit, retrieving of exchange rates, price precision, generating of warehouse documents or VAT calculation method.
Tab Series
After adding a series do edited document type, it is contained in a document numerator (provided that the numerator includes element Document Series).

In order to attach a series to a document type, click on the button [Attach] and select proper series available within a given center from the opened list. For a series to be available on the list, it must first be added to the center from the level of Object Availability panel. To detach a series, mark it on the list and click on the button [Detach]. When creating a new document, there will be series available which are included in this tab and have parameter Active checked. The series with parameter Default checked will be selected, by default.
From the level of this tab, it is possible to associate a document numeration series with selected VAT account.
Tab Warehouses
For some types of trade/warehouse documents it is possible to attach warehouses defined in the system. Owing to that, when issuing a new document, a user can decide, e.g., from which warehouse items added onto a document are to be collected.

In order to attach a warehouse to a document type, click on the button [Attach] and select proper warehouse available within a given center from the opened list. For a warehouse to be available on the list, it must first be added to a center from the level of Object Availability panel. To detach a warehouse, mark it on the list and click on the button [Detach]. When creating a new document, there will be warehouses available which are included in this tab and have parameter Active checked. The warehouse with parameter Default checked will be selected, by default.
In Warehouses tab, the following parameters are also available:
- Operations on one warehouse – if checked, then when issuing trade documents, it will be possible to add an item only from one warehouse (checked as Default).
- Prefer default warehouse – if checked, then when adding items to documents, items from the default warehouse are collected first, according to the selected queue method (FIFO, LIFO) and only then items from the other warehouses, also according to the selected queue method, are collected. The parameter affects only trade documents, because operations made on warehouse documents always concern only one warehouse. This parameter is checked automatically if parameter Operations on one warehouse is checked
Tab Visibility
List of documents in particular centers of company structure may differ and not all documents are visible in all centers. The visibility of documents in particular centers is determined by the user, however, the following rules must be observed:
- A document issued by a given center is visible for all the parent centers in a given branch of the structure
- A document issued by a given center is invisible for all the child centers in a given branch which are equal to one another
The center Company sees all the documents issued in that center and all those which were issued by all its child centers.
The local center Accounting sees those documents which were issued in that center. However, it does not see documents issued in the center Shoes4UOU and Main Company. Moreover, it does not see documents issued in other local centers, that is Management and Warehouse because they are equal to each other.
The center of Company type Shoes4You_DE only those documents issued in that center of this structure. However, it does not see documents issued in the center Main Company and other companies, that is Shoes4You and Shoes4You Accessories (equal to each other) and in their child centers.
For each document type, it is possible to specify the centers of the same level, child centers and those assigned to another branch of the structure for which the documents must be visible (even though the above-specified rights do not say so). The rule, stating that if a document is visible for a given center, it is also visible for all the parent centers, still applies.

With the use of the button [Attach]it is possible to select from the list of company structure a center in which a given document should be visible. In order to remove the visibility of the document from a given center, it is necessary to mark it on the list and click on the button [Detach].
The user logged in to the center Main Company attaches the local center Management in the tab Visibility. This means that a user logged in to the center Management will be able to preview all the documents (of a given type) issued in the center Main Company.
VAT Accounts tab
From the level of this tab, it is possible to assign many VAT accounts and select the default VAT account for a given type of document.

In order to attach VAT accounts, click on the button [Attach] and select an account from the opened list of VAT accounts. To detach an account, mark it on the list and click [Detach]. It is also possible to determine which account should be default for a given document type by checking the parameter Default. More information can be found here.
Tab Operators
Information regardin this tab can be found here.
Tab Tax Returns
This tab Tax Returns allows entering information necessary to submit a tax return.
The layout of this tab changes depending on type of payer selected in field Taxpayer Type.
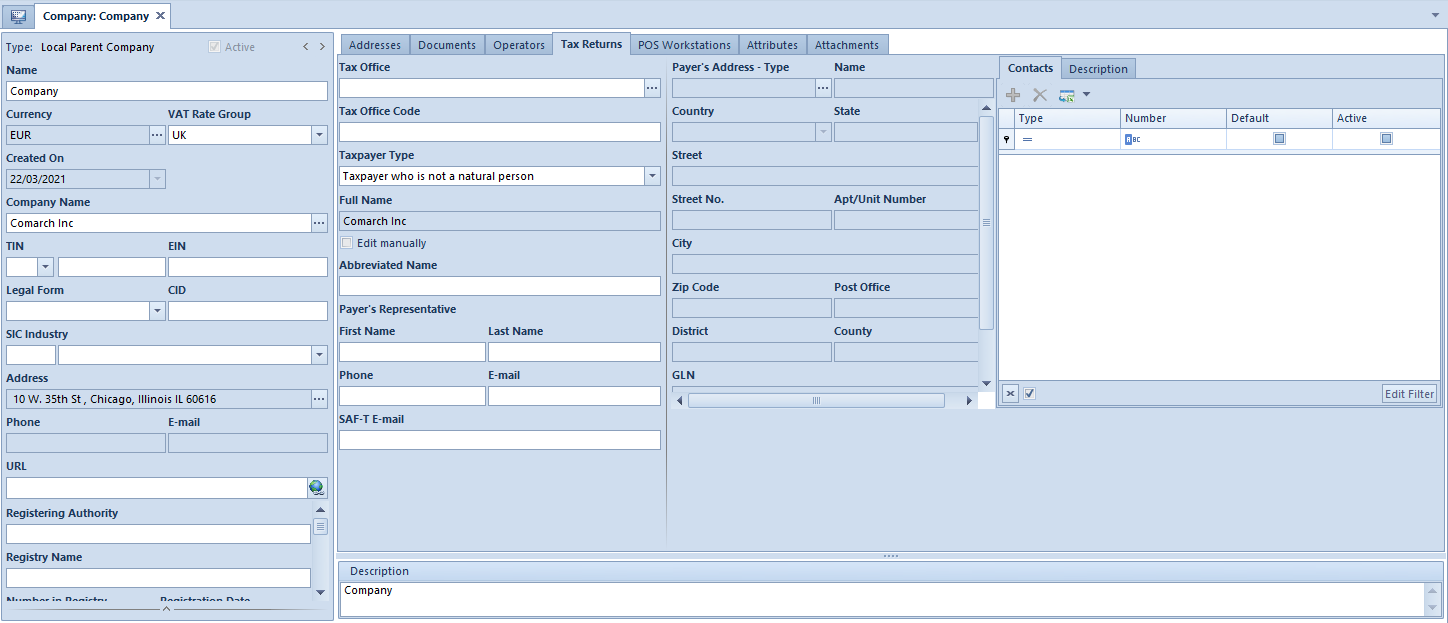
Available fields:
- Tax Office ─ name of the tax office which will be assigned to a company. Button […] opens the list of offices defined in the system.
- Tax Office Code ─ field completed automatically upon selecting an appropriate office or can be filled in manually.
- Taxpayer Type ─ drop-down list with the following options:
- Natural person ─ opens additional fields which should be completed: First Name, Last Name, Date of Birth and Nin
- Taxpayer who Is not a natural person
- Full Name ─ field filled in automatically with the company name retrieved from the company header. Upon selecting Edit manually option, it is possible to change data.
- Abbreviated name ─ abbreviation of company’s name
In Payer’s Representative section, it is possible to specify the following data referring to a person representing a company, such as: First Name, Last Name, Phone, and E-mail.
- SAF-T e-mail ─ indicated e-mail address will be automatically added to SAF-T file form
Data regarding taxpayer’s address, in the middle section of the tab, is retrieved with the use of the button […] available in the Payer’s Address ─ Type field, which opens a window with the list of addresses defined in the system.
Tab POS Workstations
In this tab it is possible to add points of sale attached to the center in which the user is currently working. From the level of this tab, it is also possible to define a new POS workstation. Detailed information about parameters available in this tab as well as instruction on how to add points of sale can be found here.
Tab Attributes
This tab allows for attaching an attribute to a structure center according to the rules described here.
Tab Attachments
This tab allows for attaching an attachment to a structure center according to the rules described here.