Company’s structure – general information
The window is used to determine the structure of the company. The structure is determined according to three schemes: rights structure, cost structure, and subordinate structure. According to these schemes, the window is divided into three tabs.
Company’s structure, tab: Rights structure
The tab serves to assign rights to operators assigned to a rights centre. The left panel displays a list of centres arranged in a tree-like structure.
The right panel displays a list of operators assigned to the selected (in the left panel) centre. Clicking: ![]() [Show also groups], will also display the groups to which the operators are assigned in this panel.
[Show also groups], will also display the groups to which the operators are assigned in this panel.
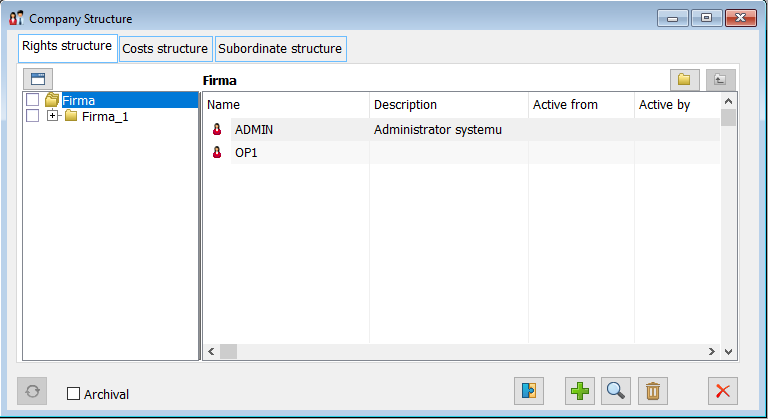
The tab contains the following fields and functions:
Archive. Checking will also display the archived elements of the company structure.
![]() [Assign operator] – once clicked, the following window will be displayed: Operators, which allows the user to select the operator to be assigned to the centre indicated in the left panel (by using multiple selection, it is possible to assign several operators to the centre at the same time). In the window: Operators the user can also add a new operator and assign such a new operator to a centre.
[Assign operator] – once clicked, the following window will be displayed: Operators, which allows the user to select the operator to be assigned to the centre indicated in the left panel (by using multiple selection, it is possible to assign several operators to the centre at the same time). In the window: Operators the user can also add a new operator and assign such a new operator to a centre.
![]() [Add centre] – enables adding a new centre to the company structure. The new centre is added as a subordinate centre to the one indicated in the left panel. After clicking the button
[Add centre] – enables adding a new centre to the company structure. The new centre is added as a subordinate centre to the one indicated in the left panel. After clicking the button ![]() , the following window will open: Company’s structure edition, where the parameters of the new centre are to be determined.
, the following window will open: Company’s structure edition, where the parameters of the new centre are to be determined.
Note: It is not possible to log in to COMARCH ERP XL for an operator whose default centre in the rights structure is a branch centre.
![]() [Change company’s structure element] – allows the user to modify the data of the company structure, or operator – depending on whether a centre or operator has been selected. If:
[Change company’s structure element] – allows the user to modify the data of the company structure, or operator – depending on whether a centre or operator has been selected. If:
a centre was selected – a new window will open: Company’s structure edition.
an operator was selected – a new window will open: Operator.
![]() [Delete company’s structure item] – deletes the selected company’s structure item.
[Delete company’s structure item] – deletes the selected company’s structure item.
Company’s structure edition from the level of rights structure
The window is used to define or modify settings for the centre. The window contains the tabs described below.
Company’s structure edition, tab: General
This tab is for entering basic data for the centre and defining parameters for easy sale.

The window contains the following fields:
Name – used to enter the name of the centre. Filling in this field is mandatory.
Note: When editing the window: Company’s structure edition, from the level of the window: Company’s structure, (Rights structure tab), it is possible to refresh the window after switching to another node of the company’s structure tree.
Description – is used to enter a description for the centre.
URL – used to enter the website address for the centre.
Stamp – after clicking the button, the following window will open: Company’s stamp, which displays a list of stamps registered in the system. From this list the user can select or register a new stamp for the edited structure.
Location – the location of the centre. The route by which dispatches generated in the following module are executed is attached to the location: Sales. This means that for shipments issued at a particular centre, routes are displayed where the location is the same as the location of that centre (for more information, see the module documentation: Sales).
Edit centre documents – indicates the centre in which it is possible to edit documents. Selecting the parent centre will make it possible to edit documents in all sub-centres.
Company’s stamp from the level of company’s structure edition
The window will open, after clicking: ![]() , in the window: Company’s structure edition. The window contains a list of stamps that can be assigned to the company’s structure. Thus, it is possible to assign a different stamp for each branch.
, in the window: Company’s structure edition. The window contains a list of stamps that can be assigned to the company’s structure. Thus, it is possible to assign a different stamp for each branch.
When adding a new centre, the field: Stamp, will be filled in by default with the first stamp from the list of stamps.
![]() [New] – enables a new stamp to be registered and added to the list.
[New] – enables a new stamp to be registered and added to the list.
![]() [Change] – opens the company’s stamp for viewing and editing.
[Change] – opens the company’s stamp for viewing and editing.
![]() [Select] – assigns the stamp indicated in the list to the edited company’s structure.
[Select] – assigns the stamp indicated in the list to the edited company’s structure.
Company’s structure edition, tab: Retail
The tab contains parameters used in the module: Retail sales and Easy sales.
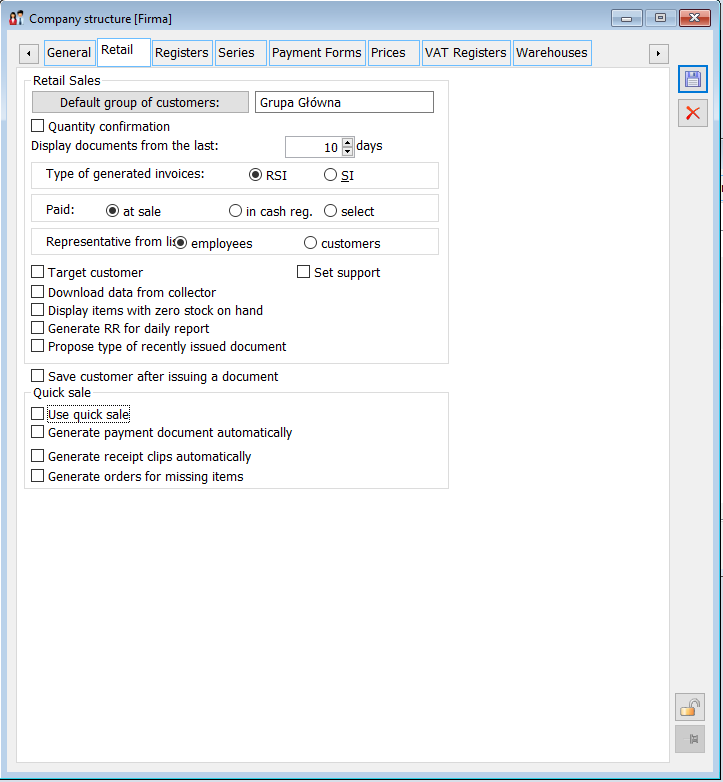
Parameters concerning Retail sales:
Default contractors group – this field indicates the contractors group into which contractors added from the level of the following module will be entered: Retail.
Confirm quantity – selecting this parameter affects the way items are entered into the list of sold goods. More information is available in the module documentation: Retail sales.
Display documents issued recently – after indicating the number of days, the history of transactions will be displayed for them.
Type of issued invoices – depending on the selection of the parameter: RA or FS, in the retail sales window it will be possible to issue receipts or receipts and invoices.
Payment – setting this option determines whether the issued document will be paid:
On sales – after the document is generated (and the following is clicked: ![]() or
or ![]() )
)
At the cash desk – a document issued in the sales window will be placed in the buffer. Payment will take place after opening the document from the document list and clicking: ![]()
As chosen – the selection of the payment method will depend on the User
Suggest type of the last issued document – this parameter is important when the following option: FS, has been provided for parameter: Type of invoice to be issued and a selection of the type of document to be issued should be made before entering items on that document. If the parameter is checked then, by default, the last issued document will be selected as the type of document to be generated.
Target contractor– when this parameter is selected, fields and functions relating to the target contractor will be available in the module.
Load data from collector – if this parameter is selected, it will be possible to enter data about the commodity from the collector in the module.
Display goods with zero stock level – if this parameter is selected, the goods with zero stock level shall also be displayed in the list of goods for sale.
Generate RS for the daily report – if the parameter in the rights structure centre is selected, then after clicking: ![]() in the window: Day closure (available after clicking:
in the window: Day closure (available after clicking: ![]() , and then:
, and then: ![]() ), apart from daily report printing, RS document will be created for all fiscal documents issued on given post, which have not been clipped to RS document yet.
), apart from daily report printing, RS document will be created for all fiscal documents issued on given post, which have not been clipped to RS document yet.
COMARCH ERP XL system includes simplified method of sales – so called Easy sales. (more information in module documentation: Sales). On the tab, in the section: Easy sales, the parameters of this method of sale are determined for a given rights centre.
Company’s structure edition, tab: Registers
The tab displays the list of registers used in the centre.
Checking the field: Same as in the subordinate node, will cause the following buttons to be greyed out: ![]() [New] and
[New] and ![]() [Delete] and it will not be possible to add new registers manually. The list of registers will then display the registers as in the parent node.
[Delete] and it will not be possible to add new registers manually. The list of registers will then display the registers as in the parent node.
On the tab it is possible to set default bank register for a given currency by checking the “Default for currency” option next to the register. This option is available only for bank registers. Selecting a default register for a currency causes this register to be downloaded to a document issued in that currency. The tab also contains the following parameters: Default bank register, where the default register entered on documents generated in the centre is selected. However, the setting concerning the default register for the currency is of overriding importance here, unless the register has been set on the card of the contractor to whom the document is issued (in the window: Contractor card, tab: Settlements, Assigned bank registers). The register is selected from the list of all bank registers available in the centre.
Company’s structure edition, tab: Series
The tab displays a list of document series used by the centre.
The tab contains the following fields:
Same as in the parent node. Ticking the box will cause the tab to display the same series as in the parent node. Unchecked, the box allows the user to add a new series or remove selected series from the list.
Show branch series in lists. If checked, branch series will be displayed in the lists used for quick document searches (if there are many offline branches in the system, displaying these series could make it difficult to work in the lists).
Default series. This is the default series for all documents not subject to a more precise definition (which has no equivalent in the tab: Documents).
If the series set as default in the document definition is removed from the company’s structure centre, the default series for the centre will be automatically assigned as the default series if it is available for the document, and if not, it will be the first one in the list available for the document.
It is not possible to remove a series from the list of series available for the centre (rights structure centre window, {Series} tab), if the series is set as default for that centre and is not the only one in the list.
Once the first series has been added to the list of series available for a centre, it will be set as the default series for the centre and as the default/correction series in all document definitions for this centre and sub-centres.
Company’s structure edition, tab: Payment methods
The tab displays the list of payment methods (defined in the window: Configuration, tab: Sales/Payment methods; at this level, it is also possible to translate the name of the Payment method).
Note: The list of payment methods is different for a “normal” centre and for a branch centre. This documentation describes the list of payment methods for a centre that is not a branch centre. The payment methods for a branch centre are described in the module documentation: Branch administrator.
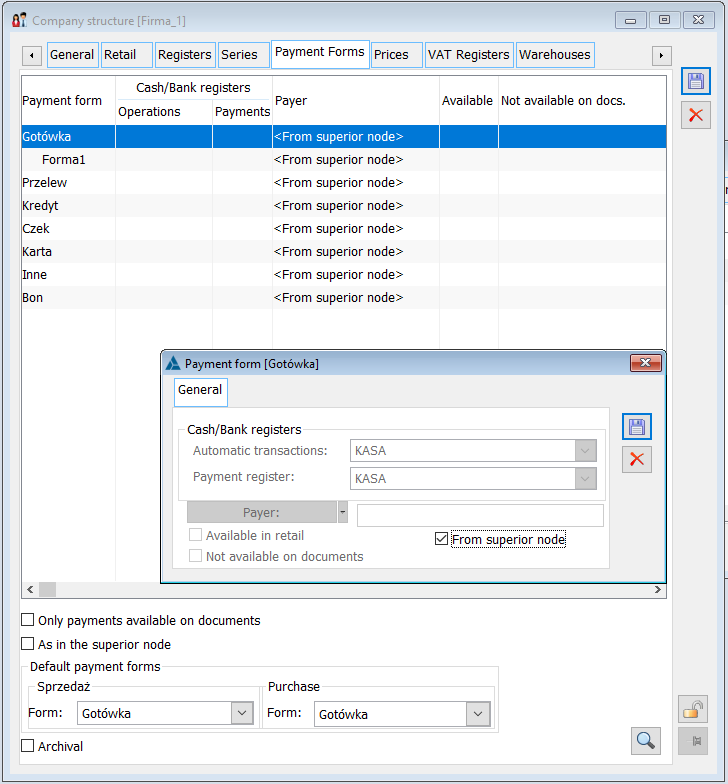
In the company structure centre, for payments predefined in the system, the user can specify whether a payment method will be included in the module: Retail. To specify:
check the payment method to be available in the module: Retail;
click: ![]() [Change]. A new window will open: Payment method edition
[Change]. A new window will open: Payment method edition
in the window: Payment method edition, check: Retail. If the field is inactive, first uncheck the field: Default from configuration
Payment method edition:
In the window: Payment method edition, the following data are defined, which affect the use of the edited payment method in the centre for which it is defined. The following parameters can be edited:
Cash/bank registers
Automatic operations – the register will be selected from the list of registers available for the centre and will be used to perform automatic cash/banking operations (“handle” payment registration)
Register for payments – will be selected from the full list of registers in the system and will be assigned to a payment method when it is created. This will make it possible to handle the following situation: the operator does not have the right to perform operations in a given register (document settlement), but when creating a document they can assign this register to the payment.
Payer – the default payer for the selected method of payment. This payer will be prompted on the document if an appropriate method of payment has been selected and the contractor on the document is the payer for itself (setting on the contractor card, on the tab: Commercial, in the field: Payer). More information on payer on documents is available in the module documentation: Sales.
Available in retail – as described above, ticking this parameter will make the payment method available for use in the module: Retail sales. Checking this parameter will be possible once the following parameter is unchecked: Default from configuration.
From parent node – checking this parameter will cause the method of payment from the parent node to be used (the fields of the window described above: Payment method edition will become unavailable).
Note: If the centre is not a branch centre, it is not possible to assign to the payment method the register being a branch register.
Company’s structure edition, tab: Prices
The tab is used to define price types for the centre. It contains a list of available price types. The list presents the name of the price type, its type (net/gross), and the precision with which it is determined (2 or 4 decimal places). In case of the main administration centre, the list presents all price types defined in the system. For sub-centres, on the other hand, only the price types assigned to the centre are displayed.
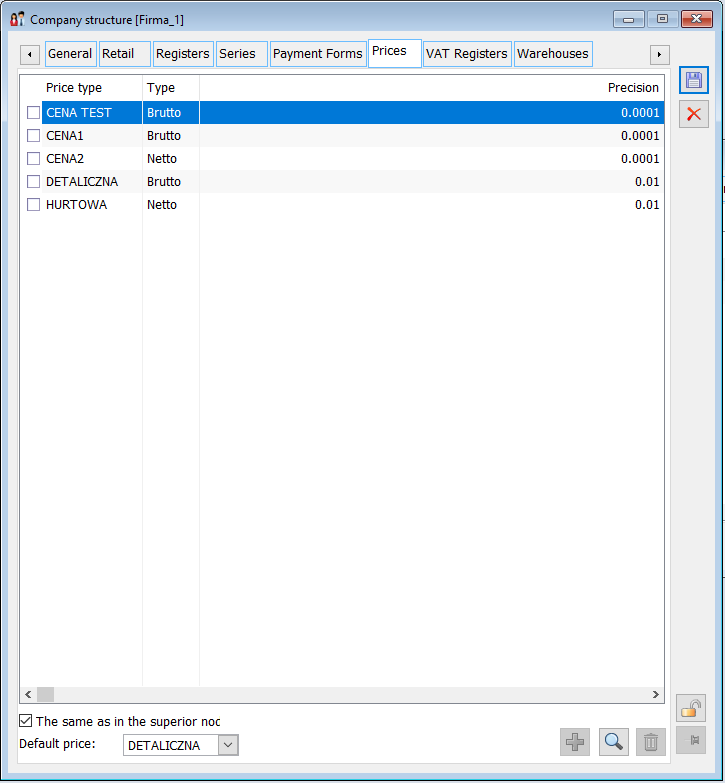
To assign a price to a sub-centre, select ![]() [New] button below the price list. This will open a window with a list of price types defined in the system. On this list, select and choose price types to be added to the given centre.
[New] button below the price list. This will open a window with a list of price types defined in the system. On this list, select and choose price types to be added to the given centre.
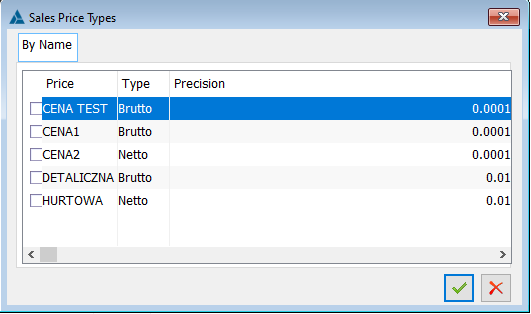
In case of main centre, clicking ![]() [New] adds a new price type. This is the same action as adding a price type from the Configuration level. For more information on adding new price types, please refer to the section on Configuration (Sales/Dictionaries tab) in the documentation for the Sales module.
[New] adds a new price type. This is the same action as adding a price type from the Configuration level. For more information on adding new price types, please refer to the section on Configuration (Sales/Dictionaries tab) in the documentation for the Sales module.
The function of the ![]() [Card] button also varies depending on whether it is clicked from the main centre or from the sub-centre. From the main centre, the price type window is opened in edit mode, while from the sub-centre level, the price type window is opened in preview mode.
[Card] button also varies depending on whether it is clicked from the main centre or from the sub-centre. From the main centre, the price type window is opened in edit mode, while from the sub-centre level, the price type window is opened in preview mode.
The ![]() [Delete] button also works differently for the main centre and for the sub-centre. In the case of the main centre, clicking this button removes the given price type completely from the dictionary: Price types in the configuration. However, the deletion of the price type is possible only if the indicated price type has not been assigned to any commodity. In the case of a sub-centre, the price is only detached from that centre and not removed completely.
[Delete] button also works differently for the main centre and for the sub-centre. In the case of the main centre, clicking this button removes the given price type completely from the dictionary: Price types in the configuration. However, the deletion of the price type is possible only if the indicated price type has not been assigned to any commodity. In the case of a sub-centre, the price is only detached from that centre and not removed completely.
On the tab: Prices, there are the following fields:
Same as in parent node – ticking the box will cause the tab to display the same price types as in the parent node. Unchecked, the box allows the user to add a new price or remove selected prices from the list. Checking this box also makes the following buttons grey: ![]() [New] and
[New] and ![]() [Delete].
[Delete].
Default price – the field is presented only for subordinate centres (for the main centre there is no such field on the tab). In this field the user can define price, which will be set as default price for subordinate centre while working with COMARCH ERP XL system. Such a price may be selected from among the prices assigned to a given centre. Indicating the default price does not block the possibility of using a different price when performing actions in the system.
Company’s structure edition, VAT registers
The tab contains a list of available VAT registers. The tab contains information displayed in columns:
Code – the code of the VAT register the name of which is displayed in the column: Name
Name – VAT register name
Type – VAT register type (purchase or sales)
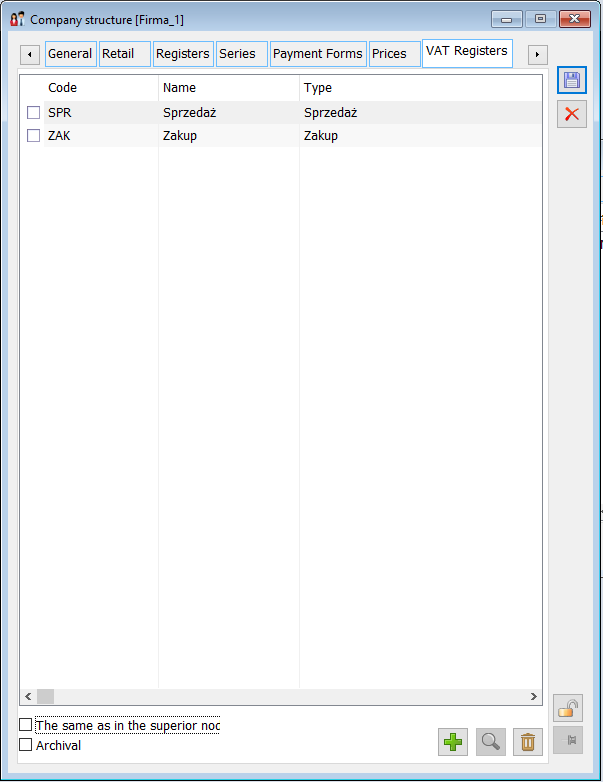
On the tab the following buttons are available:
![]() – [Add] in the main centre, opens the window for adding a register; in the sub-centre, opens the window for the list of registers in selectable mode.
– [Add] in the main centre, opens the window for adding a register; in the sub-centre, opens the window for the list of registers in selectable mode.
![]() – [Card] Preview of register settings. Button active only in the parent centre.
– [Card] Preview of register settings. Button active only in the parent centre.
![]() [Delete] in the main centre – delete the specified register type; in the sub-centre – disconnect the specified register from the centre.
[Delete] in the main centre – delete the specified register type; in the sub-centre – disconnect the specified register from the centre.
Note: Deleting a VAT register is possible when there are no documents with this type of VAT register. Deleting a register from the parent centre results in its deletion from the sub-centres.
In case of the main centre, the VAT registers list presents all VAT registers defined in the system. In case of sub-centres, only the registers assigned to the centre are displayed.
Same as in parent node – ticking the box will cause the tab to display the same VAT registers as in the parent node. Unchecked, the box allows the user to add a new register or remove selected registers from the list.
The list of VAT registers that can be selected from the commercial document header is limited to those that are available for the current centre.
Company’s structure edition, tab: Warehouses
The tab is used to define warehouses for the centre. The tab contains information displayed in columns:
Code – the code of the actual warehouse, the name of which is displayed in the column: Name.
Production warehouse – production (the so-called virtual) warehouse, defined in the window: Categories. The assignment of the production warehouse to the actual warehouse takes place with the following field unchecked: Same as in the parent node. To enter a production warehouse, double-click with the left mouse button in the column at the height of the actual warehouse to which the assignment is to take place. More information on production warehouses can be found in chapter: Production warehouses.
Name – name of the actual warehouse defined in the window: List of warehouses (more in: 1.11 Window: List of warehouses).
Warehouses for branch are defined in the window: New branch wizard COMARCH ERP Optima – Step 1.
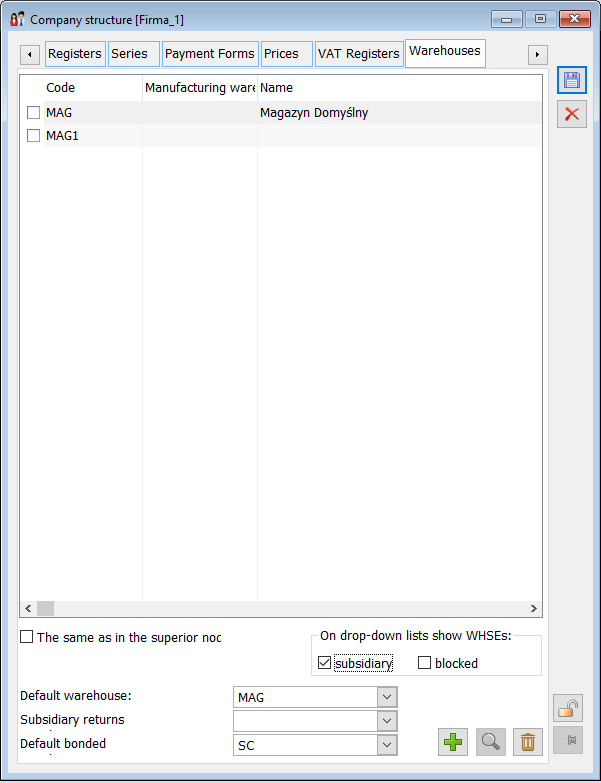
The tab contains the following fields:
Same as in parent node – ticking the box will cause the tab to display the same warehouses as in the parent node. Unchecked, the box allows the user to add a new warehouse or remove selected warehouses from the list.
On the selection list, display:
Branch warehouses – checking the box will make the branch warehouse visible in the places where the selection of the branch warehouse is allowed.
Blocked warehouses – checking the box will make the warehouses locked by users to be visible in the Warehouse drop-down menu. Blocked warehouses are displayed in red
Default warehouse – in this field the user can indicate a warehouse, which will be set as default warehouse while working with COMARCH ERP XL system. Indicating the default warehouse does not block the possibility of using a different warehouse when performing actions in the system.
Branch returns warehouse – warehouse appropriate only for the branch centre. This is the warehouse to which MMs are transferred when a branch is liquidated.
Branch orders warehouse – warehouse appropriate only for the branch centre. This is the warehouse in the head office to which orders will be issued at the branch.
More information on warehouses for branch centre is available in the module documentation: Branch administrator.
Default customs warehouse – this field is used to select default customs warehouse for a given centre. This selection will not block possibility to change customs warehouse while working with COMARCH ERP XL system.
If the warehouse set as source/target in the document definition is deleted from the company structure centre, the target/source warehouse is undefined (empty) for this document. In this situation, the default warehouse for the centre will be automatically assigned as the source/target warehouse if it is available for the document, and if not, the first one in the list of available for the document. It is not possible to remove a warehouse from the list of warehouses available for a centre (rights structure centre window, {Warehouses} tab, if a warehouse is set as default for this centre and is not the only one in the list).
If the user adds the first warehouse to the list of warehouses available for a centre, it will be set as the default warehouse for the centre and as the source/target warehouse in all document definitions for this centre and its sub-centres.
Company’s structure edition, tab: Operators
The tab contains operators belonging to a given centre.
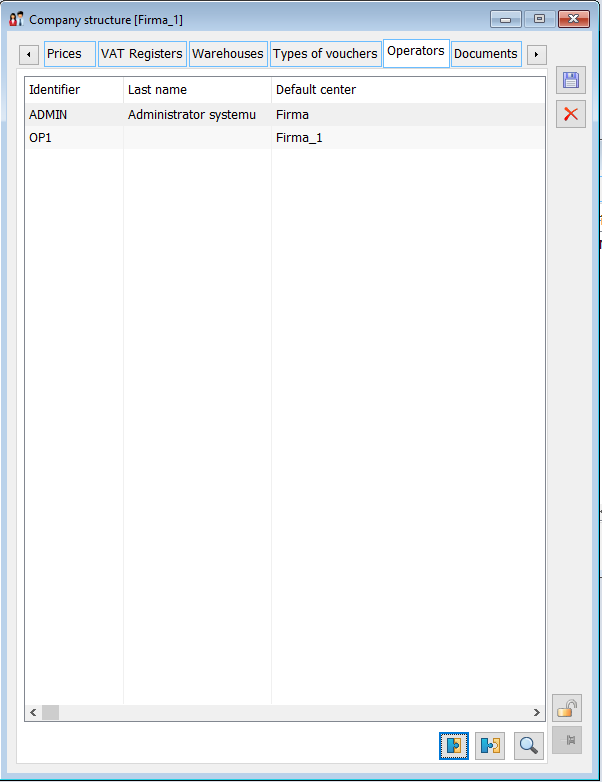
![]() [Assign operator] – button for adding an operator to a centre.
[Assign operator] – button for adding an operator to a centre.
![]() [Disconnect operator] – button for disconnecting an operator from a centre.
[Disconnect operator] – button for disconnecting an operator from a centre.
Company’s structure edition, tab: Documents
This tab displays list of document definitions used in COMARCH ERP XL system. Definitions defined from this level will apply to documents issued in current centre.
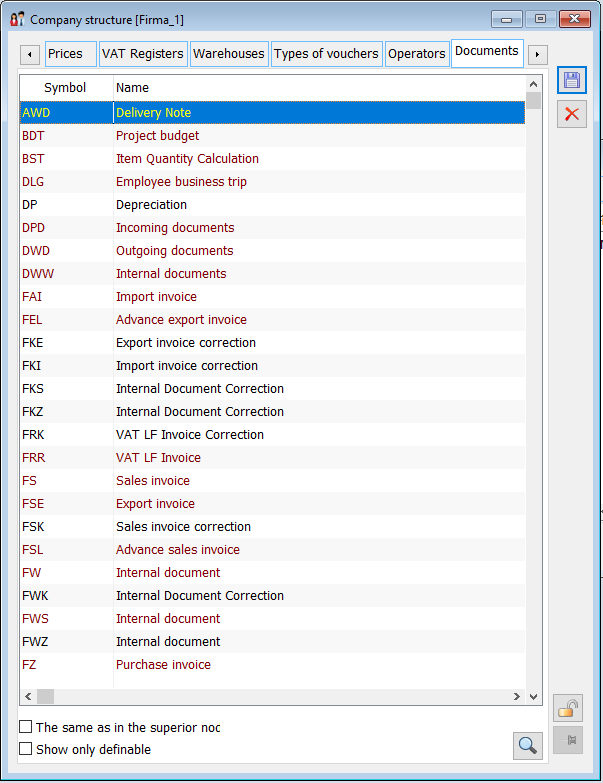
The tab contains the following fields and functions:
Show only definable. If checked, the list of documents will include only those which are definable, meaning those for which modification is possible.
![]() [Card] – after selecting a document, clicking this button enables its modification.
[Card] – after selecting a document, clicking this button enables its modification.
Company’s structure edition, tab: Production 1
On the tab: Production 1 there is an area for Show conflicts, Rounding quantities, Displaying changes on the Gantt Chart, Updating lot/batch numbers, ZP item planning date as a priority.
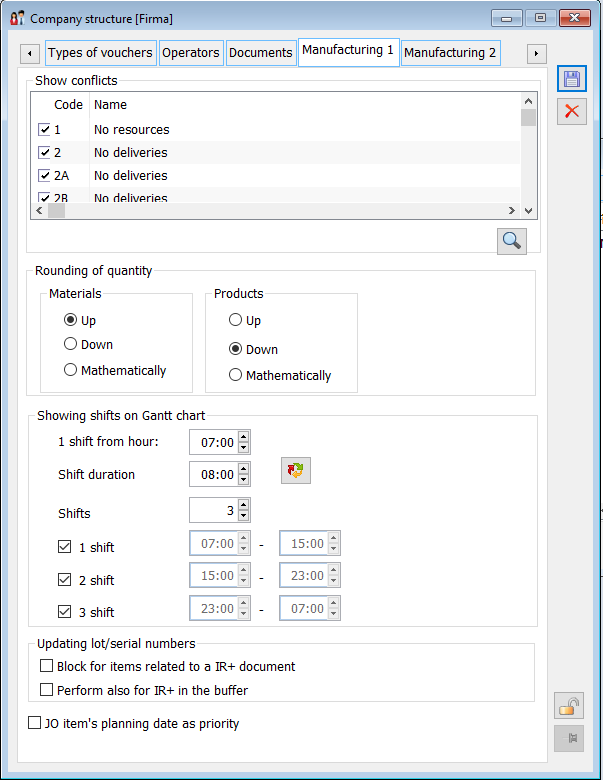
In the area: Show conflicts, a list of conflicts is provided, displayed in layout:
Column for conflict selection (check):
Free editing of checks possible, provided that the parameter: Same as in the parent node, is unchecked.
Checks can be selected independently of each other, meaning each check/conflict is a separate record.
Checks are transferred to the added centre from the parent centre by default
Code – numeric code of conflict from procedure – according to table below.
Name – name of conflict from procedure – according to table below.
A context menu with the following options is available for the list:
Check – when selected, the check is selected.
Uncheck – when selected the check is unchecked.
Check all – when this option is selected, all conflicts will be checked.
Uncheck all – when this option is selected, all conflicts will be unchecked.
For list of conflicts the following functions were made available:
Double-click – opens the conflict window for preview: Conflict details.
![]() [Preview] – open the window of selected conflict for preview: Conflict details.
[Preview] – open the window of selected conflict for preview: Conflict details.
The shortcut Ctrl+A has been supported – if the cursor is in the list, the shortcut functions as follows:
If no conflict is selected – after triggering the shortcut all conflicts are selected.
If at least one conflict is selected – after triggering the shortcut the remaining conflicts are selected.
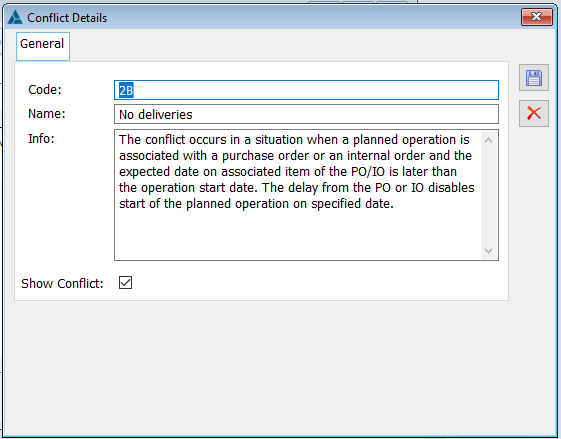
In the window the following fields were made available:
Code – text field with the conflict number.
Name – text field with the conflict name.
Description – the field displays the conflict description.
The above windows cannot be edited.
Show conflict – fields available as a check.
Check edition is possible only if the following parameter is unchecked: Same as in the parent node, for the centre from the level of which the conflict preview is opened.
| Code | Name | Description |
| 1 | No raw materials | No raw materials in the warehouse indicated for order implementation. In rough planning the following conflict is not taken into account: No semi-finished products (raw materials from other operations) |
| 2 | No deliveries | No deliveries for order implementation. In rough planning the conflict is not taken into account. No booking is not a conflict. When updating the booking for rough operations, the following parameter is taken into account: Reserve resources, on the document definition. |
| 2A | No deliveries | This conflict arises when there are no deliveries for a material, but there are registered purchase orders or an internal order for that material. |
| 2B | No deliveries | A conflict arises when a planned operation is linked to a purchase order or an internal order and the completion date on the linked ZZ/ZW element is later than the start date of the operation. The delay resulting from the ZZ or ZW prevents the planned operation from starting on time. |
| 3 | No resources | No resources for order implementation. The message takes into account the type of planning and the work cell parameter – for example during detailed planning a conflict is displayed if there are no resources assigned to the work cell with the selected parameter: Planned – detailed; during rough planning a conflict is displayed if there are no resources assigned to a work cell with the following parameter checked: Planned – rough. |
| 4A | Resources in other operations | A conflict arises when a resource has been scheduled for another order at the same time. Replanning always occurs, even when it occurs between related operations. In rough planning the conflict is not taken into account. |
| 4B | Resource in other tasks | Conflicts arise when a resource has been scheduled at the same time for tasks other than production tasks (that is tasks arising from the schedule or from service orders). |
| 5 | Work cell min./max. quantity | A conflict will occur when a resource is scheduled to execute an order for which the quantity is less than the minimum quantity or greater than the maximum quantity defined in the window: Edit work cell for a resource. |
| 6 | Changing time of the work cell | A conflict will be displayed when the time taken to change the work cell (changeover) for a resource between operations is violated.
Example: For operation 1 and operation 2, this resource has been selected, but in operation 1 the resource works as a work cell: Cell 1, and in operation 2 it works as Cell 2. The time required to changeover the resource from Cell 1 to Cell 2 is 2 hours. If this period is less than 2 hours as a result of scheduling, then conflict 6 will occur. |
| 7 | Failure to execute after deadline | Conflict included in every type of planning, occurs when the scheduled execution deadline has passed |
| 8A | Resource is not available during this period | A conflict will appear when some operation is scheduled to be performed for a resource indicated for a technology during its unavailability period. In this situation, the System, apart from displaying a message, will schedule the execution of the operation for the first period of resource availability. |
| 8B | Unavailability period according to company common periods | A conflict arises when an order is scheduled to be executed during the unavailability period set in the common periods. |
| 9 | Resources in lower priority operations | Indicates that resources have been allocated to a higher priority order. In rough planning this conflict is not taken into account |
| 10 | Operation planned after the deadline | Conflict will arise when, due to other orders, planning for a specific date has to have its execution plan postponed. |
| 11 | Incompatible end/start dates of operations | A conflict arises when the start of the next operation is earlier than the end of the previous operation linked to the next one. In case of incompatibility of dates, the following parameter is taken into account: Allow transfers between operations. |
Scheme for filling in conflict details
Conflicts are displayed only when a given conflict is selected in the company’s structure centre, from which the operation requiring the ProdCzynnosciKonflikty launch is triggered.
Quantity rounding – the rounding method used when planning and executing orders. For both materials and products, the following rounding options are available for selection:
- “Up” – as used so far only for raw materials
- “Down” – as used so far only for products
- “Mathematical” – according to the rules for mathematical rounding of quantities
Displaying changes to Gantt Chart
In the section, the following parameters are available:
- 1 shift from hour – default value is 07:00
- Shift time – default value is 08:00
- Number of shifts – value depends on the Shift time field
- [Generate shifts] – when clicked, a term will be generated for the shifts according to the parameters entered in the fields: 1 shift from hour and Shift time.
Update of batch/lot numbers
If the parameter Block for items related to the IR+ document is selected, then the update of the lot/batch number will not be performed for those products on the JO that are related to the IR+ document.
If the Perform also for IR+ in buffer parameter is selected, then the update of the lot/batch number will also be performed on the IR+ document in the buffer, which is associated with the given order item.
Selecting both parameters at the same time will cause that if a given order product is associated with the IR+ document, when updating the number, the data will be overwritten only on the IR+ document in the buffer, while the number will not be updated on the JO, on the product, associated with this document. This parameterisation may be useful, for example, when a JO item for which the number has already been generated is linked with a IR+ document in the buffer.
Planning date for JO items as priority
This parameter may be used if the planned orders are being carried out and then one more important order with an earlier planning date is added. In this situation, when scheduling an order with an earlier scheduling date, other orders that have this later date will be rescheduled.
The functionality should be used in conjunction with the functionality to automatically reschedule lower priority orders when scheduling higher priority orders.
Company’s structure edition, tab Production 2
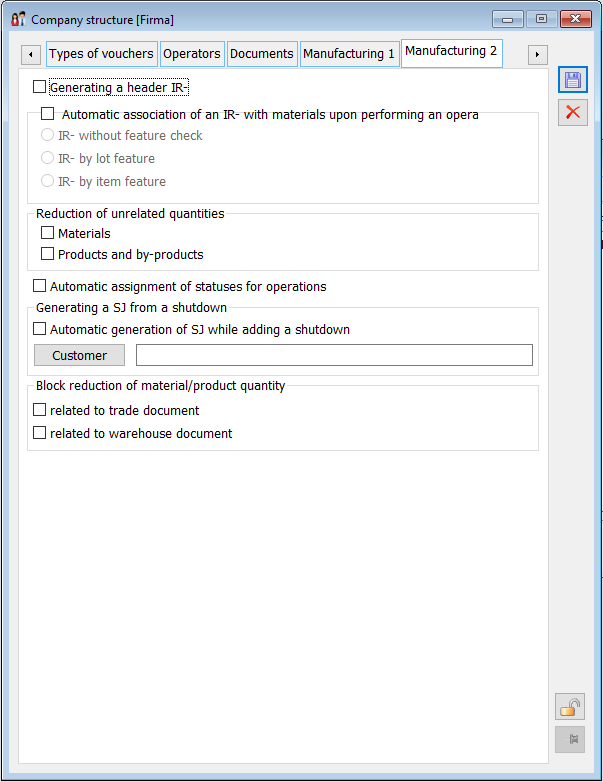
Generate header IR- – this parameter enables the generation of header IR- along with the materials of the order during the execution or completion of an operation.
If the Automatic binding of IR- documents with materials during operation execution parameter is selected, the header RW documents will be automatically bound with the materials of the given operation execution during its execution or termination (they will not be automatically bound with the materials when the operation execution is started). The criteria for the binding of IR- header documents with the material during the execution of the operation will be the same as those used for the manual binding of IR- documents with the material in the JO.
Reduction of unbound quantities: Materials, Products, and by-products – functions that can be used to automatically reduce the quantity of material and/or product found on the execution of operations on a given order to that which has been clipped with the RW/PW documents
Automatically assigning state to operations
An SQL procedure ProdAktualizujStanOperacji has been made available, which can be used to automatically assign states to operations during their execution. The procedure takes a default value from the Operation state category dictionary and updates the state of the planned operation to which the execution is added. It is triggered in the system with the selected parameter Automatically assigning state to operations
Generation of SJ from downtime
When the Automatic SJ generation is selected during the downtime, when adding downtime, when the downtime is first saved, a SJ document will be automatically generated for the production resource for which the downtime was registered. The default setting in the Downtime window is taken from the setting in the Company’s structure, tab Production 2. A SJ document that is automatically generated from a downtime will be generated as unapproved, in the background and for the contractor indicated in the Company’s structure edition, on the tab. If a contractor is not assigned in the configuration of a centre, then in this centre it will not be possible to automatically generate a SJ when saving a downtime.
Company’s structure edition, tab: PI
Start/End the operation after loading the code – if this parameter is selected, the operation in the list of operations will be started immediately after loading the barcode from the work card printout. If the operation has already been started, it will be terminated after the code is loaded.
End date of the operation according to the plan – this parameter allows the user to edit the end date of the operation according to the plan.
Record completion of operation only – with this parameter selected, it is allowed to approve the execution of an operation after it has been started.
Record execution of operation without editing – with this parameter checked, the following window will not be displayed: Operation, when approving the execution of an operation.
Allow execution of stages – with this parameter selected, the type of execution opened from the level of simple interface depends on the type of planned operation. If an operation is marked as a stage operation, the following function is activated for this operation: Execute stage. This means that the registration of such an operation will also result in the registration of operations preceding the stage, in accordance with the rules for the execution of a stage operation. If an operation is marked as a non-stage operation, the following function is activated for this operation: Execute deadline.
Show operations only from released orders – if the parameter is checked for the centre in the context of which the operator logs in:
1. A list of operations originating from released production orders will be displayed.
2. When filtering/searching for operations, the search is limited only to operations that originate from released orders. That is, a search, for example, by order number, will not display operations originating from that order unless the order is in the state: Released for production.
3. If, on the screen where the list of operations is displayed, the EAN code is entered or loaded and originates from an operation originating from an order that is not in the state: Released for production, a message will be displayed: “Searching for an operation is not possible. The operation originates from an order that has not been released for production.”
Parameter: Same as in the parent node is displayed only in sub-centres. When the parameter: Same as in the parent node, is checked all checks are greyed out – both in the area: Show conflicts as well as in the area: Simple interface.
JO item scheduling date as priority – checking this parameter will determine the order priority by scheduling dates on the order item.
Company’s structure edition, tab: MES
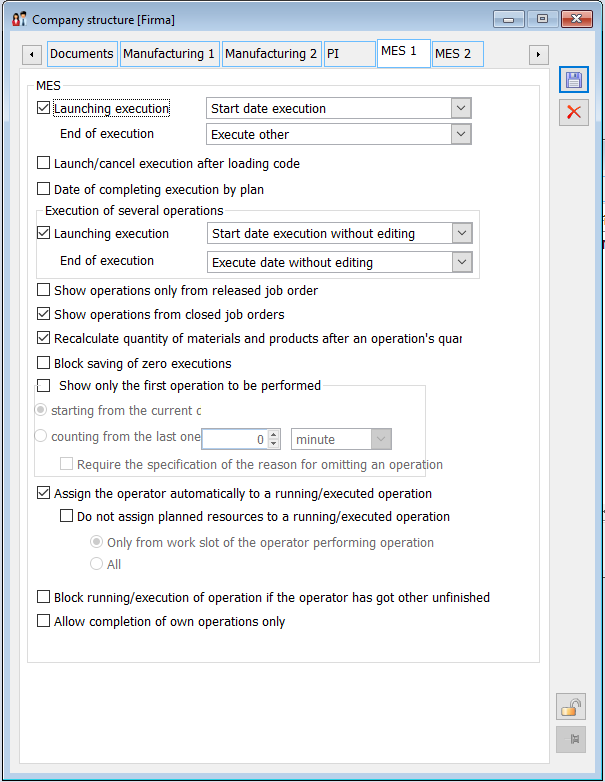
As of version 2017.0.1, a new MES production interface has been made available.
The Name and Material code of the product are displayed as compared to the product card.
On the company’s structure, the user configures the settings that determine how to work in the module: MES. It is, therefore, decided from here, among other things, whether in the MES application:
- the function to start execution will be active.
- the start/finish operation will take place immediately after the code has been loaded.
For more information, please refer to the Ways of working in COMARCH ERP XL MES documentation.
Company’s structure edition, tab: Attributes
On the tab the user can assign attributes to a specific centre. For this to be possible, attributes must first be assigned to the object: [Company’s structure], [Rights structure], in the window: Attributes definition, in the Objects tab (module: Administrator). Attributes are assigned according to the general rules.
Company’s structure edition, tab: Allowances
On the tab, allowances are assigned to the respective centre. On the tab of subordinate centres there is a parameter: Allowances from parent node, which allows functional allowances defined in the parent centre to be transferred to the sub-centres.
For more information, see chapter: 1.5.9 Allowances.
Company’s structure edition, tab: Processes
The tab contains a list of processes and tasks to be performed by the centre. New processes/tasks are introduced:
by assigning a centre as a supervisor of a selected task in the process definition;
when the following button is clicked: ![]() [Add], in the window: Company’s structure edition, on the tab: Processes, and selecting in the opened window: Supervisor task, the appropriate process and task. The selection is made by clicking:
[Add], in the window: Company’s structure edition, on the tab: Processes, and selecting in the opened window: Supervisor task, the appropriate process and task. The selection is made by clicking: ![]() and
and ![]() , indicating the appropriate items and confirming the selection with the button:
, indicating the appropriate items and confirming the selection with the button: ![]() [Select].
[Select].
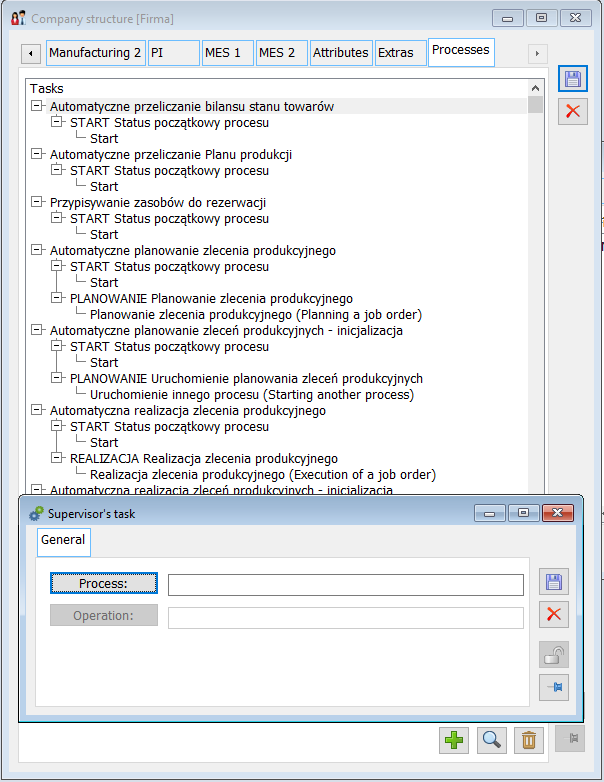
On the tab there are also buttons:
![]() [Change] – allows the user to view and edit the process/task, for the indicated item in the list.
[Change] – allows the user to view and edit the process/task, for the indicated item in the list.
![]() [Delete] – removes the centre from the role of the supervisor for the indicated task.
[Delete] – removes the centre from the role of the supervisor for the indicated task.
Company’s structure, tab: Cost structure
The tab is of importance for the module: Business Intelligence. The list displayed here, in the form of a tree structure, indicates the place of origin of costs and on this account, the operators assigned to the given cost centre are displayed.
There are two panels on the tab. The left panel shows a list of centres, sub-centres, and locations, while the right panel shows a list of operators assigned to the item selected in the left panel.
On the tab, there are the same functions as on the tab Rights structure. It is possible to add the following elements of the company structure:
centre – indicate the group or centre to which the centre (Sub-centre) is to belong in the left panel of the window, and then click the ![]() [Add centre] button. Then fill in the window, opened as a result of this command: Company’s structure edition.
[Add centre] button. Then fill in the window, opened as a result of this command: Company’s structure edition.
employee – select a centre, sub-centre or location in the left-hand panel of the window and then click the ![]() [Assign employee] button. After selecting this command, in the window that opens: List of employees, select the employee to be assigned.
[Assign employee] button. After selecting this command, in the window that opens: List of employees, select the employee to be assigned.
locations – it may happen that one centre has several locations. To indicate a location, select the centre for which it is to be indicated in the left panel, and then select the command: Add location from the drop-down menu opened with the ![]() button [Expands menu of available options] next to the
button [Expands menu of available options] next to the ![]() [Assign employee] button. The following window will open: Locations list, where relevant item is to be selected.
[Assign employee] button. The following window will open: Locations list, where relevant item is to be selected.
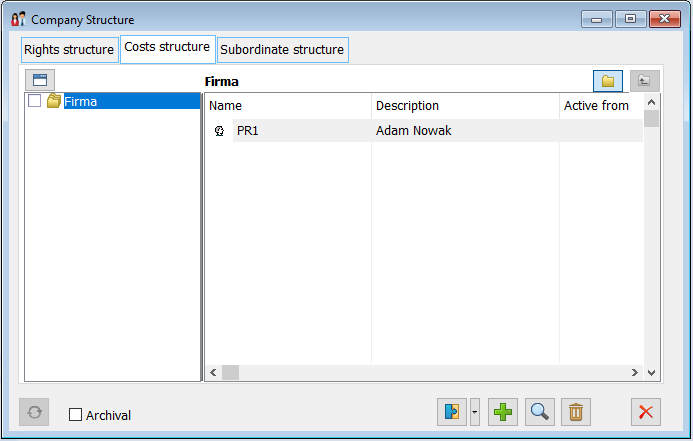
Company’s structure edition from the level of cost structure
Cost structure edition, tab: General
The tab contains the following fields:
Description – centre description.
URL – centre address.
From – date of centre activation.
To – date of centre validity.
Note
Note: Dates of activation and centre validity are included in the period of the centre’s existence.
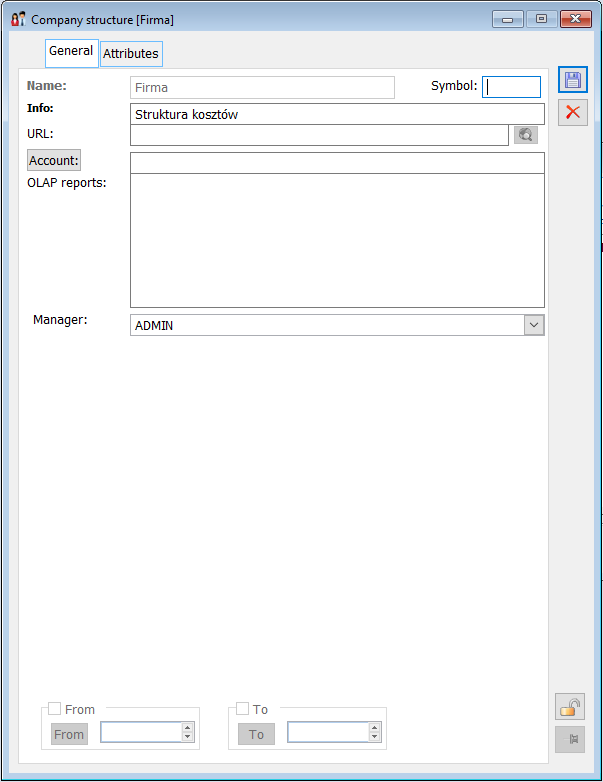
Cost structure edition, tab: Attributes
On the tab the user can assign attributes to a specific centre. For this to be possible, attributes must first be assigned to the object: [Company’s structure], [Costs structure], in the window: Attributes definition, in the Objects tab (module: Administrator). Attributes are assigned according to the general rules.
Company’s structure, tab: Subordinate structure
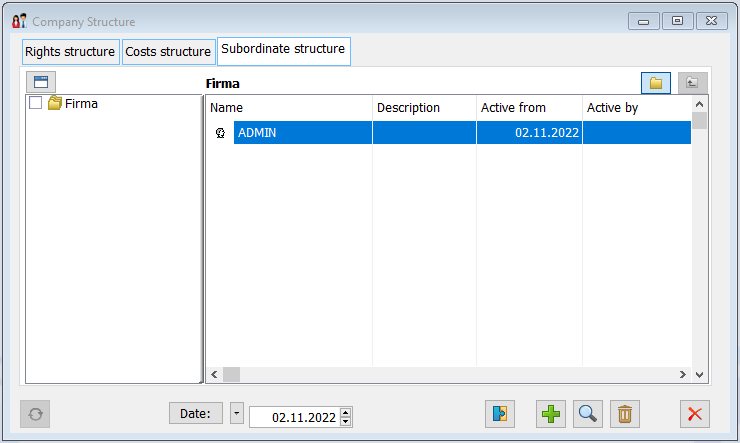
The tab displays, in tree form, the subordinate structure of the company.
In addition to the functions also found on the Rights structure tab, a function is available:
![]() [Select date] – function active when the following field is checked: Archive. It is used to indicate the date for displaying archived items on the tab.
[Select date] – function active when the following field is checked: Archive. It is used to indicate the date for displaying archived items on the tab.
On the tab, the user adds a centre or employees who report to a given centre.
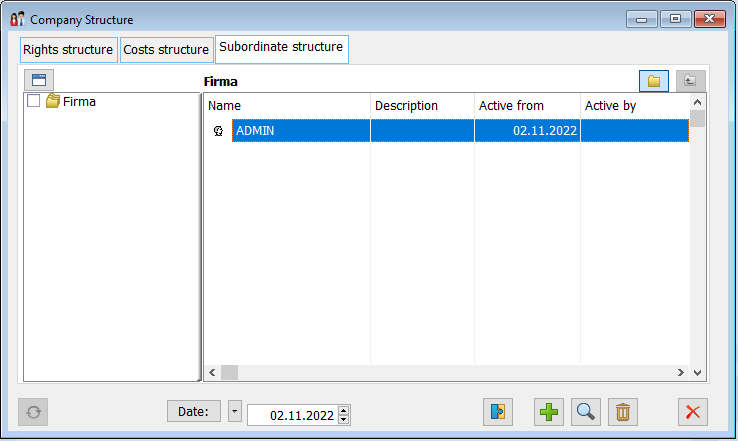
On the list of employees, from the context right-click menu, the following function is available: Set activity dates. Once set, the following window will open: Edit activity dates, where the user can record the employee activity date in a given subordinate structure centre. An employee cannot be assigned to multiple subordinate structure centres. Therefore, the activity dates in the various centres cannot overlap. Finding overlapping dates for individual employees is possible after running an integrity test: Historical clips in the subordinate structure.
Company’s structure edition from the level of subordinate structure
Subordinate structure edition, tab: General
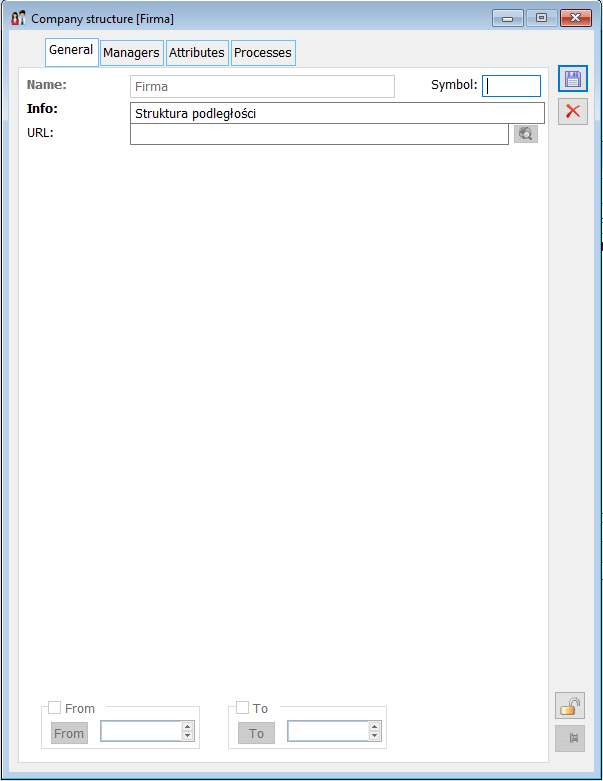
The tab contains the following fields:
Name – centre name.
Description – centre description.
URL – centre address.
From – date of centre activation.
To – date of centre validity.
Note: Dates of activation and centre validity are included in the period of the centre’s existence.
Subordinate structure edition, tab: Managers
The tab contains the list of centre managers.
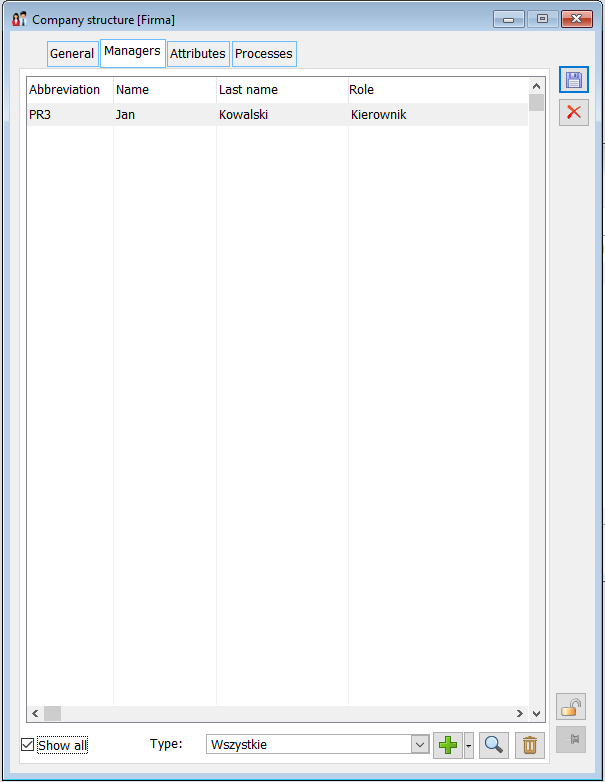
On the tab there are the following buttons: ![]() [New] and
[New] and ![]() [Delete], used to add and remove the managers to/from a list.
[Delete], used to add and remove the managers to/from a list.
Subordinate structure edition, tab: Attributes
On the tab the user can assign attributes to a specific centre. For this to be possible, attributes must first be assigned to the object: [Company’s structure], [Subordinate structure], in the window: Attributes definition, in the tab: Objects (module: Administrator). Attributes are assigned according to the general rules.
Subordinate structure edition, tab: Processes
The tab contains a list of processes and tasks for which a subordinate centre is a supervisor. Adding a centre as a supervisor to individual tasks and entering processes into the list is done analogically to the way the Company’s structure centre is added from the level of the rights structure (tab: Processes).
