Window: Active sessions
Window is used to display information about COMARCH ERP XL system sessions, for a given database. Session validity is checked periodically, and when the session is closed, program operation is stopped.
It is not possible to open documents for editing on a post where session was closed or deleted from database.

There are three tabs in the window which display information in common columns:
Operator – indicates COMARCH ERP XL system operator.
Module – indicates the module where session is taking place (on tab Active) or took place (on tab History).
Computer – indicates the post where session is taking place (on tab Active) or took place (on tab History). If the session has not been correctly terminated, it is still visible on the Active tab.
Start – displays information about the start date of the session.
End – displays information about the end date of the session.
Version – indicates the version of the software where session is taking place (on tab Active) or took place (on tab History).
The tabs contain the following functions:
![]() [Enable filtering] – used to display sessions according to the criteria indicated in the filter.
[Enable filtering] – used to display sessions according to the criteria indicated in the filter.
![]() [Filter wizard] – used to construct the filter.
[Filter wizard] – used to construct the filter.
![]() [Close the window] – closes the window.
[Close the window] – closes the window.
![]() [Interrupt the highlighted session] – is used to abort the highlighted session. This function is available only on the Active tab. To abort a session, select the session to be aborted in the list of sessions and click:
[Interrupt the highlighted session] – is used to abort the highlighted session. This function is available only on the Active tab. To abort a session, select the session to be aborted in the list of sessions and click: ![]() Information about the Operator who has independently aborted a given program session is saved in the cdn.Sesje table.
Information about the Operator who has independently aborted a given program session is saved in the cdn.Sesje table.
Note: It shall not be possible to interrupt a session that is active on a post where the session is being interrupted.
Tab: Active
Displays information on the current sessions in COMARCH ERP XL system.
Tab: History
Displays information about all sessions that took place in COMARCH ERP XL system, for given database.
Tab: Interrupted
Displays information about all sessions that have been interrupted.
Window: Password change
The window is used to change the password for the operator.
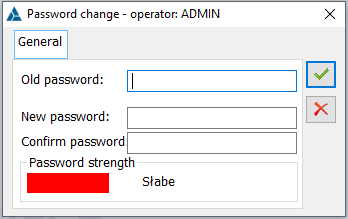
To change the password:
enter the old password in the field: Old password,
enter the new password in the field: New password,
re-enter the new password in the field: Confirm password.
Window: Date change
The window indicates the system date and can be used to change it. This date will be entered by default in all windows that require such a date.
To change the system date:
click: ![]() [Select date] and choose a specific date from the displayed calendar or
[Select date] and choose a specific date from the displayed calendar or
select a date by using the buttons: ![]() ,
,
click: ![]() [Confirm].
[Confirm].
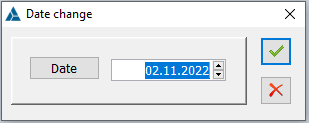
Note: If there is a change of date to one that falls within a closed trading period, the change of date will be preceded by an appropriate message.
Window: Financial periods
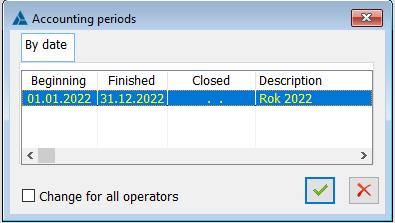
The window can be opened after selecting from the menu: System, the item: Period change… . It indicates financial period for which operations are performed in COMARCH ERP XL system. Changing the financial period is done by selecting it and clicking the button: ![]() [Select].
[Select].
In window, the user can find the following function: Change for all operators. If checked, the change shall apply to all operators.
Window: Selection of operator’s centre
The window can be opened after selecting from the menu: System, the item: Change of the operator’s context. It displays the centre indicated for the operator. In the window, the user can use a limiting placeholder, as the list is limited to those centres which in their names contain the value entered in the placeholder.
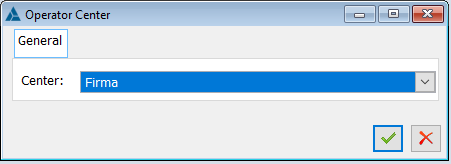
To change the centre:
expand the centres list by clicking: ![]() ,
,
After selecting the relevant centre from the list, click: ![]() [Confirm].
[Confirm].
Window: Contextual bans
The window displays contextual bans for individual operators and posts that is access bans to certain functions (windows) for operators or posts. It contains a list of functions, corresponding to currently opened windows. For each of these functions it is possible to create a list of operators and posts which will not have access to it.
The window allows the user to assign to a specific post or operator a ban associated with the currently open window, such as operator editing – as shown in the figure. Another way to assign bans to operators and positions is to add them in the window: Operator and Post, on the tab Bans. However, the use of the window: Contextual bans, may prove more convenient for the User, who can assign a ban resulting from a specific event – a context.
In window, the user can find the following function for the positions and operators:
![]() [Add] – adds a new post or operator to the list.
[Add] – adds a new post or operator to the list.
![]() [Change] – allows viewing and editing the selected ban. Editing of a ban (preview and change) is possible only when it is displayed in red colour on the list of selected bans. This colour is used to display all bans defined as: Form.
[Change] – allows viewing and editing the selected ban. Editing of a ban (preview and change) is possible only when it is displayed in red colour on the list of selected bans. This colour is used to display all bans defined as: Form.
![]() [Refresh] – refreshes the items in the list (if a new window is opened in the system).
[Refresh] – refreshes the items in the list (if a new window is opened in the system).
![]() [Reset] – resets the items in the list, that is deletes the items in the list if some window is closed.
[Reset] – resets the items in the list, that is deletes the items in the list if some window is closed.
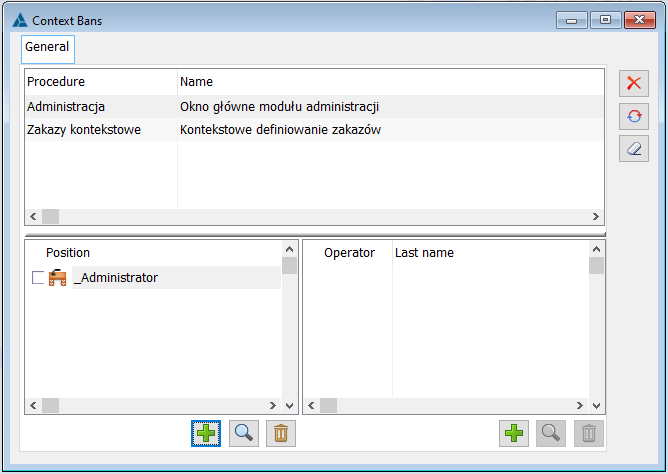
To establish a ban of access to a function for a particular operator or post:
select in the left panel of the window: Contextual bans, the active function;
in the open window in which the bans are to be set for the operator and the post, open: Contextual bans.
click: ![]() [Add]; this will open the window: Operators or Posts;
[Add]; this will open the window: Operators or Posts;
from the window: Operators or Posts, select the operator or post for which the ban is to apply, and then click: ![]() [Select];
[Select];
the operator for whom the ban is established will be displayed in the right panel of the window: Contextual bans (after selecting the function for which he/she has a ban established).
To modify a ban assigned to an operator/position, click: ![]() [Change]. A new window will open: Procedure ban mode. In the window, appropriate options should be selected, which will block selected operations. If in the Procedure ban mode window, the Preview checkbox is ticked, then it is not possible to tick the following parameters: Add, Change, Delete.
[Change]. A new window will open: Procedure ban mode. In the window, appropriate options should be selected, which will block selected operations. If in the Procedure ban mode window, the Preview checkbox is ticked, then it is not possible to tick the following parameters: Add, Change, Delete.
To save the changes made to the ban to specific operations, in the window: Procedure ban mode, click: ![]() [Accepting changes].
[Accepting changes].
Window: User settings
There are two types of interfaces in COMARCH ERP XL:
- Toolbar
- Ribbon
- optionally for both: Operator’s dashboard
The ability to choose between the interface types is available from the window: User settings. The window opens once the following function was selected: User settings, available after expanding the options in the menu: System.
The operator’s dashboard allows preparing a customised desktop with the objects most frequently used by the operator,
Window size allows the operator to change the size of windows in the system.
Moreover, in the window: User settings, it is possible to set the background for the program. The following parameters make this possible:
Graphic file – in the field the user can indicate the path from which the graphic file will be downloaded, which will be used as wallpaper in the main window of the module from which the following window was opened: User settings
Wallpaper layout – the options available for this parameter allow scaling the selected wallpaper according to standard criteria: Tile / Centre / Stretch.
Set background for all modules – selecting this option will cause that the background selected in the field: Graphic file, will be placed in the main window of each system module.
Note: If a background is defined in the window: Configuration, then the possibility of setting the background colour from the level of the following window will be blocked: User settings.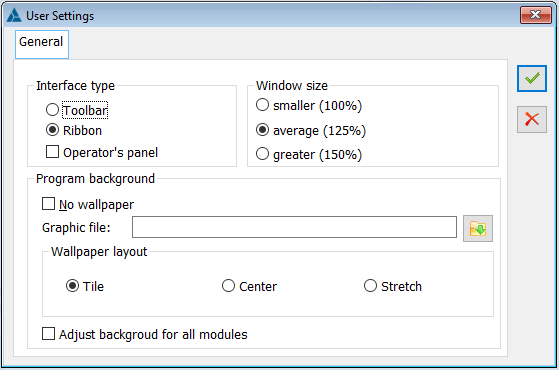
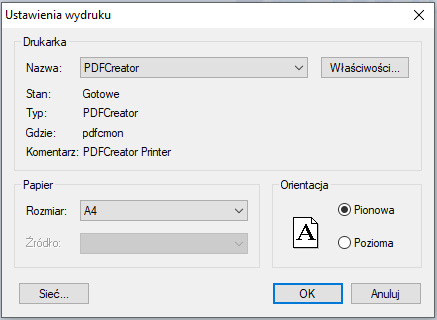
Window: Printer settings
Window is used to select default printer for COMARCH ERP XL system printouts and to select basic printout parameters. Option is inactive, if there is no printer installed in the system.
Add-ons
Add-ons functioning
Add-ons are a mechanism for hiding or disabling controls on existing windows. Add-ons are shown in a list that can be opened from the menu: System. This list allows to import and export add-ons, change their status, create new ones, delete, and edit them.
Creating an add-on
To create an add-on:
From the menu: System, select the function: Add-ons.
In the opened window: List of add-ons, click: New add-on. A new window will open: Add-on edition, where the user can define it.
In the window that opens, enter a name for the add-on and set its status to: active and click: Save. The new add-on will be added to the add-ons list.
In the window: List of add-ons, click: Add. A new window will open: Procedures group edition. In the window, enter the name of the procedures and save by clicking: Save. Procedures will be displayed as a branch in the new add-on tree.
The next action is to select the procedure in the list of add-ons and click: Add. A new window will open: Procedure subscription edition. When the window opens, open the object to which the add-on is to be applied, for example a sales invoice.
Then click once with the left mouse button on the field: ![]() , and then a second time while holding down the button. The following cursor will be activated:
, and then a second time while holding down the button. The following cursor will be activated: ![]() , which must be dragged to the object to which the add-on is to be applied. After dragging and dropping it (releasing the left mouse button), in the window: Procedure structure edition, the name of this object will be displayed. After entering the name, close the window: Procedure structure edition by clicking: Save. The object name will be entered in the list of add-ons as a branch under the procedure name.
, which must be dragged to the object to which the add-on is to be applied. After dragging and dropping it (releasing the left mouse button), in the window: Procedure structure edition, the name of this object will be displayed. After entering the name, close the window: Procedure structure edition by clicking: Save. The object name will be entered in the list of add-ons as a branch under the procedure name.
Selecting the procedure structure name in the list of add-ins, clicking: Add. A new window will open: Action edition on the control. In the window, define the type of add-on (hide or deactivate) and then, activate the cursor ![]() and drag it to the button/function to be hidden or deactivated. Once done, save the data by clicking the button: Save.
and drag it to the button/function to be hidden or deactivated. Once done, save the data by clicking the button: Save.
Then, on the list of add-ons, click: Refresh in programme.
To activate the add-on in the software, open the window: Company’s structure edition (from the level of rights structure) in the module: Administrator. This must be the correct window for the centre where the new add-on is to be active. In the window, select the Add-ons tab and click: Add. A list will be displayed in which the previously defined add-ons must be indicated and the selection confirmed with the button: Select. Once selected, save the window: Company’s structure edition.
The add-on will function on the selected object after saving the configuration (opened from the menu: System).
Note: In addition to creating a new add-on, it is also possible to import add-ons. The import takes place by clicking in the window: List of add-ons, the button: ![]() and selecting the appropriate file. If the user is importing an add-on with the same name as another add-on already registered in the system, the imported add-on will replace the previous one. In this case, there is no need to re-register the add-on in the company structure centre.
and selecting the appropriate file. If the user is importing an add-on with the same name as another add-on already registered in the system, the imported add-on will replace the previous one. In this case, there is no need to re-register the add-on in the company structure centre.