Functionality of schedules
Schedules are a notebook in the form of a calendar that displays a list of tasks for employees or production facilities. From the level of the schedule, it is possible to generate, view, edit and execute tasks. Each of the employees has his/her own schedule in which his/her tasks are displayed. An employee with appropriate rights can also access and edit the tasks of their subordinates in the schedule.
The tasks presented in the schedule are tasks of different nature – they can be generated in connection with the performance of activities in the system, for example scheduling a production order, generating a service order or performing activities as part of process management. It is also possible to register tasks which do not concern objects in the system, for example scheduling a team meeting or performing a task for a customer.
Control over the timeliness of tasks recorded in the schedule is facilitated by the functionality of reminders, which can be generated for them and which contain information about the type of task and its deadline.
Rights to use a schedule
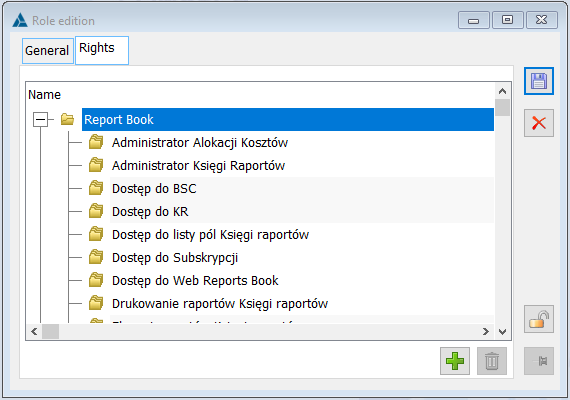
Any operator who is associated with an employee can use the schedule. The employee does not need to be assigned any rights to use his/her schedule. However, in order to be able to edit the tasks of subordinate employees, the employee must be assigned a role with appropriate rights. These permissions are assigned to the role in the window: Role edition, in the tab: Rights (for more information on roles, see chapter: 1.8 Roles). A suitably defined role should be assigned to an employee on his/her card, on the tab: Roles (for more information, see chapter: Employee card, tab: Roles).
Running a schedule
Schedule is available for employees from any module of COMARCH ERP XL system. Opening of the schedule takes place:
after selecting the function: Schedule, from menu: Tasks (in the module: Administrator, this function can be found in the following menu: Lists)
when the following button is clicked: ![]() [Schedule]
[Schedule]
Schedule – window description
The schedule window consists of three separate panels. The main panel is a view of tasks in the schedule by day, week and month. This view can be replaced by a schedule taking into account the occupation of cooperating employees. On the right side at the top, a standard monthly calendar is presented, showing the current context of the schedule view. On the right side at the bottom there is a list of employees, to which the system user has access in accordance with his/her rights. At the bottom of the window there is a filter and other parameters of the schedule view display manner.
Schedule, tab: Day
On the Day tab in the main panel, tasks for the indicated day are displayed. By default, the tasks for the current day will be displayed, but it is possible to display tasks for a different, specified day. On the tab the view of the day indicated in the calendar on the right side is presented, where hours are displayed vertically with a breakdown into the time interval indicated at the bottom of the window. At the top of the window the day selected in the main panel is displayed. Using the arrows on the left, the user can move between adjacent days. From the level of the tab it is possible to add new tasks, edit, execute, and delete already existing ones.
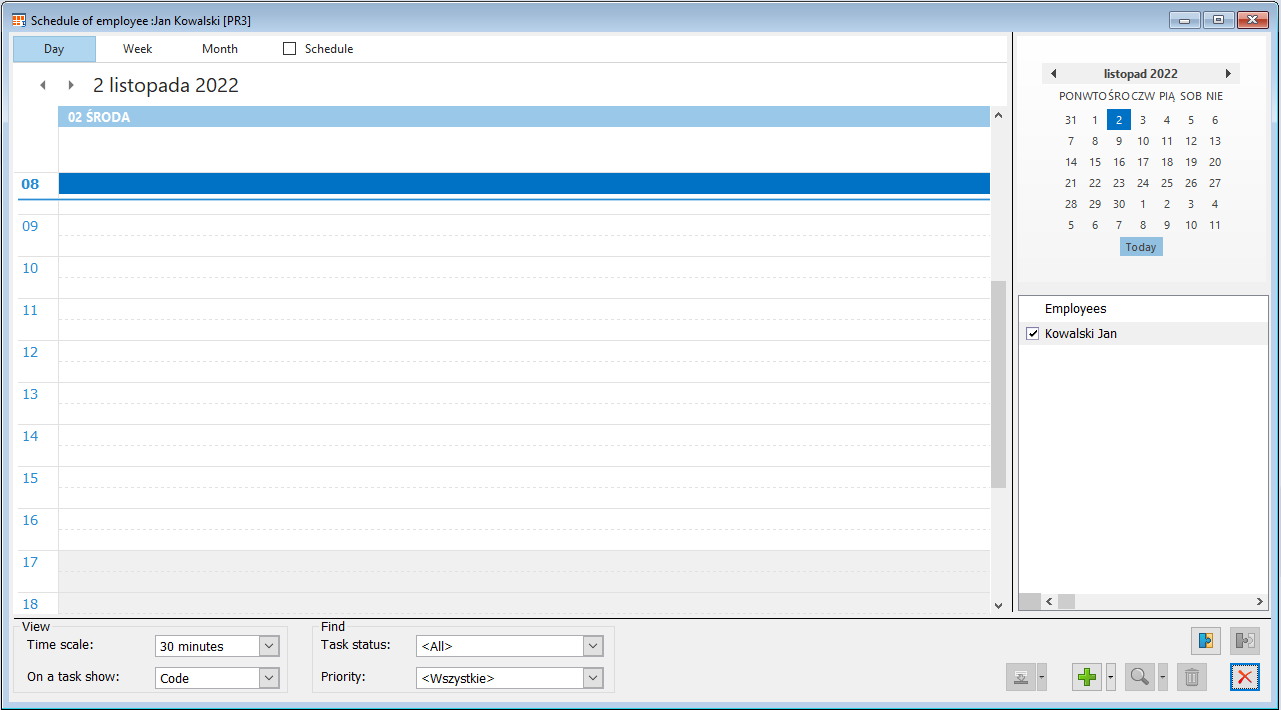
Checking the Schedule parameter on the tab allows the schedule to be displayed as an occupancy schedule for cooperating employees. In the schedule window, tasks of all employees assigned to the list are displayed, irrespective whether they are checked or not. Tasks are displayed in ascending order by start time, and if tasks start at the same time, then alphabetically by task code.
On the right side at the top, a standard monthly calendar is presented, showing the current context of the schedule view. At the bottom of this section there is the Today button, the selection of which will move the user to the current date as set in the program. The opened day will be marked in red and the month of this date will be displayed. On the bottom right there is an area where the user can indicate a list of employees (subordinates or colleagues depending on the role assigned to the employee). If the employee is assigned the role of Manager then all employees from the centre indicated in the role and from subordinate centres can be displayed. On the other hand, if the role is different than Manager then it will be possible to display all employees from the Centre indicated in the role who do not have the Manager role assigned.
The employee associated with the currently logged in operator always appears at the top of the list. Other employees are displayed in alphabetical order.
If more than one record is selected in the employee list, then each day in the schedule will be divided into as many equal columns as many records are selected. The column shows the tasks of a given employee. Tasks lasting more than one day have additional arrows.
It is possible to freely define colours for tasks in the schedule. The parameterisation depends on the type and source of the task, the list of which can be found in the dictionaries of categories in the branch Other, in the group Object colours in the section Schedule task colours. In the list, it is possible to modify the colour and name of the existing categories. The user cannot add new records and delete predefined ones.
Depending on the state of task execution, on the left side of its window in the schedule, a side bar in the following colour is visible:
White – active tasks, for which the deadline has not passed yet
Violet – overdue tasks, that is those for which the execution deadline has been exceeded (the second from the range of dates defining the execution deadline of the task is taken into account)
In colour corresponding to the type of task – completed task.
In the schedule window, hours beyond the availability of employees defined in the configuration in path General/Parameters 2 in the area Schedule are presented in grey.
If the following parameters are set for the task, the corresponding icons are displayed in the schedule window in the lower right corner of the task:
![]() – if a reminder is set
– if a reminder is set
![]() – if the task is shared, i.e. more than one employee is assigned to it
– if the task is shared, i.e. more than one employee is assigned to it
![]() – if the task is marked as cyclical
– if the task is marked as cyclical
It is possible to display several tasks for the same date. The order in which they are displayed will then be determined by the priority set for the task.
The list of tasks may be displayed taking into account the following filters:
View:
By time scale – select the time scale (5 minutes, 6 minutes, 10 minutes, 15 minutes, 20 minutes, 30 minutes, 60 minutes) according to which the scale of the vertical axis will be displayed
On the task show: Code/Name – it is possible to display for the task its code or name.
Search:
Task status – after selecting one of the options in this field (All/ To be completed/ Completed/ Outstanding) appropriate tasks will be displayed in view of their completion status.
Priority – after selecting one of the options defined in the dictionaries of categories in the branch Other, relevant tasks with an indicated priority will be displayed.
From the tab, the following operations can be performed:
![]() [Add to list] – the button will only be active if the employee has been assigned a role in which access to view/modify tasks as a manager (rights: Access to subordinate tasks or Modification of subordinate tasks) or employee was specified (rights: Access to Centre employee tasks or Modification of Centre employee tasks). After clicking the [Add to list] button, a list of employees will be displayed, with the option to select an employee.
[Add to list] – the button will only be active if the employee has been assigned a role in which access to view/modify tasks as a manager (rights: Access to subordinate tasks or Modification of subordinate tasks) or employee was specified (rights: Access to Centre employee tasks or Modification of Centre employee tasks). After clicking the [Add to list] button, a list of employees will be displayed, with the option to select an employee.
![]() [Remove from list] – button removes the employee from the list.
[Remove from list] – button removes the employee from the list.
![]() [Execute task] – button will be active after selecting a task, which can be executed, on the list. Clicking the button is used to execute the task from the schedule level. The execution of a task from the schedule results in execution of the source task and vice versa, for example execution of the process task which is included in the schedule results in marking its execution also in the schedule. Similarly – execution of a task from the schedule level will also be reflected in the window: Process history and in the window: Employee mailbox.
[Execute task] – button will be active after selecting a task, which can be executed, on the list. Clicking the button is used to execute the task from the schedule level. The execution of a task from the schedule results in execution of the source task and vice versa, for example execution of the process task which is included in the schedule results in marking its execution also in the schedule. Similarly – execution of a task from the schedule level will also be reflected in the window: Process history and in the window: Employee mailbox.
![]() [Add task] – allows to generate a task from the level of the schedule. After clicking the button, the following window will open: Schedule task, where the details of the generated task are specified. However, when using the
[Add task] – allows to generate a task from the level of the schedule. After clicking the button, the following window will open: Schedule task, where the details of the generated task are specified. However, when using the ![]() [Expands the menu of available options] button, in addition to adding a task, it is possible to generate individual schedule tasks, add a sales appointment, a CRM task and import a CRM task.
[Expands the menu of available options] button, in addition to adding a task, it is possible to generate individual schedule tasks, add a sales appointment, a CRM task and import a CRM task.
![]() [Card] – by default opens the window: Schedule task, making it possible to view and edit the task. With the use of
[Card] – by default opens the window: Schedule task, making it possible to view and edit the task. With the use of ![]() [Expands the menu of available options] button, the user can edit: Task, Source task.
[Expands the menu of available options] button, the user can edit: Task, Source task.
After moving the cursor over the task in the schedule, start and end times of the task (for tasks other than whole-day and multi-day tasks), its code and name are displayed.
When the user double-clicks on a particular schedule cell, a new task window can be automatically generated with the employees selected on the list, duration equal to 30 minutes and start time taken from the selected cell.
In the schedule window it is possible to increase/decrease the task window vertically and to move tasks vertically and horizontally with the mouse, thanks to which it is possible to automatically trigger a change of the task duration to the one set in the schedule.
The context menu allows the following operations: Add task, Generate individual tasks, Edit, Delete
Schedule, tab: Week
On the Week tab in the main panel tasks for the indicated week are displayed. By default, the tasks for the current week will be displayed, but it is possible to display tasks for a different, specified week. On the tab the view of the date range indicated in the calendar on the right side is presented, where days of the week are displayed vertically with a breakdown into the time interval indicated at the bottom of the window. At the top of the window the date range selected in the main panel is displayed. Using the arrows on the left, the user can move between adjacent periods. From the level of the tab it is possible to add new tasks, edit, execute, and delete already existing ones.
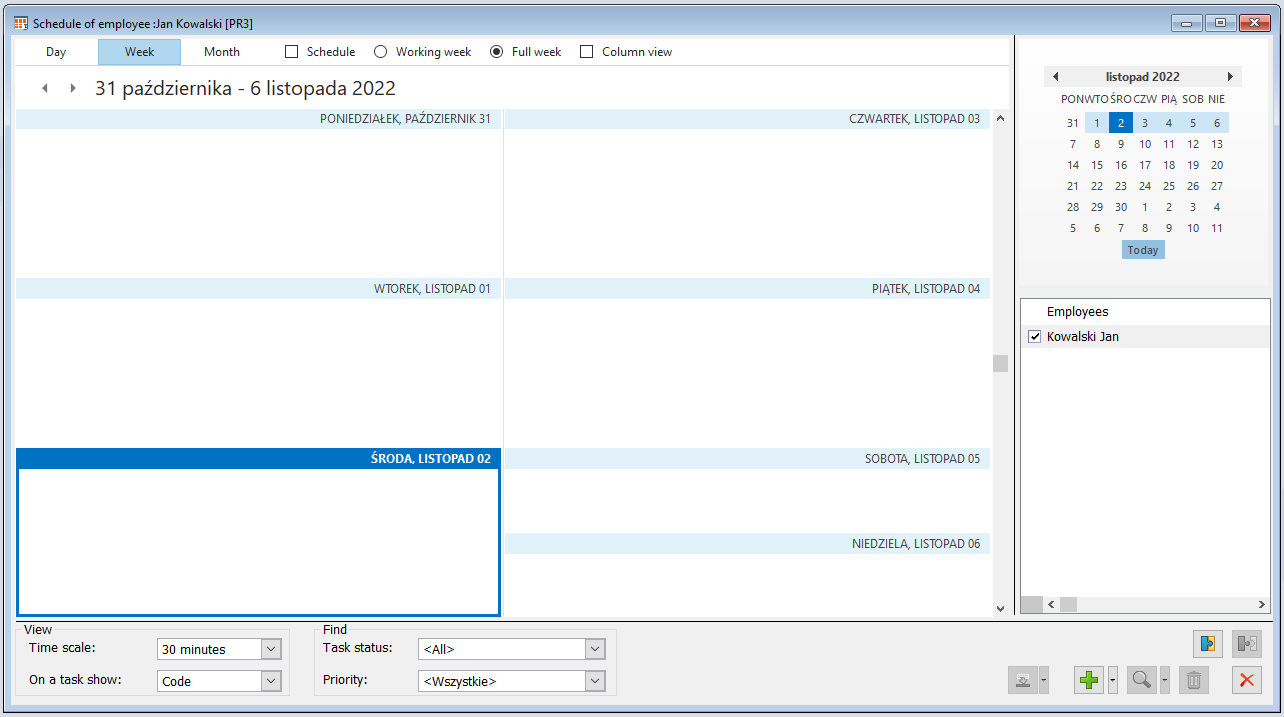
Tasks are displayed according to their source and the status of their execution, to which the colours correspond, the parameterisation of which is described in the Day tab section of this document. The list of tasks may be filtered according to the parameters described in the Day tab. Operations that can be performed from the Week tab are analogous to those described in the Day tab.
Checking the Schedule parameter on the tab allows the schedule to be displayed as an occupancy schedule for cooperating employees. In the schedule window, tasks of all employees assigned to the list are displayed, irrespective whether they are checked or not. Tasks are presented broken down into individual days.
For the Week tab it is possible to display the main panel in one of two modes:
Working week – view of a day from Monday to Friday
Whole week – all days of the week are displayed
Column view – additionally, the user may choose to display the schedule in column mode so that individual days will be displayed in separate columns.
On the right side at the top, a standard monthly calendar is presented, showing the current context of the schedule view. At the bottom of this section there is the Today button, the selection of which will move the user to the current date as set in the program. Days from the selected period, for which tasks are registered, are displayed in bold.
If more than one record is selected in the employee list, then each day in the schedule will be divided into as many equal columns as many records are selected. The column shows the tasks of a given employee.
Schedule, tab: Month
On the tab in the main panel tasks for the indicated month are displayed. By default, the tasks for the current month will be displayed, but it is possible to display tasks for a different, specified month. On the tab a view in a monthly layout is presented. At the top of the window the month range selected in the main panel is displayed. Using the arrows on the left, the user can move between adjacent periods. From the level of the tab it is possible to add new tasks, edit, execute, and delete already existing ones.
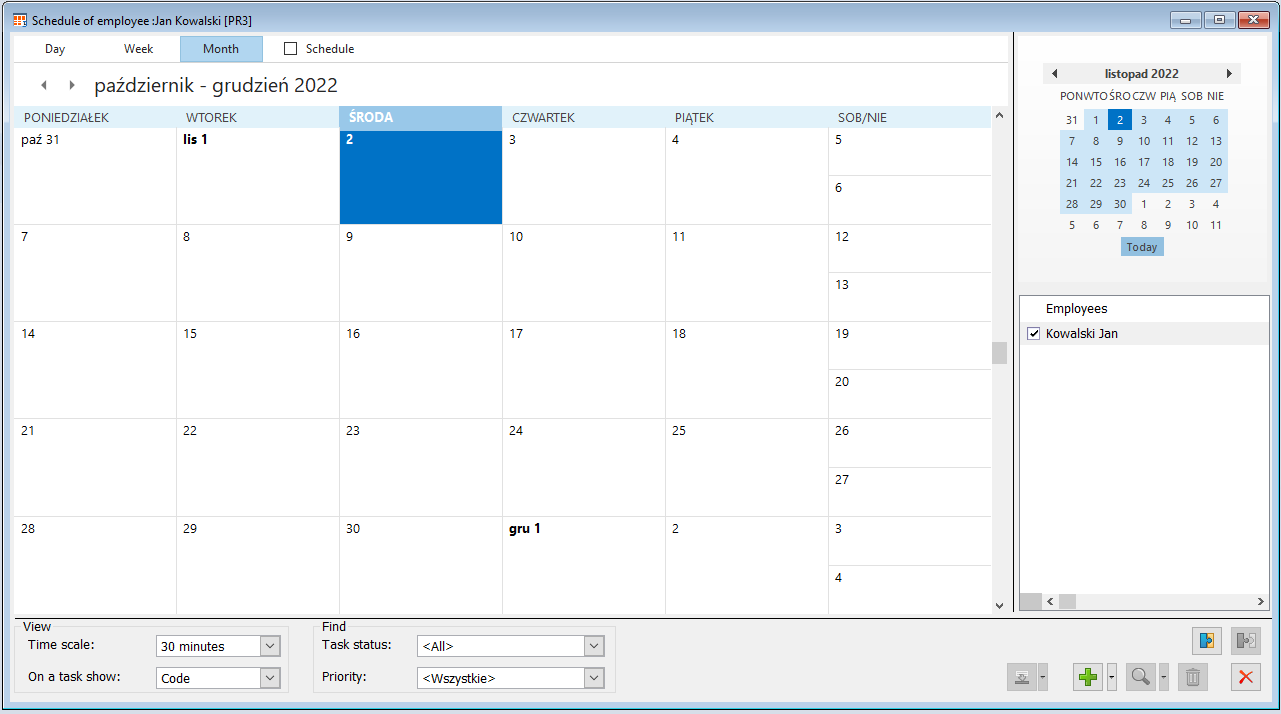
Tasks are displayed according to their source and the status of their execution, to which the colours correspond, the parameterisation of which is described in the Day tab section of this document. The list of tasks may be filtered according to the parameters described in the Day tab. Operations that can be performed from the Month tab are analogous to those described in the Day tab.
Checking the Schedule parameter on the tab allows the schedule to be displayed as an occupancy schedule for cooperating employees. In the schedule window, tasks of all employees assigned to the list are displayed, irrespective whether they are checked or not. Tasks are presented broken down into individual days.
On the right side at the top, a standard monthly calendar is presented, showing the current context of the schedule view. At the bottom of this section there is the Today button, the selection of which will move the user to the current date as set in the program. Days from the selected period, for which tasks are registered, are displayed in bold.
If more than one record is selected in the employee list, then each day in the schedule will be divided into as many equal columns as many records are selected. The column shows the tasks of a given employee.
Schedule rights management
The role of the manager and the absence of such permission determines first the way of filtering of the list of tasks visible in the schedule. If the Employee has access to subordinate tasks, all employees from the Centre to which he/she belongs and from the following structure are visible. If the Employee has access to Centre employee tasks, all from the Centre to which he/she belongs are visible. If the user does not have any rights or no role assigned, then the Employee only sees himself/herself and his/her tasks.
Secondly, the filtering of the list of tasks is determined by available fields in the task window. If the Employee has access to the tasks of subordinates/employees of the Centre, it is checked if the Employee is also the object of the task. If the employee is an object, the list of objects and the option to mark the completion of the task are active. If the employee is not an object, no fields are active. If the Employee has the right to modify the tasks of subordinates/employees of the Centre or has no rights or role assigned, then it is checked if he/she added the task. If the Employee has added the task all fields are active, if he/she has not added a task, the role rights are checked. Modification of subordinate employees’ rights results in the activation of all fields except description. Centre employee modification or no rights or no role assigned results in the ability to mark the completion of the task and an active list of objects.
In case the Employee has an assigned role without a Centre then he/she sees only himself/herself and his/her tasks.
If the Employee has two roles: one with access to the tasks of Centre 1 employees and modification of tasks of Centre 2 employees, and there is an employee from Centre 1 and an employee from Centre 2 on the task, then the least restrictive rights are selected (for example if the right to modify at least one of the objects on the list is given, then the permission to modify the whole task is granted).
Schedule task
In the window there are data concerning the task registered in the schedule. A task can be registered manually – from the schedule level by clicking the button ![]() , from the context menu by choosing: Add task or by double-clicking on a free time in the schedule. It can also be generated in connection with an event, which is connected with generating a task in the schedule:
, from the context menu by choosing: Add task or by double-clicking on a free time in the schedule. It can also be generated in connection with an event, which is connected with generating a task in the schedule:
planning the production activity
registering a work card on a service order
handling the task within the process functionality
generating a CRM task.
Whether the task will be included in the schedule is determined by marking the following parameter on the listed objects: Generate a record in the schedule. This parameter setting is copied by default from the setting of the parameter: Generate a record in the schedule on a relevant document definition.
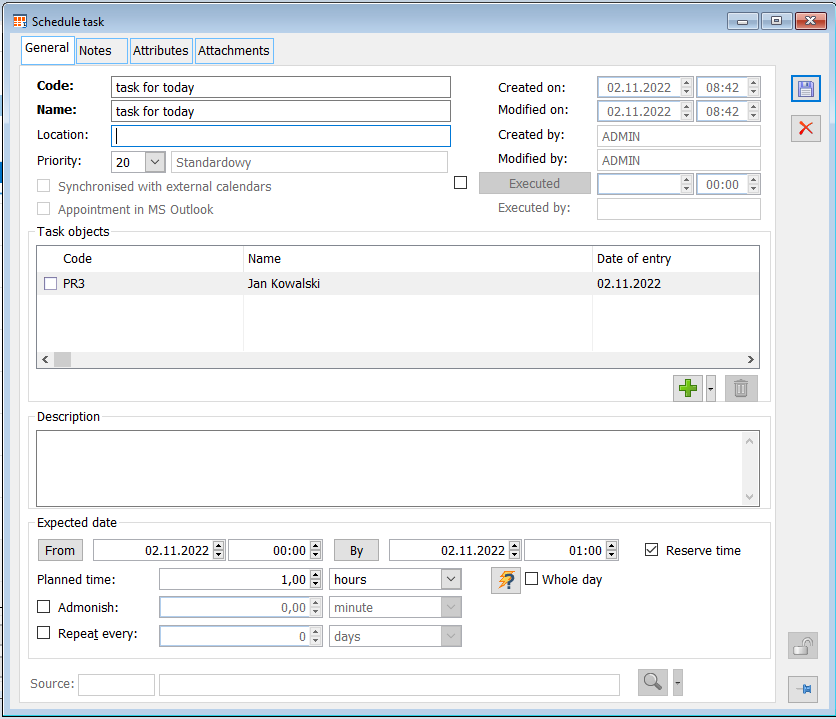
The task data are defined in the following parameters:
Code/Name – code and name of the task.
Priority – in this field, the task priority can be set, defined in the window: Categories. The priority will determine the hierarchy of tasks set for the same date and the order in which they are displayed in the schedule. Tasks with a higher priority will be displayed first among the tasks for the corresponding date.
Created by/Modified by/Created by/Modified by – the fields contain data on the execution of the relevant operations.
Executed – ticking this parameter means that the task has been executed. Completed tasks are displayed in the schedule (on tabs: Day, Week) in maroon colour. The executed task is not available for editing. The execution of a task can take place by checking the parameter, by executing the task from the level of the window: Schedule, or from the level of another object in the system with which a record in the schedule is linked, for example as a result of performing an action in a process involving confirmation of a SO from the level of that document. The task execution is also possible from the level or reminder generated for that task. In the field: Performed by, there are data about the object that performed the task. It is possible that other employees were attached to the task (in panel: Task objects). In this case, registering the execution of the task by one of the employees causes the same effect in other employees’ schedules – the task will be displayed in maroon as completed. It is possible to edit the date of task execution.
Synchronized with external calendars – a configuration parameter that enables synchronization of a task with an external calendar: Google Calendar.
Meeting with MS Outlook – a configuration parameter that allows for synchronization of a task with MS Outlook.
Task objects – a list of objects assigned to a task is displayed in the panel – it can be, for example, a list of employees who will participate in an organized meeting, or a list of production objects participating in the activity planned in the production order – introduced automatically when such an activity is planned (which is determined by selecting the following parameter on the technology: Generate records in the schedule). Entering an object/employee to a task means that this task will also be visible in their schedule. If a reminder is generated for a task, this reminder will also be displayed for the employee who is an object of the task. Registering the completion of a task by one of the employees will cause the task to be registered as completed for the other employees. An object can be added when the following button is clicked: ![]() [Add object]. A new window will open: List of employees, from which the employees assigned with the task can be selected. When the following button is clicked:
[Add object]. A new window will open: List of employees, from which the employees assigned with the task can be selected. When the following button is clicked: ![]() , next to the button: Add object, a menu will expand, with available options: From list of employees, From list of operators, Production resources.
, next to the button: Add object, a menu will expand, with available options: From list of employees, From list of operators, Production resources.
When the “From list of employees” option is selected, a window will open: List of employees, from which it is possible to select an employee.
When the “From list of operators” option is selected, a window will open: Operators, with a list of operators linked with employees. After accepting the selection, employees related to the indicated operator are added to the list of task supervisors.
When the “Production resources” option is selected, a window will open: List of resources, from which it is possible to select production objects (registered from the module level: Production).
Excluding an object/employee from a task takes place after selecting it/them in the panel: Task objects and clicking the button: ![]() [Remove object]. After checking many objects of a task, it is possible to remove from the list multiple objects at the same time.
[Remove object]. After checking many objects of a task, it is possible to remove from the list multiple objects at the same time.
Description – in the filed: Description, there is a place for entering the description of the generated task. Description field is inactive if the task window is opened by an employee who has not added it (the operator associated with this employee does not appear in the field Created by).
Execution deadline – in this panel the user can define data concerning the execution deadline of the task and the generation of reminders:
From/To – in the fields the user specifies the time interval for the task execution. Failure to complete a task by the deadline results in the task being marked with the status: Overdue (tasks displayed in maroon). Overdue will take place after the deadline specified in the following field expired: To. To display overdue tasks, select Overdue in the task status area of the filter in the schedule window
Reserve time – if this parameter is selected, the time for which the task was generated will be marked as occupied. This will result in a warning being displayed when attempting to generate a task for the same time period, stating that this is the next task scheduled for that date. However, this warning will not block the user from scheduling another task for the same date. If the user attempts to automatically set a deadline (triggered by the button: ![]() [Set deadline]) it will not be possible to specify this deadline for the reserved time.
[Set deadline]) it will not be possible to specify this deadline for the reserved time.
Scheduled time – the time resulting from the dates specified in the fields: From/To. The modification of the time will result in the postponing the deadline: To, in the above field.
![]() [Set deadline] – running the function sets a common free deadline for which it will be possible to generate a task for objects that have been added to the task (this applies to tasks generated from the module level: CRM, generated directly from the schedule level and job card level). The function starts searching for a deadline from the date specified in the field: From (execution deadline). After checking the availability periods of the objects selected for the task, and after finding a period at the intersection of these periods in which the objects are available at the same time, a deadline for the task execution is set.
[Set deadline] – running the function sets a common free deadline for which it will be possible to generate a task for objects that have been added to the task (this applies to tasks generated from the module level: CRM, generated directly from the schedule level and job card level). The function starts searching for a deadline from the date specified in the field: From (execution deadline). After checking the availability periods of the objects selected for the task, and after finding a period at the intersection of these periods in which the objects are available at the same time, a deadline for the task execution is set.
All day – parameter enabling marking the completion of a task for the whole day
Reminder – if this parameter is selected, reminders will be displayed for the task completion, regardless of the module to which the operator connected to the employee is logged in.
Repeat every – if this parameter is selected, the task will have a cyclic character – it will be repeated at the specified time. Entering the next occurrence of the task will take place each time after the task is completed.
Execution deadline field is inactive if the Task window is opened by an employee who has not added it (the operator associated with this employee does not appear in the field Created by).
Source – in this field the source of task generation will be displayed, if the task was generated in connection with an event registered in the system, for example for a task generated as part of process handling, information on processes will be displayed as the source – the name of the process and the task in the process, which corresponds to the task registered in the schedule. When the following button is clicked: ![]() [Show task source], the source task will be displayed, for example the Task in process or the Work card from the service order. In turn, with the use of
[Show task source], the source task will be displayed, for example the Task in process or the Work card from the service order. In turn, with the use of ![]() [Expands the menu of available options] button it is possible to view the source task card or conversation thread card (this option is active only if the source task is related to a conversation).
[Expands the menu of available options] button it is possible to view the source task card or conversation thread card (this option is active only if the source task is related to a conversation).
The task can be described by attributes. This can be done with the tab: Attributes. To be able to add attributes to a specific task, the appropriate attribute class must be assigned to the object: Task. Attributes are added according to general rules.
An attachment can also be attached to a task. The user can do it on the tab Attachments by clicking on the button ![]() . Then, by default, the form of a new attachment will be opened, described in chapter. Clicking
. Then, by default, the form of a new attachment will be opened, described in chapter. Clicking ![]() gives the possibility of adding the attachment through actions: Add attachment, Select from list, Download. The Set default option is only available after an item has been added to the attachments list and allows the user to specify a default attachment for the task.
gives the possibility of adding the attachment through actions: Add attachment, Select from list, Download. The Set default option is only available after an item has been added to the attachments list and allows the user to specify a default attachment for the task.
Generating individual tasks
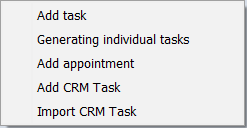
In employee’s schedule, in context menu and after ![]() expanding available options next to
expanding available options next to ![]() [Add task] button, COMARCH ERP XL system allows generating individual task:
[Add task] button, COMARCH ERP XL system allows generating individual task:
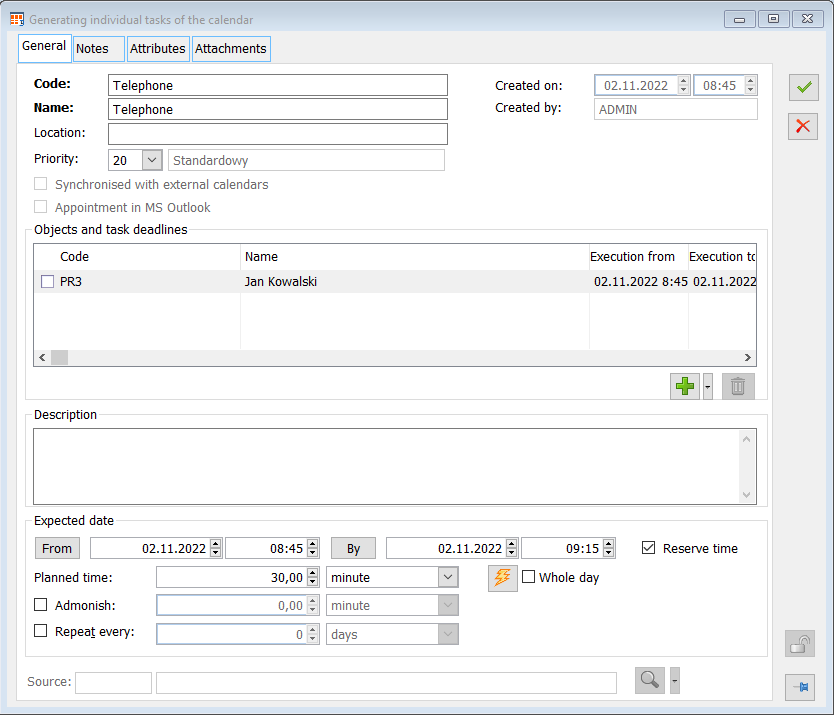
The Generating individual tasks window is a modified Schedule task window. The Objects and task deadlines table allows the user to add objects from the list of employees, operators, and production resources. At the same time, the table shows the deadlines set for these objects to complete the task. After launching the window, the fields “Execution deadline from – to” display values that are automatically duplicated to the Execution date from, Execution date to columns for each object.
After the ![]() [Set deadline] icon is selected, the nearest available deadline is searched for, separately for each object, and displayed in the Execution date from, Execution date to columns.
[Set deadline] icon is selected, the nearest available deadline is searched for, separately for each object, and displayed in the Execution date from, Execution date to columns.
After setting all the data in the “Generating individual tasks” window, select the ![]() [Generate] icon. Verification is then performed for all objects to see if the fixed dates conflict with their schedules. If there are any conflicts, the following message will be displayed: “Schedule conflicts with other tasks or object’s availability calendar. Do you want to save the task?”. If a “Yes” answer is selected (or if they do not collide), standard tasks will be added to the schedule of all the objects indicated in the “Generating individual tasks” window. If the answer “No” is selected, the User will return to the task generation window.
[Generate] icon. Verification is then performed for all objects to see if the fixed dates conflict with their schedules. If there are any conflicts, the following message will be displayed: “Schedule conflicts with other tasks or object’s availability calendar. Do you want to save the task?”. If a “Yes” answer is selected (or if they do not collide), standard tasks will be added to the schedule of all the objects indicated in the “Generating individual tasks” window. If the answer “No” is selected, the User will return to the task generation window.
Reminders
The System offers the possibility of informing the User about the necessity of performing the tasks registered in the schedule by means of alerts, meaning special reminders displayed automatically on the screen. These reminders work in a similar way as reminders in MS Outlook. The user can manage reminders – specify the time at which the reminder should be displayed, cancel reminders for selected tasks, as well as postpone the reminder to a set date.
Reminders activation
The reminders will be displayed if in the following window: Configuration (tab: General/Parameters 1) in the section: Schedule, the following parameter has been checked: Enable reminders.
The reminders can be defined from the level of window:
Schedule task
Process task definition
Task to be implemented (for a task generated from the level of the module: CRM)
A reminder is generated by selecting the following parameter in the listed objects: Reminder.
From the level of window: Definition of the process task and Task to be performed (CRM tasks), it is possible to select the parameter if it is foreseen that the task is to be included in the schedule (in section: Schedule, the following parameter has been checked: Reserve time or Do not reserve time).
Next to the parameter: Reminder, there is a field where the user specifies the date when the reminder is to be displayed. The date specified for the reminder is counted backwards from the date of the scheduled task start.
Example: For a task, the execution deadline is set to 1 hour (from the time the process enters this task) and the reminder is set to 15 minutes. This means that the reminder will be displayed 15 minutes before the task starts.
There is a mechanism in the System that checks if there are any new reminders to be displayed. The frequency of this verification is defined in the window: Configuration, tab: General/Parameters 1, by entering an appropriate value in the field: Reminders check frequency.
Example: In configuration, in the field: Reminders check frequency, the frequency was set to 30 s (seconds). This means that every 30 seconds the System will check if there are reminders ready to be displayed. If there are such reminders, they will be displayed. The operator will be able to postpone the reminder, and if they do not use the postpone function, the reminder will be displayed every other 30 seconds.
Displaying reminders
The reminders will be displayed in the window: Reminder. If there are several reminders, then they will be displayed collectively in the same window. Reminders for overdue tasks will also be displayed in the window. The reminder will be displayed for those operators who are supervisors in the task.
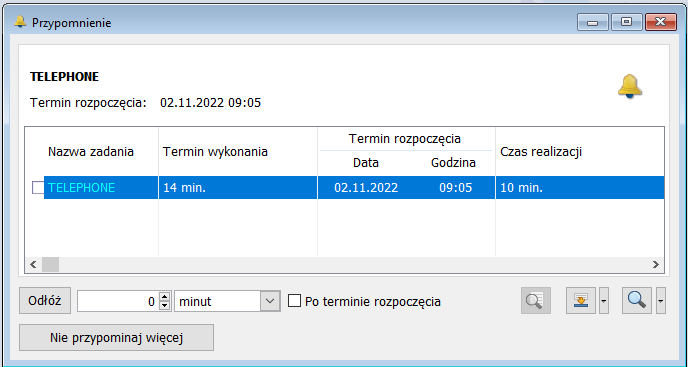
The window displays information on the activities to be performed, the deadline for their execution and completion, as well as data on the object to which the task relates (for example document number).
In this window, the user can find the following fields and functions:
Postpone – the field defines the time for which the reminder selected on the list will be postponed. The postponement date will be counted from the task execution deadline. After indicating the postponement time, click: ![]() [Postpone].
[Postpone].
After the start date – it is possible, that the supervisor wants to postpone the task execution after the date pointed out in the process definition. Selecting this parameter also postpones the reminder for the time period indicated in the field: Postpone. To activate the function it is necessary to click: Postpone (after specifying the date).
Example: In the definition handling FS, two tasks were defined: Add commercial document and Confirmation of commercial document, which are included in the schedule. For the task: Confirmation of commercial document, a reminder was set to be generated and the date for this task was set to 15 minutes after the process entered this stage. The FS was then generated and the operator received a reminder to confirm the generated document. However, the operator postponed the reminder until 30 minutes after the task start date specified in the process – after selecting this reminder in the list, he entered a value of 30 minutes, checked the box: After the start date, and then clicked the button: Postpone. The reminder will not be displayed until those 30 minutes have passed from the date which was indicated in the process definition as the task start date.
Do not remind again – this function cancels the reminder indicated in the list.
![]() [Object preview] – allows the user to open the window of the document/object for which the process is defined.
[Object preview] – allows the user to open the window of the document/object for which the process is defined.
![]() [Perform action] – from the level of the window: Reminder, the user can perform the task for which the reminder is displayed. To perform an action, select a reminder on the list and click the button.
[Perform action] – from the level of the window: Reminder, the user can perform the task for which the reminder is displayed. To perform an action, select a reminder on the list and click the button.
![]() [Edit task] – after selecting from the drop-down menu with the button:
[Edit task] – after selecting from the drop-down menu with the button: ![]() , the appropriate function, it is possible to edit the task/source task within which the reminder indicated in the list is displayed. The source task will be, for example, a work card from a service order, for which a task has been generated in the schedule.
, the appropriate function, it is possible to edit the task/source task within which the reminder indicated in the list is displayed. The source task will be, for example, a work card from a service order, for which a task has been generated in the schedule.
