Attachments make it possible to enter any data into the system: images, files, documents, and link them with objects in the system, for example goods and contractors. In this way, it is possible, for example, to attach to the product card a photo of the product, and to the customer card references in the form of an MS Word file.
Since version 2016 of ERP XL, the possibility of adding attachments in the form of links has been introduced. Thanks to this, it is possible to share via URLs attachments of large size without causing unnecessary load on the database.
Moreover, the Attachments functionality allows reviewing physical printouts made on a printer and printouts sent as PDF attachments by mail programs. In order to make such an overview possible, it is necessary to check the following parameter on the printout definition: Electronic copy:
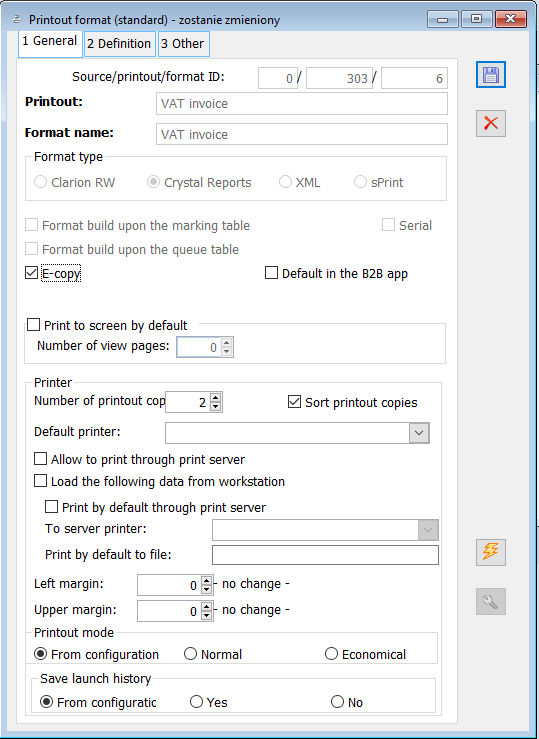
The formats in which attachments may be included are defined in the window: Category dictionaries,
in the folder: Other, in the branch: Attachment types.
Attachment types (formats)
The following types (formats) of attachments are predefined in the system:
Archive – Archives (*.zip)|*.zip|All files (*.*)|*.*
Printouts archive including the following file types: PDF files (*.pdf).pdf|All files (*.*)|*.*
Outlook – Outlook (*.txt,*.htm,*.html,*.msg)|*.txt;*.htm;*.html;*.msg|All files (*.*)|*.*
MSExcel – Spreadsheets (*.xls)|*.xls|All files (*.*)|*.*
MSWord – Documents (*.doc)|*.doc|All files (*.*)|*.*
Image – Images (*.bmp,*.jpg,*.gif)|*.bmp;*.jpg;*.gif|All files (*.*)|*.*
Log – log files (*.log) |*.log|All files (*.*)|*.*
Wallpaper – wallpaper (*.bmp,*.jpg,*.gif)|*.bmp;*.jpg;*.gif|All files (*.*)|*.*
WFLMail including the following file types: WFLMail files (*.WFLMail)|*.WFLMail|All files (*.*)|*.*
It is, however, possible to define other types. To do it:
in the window: Categories, select the folder: Other and select the branch: Attachment types,
click: ![]() [Add]. A new window will open: Attachment types.
[Add]. A new window will open: Attachment types.
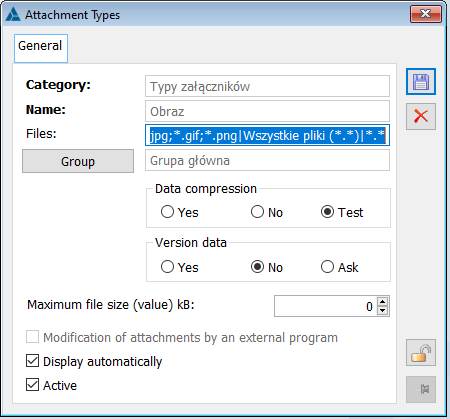
In the window, fill in the following fields:
- Category – name of the category
- Name – type name
- Files – files supported by a given type
- Group and field button – displays the name of the group to which the attachment is assigned
- Data compression – if data compression is selected, then files of the given type will be compressed in the system. This test determines whether compression is necessary. The files, whose volume will decrease after compression to 80% of their pre-compressed state, will be compressed.
- Allowed file size (value) kB – this field allows specifying the size in kB which the specified attachment type can maximally reach. The operator may enter a value from the range 0–9.999.999. A value of 0 means that the system will not control the size of imported files.
- Modifying attachments with an external program – disabled field
- Active – selection decides on activity status of given type. It will not be possible to place an inactive attachment type in the object
- Automatically display – if this parameter is checked, attachments placed in the object will be automatically displayed after being selected (marked on the tab: Attachments).
Note: On the tab: Attachments, the preview is displayed for objects to which attachments have been attached; preview is activated for images up to 2 MB, and for attachment cards up to 10 MB. From version 2021.0, the preview is also available for attachments saved as links, as long as the link is to a locally saved file and not to a folder or website. It is also a prerequisite that they are of the correct type: PNG, JPG, BMP, GIF, and PDF. The preview of attachments of type “image” and PDFs that have been saved as links to local files is always available, meaning it works regardless of setting the parameter Automatically display in the definition of the attachment type.
Once data are entered, click: ![]() [Save changes].
[Save changes].
New format allows the user to add attachments in this format.
Attachments list
Attachments used in the System are displayed in the window: Attachments list. In the window: Attachments list there are two tabs: Attachments and Printouts archive:
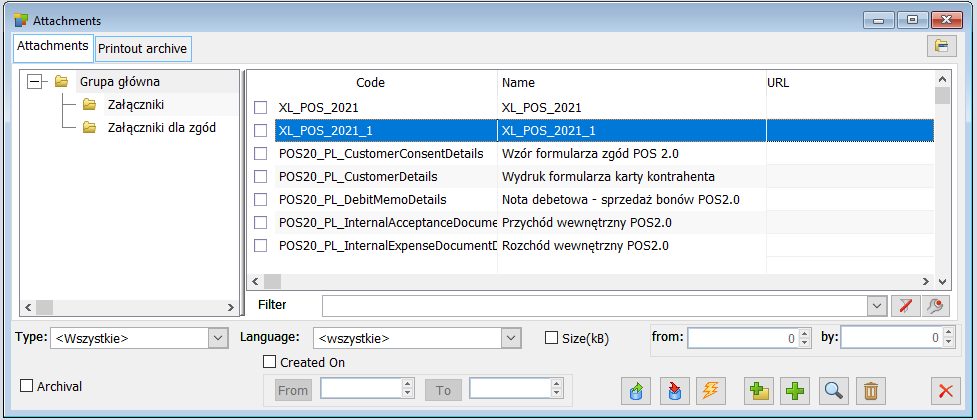
Attachments list, tab: Attachments
Window displays list of attachments used in COMARCH ERP XL system. To open the window, from the menu: Tools, select the item: Attachments.
In this window, the user can find the following fields and functions:
Size – the filter allows narrowing the list of displayed attachments according to the criterion of file size in kB.
Archived – if this parameter is selected, the list will display both active and archived attachments. Archived attachments will be displayed in grey font.
Type – filter that will allow narrowing the list of displayed attachments according to their type.
Language – filter that will allow narrowing the list of displayed attachments according to their language.
Creation date – filter that will allow narrowing the list of displayed attachments to the date range specified in the fields: From, To.
![]() [Add group] – when the button is clicked, the window opens: Attachments group.
[Add group] – when the button is clicked, the window opens: Attachments group.
![]() [Add] – used to add attachment to the list. After clicking the button, the following window will open: Attachment, from which it is possible to import and export attachments, as well as assign attachments to an object. When an attachment is added, the cursor will highlight the newly added record in the list.
[Add] – used to add attachment to the list. After clicking the button, the following window will open: Attachment, from which it is possible to import and export attachments, as well as assign attachments to an object. When an attachment is added, the cursor will highlight the newly added record in the list.
![]() [Card] – once clicked, a window will be displayed for viewing/editing: Attachment.
[Card] – once clicked, a window will be displayed for viewing/editing: Attachment.
![]() [Delete] – removes an attachment (not related to any object) from the list.
[Delete] – removes an attachment (not related to any object) from the list.
List of attachments will automatically display attachments of the log type, which contain the log generated during the execution of the key action by XL WORK AUTOMAT in processes.
These logs contain information about the reasons for failure in the performed actions.
In the Configuration in the General part on Parameters 2 tab there is a parameter enabling for configuration of displaying of information in the log “Attach log to the process only if errors or warnings occurred”. If this parameter is checked, processes should make entries to the attachments only if there are errors or warnings in the log.
Attachments list, tab: Printouts archive
The Printouts archive tab of the Attachments list is almost analogous to the Attachments tab. The difference between the two tabs consists of additional filters. In addition, this tab shows printouts that are sent as PDF attachments by mail next to printouts generated for a desktop printer. The name of a printout consists of: <Print name>_<Document number>_<Print date>.pdf.
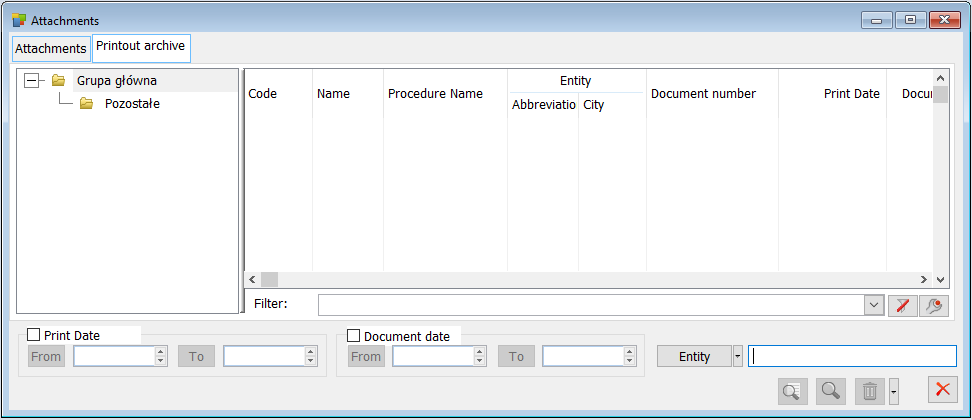
The window has the following filters:
Printout date – filter that allows narrowing the list of displayed attachments to the date range specified in the fields: From, To. Sorting is done by the date of printout.
Document date – filter that will allow narrowing the list of displayed attachments to the date range specified in the fields: From, To.
Entity – filter that will allow narrowing the list of displayed attachments depending on the indicated entity. At the same time it is possible to indicate: Contractor, Employee, Office, Bank, Other.
[PDF printout preview] – enables previewing the selected attachment in PDF format.
![]() [Preview] – allows to preview the selected attachment. Clicking the icon will open the form of the selected document.
[Preview] – allows to preview the selected attachment. Clicking the icon will open the form of the selected document.
Attachment
The Attachment window provides information about the attachment and the objects associated with the attachment.
Attachment, tab: General
The tab specifies the code and name of the attachment and imports and exports the file.
Data of type: Name, Code are not archived, they are updated for each entry with the same ID number (DAB_ID).
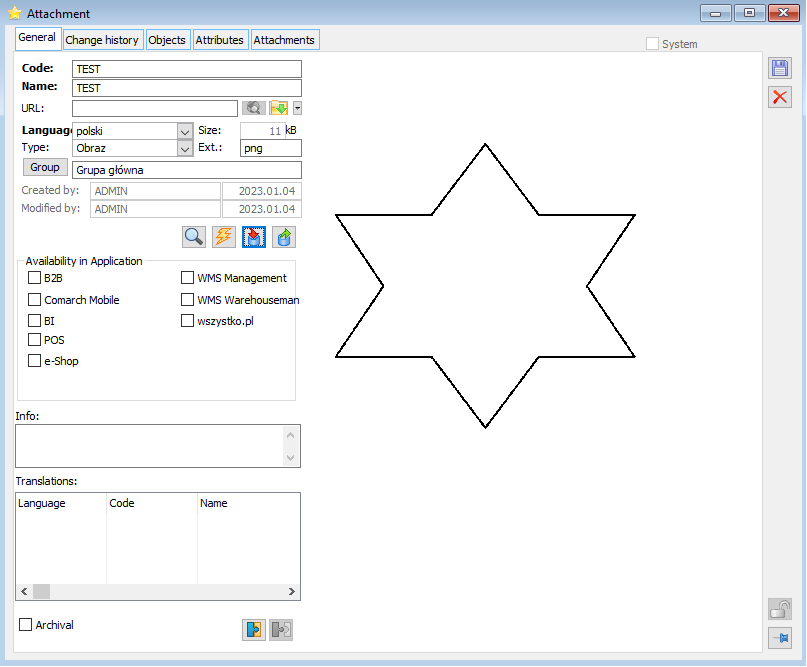
This is done using fields and functions:
Code – this field is used to enter the code of the attachment, displayed on the list of attachments. To search for an attachment by its code, use the locator on this list.
Name – the name of the attachment. After importing an attachment, the name of this file will be displayed by default.
URL – this field allows entering a link to a web page, file or folder path
[View page] – clicking the button will open the web page entered in the URL field or the file/object to which the path is provided, in the default browser.
![]() [Location of file or folder] – clicking the button opens a window with a selection of the file. Next to it there is a button which expands a menu with available options to choose from: file location, folder location, website address.
[Location of file or folder] – clicking the button opens a window with a selection of the file. Next to it there is a button which expands a menu with available options to choose from: file location, folder location, website address.
After selecting the file location option, a window will appear to select the file. The URL field will indicate the path to the file. Analogically in the case of folder location.
Language – the language of the attachment. The field is filled with the value “Polish” if the Language filter has not been enabled in the attachments list. If a value has been selected in the filter, the value of the Language field on the newly added entry will be consistent with the value set during filtering.
Type – attachment format. Field also automatically filled in after importing the file.
Extension – extension of attachment. Field filled in automatically after importing to the System.
Size – field describing the size of attachment in kB, filled in automatically.
Created by – this field displays data of the operator who added attachment and date when it was done.
Modified by/Date – this field displays data of the operator who modified the attachment and the date when the modification was made.
Archived – by making an attachment archival, the user can limit the list of attachments to active ones. The archived attachment can still be used on objects – it will be possible to view it, edit it, etc.
![]() [Edit] – clicking the button will open the attachment for editing
[Edit] – clicking the button will open the attachment for editing
![]() [Run read] – clicking the button will open the attachment for viewing; PDF files have been supported and can be displayed in the attachment window. Additionally, after entering the attachment form, the file content is immediately displayed using the built-in PDF viewer. If the content of the file does not fit in the window, the user can move it using the vertical and horizontal sliders, or shrink and enlarge the image using the mouse scrollbar.
[Run read] – clicking the button will open the attachment for viewing; PDF files have been supported and can be displayed in the attachment window. Additionally, after entering the attachment form, the file content is immediately displayed using the built-in PDF viewer. If the content of the file does not fit in the window, the user can move it using the vertical and horizontal sliders, or shrink and enlarge the image using the mouse scrollbar.
If the file has multiple pages, the user can navigate to a specific page using the button ![]() .
.
An analogous preview will be available for attachments of following types: Printouts archive and OCR document if the file extension is .pdf.
![]() [Import from file] – this function enables an attachment to be imported into the System. After clicking the button, the following window will open: Import of file into database, where the appropriate file must be indicated, and then click: Open. The attachment will be imported. After selecting the file for import, the system will check whether its size does not exceed the allowed size specified for the attachment type. If the size is exceeded, the system will inform the user with an appropriate message about the exceeded size.
[Import from file] – this function enables an attachment to be imported into the System. After clicking the button, the following window will open: Import of file into database, where the appropriate file must be indicated, and then click: Open. The attachment will be imported. After selecting the file for import, the system will check whether its size does not exceed the allowed size specified for the attachment type. If the size is exceeded, the system will inform the user with an appropriate message about the exceeded size.
![]() [Export to file] – this function enables exporting an attachment (file) from the database. After clicking the button, the following window will open: Export to file from database, where the user can indicate the location to which they want to export the file and then click: Save. Exporting an attachment will not remove the attachment from the database – it will simply be copied to the specified location.
[Export to file] – this function enables exporting an attachment (file) from the database. After clicking the button, the following window will open: Export to file from database, where the user can indicate the location to which they want to export the file and then click: Save. Exporting an attachment will not remove the attachment from the database – it will simply be copied to the specified location.
Availability in applications – this field can be used to select additional applications for which the attachment will be available. The selection can be made from the following: Comarch ERP Contractor’s Dashboard, Intranet workflow, Comarch ERP Mobile Vendor, Retail, WMS Management, WMS Warehouse, Comarch ERP e-Store, iMall24, BI.
Description – possibility to add description. The description is moved to the Description column in the list of attachments, in the template of the sales visit item (CRM module), in the visit item of the Merchandising type.
Translations – the table shows links between attachments in different languages. The information is displayed in three columns:
Language – the language of the attachment,
Code – attachment code,
Name – the name of the attachment.
Adding or removing a translation is done by using the following buttons:
![]() [Add] – clicking opens the list of attachments in selectable mode, where in the filter: Language, only those languages are available which have not yet been assigned to the attachment and are not selected in the attachment definition in the language field from which the list was opened. Once an attachment is selected, it will be placed on the list of Translations. Assigning an attachment in one language is equivalent to assigning it to the assigned attachment.
[Add] – clicking opens the list of attachments in selectable mode, where in the filter: Language, only those languages are available which have not yet been assigned to the attachment and are not selected in the attachment definition in the language field from which the list was opened. Once an attachment is selected, it will be placed on the list of Translations. Assigning an attachment in one language is equivalent to assigning it to the assigned attachment.
![]() [Add] – clicking the button removes the link between attachments.
[Add] – clicking the button removes the link between attachments.
[Show on map] – The attachment tab allows the user to store GPS data. GPS data can only be filled in by external programs. In future, the Mobile Vendor module for the Android platform will fill in this data. If the data are filled in, the following button is displayed in the attachment tab: Show on map. Thanks to this functionality, it is possible to check, among other things, where the photo was taken – a functionality which is particularly useful in case when the sales visit of merchandising type is being implemented.
Attachment, tab: Change history
The Change history tab presents a list of entries related to the change of the attachment. The table at the top of the tab includes two columns: Date and time – the time when the attachment change was made, Operator – the code of the operator who made the object change. The following buttons are available under the table of changes:
![]() [Edit] – clicking the button will open the attachment for editing.
[Edit] – clicking the button will open the attachment for editing.
![]() [Run Read] – clicking the button will open the attachment for viewing in read-only mode.
[Run Read] – clicking the button will open the attachment for viewing in read-only mode.
![]() [Export to file] – this function enables exporting an attachment (file) from the database. After clicking the button, the following window will open: Export to file from database, where the user can indicate the location to which they want to export the file and then click: Save. Exporting an attachment will not remove the attachment from the database – it will simply be copied to the specified location.
[Export to file] – this function enables exporting an attachment (file) from the database. After clicking the button, the following window will open: Export to file from database, where the user can indicate the location to which they want to export the file and then click: Save. Exporting an attachment will not remove the attachment from the database – it will simply be copied to the specified location.
![]() [Delete] – this function will delete the attached file and attachment.
[Delete] – this function will delete the attached file and attachment.
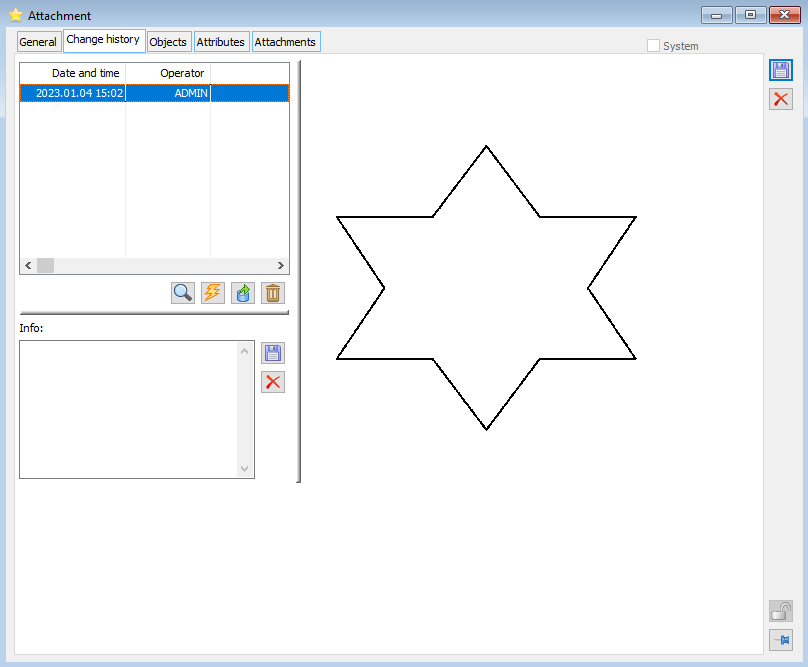
At the bottom of the window, in the Description field, it is possible to enter a description for the attachment. The following buttons are available:
![]() [Save changes] – used to save the entered description to the attachment.
[Save changes] – used to save the entered description to the attachment.
![]() [Cancel] – by clicking the button, the description field will be cleared.
[Cancel] – by clicking the button, the description field will be cleared.
Attachment, tab: Objects
The tab displays the list of objects with which attachments are linked. It is also possible to display attachments that have been defined as attributes, and as attributes are assigned to objects in the System.
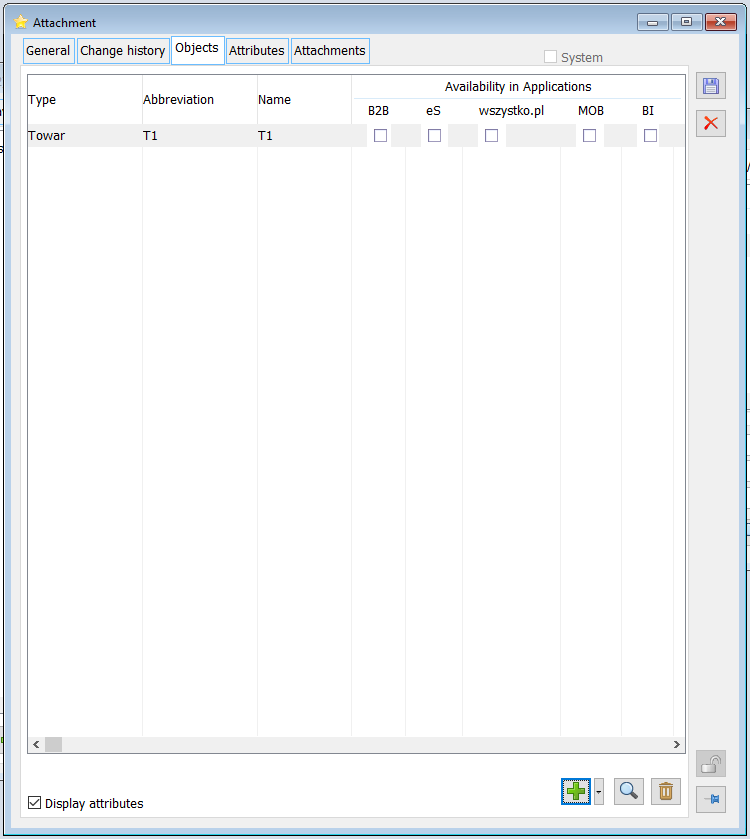
The tab contains the following fields and functions:
Display attributes – when this parameter is selected, the tab will display attachments that have been assigned to objects in the System as attributes (attribute class with type: Attachments). Linking an attribute: Attachments with objects in the System is done from the window: Attribute definition, following the general rules for linking attributes to objects. Attachments as attributes will be displayed in blue font.
![]() [Add] – this function enables indicating the object, to which an attachment will be linked . When the following button is clicked:
[Add] – this function enables indicating the object, to which an attachment will be linked . When the following button is clicked: ![]() a menu will be expanded from which the user can select the object type (for example contractor, goods), and after expanding the relevant list, indicate a specific object to be linked. This way, several contractors or goods can be added at once. The advantage of linking attachments to objects from the level of the level of window: Attachment is that it is possible here to link this attachment to multiple objects. Therefore, there is no need to edit the cards of subsequent objects and assign them the same attachment. After adding an object to the list, the user can specify whether the object is to be linked to an attachment also
a menu will be expanded from which the user can select the object type (for example contractor, goods), and after expanding the relevant list, indicate a specific object to be linked. This way, several contractors or goods can be added at once. The advantage of linking attachments to objects from the level of the level of window: Attachment is that it is possible here to link this attachment to multiple objects. Therefore, there is no need to edit the cards of subsequent objects and assign them the same attachment. After adding an object to the list, the user can specify whether the object is to be linked to an attachment also
in applications: Comarch ERP Contractor’s Dashboard, Intranet workflow, Comarch ERP Mobile Vendor, Comarch ERP e-Store, iMall24, BI. These settings will be transferred to the Object attachment tab and can be edited from there.
![]() [Edit] – when this button is clicked, the object selected in the list of objects will be opened for editing.
[Edit] – when this button is clicked, the object selected in the list of objects will be opened for editing.
![]() [Delete] – the function is used to delete an attachment with the object selected in the list.
[Delete] – the function is used to delete an attachment with the object selected in the list.
Attachment, tab: Attributes
The tab allows describing the attachment with attributes. To be able to assign an attribute to an attachment, the following class of that attribute must first be assigned to the object: [Attachment].
Tab: Attachments on objects
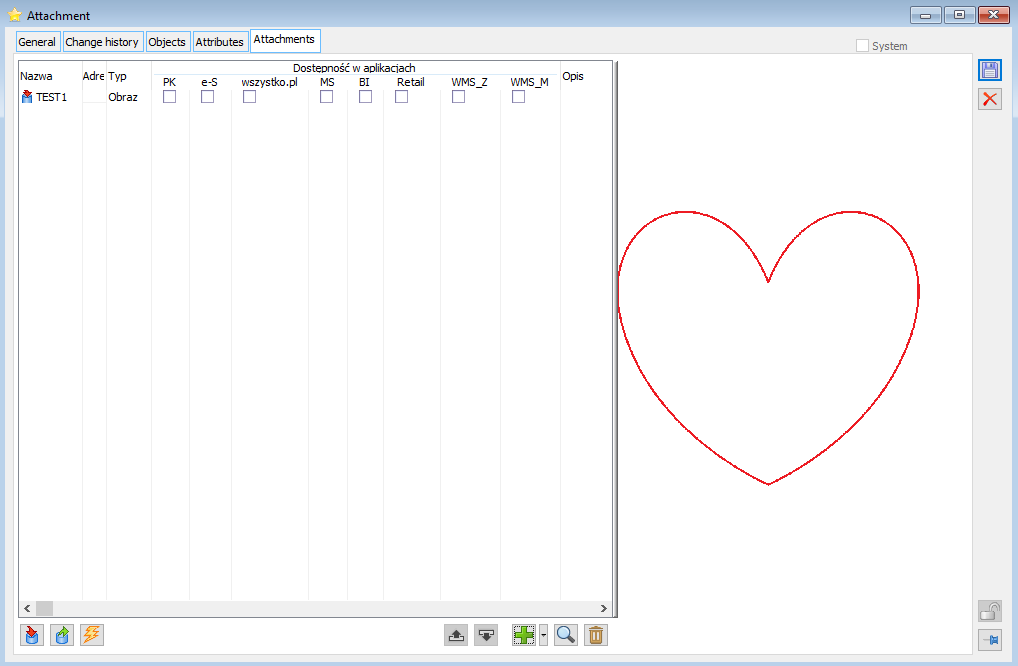
Objects with which attachments can be linked have the following tab: Attachments. On this tab the attachments linked with the object are displayed from the level of window: Attachment.
From the level of tab: Attachment, located on objects, an attachment can also be added, imported, exported and deleted from the object.
On the tab: Attachment, the user will find a list of attachments displayed in three columns:
Name – the name of the attachments entered; this could be, for example, the title of an employee photo or the name of a diploma, etc.
URL – the column contains the link to the web page. The address is presented as read-only (the user can change it by editing the attachment). Clicking directly on the link will open the page/file.
Type – the type of attachment, meaning the format in which the attachments are saved – for spreadsheets this will be MS Excel, etc.
Availability in applications – indicates in which applications the attachment is available. It is possible to modify this accessibility. The abbreviations that appear here indicate the following applications:
- PK – Contractor’s dashboard
- IOD – Intranet workflow
- iS24 – iSklep24
- iM24 – iMall24
- MS – Mobile Vendor
On the right-hand side of the window, there is space to display an attachment, for example a photo, if the following option is selected for the attachment type: Automatically display (in the window: Attachment types, displayed from the window: Categories).
Moreover, in the window, the user can find the following functions:
![]() [Data import] – the button opens the window: Import file to database, where the user indicate the file that will be saved in COMARCH ERP XL database. Selection takes place after selecting a file and clicking:
[Data import] – the button opens the window: Import file to database, where the user indicate the file that will be saved in COMARCH ERP XL database. Selection takes place after selecting a file and clicking: ![]() [Open].
[Open].
![]() [Export data] – clicking this button opens the window: Export to file from database, which indicates the location of the file exported from COMARCH ERP XL database. Exporting is done by clicking:
[Export data] – clicking this button opens the window: Export to file from database, which indicates the location of the file exported from COMARCH ERP XL database. Exporting is done by clicking: ![]() [Save].
[Save].
![]() [Run view] – opens the specified file for preview, for example in the case of an MS Word document, the MS Word application will be launched to view the document.
[Run view] – opens the specified file for preview, for example in the case of an MS Word document, the MS Word application will be launched to view the document.
![]() [New] – clicking this button opens the window: Attachment, in which the attachment is defined. For the new item, the user needs to specify the name and type of attachment, as well as the availability of the attachment in applications by checking the checkbox in the appropriate field.
[New] – clicking this button opens the window: Attachment, in which the attachment is defined. For the new item, the user needs to specify the name and type of attachment, as well as the availability of the attachment in applications by checking the checkbox in the appropriate field.
![]() [Card] – allows to change the name of the attachment type.
[Card] – allows to change the name of the attachment type.
![]() [Delete] – removes the selected item from the list.
[Delete] – removes the selected item from the list.
Adding attachment to an object
To add attachment, open the following window: Attachment, from the level of: Object cards, that has the tab: Attachments. When the following button is clicked: ![]() [Add], in the window: Attachment, select the tab: General, and there click:
[Add], in the window: Attachment, select the tab: General, and there click: ![]() [Import from file], in the window that opens: Import a file into the database, indicate the appropriate file and confirm the selection with the button: Open, then specify the code and name of the imported attachment and select the tab: Objects. On the tab, expand the menu using the button:
[Import from file], in the window that opens: Import a file into the database, indicate the appropriate file and confirm the selection with the button: Open, then specify the code and name of the imported attachment and select the tab: Objects. On the tab, expand the menu using the button: ![]() [Expands the menu of available options] and select from it the type of object (e.g. Contractor) to which the attachment is to be attached, a list of objects will open, from which a specific object (e.g. contractor) with which the attachment is to be associated must be selected.
[Expands the menu of available options] and select from it the type of object (e.g. Contractor) to which the attachment is to be attached, a list of objects will open, from which a specific object (e.g. contractor) with which the attachment is to be associated must be selected.
Save the attachment (click: ![]() [Save changes]).
[Save changes]).
