Window: Attributes definition
Attributes are grouped into classes of values, which can be assigned to objects in COMARCH ERP XL system. After the user assigns a particular attribute class to an object, in its window, on Attributes tab, a list of attributes will be displayed, from which the user can choose a particular attribute for a particular object. To assign a specific attribute to an object (such as a purchase order), the user must first define it within the attribute class in the window: Attribute definition, on the Attributes class tab, and then assign the class to the object on the Objects tab. The attribute class assigned in this manner can be used when working with a given object (for example when issuing a new purchase order, it will be possible to assign to it an attribute from the attribute class defined and assigned to the object: Purchase order, in the module: Administrator).
Window: Attributes definition is used to define attributes, attribute classes, and attribute groups which will be used while working with COMARCH ERP XL system. Attributes appear in many windows and are used to define additional traits of system elements, for example documents, and facilitate searching according to criteria of indicated attribute.
Attributes can be copied between objects, for example an attribute which describes a contractor will be copied to sales order generated for this contractor.
To open the window, from the menu: Tools, select the sub-menu: Attributes.
The window consists of tabs that are used to classify attributes and define attribute links between objects.
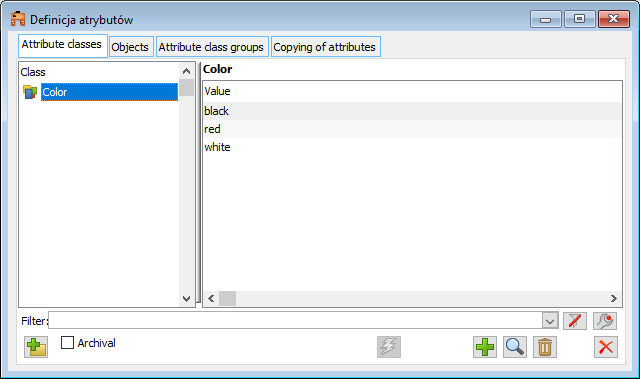
Attributes definition, tab: Attributes classes
On the tab, attribute information is displayed in two panels. The left panel shows a list of attributes classes, while the right panel shows the values that are assigned to them. In the window it is possible to filter information, also using the filter wizard. Moreover, the tab contains the following fields and functions:
![]() [Add attributes class] – launches the process of adding a new attribute class, by opening the window: Attribute class.
[Add attributes class] – launches the process of adding a new attribute class, by opening the window: Attribute class.
Show inactive. Checking the field will result in the display also of the classes of inactive attributes.
![]() [Execute SQL query] – this function is active for attribute class which in the following window: Attribute class, in the field: Type, has the following item selected: SQL. Clicking will result in the generation of list of values for SQL-type classes and its display.
[Execute SQL query] – this function is active for attribute class which in the following window: Attribute class, in the field: Type, has the following item selected: SQL. Clicking will result in the generation of list of values for SQL-type classes and its display.
![]() [Add value] – this function is active for attribute class which in the following window: Attribute class, in the window: Type, has the following item selected: List. This function allows adding new value to the attribute class indicated in the left panel.
[Add value] – this function is active for attribute class which in the following window: Attribute class, in the window: Type, has the following item selected: List. This function allows adding new value to the attribute class indicated in the left panel.
![]() [Change attribute class/Edit value] – depending in which panel the item was selected, the function allows for its preview and edition.
[Change attribute class/Edit value] – depending in which panel the item was selected, the function allows for its preview and edition.
![]() [Delete attribute class/Delete value] – deletes the selected item.
[Delete attribute class/Delete value] – deletes the selected item.
On the Attributes classes tab there is a locator that allows the user to easily find the attribute class. The locator can be triggered by entering the value the user wishes to look for from the keyboard.
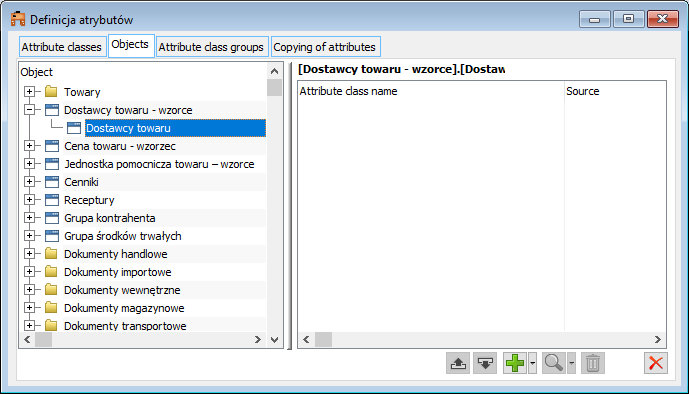
Attributes definition, tab: Objects
This tab displays attributes classes (in right panel) assigned to objects in COMARCH ERP XL system. Defining them is necessary to use attributes in specific cases, for example when issuing a purchase invoice.
In the left panel of the tab, the user can see a list of objects to which the user can assign attributes classes. Their assignment in this window is necessary to use attributes while working with COMARCH ERP XL system. On the tab, above the list of attributes classes’ names, full path of the object with attributes classes is displayed.
The tab contains the following fields and functions:
![]() [Move up] – allows the user to move the selected item up.
[Move up] – allows the user to move the selected item up.
![]() [Move down] – allows the user to move the selected item down.
[Move down] – allows the user to move the selected item down.
![]() [Add class to the object] – used to add a new class to the object selected in the left panel of the tab. When the following button is clicked:
[Add class to the object] – used to add a new class to the object selected in the left panel of the tab. When the following button is clicked: ![]() [Expands the menu of available options], a list appears from which the user can add an attribute class, attribute class from a given group or groups of attributes classes.
[Expands the menu of available options], a list appears from which the user can add an attribute class, attribute class from a given group or groups of attributes classes.
![]() [Class-object link] – allows the user to preview the selected attributes class.
[Class-object link] – allows the user to preview the selected attributes class.
![]() [Remove class from object] – detaches the attributes class from the object selected in the left panel.
[Remove class from object] – detaches the attributes class from the object selected in the left panel.
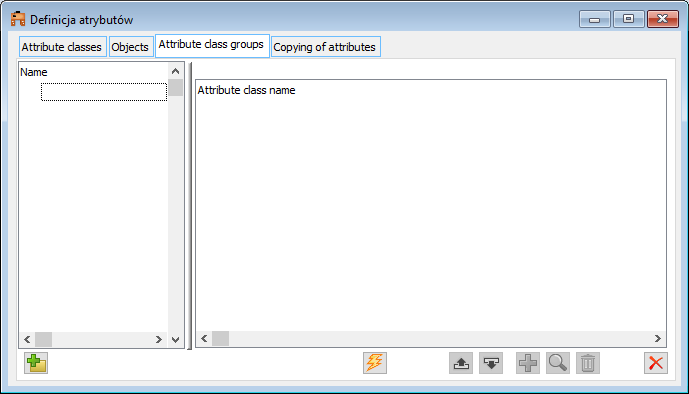
Attributes definition, tab: Groups of attribute classes
The tab displays the attributes classes groups (in the left panel) to which the attributes classes (in the right panel) are assigned.
The tab contains the following functions:
![]() [Add group] – used to create group of attributes classes. Opens the window: Set name. The window contains two tabs. On the tab: General, the user enters the name of the group, while in the tab: Objects, the user assigns objects to the group. It is also possible to delete objects from the group.
[Add group] – used to create group of attributes classes. Opens the window: Set name. The window contains two tabs. On the tab: General, the user enters the name of the group, while in the tab: Objects, the user assigns objects to the group. It is also possible to delete objects from the group.
![]() [Move up] – allows the user to move the selected item up.
[Move up] – allows the user to move the selected item up.
![]() [Move down] – allows the user to move the selected item down.
[Move down] – allows the user to move the selected item down.
![]() [Add class to the group] – used to add a new class to the group selected in the left panel.
[Add class to the group] – used to add a new class to the group selected in the left panel.
![]() [Show attributes class/show group] – allows to preview the selected attribute class/group (if only one attribute class has been added).
[Show attributes class/show group] – allows to preview the selected attribute class/group (if only one attribute class has been added).
![]() [Remove class from group/remove group] – detaches the attribute class, selected in the right panel, from the group or detaches group (if only one attribute class has been added).
[Remove class from group/remove group] – detaches the attribute class, selected in the right panel, from the group or detaches group (if only one attribute class has been added).
Note: If an attribute with the following parameter checked: Automated system, has been assigned to a group, then it will be automatically assigned to the object when the group is added to it.
Attributes definition, tab: Copying attributes
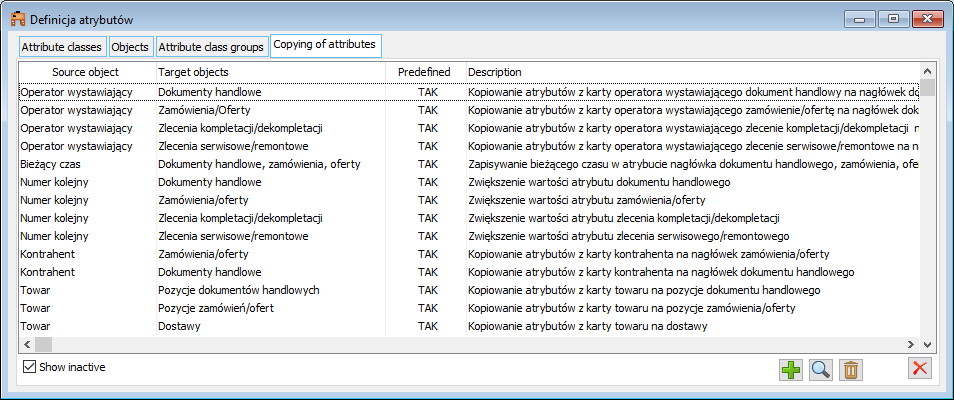
The tab contains links that allow attributes to be copied between a source object and a target object, such as from a contractor to an order.
The user can point to these links when defining an action on an attribute class for a particular object.
On the tab there are the following functions:
![]() Show inactive – a filter that allows the user to narrow the list of links to active ones.
Show inactive – a filter that allows the user to narrow the list of links to active ones.
![]() [Add] – allows to define a new link that will enable attributes to be copied between objects. The link is defined in the window: Copying attributes.
[Add] – allows to define a new link that will enable attributes to be copied between objects. The link is defined in the window: Copying attributes.
![]() [Source object edition] – allows the user to view and edit the registered links.
[Source object edition] – allows the user to view and edit the registered links.
![]() [Delete] – removes the link from the list.
[Delete] – removes the link from the list.
Defining a link (window: Copying attributes)
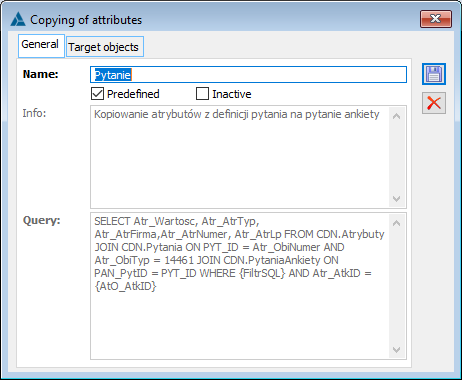
Window: Copying attributes, allows defining a link between objects to which the same attribute class is assigned. Once it is defined, it will be possible to copy attributes between these objects, during actions: Add, Read, and other actions defined from the window: Attribute class for the object.
To define the link, the user uses the following fields:
Name – link name.
Predefined – there is a number of predefined links in the System. These links are available for the User to edit. To edit such links, uncheck the parameter.
Note: Deselecting the Predefined parameter and saving the window with this change is an irreversible operation – the option cannot be selected again. A special function is used to rebuild the list of predefined links: Repair of source attributes.
Inactive – a link can be defined as active or inactive which determines the copying of attributes.
Description – in this field, the user enters a description of the link. The description shall be displayed in the list of links in the window: Attributes definition, in the tab: Copying attributes, in the column: Description.
Query – SQL query that provides a definition for copying attributes between objects. The result of the query will be the basis for determining the value on the target object. Queries with predefined links can be the basis for User-defined relationships.
On the tab: Target objects, a list of target objects is defined, which can be selected from the objects displayed in the attributes list. Clipping new target objects and detaching existing ones is possible by using the buttons: ![]() [Attach] and
[Attach] and ![]() [Remove].
[Remove].
![Copying attributes, tab: Target objects A new link is saved by clicking: [Save].](https://help.comarch.com/xl/wp-content/uploads/2022/11/word-image-10681-29.png)
Attribute class
The window is used to define attribute class. A value can be assigned to an attribute. This can be done in the window: Attribute class or in the window: Attributes definition, in the tab: Attributes class.
Attribute class, tab: General
In this tab, the user enters basic data concerning attribute class.
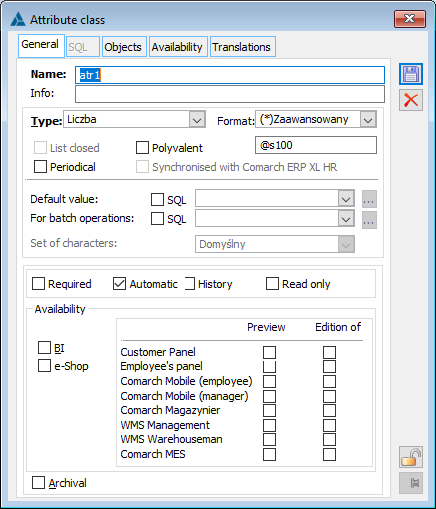
The tab contains the following fields:
Name – used to enter the name of the class. This field must be filled in to register an attribute class.
Description – description for attributes class. This field is helpful when numerous attributes classes have been registered.
Type – when the following button is clicked: ![]() , a list with types of attribute classes will expand, from which the user can select the appropriate type. This attribute, when applied to the document, will enable the connection with the indicated address (after clicking:
, a list with types of attribute classes will expand, from which the user can select the appropriate type. This attribute, when applied to the document, will enable the connection with the indicated address (after clicking: ![]() , located next to the attribute assigned to the document). A connection to an address is also possible after selecting an attribute of a URL type assigned to a particular object and choosing an option from the context menu: Show.
, located next to the attribute assigned to the document). A connection to an address is also possible after selecting an attribute of a URL type assigned to a particular object and choosing an option from the context menu: Show.
Similarly, if the attribute type is specified as a contractor or commodity, then on the tab: Attributes, of the specific object to which the attribute has been assigned, it will be possible to preview the card (selected as an attribute) of the contractor or product. Opening the card for preview will take place after checking on the tab: Attributes (edited object) a contractor or a product and selecting the following function from the context menu: Show.
A document can also be a type. It allows to assign to an object an attribute class: Service, maintenance, and repair orders, with the attribute value to be a specific (selected from the list of orders) document.
It is also possible to define default values with an SQL query, and it is possible to use a variable prompted by the program in these queries. When defining default values by SQL query, check the box: SQL.
Format – when the following button is clicked: ![]() , a list with available formats for the attribute class will be expanded, from which the user can select the appropriate one for the class being created.
, a list with available formats for the attribute class will be expanded, from which the user can select the appropriate one for the class being created.
Closed list – the field is active for a class of type: List. In the case of an attribute class with the parameter checked, a locator will function on the objects to which the attribute has been assigned to make it easier to search for values that belong to that attribute class.
Example: The following Attribute class has been defined: Colour, where the following parameter was checked: Closed list. Then, the attribute was assigned to Product object. When describing a specific product card with the attribute (window: Product card, tab: Attributes) we can quickly select the value of this attribute by using locator in the column: Attribute value.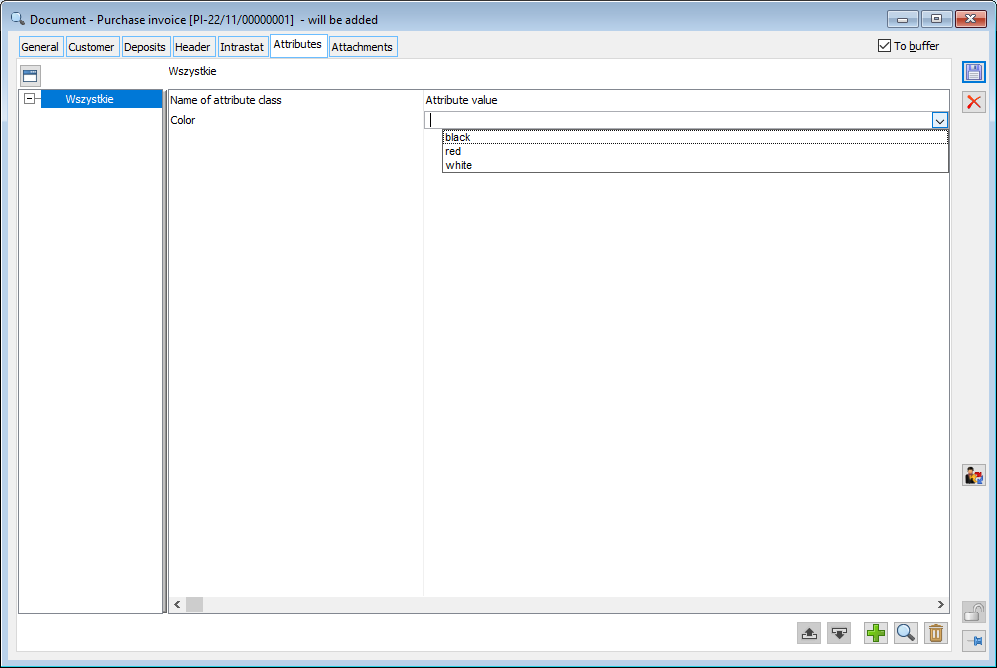
Periodic – when editing such an attribute when assigning it to an object, a window will open with a list of attribute values and dates indicating their validity. The attribute class can be periodic or historical. It is possible to enter the period of validity of an attribute with the precision to the day.
Multi-valued – by checking this parameter, the user can assign an attribute with multiple values to a particular object.
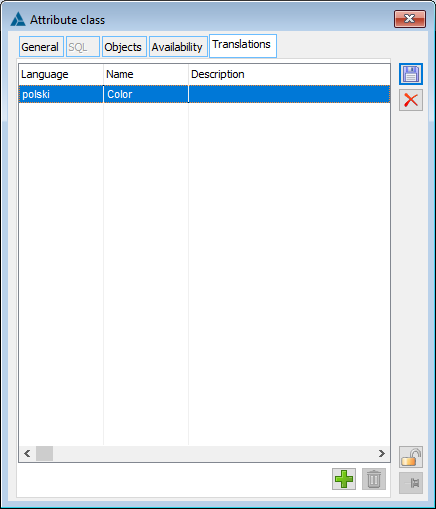
The Translations tab allows entering the translation of attribute class names in a foreign language. After clicking the [Add] button, select a language from the categories previously defined in the dictionary, then enter the appropriate translation and save the window.
Example: The following attribute class has been defined: Training, which has been assigned to the object: Contractor. As a result, in the window: Contractor card, on the tab: Attributes, it is possible to record the fact of training being received by a particular contractor under a single attribute class: Trainings.
Note: It is impossible to give multi-valued attributes a status: BI.
Default value – used to define default value for an attribute.
For batch operations – indicates the default value of the class for batch operations.
Characters set – when the following button is clicked: ![]() , a list of characters to be selected for the class record will be expanded. When a characters set other than the default is selected, when editing an attribute – for example, when assigning an attribute to an object, the keyboard will automatically switch to the selected characters system if in the window: Operator, on the tab Parameters/System, the following parameter has been selected: Language version switching.
, a list of characters to be selected for the class record will be expanded. When a characters set other than the default is selected, when editing an attribute – for example, when assigning an attribute to an object, the keyboard will automatically switch to the selected characters system if in the window: Operator, on the tab Parameters/System, the following parameter has been selected: Language version switching.
Required – checking the box will make the attribute required. Selecting this parameter means that the following field must be filled in: For batch operations. An attribute registered as required will be displayed in red in the list. When such an attribute is assigned to an object, the attribute will be required for operations performed with that object.
Automated system – attribute with this field checked will be automatically added to the registered object.
Availability – in this group of options, it is possible to define whether an attribute will be available and editable in the following modules: Comarch ERP Contractor’s dashboard, Comarch ERP Employee’s dashboard, Comarch ERP Mobile Sales, Comarch Warehouse, WMS Management, WMS Warehouse.
Note: An attribute with the parameter checked: BI, cannot be a multi-valued attribute.
History – checking the box will cause historical attribute values to be recorded. It is possible to choose between the attribute class with the following parameter checked: Periodic or Historical.
Read-only – checking this parameter will define the attribute class as non-editable. Once an attribute is assigned to a particular object, it will have a fixed value. Because the value of such an attribute class cannot be edited on a particular object, it must be assigned in the window: Attributes definition. Once defined, in the window: Attribute class, indicate the default value that will be displayed on the object (parameter: Default value).
Inactive – when selected, the attribute class will be put in an inactive state.
Attribute class, tab: SQL
This tab becomes active if in the General tab of the window: Attribute class, in the field: Type, the following item was selected: SQL. It is possible to use a variable prompted from the SQL Filter program in SQL queries.
This tab allows entering a SQL query that contains a list of allowed values. In the window: Attributes definition, after clicking the button: ![]() [Execute SQL query], the attribute value will be displayed.
[Execute SQL query], the attribute value will be displayed.
Once the data has been entered into the window: Attribute class, the data must be saved. Click: ![]() [Save changes].
[Save changes].
Attribute class, tab: Objects
The tab displays the objects to which the class of the attribute being edited has been assigned, as well as the objects to which the class is attached indirectly via a set. It is also possible here to add objects to which attributes will be assigned and to remove them.
On the tab there are the following functions:
Show also groups – when this parameter is selected, the list will also include groups of objects (defined in the window: Attributes definition, on the Groups of attributes classes tab) to which attributes classes have been assigned.
![]() [Add to object] – displays a list of objects from which the user can select the object to which the edited attribute class is to be assigned.
[Add to object] – displays a list of objects from which the user can select the object to which the edited attribute class is to be assigned.
![]() [Remove from object] – removes the object from the list of objects to which the edited attribute class is assigned.
[Remove from object] – removes the object from the list of objects to which the edited attribute class is assigned.
![]() [Class-object link] – opens the window: Attribute class for the object
[Class-object link] – opens the window: Attribute class for the object
Attribute class for the object
An attribute class can have different properties as regards the objects to which it is assigned.
Example: Attribute class: Project, has been assigned to multiple objects, but only for one of them, the contractor, this class will be required.
The following traits can be specified for an attribute class assigned to a particular object:
Required
Automated system
Read only
Depending on the setting of the following options for these traits: by attribute class/by object type, the setting on the object will be taken either from:
Attribute class – that is, the general definition of the attribute class, defined in the window: Attribute class.
Attribute class for the object – that is in accordance with the checking/unchecking of the parameter in the described window: Attribute class for the object.
An attribute class to an object can be immediately saved to the database when it is entered for the object. Any change will also be saved to the memory immediately. The immediate saving to database trait is assigned to the attribute class when the following parameter is checked: Immediate saving to database.
Example: The immediate saving to database trait allows the attribute to be used in the following situation: A user edits (changes) an attribute on a document header, then adds a payment to the document. Thanks to the fact that the attribute has the immediate saving to database trait, it is possible to add an attribute to the payment, the value of which will depend on the value of the attribute defined in the document. If the document attributes were not immediately saved to the database tables this would be impossible
Note: Immediate saving of an attribute will be a trait not only of a single attribute, but of all attributes attached to an object – even if the others do not have this trait – meaning if they will have the following parameter unchecked: Immediate saving to database.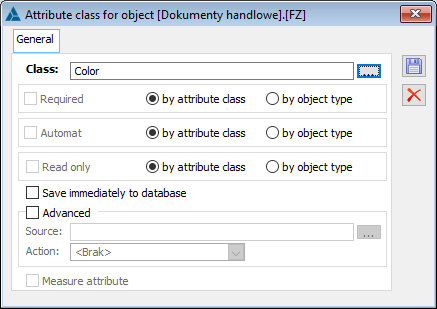
In addition, for an object to which a class has been assigned, the user can specify the action of copying attributes from another object. This is done using sources that indicate from which object the copy action is to be performed.
Activating the function to copy attribute classes from one object to another is done by checking the parameter: Advanced.
Source – the source for copying the attribute class is selected in this field. The selection is made from the list of sources, displayed by clicking: ![]() [Select source]. In the list (window: Attributes definition, in the tab: Copying attributes) the source objects, meaning the links between objects, one of which is the source object (from which attributes will be copied) and the other is the target object, will be displayed. Only the source objects that contain a reference to the object being edited will be displayed in the list. In addition, for the action of copying a given attribute class to take place, that class will also have to be assigned to the object from which the copying will take place. Some of the links between source and target objects have been predefined in the system. These links are displayed in a list in the window: Attributes definition, in the tab: Copying attributes. The user can define their own links.
[Select source]. In the list (window: Attributes definition, in the tab: Copying attributes) the source objects, meaning the links between objects, one of which is the source object (from which attributes will be copied) and the other is the target object, will be displayed. Only the source objects that contain a reference to the object being edited will be displayed in the list. In addition, for the action of copying a given attribute class to take place, that class will also have to be assigned to the object from which the copying will take place. Some of the links between source and target objects have been predefined in the system. These links are displayed in a list in the window: Attributes definition, in the tab: Copying attributes. The user can define their own links.
Action – the field defines the nature of the action, e.g. add means that the attribute class will be copied between objects when a new target object is added (as long as the attribute is assigned to the object from which the copying is performed), for example action: Add, for the link: From contractor to orders will copy the attribute class from the contractor card when an order is generated for that contractor, action: Read, will copy the attribute from the source object, to the target object when the target object is displayed for editing or viewing, etc.
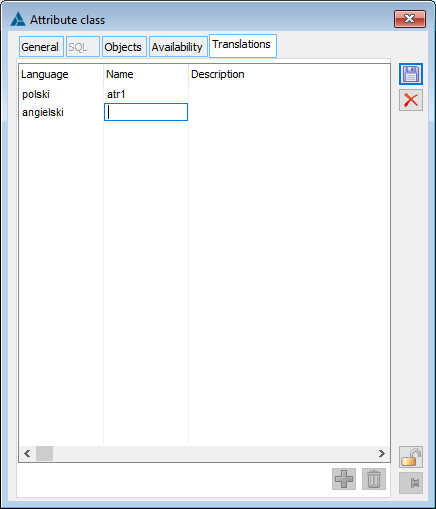
Attribute class, tab: Translations
The Translations tab allows entering the translation of attribute class names in a foreign language. After clicking the [Add] button, select a language from the categories previously defined in the dictionary, then enter the appropriate translation and save the window.
Multi-valued attributes
Multi-valued attributes are those that have the following parameter checked: Multi-valued, in the window: Attribute class, on the tab: General. Thus, once such an attribute class is assigned to an object, it will be possible to assign multiple values to a particular object within a single attribute class. These values will be available for preview by selecting on the tab: Attributes, of the specific object, the attribute class in question and clicking: ![]() [Change]. A new window will open: Attribute values.
[Change]. A new window will open: Attribute values.
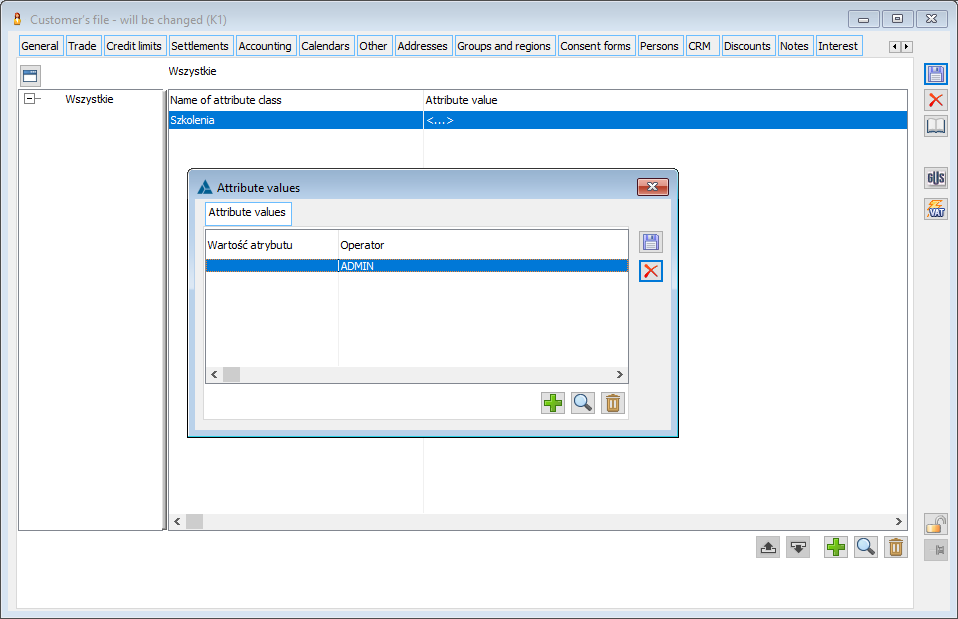
Adding new values within an assigned class is done by clicking in the window: Attribute values the following button: ![]() [Add value]. A new window will open: Editing attribute values.
[Add value]. A new window will open: Editing attribute values.
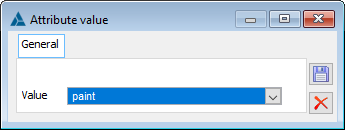
In the window, enter the appropriate value and then save it by clicking: ![]() [Save]. The new value will be added to the list of values in the window: Attribute values.
[Save]. The new value will be added to the list of values in the window: Attribute values.
Note: It is impossible to give multi-valued attributes a status: BI.
Assigning attribute class to an object
Assigning attributes to an object allows using them later when working with objects.
To assign an attribute class to an object:
in the window: Attributes definition, on the Objects tab, select the object to which the user wants to assign the attribute class in the left panel;
click: ![]() [Add class to object] (or select one of the options to add attribute classes to the object after clicking:
[Add class to object] (or select one of the options to add attribute classes to the object after clicking: ![]() [Expands the menu of available options]). A new window will open: Attributes definition.
[Expands the menu of available options]). A new window will open: Attributes definition.
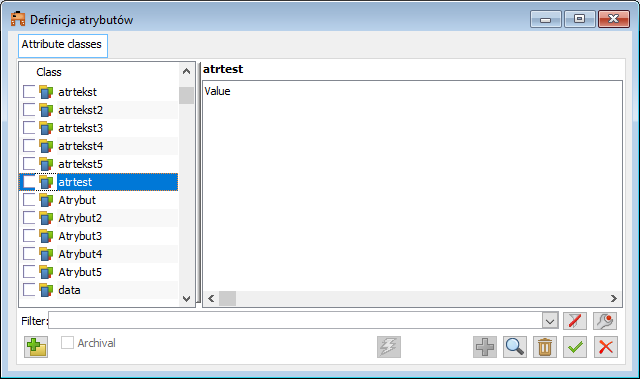
In the window: Attributes definition, select the attribute class (or classes) to be assigned to the object. The “mutliselect” mode in which the list is displayed allows selecting several attributes classes at once (by highlighting the selected attributes class with the left mouse button, with the <Ctrl> key pressed).
After selecting the attributes classes, confirm the selection with the button: ![]() [Select]. The selected attribute classes will be assigned to the object and displayed in the window: Attributes definition, in the Objects tab.
[Select]. The selected attribute classes will be assigned to the object and displayed in the window: Attributes definition, in the Objects tab.
Defining attributes classes group
To add a new group and assign it attributes classes, click: ![]() [Add group]. A new window will open: Set name. Use this window to enter the name of a new attributes class group.
[Add group]. A new window will open: Set name. Use this window to enter the name of a new attributes class group.
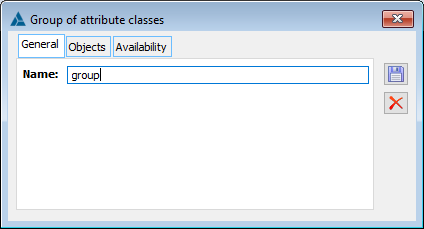
After entering the name in the window: Set name, save the new group by clicking the button: ![]() [Save changes]. The new group will be displayed in the window: Attributes definition, on the Groups of attributes classes tab.
[Save changes]. The new group will be displayed in the window: Attributes definition, on the Groups of attributes classes tab.
The user can then assign the attribute classes to the group. To do this:
select the group to which the attributes classes are to be assigned,
Click: ![]() [Add class to group]. A new window will open: Attributes definition – attribute class.
[Add class to group]. A new window will open: Attributes definition – attribute class.
From the window: Attributes definition, select the attributes classes to be assigned to the group. The “mutliselect” mode in which the list is displayed allows selecting multiple classes at once (by highlighting the selected attributes class with the left mouse button, with the <Ctrl> key pressed).
After selecting the attributes classes, confirm the selection with the button: ![]() [Select]. The selected attributes classes will be assigned to the group and displayed in the window: Attributes definition, on the Groups of attributes classes tab.
[Select]. The selected attributes classes will be assigned to the group and displayed in the window: Attributes definition, on the Groups of attributes classes tab.
Note: The order in which the attributes classes assigned to a group are displayed affects the order in which the attributes classes within that group are added to the object. The attributes will be assigned to the object in the order in which they are displayed on the Groups of attributes classes tab. To change the order of attributes classes on this tab, use the buttons: ![]() [Move up] and
[Move up] and ![]() [Move down].
[Move down].
Attributes permissions
Availability settings configuration
From version 2017.1 onwards, a new Availability tab has been added to the definition of the attribute class, allowing the list of operators to be restricted to those for whom the attribute class will be available. It is possible to define access rights separately in terms of the possibility to enter a value for the attribute class (parameter Entry) and to edit/modify this value (parameter Change).
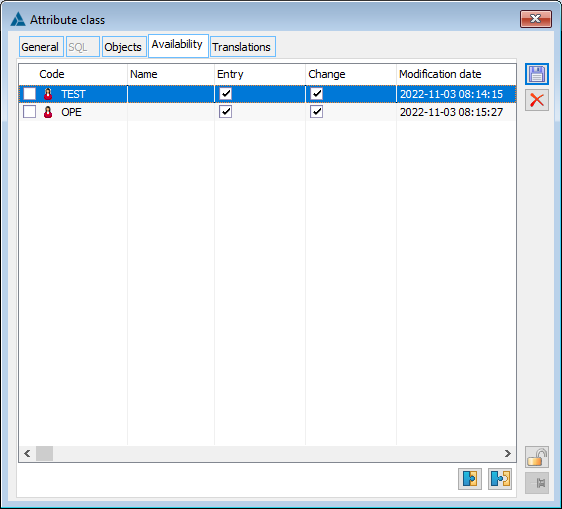
On the Availability tab the user can:
Assigning operators – using the Attach operator button the user can assign the selected operator or multiple operators at the same time.
Disconnecting – using the Disconnect operator button the user can disconnect a selected operator or many operators at the same time (operation for selected operators).
By default, when assigning a new operator to the availability list, the Enter parameter is always checked. On the other hand, the parameter Change depends on the setting of the general Read only parameter in the class definition:
if the parameter is checked, then the Change parameter is unchecked and inactive,
if the parameter is unchecked, then the parameter Change is checked and active (possibility to change the setting).
An analogous setting appeared on the group of attributes classes. It only indicates the pattern for attributes classes added to this group, meaning it does not directly determine the visibility of the group for a particular operator.
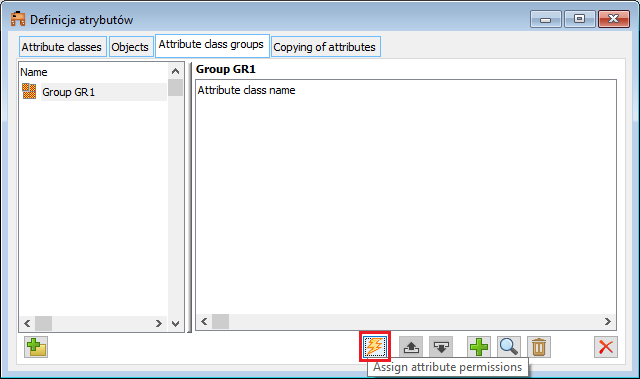
When assigning an attributes class to a group for which the Availability list is not empty, it is possible to transfer the availability settings from the group to the attribute class (or classes) being assigned – the choice is up to the user. An analogous operation can be performed from the level of the list of Groups of attributes classes, using the lightning button Assign attribute rights available under the list. If no operators are set on the group a message will be displayed: “Availability restriction settings on attributes classes will be removed. Do you wish to continue?”. Only by selecting YES will the operators be removed from the list of associated attributes classes.
Restricting the availability of attributes is also possible from the operator’s card level, by adding specific attributes classes on the Attribute permissions tab. And then specifying access in terms of entry or change. Data entered on an attribute class are automatically reflected on the operator card and vice versa.
Also on the operator’s template card the user can add permissions to attributes classes, which are then transferred to the cards of the operators assigned to that template. Standard compliant operation allows data to be retrieved from the template when adding new operators or updating existing ones.
In the Attribute permissions window in the operator’s card and operator template it is possible to filter, also using the filter wizard. In the windows the user can see a panel with a list of groups to which the selected attributes classes are assigned. It is also possible to add custom columns, sorting the list by clicking on the column header (default sorting by attribute class name). In the window, the locator is enabled. A separate column shows the date of the last modification for the attribute class associated with the operator.
When adding a new attribute on the [Attribute permissions] tab of the operator’s card and on the operator’s template, the list (opened by clicking plus button) displays only those attributes classes that are not yet assigned to the operator. Additionally, attributes classes which have been added to the database after the date of the last change in this list are highlighted in green.
Note: The modification date and the date the attribute class was added to the database are recorded as of version 2018.2, so in post-conversion databases, for all records added the same date is set: 01/01/1990. This means that highlighting classes in the selection list when adding to an operator will only be possible for classes added in this version or later versions
Access to attributes for authorized operators
Access to an attribute on an object will be possible if in the attribute class definition:
No operator or rights centre has been added – meaning it is available to all operators.
A specific operator(s) has been added – then only they have access to this class.
Note: Specifying the availability of attributes classes to all users using an empty tab results in the conversion not having to fill in any data and the behaviour of the system remains unchanged. Only the assignment of specific operators to attribute classes will result in restrictions on access to those classes.
The mode of access to attributes class values on an object depends on the availability setting:
Value available for editing if:
- the class has no value assigned and in the new table the parameter Entry is checked,
- the class has value assigned and in new table parameter Change is checked
Value available for preview if:
- the class has no value assigned and in the new table the parameter Entry is not checked.
- the class has value assigned and in new table parameter Change is not checked.
Also, adding attributes classes to objects is subject to new access privileges. If an attribute class has no assigned operators in the definition, then any operator will be able to add it. On the other hand, if operators are assigned in the class definition, then only these operators will have the ability to assign new classes on the Attributes tab of individual objects. The same holds true for attributes that are automatically added (the Automated system parameter in the class definition) – they will only be added to new objects if the operator who adds them has permissions to do so. The list of attributes to be assigned to an object will only show the attributes that a given operator has access to. Also, when executing the Serial change of attributes values on pre-posting entries (from the Account tab), the Add option narrows down the list of attributes to those to which the operator has permission.
The exceptions are the default values set on the attribute class. Regardless of the operator’s right to enter values for attributes, they are always automatically assigned to the attribute. This applies also to the default values for batch operations.
Example: In the class definition of a text attribute, a default value was set: WD1. The operator for this attribute class has the Entry check box unchecked. He adds such a class to the product card. For this class, the default value of WD will be automatically downloaded:
Copying attributes between different objects does not check the operator’s right for the attribute class being copied. The check is done only when displaying the list of classes assigned to the object. This results in the fact that even if a class to which the operator does not have permission is added to the object, the operator will not see it. The setting on a class card of an attribute can be quite different from that on a group of classes, so when displaying attributes on an object card, the visibility of groups is limited to those where the operator has at least one attribute available. So the setting in the attribute group will not determine whether the group is visible on the object card or not.
