In this window, the User can perform the computer configuration.
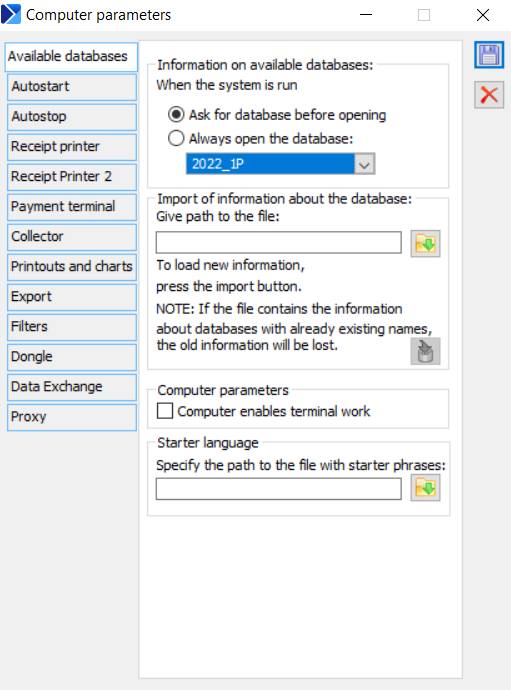
Computer configuration, tab: Available databases
The tab contains the following fields and functions:
When starting the system:
Ask for database before opening – checking this field will cause COMARCH ERP XL system to display question about database on which User will work.
Always open database – if the user checks this field, system will always be started with database selected in field below.
Enter file path – used to indicate the path to the file: *.ini., in which the information on the connected databases is stored.
![]() [Select file] – used to select the following file: *.ini.
[Select file] – used to select the following file: *.ini.
![]() [Import information on database connections] – starts the process of importing information.
[Import information on database connections] – starts the process of importing information.
Computer enables terminal work – ticking enables terminal work.
Computer configuration, tab: Autostart
On this tab the user can enter commands which will be executed before COMARCH ERP XL system starts. These may be commands typical for files like .bat or commands of files with extension supported by WSH (for example *.vbs).
Computer configuration, tab: Autostop
On this tab the user can enter commands which will be executed after COMARCH ERP XL system closes.
Computer configuration, tab: Fiscal printer
On this tab a fiscal printer is configured, if such a printer is connected to the system.
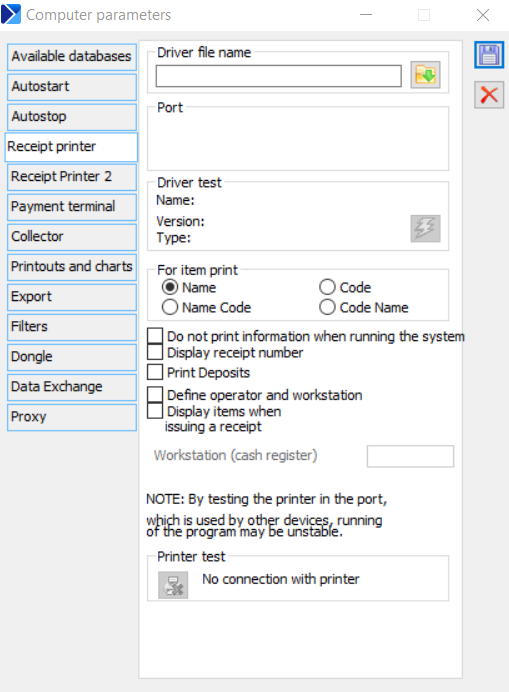
The tab contains the following functions:
Driver file name – after clicking the button: ![]() [Select file], indicate the location of the fiscal printer driver.
[Select file], indicate the location of the fiscal printer driver.
Port – the field is used to indicate the port for the printer.
Driver test – this section will display information about the printer driver, and the function: ![]() [Run test] will initiate its test.
[Run test] will initiate its test.
Printer test – this field displays information about the printer under test. If the field displays the message: No connection to the printer, it means that the printer has not been connected or has been connected incorrectly.
Parameters meaning export of additional information to fiscal printer:
Do not print information at system start – if this parameter is not checked, then after every start of COMARCH ERP XL system module, for example Sales, a non-fiscal part with information about cash register number etc. will be printed. To avoid printing such information, in situation when the system is started several times during a day, this parameter should be checked.
Display receipt number – the receipt number will be shown on the printout.
Print deposits – the printout of the fiscal document will include elements of deposits.
Operator and post designation – on the printout, there will be the operator and post designation defined in the lines:
Job designation (cash register),
Operator designation (cashier).
Computer configuration, tab: Fiscal printer 2
On this tab a fiscal printer is configured, if such a printer is connected to the system, according to so called New drivers, available since Comarch ERP XL 2013.5.
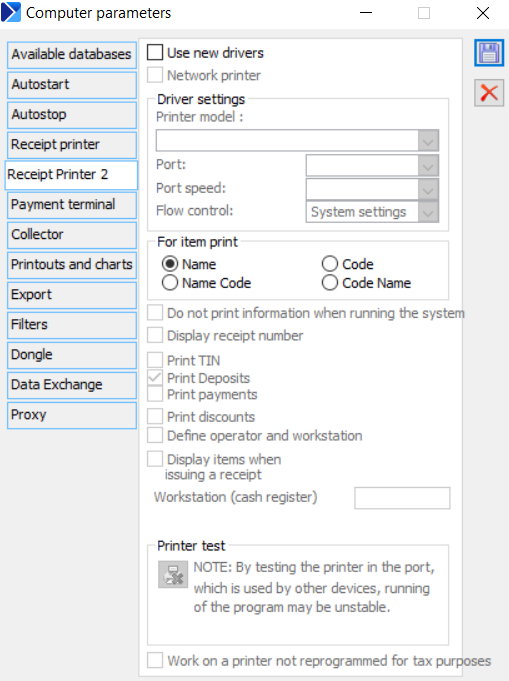
The tab contains the following functions:
Use new drivers – to use the drivers implemented from system version no. 2013.5, this option should be selected.
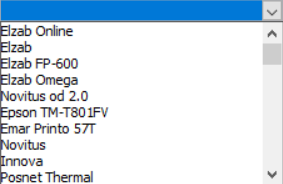
Driver settings / Printer model – select one of the options from the drop-down list:
Driver settings / Port – select the port for the specified printer, as above (details available in Technical newsletter).
Driver settings / Port speed – select the port speed for the specified printer, as above. (details available in Technical newsletter).
Driver settings / Flow control – select the port speed for the specified printer, as above. (details available in Technical newsletter).
For commodity, send: Name, Name Code, Code, Code Name – the group is used to indicate one of the options to be sent to the printer for the commodity from among the available ones, that is: name, code, name and code, code and name.
Do not print information at system start – if this parameter is not checked, then after every start of COMARCH ERP XL system module, for example Sales, a non-fiscal part with information about cash register number etc. will be printed. To avoid printing such information, in situation when the system is started several times during a day, this parameter should be checked.
Display receipt number – the receipt number will be shown on the printout.
Print NIP number – this parameter is available for new fiscal drivers. Checking this parameter makes sense only for those printers, which, in accordance with the law, have the option to print NIP number in a specific place on the receipt. In case of older models of printers, after this parameter is selected, an error is generated during receipt printing. At the same time, the option of printing the NIP number in the non-fiscal part of the receipt has been abandoned if the parameter Display receipt number is selected.
Print deposits – the printout of the fiscal document will include elements of deposits.
Print payments – sending a payment method to a fiscal printout
Print discounts – sending information about discount to the fiscal printout
Operator and post designation – on the printout, there will be the operator and post designation defined in the lines: Job designation (cash register),
Operator designation (cashier).
Display items when a receipt is issued – as per parameter description
Printer test – this field displays information about the printer under test. If the field displays the message: No connection to the printer, it means that the printer has not been connected or has been connected incorrectly.
Work on a non-fiscal printer – if this box is checked, it will be possible to work on a non-fiscal printer
Network printer – a parameter introduced in version 2017.1 of the system enabling support of a network fiscal printer. When the checkbox is selected, the button opening the window for configuration of network printer parameters appears:
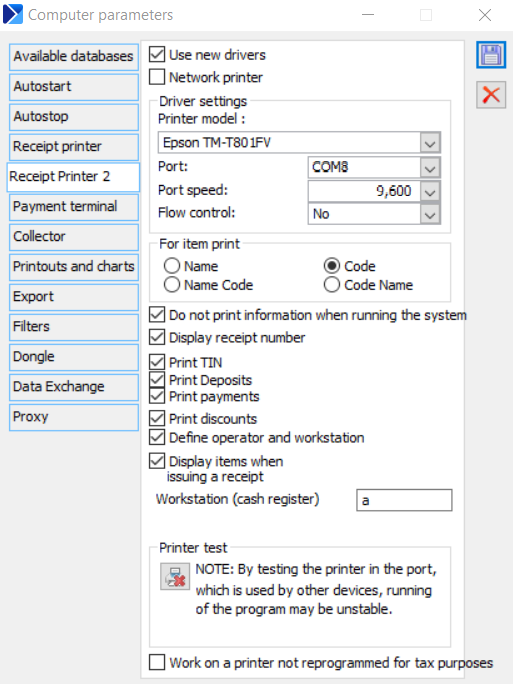
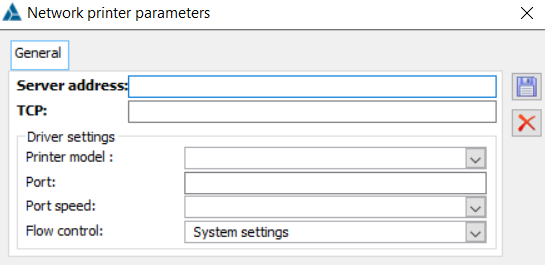
The following settings are available in the window for configuration of network printer parameters:
Server address – enter the address of the computer that will serve as the fiscal printer server
TCP – enter the TCP port address
Driver settings / Printer model – select one of the options from the drop-down list with the used model of the fiscal device
Driver settings / Port – select the port for the specified printer, as above (details available in Technical newsletter).
Driver settings / Port speed – select the port speed for the specified printer, as above. (details available in Technical newsletter).
Driver settings / Flow control – select the port speed for the specified printer, as above. (details available in Technical newsletter).
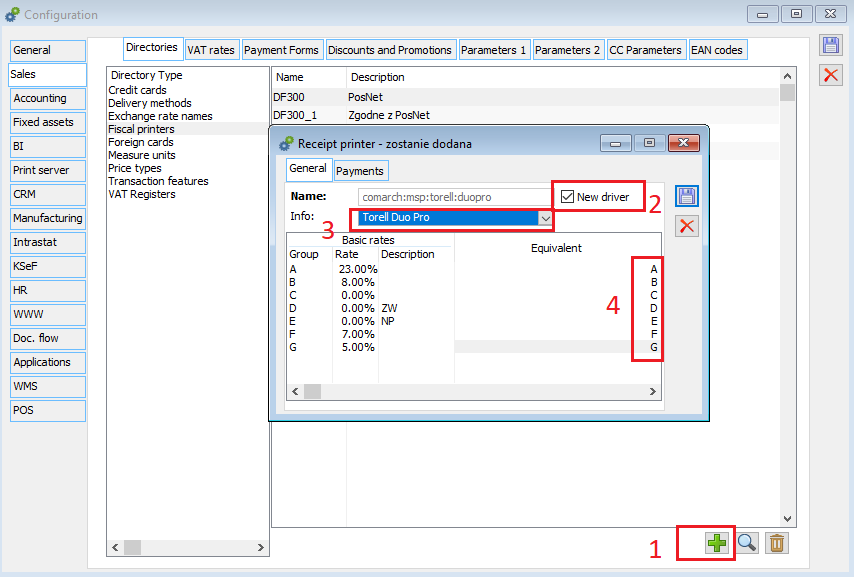
It should be added that in order to be able to work on the so-called New drivers, the system settings must also be configured in any module in the window: Configuration, tab: Sales / Dictionaries / Fiscal printers, i.e. sequentially (see screen shot below; described in module: Sale):
- Add another driver with the [Add] button,
- Select the option: New driver, which will simultaneously activate the list in the field: Description,
- In the field: Description select the type of printer from the list (for terminal mode operation the following word will be visible at the end of the printer name: Terminal),
- Set VAT rates,
- Save the newly added driver.
Computer configuration, tab: Mobile terminal
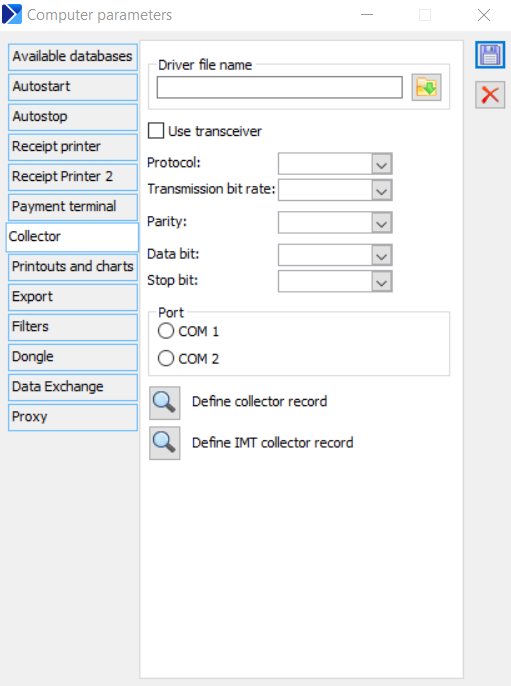
In this tab the user can set parameters of mobile terminal, with which COMARCH ERP XL works.
Following types of mobile terminal work with COMARCH ERP XL application:
- Dolphin (HandHeld),
- BHT (Denso),
- Cipherlab 711, 720, 8000C,
- OPTICON PHL 2700, PHL 1300.
Configuration parameters:
Driver file name:
CDN_Coll.dll for BHT (Denso) and dolphin (handheld),
cdn_ciph.dll for 711, 720 (Cipherlab), PHL2700, PHL 1300,
For Dolphin mobile terminal the user should use Y-modem protocol (from version 4.0) – in case of this mobile terminal, the order of actions is important, first in COMARCH ERP XL the user shall start the read-out, and then send data from the mobile terminal.
Use transceiver – only relevant for CipherLab devices – the box is checked if a transceiver (com-irda adapter) is used.
Protocol – relevant for BHT/dolphin only – set the transmission protocol to be the same as that of the device.
Baud rate – relevant for all models – set the same rate as in the device.
Parity/Data bits/StopBits – important parameters for all models. They should be set as in the device – if it is not possible to set them in the device (it happens quite often), the user should check in the manual what the correct settings for them are.
Computer configuration, tab: Printouts and charts
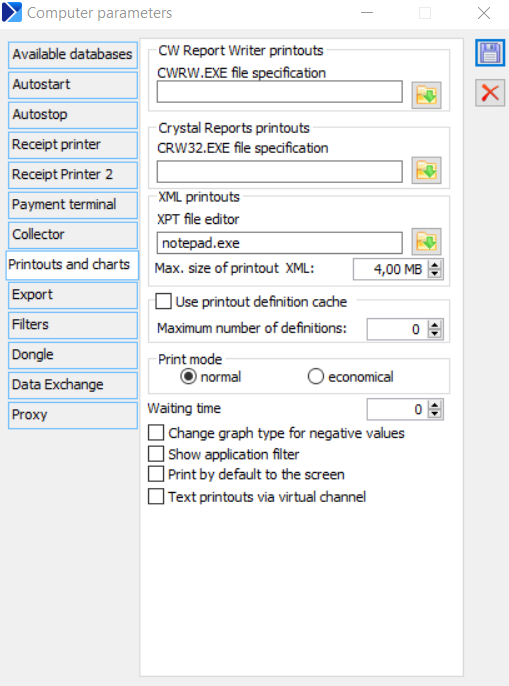
On the tab, the files for the printouts of the following type are defined: EXE.
Moreover, the tabs contain the following functions:
Use printout definition cache – checking is useful when one printout is used frequently. Its data are then retrieved from local memory, which shortens the printing time.
Maximum number of definitions – use this field to enter the number of definitions to be used. The fewer definitions stored, the faster the process of creating printouts.
Print mode – a parameter for specifying the quality of the printout.
Waiting time – specifies the time to wait for the conversion of values for charts. If this time is exceeded, chart creation will be interrupted. This parameter is additionally placed on the chart definition, allowing to define a different value for each chart.
Change chart type for negative values – for some computer configurations, the module: Insight created a GPF, among other things, if there were negative ordinate values in the queue and the chart type was pie or line. To protect against this, this parameter should be enabled. Then the engine automatically changes the chart type to column chart in problematic situations.
Show application filter – if this parameter is selected, the filter structure will be presented in the printouts.
Print to screen by default – this parameter allows to globally set the default printing of all printouts to the screen.
Text printouts via virtual channel – the parameter is used in terminal installations for making text printouts
Computer configuration, tab: Export
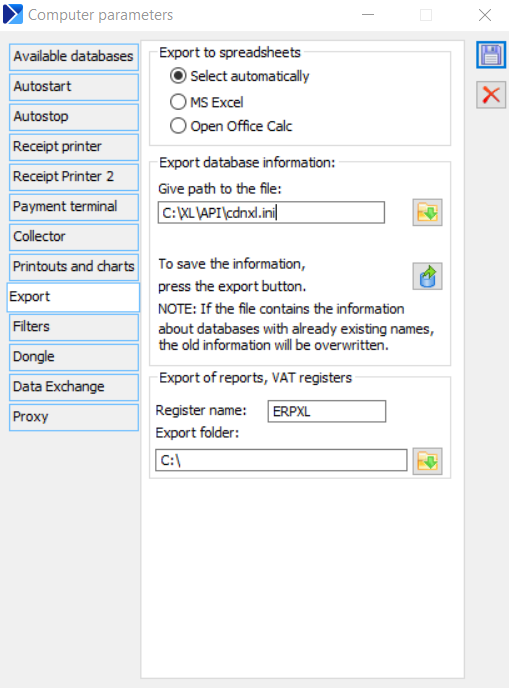
The tab is used to indicate the export path for database information.
The tab contains the following fields and functions:
Export to spreadsheets – in this section the user can indicate the spreadsheet to which the data export will be performed:
- Select automatically
- MS Excel
- Open Office Calc
Enter file path. When the following button is clicked: ![]() [Select export directory], the following window will open: Specify the file to export, where the system is to save the export file with the database information.
[Select export directory], the following window will open: Specify the file to export, where the system is to save the export file with the database information.
Information for COMARCH ERP XL. Exported information are provided for COMARCH ERP XL.
![]() [Export information on database connections] – starts the process of exporting the selected information.
[Export information on database connections] – starts the process of exporting the selected information.
Export of reports, VAT registers – in this section the user indicate the name of the register under which it will be exported to the indicated path. The tab is used to indicate the location of the file in which the filter settings will be saved and from which they will be retrieved. The tab contains the following fields and functions: Export. In the field, indicate the file in which the filter settings will be saved. Import. The field indicates the file from which the filter settings will be loaded. By default, this field will indicate the file that was saved as the settings export file in the field: Export. This tab is used to indicate the dongle on the server. The indication is necessary if the dongle is located on a different server than the one where the database is located. The tab contains the following fields and functions: Key server name. Used to enter the key server name. Saving settings in the window: Computer parameters, is done by clicking: In the window the user can find folders used for data exchange. Functionality of COMARCH ERP XL software allows to exchange documents between supplier and receiver using ECOD system. The exchange of the following documents is possible: SI / (C)SI, SIC / (C)SIC, SOR, POR, and PO. From the computer configuration level, set the path to the folder where the exported documents will be saved (this is done in the field: Folder of exported files). In addition, further path components can be indicated in the field below, allowing for the creation of an appropriate subdirectory structure in the folder of exported files. The subdirectory structure is created based on the type of document being exported and the acronym of the contractor. The user can indicate the following ways of creating the subdirectory structure: No subdirectories One-step subdirectory structure of the form: Two-step subdirectory structure of the form: If subdirectories include the type of document to be exported, in their names in place of: DocumentType the following values are substituted:
Computer configuration, tab: Filters
![]() [Select file] – opens the window: Select the file to export settings to, where the system is to save the export file.
[Select file] – opens the window: Select the file to export settings to, where the system is to save the export file.![]() [Export filter settings] – starts the process of filter settings to the selected export file.
[Export filter settings] – starts the process of filter settings to the selected export file.![]() [Select file] – opens the window: Select file to import settings, from which the settings import file should be selected. By default, a file will be entered in this field, saved as an export file, in the field: Export.
[Select file] – opens the window: Select file to import settings, from which the settings import file should be selected. By default, a file will be entered in this field, saved as an export file, in the field: Export.![]() [Import filter settings] – starts the process of importing settings from the indicated settings import.
[Import filter settings] – starts the process of importing settings from the indicated settings import.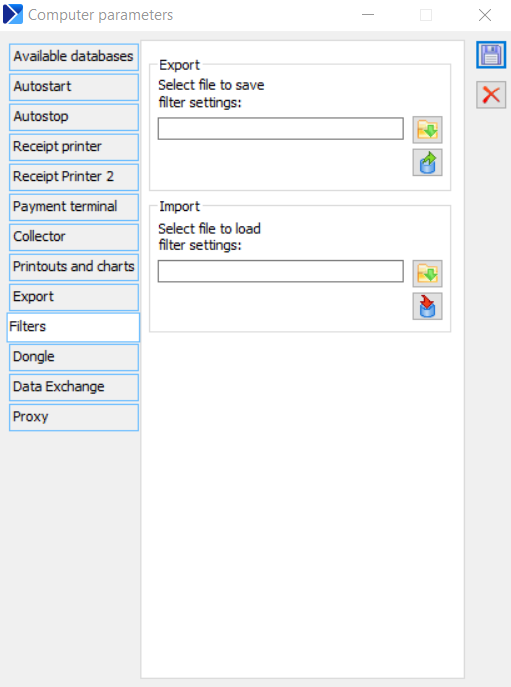
Computer configuration, tab: Key
![]() [Search for active dongle servers on the network] – starts the process of searching for a server.
[Search for active dongle servers on the network] – starts the process of searching for a server.![]() [Program dongle] – serves to program the dongle.
[Program dongle] – serves to program the dongle.![]() [Save].
[Save].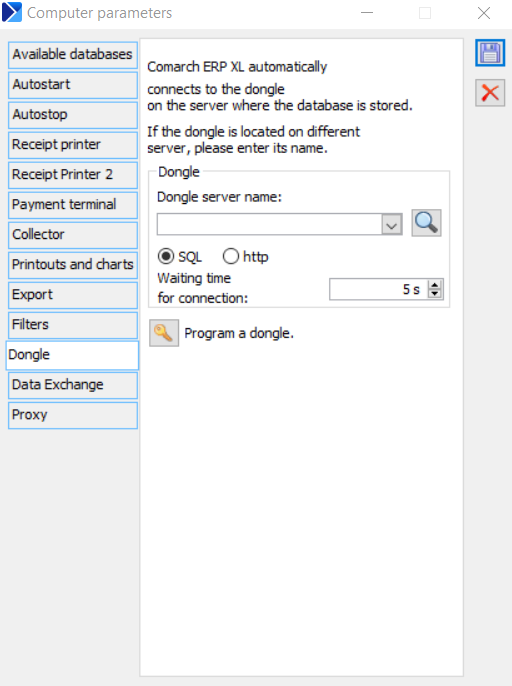
Computer configuration, tab: Data exchange
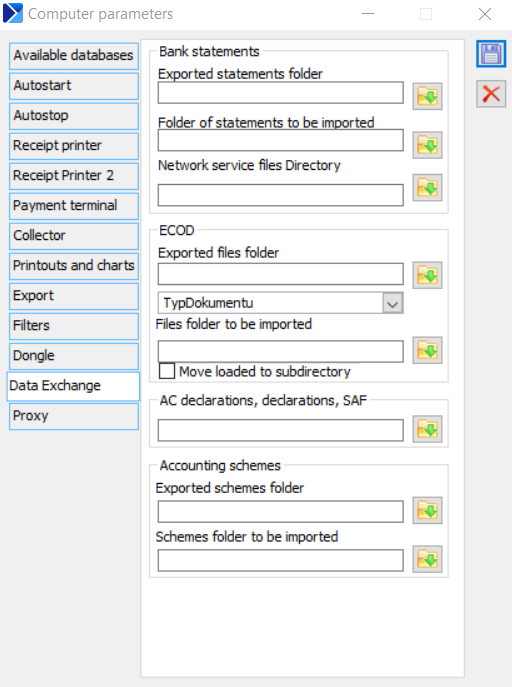
ECOD
Export
