List of employees
Window displays list of employees of the COMARCH ERP XL system User. To open it, from the menu: List, select the following item: Employees.
The window contains two tabs: By acronym and By surname. They differ in the layout of the employees list. Tab: By acronym, arranges the list of employees in alphabetical order of acronyms, tab: By surname arranges the list in alphabetical order of surnames.
Due to the fact that the list of employees is used in many places in the System, in this list, from version 2021.1 Comarch ERP XL, the PESEL column has been hidden as a standard. This ensures greater protection of personal data without having to hide this column for many operators. Operation from this version onwards will be in the reverse direction, that is authorised operators should be shown this column on separately defined list formats.
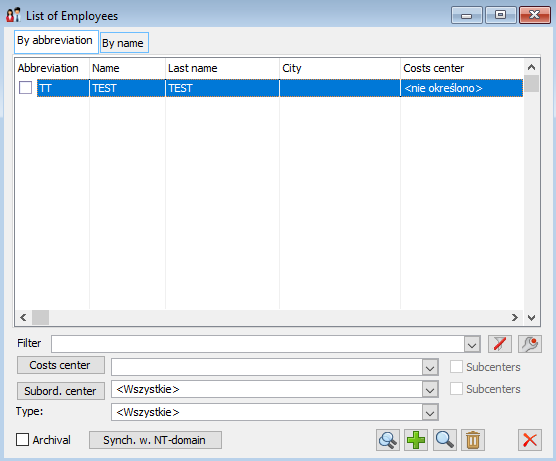
In this window, the user can find the following fields and functions:
![]() [Enable filtering] – allows the user to display a list of employees or search for a specific employee according to the indicated criteria.
[Enable filtering] – allows the user to display a list of employees or search for a specific employee according to the indicated criteria.
Cost centre – with the use of the button: ![]() [Indicate centre], or button:
[Indicate centre], or button: ![]() , the user can select the cost centre. Once selected, a list of only those employees assigned to the centre will be displayed.
, the user can select the cost centre. Once selected, a list of only those employees assigned to the centre will be displayed.
Subordinate centre – will display the employees for the selected subordinate centre.
Sub-centres – if this option is checked, the displayed list of employees includes those assigned to the centre’s sub-centre.
Archived – if checked, the displayed list will also include employees whose data is already archived.
Synchronise with NT domain – when the following button is clicked: ![]() [Synchronise employees’ cards with NT domain], the synchronisation process is started.
[Synchronise employees’ cards with NT domain], the synchronisation process is started.
As a result, in the employees’ cards the following fields will be populated. Account in NT domain.
![]() [Add employee card] – opens the window: Employee card (more in: Employee card chapter) that allows the user to create and add a new employee card.
[Add employee card] – opens the window: Employee card (more in: Employee card chapter) that allows the user to create and add a new employee card.
![]() [Change employee card] – allows for preview and edition of data in the selected employee card.
[Change employee card] – allows for preview and edition of data in the selected employee card.
![]() [Delete employee card] – deletes the selected employee card.
[Delete employee card] – deletes the selected employee card.
Creating and adding a new employee card can be done when clicking: ![]() [Add employee card]. A window will then open: Employee card.
[Add employee card]. A window will then open: Employee card.
From the employee list opened by right-click via the “List of employee centres” option, the user can open a list of cost centres to which the selected employee is assigned and which of these centres is the default employee centre. If there is only one centre linked, it will automatically be the default centre. If there is more than one link, then the default centre will be the last centre set on the general tab of the employee card. It is not possible to remove an employee from their default cost centre. Only one centre can be the default for a given employee. The default cost centre can be changed from the List of employee centres by ticking the Default parameter next to the centre which is to become the default centre. The parameter next to the current default centre will be automatically unchecked.
Employee card
The window consists of tabs into which the user can enter employee data.
Employee card, tab: General
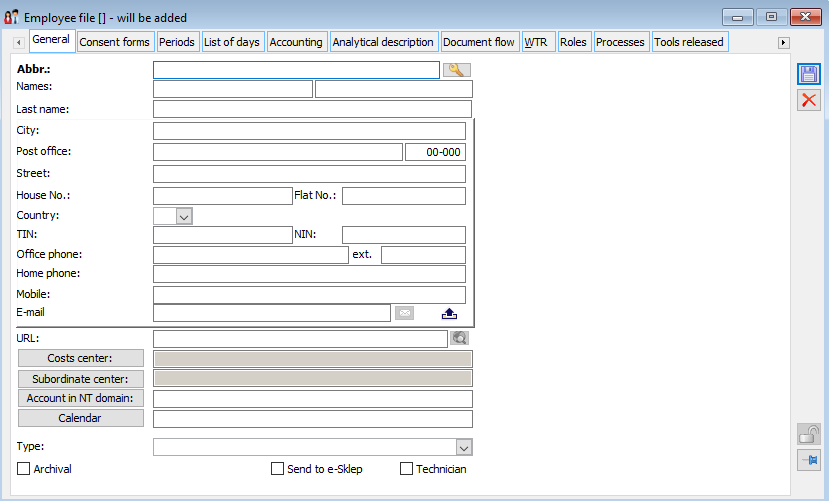
On the tab, the user enters the personal data of the employee. Among the given fields, it is required to fill in the following field: Acronym.
If the employee data are out of date, the card should be given archive status. To do this, check the box: Archival.
In the field e-mail, it is possible to add multiple entries with addresses. Using the icon: ![]() Show additional e-mail addresses the user can open a table with addresses. After expanding the list, two columns are visible: E-mail address and Mobile BI Login. After entering the first e-mail address in the list and accepting the changes, it automatically becomes the default value (in the list it has a red colour). Similarly, after selecting “Default value” from the context menu. Based on multiple e-mail addresses, the User can perform authentication in Comarch ERP Mobile BI.
Show additional e-mail addresses the user can open a table with addresses. After expanding the list, two columns are visible: E-mail address and Mobile BI Login. After entering the first e-mail address in the list and accepting the changes, it automatically becomes the default value (in the list it has a red colour). Similarly, after selecting “Default value” from the context menu. Based on multiple e-mail addresses, the User can perform authentication in Comarch ERP Mobile BI.
After clicking ![]() a list to select the subordinate centre for an employee opens; as a result is possible to indicate all items or, through the option Current as of with date, to limit the view to centres active as of a selected date. The activity period set for the centre is checked.
a list to select the subordinate centre for an employee opens; as a result is possible to indicate all items or, through the option Current as of with date, to limit the view to centres active as of a selected date. The activity period set for the centre is checked.
In addition to the standard data for the employee, the tab provides a field for entering a domain account. The account is selected by clicking: ![]() . Then, the following window will open: List of group members, from which the user is supposed to make a selection (by clicking:
. Then, the following window will open: List of group members, from which the user is supposed to make a selection (by clicking: ![]() [Select]). Checking the field: Account in NT domain is not mandatory. On the tab there we can find the following button:
[Select]). Checking the field: Account in NT domain is not mandatory. On the tab there we can find the following button: ![]() [Password change], allowing to change the employee’s password.
[Password change], allowing to change the employee’s password.
What is more, the user can also select the following parameter for an employee: Service engineer. When adding employees to a service order, a list is displayed where the display of data can be narrowed down to only those employees who have this parameter selected.
It is also possible to indicate a calendar for an employee, selected by clicking: ![]() , from the calendars list. The selected calendar will determine the periods of availability/non-availability of the employee, which affects the ability to generate tasks for the employee. These tasks are available from the window: Schedule.
, from the calendars list. The selected calendar will determine the periods of availability/non-availability of the employee, which affects the ability to generate tasks for the employee. These tasks are available from the window: Schedule.
Employee card, tab: Consents
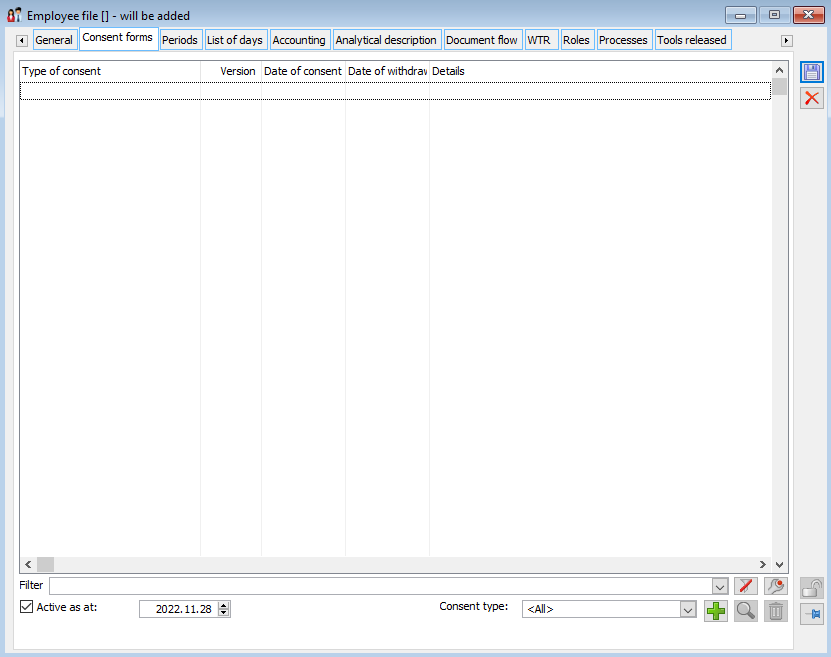
From the level of the tab it is possible to add consent for personal data processing.
The consent form is described in detail in the module documentation: GDPR.
Filtering of consents on the list is performed using the following tools:
-Simple filter and filter wizard – allow to narrow the displayed list according to the indicated criteria,
-Filter “Current as of” – allows to search for current consents as of a given date
-Type of consent – allows narrowing down the list to a selected type of consent
Employee card, tab: Periods
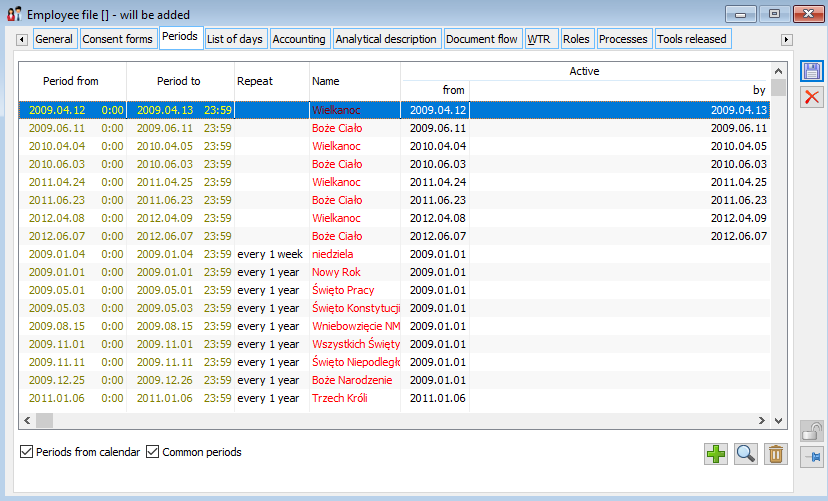
The tab lists the periods of availability/non-availability assigned to the employee. These are periods resulting from the calendar assigned to the employee on the tab: General, common periods, defined in the window: Calendars list, on the tab: Periods – common and periods defined for a specific employee, after clicking: ![]() [New]. The periods of availability/non-availability decide on the possibility of generating tasks for the employee. These tasks are grouped in the window: Schedule.
[New]. The periods of availability/non-availability decide on the possibility of generating tasks for the employee. These tasks are grouped in the window: Schedule.
The tab contains the following parameters and buttons:
Periods from calendar, Common periods – options to narrow the list of displayed availability/non-availability periods.
![]() [New] – allows to add a period for an employee.
[New] – allows to add a period for an employee.
![]() [Card] – allows to view periods resulting from the calendar or common period or edit the period added for the employee with the button:
[Card] – allows to view periods resulting from the calendar or common period or edit the period added for the employee with the button: ![]() [New].
[New].
![]() [Delete] – removes the selected period from the list of employee periods. On the tab: Periods, it is possible to delete only those periods that were added to a given employee from its level.
[Delete] – removes the selected period from the list of employee periods. On the tab: Periods, it is possible to delete only those periods that were added to a given employee from its level.
Employee card, tab: List of days
The tab displays a list of days indicating, for these days, the periods of availability and unavailability resulting from the periods assigned to the calendar.
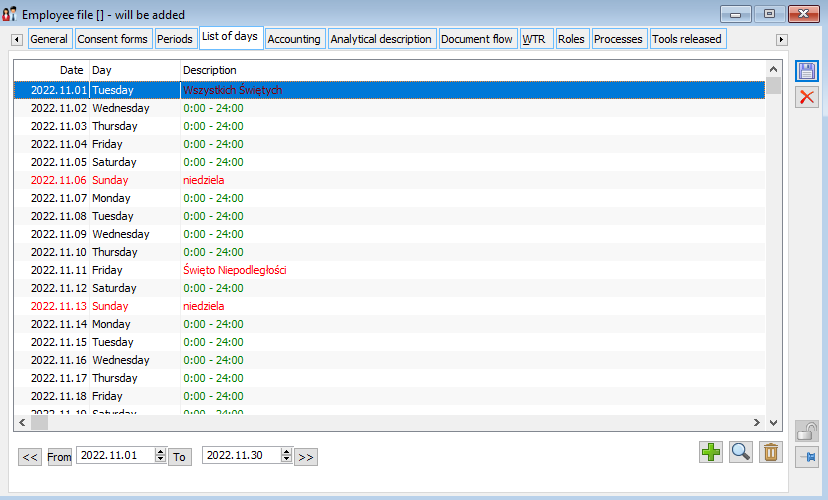
The entries in the list of days should be read in such a way that the period of unavailability is indicated by the expression: <unavailable>, while periods of availability are specified as a time interval, delimited by hours for each day, for example if for 2007-05-21 the entry “<unavailable>7.00-15.00,<unavailable>” is displayed, it means that the employee is unavailable until 7.00 a.m. on that day; from 7.00 a.m. to 3.00 p.m. he/she is available, and after 3.00 p.m. until the end of the day he/she is unavailable.
The tab contains the following parameters and buttons:
From/To – these buttons allow specifying the time interval for which the list of days will be displayed. By default, the list of days will be displayed for the current month.
![]()
![]() – these buttons allow going to the next/previous month, for which the list of days will be displayed.
– these buttons allow going to the next/previous month, for which the list of days will be displayed.
![]() [New] – allows for adding a new period to a specific employee.
[New] – allows for adding a new period to a specific employee.
![]() [Card] – allows to view periods resulting from the calendar or common period or edit the period added for the employee with the button:
[Card] – allows to view periods resulting from the calendar or common period or edit the period added for the employee with the button: ![]() [New].
[New].
![]() [Delete] – removes the selected period from the list of employee periods. On the tab: Periods, it is possible to delete only those periods that were added to a given employee from its level.
[Delete] – removes the selected period from the list of employee periods. On the tab: Periods, it is possible to delete only those periods that were added to a given employee from its level.
Employee card, tab: Accounting
The tab is used to indicate the employee’s accounts in the accounting programme. In the window there is also a possibility to enter the employee’s bank account number and define the method of payment of remuneration. While entering the account number, the NRB standard is checked. When the parameter: NRB is checked, the /-/ character will be added to the bank number and the possibility of specifying two check digits at the beginning of the account number will be made available.
Employee card, tab: Analytical description
The tab is used to specify the centres to which the employee will be assigned.
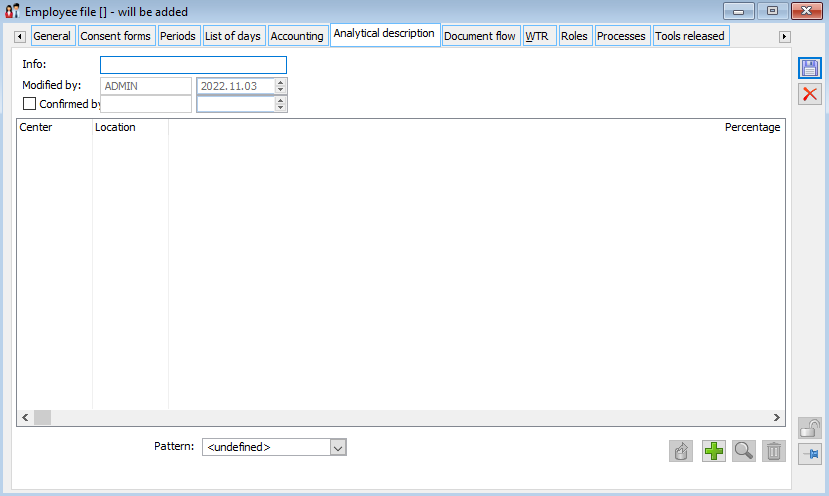
The tab contains the following fields and functions:
![]() [New] – adds a new line of description in the template.
[New] – adds a new line of description in the template.
![]() [Edit] – edit the selected item in the description template.
[Edit] – edit the selected item in the description template.
![]() [Delete] – delete a line or the whole description template.
[Delete] – delete a line or the whole description template.
![]() [Copy template] – copies the template of analytical description.
[Copy template] – copies the template of analytical description.
Template – by clicking![]() the user can select analytical description template.
the user can select analytical description template.
Modified by – the operator who last modified the analytical description tab and the date of this modification are entered in these fields.
Description –used to determine the name of the description.
Modified by – indicates the entity modifying the description.
Approved by – indicates the entity approving the entered record.
Employee card, tab: Documents flow
For each employee registered in COMARCH ERP XL system, it is possible to define conditions under which documents will be delivered to the employee’s personal mailbox, on which the employee will be required to complete an analytical description. Such conditions can be set in Documents flow tab.
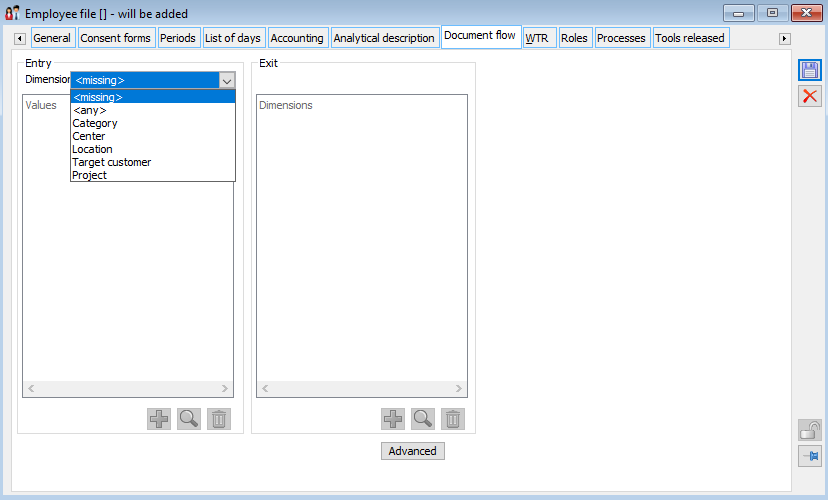
The tab consists of two parts.
Input
This section defines the input conditions that must be met for the document to be visible in the employee’s mailbox.
Dimension – this field defines the dimension whose addition to the analytical description of the document with the value given in the field below will result in sending the document to the employee’s mailbox.
![]() [New] – adding a new value for the dimension selected in the field: Dimension. If on the analytical description of the document, the dimension selected in the field: Dimension, will have one of the values entered here assigned to it, then such a document will be sent to the mailbox of the employee concerned.
[New] – adding a new value for the dimension selected in the field: Dimension. If on the analytical description of the document, the dimension selected in the field: Dimension, will have one of the values entered here assigned to it, then such a document will be sent to the mailbox of the employee concerned.
![]() [Card] – change of the checked value for the dimension selected in the field: Dimension.
[Card] – change of the checked value for the dimension selected in the field: Dimension.
![]() [Delete] – deletes the selected value of the dimension.
[Delete] – deletes the selected value of the dimension.
Output
This section defines the output conditions that must be met for the document to leave the employee’s mailbox.
![]() [New] – adding a new dimension that will have to be filled in on the analytical description of the document (for it to leave the employee’s mailbox).
[New] – adding a new dimension that will have to be filled in on the analytical description of the document (for it to leave the employee’s mailbox).
![]() [Card] – changing a new dimension that will have to be filled in on the analytical description of the document (for it to leave the employee’s mailbox).
[Card] – changing a new dimension that will have to be filled in on the analytical description of the document (for it to leave the employee’s mailbox).
![]() [Delete] – deletes the selected dimension.
[Delete] – deletes the selected dimension.
Button: ![]() to be found at the bottom of the window, allows the user to define, using SQL language syntax, the conditions for documents to appear in the employee’s mailbox.
to be found at the bottom of the window, allows the user to define, using SQL language syntax, the conditions for documents to appear in the employee’s mailbox.
If documents that have been described on their analytical description in the centre: Administration are to appear in an employee’s mailbox, and have only left that employee’s mailbox when he or she completes the description with a dimension: Project, one shall:
– in the field: Centre, select the dimension: Centre
– in the field: Value (input side) add the value: Administration
– in the field: Value (output side) add the dimension: Project.
Employee card, tab: WTR
The tab contains data on the card number and the time it has been assigned to the employee.
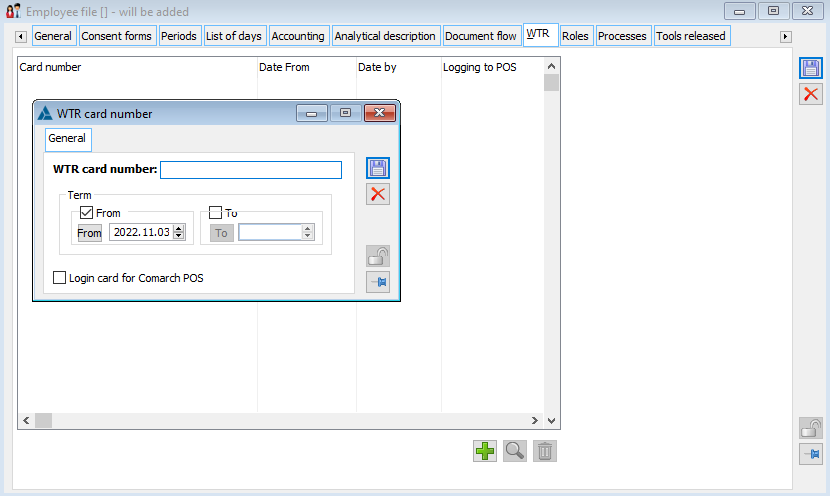
On the tab there are the following functions:
![]() [New] – allows for registering the employee card. Once clicked, the following window will open: WTR card number. Fill in the fields the values of which will be displayed in the individual columns of the tab: WTR.
[New] – allows for registering the employee card. Once clicked, the following window will open: WTR card number. Fill in the fields the values of which will be displayed in the individual columns of the tab: WTR.
![]() [Card] – allows to view and edit the employee card.
[Card] – allows to view and edit the employee card.
![]() [Delete] – deletes the WTR card of the employee.
[Delete] – deletes the WTR card of the employee.
Employee card, tab: Roles
The tab displays information about the employee’s role in the company. The roles are defined in the window: Employee roles.
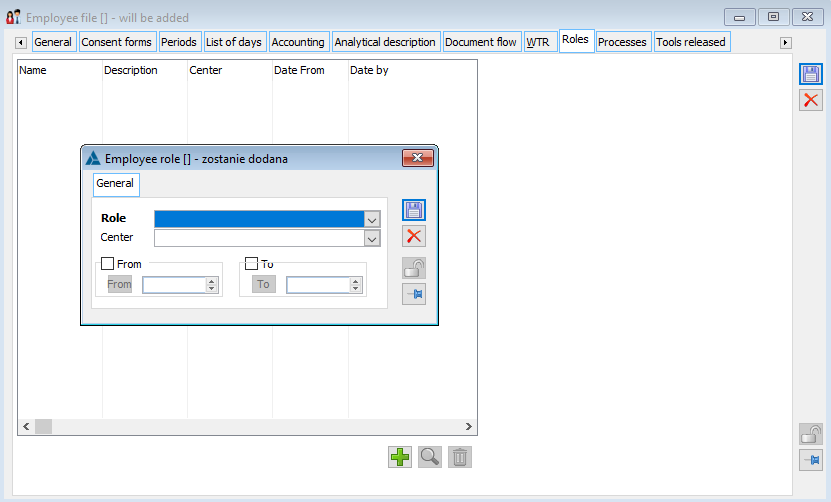
On the tab there are the following functions:
![]() [New] – allows for adding a new employee’s role.
[New] – allows for adding a new employee’s role.
![]() [Change] – allows the user to edit the employee’s role.
[Change] – allows the user to edit the employee’s role.
![]() [Delete] – removes the role selected from the list.
[Delete] – removes the role selected from the list.
Employee card, tab: Processes
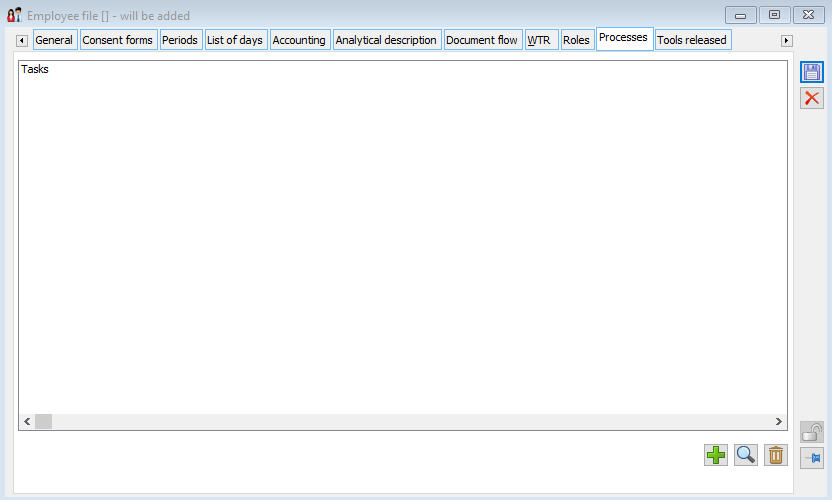
The tab displays processes for which the edited employee is the supervisor. From the tab level, it is also possible to assign an employee as a supervisor to a selected process.
On the tab there are the following buttons:
![]() [Add] – allows assigning an operator as a supervisor to a selected process. Clicking the button opens the window: Supervisor task, where after using the button:
[Add] – allows assigning an operator as a supervisor to a selected process. Clicking the button opens the window: Supervisor task, where after using the button: ![]() , the process, to which an operator will be assigned, is indicated. After indicating the process, the activity for which the operator is to be the supervisor is selected. Approval of the supervisor’s assignment to the activity of the selected process takes place after clicking the button:
, the process, to which an operator will be assigned, is indicated. After indicating the process, the activity for which the operator is to be the supervisor is selected. Approval of the supervisor’s assignment to the activity of the selected process takes place after clicking the button: ![]() [Save].
[Save].
![]() [Preview] – clicking the button opens the process/activity selected on the list for preview.
[Preview] – clicking the button opens the process/activity selected on the list for preview.
![]() [Delete] – clicking the button releases the employee from the role of process or selected activity supervisor.
[Delete] – clicking the button releases the employee from the role of process or selected activity supervisor.
Employee card, tab: Attributes
The tab is used to assign attributes for the employee. Attributes are assigned according to the general rules.
Employee card, tab: Attachments
On the tab, attachments can be added to the employee. It is possible to attach photos, text files, spreadsheets, etc. here. The user is free to specify the format in which attachments will be saved and stored.
