Tasks and role of the processes[1]*
Processes in COMARCH ERP XL system fulfil the following functions:
-information and document flow management
-registering documents which come to the company but are not reflected in COMARCH ERP XL
-cataloguing and storing external information
-enabling the division of tasks
-defining new document statuses (for example between an unconfirmed and confirmed order we introduce an additional order validation).
Thanks to their functions, processes enable:
-controlling the flow of information in the company and searching for the so-called “bottlenecks”
-searching for “critical moments” and informing key persons about such situations (for example informing a manager about overdue tasks of an employee)
-conditional execution of tasks, for example approval of an order depending on its value is carried out by another employee
-automatic execution of tasks, for example batch posting – after starting the posting – the process of posting selected documents runs automatically within the time specified in the process definition.
Glossary of terms (objects) used to define and handle processes
Terms used to define and handle processes are as follows:
Process – a sequence of performed tasks, the effect of which is a change in the process status, or the creation of a new process.
Task – is the main element of the process. It is a stage through which the process must pass. Activities to be performed are defined for each stage. For each process, two tasks are predefined in the system: START and END. They mark the beginning and the end of a process. Any other tasks may be defined between these two, for example registering a document (within which tasks are also defined, for example: issuing a document, approving a document, etc.).
When handling processes, a task indicates the state in which the process is located.
Activity – an activity is an element of a task. A task, that is, a state in which a process is located, may consist of many activities. Actions and their results are defined for activities. Depending on whether the activity will have a key action assigned, the following types can be distinguished:
Key activity – an activity that corresponds to the functionality found in the system, for example: order confirmation. A key activity is defined in the process by selecting a key action.
Activity – an activity to which no key action is assigned will be an ordinary activity. This will be an activity that is not reflected in the COMARCH ERP XL system. As such activity can be defined for example: Registration of document release protocol. Document release protocol is not a document supported by COMARCH ERP XL system, however, the fact of its registration may be recorded in the system with the use of the process.
Special activity – special activities are a group of tasks of general use, independent from process status and independent from objects in COMARCH ERP XL, for example sending an e-mail.
Action – action, the execution of which has been foreseen in activity definition. If an action corresponds to a function in COMARCH ERP XL system, then it is a key action.
Result – task to which a process shall be forwarded after completing an action. It is possible to define result as a transition to a stage earlier than it results from the chronology of defined process.
Supervisor – assigned to an activity, is authorised to perform it and is responsible for it. A supervisor may be:
-A centre in a rights structure
-A centre in a subordinate structure
-Employee or group of employees
-Operator or group of operators
-An automatic supervisor
Defining a process
Window: Processes definitions
Each process, before it can be started and handled, must be defined in the following window: Processes definitions. The definition registered here will constitute a template, on the basis of which a specific process shall be initiated, in accordance with the data saved in it.
To open the window, from the menu: Processes, select the function: Processes definitions.
The window has two tabs.
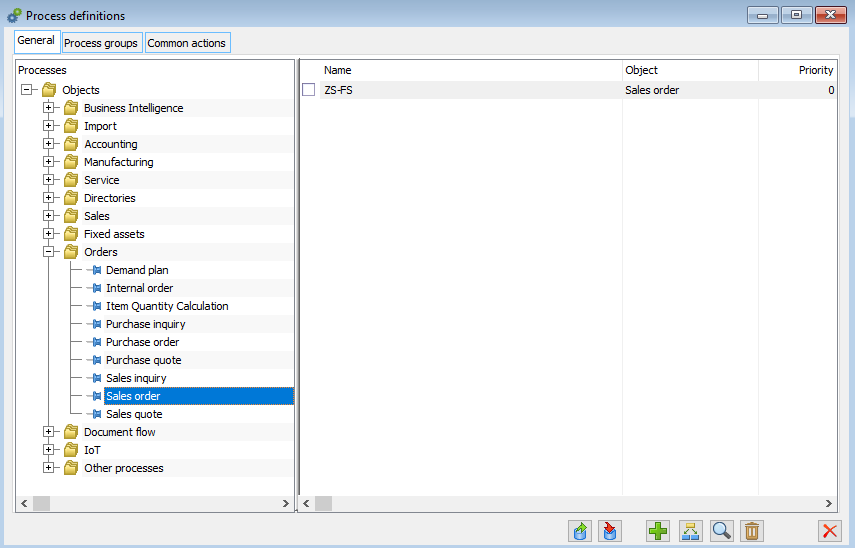
Processes definitions, tab: General
There are two panels on the tab. In the left panel, there is list of objects, for which you can define process. These objects are divided according to modules, present in COMARCH ERP XL system. Apart from them, there is a folder on the list: Other processes, which allow defining processes for other object than provided in COMARCH ERP XL system.
The right panel contains a list of processes definitions defined for the object, which was selected in the left panel.
In window, you can find the following functions:
![]() [Definition export] – after selecting a process and clicking the button, export of this process to a file indicated by the User (format .xml) will be activated.
[Definition export] – after selecting a process and clicking the button, export of this process to a file indicated by the User (format .xml) will be activated.
![]() [Definition import] – the button enables import of the process from the indicated .xml file.
[Definition import] – the button enables import of the process from the indicated .xml file.
![]() [Add] – opens the window: Process definition, allowing for adding a new process to the list.
[Add] – opens the window: Process definition, allowing for adding a new process to the list.
![]() [Change] – allows to edit an already registered process indicated on the list.
[Change] – allows to edit an already registered process indicated on the list.
![]() [Delete] – removes a process from the list.
[Delete] – removes a process from the list.
The defined processes can be displayed in the window in black or grey. In grey colour inactive processes are displayed (having the parameter: Active unchecked, on the process definition, on the tab: General).
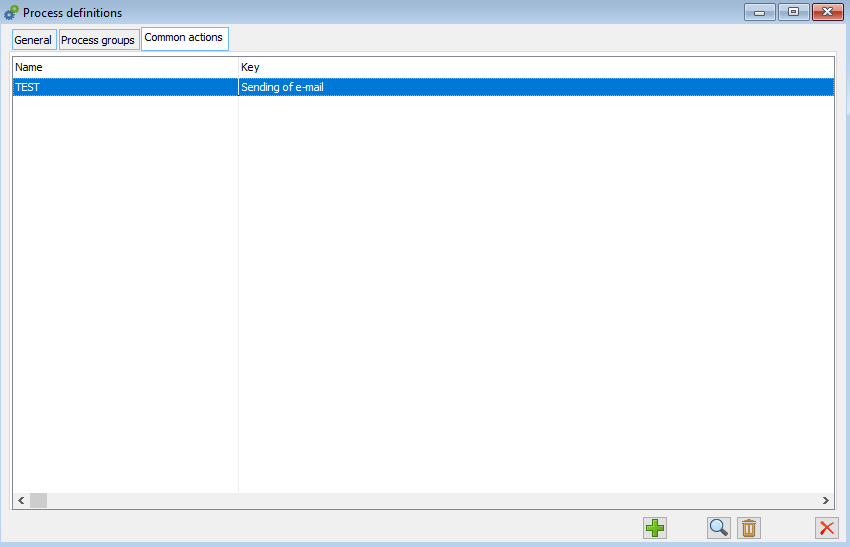
Processes definitions, tab: Common actions
On this tab common actions are defined for all processes definitions registered on the tab: General. Common actions will be added to all processes – both the already registered ones and the newly added ones. On the list of actions for the process definition (window: Process definition, tab: Actions), common actions shall be displayed in blue.
It is possible to select a common action from a dictionary predefined in the system.
![]() [Add] – opens the window: Action definition, allowing for adding a new action to the list.
[Add] – opens the window: Action definition, allowing for adding a new action to the list.
![]() [Change] – this function enables the user to edit the action selected on the list.
[Change] – this function enables the user to edit the action selected on the list.
![]() [Delete] – deletes the action checked on the list.
[Delete] – deletes the action checked on the list.
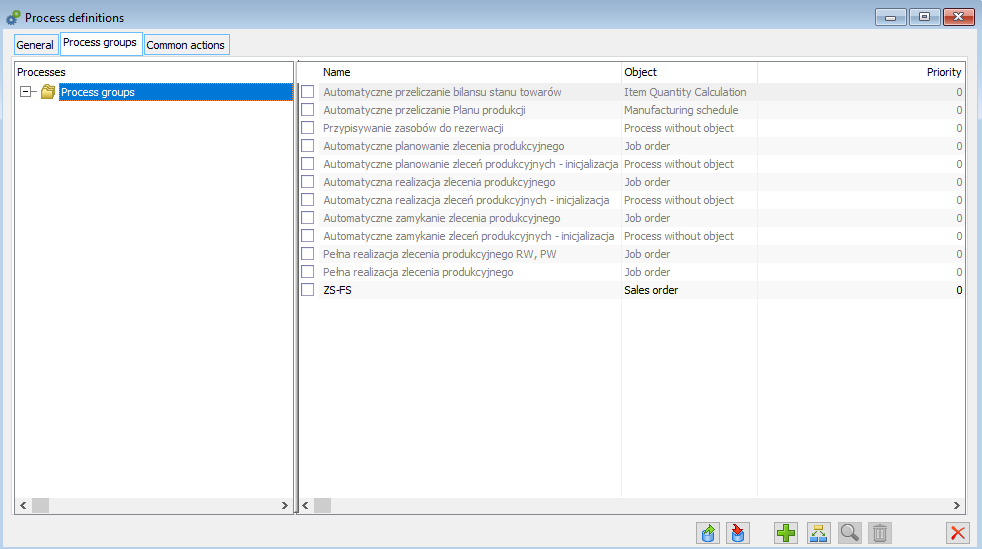
Processes definitions, tab: Processes groups
On the tab it is possible to combine processes into groups realizing a specific scenario of issuing documents.
![]() [Definition export] – after selecting a process definition and clicking the button, export of process definition to a file indicated by the User (format .xml) will be activated.
[Definition export] – after selecting a process definition and clicking the button, export of process definition to a file indicated by the User (format .xml) will be activated.
![]() [Definition import] – the button enables import of the process definition from the indicated .xml file.
[Definition import] – the button enables import of the process definition from the indicated .xml file.
![]() [Add] – opens the window: Process definition, allowing for adding a new process definition to the list.
[Add] – opens the window: Process definition, allowing for adding a new process definition to the list.
![]() [Change] – allows to edit an already registered process definition indicated on the list.
[Change] – allows to edit an already registered process definition indicated on the list. ![]() [Delete] – removes a process definition from the list.
[Delete] – removes a process definition from the list.
![]() [End] – closes the window.
[End] – closes the window.
Process definition
In the process definition window the process definition is defined. This definition shall constitute the template for the specific process being handled.
Opening the process definition window takes place after clicking in the window: Processes definitions, the button: ![]() [Add].
[Add].
It is possible to define a process definition concerning an object in COMARCH ERP XL, or a process without such an object.
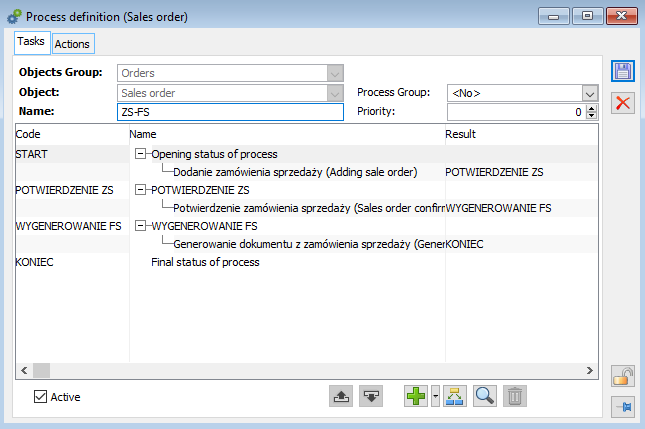
Tab: Tasks
On the tab you define the components of the process:
Tasks, that is the stages through which the process is to pass. For each process, there are two tasks predefined in the system: START and END. For the task: START, it is necessary to define an activity (action), the execution of which will start the process.
Tasks, that is the tasks to be performed in a given stage (status).
Moreover, on the tab there are functions and fields to be described:
Object group – information to which group the defined process belongs, a non-editable field.
Object – information on the object, non-editable field.
Processes group – a possibility of assigning the defined process to a selected group.
Name – name of the process definition.
Priority – the priority of the process. The priority indicates the order of handling particular processes by the responsible employee. The priority defined here is the default priority, which will be assigned to the specific process being started. However, the priority can be changed by an authorised user. The rule is that the higher the priority value, the higher the priority, for example a process with an entered priority of 70 will be “more important” than a process with a priority marked with the value 50. The order of handling processes according to priority is not enforced by the system.
Active – marking the process as active means that it can be handled. Thus, this parameter has a similar meaning as the parameter in the configuration: Enable processes handling. In order for the process to be initiated and handled, it must have both parameters selected. If the parameter on the process definition: Active, is unchecked, then, despite processes handling being enabled (a parameter in the configuration), the process will not be handled. Additionally, for processes already running, adding new tasks (statuses) will be suspended.
The handling of the task from an inactive process will consist in terminating the currently executed one; the result of the action will always be the final status (END).
When saving the process definition after selecting the parameter: Active, the process definition is checked for correctness. In a correct active process definition, the following conditions must be met:
-an action must be assigned to the task for execution (except status: END)
-each activity must be assigned an action to be executed
-each activity must be assigned a supervisor who will be responsible for the task.
When attempting to save the active process definition, if no activity is assigned to each task to be performed, saving the definition will not be possible. The process definition correctness check does not take place if the parameter: Active, is not checked.
![]() [Add] – allows defining and adding a new task to the process, if on the list the task: END is checked, or a new activity if other item is checked. When the following button is clicked:
[Add] – allows defining and adding a new task to the process, if on the list the task: END is checked, or a new activity if other item is checked. When the following button is clicked: ![]() [Expands menu of available options], a menu will expand with options to choose to add: a task or an activity.
[Expands menu of available options], a menu will expand with options to choose to add: a task or an activity.
![]() [Change] – allows you to edit the task/activity.
[Change] – allows you to edit the task/activity.
![]() [Delete] – removes a task/activity from the process definition. It is not possible to delete a task: START and END – predefined in the system.
[Delete] – removes a task/activity from the process definition. It is not possible to delete a task: START and END – predefined in the system.
![]() [Up] – changes the order in which tasks are displayed, moving the selected status one up.
[Up] – changes the order in which tasks are displayed, moving the selected status one up.
![]() [Down] – changes the order in which statuses are displayed, moving the selected status one down.
[Down] – changes the order in which statuses are displayed, moving the selected status one down.
Functions activated with the use of buttons are also available after expanding the context menu, activated with the right mouse click.
Tab: Actions
On the tab, the actions assigned to the process are displayed. These are the following actions:
-Common – defined in the field: Processes definitions, on tab: Common actions, displayed in blue
-defined on the tab by the User by clicking: ![]() [Add]
[Add]
-assigned to a particular process definition by the User, from the level of the tab: Tasks.
Common actions are added to each process by registering common actions in the window: Processes definitions, on tab: Common actions. On a given process definition it is not possible to edit or delete such actions. This is only allowed in the window: Processes definitions.
On this tab, you can find the same fields as on the tab: Tasks. Apart from that, on the tab there are the following functions:
![]() [Add] – allows for registering a new action in the process definition. Adding an action in this way is not yet sufficient for it to be executed in the process. The actions added here will create a list from which the action to be performed in the process is selected. More information on assigning actions to processes can be found in chapter:
[Add] – allows for registering a new action in the process definition. Adding an action in this way is not yet sufficient for it to be executed in the process. The actions added here will create a list from which the action to be performed in the process is selected. More information on assigning actions to processes can be found in chapter:
![]() [Change] – allows you to edit the registered action. It is not possible to edit a common action.
[Change] – allows you to edit the registered action. It is not possible to edit a common action.
![]() [Delete] – allows for deleting a registered action from the process. It is not possible to delete a common action.
[Delete] – allows for deleting a registered action from the process. It is not possible to delete a common action.
![]() [Add missing actions] – enables you to re-enter actions that you have removed from the list using the Delete button.
[Add missing actions] – enables you to re-enter actions that you have removed from the list using the Delete button.
The Execution of other actions parameter: Prohibited or Allowed enables the execution (or not) of actions other than those listed in the defined process.
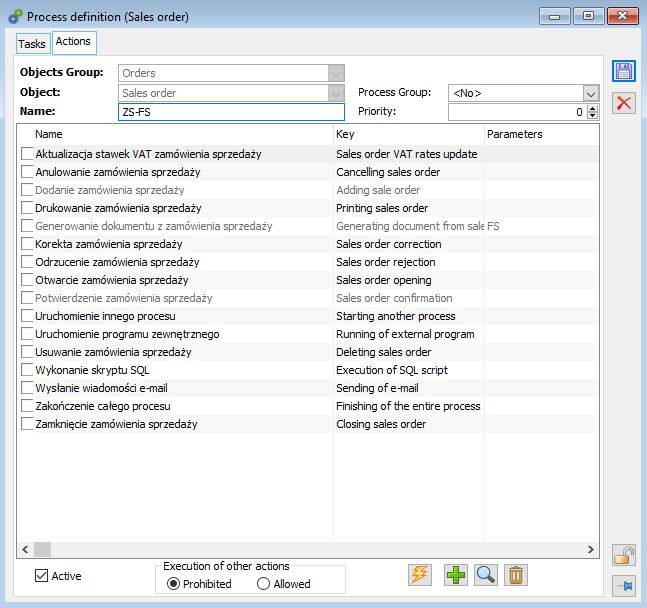
If actions are used in the process definition, i.e. they have been assigned to tasks, it is not possible to delete them. If the user selects all actions and deletes them serially, only those that have not been assigned to tasks will be deleted. The action used in the process will be highlighted in grey.
Process task definition
A process task is its stage, which includes tasks to be performed. Defining a process task takes place from the level of the tab: Tasks, of the window: Process Definition, after clicking the button: ![]() [Add].
[Add].
The window consists of two or three tabs depending on whether the following tab is activated: SQL.
A task performed in the process on the basis of the definition can be included in the schedule.
From the schedule level it will be possible to execute it; it will also be possible to set reminders for such a task. The condition for including the task in the schedule is selecting in the section: Schedule, the option: Reserve time or Do not reserve time.
Process task definition, tab: General
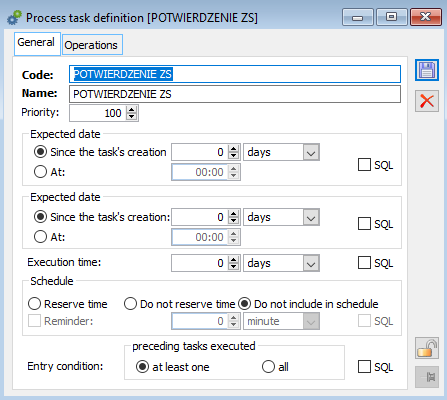
On the tab, the basic data of status can be defined:
Code – abbreviated task name.
Name – full task name.
Priority – each task within a process can be given a different priority. This priority applies only to the task – the process itself has a separate priority. Similarly to the priority for the process, the rule is that the higher the value entered in the field: Priority, the higher the priority for the task.
Execution time – is the time of execution of the task for the operator, it is automatic, indicates the time at which the execution of the key action will be triggered.
Execution deadline – the execution deadline, is the date by which the task is to be executed. It is counted from the moment the task hits the employee’s mailbox. The deadline can be specified by indicating the number of seconds, minutes, hours, days, weeks or by using an SQL condition. The condition is entered on the tab: SQL, activated once the following field was checked: SQL. This condition should return a variable in timestamp format.
The date can be specified by indicating the number of seconds, minutes, hours, days, weeks or by using an SQL condition. The condition is entered on the tab: SQL, activated once the following field was checked: SQL. This condition should return a variable in timestamp format.
Regardless of specifying the date of execution in this window, it can also be edited individually for each task performed separately – in the window: Task, available from the level of the respective mailboxes (employee/xl automated system).
Execution time – the time allowed for the execution of the task. The time can be specified by indicating the number of seconds, minutes, hours, days, weeks or by using an SQL condition. The condition is entered on the tab: SQL, activated once the following field was checked: SQL. This condition should return a variable in timestamp format.
When assigning the date of task execution, the execution times for other tasks in the employee’s mailbox are taken into account – System searches for the first free time slot. Searching for free dates will take place only if non-zero execution time is given in task definition.
The execution time will be the deadline for task execution recorded in the schedule, if such an option has been provided for (in section: Schedule, they will have the following parameter checked: Reserve time, Do not reserve time).
Schedule – the options in this section determine whether the process task will be included in the schedule. The task will be included in the schedule if the task supervisor in the process is:
-an employee
-an operator connected with an employee
-the centre of the company’s structure to which the employee belongs (the task will be included in the schedules of employees belonging to this centre) or an operator linked to the employee.
Options available in the schedule section:
Reserve time – if this parameter is selected, the time for which the task was generated will be marked as occupied. The task will be included in the schedule. The execution deadline set for the task registered in the schedule will be the time specified for the process task in the field: Execution time.
Do not reserve time – if this parameter is selected, the time for which the task has been assigned in the process will not cause the object to be occupied. However, the task will be included in the schedule. The execution deadline set for the task registered in the schedule will be the time specified for the process task in the field: Execution time
Do not include in the schedule – if this parameter is selected, the task resulting from the process will not be registered in the schedule. It will not be possible to generate reminders for tasks which are not included in the schedule.
The options described above are available both from the level of the task definition and from the level of a specific task edited for a running process from the level of the following window: Employee mailbox. The execution of the process task, which is included in the schedule, results in marking its execution also in the schedule. Similarly – execution of a task from the schedule level will also be reflected in the window: Process history and in the window: Employee mailbox
Reminder – if this parameter is selected, a reminder will be generated in the process initiated on the basis of the process definition, in the current task and within the set deadline (counted backwards from the task start deadline), about the necessity of performing the activity provided for in this task. A reminder will be generated only for those tasks that are included in the schedule (in the section: Schedule, they will have the following parameter checked: Reserve time, Do not reserve time).
Entry condition – the condition that must be met for entry into a status to occur. This condition is determined by the completion of the preceding tasks:
the preceding tasks have been performed:
- at least one – if at least one preceding task (activity) has been performed for which this task will be the result. Such a situation will occur in the case when the process runs in two tracks and two tracks of this process meet in the current task.
- all – in order for the entry to the task to occur, all preceding tasks (activities) will have to be performed.
SQL – checking this option makes the following tab active: SQL. On the tab, you can specify the SQL condition that will trigger the status entry, for example: completion of two preceding tasks, etc.
Process task definition, tab: SQL
The tab becomes active after selecting on the tab: General, of the option: SQL, for at least one of the parameters:
-Execution deadline
-Execution date
-Execution time
-Reminder
-Entry condition.
On this tab, you enter the SQL conditions, relevant for the description, as described in the chapter: Tab: General (2,048 characters are provided for each SQL field, but the sum of all characters in one task cannot exceed 8,000).
Process task definition, tab: Activities
On this tab, the activities to be performed in the defined task (stage) are specified.
In window, you can find the following functions:
![]() [Add] – used to add activity to the task. After clicking the button, the following window will open: Process activity definition, which allows you to define such an activity.
[Add] – used to add activity to the task. After clicking the button, the following window will open: Process activity definition, which allows you to define such an activity.
![]() [Change] – allows you to edit the added activity.
[Change] – allows you to edit the added activity.
![]() [Delete] – allows for deleting a selected activity from the process.
[Delete] – allows for deleting a selected activity from the process.
Process activity definition
The window enables defining activities for the process (task). This defining can take place from the level of:
-window: Processes definitions (tab: Tasks)
-window: Process task definition (tab: Activities).
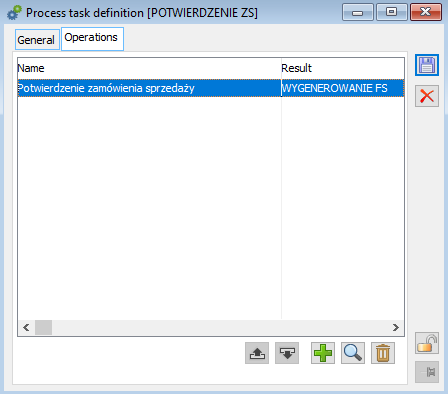
An activity consists of: an action, meaning a specific action to be performed, and a result, that is an indication to which status (stage) the process is to be forwarded, after the action has been performed. Each activity can be assigned a supervisor who will be responsible for its implementation.
The window has two tabs.
Process activity definition, tab: General
The tab defines the action that must be performed as part of the process task and the result that is to take place after its execution.
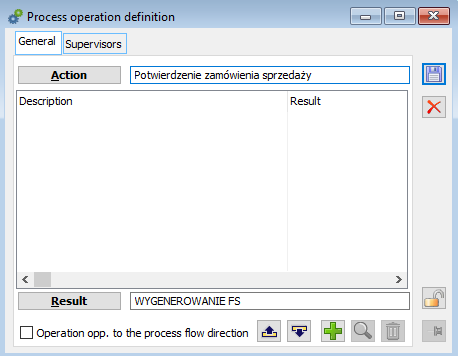
Action – a specific task to be implemented. It is selected after clicking: ![]() [Select action]. Then, the following window will open: Process definition, with one tab: Actions (it is a process window to which a task is to be assigned). On this tab there are actions available for selection. If the desired action is not on the list, it should be added by clicking the button:
[Select action]. Then, the following window will open: Process definition, with one tab: Actions (it is a process window to which a task is to be assigned). On this tab there are actions available for selection. If the desired action is not on the list, it should be added by clicking the button: ![]() [Add]. The action is selected by highlighting it and clicking the button:
[Add]. The action is selected by highlighting it and clicking the button: ![]() [Select].
[Select].
Result – is an indication, to which task (stage) the process is to be forwarded, after execution of the action. It is selected after clicking: ![]() [Select result]. Then, the following window will open: Process definition, with one tab: Tasks (it is a process window to which a task is to be assigned). If more results are to be selected for an action, they can be added by clicking the button:
[Select result]. Then, the following window will open: Process definition, with one tab: Tasks (it is a process window to which a task is to be assigned). If more results are to be selected for an action, they can be added by clicking the button: ![]() [Add], at the bottom of the tab. Such results may be subject to SQL conditions that can be defined when adding a particular result.
[Add], at the bottom of the tab. Such results may be subject to SQL conditions that can be defined when adding a particular result.
Condition testing whether the SO document has a CE series:
select @Wynik = case when exists (select * from cdn.ZamNag where Zan_gidtyp = @ObiTyp and Zan_gidnumer = @ObiNumer and Zan_ZamSeria=’CE’) then 1 else 0 end
The result can only be an already defined task. However, it may happen that while defining an activity, the task which is to be its result has not yet been defined in the process. In such a situation, you can add a new task to the process by performing the following actions:
click: ![]() . A new window will open: Process definition;
. A new window will open: Process definition;
in the window: Process definition, click the button: ![]() [Expands the menu of available options]. From the drop-down menu select the function: Add task, which will make it possible to define a new task;
[Expands the menu of available options]. From the drop-down menu select the function: Add task, which will make it possible to define a new task;
after defining a task, it must be saved. Click: ![]() [Save changes].
[Save changes].
The new task will be added to the list of tasks on the process definition and can be selected as a result, after selecting it and clicking the button: ![]() [Select].
[Select].
Activity against the process direction – the default selection of this parameter is moved from the Action Definition.
On the tab there are the following functions:
![]() [Add] – is used to define the result for the action and its condition. By opening the window: Definition of activity result status, it is possible to add one or more results.
[Add] – is used to define the result for the action and its condition. By opening the window: Definition of activity result status, it is possible to add one or more results.
![]() [Change] – allows to edit the result and its condition.
[Change] – allows to edit the result and its condition.
![]() [Delete] – removes a result from the list.
[Delete] – removes a result from the list.
![]() [Up] – changes the order in which activities are displayed, moving the selected one up.
[Up] – changes the order in which activities are displayed, moving the selected one up.
![]() [Down] – changes the order in which activities are displayed, moving the selected one down.
[Down] – changes the order in which activities are displayed, moving the selected one down.
Process activity definition, tab: Supervisors
On the tab you can assign a supervisor, who will be responsible for the execution of the action defined on the tab: General.
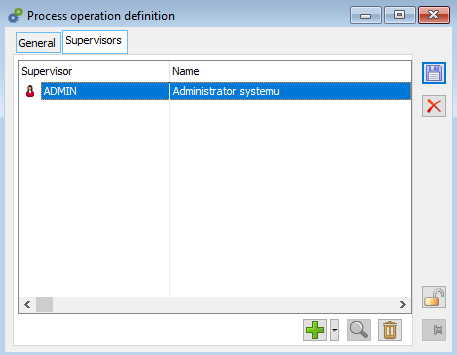
Adding a supervisor can be done by clicking: ![]() [Add]. Button:
[Add]. Button: ![]() [Expands menu of available options], a menu will expand with options for selecting a supervisor:
[Expands menu of available options], a menu will expand with options for selecting a supervisor:
-from the company structure (possible options: subordinate centre or rights centre),
-from list of employees,
-from list of operators,
-automatic supervisor.
The selection is made by choosing a supervisor from the open list and clicking the button: ![]() [Select]. It is possible to select more than one supervisor. If a supervisor is selected, then when the process is started, the specified task will be sent to the selected employee’s/operator’s mailbox. If a subordinate centre has been selected as the supervisor, then the task will be in the mailboxes of all employees in that centre, as well as in sub-centres. Similarly, if a rights centre is selected as the supervisor – the task will be sent to the mailboxes of all operators and sub-centres. Completion of a task by one employee/operator is effective for the other entities, which results in the task, as completed, being removed from their mailboxes.
[Select]. It is possible to select more than one supervisor. If a supervisor is selected, then when the process is started, the specified task will be sent to the selected employee’s/operator’s mailbox. If a subordinate centre has been selected as the supervisor, then the task will be in the mailboxes of all employees in that centre, as well as in sub-centres. Similarly, if a rights centre is selected as the supervisor – the task will be sent to the mailboxes of all operators and sub-centres. Completion of a task by one employee/operator is effective for the other entities, which results in the task, as completed, being removed from their mailboxes.
Action Definition
The window opens when you add an action from the level of the window: Process definition (tab: Actions). Action can be defined:
By adding action in the window: Process definition, in the tab: Actions,
When defining a task in the window: Process task definition (tab: General), when the following button is clicked: ![]() [Select action] and the action is defined in the window: Process definition, in the tab: Actions.
[Select action] and the action is defined in the window: Process definition, in the tab: Actions.
When the following button is clicked: ![]() [Add], in the window: Process definition, in the tab: Actions, a new window will open: Action Definition.
[Add], in the window: Process definition, in the tab: Actions, a new window will open: Action Definition.
Action Definition, tab: General
On the tab, the following fields are to be defined:
Name – action name.
Key action – if defined action is related to an object in COMARCH ERP XL system, then key action should be indicated. When the following button is clicked: ![]() , a predefined list of available key actions will be displayed, specific to the object the process concerns, for example, for the process: Handling a purchase order, a list of possible actions related to the purchase order document will be displayed: add purchase order, confirm purchase order, etc. If the action is to be defined as unrelated to any activity that can be performed in COMARCH ERP XL, then the field: Key action is to be left empty.
, a predefined list of available key actions will be displayed, specific to the object the process concerns, for example, for the process: Handling a purchase order, a list of possible actions related to the purchase order document will be displayed: add purchase order, confirm purchase order, etc. If the action is to be defined as unrelated to any activity that can be performed in COMARCH ERP XL, then the field: Key action is to be left empty.
Key actions must be selected appropriately to the nature of the activities they are to trigger, for example:
-the action for generating a commercial document is: Add commercial document
-the action triggering the generation of the correction to the commercial document will be the key action: Add commercial document from source document. This means that if, for example, a process is defined for the object: Sales invoice correction, which is to initiate the generation of a correction, then the first action to trigger this process should be the action: Add commercial document from source document.
Action against the process direction – this parameter is important in two situations:
-two paths have been defined for the process. When an action on one of the paths is executed, the actions on the other path are “executed” as well (this execution is conventional – the tasks on the second path are considered executed, because the process follows the first path). When searching for previous actions (executed ones), those for which the parameter: Action against the process direction is checked, shall be ignored;
-if, for a given task, as an entry condition the following condition has been marked: Performed preceding tasks – all, then, when searching for all performed preceding tasks, those for which the following parameter has been checked: Action against the process direction, will be ignored.
Restart when it is completed – if the parameter is unchecked, the process will be restarted only for those objects for which it was not yet started. If the parameter is checked, the process will be initiated for all objects for which it was not initiated and for those for which it was initiated but has already been closed.
Action Definition, tab: Parameters
This tab becomes active when defining some key actions. For actions for which the tab is activated, the activity to be performed must be defined, for example for a key action: Generate document from sales order, on the tab: Parameters, the name of the document to be generated is entered, for example SI. If more than one document has been defined in the given example, then by default the document specified in the action definition as the first one will be generated. The names of documents to be generated from the order should be entered with a semicolon in the following format:
PI,IR+,POR (example for a process handling a purchase order).
A special case is the action definition where the key action is: Send email. For the action to be executed correctly, on the tab: Parameters, of the definition of such an action, it is necessary to indicate: Address of the recipient of the message, subject of the message and its content. The data should be entered according to the following formula:
<DO>recipient address</DO>
<TEMAT>subject</TEMAT>
<TRESC>Message content</TRESC>
<ZALACZNIK Wydruk=1\> – default printout
<ZALACZNIK Wydruk=1> Zrodlo = 0, Wydruk = 94, Format = 1 </ZALACZNIK> – indicated printout
<ZALACZNIK Wydruk=0> path for example (C:\przyklad.jpg) <ZALACZNIK> – file from the drive
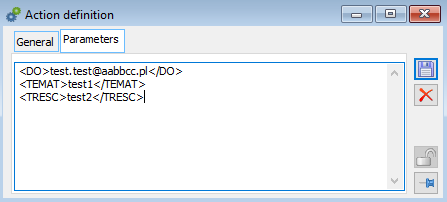
On the tab: The parameters can also be entered by means of a query in T-SQL language, which makes it possible, for example, to send an email to the address given on the card of the contractor for whom the document was generated. To use this functionality, proceed as follows:
In the first character of an expression (entered in the <DO>, <TEMAT>, or <TRESC> section) interpreted by the program, insert the ’!’ character, e.g., <TRESC>!’here_code’ </TRESC> mark
Among the available primitives are:
- @OBITYP, @OBINUMER – representing the identifier of the object being processed
- @PRCTYP, @PRCNUMER – employee identifier
- @OPENUMER – operator identifier
- @SQL – function executing any SQL query
- @ADRESEMAILKONTRAHENTA
- @NUMERDOKUMENTU
The content of the tab: Parameters, which allows an email to be sent to the address specified on the contractor’s card, about the order handled by the process: <DO>!@SQL(‘Select KNT_EMail From cdn.kntkarty (NOLOCK) join CDN.ZAMNAG (NOLOCK) on ZaN_KntNumer = Knt_GIDNumer where ZaN_GIDNumer=’&@OBINUMER)</DO> <TEMAT>test</TEMAT> <TRESC>!’Document:’&@SQL(‘Select CDN.NumerDokumentu(CDN.DokMapTypDokumentu(ZAN_GIDTyp,ZAN_ZamTyp, ZAN_Rodzaj),0,0,ZAN_ZamNumer, ZAN_ZamRok, ZaN_ZamSeria,0) From CDN.ZamNAg (NOLOCK) Where ZaN_GidNumer=’&@OBINumer)</TRESC>
In case you are sending several rows as a list in the body of an email using a SQL query, you need to add the 'list’ tag in such a query.
In case of action: Posting (for batch posting process), on the tab: Parameters, it is possible to indicate what operator on the accounting record is to be entered in the field: Entered by (field: DZK:OPEWGID, in the table: DZIENNIK). The parameter is entered according to the following scheme:
<OPERATOR>Operator identifier</OPERATOR>
In the scheme, in addition to using a specific operator identifier, for example ADMIN, you can also use special values such as:
@ostatni – operator on the most recently executed task (other than the automatic supervisor) including the current task. The expression will have the form <operator>@ostatni </operator>.
@uruchomil – operator who has performed the “start posting” or “start default posting” action. The expression will have the form: <operator>@uruchomil</operator>
@biezacy – the operator who started the posting automated system (XLWork automated system). The expression will have the form <operator>@biezacy</operator>
The default option is @uruchomil.
Another example of the use of the Parameters tab is the use of the Launch external program action, where the parameters indicated on the tab make it possible to launch an appropriate application, together with providing it with selected values of launch parameters:
<PROGRAM> access path along with the name of the application to be launched <\PROGRAM>
<PARAMETRY> list of parameters to be transferred to the application <\PARAMETRY>
<CZEKAJ> the length of time in milliseconds that the system has to wait after starting the application </CZEKAJ>, no tag or a value of 0 means no waiting, a value of -1 means that the system will wait for the application to finish running.
After entering data, the data must be saved. Click: ![]() [Save changes]. The saved action will be placed on the process definition and can be assigned to a selected task in the process.
[Save changes]. The saved action will be placed on the process definition and can be assigned to a selected task in the process.
Order of defining a process
The order of activities when defining processes is described below. While performing particular activities, you should use the description of relevant windows included in the chapter.
In order to define the process:
-open the window: Processes definitions and select the tab: General,
-on the tab, in the right panel, indicate the object for which the process is to be defined and select the relevant object or expand the folder: Other processes and select the path: Process without object (if the process is to concern a different object than that provided for in COMARCH ERP XL);
Once the object is selected, click the button: ![]() [Add]. A new window will open: Process definition. Fill in this window in accordance with its description in chapter: 1.25.3.2
[Add]. A new window will open: Process definition. Fill in this window in accordance with its description in chapter: 1.25.3.2
Then, define tasks for the process (two statuses: START and END are predefined in the system and take place for each process). For this purpose, on the tab: Tasks (in the window: Process definition) click the button: ![]() [Expands the menu of available options]. From the drop-down menu select the function: Add task. Tasks, in turn, must be assigned activities. You can add them:
[Expands the menu of available options]. From the drop-down menu select the function: Add task. Tasks, in turn, must be assigned activities. You can add them:
-in the window: Process task definition, on the tab: Activities, when the following button is clicked: ![]() [Add] or
[Add] or
-directly on the process, in the window: Process definition, in the tab: Tasks, when the following button is clicked: ![]() [Expands the menu of available options] and from the drop-down menu the following function is selected: Add activity.
[Expands the menu of available options] and from the drop-down menu the following function is selected: Add activity.
The activity is composed of action and result.
After entering the statuses and tasks, save the process by clicking the button: ![]() [Save changes].
[Save changes].
Thus, a process is defined.
Handling a process
Process handling consists in the execution of a specific process based on its definition specified in the window: Processes definitions. For the process handling to be started, the following conditions must be met:
In the configuration, on tab: General/Parameters 2, the following parameter has been selected: Enable processes handling,
The process to be handled has the following parameter checked: Active.
To every process task a supervisor is assigned. It can be an automatic supervisor – then the actions within the process are performed by XL Work.
The process can be handled both from the level of the window: Employee mailbox, as well as from other windows, appropriate due to the process object (as long as it is a process related to an object in the system), for example if the following process is handled: Purchase order handling, then the handling of this process can be carried out both from the level of the window: Employee mailbox, as well as from the level of the list of orders, or other levels where the object – purchase order – is available.
Multiple processes
If multiple processes have been defined for a single object, launching one of them will “launch” the others. In fact, one process will run, however, both in the window: Employee mailbox, as well as in the window: Process history, all processes, that foresee the execution of the next action, will be displayed.
Start of the process
The process may be started:
-from the level of window: Employee mailbox or Process list, by clicking: ![]() [Add] or
[Add] or
-by performing a standard action in the system, which is a task specified on the process definition as starting the process.
![]() [Add] or directly by registering an order (for example from the level of order list).
[Add] or directly by registering an order (for example from the level of order list).
Starting a process by making a standard action in COMARCH ERP XL system, for example issuing an order or registering a picking order, is described in particular parts of this documentation – documentation for the module: Orders, Production etc. (description of documents and the manner of their registration).
How to start the process from the level of the window: Employee mailbox, is described below.
Starting the process from the level of the windows: Employee mailbox and Process list
Starting the process from the level of the windows: Employee mailbox and Process list is performed in the same way. After clicking: ![]() [Add], that can be found in both windows. The path for starting the process is the same for both levels, so here it is presented using the example of starting the process from the level of the window: Employee mailbox.
[Add], that can be found in both windows. The path for starting the process is the same for both levels, so here it is presented using the example of starting the process from the level of the window: Employee mailbox.
To start the process from the level of the window: Employee mailbox:
from the menu: Tasks, select the function: Employee mailbox. A new window will open: Employee mailbox;
in the window, click the button: ![]() [Add]. A new window will open: Processes to start. The window displays processes which can be started by a given operator/employee. The operator/employee must be assigned to a process task in order for the process to be available to him/her. If a centre has been defined as a supervisor, then the employee/operator must be assigned to this centre.
[Add]. A new window will open: Processes to start. The window displays processes which can be started by a given operator/employee. The operator/employee must be assigned to a process task in order for the process to be available to him/her. If a centre has been defined as a supervisor, then the employee/operator must be assigned to this centre.
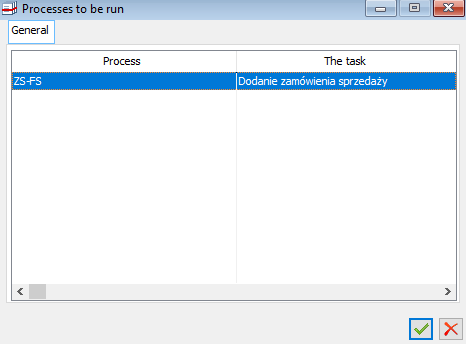
In the window: Processes to start, select the process you want to run and click the button: ![]() [Confirm]. A new window will open: Process;
[Confirm]. A new window will open: Process;
In the window: Process, the following data can be found:
- Name – the name of the process, transferred from its definition (more information about the process definition can be found in chapter:).
- Object – the action triggered with the button: [Object], depends on the process that is started. If there is no object in the process or creation of an object in COMARCH ERP XL system is defined as the first task (that starts a given process, for example adding an order), then it will not be possible to select the object (button will be inactive). If, on the other hand, the process concerns an object in the system (for example an order), and its first task has been defined as not adding a document, but for example its approval, then when starting the process it is possible to select a specific object, for example: an order which is in the buffer.
- Priority – the process priority, whose default value is carried over from its definition. However, it is possible to change this priority in the field.
- Description – a description of the process, entered by the User.
- Employee – the operator who created the process.
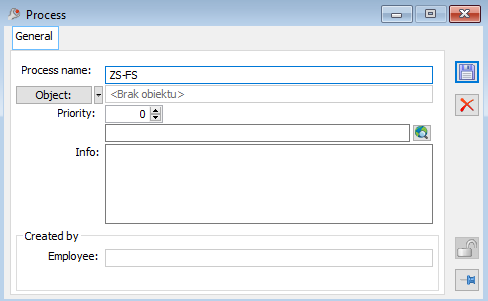
If you have finished editing the window: Process (entering or modifying data is not necessary to start the process), click the button: ![]() [Save changes]. Using this button will start the process, for example if the following process is started: Handling a purchase order,
[Save changes]. Using this button will start the process, for example if the following process is started: Handling a purchase order,
in which the first activity is to add a purchase order, then, when the button is clicked, the following window will open: Purchase order (the same as is opened from the order list), which enables the registration of this document. The registered document will be available on the lists, just like any other order document.
Thus, the process will be started. A record of it will be displayed in the window: Employee mailbox.
The process handling can be continued both from the level of the window: Employee mailbox, as well as from other windows, appropriate due to the process object (as long as it is a process related to an object in the system), for example if the following process is handled: Purchase order handling, then the handling of this process can be carried out both from the level of the window: Employee mailbox, as well as from the level of the list of orders, or other levels where the object – purchase order – is available.
Execution of tasks in the process
The execution of tasks in the process takes place through:
Performing an activity in the system, for example confirming an order from the order list level, generating a stock document from a commercial document, etc., if such an activity was provided for in the process definition
Performing the same actions as described above, but from the level of the window: Employee mailbox
Performing the same actions as described above, but from the level of the window: Process history
Automatic task execution using an automatic operator – XL Work (for example batch posting). XL Work can be started in batch mode, after giving in the command line the location of the file cdnwork.exe, indicating the database name, operator, password for the operator, and the parameter: startxlwork=1, for example:
Employee mailbox
The Employee mailbox is a window from the level of which the operator/employee can handle all processes assigned to him/herself, to the centre in which he/she is located and to subordinate employees (according to the subordinate structure). Handling a process from the level of an employee mailbox is a possibility to start the process and perform subsequent tasks. According to the criterion of supervisors, the window is divided into tabs. The last tab in the window is the tab: Tasks performed, which displays the tasks performed (operator/employee, centre where the operator/employee is located, subordinate employees).
To open the window, from the menu: Processes, select the function: Employee mailbox.
In the window, information about running processes is displayed in columns:
Process name – name of the process, in which activities are executed.
Object – object in COMARCH ERP XL system, which the process concerns.
Task – current task, which is to be executed in process (in other words – status, in which the process is).
Priority – the priority value is displayed as a product of the process priority and the status priority (defined as a percentage, for example: the priority value for the process is 50 and 100% for the status. The value of 50 will then be displayed for the task).
Execution date – task execution date defined in the window: Process task definition.
Execution deadline – task execution deadline defined in the window: Process task definition.
Supervisor – supervisor assigned to the task.
In the window there are the following buttons and functions common for all tabs:
![]() [Refresh mailbox content] – pressing the button will refresh the list, that is, update the status of the displayed tasks in the window.
[Refresh mailbox content] – pressing the button will refresh the list, that is, update the status of the displayed tasks in the window.
![]() [Edit object] – once this button is clicked, an object will be opened for preview, related to process/task checked in the window. If, for instance, the process concerns the handling of sales orders, then after clicking the button, the window of a specific sales order, to which the selected process/task relates, will be opened for preview.
[Edit object] – once this button is clicked, an object will be opened for preview, related to process/task checked in the window. If, for instance, the process concerns the handling of sales orders, then after clicking the button, the window of a specific sales order, to which the selected process/task relates, will be opened for preview.
![]() [Process history] – opens the window: Process history, enabling the viewing of completed tasks and execution of current tasks.
[Process history] – opens the window: Process history, enabling the viewing of completed tasks and execution of current tasks.
![]() [Execute task] (the name of this button is displayed accordingly to the type of task to be executed) – activating the function available under the button leads to the execution of the task in the current status. When the following button is clicked:
[Execute task] (the name of this button is displayed accordingly to the type of task to be executed) – activating the function available under the button leads to the execution of the task in the current status. When the following button is clicked: ![]() [Expands the menu of available options], a list of these tasks will be displayed (if there is more than one and each of them can be executed, for example for status: Order confirmation, the following tasks were defined for execution: Order confirmation, Order rejection – both these tasks can be executed within the current status). This button is not available on the tabs: Tasks of subordinates, Tasks completed. It is not possible to perform a task on the tabs: Tasks of subordinates and Tasks completed. The execution of the process task, which is included in the schedule, results in marking its execution also in the schedule. Similarly – execution of a task from the schedule level will also be reflected in the window: Process history and in the window: Employee mailbox.
[Expands the menu of available options], a list of these tasks will be displayed (if there is more than one and each of them can be executed, for example for status: Order confirmation, the following tasks were defined for execution: Order confirmation, Order rejection – both these tasks can be executed within the current status). This button is not available on the tabs: Tasks of subordinates, Tasks completed. It is not possible to perform a task on the tabs: Tasks of subordinates and Tasks completed. The execution of the process task, which is included in the schedule, results in marking its execution also in the schedule. Similarly – execution of a task from the schedule level will also be reflected in the window: Process history and in the window: Employee mailbox.
![]() [Add process] – clicking this button starts a process. It is not possible to run the process on the tabs: Tasks of subordinates and Tasks completed.
[Add process] – clicking this button starts a process. It is not possible to run the process on the tabs: Tasks of subordinates and Tasks completed.
![]() [Edit task/process] – opens the following window for viewing and limited editing: Task or Process. In these windows there are basic data concerning the edited process/task, such as: the name of the process, task, dates of creation and implementation, description. Moreover, in the window: Process, it is possible to define attachments.
[Edit task/process] – opens the following window for viewing and limited editing: Task or Process. In these windows there are basic data concerning the edited process/task, such as: the name of the process, task, dates of creation and implementation, description. Moreover, in the window: Process, it is possible to define attachments.
Posting only – when this parameter is selected, only batch posting processes will be displayed.
Other operators – this parameter is active if one employee is connected to many operators. When checked, tasks which are supervised by another operator connected to the current employee will be displayed.
On the tabs: My tasks, Tasks for the Centre, Tasks for subordinates, it is possible to display tasks to be completed as at a given date and to filter out overdue tasks.
In addition, the window includes a standard filter with a creator.
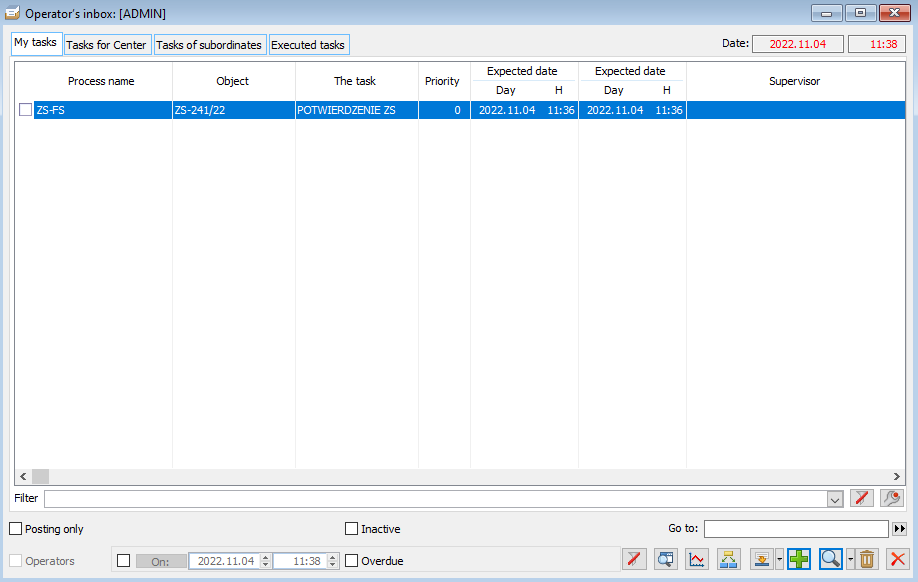
Colour meanings in the window: Employee mailbox
Tasks in the window: Employee mailbox are displayed using different colours. Particular colours depend on the deadline and date of the tasks completion:
Red – red font is used to display overdue tasks, for which the deadline and date of execution has passed.
Black – with black font the tasks are displayed, for which the date of realisation has passed, but the task execution deadline has not yet been exceeded.
Blue – blue font is used to display the tasks, for which neither the date nor the deadline of the task implementation have been exceeded yet.
Task edition from the level of the window: Employee mailbox
From the level of window: Employee mailbox it is possible to view and edit a selected task.
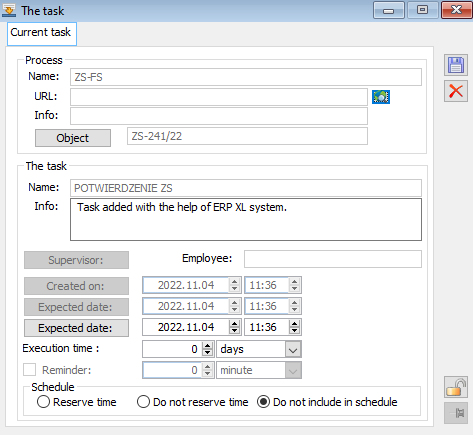
In this window, the following fields can be edited:
Task description – when time is booked in the schedule, the description is transferred to the schedule task.
Task execution date – when assigning the date of task execution, the execution times for other tasks in the employee’s mailbox are taken into account – System searches for the first free time slot. Searching for free dates will take place only if non-zero execution time is given in task definition. The search for free time slot also takes place when the activity supervisor is an automatic supervisor.
Task execution time (edited in the selected time unit).
Schedule – the options in this section determine whether the process task will be included in the schedule. The task will be included in the schedule if the task supervisor in the process is:
-an employee
-an operator connected with an employee
-the centre of the company’s structure to which the employee belongs (the task will be included in the schedules of employees belonging to this centre) or an operator linked to the employee.
Options available in the schedule section:
Reserve time – if this parameter is selected, the time for which the task was generated will be marked as occupied. This will result in a warning being displayed when attempting to generate a task for the same time period, stating that this is the next task scheduled for that date. However, this warning will not block you from scheduling another task for the same date. The task will be included in the schedule. The execution deadline set for the task registered in the schedule will be the time specified for the process task in the field: Execution time.
Do not reserve time – if this parameter is selected, the time for which the task has been assigned in the process will not cause the object to be occupied. However, the task will be included in the schedule. The execution deadline set for the task registered in the schedule will be the time specified for the process task in the field: Execution time
Do not include in the schedule – if this parameter is selected, the task resulting from the process will not be registered in the schedule. It will not be possible to generate reminders for tasks which are not included in the schedule.
By default, the setting in this window is carried over from the process task definition. The execution of the process task, which is included in the schedule, results in marking its execution also in the schedule. Similarly – execution of a task from the schedule level will also be reflected in the process history and in employee mailbox.
In addition, when editing a task from the level of the tab: Tasks of subordinates, it is possible to change the supervisor.
Process edition from the level of the window: Employee mailbox
When editing the process from the level of the window: Employee mailbox, a similar window is displayed, which is opened when starting the process. The difference with this window is that the window: Process, opened for editing has an additional tab: Attachments. This tab is analogous to the tabs: Attachments, which are located on: Employee card and Product card. The tab automatically displays attachments of the type: Log, containing information (logs) of key actions performed.
Tab: My tasks
The tab displays running tasks assigned to a given operator. From the tab level it is possible to start a process, edit a process or a task (to a limited extent), and execute actions.
Tab: Tasks for centre
The tab displays tasks that have the centre, where the operator/employee is located, assigned as the supervisor. The window offers the same functions as the tab: My tasks.
Tab: Tasks of subordinates
The window displays tasks of employees subordinate to the current employee (according to the subordinate structure). Therefore, the tab enables the analysis of tasks carried out by subordinate employees and the control of their timely completion.
From the window level, it is possible to change the supervisor for a selected task in the process. To change the supervisor, a special permission is required, which is defined by:
-defining a role with the right: Change of the process supervisor, in the window: Employee roles > Role edition. More information on role edition can be found in chapter: Role edition.
-assigning the defined role to the employee on the employee’s card, on the tab: Roles. More information on assigning a role to employee can be found in chapter: Employee card, tab: Roles.
Changing the supervisor is possible only if a supervisor is assigned to the edited task and is located in the subordinate structure below the employee who is to make the change.
In the same way that a change of supervisor can be made, a change of task deadline is made.
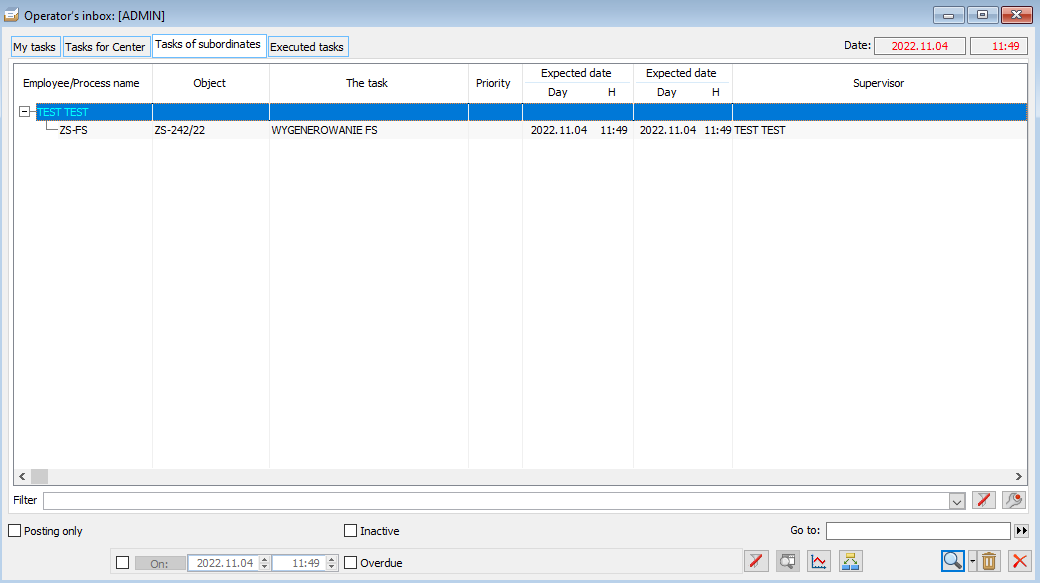
Supervisor is changed by selecting the task on the list and clicking the button: ![]() [Edit task]. A new window will open: Task. In the window, a button can be found:
[Edit task]. A new window will open: Task. In the window, a button can be found: ![]() [Supervisor]. Once clicked, select the appropriate supervisor, which will change the supervisor for the current task.
[Supervisor]. Once clicked, select the appropriate supervisor, which will change the supervisor for the current task.
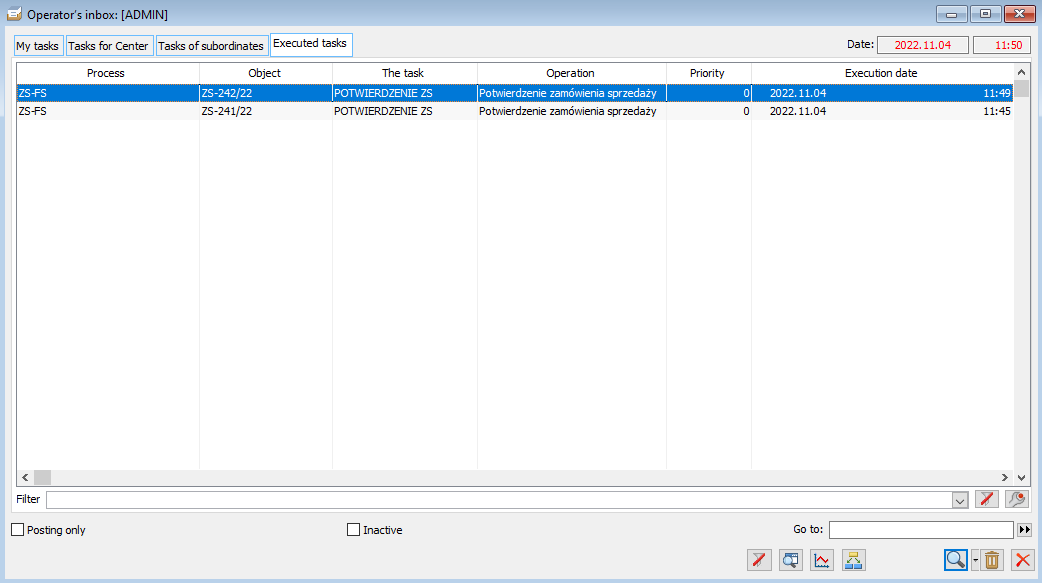
Tab: Completed task
In the tab, there are displayed tasks performed by the current employee/operator. In the window it is possible to view the selected task or process and also to display the history of the selected process.
XL automated system mailbox
XL automated system mailbox is available only from the level of the module: Administrator. It allows the user to view the tasks to be performed by the automated operator. The window layout is the same as the window: Employee mailbox.
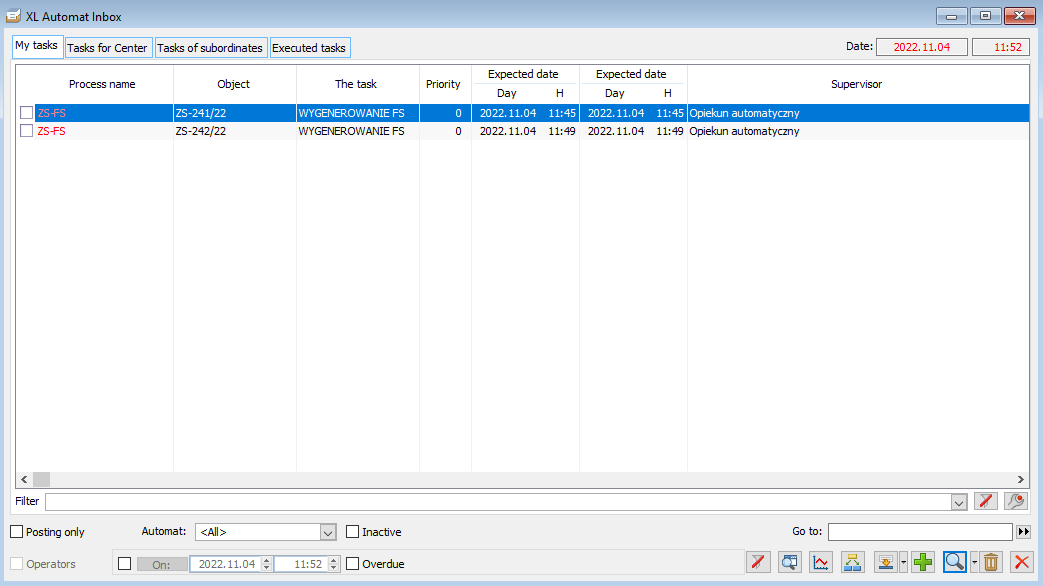
In order to facilitate browsing through the tasks, a filter has been placed under the list, allowing you to browse through the tasks of the selected automated system.
XL Work automated system
To execute the tasks of the selected automated system, go to the XL Work automated system window, go to the tab Parameters and select from the list the automated system the tasks of which you want to execute. Then start the automated system by clicking on the Start or Now button. Simultaneous work of the automated systems is possible after starting a separate CDNWork module (one for each automated system) and following the steps described above.
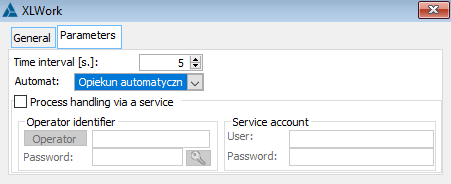
When launching cdnwork.exe from the command line it is possible to enter the parameter automated system=name, which will cause the given automated system to be selected on the list of automated systems. Example: CDNWORK.EXE” baza=t_60 operator=admin haslo=a startxlwork=1 automat=”Opiekun automatyczny”
List of processes
The window displays all active processes registered in the system. From the level of the window it is possible to start a selected process, display its history, etc.
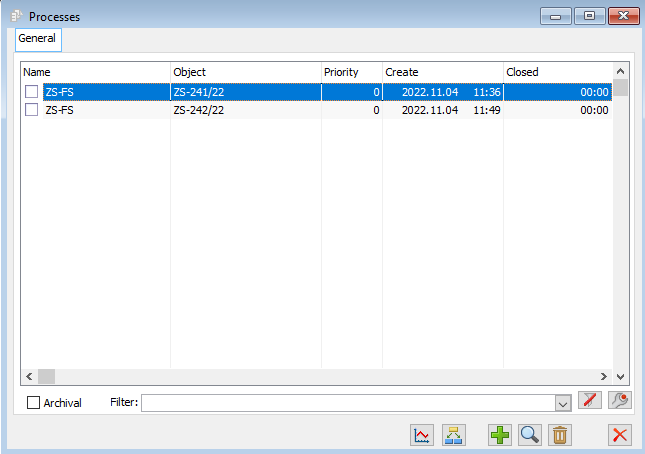
In window, you can find the following functions and buttons:
Archived – when this parameter is selected, the already closed (archived) processes will also be displayed.
Filter – a standard filter which allows you to narrow down the displayed processes.
![]() [Process history] – opens a window with the history of the process.
[Process history] – opens a window with the history of the process.
![]() [Run] – clicking the button will start the process.
[Run] – clicking the button will start the process.
![]() [Edit] – clicking this button allows to edit the process indicated on the list. The window opened is the same as the one opened when editing the process from the employee’s mailbox.
[Edit] – clicking this button allows to edit the process indicated on the list. The window opened is the same as the one opened when editing the process from the employee’s mailbox.
![]() [Close] – after clicking the button, the selected process will be closed.
[Close] – after clicking the button, the selected process will be closed.
Process history
In the window the executed tasks of the process and the status, in which the process is currently located (if it is active), are displayed. From the level of the history of active process it is possible to execute the current task (action).
Information about the process history are displayed in columns:
No. – number assigned to the task.
Task – the type of information displayed in the column is indicated by the font colour
- a task displayed in blue font indicates the status the process is currently in
- a task displayed in black font is the status, which has already been executed in the process.
Supervisor – supervisor assigned to the task
Activity – the column is filled in only if an action has already been performed in the given task for the process. If the action has not been performed yet, then this field will be empty. The status for a non-executed action will be displayed in blue
Executed by – the column is filled in only for the performed action; it indicates the employee who has performed the action
Date of closure – the column is filled out only for the action performed (status completed). In the column, the automatically registered date of closure is displayed
Description – description entered in the task edition, launched from the employee mailbox level
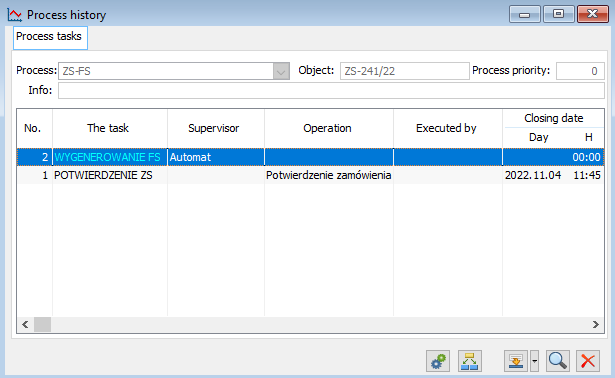
In this window, you can find the following field and functions:
Process header data – process data which are not subject to editing from the level of the window: Process history.
- Process – name of the definition on the basis of which the edited process is operated. In the window: Process history, edited from the level of order list, it is possible to edit this field. This happens when for an object selected in the order list it is possible to perform activities in different processes.
- Object – an object that is handled by the edited process.
- Process priority – the process priority set during the process start-up or taken from the process definition.
![]() [Process edition] – opens for preview the process definition, based on which the current process is handled.
[Process edition] – opens for preview the process definition, based on which the current process is handled.
![]() [Execute task] (the name of this button is displayed accordingly to the type of task to be executed) – leads to the execution of the task in the current status. When the following button is clicked:
[Execute task] (the name of this button is displayed accordingly to the type of task to be executed) – leads to the execution of the task in the current status. When the following button is clicked: ![]() [Expands the menu of available options], a list of these tasks will be displayed (if there is more than one and each of them can be executed, for example for status: Order confirmation, the following tasks were defined for execution: Order confirmation, Order rejection – both these tasks can be executed within the current status). The button is inactive if the history of closed process is being edited. The execution of the process task, which is included in the schedule, results in marking its execution also in the schedule. Similarly – execution of a task from the schedule level will also be reflected in the window: Process history and in the window: Employee mailbox.
[Expands the menu of available options], a list of these tasks will be displayed (if there is more than one and each of them can be executed, for example for status: Order confirmation, the following tasks were defined for execution: Order confirmation, Order rejection – both these tasks can be executed within the current status). The button is inactive if the history of closed process is being edited. The execution of the process task, which is included in the schedule, results in marking its execution also in the schedule. Similarly – execution of a task from the schedule level will also be reflected in the window: Process history and in the window: Employee mailbox.
![]() [Task preview] – clicking this button opens the task selected in the window for preview. The window displays the data for this task. In the case of a batch posting process, for a task displayed for preview, in the field: Description, information about the scheme and journal of accounts used for posting will be displayed. The window also shows whether the task is included in the schedule and, if so, whether the time allocated to it is marked as occupied. The fields in the window are not available for editing – their display is for information purposes only.
[Task preview] – clicking this button opens the task selected in the window for preview. The window displays the data for this task. In the case of a batch posting process, for a task displayed for preview, in the field: Description, information about the scheme and journal of accounts used for posting will be displayed. The window also shows whether the task is included in the schedule and, if so, whether the time allocated to it is marked as occupied. The fields in the window are not available for editing – their display is for information purposes only.
Batch posting process
Batch posting process definition
Version 5.0 introduced the possibility of defining the process of batch posting of documents. It enables automatic posting of documents. The batch posting process is defined for each document type. When defining this process, the following key actions can be used:
-Start posting
-Start posting by default
-Posting
-Pre-posting
When defining the batch accounting process, please note that for the key action: Start posting/Start posting by default, an automatic supervisor cannot be assigned. Initiation of the process must be carried out manually – by the designated operator. The next posting stages are already automatic (after an automatic supervisor has been assigned to them). To sum up – with the use of batch posting, the activity of document posting by the user can be limited to the following steps:
-Identifying documents for posting
-Start posting
-Multiple documents can be selected for batch posting at the same time.
The definition of the batch posting process follows the same steps as any other process.
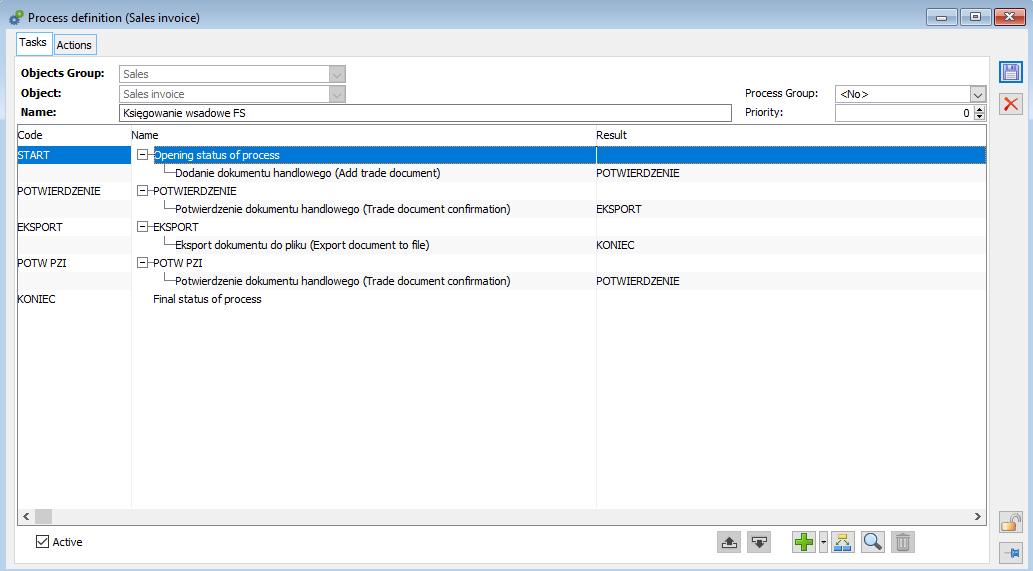
Posting a document using the batch posting process scheme takes place in the following steps:
On the list of documents, select the documents to be posted using the process
After selecting the document(s), click the button: ![]() [Posting]. A new window will open: Commercial documents posting
[Posting]. A new window will open: Commercial documents posting
The window should indicate the posting scheme and the journal to which the selected document will be posted. The window also includes options concerning the method of posting:
- Post immediately – the document will be posted without the use of the process
- Post using the default process – a batch posting process for the document(s) will be started. This posting will be handled by the process that has the following action defined: Start posting by default
- Post by process – when this option is selected, the following button will be activated: [Process], which, once clicked, opens a list of processes to run. On the list, select the process, according to which the batch posting will be carried out, and confirm the selection with the button: [Confirm].
Once the process is selected, the posting will be started. With the appropriate settings (assigning an automatic supervisor to actions: Pre-posting and Posting), the posting process will run automatically.
New processes functionalities
IQC handling
In version 2013.5, the list of System objects supported in processes was extended by the IQC document (balance of goods). Key actions corresponding to operations performed on this document have been made available for this object:
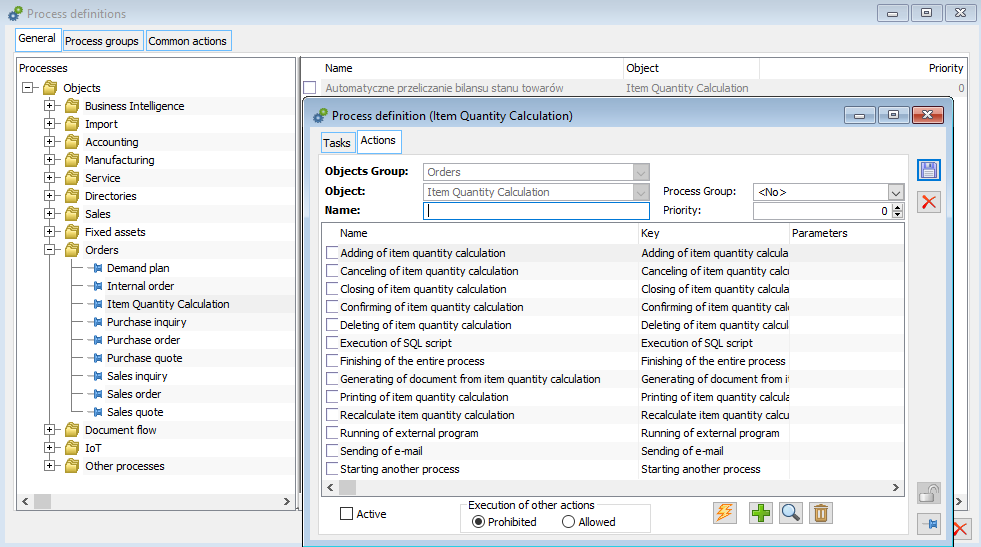
Adding balance of goods
The action corresponds to the operation of adding a document from the interface, i.e. a IQC document will be added with default values meaning Group of goods, supplier, warehouse, planned range.
Confirmation of balance of goods
The action enables the validation of the balance in the same way as the validation operation from the interface.
Closing balance of goods
The action corresponds to the document closing operation from the interface level. (Only validated IQC can be closed)
Cancelling balance of goods
The action corresponds to the document cancelling operation from the interface level
Recalculate balance of goods
The action corresponds to a recalculation operation of the IQC, according to the parameters set for the IQC.
Printing balance of goods
The same action as for printing other documents
Generate document from balance of goods
The action has a Parameters tab. On the Parameters tab you can specify which document should be generated from the IQC.
Possible parameters:
– PO – purchase order
– IO – internal order
– WMR- – WMR- transfer
– JO – production order
– AJ – picking order
– AC
Deleting balance of goods
The action should correspond to the document deleting operation from the interface level
In addition to actions resulting from the specificity of the IQC document, general actions have been made available, just like for other System objects:
-Starting another process
-Start of internal programme
-SQL script execution
-Sending email message
-Ending the whole process
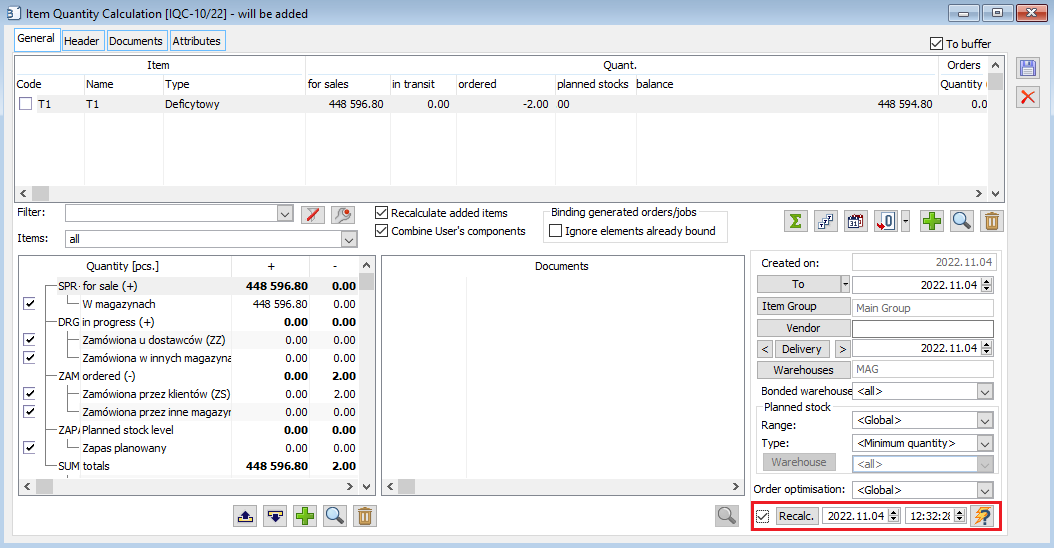
When converting a database or creating a new database, the System adds a predefined process of calculating the IQC document: in order to use it, just mark the parameter “Active” on it. After enabling the process handling in the System and starting XLWorkAutomat, the User can set the task on the specific IQC document to perform the automatic IQC recalculation at a specific time. To do this, simply check the “Recalculate” parameter, set the desired update time and have it performed by running the “recalculate balance” option.
Handling of the Production Plan
In version 2014, the list of System objects supported in processes was extended by the Production Plan. Key actions corresponding to operations performed on this document have been made available for this object:
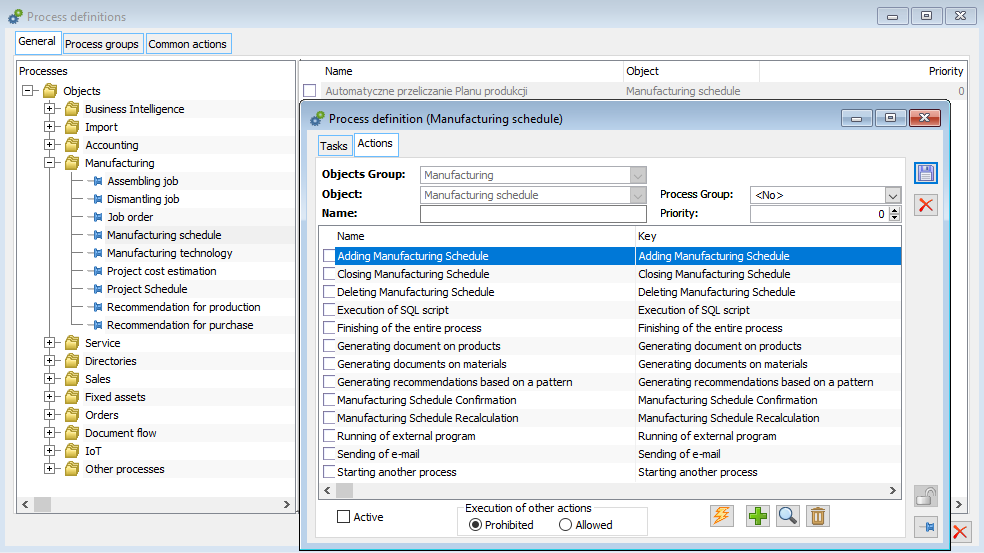
Adding production plan
The action should correspond to the action of adding a Production plans document from the interface level with input data, just like when adding a new document manually.
Confirming production plan
The action should correspond to the document confirming operation from the interface level.
Closing production plan
The action should correspond to the document closing operation from the interface level.
Deleting production plan
The action should correspond to the document deleting operation from the interface level.
Recalculating production plan
The action corresponds to a recalculation operation of the Production plan, according to the parameters set for the plan
Document printing
The same action as for printing other documents.
Generating a document for materials
For the action, the following tab has been made available: Parameters; there one can specify which document is to be generated from the Production plan: PO, IO, JO or WMR-.
Generating document for products
For the action, the following tab has been made available: Parameters; there one can specify which document is to be generated from the Production plan: PO, IO, JO or WMR-
Actions common to all objects will also be available for the Production plan:
-Starting another process
-Start of internal programme
-SQL script execution
-Sending email message
-Ending the whole process
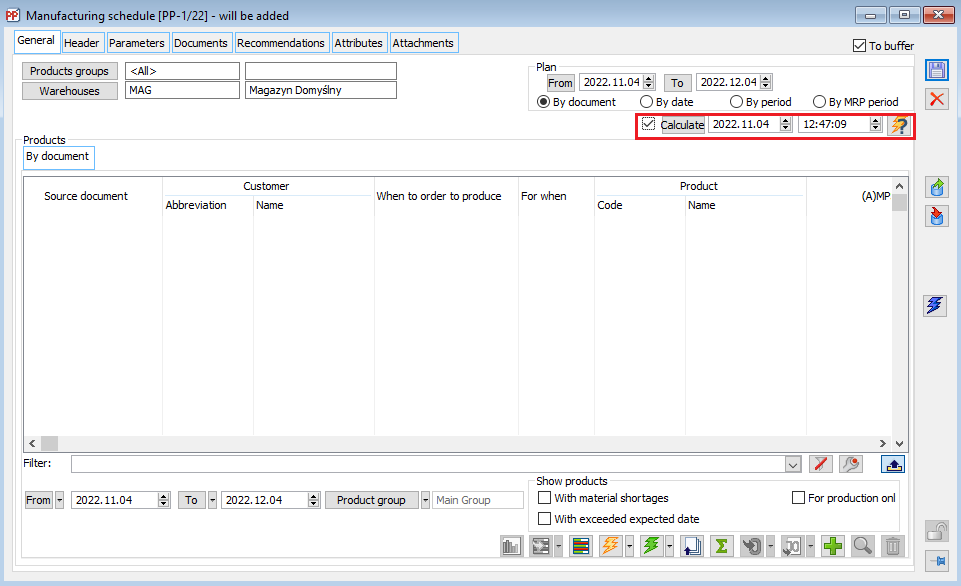
When converting a database or creating a new database, the System adds a predefined process of calculating the Production plan: in order to use it, just mark the parameter “Active” on it. After enabling the process handling in the System and starting XLWorkAutomat, the user can set the task on the specific Production plan document to perform the automatic recalculation of the plan at a specific time. To do this, simply check the “Recalculate” parameter, set the desired update time and have it performed by running the “Recalculate Production plan” option.
Support for binding resources to reservations
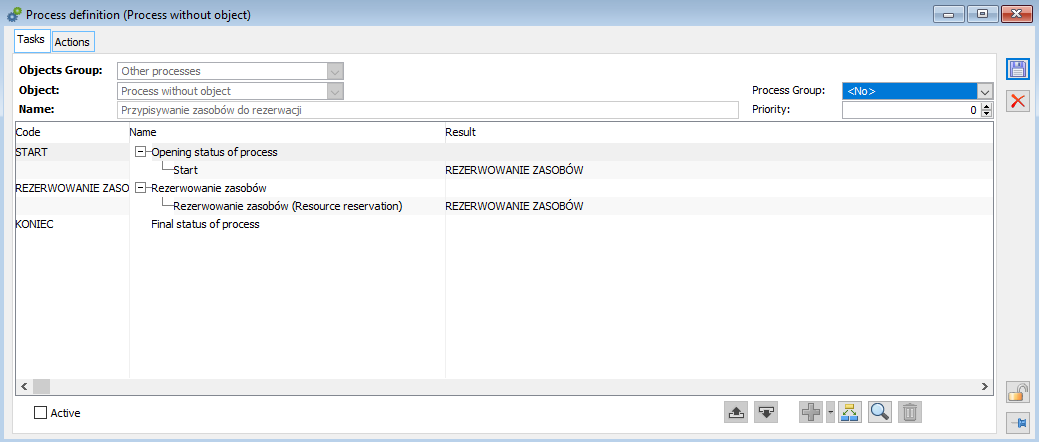
From version 2016.2, a key action in processes has been made available: “Reservation of resources”, available for a process connected to a process branch without an object. This action will trigger the operation of assigning resources to active, valid sales reservations.
During the creation and conversion of the database a predefined process “Assigning resources to reservations” using the above-mentioned action will be added, which only needs to be activated (tick the “Active” checkbox) and run (perform the first task) to obtain the functionality of automatic resource binding using the process. The operator “performing” the task of Resource reserving in the aforementioned predefined process is the automated system, and the effect of “cyclicity” and repetitiveness of the above-mentioned operation was obtained by assigning the same activity as the “resulting” action for Resource reserving. The User can change the frequency of recurring actions by changing the parameters of the task (edit task definition, section Execution date, Execution deadline).
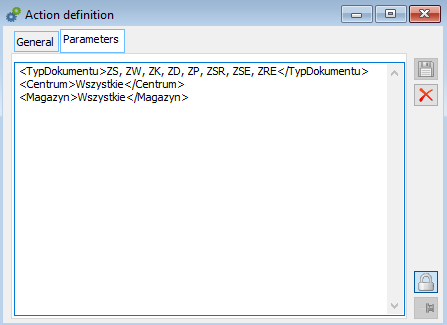
The key action Resources reserving can be used also in other processes. The function parameters defined on the Parameters tab are:
Source document type (document creating the reservation, for example SO, IO)
Warehouse (value “All”, or consecutive warehouse codes of the reservation for which the operation is to be performed)
Centre (value “All”, or consecutive centre names – owners of the reservation for which the operation is to be performed)
Process as a service
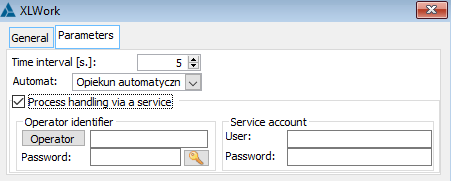
As of version 2017.0, there is a mechanism that will create a running service by the application itself.
For this purpose, the parameter Process handling by service is used. The condition is that the “Windows Operator” has permissions for batch operations.
New action Generate clip
Previously in processes you could perform the action of adding a document to a clip (Attach to clip), but the System would clip subsequent documents to an unapproved clip, and if there was no clip, then create a new clip. Version 2019.0 introduced a new Generate Clip action in which a new clip is always generated.
Graphical presentation of the process definition
From version 2019.0 it is possible to display the process graphically. Such a display of the process will affect the readability and will allow verifying the correctness of its definition.
A ![]() button is available on the process-related formats to enable graphical preview of the chart.
button is available on the process-related formats to enable graphical preview of the chart.
The graphic preview of the chart allowed for:
– displaying the process tree, i.e. tasks connected with actions/activities for their execution
– displaying context information for the process task – executable actions, task supervision
– displaying context information for activities (process actions)
– any displacement of the process components according to the Operator’s needs
– layout export to file
– simultaneous presentation of related processes – connected via the action Starting another process
In future versions it is planned to enable defining the process by adding / combining subsequent tasks / activities in a graphic form.
-
* Functionality not available in Comarch ERP XL Start ↑
