Banks list
Window: Banks is used to list all the banks that serve contractors and the company. Recording banks in this window is necessary due to the fact that introducing a bank e.g. on a contractor’s card is possible only by selecting it from the list defined in this window.
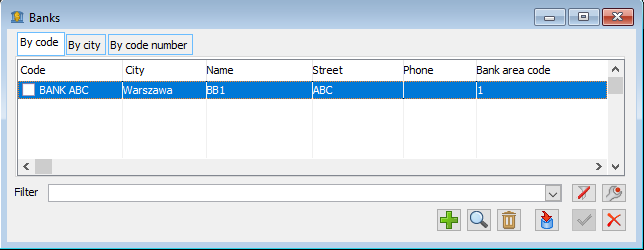
In the window, the list of banks is sorted by code, city (bank registered office) and the bank’s area code. This division corresponds to the layout of the tabs. The columns on the tabs are identical and indicate the banks’ basic data.
In addition, in the window, you can find the following functions:
![]() [Add] – used to add a new bank to the list.
[Add] – used to add a new bank to the list.
![]() [Change] – used to view and modify bank data.
[Change] – used to view and modify bank data.
![]() [Import banks] – used to import banks from the indicated file.
[Import banks] – used to import banks from the indicated file.
Bank
Window: Bank, is used to define or change the data of a bank which will be added to the list in the window: Banks. The window is opened by:
pressing in the window: Banks, the following button: ![]() [Add] – if a new bank is to be added to the list,
[Add] – if a new bank is to be added to the list,
pressing in the window: Banks, the following button: ![]() [Change] – if changes are to be made to a bank on the list.
[Change] – if changes are to be made to a bank on the list.
Bank, tab: General
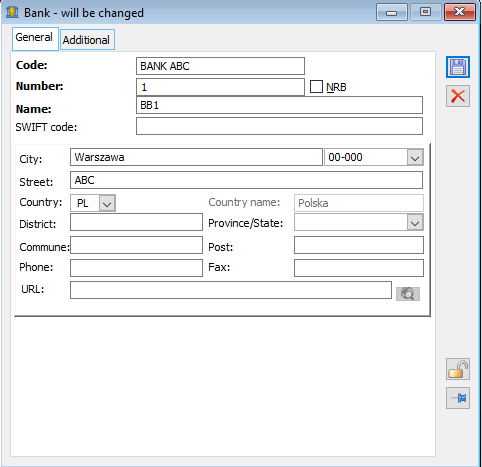
The tab contains fields for defining bank data. It is mandatory to fill in the fields titled in bold in the window.
Code – the bank code, which is the identifier of the bank in the system.
Area code – the bank’s area code.
Name – full name of the bank.
NRB – selecting it checks the compatibility of the bank number with the area code. If in the field: Area code, an incorrect length number is entered or contains numbers, an appropriate message will be displayed.
City – the city of the bank’s headquarters. Next to it, there is a field for entering the post code. If such a code was previously defined in the window: List of post codes, you can select it from the list expanded by pressing the button: ![]() [Select a postcode].
[Select a postcode].
Street, Country, Province … – the exact address of the bank’s registered office.
URL – the Internet address that will be navigated to when the button is pressed: ![]() .
.
Bank, tab: Additional
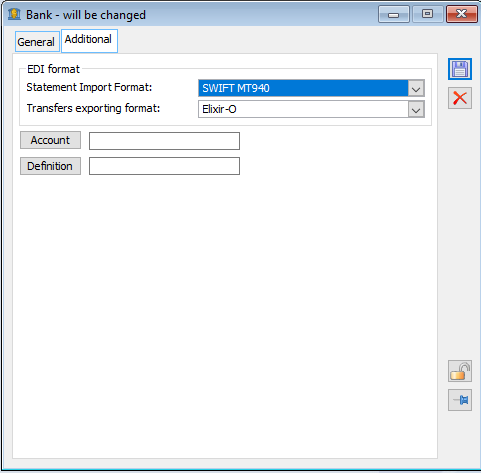
The tab contains fields for electronic data exchange. In this window, you can find the following fields:
Electronic data exchange format – from the list, the format of data exchange with the bank is selected.
Statement import format – the fields refer to the data exchange format.
Transfer export format – the fields refer to the data exchange format.
Account – used to specify the number of an account in the chart of accounts.
Definition – used to select one of the bank definitions.
Bank, tab: Network service
If on the bank card on the tab: Additional, in a section field: Electronic data exchange format, the CDC (Comarch Data Connect) type exchange format will be indicated, and an additional tab will appear on the bank card: Network service.
This tab allows defining parameters for the network service, such as: specifying the party bearing the costs of the currency transfer, indicating the contact person and the transport certificate necessary for connections with the bank.
Currency list
The window displays a list of currencies in which transactions can be recorded in Comarch ERP XL system.

The window contains the following fields and functions:
![]() [Add rate] – adds a currency rate.
[Add rate] – adds a currency rate.
Type of rate – this field is used to indicate the type of rate for which the currencies will be displayed.
![]() [Update rate] – used to update rates by importing data published by the NBP. For more information on updating rates, see: Updating rates.
[Update rate] – used to update rates by importing data published by the NBP. For more information on updating rates, see: Updating rates.
![]() [Add currency] – adds the currency to the list of currencies.
[Add currency] – adds the currency to the list of currencies.
![]() [Change] – changes the currency data.
[Change] – changes the currency data.
Updating currency exchange rates
Updating rates allows automatically updating exchange rates indices. Data is imported on the basis of data published by the NBP. Therefore, it should be borne in mind that imports depend on the specifics of the publication of these data – exchange rate information is published around midday on weekdays. This means that an attempt to import data from, for example, Sunday will fail.
The data import is made with 4 decimal places, but in the rates table, it is possible to insert the rate with 2 decimal places, so the rate updated automatically is multiplied by 100.
The import will be performed only for those currencies that are registered in the System (adding a currency is done from the window level: Currencies).
The update can be performed:
- From the level of Comarch ERP XL, from the window: Currencies
- By running a script outside Comarch ERP XL (which allows updating courses fully automatically)
Updating of exchange rates is only possible for programmes under warranty.
To download exchange rates, please make sure that the port on which HTTPS is running is available. By default, this is TCP protocol, port 443.
Update from Comarch ERP XL level
Exchange rates in Comarch ERP XL are updated from the level of the window: Currencies. After selecting the rate type to be updated and pressing the button: ![]() [Update rate], the following window will be displayed: Updating rates, where you indicate the period for which you want to download rate information. Below, you should specify which of the rates published by NBP should be used for updates. This can be an average, buy, or sell rate.
[Update rate], the following window will be displayed: Updating rates, where you indicate the period for which you want to download rate information. Below, you should specify which of the rates published by NBP should be used for updates. This can be an average, buy, or sell rate.
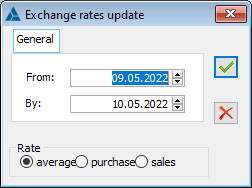
Specifying the appropriate day and pressing the button: ![]() [Update] will import the rates data for the days indicated. Information about the rates will be placed in the window: Currencies. The column: Description, will include the following information: Automatic update, to help distinguish an automatic update from an update recorded manually by the operator.
[Update] will import the rates data for the days indicated. Information about the rates will be placed in the window: Currencies. The column: Description, will include the following information: Automatic update, to help distinguish an automatic update from an update recorded manually by the operator.
Currency
The window is used to define the currency, which will then be placed on the currency list.
Currency, tab: General
The tab contains the basic data of the currency. In the columns: Date and Time, data is entered informing about the date of the update (both manually entered by the operator and automatic).
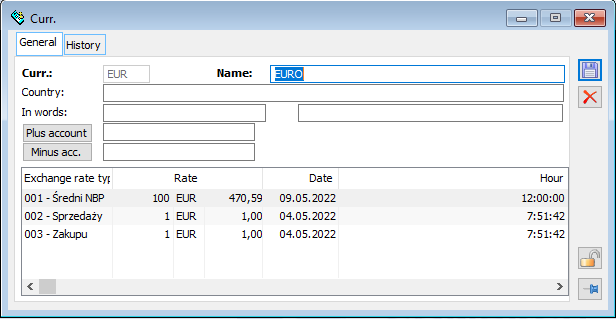
In this window, you can find the following fields:
Currency – acronym for currency.
Name – currency name.
Country – the country in which the currency is used.
Positive account/negative account – accounts to which positive and negative exchange rate differences are posted. After pressing the buttons, the following window will appear: Select the exchange rate differences account, from which the relevant account is selected.
There is a list of exchange rates at the bottom of the window.
Currency, tab: History
The tab contains a list of historical currency rates. The list also includes information on automatically updated rates. The exchange rate data import is made automatically with an accuracy of 4 decimal places, however, in the rates table, you can insert the rate with an accuracy of 2 decimal places, so the automatically updated rate is multiplied by 100 (for more information, see chapter: Updating currency exchange rates).
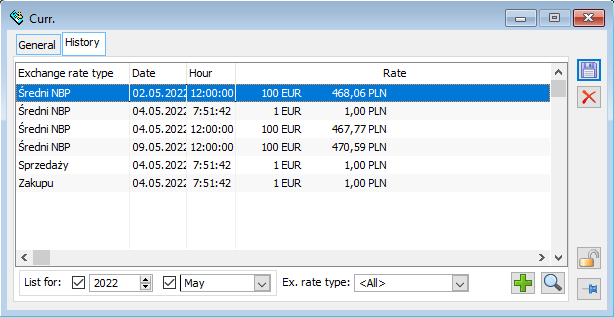
The tab contains the following fields and functions:
List for – the fields are used to display the time range of the courses.
Rate type – the field indicates the type of rate for which the currency history will be displayed.
![]() [New] – adds a new currency rate.
[New] – adds a new currency rate.
![]() [Change] – used to change the rate.
[Change] – used to change the rate.
Rates
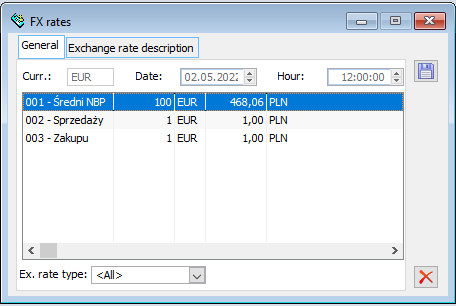
The window is used to define the rate for a given currency.
Rates, tab: General
The tab contains the following fields:
Currency – indicates the currency of the exchange rate.
Date – the date of the rate.
Time– the exact date of the rate, calculated in hours/minutes/seconds.
The rate is changed by double-clicking on the selected course and indicating the value, by entering the value from the keyboard or by using the buttons: ![]() .
.
Rates, tab: Rate description
In the tab, you can enter a description of the currency rate.
List of product code wizards
The product code wizard is used to easily generate the code by specifying parameters and user-defined elements.
You can add a product code through a wizard if you select one of the defined wizards on the product template card by invoking the list of wizards with the button ![]() . If a wizard is defined on the template, the product code can be also generated from the product card and the button
. If a wizard is defined on the template, the product code can be also generated from the product card and the button ![]() .
.
In the code wizards list, you can view the product code wizards defined in the system and add/delete existing code wizards.
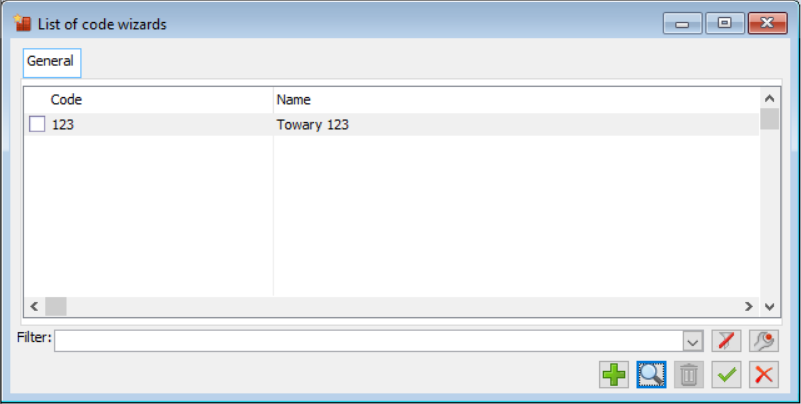
In the above window, you will find the functions:
![]() [Add] – adds a new code wizard.
[Add] – adds a new code wizard.
![]() [Change] – used to change the code wizard data for the indicated item.
[Change] – used to change the code wizard data for the indicated item.
![]() [Delete] – removes the selected items from the list of code wizards.
[Delete] – removes the selected items from the list of code wizards.
![]() [Select] – used to select the code wizard and download it, e.g. to the goods templates
[Select] – used to select the code wizard and download it, e.g. to the goods templates
![]() [Close]
[Close]
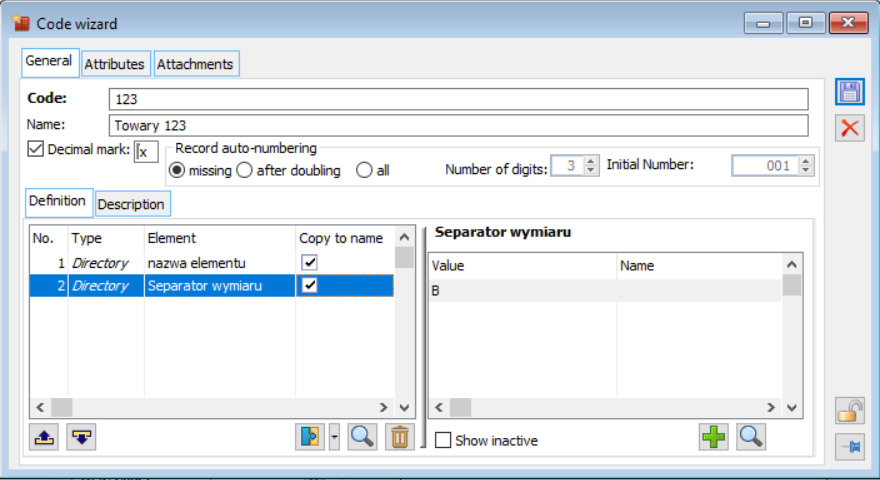
Code – code used to add the group of goods
Name – name used to add the group of goods
Separator – ![]() , which will be used when creating the product code. If the parameter is unchecked, the consecutive parts of the created code will be glued together; if the parameter is checked and no character is entered, a space will be used to separate the parts.
, which will be used when creating the product code. If the parameter is unchecked, the consecutive parts of the created code will be glued together; if the parameter is checked and no character is entered, a space will be used to separate the parts.
Autonumbering of records:
- None
- All
- After duplication – the numbering will be triggered only if the goods codes generated by the wizard are duplicated
- Number of digits – number of digits comprising the numbering format of the product codes from the wizard
- Start number – the number from which the product codes will be created via the code wizard
Example: On an empty database (no goods). In the code wizard, for example, there is the “COLOUR” feature with items: WHITE and BLACK: Autonumbering with “all” option Add the first product, select WHITE and the WHITE 001 record is created Add another, select WHITE and the WHITE 002 record is created Add another, select WHITE and the WHITE 003 record is created And so on. Add another, select BLACK and the BLACK 001 record is created Add another, select BLACK and the BLACK 002 record is created And so on. Autonumbering with the “after duplicating” option Add the first product, select WHITE and the WHITE record is created – there is no number here as it is the first code with this string! Add another, select WHITE and the WHITE 001 record is created Add another, select WHITE and the WHITE 002 record is created And so on. Add one more, select BLACK and a BLACK record is created – there is no number here as this is the first code with this string! Add another, select BLACK and the BLACK 001 record is created And so on. For the “all” option, the number will always be added to each code created. For the “after duplication” option – only if there is already a code with the same name as the one created by the wizard. That is, if there are no codes with repeatable elements in the database, the number may never be added.
![]() [Add] – adds a new code wizard.
[Add] – adds a new code wizard.
![]() [Change] – used to change the code wizard data for the indicated item.
[Change] – used to change the code wizard data for the indicated item.
![]() [Delete] – removes the selected items from the list of code wizards.
[Delete] – removes the selected items from the list of code wizards.
![]() [Add] – depending on the selection from the drop-down list
[Add] – depending on the selection from the drop-down list ![]() you can add an item from the category dictionaries via
you can add an item from the category dictionaries via ![]() or from the feature classes via
or from the feature classes via ![]() . When generating the code through the wizard, you will be able to select the appropriate values for the elements that will make up the newly generated code.
. When generating the code through the wizard, you will be able to select the appropriate values for the elements that will make up the newly generated code.
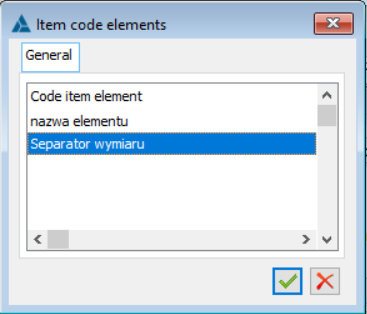
![]() [Select] – used to select the product code element
[Select] – used to select the product code element
![]() [Close] – closes the window
[Close] – closes the window
In the example below, for such selected element values the code “METAL OAK” will be generated, where the values will be separated by the separator indicated in the wizard configuration and the number will be added depending on the parameter for autonumbering and with the format defined in the configuration.
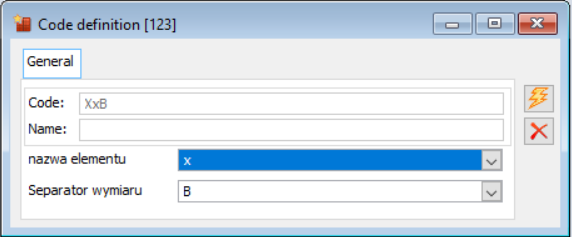
![]() [Create code] – starts the generation of the code after selecting the appropriate values of the code elements
[Create code] – starts the generation of the code after selecting the appropriate values of the code elements
![]() [Close] – closes the window
[Close] – closes the window
Product code elements of the type: Dictionary can be defined from the category dictionary list:

List of SWW/PKWiU
The window contains a list of SWW and PKWiU that the User can record in the system.
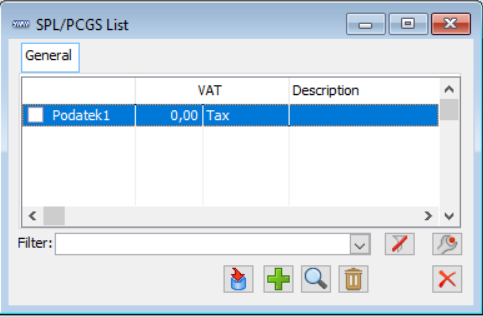
In window, you can find the following functions:
![]() [Add] – add the item to the SWW/PKWiU list.
[Add] – add the item to the SWW/PKWiU list.
![]() [Change] – used to change SWW/PKWiU data for the selected item.
[Change] – used to change SWW/PKWiU data for the selected item.
![]() [Delete] – removes the selected item from the SWW/PKWiU list.
[Delete] – removes the selected item from the SWW/PKWiU list.
SWW/PKWiU
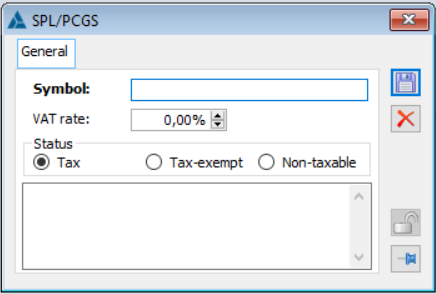
In the window, the SWW/PKWiU items are defined in the fields:
Symbol – the SWW/PKWiU symbol.
VAT rate – the VAT rate specified for the item.
Status – status of the SWW/PKWiU item.
Post codes
Window: The post code list is a record of the post codes used in the system. The codes defined in this window can then be entered by selecting from a list into individual windows, e.g. the contractor’s card. There is then no need to enter the code from the keyboard, which significantly speeds up the work with the system.
To open the window, from the menu: Lists, select a submenu: Post codes
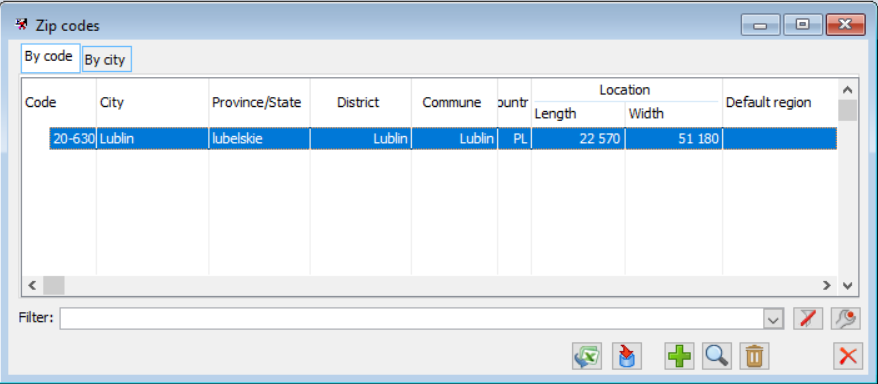
Post codes are arranged in two ways: by code and by city. These lists correspond to the tabs in the window. In both lists, the codes are arranged in the same columns:
Code – the post code for the city. This column has the functionality of a restrictive placeholder.
City, Province, County, Municipality, Country – location of the city for which the post code has been set.
Location – data on the geographical location of the city (longitude and latitude).
Default region – the default region assigned to the post code.
In addition, in the window, you can find the following functions:
![]() [Import from file] – when clicked, the following window opens: Update of city names, which is now opened from the Special Function with options: Update of city names.
[Import from file] – when clicked, the following window opens: Update of city names, which is now opened from the Special Function with options: Update of city names.
![]() [Add] – used to add a post code to the list.
[Add] – used to add a post code to the list.
![]() [Change] – used for editing the registered code.
[Change] – used for editing the registered code.
![]() [Delete] – deletes the item indicated in the list.
[Delete] – deletes the item indicated in the list.
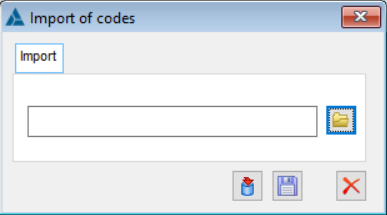
![]() [Import post codes from xls/csv file to tps] – this function allows the system to import xls/csv file with post codes and then save it to tps file. First, indicate the path to the desired xls/csv file via the
[Import post codes from xls/csv file to tps] – this function allows the system to import xls/csv file with post codes and then save it to tps file. First, indicate the path to the desired xls/csv file via the ![]() icon. Then load the file data into memory via the icon
icon. Then load the file data into memory via the icon ![]() [Import from file]. To write from memory to a tps file, use the function
[Import from file]. To write from memory to a tps file, use the function ![]() [Save to tps]. The tps file will be saved in the main folder of the Comarch ERP XL system.
[Save to tps]. The tps file will be saved in the main folder of the Comarch ERP XL system.
A correctly defined xls and csv post code import file should contain columns in the following order:
PNA, TOWN, MUNICIPALITY, DISTRICT, VOIVODESHIP, REGION, LATITUDE, LONGITUDE.
It is possible to load files which have all the columns mentioned above except (REGION, LATITUDE, LONGITUDE).
The sheet should have a name: Cities.
Window: Post code
The post code is defined in the window. To open this window, in the following window: List of post codes:
click: ![]() [Add] – if a post code is to be added to the list,
[Add] – if a post code is to be added to the list,
click: ![]() [Change] – to open the registered post code card for editing.
[Change] – to open the registered post code card for editing.
.
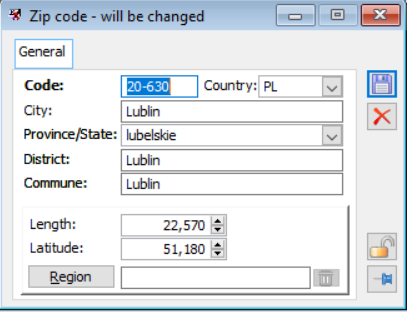
The window contains fields whose data will then be transferred to the columns in the window: List of post codes. After entering data, the data must be saved. Click: ![]() [Save].
[Save].
Features
In the window: Features, it is possible to define a feature class and assign features to the class.
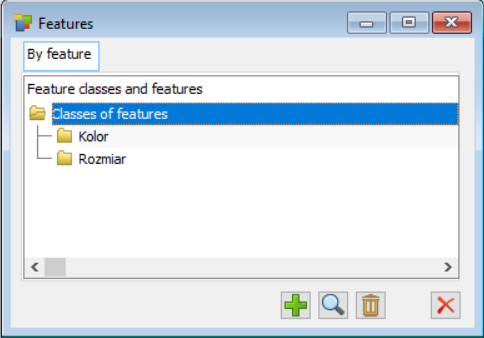
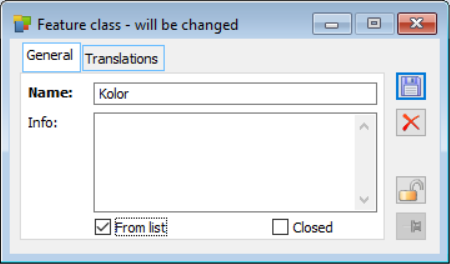
After selecting from the List of option: Features – a window will open in which the feature class should be added first. The window has two tabs: General and Translation. In the first tab, complete the Name field and, optionally, select parameters: From the list and Closed. On the Translations tab, you can enter a translation of the name in another language.
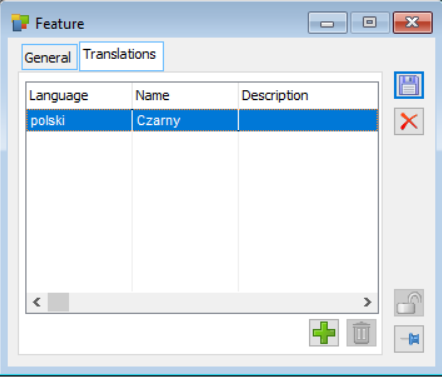
Window: The feature has two tabs. The General tab requires entering a name for the feature, while the Translations tab allows entering a name in a foreign language.
Additionally, in the General tab, it is possible to confirm the availability of the value of a feature and class to which it belongs in Comarch ERP e-Store.
Deselecting the parameter: Availability: e-Store implies that goods with this feature value cannot be sold in Comarch ERP e-Store. Also, goods with an undefined feature value cannot be sold in Comarch ERP e-Store. If all values of a feature are marked, it will not be sent to Comarch ERP e-Store, while all resources with this feature will be sent, and it will be treated as an undefined feature. Comarch ERP e-Store allows entering 200 characters of the feature value.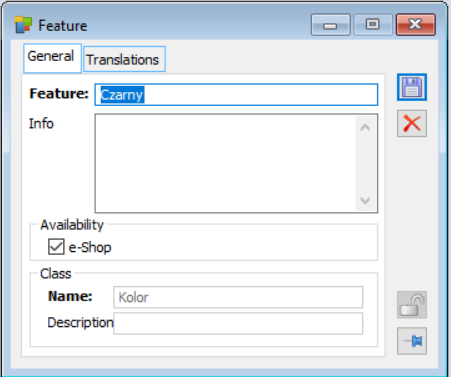
The fields in which a feature is written allow entering a feature value with a longer number of characters.
It is possible to enter 255 characters in a control field with a feature value.
The feature may be specified or changed directly on the deliveries and in the case of elements indicating a-vista services/costs/goods on the sub-elements of the incoming documents (FZ, (A)FZ, FRR, PZ, PZI, PKA, PW, Manual corrections FSK/FKE/WKK/(A)FSK/A(FWK)).
When entering or editing values of features with many characters, it is easier to use the drop-down menu where [Edit feature] and [Select feature from list] options are available. The [Edit feature] option opens the Change feature value window. The [Select feature from list] option opens the window with a list of features defined for a given class, facilitating the selection of feature values with a long number of characters.
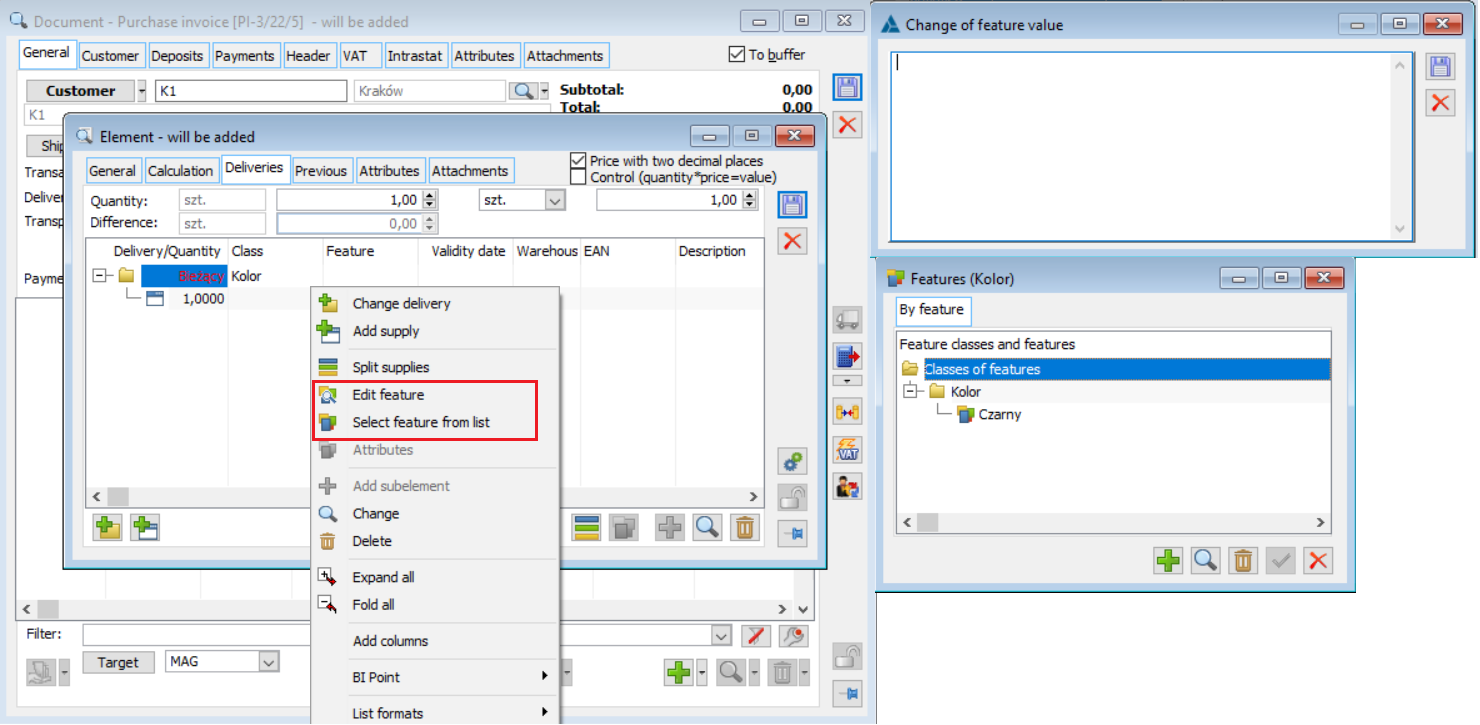
The [Edit feature] button is always active.
The [Select from list] button is active if:
- the document is not approved
- A specific feature class has been entered in the feature class control for a given value
- On the product card, on the Other tab, an option other than On sale / From resource has been selected for the feature
The [Select from list] option allows assigning a feature value by indicating it from a list of values defined for the class opened in a separate window rather than in the button menu. This is useful for feature values with a long number of characters.
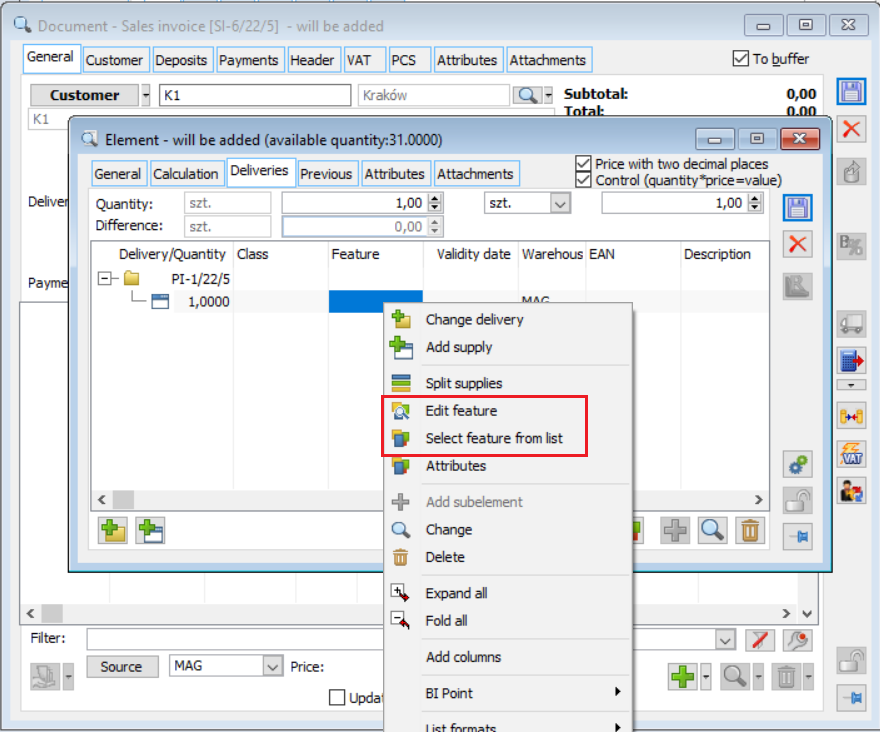
The [Edit feature] and [Select feature from list] options on an expenditure document are also available in the drop-down menu on the Deliveries tab.
Both options are active if:
– cursor points to a sub-element
– the document is not approved
– the feature value was not given on the element
– the option other than feature/from resource is selected for the feature on the goods
